Battery FIAT DUCATO BASE CAMPER 2018 Owner handbook (in English)
[x] Cancel search | Manufacturer: FIAT, Model Year: 2018, Model line: DUCATO BASE CAMPER, Model: FIAT DUCATO BASE CAMPER 2018Pages: 304, PDF Size: 14.93 MB
Page 65 of 304
What it means What to do
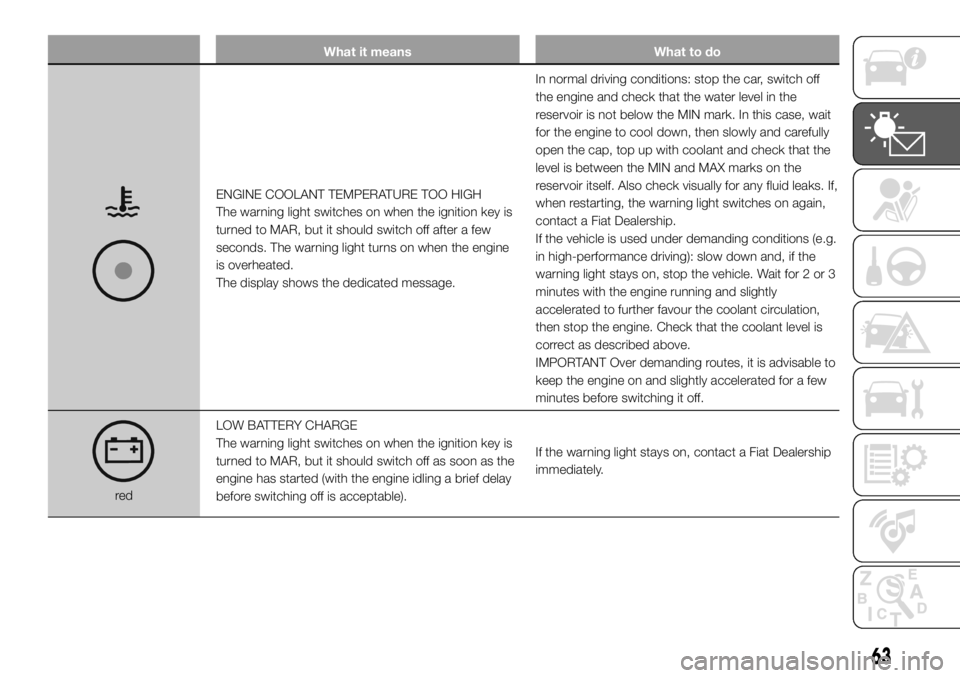
ENGINE COOLANT TEMPERATURE TOO HIGH
The warning light switches on when the ignition key is
turned to MAR, but it should switch off after a few
seconds. The warning light turns on when the engine
is overheated.
The display shows the dedicated message.In normal driving conditions: stop the car, switch off
the engine and check that the water level in the
reservoir is not below the MIN mark. In this case, wait
for the engine to cool down, then slowly and carefully
open the cap, top up with coolant and check that the
level is between the MIN and MAX marks on the
reservoir itself. Also check visually for any fluid leaks. If,
when restarting, the warning light switches on again,
contact a Fiat Dealership.
If the vehicle is used under demanding conditions (e.g.
in high-performance driving): slow down and, if the
warning light stays on, stop the vehicle. Wait for 2 or 3
minutes with the engine running and slightly
accelerated to further favour the coolant circulation,
then stop the engine. Check that the coolant level is
correct as described above.
IMPORTANT Over demanding routes, it is advisable to
keep the engine on and slightly accelerated for a few
minutes before switching it off.
redLOW BATTERY CHARGE
The warning light switches on when the ignition key is
turned to MAR, but it should switch off as soon as the
engine has started (with the engine idling a brief delay
before switching off is acceptable).If the warning light stays on, contact a Fiat Dealership
immediately.
63
Page 122 of 304
PROCEDURE FOR
NATURAL POWER
VERSIONS
(For versions/markets, where provided)
The various engine cranking methods
are described below:
METHANE tank not on reserve –
petrol tank not empty:
the engine is always started in methane
mode;
METHANE tank empty – petrol tank
not empty:
the engine is forced to start on petrol
and it will not switch to methane until
the methane tank has been filled. At the
same time, the reserve warning light
will turn on and the "REFUELLING
REQUIRED" message will be shown on
the instrument panel display;
METHANE tank not on reserve –
petrol tank empty:
the engine is always started in methane
mode.
17) 18) 19) 20) 21)
WARNING
116)It is dangerous to run the engine in
enclosed areas. The engine consumes
oxygen and engine exhaust contains
carbon dioxide, carbon monoxide and
other toxic gasses.
WARNING
14)It is advisable not to demand maximum
performance from your vehicle (e.g.
excessive acceleration, long distances at
high speeds, excessive intense braking,
etc.) during the initial period of use.
15)When the engine is switched off never
leave the key turned to MAR-ON to prevent
useless current absorption from draining
the battery.
16)If the engine fails to start with a gear
engaged, the potentially dangerous
situation due to the fact that the
transmission is automatically placed in
neutral will be signalled by a buzzer.
17)
If the warning light
flashes for 60
seconds after starting or during an
extended towing period, this indicates a
problem in the glow plug preheating
system. Use the vehicle normally if the
engine starts, but contact a Fiat Dealership
as soon as possible. 18)
Remember that the brake servo and
power steering are not operational until the
engine has been started, so you need to
apply much more force than usual to
the brake pedal and steering wheel. 19)
Never bump start the engine by
pushing, towing or coasting downhill. This
could cause fuel to flow into the catalytic
converter and damage it beyond repair. 20)A quick burst on the accelerator before
stopping the engine serves no practical
purpose; it wastes fuel and is especially
damaging to turbocharged engines. 21)
In some cases, when the engine
switches off, the fan could activate for max.
120 seconds.
120
STARTING AND DRIVING
Page 123 of 304
PARKING THE
VEHICLE
117)
22)
Proceed as follows when parking and
leaving the vehicle:
engage the gear (on a slope, engage
first gear if the vehicle is facing uphill
or reverse if it is facing downhill) and
leave the wheels steered;
stop the engine and engage the
handbrake;
always remove the ignition key.
If the vehicle is parked on a steep
slope, it is advisable to block the
wheels with a wedge or stone.
On versions equipped with automatic
transmission (Comfort matic), wait
for the letterPto appear on the display
before releasing the brake pedal.
IMPORTANTNEVERleave the vehicle
with the gearbox in neutral (or, on
versions equipped with automatic
(Comfort matic) transmission, before
putting the shift lever in thePposition).VERSIONS WITH MANUAL
TRANSMISSION
Proceed as follows:
engage a gear (on a slope, engage
first gear if the car is facing uphill or
reverse if it is facing downhill) and leave
the wheels steered.
stop the engine and engage the
handbrake;
If the vehicle is parked on a steep
slope, it is advisable to block the
wheels with a wedge or stone.
Do not leave the key in the ignition as
this drains the battery. Always remove
the key when you leave the car.
VERSIONS WITH COMFORT MATIC
TRANSMISSION
To park safely, it is essential to engage
1st gear or reverse (R), with your foot
on the brake pedal and, if the road
is sloping, to operate the handbrake; it
is also essential to wait for the engaged
gear to disappear from the
reconfigurable multifunction display
before releasing the brake pedal.
IMPORTANT NEVER leave the car with
the gearbox in neutral (N).
IMPORTANT NOTES
With the vehicle stationary and a
gear engaged, always keep the brake
pedal pressed until you decide to
set off, then release the brake and
accelerate gently;
during prolonged stops with the
engine running, it is advisable to keep
the gearbox in neutral (N);
to keep the clutch in good condition,
do not use the accelerator to keep the
car stationary (e.g. when stopped
facing uphill); the clutch could be
damaged by overheating. Use the
brake pedal instead and operate the
accelerator only when you are ready to
set off;
only use second gear when you
need greater control for starting
manoeuvres on surfaces with poor grip;
if, with reverse gear (R) engaged,
you have to engage first gear or vice
versa, only do this when the vehicle is
completely stationary and with the
brake pedal pressed;
although it is strongly inadvisable, if
you are driving downhill and, for
unexpected reasons, you let the vehicle
move forward with the transmission in
neutral (N), when you engage a gear,
the system will automatically engage
the best gear to transmit the correct
drive torque to the wheels depending
on the vehicle's speed;
121
Page 127 of 304
START&STOP
SYSTEM
IN BRIEF
The Start&Stop device automatically
stops the engineeach time the
vehicle is stationary and all the
conditions for automatic switch-off
have been met, and starts it again
when the driver wants to move off.
This improves the efficiency of the
vehicle by reducing fuel consumption,
the emission of harmful gases and
noise pollution.
OPERATING MODE
Stopping the engine
Versions with manual transmission
With the vehicle stationary, the engine
stops with the gearbox in neutral and
the clutch pedal released.
Versions with Comfort-matic
transmission
With car at a standstill and brake pedal
pressed, the engine switches off if the
gear lever is in a position other thanR.In the event of stops uphill, engine
switching off is disabled to make the
"Hill Holder" function available (works
only with the engine running).
The warning light on the instrument
panel switches on to signal that the
engine has stopped.
Restarting the engine
Versions with manual transmission
Depress the clutch pedal to restart
the engine.
Versions with Comfort-matic
transmission
Releasing the brake pedal the engine
restarts automatically; the icon
switches off on the display.
If the engine is restarted with the “Hill
Holder” function off, move the lever
towards (+), (-)orRand the engine
restarts.
MANUAL ACTIVATION
AND DEACTIVATION OF
THE SYSTEM
To activate/deactivate the system
manually, press the
button on the
dashboard control panel.
25)
SAFETY FUNCTIONS
In engine cut-out conditions through
the Start&Stop system, if the driver
unfastens his/her seat belt and opens
the driver's door or the passenger door,
the engine can be restarted only by
using the key. The driver is notified of
this condition by a buzzer, through the
instrument panel warning light
flashing and, where provided, by a
message in the display.
119) 120)
WARNING
25)If the vehicle is equipped with manual
climate control, if you want to favour
climate comfort, the Start&Stop system
can be deactivated for continuous climate
control system operation.
WARNING
119)The vehicle should always be
evacuated after the key has been removed
or turned to the STOP position. When
refuelling, make sure that the car is
switched off with the key in the STOP
position.
120)If the battery needs to be replaced,
always contact a Fiat Dealership. The
replacement battery should be of the same
type (L6 105Ah/850A) and should have
the same characteristics.
125
Page 143 of 304
TOWING TRAILERS
IMPORTANT NOTES
The vehicle must be provided with a
type-approved tow hook and adequate
electrical system to tow caravans or
trailers. Installation should be carried
out by specialised personnel who
will issue the required papers for
travelling on roads.
Install any specific and/or additional
door mirrors as specified by the
Highway Code.
Remember that when towing a trailer,
steep hills are harder to climb, the
braking spaces increase and overtaking
takes longer depending on the overall
weight.
Engage a low gear when driving
downhill, rather than constantly using
the brake.
The weight of the trailer on the vehicle
tow hook will reduce the loading
capacity of the vehicle by the same
amount. Consider the weight of the
trailer fully laden, including accessories
and luggage, to make sure you do
not exceed the maximum towable
weight (shown on the vehicle
registration document).Do not exceed the speed limits specific
to each country you are driving in, in
the case of vehicles towing trailers.
In any case, the top speed must not
exceed 100 km/h.
You are advised to fit a suitable
stabiliser to the trailer drawbar.
In the vehicles equipped with parking
sensors, after fitting the tow hook
malfunctioning warnings may be
displayed, as some parts (tow bar, ball
tow hook) may be within the sensor
detection range. In this case the
detection range must be adjusted or
the parking assistance function must be
deactivated.
In vehicles equipped with "Comfort-
matic" transmission, make sure that the
gearbox is in neutral (N) (checking that
the vehicle moves when pushed) and
proceed in the same way as for towing
a normal vehicle with manual
transmission. If the gearbox cannot be
put in neutral, do not tow the vehicle
and contact a Fiat Dealership.
137) 138)
INSTALLING THE TOW
HOOK
The towing device should be fastened
to the body by specialised technicians
according to any additional and/or
integrative information supplied by the
Manufacturer of the device.
The towing device must meet current
regulations with reference to Directive
94/20/EC and subsequent
amendments.
For any version the towing device used
must match the towable weight of the
vehicle on which it is to be installed.
For the electric connection a standard
connector should be used which is
generally placed on a special bracket
normally fastened to the towing device,
and a special ECU for external trailer
light control must be installed on the
vehicle. For the electrical connection, 7
or 13 pin 12 V DC connections are to
be used (CUNA/UNI and ISO/DIN
Standards). Follow the instructions
provided by the vehicle manufacturer
and/or the tow hitch manufacturer.
Any electric brake (or electric winch,
etc.) should be supplied directly by the
battery through a cable with a section
of at least 2.5 mm
2.
IMPORTANT Electric brakes or other
devices must be used with engine
running.
141
Page 144 of 304
In addition to the electrical branches,
the vehicle's electric system can only
be connected to the supply cable for an
electric brake and to the cable for an
internal light, though not above 15
W. For connections use the preset
control unit with battery cable no less
than 2.5 mm
2.
IMPORTANT The trailer tow hook
contributes to the length of the vehicle.
When installing on long wheelbase
versions, it is only possible to install
removable tow hooks because the total
vehicle length limit of 6 metres is
exceeded.
If no trailer is fitted, the hook must be
removed from the attachment base and
it must not exceed the vehicle's
original length.
IMPORTANT If you wish to leave the
tow hook fitted without towing a trailer,
it is advisable to contact a Fiat
Dealership for the relevant system
update operations because the tow
hook could be detected as an obstacle
by the central sensors.Installation diagram for Van
versions fig. 142
The tow hook structure must be
fastened in the points shown by the
symbol Ø using a total of 6 M10x1.25
screws and 4 M12 screws.
The internal back plates must be at
least 5 mm thick. MAX LOAD ON
BALL: 100/120 kg depending on the
payload (see the “Weights” table in the
“Technical Data” chapter).
139)
To install a tow hook, the bumpers
must be trimmed as described in the
supplier's installation kit.
Installation diagram for Truck and
Chassis Cab versions fig. 143
Another tow hook specific to Truck and
Chassis Cab versions is shown in fig.
143.
The structure Ø must be fixed in the
points indicated using a total of 6
M10x1.25 screws and 4 M12 screws.
MAX LOAD ON BALL: 100/120 kg
depending on the payload (see the
“Weights” table in the “Technical Data”
chapter).
WARNING
137)The ABS with which the vehicle may
be equipped will not control the braking
system of the trailer. Particular caution
is required on slippery roads.
138)Never modify the braking system of
the vehicle to control the trailer brake. The
trailer braking system must be fully
independent from the hydraulic system of
the vehicle.
139)After fitting, screw holes must be
sealed to prevent a exhaust gas inlet.
142
STARTING AND DRIVING
Page 149 of 304
PROLONGED
VEHICLE INACTIVITY
If the vehicle needs to be off the road
for longer than one month, the following
precautions must be taken:
park the vehicle indoors in a dry
and, if possible, well-ventilated place;
engage a gear;
check that the handbrake is not
engaged;
disconnect the negative battery
terminal; if the vehicle is equipped with
a battery disconnection function
(disconnector), see the description of
the procedure in the "Controls"
paragraph in the "Dashboard and
controls" section;
clean and protect the painted parts
using protective wax;
clean and protect the shiny metal
parts using special compounds
available commercially;
sprinkle talcum powder on the
windscreen and rear window wiper
rubber blades and lift them off the
glass;
slightly open the windows;
cover the vehicle with a piece of
fabric or perforated plastic sheet. Do
not use compact plastic tarpaulins,
which prevent humidity from
evaporating from the surface of the
vehicle;
inflate tyres to +0.5 bar above the
standard specified pressure and check
it at intervals;
do not drain the engine cooling
system.
IMPORTANT If the vehicle is equipped
with an alarm system, switch off the
vehicle alarm with the remote control.
IMPORTANT After turning the ignition
key to STOP and having closed the
driver side door, wait at least one
minute before disconnecting the
electrical supply from the battery. When
reconnecting the electrical supply to
the battery, make sure that the ignition
key is in the STOP position and the
driver side door is closed.
147
Page 150 of 304
IN AN EMERGENCY
REPLACING A BULB ......................149
REPLACING AN EXTERIOR
BULB ..............................................152
REPLACING INTERIOR BULBS ......157
REPLACING FUSES........................158
GATEWAY FMS MODULE ...............171
CHANGING A WHEEL ....................176
FIX & GO AUTOMATIC QUICK
TYRE REPAIR KIT ...........................180
JUMP STARTING ............................183
BATTERY RECHARGING ................184
FUEL CUT-OFF SWITCH ................185
TOWING THE VEHICLE ..................186
148
IN AN EMERGENCY
A punctured tyre or a burnt-out bulb?
At times, a problem may interfere
with our journey.
The pages on emergencies can help
you to deal with critical situations
independently and with calm.
In an emergency we recommend that
you call the freephone number found in
the Warranty Booklet.
The www.fiatprofessional.com website,
or www.fiatcamper.com for motorhome
owners, provides information about
the nearest Fiat Service Network
together with a great deal of other
useful information.
Page 163 of 304
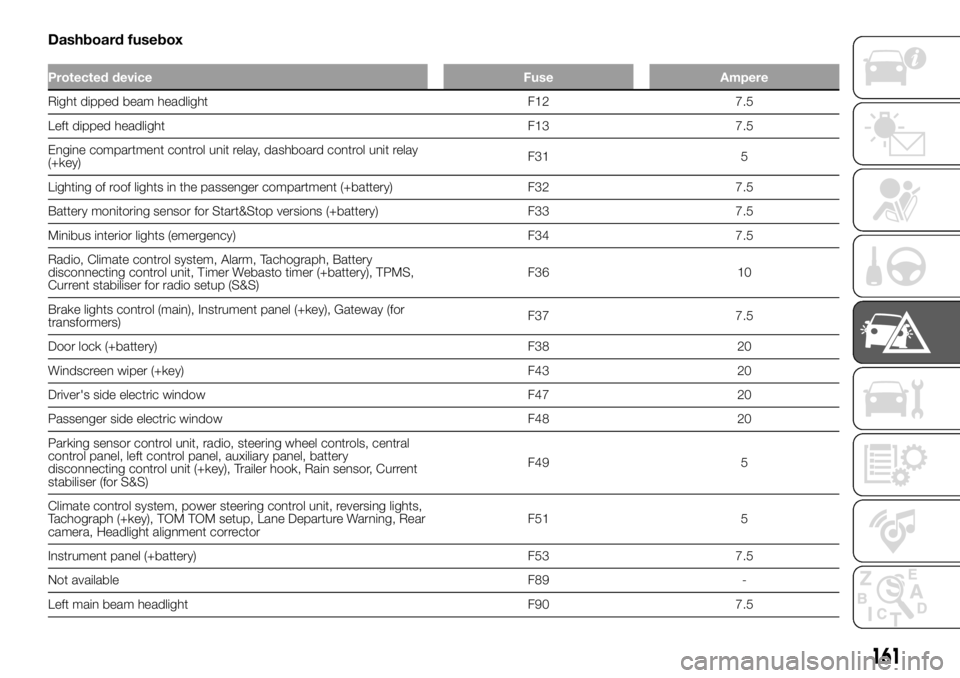
Dashboard fusebox
Protected device Fuse Ampere
Right dipped beam headlight F12 7.5
Left dipped headlight F13 7.5
Engine compartment control unit relay, dashboard control unit relay
(+key)F31 5
Lighting of roof lights in the passenger compartment (+battery) F32 7.5
Battery monitoring sensor for Start&Stop versions (+battery) F33 7.5
Minibus interior lights (emergency) F34 7.5
Radio, Climate control system, Alarm, Tachograph, Battery
disconnecting control unit, Timer Webasto timer (+battery), TPMS,
Current stabiliser for radio setup (S&S)F36 10
Brake lights control (main), Instrument panel (+key), Gateway (for
transformers)F37 7.5
Door lock (+battery) F38 20
Windscreen wiper (+key) F43 20
Driver's side electric window F47 20
Passenger side electric window F48 20
Parking sensor control unit, radio, steering wheel controls, central
control panel, left control panel, auxiliary panel, battery
disconnecting control unit (+key), Trailer hook, Rain sensor, Current
stabiliser (for S&S)F49 5
Climate control system, power steering control unit, reversing lights,
Tachograph (+key), TOM TOM setup, Lane Departure Warning, Rear
camera, Headlight alignment correctorF51 5
Instrument panel (+battery) F53 7.5
Not available F89 -
Left main beam headlight F90 7.5
161
Page 165 of 304
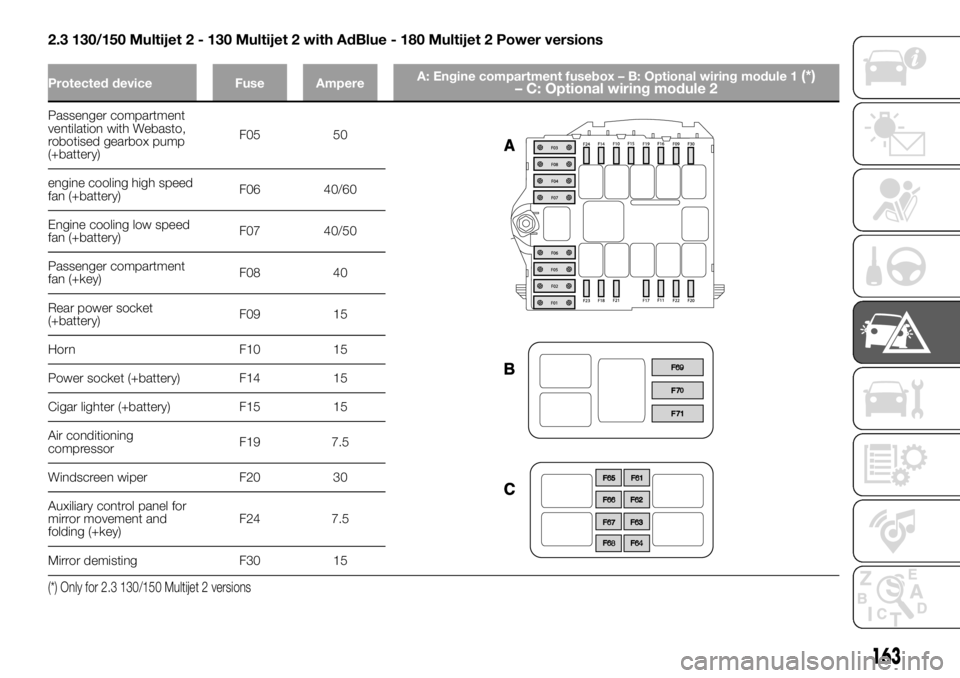
2.3 130/150 Multijet 2 - 130 Multijet 2 with AdBlue - 180 Multijet 2 Power versions
Protected device Fuse AmpereA: Engine compartment fusebox – B: Optional wiring module 1(*)
– C: Optional wiring module 2
Passenger compartment
ventilation with Webasto,
robotised gearbox pump
(+battery)F05 50
engine cooling high speed
fan (+battery)F06 40/60
Engine cooling low speed
fan (+battery)F07 40/50
Passenger compartment
fan (+key)F08 40
Rear power socket
(+battery)F09 15
Horn F10 15
Power socket (+battery) F14 15
Cigar lighter (+battery) F15 15
Air conditioning
compressorF19 7.5
Windscreen wiper F20 30
Auxiliary control panel for
mirror movement and
folding (+key)F24 7.5
Mirror demisting F30 15
(*) Only for 2.3 130/150 Multijet 2 versions
163