ECU FIAT DUCATO BASE CAMPER 2018 Owner handbook (in English)
[x] Cancel search | Manufacturer: FIAT, Model Year: 2018, Model line: DUCATO BASE CAMPER, Model: FIAT DUCATO BASE CAMPER 2018Pages: 304, PDF Size: 14.93 MB
Page 147 of 304
 INSTRUCTIONS FOR
USING THE REMOVABLE
BALL HEAD TOW BAR
41) 42) 43) 44) 45) 46)
Before setting off, check the correct
locking of the removable ball head tow
bar, as follows:
The green mark of the flywh")
INSTRUCTIONS FOR
USING THE REMOVABLE
BALL HEAD TOW BAR
41) 42) 43) 44) 45) 46)
Before setting off, check the correct
locking of the removable ball head tow
bar, as follows:
The green mark of the flywheel must
coincide with the green mark on the
tow bar.
The flywheel is in the stop position
on the tow bar (without slot).
Locked lock and key removed. The
flywheel cannot be removed.
Ball head bar firmly secured to the
housing pipe. Check by shaking with a
hand.
The fitting procedure must be repeated
if any of the 4 checked requirements
is not met.
If even only one of the requirements is
not met the tow hook must not be
used, as in this case there is risk of
accidents. Contact the joint
manufacturer.
The ball head tow bar can be fitted and
removed manually, without needing
any tool.
Never use working tools or means, as
the mechanism could be damaged.
Never unlock in the case of trailer
attached to the vehicle or fitted rack.When driving without trailer or rack the
ball head tow bar must be removed
and the closing plug must always
be inserted in the housing pipe. This
applies particularly if the visibility of the
number plate characters or of the
lighting system is reduced.
Removable ball head tow bar fig.
144 - fig. 145 - fig. 146
1. Mounting pipe - 2. Ball head tow bar
- 3. Locking ball - 4. Release lever -
5. Handwheel - 6. Cap - 7. Wrench - 8.
Red mark (handwheel) - 9. Green
mark (handwheel) - 10. Green mark
(tow bar) - 11. Symbol (release control)
- 12. Closing plug - 13. Coupling pin
- 14. No gaps between 2 and5-15.
Gap of about 5 mm
Installing the ball head tow bar
1. Remove the plug from the mounting
pipe.
The ball head tow bar is usually in the
released position when taken out from
the boot. This can be observed by
the flywheel spaced from the tow bar,
corresponding to a slot of approx. 5
mm (see figure) and by the red mark on
the flywheel directed to the green
mark on the tow bar.
144F1A0380
145 - Locked position, drivingF1A0381
146 - Released position, removedF1A0382
145
Page 154 of 304
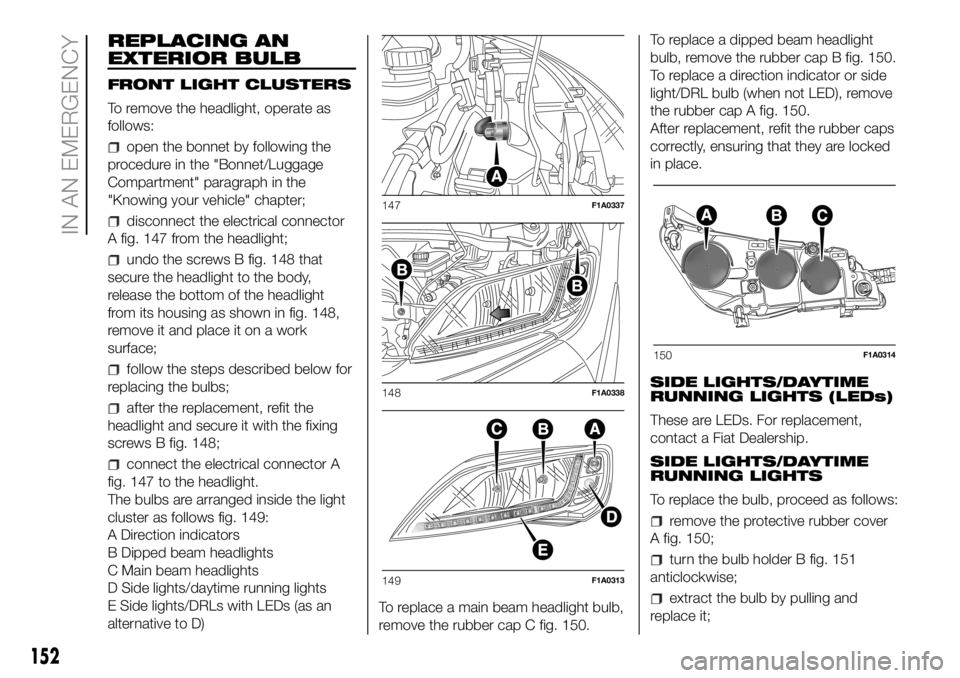
REPLACING AN
EXTERIOR BULB
FRONT LIGHT CLUSTERS
To remove the headlight, operate as
follows:
open the bonnet by following the
procedure in the "Bonnet/Luggage
Compartment" paragraph in the
"Knowing your vehicle" chapter;
disconnect the electrical connector
A fig. 147 from the headlight;
undo the screws B fig. 148 that
secure the headlight to the body,
release the bottom of the headlight
from its housing as shown in fig. 148,
remove it and place it on a work
surface;
follow the steps described below for
replacing the bulbs;
after the replacement, refit the
headlight and secure it with the fixing
screws B fig. 148;
connect the electrical connector A
fig. 147 to the headlight.
The bulbs are arranged inside the light
cluster as follows fig. 149:
A Direction indicators
B Dipped beam headlights
C Main beam headlights
D Side lights/daytime running lights
E Side lights/DRLs with LEDs (as an
alternative to D)To replace a main beam headlight bulb,
remove the rubber cap C fig. 150.To replace a dipped beam headlight
bulb, remove the rubber cap B fig. 150.
To replace a direction indicator or side
light/DRL bulb (when not LED), remove
the rubber cap A fig. 150.
After replacement, refit the rubber caps
correctly, ensuring that they are locked
in place.
SIDE LIGHTS/DAYTIME
RUNNING LIGHTS (LEDs)
These are LEDs. For replacement,
contact a Fiat Dealership.
SIDE LIGHTS/DAYTIME
RUNNING LIGHTS
To replace the bulb, proceed as follows:
remove the protective rubber cover
A fig. 150;
turn the bulb holder B fig. 151
anticlockwise;
extract the bulb by pulling and
replace it;
147F1A0337
148F1A0338
149F1A0313
150F1A0314
152
IN AN EMERGENCY
Page 159 of 304
 REPLACING
INTERIOR BULBS
For the type of bulb and relevant power
rating, see “Changing a bulb”.
FRONT CEILING LIGHT
To replace the bulbs, proceed as
follows:
operate in the point shown by the
arro")
REPLACING
INTERIOR BULBS
For the type of bulb and relevant power
rating, see “Changing a bulb”.
FRONT CEILING LIGHT
To replace the bulbs, proceed as
follows:
operate in the point shown by the
arrow and remove the roof light A
fig. 166;
open protective flap B fig. 167;
replace the bulbs C fig. 167
by releasing them from the side
contacts and making sure that the new
bulbs are correctly secured between
the contacts;
re-close the flap B fig. 167 and
fasten the roof light A fig. 166 in its
housing, making sure that it locks into
place.
REAR CEILING LIGHT
To replace the bulbs, proceed as
follows:
operate in the points indicated by
the arrows and remove the roof light D
fig. 168;
open protective flap E fig. 169;
replace the bulb F fig. 169 by
releasing it from the side contacts and
making sure that the new bulb is
correctly secured between the
contacts;
close the protective flap E fig. 169
and refit the roof light D fig. 168 in
its housing, making sure that it locks
into place.
166F1A0208
167F1A0209
168F1A0210
169F1A0211
157
Page 181 of 304
 the kit includes one bracket, three
special screws and one Allen spanner,
10 size;
go to the rear side of the vehicle
where the spare wheel is located;
make sure that all of the cable for
the spare wh")
the kit includes one bracket, three
special screws and one Allen spanner,
10 size;
go to the rear side of the vehicle
where the spare wheel is located;
make sure that all of the cable for
the spare wheel lifting device has been
unrolled, grip the bell and position it
inside the circular bracket fig. 190;
tighten the knob onto the screw to
secure the bracket fig. 191.
rest the bracket on the inside of the
allow wheel fig. 192.
use the Allen key to tighten the three
special screws on the bracket's nuts
fig. 193 and secure the wheel;
insert the assembled tool fig. 185
equipped with the dedicated extension
B fig. 184 onto the screw A fig. 184
of the operating device on the spare
wheel compartment and turn it
clockwise to allow the spare wheel to
raise, until it rests fully against the
sub-platform, making sure that the the
locking mark D fig. 187 has appeared in
the window on the device.
Check that the position of the
replaced wheel under the platform is
correct (the lifting system is equipped
with a clutch to limit the end of the
stroke, incorrect positioning may
jeopardise safety;)
place the removal tools back in the
tool bag / compartment;
place the tool box / compartment in
its housing under the passenger seat.
159) 160)
WARNING
146)Use your hazard lights, warning
triangle, etc. to show that your vehicle is
stationary. Passengers should get out
of the vehicle, particularly if it is heavily
loaded, and wait for the wheel to be
changed away from the traffic. Apply the
handbrake. in the event of a wheel change
on a slope or on unsurfaced roads, put
any object as stop under the wheels.
190F1A0424
191F1A0425
192F1A0426
193F1A0385
179
Page 184 of 304
 if after this operation it is still
impossible after 10 minutes to reach at
least 3 bar, do not start driving since
the tyre is excessively damaged and the
quick tyre repair kit cannot guarantee
prope")
if after this operation it is still
impossible after 10 minutes to reach at
least 3 bar, do not start driving since
the tyre is excessively damaged and the
quick tyre repair kit cannot guarantee
proper hold, contact a Fiat Dealership;
if the tyre reaches the pressure
specified in “Inflation pressure”
paragraph in the "Technical Data"
section, start driving immediately;
after having driven for about 10
minutes, stop and recheck the tyre
pressure; remember to apply the
handbrake;
if a pressure value of at least 3 bar is
detected, restore the correct pressure
prescribed in the paragraph “Inflation
pressure” in “Technical specification”
(with the engine running and the
handbrake engaged), resume driving
and drive with care to nearest Fiat
Dealership.
WARNING
161)Give the booklet to the personnel who
will be handling the tyre treated with the
repair kit.
162)Holes and damage on the tyre side
walls cannot be repaired. Do not use
the quick tyre repair kit if the damage is
due to running with flat tyre.
163)Repairs are not possible in the case of
damage to the wheel rim (bad groove
distortion causing air loss). Do not remove
the foreign body (screws or nails) from
the tyre.
164)Never operate the compressor for
longer than 20 consecutive minutes. Risk
of overheating. Tyres repaired with the
quick tyre repair kit must only be used
temporarily, as the kit is not suitable for a
definitive repair.165)The bottle contains ethylene glycol. It
contains latex that might cause allergic
reactions. It is harmful if swallowed. Eye
irritant. It may cause sensitisation if inhaled
or on contact. Avoid contact with eyes,
skin and clothes. In the event of contact,
wash immediately with plenty of water.
In the event that it is swallowed, do not
induce vomiting. Rinse out your mouth,
drink large quantities of water and seek
immediate medical attention. Keep out of
the reach of children. The product must
not be used by asthmatics. Do not inhale
the vapours during insertion and suction.
Call a doctor immediately if allergic
reactions are noted. Store the bottle in its
proper compartment, away from sources
of heat. The sealing fluid has an expiry
date. Replace the bottle if the sealant has
expired.
166)Put on the protective gloves provided
together with the quick tyre repair kit.
167)Apply the adhesive label in a position
clearly visible by the driver as a reminder
that the tyre has been treated with the
quick repair kit. Drive carefully, particularly
on bends. Do not exceed 80 km/h. Avoid
sudden acceleration or braking.
168)If the pressure falls below 3 bar, do
not drive any further: the Fix & Go
automatic quick tyre repair kit cannot
guarantee suitable sealing because the tyre
is too damaged. Contact a Fiat Dealership.
169)Inform the Dealership that the tyre
has been repaired using the quick tyre
repair kit. Give the booklet to the personnel
who will be handling the tyre treated with
the repair kit.
198F1A0335
182
IN AN EMERGENCY
Page 186 of 304
 BUMP STARTING
Never bump start the engine by
pushing, towing or driving downhill.
This could cause fuel to flow into the
catalytic converter and damage it
beyond repair.
WARNING
171)This starting proc")
BUMP STARTING
Never bump start the engine by
pushing, towing or driving downhill.
This could cause fuel to flow into the
catalytic converter and damage it
beyond repair.
WARNING
171)This starting procedure must be
performed by expert personnel because
incorrect actions could cause electrical
discharge of considerable intensity.
Furthermore, battery fluid is poisonous and
corrosive: avoid contact with skin and
eyes. Keep naked flames and lighted
cigarettes away from the battery and do
not cause sparks.
BATTERY
RECHARGING
IMPORTANT The battery recharging
procedure is given as information only.
To carry out this operation contact a
Fiat Dealership.
IMPORTANT After setting the ignition
device to STOP and having closed the
driver side door, wait at least one
minute before disconnecting the
electrical supply from the battery. When
reconnecting the electrical supply to
the battery, make sure that the ignition
device is in the STOP position and
the driver side door is closed.
IMPORTANT Charging should be slow
at a low ampere rating for
approximately 24 hours. Charging for a
longer time may damage the battery.IMPORTANT The cables of the
electrical system must be correctly
reconnected to the battery, i.e. the
positive cable (+) to the positive
terminal and the negative cable (–) to
the negative terminal. The battery
terminals are marked with the positive
(+) and negative (–) symbols, and are
shown on the battery cover. The battery
terminals must also be corrosion-free
and firmly secured to the terminals. If a
"quick-type" battery charger is used
with the battery fitted on the car,
disconnect both battery leads before
connecting it. Do not use a "quick-type"
battery charger to provide the starting
voltage.
172) 173)
VERSIONS WITHOUT
START&STOP SYSTEM
To recharge, proceed as follows:
disconnect the terminal from the
negative battery pole;
connect the charger cables to the
battery terminals, observing the polarity;
turn on the battery charger;
when it is recharged, turn the
charger off before disconnecting it from
the battery;
reconnect the terminal to the
negative battery pole.
184
IN AN EMERGENCY
Page 207 of 304
 IMPORTANT Brake fluid absorbs
moisture. For this reason, if the vehicle
is mainly used in areas with a high
degree of atmospheric humidity, the
fluid should be replaced at more
frequent intervals than")
IMPORTANT Brake fluid absorbs
moisture. For this reason, if the vehicle
is mainly used in areas with a high
degree of atmospheric humidity, the
fluid should be replaced at more
frequent intervals than specified in the
“Scheduled Servicing Plan”.
COMFORT-MATIC
GEARBOX HYDRAULIC
SYSTEM FLUID
To check the gearbox oil level and to
change the clutch hydraulic fluid, go to
a Fiat Dealership.
194)
WARNING
185)Never smoke while working in the
engine compartment: inflammable gases
and vapours may be present, constituting
a fire risk.
186)Be very careful working in the engine
compartment when the engine is hot:
you may get burned. Remember that the
fan may start up if the engine is hot: this
could injure you. Scarves, ties and other
loose clothing might be pulled by moving
parts.
187)The cooling system is pressurised. If
necessary, only replace the plug with
another original or the operation of the
system may be adversely affected. Do not
remove the reservoir plug when the engine
is hot: you risk scalding yourself.188)Prevent power steering fluid from
coming into contact with hot engine parts:
it is flammable.
189)Do not travel with the windscreen
washer fluid reservoir empty: the
windscreen washer is essential for
improving visibility.
190)Some commercial windscreen washer
additives are flammable. The engine
compartment contains hot parts which
could start a fire if they come into contact.
191)Do not release the cap from the
extension without previously extracting the
system using the ring.
192)Brake fluid is poisonous and highly
corrosive. In the event of accidental
contact, immediately wash the affected
parts with water and mild soap. Then rinse
thoroughly. Call a doctor immediately if
swallowed.
193)The symbol
, on the brake fluid
container indicates if a brake fluid is
synthetic or mineralbased. Use of mineral
type fluids will damage the special rubber
seals of the braking system beyond repair.
194)Used transmission fluid contains
substances that are harmful to the
environment. It is advisable to have the oil
changed by a Fiat Dealership where it
will be disposed of respecting the
environment and according to legal
requirements.
WARNING
50)When topping up, take care not to mix
up the various types of fluids: they are
not compatible with each other and could
seriously damage the vehicle.
51)Used engine oil and replaced oil filters
contain substances which are harmful to
the environment. To change oil and filters,
we advise you to contact a Fiat Dealership.
52)PARAFLU
UPanti-freeze fluid is used
in the cooling system. Use fluid of the
same type as that contained in the cooling
system for any top-ups. PARAFLU
UP
fluid cannot be mixed with any other type
of fluid. If this occurs, do not start the
engine and contact your Fiat Dealership
immediately.
53)Do not press on the power steering
end of travel with engine on for more than
8 consecutive seconds, since noise is
produced and there is a risk of system
damages.
54)Prevent brake fluid, which is highly
corrosive, from coming into contact with
painted parts. Should it happen,
immediately wash with water.
WARNING
4)Power steering fluid consumption is
extremely low; if another top-up is required
after only a short period of time, have the
system checked for leaks at a Fiat
Dealership.
205
Page 259 of 304
 3.0 140 Natural Power
Consumption according to the current European directive
VersionF.C.(*)Methane (m3x100 km)Methane (kg/100 km)(**)
Urban Extra-urban Combined Urban Extra-urban Combined
Light –
1")
3.0 140 Natural Power
Consumption according to the current European directive
VersionF.C.(*)Methane (m3x100 km)Methane (kg/100 km)(**)
Urban Extra-urban Combined Urban Extra-urban Combined
Light –
16.3 11.2 13.1 10.6 7.3 8.6 Maxi –
Tempo Libero –
(*) Flywheel class
(**) Consumption in kg x 100 km according to molecular weight calculation
257