sensor FIAT DUCATO BASE CAMPER 2018 Owner handbook (in English)
[x] Cancel search | Manufacturer: FIAT, Model Year: 2018, Model line: DUCATO BASE CAMPER, Model: FIAT DUCATO BASE CAMPER 2018Pages: 304, PDF Size: 14.93 MB
Page 144 of 304
In addition to the electrical branches,
the vehicle's electric system can only
be connected to the supply cable for an
electric brake and to the cable for an
internal light, though not above 15
W. For connections use the preset
control unit with battery cable no less
than 2.5 mm
2.
IMPORTANT The trailer tow hook
contributes to the length of the vehicle.
When installing on long wheelbase
versions, it is only possible to install
removable tow hooks because the total
vehicle length limit of 6 metres is
exceeded.
If no trailer is fitted, the hook must be
removed from the attachment base and
it must not exceed the vehicle's
original length.
IMPORTANT If you wish to leave the
tow hook fitted without towing a trailer,
it is advisable to contact a Fiat
Dealership for the relevant system
update operations because the tow
hook could be detected as an obstacle
by the central sensors.Installation diagram for Van
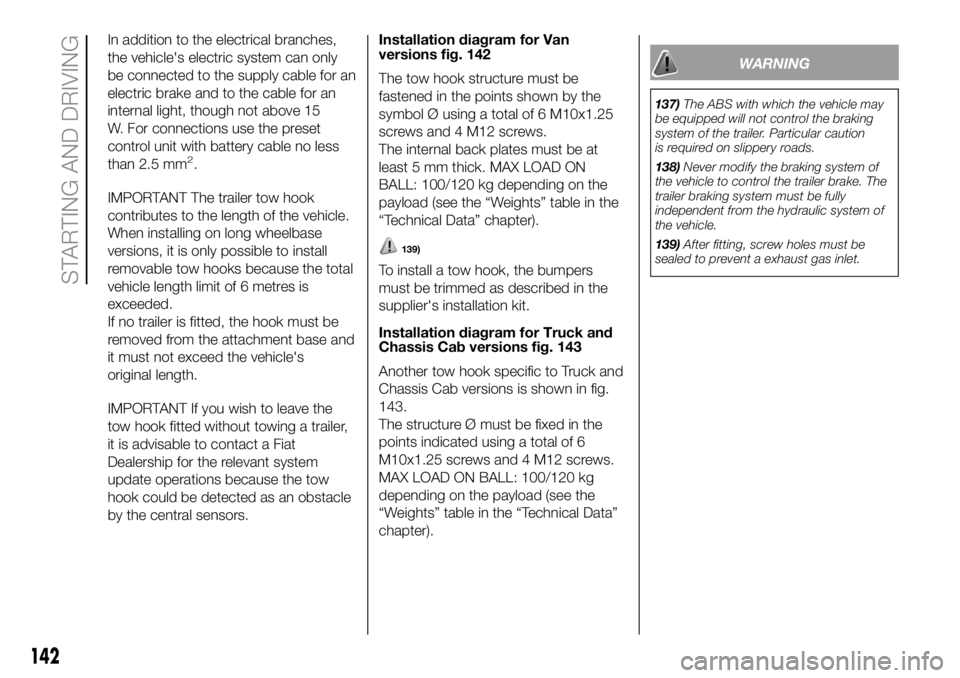
versions fig. 142
The tow hook structure must be
fastened in the points shown by the
symbol Ø using a total of 6 M10x1.25
screws and 4 M12 screws.
The internal back plates must be at
least 5 mm thick. MAX LOAD ON
BALL: 100/120 kg depending on the
payload (see the “Weights” table in the
“Technical Data” chapter).
139)
To install a tow hook, the bumpers
must be trimmed as described in the
supplier's installation kit.
Installation diagram for Truck and
Chassis Cab versions fig. 143
Another tow hook specific to Truck and
Chassis Cab versions is shown in fig.
143.
The structure Ø must be fixed in the
points indicated using a total of 6
M10x1.25 screws and 4 M12 screws.
MAX LOAD ON BALL: 100/120 kg
depending on the payload (see the
“Weights” table in the “Technical Data”
chapter).
WARNING
137)The ABS with which the vehicle may
be equipped will not control the braking
system of the trailer. Particular caution
is required on slippery roads.
138)Never modify the braking system of
the vehicle to control the trailer brake. The
trailer braking system must be fully
independent from the hydraulic system of
the vehicle.
139)After fitting, screw holes must be
sealed to prevent a exhaust gas inlet.
142
STARTING AND DRIVING
Page 163 of 304
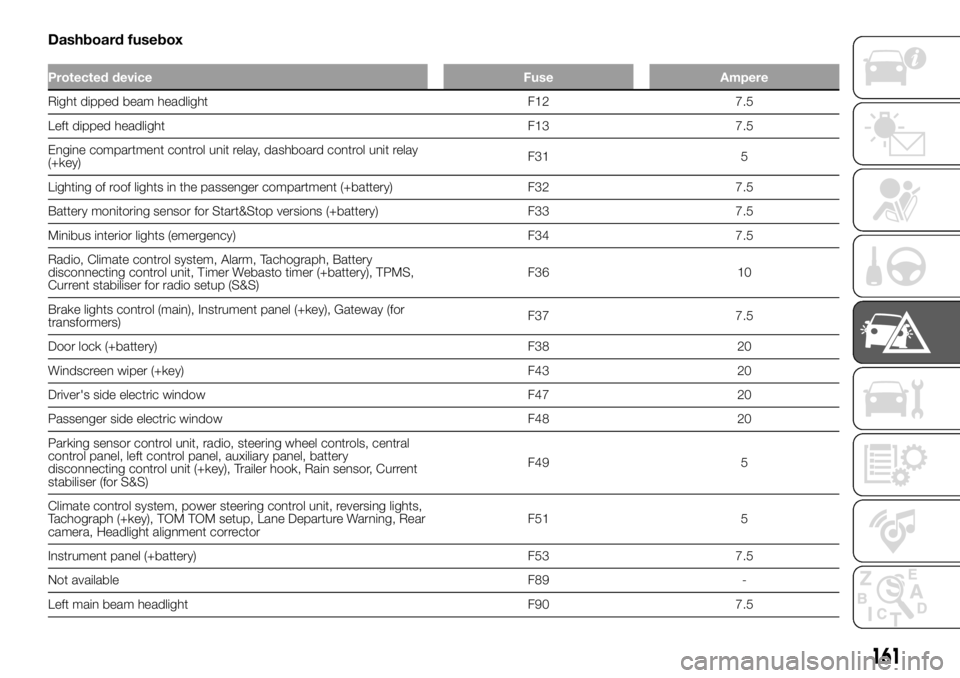
Dashboard fusebox
Protected device Fuse Ampere
Right dipped beam headlight F12 7.5
Left dipped headlight F13 7.5
Engine compartment control unit relay, dashboard control unit relay
(+key)F31 5
Lighting of roof lights in the passenger compartment (+battery) F32 7.5
Battery monitoring sensor for Start&Stop versions (+battery) F33 7.5
Minibus interior lights (emergency) F34 7.5
Radio, Climate control system, Alarm, Tachograph, Battery
disconnecting control unit, Timer Webasto timer (+battery), TPMS,
Current stabiliser for radio setup (S&S)F36 10
Brake lights control (main), Instrument panel (+key), Gateway (for
transformers)F37 7.5
Door lock (+battery) F38 20
Windscreen wiper (+key) F43 20
Driver's side electric window F47 20
Passenger side electric window F48 20
Parking sensor control unit, radio, steering wheel controls, central
control panel, left control panel, auxiliary panel, battery
disconnecting control unit (+key), Trailer hook, Rain sensor, Current
stabiliser (for S&S)F49 5
Climate control system, power steering control unit, reversing lights,
Tachograph (+key), TOM TOM setup, Lane Departure Warning, Rear
camera, Headlight alignment correctorF51 5
Instrument panel (+battery) F53 7.5
Not available F89 -
Left main beam headlight F90 7.5
161
Page 187 of 304
VERSIONS WITH
START&STOP SYSTEM
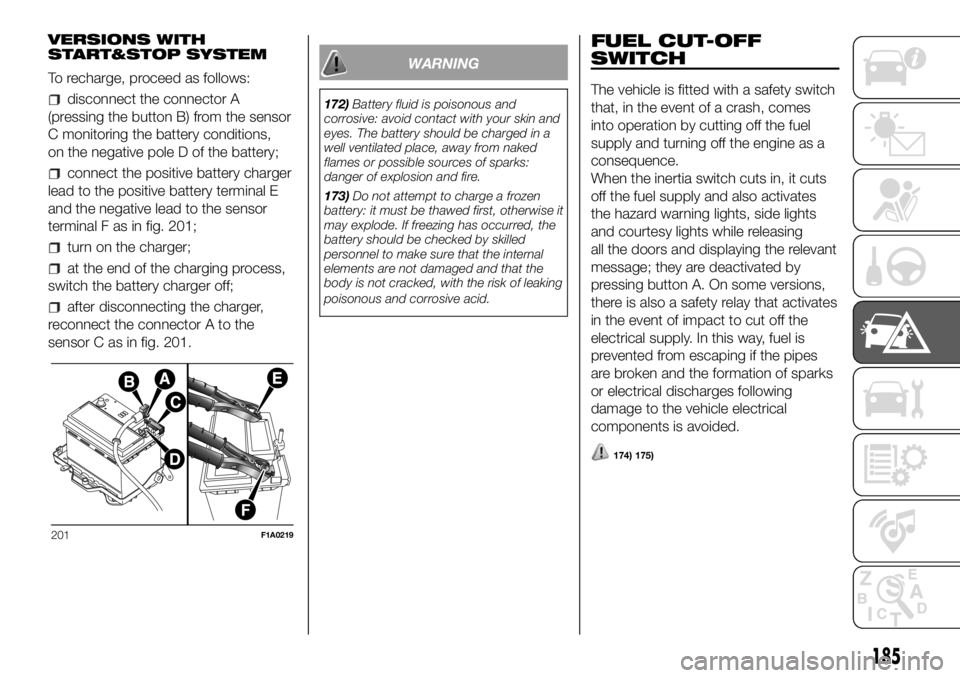
To recharge, proceed as follows:
disconnect the connector A
(pressing the button B) from the sensor
C monitoring the battery conditions,
on the negative pole D of the battery;
connect the positive battery charger
lead to the positive battery terminal E
and the negative lead to the sensor
terminal F as in fig. 201;
turn on the charger;
at the end of the charging process,
switch the battery charger off;
after disconnecting the charger,
reconnect the connector A to the
sensor C as in fig. 201.
WARNING
172)Battery fluid is poisonous and
corrosive: avoid contact with your skin and
eyes. The battery should be charged in a
well ventilated place, away from naked
flames or possible sources of sparks:
danger of explosion and fire.
173)Do not attempt to charge a frozen
battery: it must be thawed first, otherwise it
may explode. If freezing has occurred, the
battery should be checked by skilled
personnel to make sure that the internal
elements are not damaged and that the
body is not cracked, with the risk of leaking
poisonous and corrosive acid.
FUEL CUT-OFF
SWITCH
The vehicle is fitted with a safety switch
that, in the event of a crash, comes
into operation by cutting off the fuel
supply and turning off the engine as a
consequence.
When the inertia switch cuts in, it cuts
off the fuel supply and also activates
the hazard warning lights, side lights
and courtesy lights while releasing
all the doors and displaying the relevant
message; they are deactivated by
pressing button A. On some versions,
there is also a safety relay that activates
in the event of impact to cut off the
electrical supply. In this way, fuel is
prevented from escaping if the pipes
are broken and the formation of sparks
or electrical discharges following
damage to the vehicle electrical
components is avoided.
174) 175)
201F1A0219
185
Page 208 of 304
AIR CLEANER/
POLLEN FILTER
Have the air cleaner replaced by a Fiat
Dealership.
AIR CLEANER – DUSTY
ROADS
(for versions/markets, where provided)
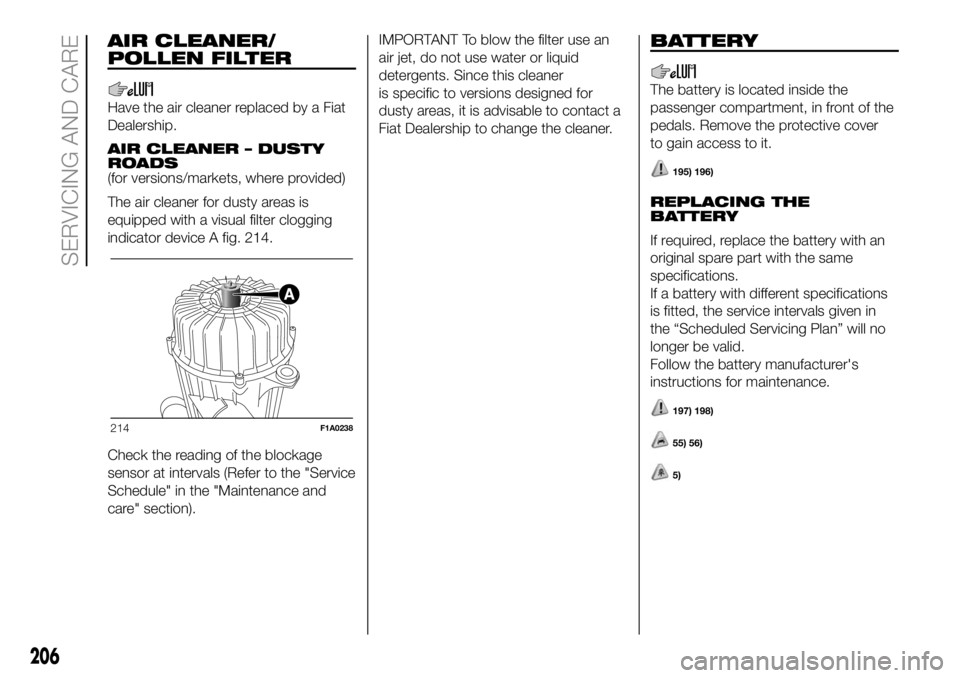
The air cleaner for dusty areas is
equipped with a visual filter clogging
indicator device A fig. 214.
Check the reading of the blockage
sensor at intervals (Refer to the "Service
Schedule" in the "Maintenance and
care" section).IMPORTANT To blow the filter use an
air jet, do not use water or liquid
detergents. Since this cleaner
is specific to versions designed for
dusty areas, it is advisable to contact a
Fiat Dealership to change the cleaner.
BATTERY
The battery is located inside the
passenger compartment, in front of the
pedals. Remove the protective cover
to gain access to it.
195) 196)
REPLACING THE
BATTERY
If required, replace the battery with an
original spare part with the same
specifications.
If a battery with different specifications
is fitted, the service intervals given in
the “Scheduled Servicing Plan” will no
longer be valid.
Follow the battery manufacturer's
instructions for maintenance.
197) 198)
55) 56)
5)
214F1A0238
206
SERVICING AND CARE
Page 212 of 304
WHEELS AND TYRES
Check the pressure of each tyre,
including the space-saver wheel,
approximately every two weeks and
before long journeys: the pressure
should be checked with the tyre rested
and cold.
It is normal for the pressure to increase
when the vehicle is used; for the correct
tyre inflation pressure, see “Wheels” in
the “Technical specifications” section.
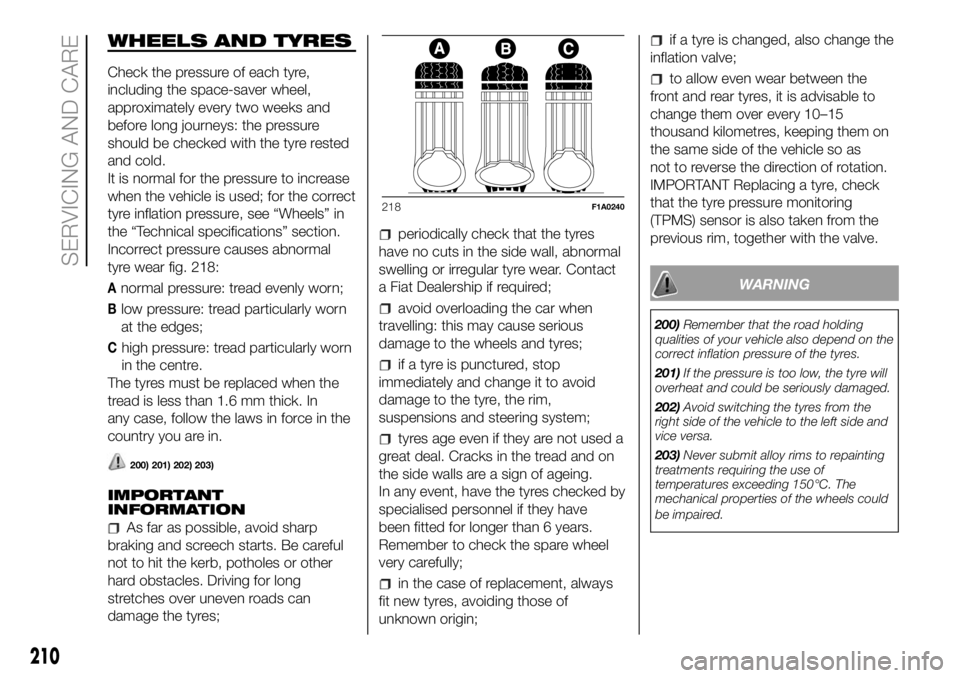
Incorrect pressure causes abnormal
tyre wear fig. 218:
Anormal pressure: tread evenly worn;
Blow pressure: tread particularly worn
at the edges;
Chigh pressure: tread particularly worn
in the centre.
The tyres must be replaced when the
tread is less than 1.6 mm thick. In
any case, follow the laws in force in the
country you are in.
200) 201) 202) 203)
IMPORTANT
INFORMATION
As far as possible, avoid sharp
braking and screech starts. Be careful
not to hit the kerb, potholes or other
hard obstacles. Driving for long
stretches over uneven roads can
damage the tyres;
periodically check that the tyres
have no cuts in the side wall, abnormal
swelling or irregular tyre wear. Contact
a Fiat Dealership if required;
avoid overloading the car when
travelling: this may cause serious
damage to the wheels and tyres;
if a tyre is punctured, stop
immediately and change it to avoid
damage to the tyre, the rim,
suspensions and steering system;
tyres age even if they are not used a
great deal. Cracks in the tread and on
the side walls are a sign of ageing.
In any event, have the tyres checked by
specialised personnel if they have
been fitted for longer than 6 years.
Remember to check the spare wheel
very carefully;
in the case of replacement, always
fit new tyres, avoiding those of
unknown origin;
if a tyre is changed, also change the
inflation valve;
to allow even wear between the
front and rear tyres, it is advisable to
change them over every 10–15
thousand kilometres, keeping them on
the same side of the vehicle so as
not to reverse the direction of rotation.
IMPORTANT Replacing a tyre, check
that the tyre pressure monitoring
(TPMS) sensor is also taken from the
previous rim, together with the valve.
WARNING
200)Remember that the road holding
qualities of your vehicle also depend on the
correct inflation pressure of the tyres.
201)If the pressure is too low, the tyre will
overheat and could be seriously damaged.
202)Avoid switching the tyres from the
right side of the vehicle to the left side and
vice versa.
203)Never submit alloy rims to repainting
treatments requiring the use of
temperatures exceeding 150°C. The
mechanical properties of the wheels could
be impaired.
218F1A0240
210
SERVICING AND CARE
Page 288 of 304
Making a phone call
The operations described below can
only be accessed if supported by
the mobile phone in use.
For all functions available, refer to the
mobile phone owner's handbook.
A call can be made by:
selecting theicon (mobile
phone phonebook);
selecting "Recent Calls";
selecting theicon;
pressing the "Redial" button.
Text message reader
The system can read the messages
received by the mobile phone.
To use this function the mobile phone
must support the SMS exchange
function throughBluetooth®.
Where operation is not supported by
the phone, the relative graphic
button is deactivated (goes grey).
When a text message is received,
the display will show a screen where
the options "Listen", "Call" or "Ignore"
can be selected.
You can access the SMS message list
received by the cell by pressing the
graphic
button (the list shows
a maximum of 60 received messages).SETTINGS
Press the
button on the front panel
to view the "Settings" main menu on
the display.
NOTE The menu items displayed vary
according to the versions.
The menu includes the following items:
Display;
Clock & Date;
Safety/Assistance (for versions/
markets, where provided);
Lights (for versions/markets where
provided);
Doors & Locks;
Audio;
Phone/Bluetooth;
Radio;
Restore Default Settings.
Safety/Assistance
(for versions/markets, where provided)
Rain sensor
The sensitivity of the rain sensor can be
adjusted with this function (for
versions/markets, where provided).
Lights
(for versions/markets, where provided)
This function can be used to carry
out the following adjustments:Headlight sensor
adjustment of the headlight activation
sensitivity;
"Automatic high beam" (for
versions/markets where provided):
activation/deactivation of automatic
main beam headlights;
“Daytime Lights" (DRL) (for
versions/markets, where provided):
activation/deactivation of daytime
running lights;
“Cornering lights" (for versions/
markets, where provided):
activation/deactivation of the cornering
lights; Doors and Door locks. This
function activates/deactivates
automatic door locking when the
vehicle is in motion ("Autoclose"
function).
"MORE" MODE
Press the MORE button on the front
panel to display the operating settings:
Outside Temperature
Clock
Compass (only forUconnect™5”
Radio Nav)
Trip Computer (only forUconnect™
5” Radio Nav)
Settings (only forUconnect™5”
Radio Nav)
286
MULTIMEDIA
Page 299 of 304

INDEX
4
-Seater bench seat (Crew Cab
Van versions).....................23
ABS (System)......................85
ABS system.........................85
Additional heater....................40
Additional rear climate control
(Panorama/Combi)................44
Additional rear heating
(Panorama/Combinato)...........43
Additive for diesel emissions
AdBlue (UREA)..................138
Advice for extending battery life.....207
Air cleaner.........................206
Air suspension......................49
ASR (system).......................87
ASR system.........................87
Automatic climate control
system...........................39
Automatic headlight sensor..........29
Automatic main beam
headlights........................28
Battery
Replacement...................206
Battery (disconnector)...............33
Battery (recharging)................184
Battery disconnector................33
Battery replacement................206
body paintwork identification
plate............................215Bodywork
Advice for preserving the
bodywork......................212
Protection from atmospheric
agents.........................212
Bodywork version..................217
Bonnet.............................45
Brake fluid.........................204
Bump starting......................184
Cargo space.......................20
Carrying children safely
Arrangement possibilities for
child restraint systems..........103
Child restraint systems.........101
Safety regulations..............104
Ceiling lights........................31
Changing a wheel..................176
Chassis marking...................215
Checking levels....................199
Climatizzatore manual...............38
CO2 emissions....................258
Comfort-matic Gearbox............123
Compartment beneath
passenger side front seat..........47
Compatibility of vehicle seats
with Isofix child seats............107
Conditions of use..................132
Controls............................32
Cruise Control.....................126
Cylinder marking...................216
Daytime running lights..............27
Dead lock device....................13
Demanding vehicle use.............191
Dimensions........................227
Dipped beam headlights.............27
Direction indicators..................29
Display
Standard screen.................56
Door locking........................34
Doors...............................12
Driving Advisor (system).............93
Driving Advisor System..............93
Driving style........................132
Electric windows...................44
Electronic alarm.....................11
Engine.............................219
Engine codes......................217
Engine coolant.....................203
Engine marking....................216
Engine oil..........................203
Engine oil level gauge................57
ESC (system).......................86
Exterior lights.......................27
Fiat CODE system...................8
Fix&Go Automatic quick tyre
pressure restoration.........180-181
Flap on bench.......................20
Flashing the headlights..............28
Flex Floor rear seat..................22
Page 300 of 304

Fluids and lubricants...............248
Fog lights...........................32
Follow Me Home device.............29
Front airbags......................111
Front airbag driver's side.......111
Manually deactivating the front
airbag and side bag............112
Passenger side front airbag.....112
Front light clusters.................152
Front roof light
(changing a bulb)................157
Fuel consumption..................251
Fuel cut-off switch.................185
Fuel tank cap......................133
Fuses (replacement)................158
Gateway fms module..............171
Gear Shift Indicator..................56
Hazard warning lights...............32
HBA (Hydraulic Brake Assist)
system...........................87
HBA (system).......................87
Head restraints
Front ............................46
Headlight alignment corrector.......30
Headlight washers...................36
Headlights
Headlight alignment
corrector........................30
Light beam alignment............30
Heated rear window.................33Heating and ventilation..............37
Heating and ventilation controls......38
Hill Descent.........................88
Hill Descent Control System.........88
Hill Holder (system)..................86
Hill Holder system...................86
Identification data..................215
Ignition switch.......................10
Independent additional heater........40
Inflation pressure...................226
Inflation procedure.................181
Instrument panel....................52
Interior.............................213
Interior fittings.......................47
Isofix child restraint systems
(setup)
Arrangement possibilities for
child restraint system on seats
of vehicle......................107
Jump starting.....................183
Lifting the vehicle..................209
Light beam alignment................30
Light bulbs
Bulbs types....................150
Lights off............................27
Loading advice.....................140
Main beam headlights..............28
Maintenance and care - regular
checks..........................190Maintenance and care -
Scheduled Servicing.............190
Maintenance and care -
scheduled servicing plan.........192
Manually deactivating the front
airbag and side bag.............112
Moving footboard...................16
MSR (System).......................85
MSR system........................85
Multifunction display
Control buttons..................57
Setup menu.....................58
Nozzles...........................209
Number plate lights................156
On-board instruments..............52
Parking lights.......................29
Parking sensors....................128
Performance.......................237
Pollen filter.........................206
Power Socket.......................47
Power steering.....................222
Power steering fluid................203
Pre-tensioners......................98
Prolonged vehicle inactivity.........147
Radio.............................266
Rain sensor.........................35
Rear door with two wings............15
Rear fog lights.......................32
Rear footboard......................16
INDEX