stop start FIAT FIORINO 2018 Owner handbook (in English)
[x] Cancel search | Manufacturer: FIAT, Model Year: 2018, Model line: FIORINO, Model: FIAT FIORINO 2018Pages: 196, PDF Size: 4.99 MB
Page 62 of 196
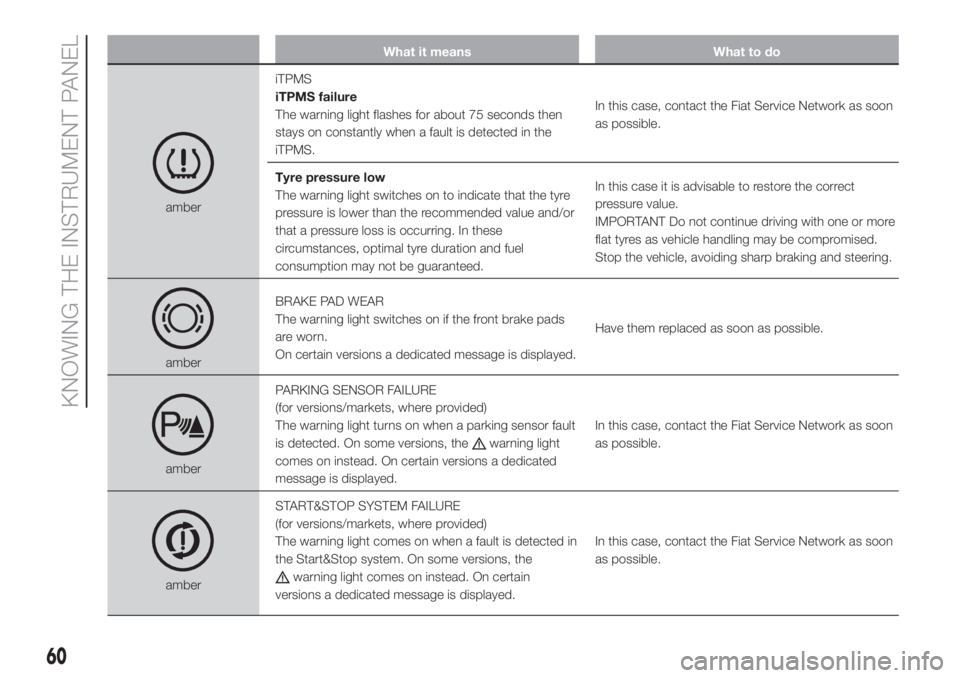
What it means What to do
amberiTPMS
iTPMS failure
The warning light flashes for about 75 seconds then
stays on constantly when a fault is detected in the
iTPMS.In this case, contact the Fiat Service Network as soon
as possible.
Tyre pressure low
The warning light switches on to indicate that the tyre
pressure is lower than the recommended value and/or
that a pressure loss is occurring. In these
circumstances, optimal tyre duration and fuel
consumption may not be guaranteed.In this case it is advisable to restore the correct
pressure value.
IMPORTANT Do not continue driving with one or more
flat tyres as vehicle handling may be compromised.
Stop the vehicle, avoiding sharp braking and steering.
amberBRAKE PAD WEAR
The warning light switches on if the front brake pads
are worn.
On certain versions a dedicated message is displayed.Have them replaced as soon as possible.
amberPARKING SENSOR FAILURE
(for versions/markets, where provided)
The warning light turns on when a parking sensor fault
is detected. On some versions, the
warning light
comes on instead. On certain versions a dedicated
message is displayed.In this case, contact the Fiat Service Network as soon
as possible.
amberSTART&STOP SYSTEM FAILURE
(for versions/markets, where provided)
The warning light comes on when a fault is detected in
the Start&Stop system. On some versions, thewarning light comes on instead. On certain
versions a dedicated message is displayed.In this case, contact the Fiat Service Network as soon
as possible.
60
KNOWING THE INSTRUMENT PANEL
Page 66 of 196
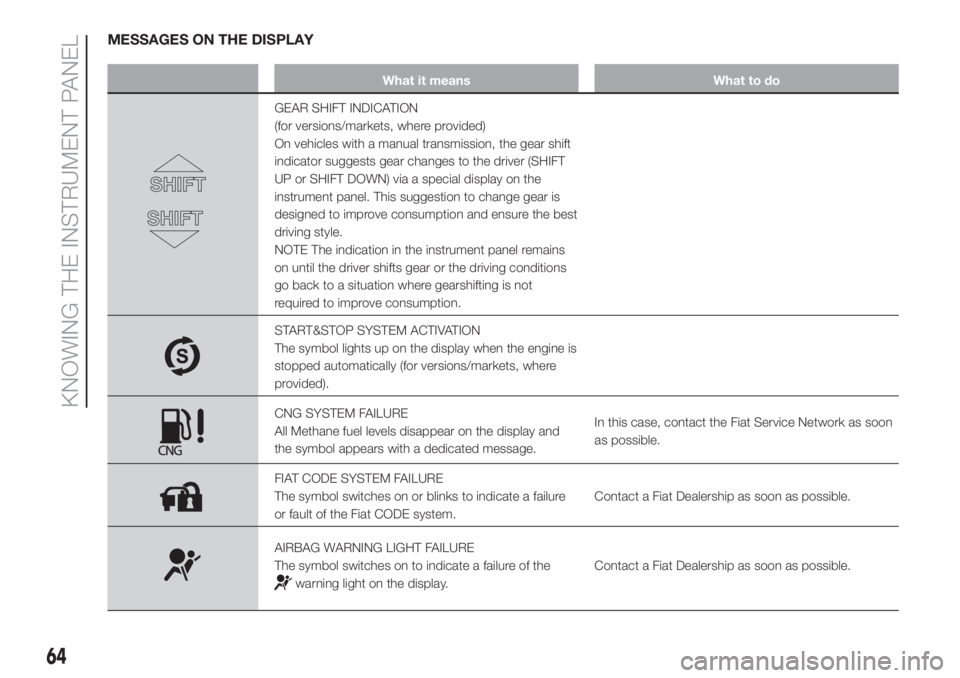
MESSAGES ON THE DISPLAY
What it means What to do
GEAR SHIFT INDICATION
(for versions/markets, where provided)
On vehicles with a manual transmission, the gear shift
indicator suggests gear changes to the driver (SHIFT
UP or SHIFT DOWN) via a special display on the
instrument panel. This suggestion to change gear is
designed to improve consumption and ensure the best
driving style.
NOTE The indication in the instrument panel remains
on until the driver shifts gear or the driving conditions
go back to a situation where gearshifting is not
required to improve consumption.
START&STOP SYSTEM ACTIVATION
The symbol lights up on the display when the engine is
stopped automatically (for versions/markets, where
provided).
CNG SYSTEM FAILURE
All Methane fuel levels disappear on the display and
the symbol appears with a dedicated message.In this case, contact the Fiat Service Network as soon
as possible.
FIAT CODE SYSTEM FAILURE
The symbol switches on or blinks to indicate a failure
or fault of the Fiat CODE system.Contact a Fiat Dealership as soon as possible.
AIRBAG WARNING LIGHT FAILURE
The symbol switches on to indicate a failure of the
warning light on the display.Contact a Fiat Dealership as soon as possible.
64
KNOWING THE INSTRUMENT PANEL
Page 73 of 196
when the space-saver wheel is
fitted. Before carrying out the “Reset”
procedure, inflate the tyres to the rated
pressure values specified in the inflation
pressure table (see "Wheels" paragraph
in the "Technical specifications"
chapter).
If the “Reset” procedure is not carried
out, in all above cases, the
warning
light may give false indications on
one or more tyres.
To carry out the “Reset” procedure,
with the vehicle stopped and the
ignition device at MAR, use the Setup
Menu as follows:
briefly press thebutton: the
display will show "Reset";
press thebutton or the
button to select ("Yes" or "No");
briefly press thebutton: the
display will show "Confirm";
pressbutton orto select
("Yes" to “Reset” or "No" to exit the
video page);
press thebutton again to return
to the standard screen or to the main
menu according to where you are in the
menu.
After the “Reset” the display will show
the "Reset saved" message, indicating
that the "self-learning" has been
started.Operating conditions
The system is active for speeds above
15 km/h. In a few situations such as
sporty driving, particular conditions of
the road surface (e.g. icy, snowy,
unsurfaced roads...) the signalling may
be delayed or partial in detecting the
contemporary deflation of more than
one tyre. Under special conditions (e.g.
vehicle loaded asymmetrically on one
side, towing a trailer, damaged or worn
tyre, fitting the space-saver wheel,
use of the "Fix&Go Automatic"
kit, fitting snow chains, fitting different
tyres on the axles) the system may give
false indications or be temporarily
deactivated.
If the system is temporarily deactivated,
the warning light
flashes for about
75 seconds and then is continuously
on; at the same time, the display shows
a dedicated message. This warning is
displayed also after the engine has
been switched off and then on again if
the correct operating conditions are not
restored.
55) 56) 57) 58) 59)
12) 13) 14) 15) 16) 17) 18) 19) 20)
WARNING
55)The system is an aid for the driver, who
must always pay full attention while
driving. The responsibility always rests with
the driver, who must take into account
the traffic conditions in order to drive
in complete safety. The driver must always
maintain a safe distance from the vehicle
in front.
56)If the driver depresses the brake pedal
fully or carries out a fast steering during
system operation, the automatic braking
function may stop (e.g. to allow a possible
manoeuvre to avoid the obstacle).
57)The laser beam is not visible at the
naked eye. Do not look directly, or with
optical instruments (e.g. lenses), at the
laser beam from a distance lower than 10
cm: this may cause damage to the sight.
The laser beam is also present when
the key is at MAR but its operation is off,
not available or manually deactivated
with the display Setup Menu.
58)The system intervenes on vehicles
travelling in the same lane. Small sized
vehicles (e.g. bicycles or motorbikes)
or people, animals and things (e.g.
pushchairs) and more in general all those
obstacles with a low reflection of the light
emitted by the laser (e.g. vehicles soiled
with mud) are not taken into consideration.
71
Page 93 of 196
STARTING AND DRIVING
Let’s get to the core of the vehicle:
seeing how you can exploit all of its
potential to the full.
We’ll look at how to drive it safely in any
situation, so that it can be a welcome
companion, with our comfort and
our wallets in mind.STARTING THE ENGINE ................. 92
HANDBRAKE .................................. 93
WHEN PARKED .............................. 94
USING THE MANUAL
TRANSMISSION ............................. 95
“COMFORT-MATIC”
TRANSMISSION ............................. 96
CRUISE CONTROL (CONSTANT
SPEED REGULATOR) ..................... 97
SPEED BLOCK ............................... 99
PARKING SENSORS....................... 99
START&STOP SYSTEM ..................100
REFUELLING THE VEHICLE ...........102
TOWING TRAILERS ........................105
91
Page 94 of 196
STARTING THE
ENGINE
The vehicle is fitted with an electronic
engine lock device: if the engine fails to
start, see the paragraph “The Fiat
CODE system” in section “Know your
vehicle”.
90) 91)
22) 23) 27) 28)
PROCEDURE FOR
PETROL VERSIONS
Proceed as follows:
engage the handbrake;
put the gear lever into neutral;
fully depress the clutch pedal
without touching the accelerator;
turn the ignition key to AVV and
release it as soon as the engine starts.
PROCEDURE FOR DIESEL
VERSIONS
Proceed as follows:
engage the handbrake;
put the gear lever into neutral;
turn the ignition key to MAR
position: the
warning light will light
up on instrument panel;
wait for the warning lightsand
to turn off, which will happen faster
the warmer the engine is;
fully depress the clutch pedal
without touching the accelerator;
turn the ignition key to the AVV
position as soon as the warning light
turns off. Waiting too long will waste
the heating work carried out by the
plugs.
Release the key as soon as the engine
starts.
With cold engine, the accelerator must
be entirely released when turning the
ignition key to position AVV.
24)
PROCEDURE FOR
NATURAL POWER
VERSIONS
The engine always starts up on petrol
independently of the previously
selected mode.
25)
PROCEDURE FOR
VERSIONS WITH
COMFORT-MATIC
TRANSMISSION
The system allows the engine to be
started both with a gear engaged and
with the transmission in neutral (N).
Always press the brake pedal with the
gear engaged.It is advisable to place the gear lever in
neutral (N) before starting the engine.
26)
IMPORTANT If the engine does not
start at the first attempt, return the
ignition key to STOP before repeating
the starting procedure. If the warning
light remains on together with warning
light
when the ignition key is at
MAR, turn the key to STOP and then
back to MAR; if the warning light stays
on, try with the other keys provided
with the vehicle. If you still cannot start
the engine, perform an emergency
start (see “Emergency starting” in the
“In an emergency” section) and go to a
Fiat Dealership.
IMPORTANT If start-up is requested
with the gearbox faulty, carry out the
"Delayed start-up" procedure (see
associated messages): turn the key to
the AVV position for at least 7 seconds
with the brake depressed and the
engine will start. The system will be in
recovery mode (maximum permitted
gear: 3
rd, Automatic mode not
available). If the engine does not start,
contact a Fiat Dealership.
92
STARTING AND DRIVING
Page 96 of 196
WARNING
92)Never leave children unattended in the
vehicle. Always remove the ignition key
when leaving the vehicle and take it out
with you.
93)The vehicle should be secured after
several clicks of the lever. If it is not,
contact a Fiat Dealership to have it
adjusted.
94)In the case of parking manoeuvres on
roads on a gradient, the front wheels
must be steered towards the pavement
(when parking downhill), or in the opposite
direction if the vehicle is parked uphill. If
the vehicle is parked on a steep slope, it is
advisable to block the wheels with a wedge
or stone.
WHEN PARKED
95)
Proceed as follows when parking and
leaving the vehicle:
engage a gear (1stgear if facing
uphill or reverse if facing downhill) and
leave the wheels turned;
stop the engine and engage the
handbrake;
always remove the ignition key.
If the vehicle is parked on a steep
slope, it is advisable to block the
wheels with a wedge or stone.
Do not leave the key in the MAR
position to prevent the battery from
running down.
Versions with COMFORT-MATIC
transmission
To park safely, keeping a foot on the
brake pedal, the 1
stor reverse (R) gear
must be engaged and, in case of
parking uphills/downhills, the
handbrake must be engaged.
IMPORTANT NEVER leave the vehicle
with the transmission in neutral (N)
or, on versions equipped with automatic
(Comfort matic) transmission, before
putting the shift lever in thePposition.IMPORTANT NOTES
With the vehicle stationary and a
gear engaged, always keep the brake
pedal pressed until you decide to
set off, then release the brake and
accelerate gently;
during prolonged stops with the
engine running, it is advisable to keep
the gearbox in neutral (N);
In order to safeguard the efficiency
of the clutch, do not use the
accelerator to keep the vehicle
stationary (e.g. when stopped on an
incline);
the clutch could overheat and be
damaged; use the brake pedal and only
operate the accelerator pedal when
you decide to set off;
only use second gear when you
need greater control for starting
manoeuvres on surfaces with poor grip;
if, with reverse gear (R) engaged,
you have to engage first gear or vice
versa, only do this when the vehicle is
completely stationary and with the
brake pedal pressed;
94
STARTING AND DRIVING
Page 102 of 196
The parking sensors work properly
with the swing doors closed. If they are
open, they can cause the system to
send false signals: always close the rear
doors.
Also, do not apply stickers to the
sensors.
The following conditions may influence
the performance of the parking
assistance system:
Reduced sensor sensitivity and a
reduction in the parking assistance
system performance could be due to
the presence on the surface of the
sensor of: ice, snow, mud, thick paint.
The sensor may detect a non-
existent obstacle (echo noise) due to
mechanical noises, for example when
washing the vehicle, in case of rain,
strong wind, hail.
The warnings sent by the sensor
can also be altered by the presence of
ultrasonic systems (e.g. pneumatic
brakes of trucks or pneumatic drills)
near the car.
Detection of obstacles in the upper
part of the vehicle (particularly in the
case of vans or chassis cabs) may not
be guaranteed because the system
detects obstacles that could strike the
lower part of the vehicle.
WARNING
99)Parking manoeuvres, however, are
always the driver’s responsibility. While
carrying out these manoeuvres, always
make sure that no people (especially
children) or animals are in the area
concerned. Parking sensors are designed
to assist drivers; however, you must always
concentrate fully during potentially
dangerous manoeuvres, even if carried out
at low speeds.
WARNING
31)The sensor must be free of mud, dirt,
snow or ice in order for the system to
work. Be careful not to scratch or damage
the sensors while cleaning them. Avoid
using dry, rough or hard cloths. The
sensors should be washed using clean
water with the addition of car shampoo if
necessary. When using special washing
equipment such as high pressure jets
or steam cleaning, clean the sensors very
quickly keeping the jet more than 10 cm
away.
START&STOP
SYSTEM
(for versions/markets, where provided)
101) 102) 103) 104)
IN BRIEF
The Start&Stop device automatically
stops the engine each time the
vehicle is stationary and all the
conditions for automatic switch-off
have been met, and starts it again
when the driver wants to move off.
This improves the efficiency of the
vehicle by reducing fuel consumption,
the emission of harmful gases and
noise pollution.
OPERATING MODE
Stopping the engine
Versions with manual transmission
With the vehicle stationary, the engine
stops with the gearbox in neutral and
the clutch pedal released.
100
STARTING AND DRIVING
Page 103 of 196
Versions with Comfort-matic
transmission
With the vehicle stationary and the
brake pedal pressed, the engine stops
if the gear lever is in position other
thanR. In the event of stops uphill,
engine switching off is disabled to make
the "Hill Holder" function available
(works only with the engine running).
The warning light on the instrument
panel switches on to signal that the
engine has stopped.
Restarting the engine
Versions with manual transmission
Depress the clutch pedal to restart
the engine.
Versions with Comfort-matic
transmission
Releasing the brake pedal the engine
restarts automatically; the icon switches
off on the display. If the engine is
restarted with the “Hill Holder” function
off, move the lever towards (+), (-)or
Rand the engine restarts.MANUAL ACTIVATION
AND DEACTIVATION
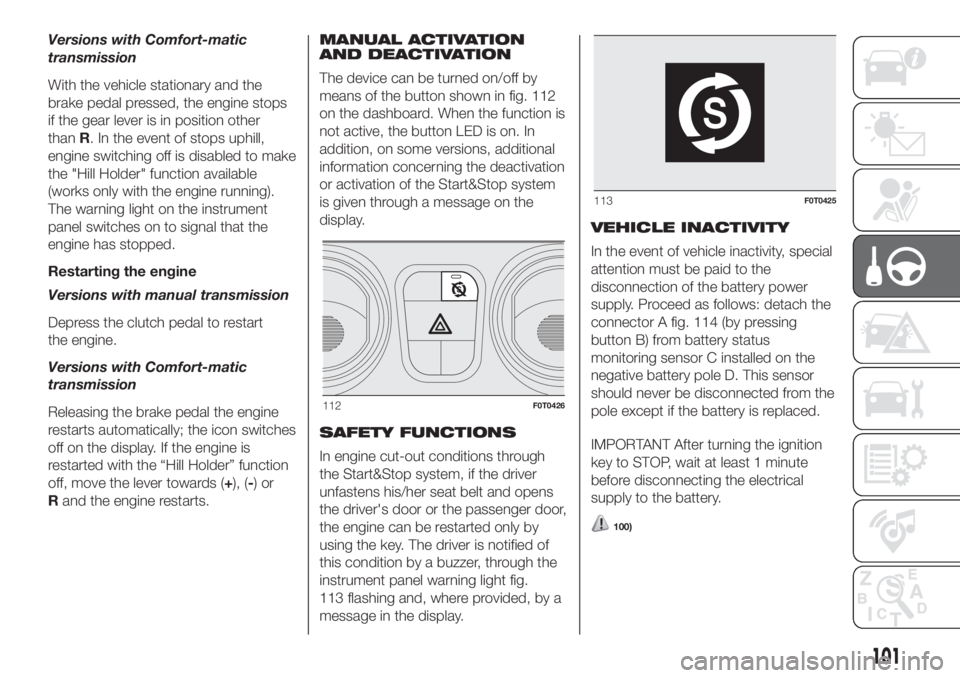
The device can be turned on/off by
means of the button shown in fig. 112
on the dashboard. When the function is
not active, the button LED is on. In
addition, on some versions, additional
information concerning the deactivation
or activation of the Start&Stop system
is given through a message on the
display.
SAFETY FUNCTIONS
In engine cut-out conditions through
the Start&Stop system, if the driver
unfastens his/her seat belt and opens
the driver's door or the passenger door,
the engine can be restarted only by
using the key. The driver is notified of
this condition by a buzzer, through the
instrument panel warning light fig.
113 flashing and, where provided, by a
message in the display.VEHICLE INACTIVITY
In the event of vehicle inactivity, special
attention must be paid to the
disconnection of the battery power
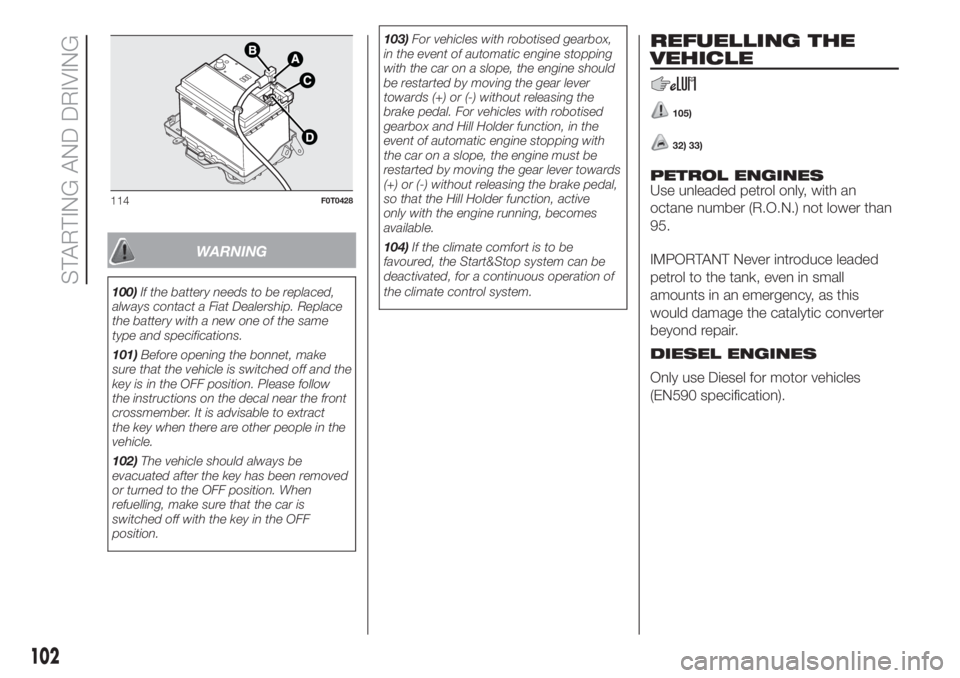
supply. Proceed as follows: detach the
connector A fig. 114 (by pressing
button B) from battery status
monitoring sensor C installed on the
negative battery pole D. This sensor
should never be disconnected from the
pole except if the battery is replaced.
IMPORTANT After turning the ignition
key to STOP, wait at least 1 minute
before disconnecting the electrical
supply to the battery.
100)
112F0T0426
113F0T0425
101
Page 104 of 196
WARNING
100)If the battery needs to be replaced,
always contact a Fiat Dealership. Replace
the battery with a new one of the same
type and specifications.
101)Before opening the bonnet, make
sure that the vehicle is switched off and the
key is in the OFF position. Please follow
the instructions on the decal near the front
crossmember. It is advisable to extract
the key when there are other people in the
vehicle.
102)The vehicle should always be
evacuated after the key has been removed
or turned to the OFF position. When
refuelling, make sure that the car is
switched off with the key in the OFF
position.103)For vehicles with robotised gearbox,
in the event of automatic engine stopping
with the car on a slope, the engine should
be restarted by moving the gear lever
towards (+) or (-) without releasing the
brake pedal. For vehicles with robotised
gearbox and Hill Holder function, in the
event of automatic engine stopping with
the car on a slope, the engine must be
restarted by moving the gear lever towards
(+) or (-) without releasing the brake pedal,
so that the Hill Holder function, active
only with the engine running, becomes
available.
104)If the climate comfort is to be
favoured, the Start&Stop system can be
deactivated, for a continuous operation of
the climate control system.
REFUELLING THE
VEHICLE
105)
32) 33)
PETROL ENGINES
Use unleaded petrol only, with an
octane number (R.O.N.) not lower than
95.
IMPORTANT Never introduce leaded
petrol to the tank, even in small
amounts in an emergency, as this
would damage the catalytic converter
beyond repair.
DIESEL ENGINES
Only use Diesel for motor vehicles
(EN590 specification).
114F0T0428
102
STARTING AND DRIVING
Page 113 of 196
FIX&GO
AUTOMATIC KIT
115) 116)
37)
The Fix&Go automatic quick tyre repair
kit is located in a special container in
the boot.
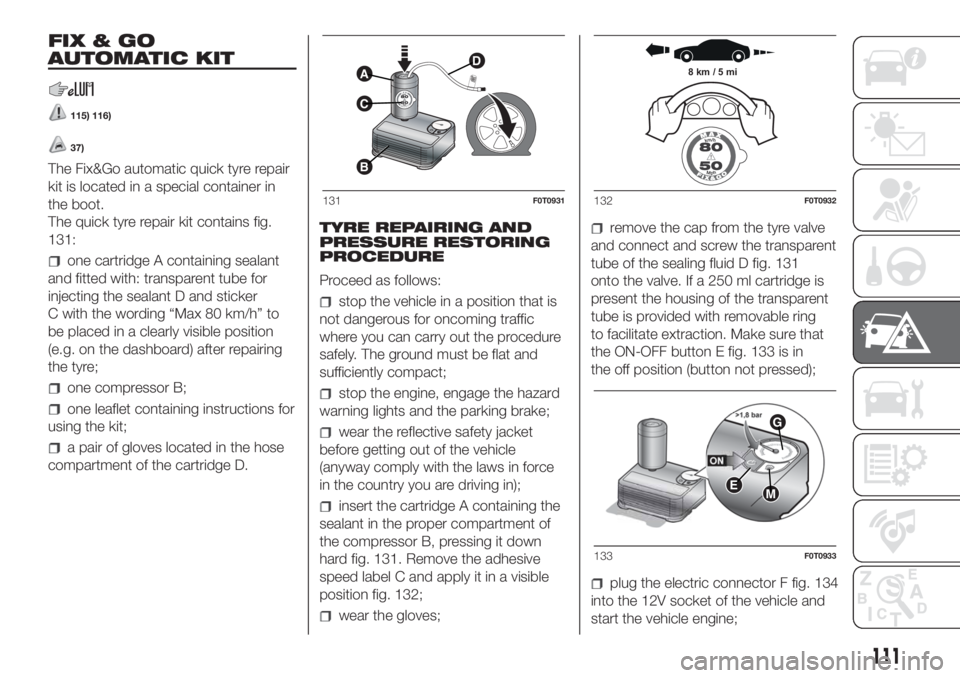
The quick tyre repair kit contains fig.
131:
one cartridge A containing sealant
and fitted with: transparent tube for
injecting the sealant D and sticker
C with the wording “Max 80 km/h” to
be placed in a clearly visible position
(e.g. on the dashboard) after repairing
the tyre;
one compressor B;
one leaflet containing instructions for
using the kit;
a pair of gloves located in the hose
compartment of the cartridge D.TYRE REPAIRING AND
PRESSURE RESTORING
PROCEDURE
Proceed as follows:
stop the vehicle in a position that is
not dangerous for oncoming traffic
where you can carry out the procedure
safely. The ground must be flat and
sufficiently compact;
stop the engine, engage the hazard
warning lights and the parking brake;
wear the reflective safety jacket
before getting out of the vehicle
(anyway comply with the laws in force
in the country you are driving in);
insert the cartridge A containing the
sealant in the proper compartment of
the compressor B, pressing it down
hard fig. 131. Remove the adhesive
speed label C and apply it in a visible
position fig. 132;
wear the gloves;
remove the cap from the tyre valve
and connect and screw the transparent
tube of the sealing fluid D fig. 131
onto the valve. If a 250 ml cartridge is
present the housing of the transparent
tube is provided with removable ring
to facilitate extraction. Make sure that
the ON-OFF button E fig. 133 is in
the off position (button not pressed);
plug the electric connector F fig. 134
into the 12V socket of the vehicle and
start the vehicle engine;
A
C
B
D
131F0T0931
8 km / 5 mi
132F0T0932
EM
G
133F0T0933
111