stop start FIAT FIORINO 2018 Owner handbook (in English)
[x] Cancel search | Manufacturer: FIAT, Model Year: 2018, Model line: FIORINO, Model: FIAT FIORINO 2018Pages: 196, PDF Size: 4.99 MB
Page 114 of 196
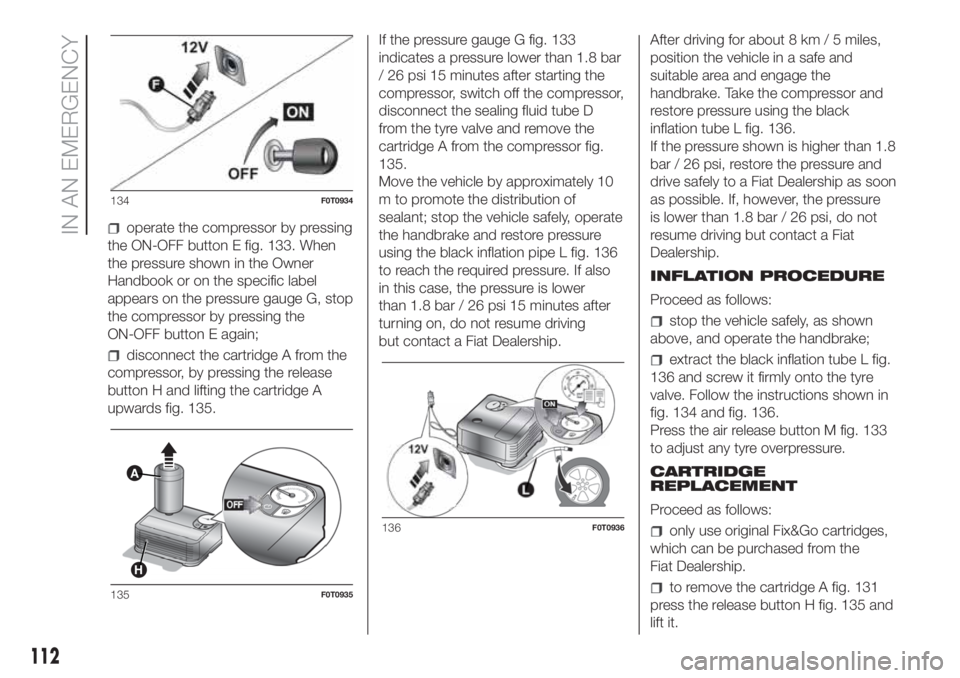
operate the compressor by pressing
the ON-OFF button E fig. 133. When
the pressure shown in the Owner
Handbook or on the specific label
appears on the pressure gauge G, stop
the compressor by pressing the
ON-OFF button E again;
disconnect the cartridge A from the
compressor, by pressing the release
button H and lifting the cartridge A
upwards fig. 135.If the pressure gauge G fig. 133
indicates a pressure lower than 1.8 bar
/ 26 psi 15 minutes after starting the
compressor, switch off the compressor,
disconnect the sealing fluid tube D
from the tyre valve and remove the
cartridge A from the compressor fig.
135.
Move the vehicle by approximately 10
m to promote the distribution of
sealant; stop the vehicle safely, operate
the handbrake and restore pressure
using the black inflation pipe L fig. 136
to reach the required pressure. If also
in this case, the pressure is lower
than 1.8 bar / 26 psi 15 minutes after
turning on, do not resume driving
but contact a Fiat Dealership.After driving for about 8 km / 5 miles,
position the vehicle in a safe and
suitable area and engage the
handbrake. Take the compressor and
restore pressure using the black
inflation tube L fig. 136.
If the pressure shown is higher than 1.8
bar / 26 psi, restore the pressure and
drive safely to a Fiat Dealership as soon
as possible. If, however, the pressure
is lower than 1.8 bar / 26 psi, do not
resume driving but contact a Fiat
Dealership.
INFLATION PROCEDURE
Proceed as follows:
stop the vehicle safely, as shown
above, and operate the handbrake;
extract the black inflation tube L fig.
136 and screw it firmly onto the tyre
valve. Follow the instructions shown in
fig. 134 and fig. 136.
Press the air release button M fig. 133
to adjust any tyre overpressure.
CARTRIDGE
REPLACEMENT
Proceed as follows:
only use original Fix&Go cartridges,
which can be purchased from the
Fiat Dealership.
to remove the cartridge A fig. 131
press the release button H fig. 135 and
lift it.
134F0T0934
A
H
135F0T0935
136F0T0936
112
IN AN EMERGENCY
Page 125 of 196
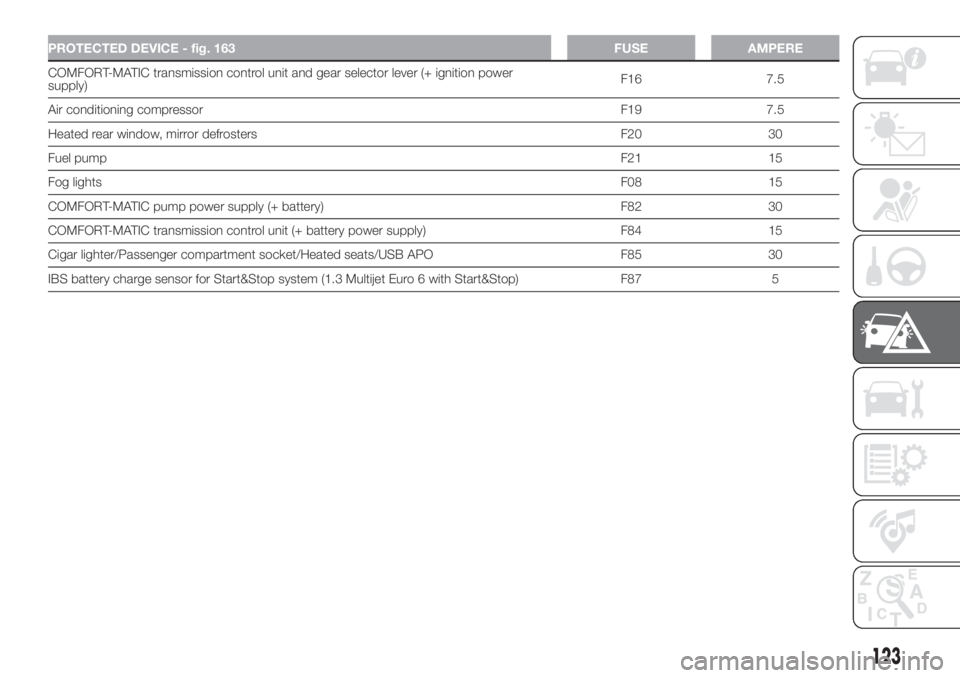
PROTECTED DEVICE - fig. 163 FUSE AMPERE
COMFORT-MATIC transmission control unit and gear selector lever (+ ignition power
supply)F16 7.5
Air conditioning compressorF19 7.5
Heated rear window, mirror defrosters F20 30
Fuel pumpF21 15
Fog lightsF08 15
COMFORT-MATIC pump power supply (+ battery) F82 30
COMFORT-MATIC transmission control unit (+ battery power supply) F84 15
Cigar lighter/Passenger compartment socket/Heated seats/USB APO F85 30
IBS battery charge sensor for Start&Stop system (1.3 Multijet Euro 6 with Start&Stop) F87 5
123
Page 131 of 196
Versions with COMFORT-MATIC
transmission
Make sure that the gearbox is in neutral
(N) (checking that the vehicle moves
when pushed) and proceed in the same
way as for towing a normal vehicle
with a manual transmission.
If the gear lever cannot be put in
neutral, do not tow the vehicle, but
contact a Fiat Dealership.
WARNING
129)Before towing, turn the ignition key to
MAR-ON and then to STOP without
removing it. The steering column
will automatically lock when the key is
removed and the wheels cannot be
steered.
130)Before tightening the hook clean the
threaded housing thoroughly. Before
towing the vehicle, make sure that the tow
ring is fully tightened in its appropriate
housing.131)Do not start the engine whilst the
vehicle is being towed.
132)Remember that the brake booster will
not work while the vehicle is being towed
and that more pressure must be applied to
the pedal. Do not use flexible cables when
towing and avoid jerky movements. During
towing operations, make sure that the
fastened joint does not damage adjoining
components. When towing the vehicle, it is
necessary to obey specific road regulations
which relate both to the towing device as
well as to the behaviour to adopt on the
road. Do not start the engine whilst the
vehicle is being towed.
WARNING
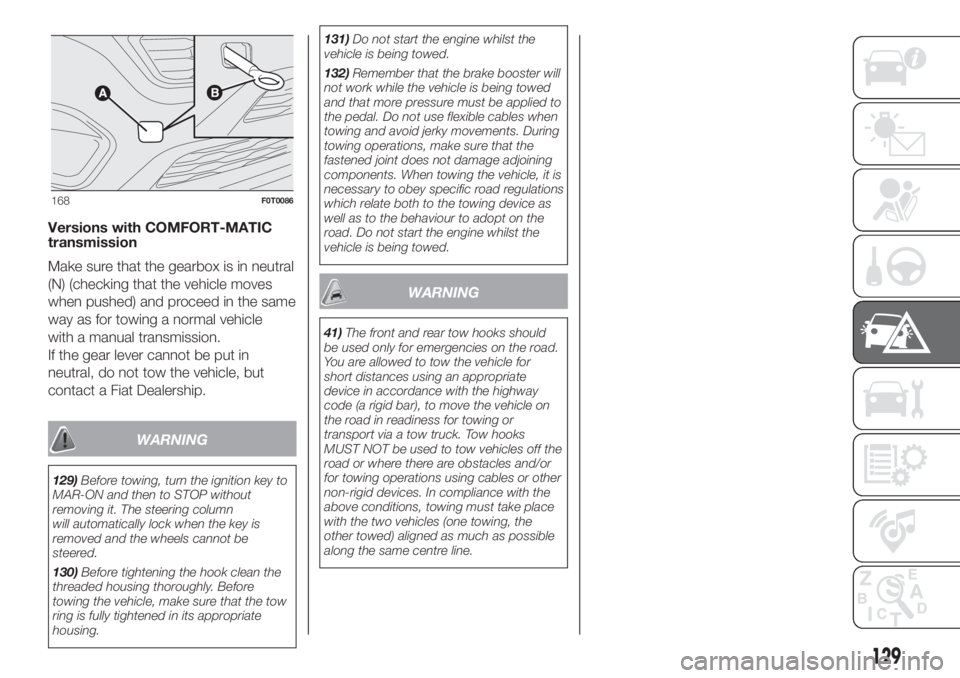
41)The front and rear tow hooks should
be used only for emergencies on the road.
You are allowed to tow the vehicle for
short distances using an appropriate
device in accordance with the highway
code (a rigid bar), to move the vehicle on
the road in readiness for towing or
transport via a tow truck. Tow hooks
MUST NOT be used to tow vehicles off the
road or where there are obstacles and/or
for towing operations using cables or other
non-rigid devices. In compliance with the
above conditions, towing must take place
with the two vehicles (one towing, the
other towed) aligned as much as possible
along the same centre line.
168F0T0086
129
Page 147 of 196
140)Prevent power steering fluid from
coming into contact with hot engine parts:
it is flammable.
141)Battery fluid is poisonous and
corrosive. Avoid contact with skin and
eyes. Keep naked flames and sources of
sparks away from the battery: risk of
explosion and fire.
142)Using the battery with insufficient
battery fluid may irreparably damage the
battery and may cause an explosion.
143)When performing any operation on
the battery or near it, always protect your
eyes with special goggles.
WARNING
43)When topping up, take care not to mix
up the various types of fluids: they are
not compatible with each other and could
seriously damage the vehicle.
44)Used engine oil and replaced oil filters
contain substances which are harmful to
the environment. To change oil and filters,
we advise you to contact a Fiat Dealership.
45)PARAFLU
UPanti-freeze fluid is used
in the cooling system. Use fluid of the
same type as that contained in the cooling
system for any top-ups. PARAFLU
UP
fluid cannot be mixed with any other type
of fluid. If this occurs, do not start the
engine and contact your Fiat Dealership
immediately.
46)Prevent brake fluid, which is highly
corrosive, from coming into contact with
painted parts. Should it happen,
immediately wash with water.47)Incorrect installation of electric and
electronic devices may cause severe
damage to your vehicle. After purchasing
your vehicle, if you wish to install any
accessories (anti-theft, radio phone, etc.),
go to a Fiat Dealership, which will suggest
the most suitable devices and advise
you whether a higher capacity battery
needs to be installed.
48)If the vehicle will be unused for an
extended period of time in extremely cold
weather conditions, remove the battery
and store it in a heated area to prevent it
from freezing.
WARNING
3)Power steering fluid consumption is
extremely low; if another top-up is required
after only a short period of time, have the
system checked for leaks at a Fiat
Dealership.
4)Used transmission fluid contains
substances that are harmful to the
environment. It is advisable to have the oil
changed by a Fiat Dealership where it
will be disposed of respecting the
environment and according to legal
requirements.
5)Batteries contain substances which are
very dangerous for the environment. You
are recommended to go to a Fiat
Dealership to have the battery replaced
where the old battery will be disposed of
respecting both the environment and
the laws in force.
BATTERY
RECHARGING
IMPORTANT The battery recharging
procedure is given as information only.
You are advised to contact a Fiat
Dealership to have this operation
carried out.
We recommend recharging the battery
slowly for approximately 24 hours at
low amperage. Charging for a longer
time may damage the battery.
To recharge, proceed as follows:
without Start&Stop system:
disconnect the terminal from the
negative battery pole;
connect the charger cables to the
battery terminals, observing the polarity;
turn on the battery charger;
when it is recharged, turn the
charger off before disconnecting it from
the battery;
reconnect the terminal to the
negative battery pole.
145
Page 148 of 196
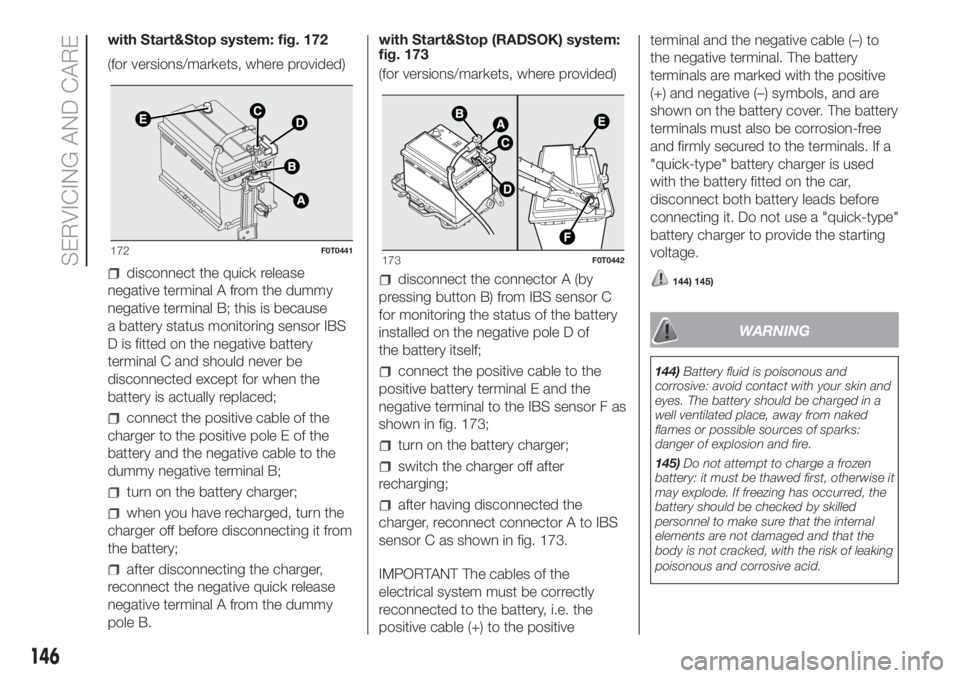
with Start&Stop system: fig. 172
(for versions/markets, where provided)
disconnect the quick release
negative terminal A from the dummy
negative terminal B; this is because
a battery status monitoring sensor IBS
D is fitted on the negative battery
terminal C and should never be
disconnected except for when the
battery is actually replaced;
connect the positive cable of the
charger to the positive pole E of the
battery and the negative cable to the
dummy negative terminal B;
turn on the battery charger;
when you have recharged, turn the
charger off before disconnecting it from
the battery;
after disconnecting the charger,
reconnect the negative quick release
negative terminal A from the dummy
pole B.with Start&Stop (RADSOK) system:
fig. 173
(for versions/markets, where provided)
disconnect the connector A (by
pressing button B) from IBS sensor C
for monitoring the status of the battery
installed on the negative pole D of
the battery itself;
connect the positive cable to the
positive battery terminal E and the
negative terminal to the IBS sensor F as
shown in fig. 173;
turn on the battery charger;
switch the charger off after
recharging;
after having disconnected the
charger, reconnect connector A to IBS
sensor C as shown in fig. 173.
IMPORTANT The cables of the
electrical system must be correctly
reconnected to the battery, i.e. the
positive cable (+) to the positiveterminal and the negative cable (–) to
the negative terminal. The battery
terminals are marked with the positive
(+) and negative (–) symbols, and are
shown on the battery cover. The battery
terminals must also be corrosion-free
and firmly secured to the terminals. If a
"quick-type" battery charger is used
with the battery fitted on the car,
disconnect both battery leads before
connecting it. Do not use a "quick-type"
battery charger to provide the starting
voltage.
144) 145)
WARNING
144)Battery fluid is poisonous and
corrosive: avoid contact with your skin and
eyes. The battery should be charged in a
well ventilated place, away from naked
flames or possible sources of sparks:
danger of explosion and fire.
145)Do not attempt to charge a frozen
battery: it must be thawed first, otherwise it
may explode. If freezing has occurred, the
battery should be checked by skilled
personnel to make sure that the internal
elements are not damaged and that the
body is not cracked, with the risk of leaking
poisonous and corrosive acid.
172F0T0441173F0T0442
146
SERVICING AND CARE
Page 150 of 196
WHEELS AND TYRES
RIMS AND TYRES
For the type of wheel rims and tyres
fitted on the vehicle see the "Wheels"
paragraph in the "Technical data"
chapter.
IMPORTANT NOTES
As far as possible, avoid sharp
braking, screech starts and violent
shocks against pavements, potholes or
other hard obstacles. Driving for long
stretches over uneven roads can
damage the tyres;
periodically check that the tyres
have no cuts in the side wall, abnormal
swelling or irregular tyre tread wear.
Go to a Fiat Dealership if required;
avoid overloading the car when
travelling: this may cause serious
damage to the wheels and tyres;
if a tyre is punctured, stop
immediately and replace it to avoid
damage to the tyre, the rim, suspension
and steering system;
tyres age even if they are not used
much. Cracks in the tread and on
the sidewalls are a sign of ageing. In
any event, have the tyres checked
by specialised technicians if they have
been fitted for longer than 6 years.
Remember to check the spare wheel
very carefully;
in the case of replacement, always
fit new tyres, avoiding those of
unknown origin;
if a tyre is changed, also change the
inflation valve;
to allow even wear between the
front and rear tyres, it is advisable to
change them over every 10–15
thousand kilometres, keeping them on
the same side of the vehicle so as
not to reverse the direction of rotation.
147) 148) 149) 150)
SNOW CHAINS
The use of snow chains should be in
compliance with local regulations of
each country. The snow chains may be
applied only onto the front wheel (drive
wheels). Check the tension of the
snow chains after the first few metres
have been driven.
151)
WARNING
147)Remember that the road holding
qualities of your vehicle also depend on the
correct inflation pressure of the tyres.
148)If tyre pressure is too low, the tyre
may overheat and be severely damaged as
a result.
149)Do not switch tyres from the
righthand side of the vehicle to the
lefthand side, and vice versa.
150)Never submit alloy rims to repainting
treatments requiring the use of
temperatures exceeding 150°C. The
mechanical properties of the wheels could
be impaired.
151)Keep the vehicle's speed down when
snow chains are fitted; never exceed 50
km/h. Avoid potholes, do not drive over
steps or pavements, and do not drive long
distances over roads without snow, to
avoid damaging both your vehicle and the
road surface.
148
SERVICING AND CARE
Page 169 of 196
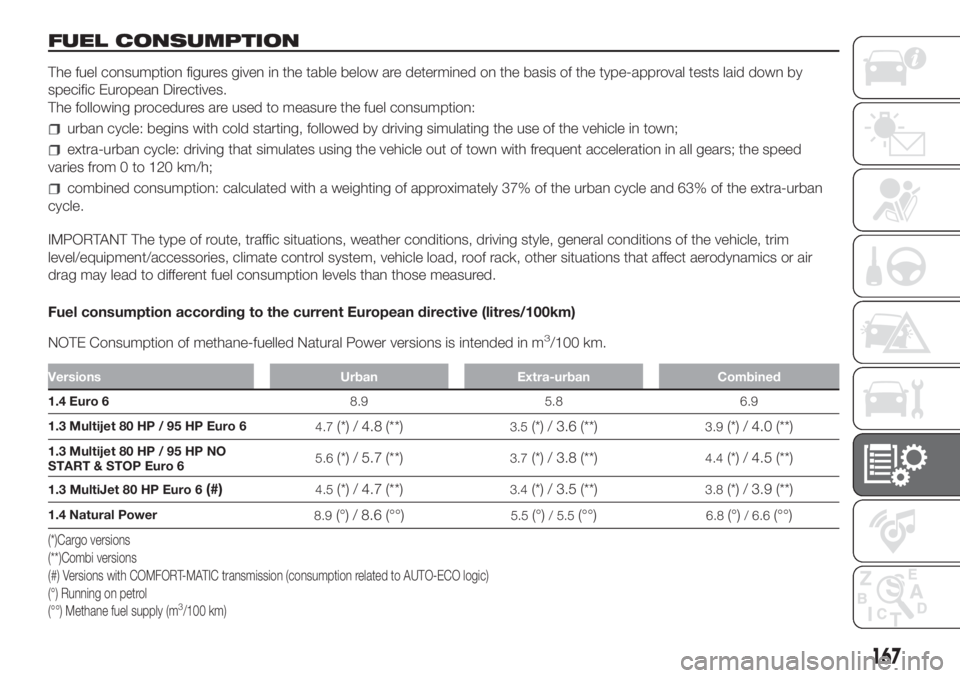
FUEL CONSUMPTION
The fuel consumption figures given in the table below are determined on the basis of the type-approval tests laid down by
specific European Directives.
The following procedures are used to measure the fuel consumption:
urban cycle: begins with cold starting, followed by driving simulating the use of the vehicle in town;
extra-urban cycle: driving that simulates using the vehicle out of town with frequent acceleration in all gears; the speed
varies from 0 to 120 km/h;
combined consumption: calculated with a weighting of approximately 37% of the urban cycle and 63% of the extra-urban
cycle.
IMPORTANT The type of route, traffic situations, weather conditions, driving style, general conditions of the vehicle, trim
level/equipment/accessories, climate control system, vehicle load, roof rack, other situations that affect aerodynamics or air
drag may lead to different fuel consumption levels than those measured.
Fuel consumption according to the current European directive (litres/100km)
NOTE Consumption of methane-fuelled Natural Power versions is intended in m
3/100 km.
Versions Urban Extra-urban Combined
1.4 Euro 68.9 5.8 6.9
1.3 Multijet 80 HP / 95 HP Euro 6
4.7
(*) / 4.8 (**)3.5(*) / 3.6 (**)3.9(*) / 4.0 (**)
1.3 Multijet 80 HP / 95 HP NO
START & STOP Euro 65.6(*) / 5.7 (**)3.7(*) / 3.8 (**)4.4(*) / 4.5 (**)
1.3 MultiJet 80 HP Euro 6(#)4.5(*) / 4.7 (**)3.4(*) / 3.5 (**)3.8(*) / 3.9 (**)
1.4 Natural Power
8.9(°) / 8.6 (°°)5.5(°)/ 5.5(°°)6.8(°)/ 6.6(°°)
(*)Cargo versions
(**)Combi versions
(#) Versions with COMFORT-MATIC transmission (consumption related to AUTO-ECO logic)
(°) Running on petrol
(°°) Methane fuel supply (m
3/100 km)
167
Page 170 of 196

CO2EMISSIONS
The CO2emission figures in the table below refer to combined fuel consumption.
VersionsCO2emissions according to the current European directive
(g/km)
1.4 Euro 6161
1.3 Multijet 80 HP / 95 HP Euro 6
104
(*)/ 106(**)
1.3 Multijet 80 HP / 95 HP NO START & STOP Euro 6
115(*)/ 118(**)
1.3 MultiJet 80 HP Euro 6(#)100(*)/ 103(**)
1.4 Natural Power
157(°)/ 119(°°)
(*) Cargo versions
(**) Combi versions
(#) Versions with COMFORT-MATIC transmission
(°) Running on petrol
(°°) Running on methane
168
TECHNICAL DATA
Page 181 of 196
Each time the button is pressed the
following bands are selected cyclically:
Pressing the FM AS button: “FM1”,
“FM2” or “FMA”;
Pressing the AM button: “MW1”,
“MW2”.
Each band is highlighted by the name
in the display. The last station selected
on the respective frequency band will
be tuned into.
PRESET BUTTONS
The buttons numbered from 1 to 6 are
used to set the following preset
stations:
18 in the AM band; 6 in FM1, 6 in
FM2, 6 in FMT or "FMA" (on some
versions);
12 in the MW band.
To listen to a preset station, select the
desired frequency band and then briefly
press the corresponding preset button
(from 1 to 6).
By pressing the preset button for more
than 2 seconds, the tuned station will
be stored. The storing phase is
confirmed by an acoustic signal.
AUTOMATIC TUNING
Briefly press the
orbutton to start
the automatic tuning search for the
next station that can be received in the
selected direction.If the button
orpressed down
longer, the fast search starts. When the
button is released, the tuner will stop
on the next station that can be
received.
If the TA function (traffic news) is on, the
tuner searches only for stations that
broadcast traffic news.
MANUAL TUNING
This is used to manually search for
stations in the preselected band. Select
the desired frequency band and then
press the
orbutton briefly and
repeatedly to start to the search in the
desired direction. If the
orbutton
is pressed longer, the fast search will
start and then stop when the button is
released.
AUTOSTORE FUNCTION (automatic
station storage)
To activate the Autostore function, hold
the FM AS button pressed until a beep
is heard. With this function, the radio
automatically stores the 6 stations with
the strongest signal in decreasing
order on the FMA frequency band.
During the automatic storing process,
the text “Autostore” flashes on the
display.Press the FM AS button again to stop
the Autostore function: the radio will
again tune into the station listened
to before the activation of the function.
When the Autostore scan is concluded,
the radio will automatically tune into
the first preset station on the FMA band
(preset 1).
The stations that have a strong signal at
that moment are then automatically
stored in the preselected band in the
buttons numbered 1 to 6.
When the Autostore function is
activated within the MW band, the FMA
band is automatically selected and the
function is performed.
IMPORTANT Sometimes the Autostore
function is not able to find 6 stations
with a strong signal. In this case, the
strongest stations stored will be
duplicated in the free preset buttons.
IMPORTANT When the Autostore
function is activated, the stations that
were previously stored in the FMA band
are deleted.
179
Page 194 of 196
Rear fog lights (changing a bulb) . . . .117
Rear light clusters..................117
Rear light clusters (bulb
replacement)....................117
Rear view mirrors
Door mirrors.....................20
Rear view mirrors
Interior mirror....................20
Rear window washer................25
Rear Window Wiper............25-147
Refuelling..........................162
Refuelling the vehicle...............102
Repair procedure..................111
Replacing a bulb...................113
Replacing an exterior bulb .116-117-118
Replacing an interior bulb...........119
Replacing interior bulbs.............119
Replacing the rear window wiper
blade...........................147
Replacing the windscreen wiper
blades..........................147Front seats......................16
Rear seats......................17
Setup menu.........................42
Side airbags
Side bag........................88
Side bags...........................88
Side lights.........................116
Side lights (changing a bulb)........116
Side lights/rear fog light
(changing a bulb)................117
Side/tail lights.......................21
Sliding side doors...................14
Speed block........................99
Start&Stop system.................100
Starting the engine..................92
Steering lock........................11
Steering wheel......................19
Symbols.............................4
Targhetta riassuntiva dati
identificazione e vernice
carrozzeria......................150Third brake lights...................118
Third brake lights (changing a
bulb)............................118
Towing the vehicle..................128
Towing trailers.....................105
Traction Plus system.................72
Transmission........................95
Trip computer.......................44
Version with methane system
(Natural Power)...................33
Warning lights and messages.......46
Weights and loads.................160
Wheel replacement procedure......107
Wheels............................154
Wheels and tyres...................148
Rims and tyres.................148
When parked.......................94
Window washing....................24
Windscreen wiper...............24-147
Windscreen/rear window washer
fluid.............................143
Scheduled Servicing Plan..........132
Seat belts
Use .............................73Seats
Foldaway passenger seat........17
FCA Italy S.p.A. - MOPAR - Technical Services - Service Engineering
Largo Senatore G. Agnelli, 3 - 10040 Volvera - Turin (Italy)
Print no. 603.91.544 - 10/2017 - 1 Edition
INDEX