FIAT FIORINO 2019 Owner handbook (in English)
FIORINO 2019
FIAT
FIAT
https://www.carmanualsonline.info/img/10/32959/w960_32959-0.png
FIAT FIORINO 2019 Owner handbook (in English)
Trending: horn, towing, fuel pressure, Stereo, belt, buttons, radio controls
Page 131 of 220
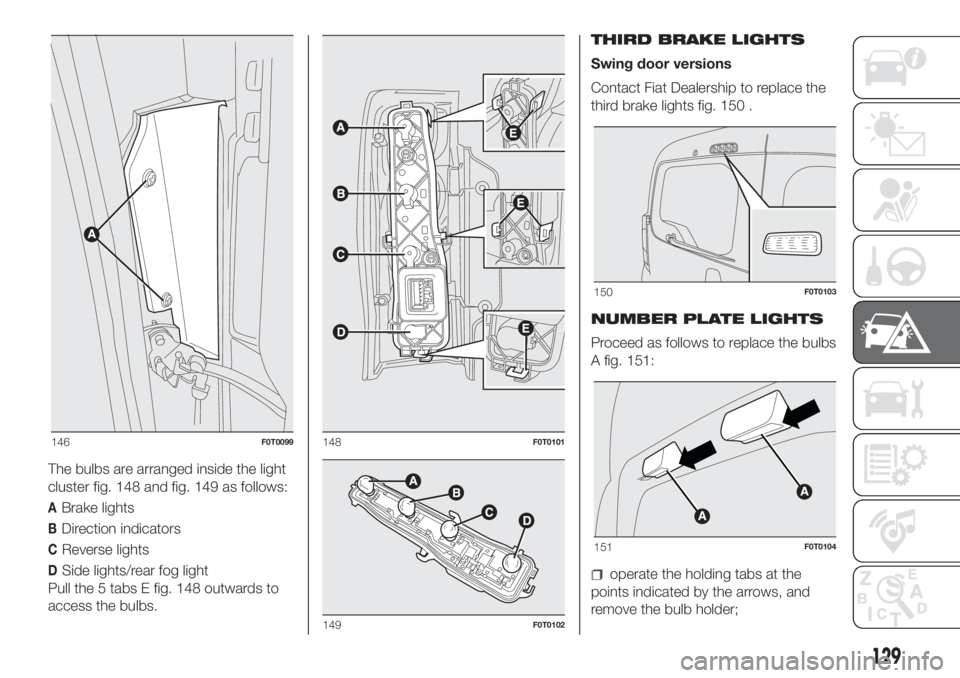
The bulbs are arranged inside the light
cluster fig. 148 and fig. 149 as follows:
ABrake lights
BDirection indicators
CReverse lights
DSide lights/rear fog light
Pull the 5 tabs E fig. 148 outwards to
access the bulbs.THIRD BRAKE LIGHTS
Swing door versions
Contact Fiat Dealership to replace the
third brake lights fig. 150 .
NUMBER PLATE LIGHTS
Proceed as follows to replace the bulbs
A fig. 151:operate the holding tabs at the
points indicated by the arrows, and
remove the bulb holder;
146F0T0099148F0T0101
149F0T0102
150F0T0103
151F0T0104
129
Page 132 of 220
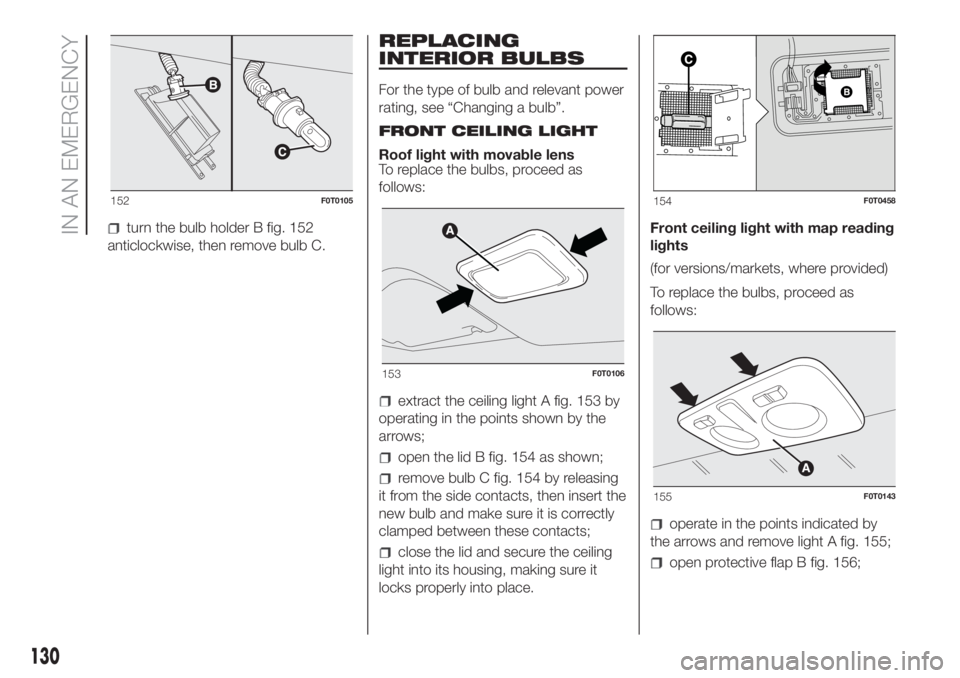
turn the bulb holder B fig. 152
anticlockwise, then remove bulb C.
REPLACING
INTERIOR BULBS
For the type of bulb and relevant power
rating, see “Changing a bulb”.
FRONT CEILING LIGHT
Roof light with movable lens
To replace the bulbs, proceed as
follows:
extract the ceiling light A fig. 153 by
operating in the points shown by the
arrows;
open the lid B fig. 154 as shown;
remove bulb C fig. 154 by releasing
it from the side contacts, then insert the
new bulb and make sure it is correctly
clamped between these contacts;
close the lid and secure the ceiling
light into its housing, making sure it
locks properly into place.Front ceiling light with map reading
lights
(for versions/markets, where provided)
To replace the bulbs, proceed as
follows:
operate in the points indicated by
the arrows and remove light A fig. 155;
open protective flap B fig. 156;
152F0T0105
153F0T0106
154F0T0458
155F0T0143
130
IN AN EMERGENCY
Page 133 of 220
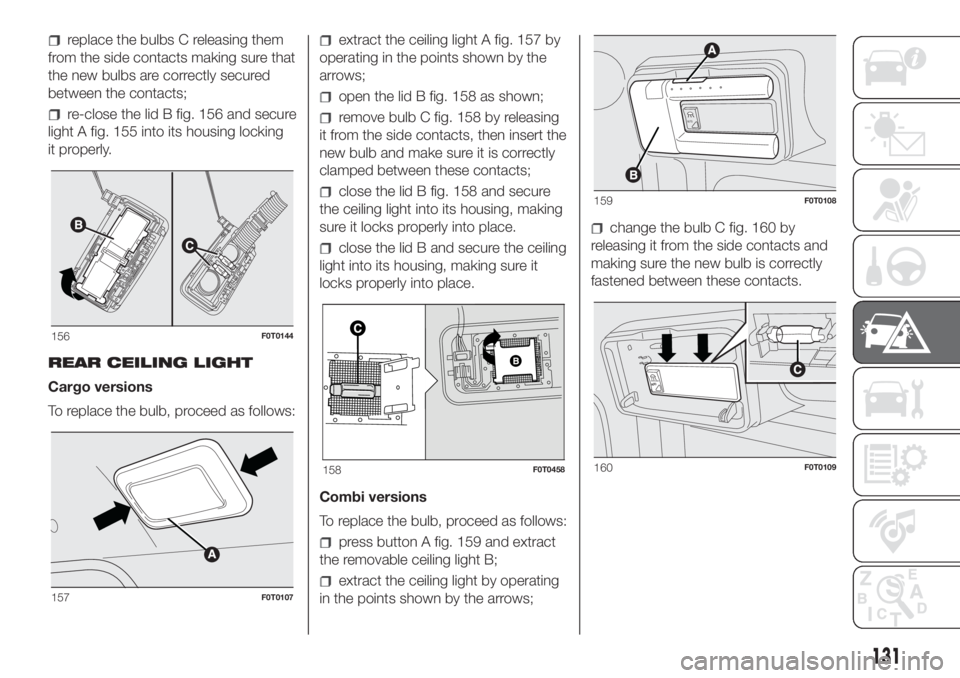
replace the bulbs C releasing them
from the side contacts making sure that
the new bulbs are correctly secured
between the contacts;
re-close the lid B fig. 156 and secure
light A fig. 155 into its housing locking
it properly.
REAR CEILING LIGHT
Cargo versions
To replace the bulb, proceed as follows:
extract the ceiling light A fig. 157 by
operating in the points shown by the
arrows;
open the lid B fig. 158 as shown;
remove bulb C fig. 158 by releasing
it from the side contacts, then insert the
new bulb and make sure it is correctly
clamped between these contacts;
close the lid B fig. 158 and secure
the ceiling light into its housing, making
sure it locks properly into place.
close the lid B and secure the ceiling
light into its housing, making sure it
locks properly into place.
Combi versions
To replace the bulb, proceed as follows:
press button A fig. 159 and extract
the removable ceiling light B;
extract the ceiling light by operating
in the points shown by the arrows;
change the bulb C fig. 160 by
releasing it from the side contacts and
making sure the new bulb is correctly
fastened between these contacts.
156F0T0144
157F0T0107
158F0T0458
A
U
T
O
159F0T0108
A
U
T
O
160F0T0109
131
Page 134 of 220
REPLACING FUSES
GENERAL INFORMATION
128) 129) 130) 131) 132)
31)
Fuses protect the electrical system:
they intervene (blow) in the event of a
failure or improper action on the
system.
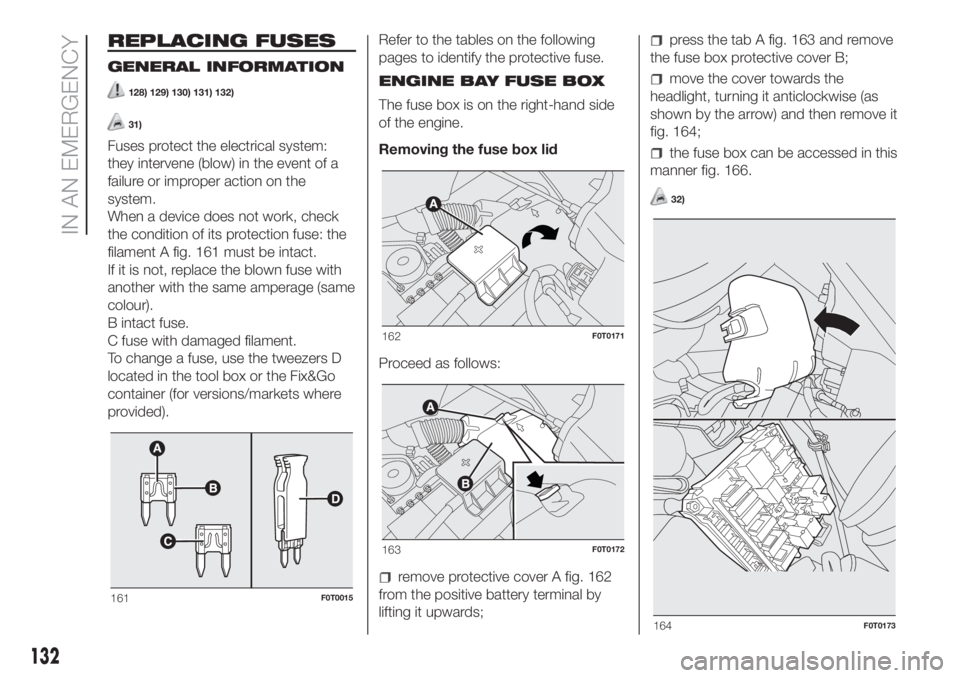
When a device does not work, check
the condition of its protection fuse: the
filament A fig. 161 must be intact.
If it is not, replace the blown fuse with
another with the same amperage (same
colour).
B intact fuse.
C fuse with damaged filament.
To change a fuse, use the tweezers D
located in the tool box or the Fix&Go
container (for versions/markets where
provided).Refer to the tables on the following
pages to identify the protective fuse.
ENGINE BAY FUSE BOX
The fuse box is on the right-hand side
of the engine.
Removing the fuse box lid
Proceed as follows:
remove protective cover A fig. 162
from the positive battery terminal by
lifting it upwards;
press the tab A fig. 163 and remove
the fuse box protective cover B;
move the cover towards the
headlight, turning it anticlockwise (as
shown by the arrow) and then remove it
fig. 164;
the fuse box can be accessed in this
manner fig. 166.
32)
161F0T0015
162F0T0171
163F0T0172
164F0T0173
132
IN AN EMERGENCY
Page 135 of 220
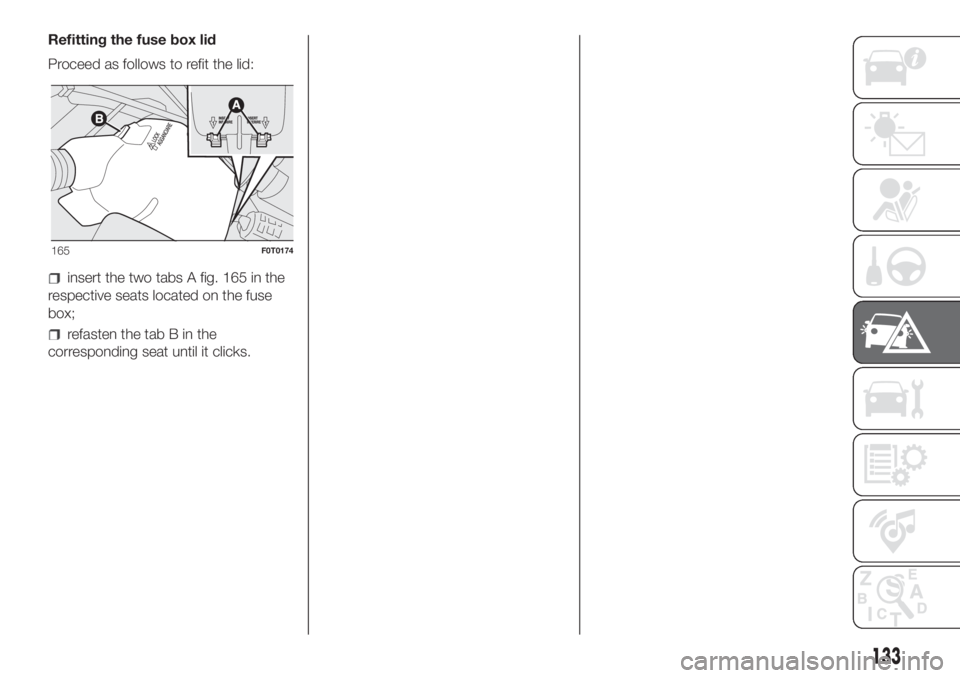
Refitting the fuse box lid
Proceed as follows to refit the lid:
insert the two tabs A fig. 165 in the
respective seats located on the fuse
box;
refasten the tab B in the
corresponding seat until it clicks.
165F0T0174
133
Page 136 of 220
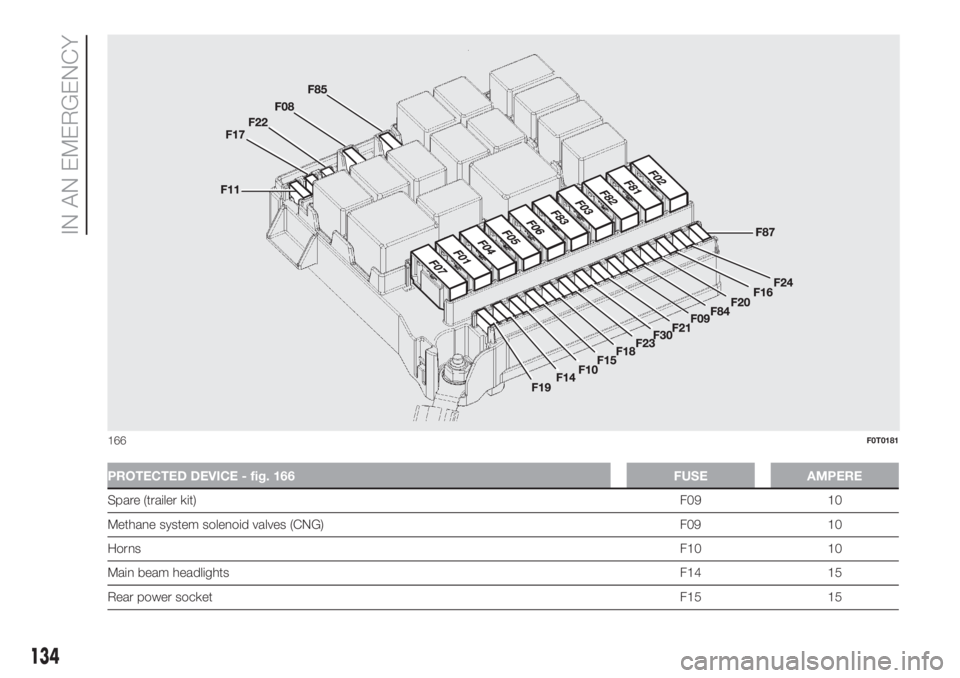
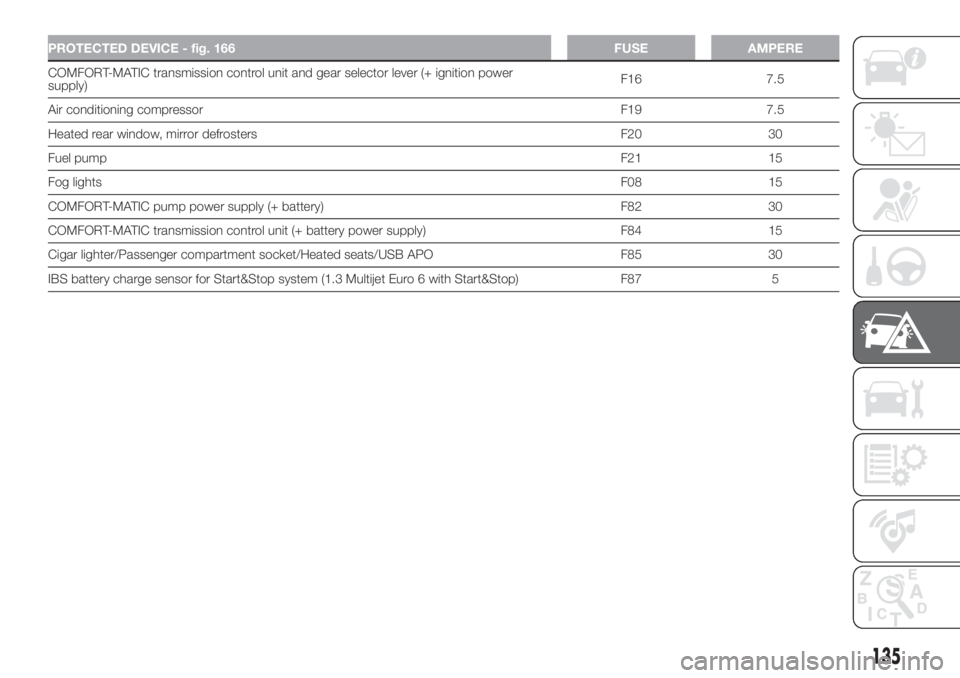
PROTECTED DEVICE - fig. 166 FUSE AMPERE
Spare (trailer kit)F09 10
Methane system solenoid valves (CNG) F09 10
HornsF10 10
Main beam headlightsF14 15
Rear power socketF15 15
166F0T0181
134
IN AN EMERGENCY
Page 137 of 220
PROTECTED DEVICE - fig. 166 FUSE AMPERE
COMFORT-MATIC transmission control unit and gear selector lever (+ ignition power
supply)F16 7.5
Air conditioning compressorF19 7.5
Heated rear window, mirror defrosters F20 30
Fuel pumpF21 15
Fog lightsF08 15
COMFORT-MATIC pump power supply (+ battery) F82 30
COMFORT-MATIC transmission control unit (+ battery power supply) F84 15
Cigar lighter/Passenger compartment socket/Heated seats/USB APO F85 30
IBS battery charge sensor for Start&Stop system (1.3 Multijet Euro 6 with Start&Stop) F87 5
135
Page 138 of 220
PASSENGER
COMPARTMENT FUSE
BOX
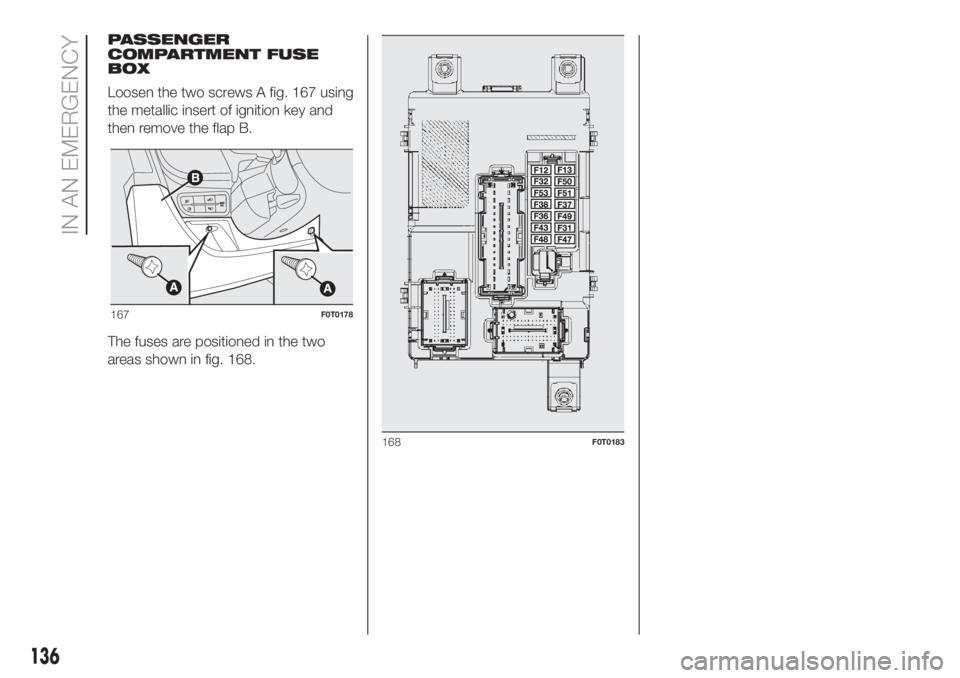
Loosen the two screws A fig. 167 using
the metallic insert of ignition key and
then remove the flap B.
The fuses are positioned in the two
areas shown in fig. 168.
167F0T0178
168F0T0183
136
IN AN EMERGENCY
Page 139 of 220
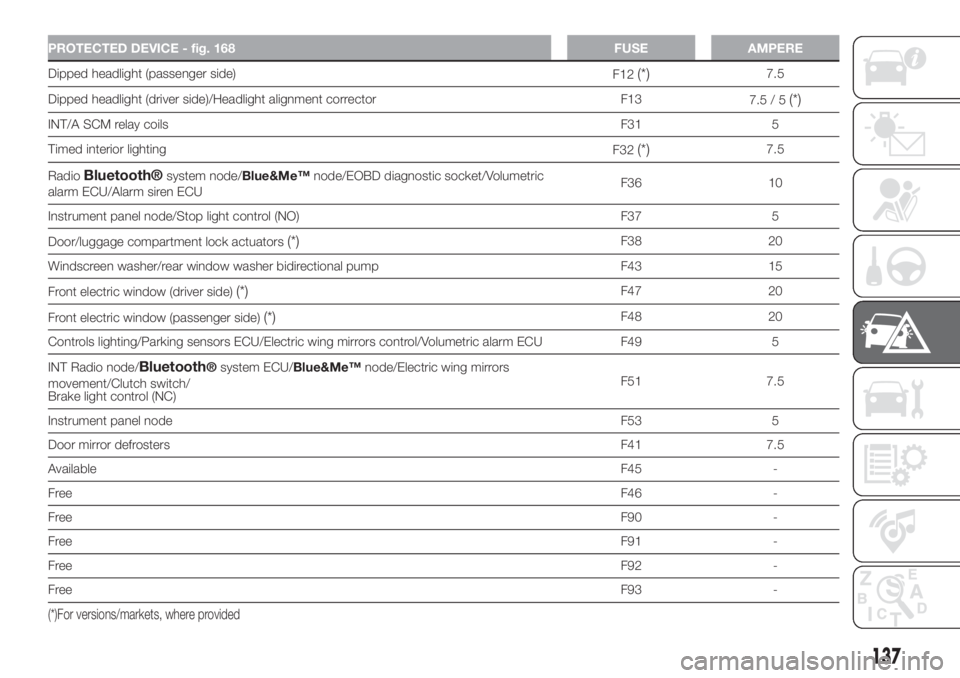
PROTECTED DEVICE - fig. 168 FUSE AMPERE
Dipped headlight (passenger side)
F12(*)7.5
Dipped headlight (driver side)/Headlight alignment corrector F13
7.5 / 5
(*)
INT/A SCM relay coilsF31 5
Timed interior lighting
F32
(*)7.5
Radio
Bluetooth®system node/Blue&Me™node/EOBD diagnostic socket/Volumetric
alarm ECU/Alarm siren ECUF36 10
Instrument panel node/Stop light control (NO) F37 5
Door/luggage compartment lock actuators
(*)F38 20
Windscreen washer/rear window washer bidirectional pump F43 15
Front electric window (driver side)
(*)F47 20
Front electric window (passenger side)
(*)F48 20
Controls lighting/Parking sensors ECU/Electric wing mirrors control/Volumetric alarm ECU F49 5
INT Radio node/
Bluetooth®system ECU/Blue&Me™node/Electric wing mirrors
movement/Clutch switch/
Brake light control (NC)F51 7.5
Instrument panel nodeF53 5
Door mirror defrostersF41 7.5
AvailableF45 -
FreeF46 -
FreeF90 -
FreeF91 -
FreeF92 -
FreeF93 -
(*)For versions/markets, where provided
137
Page 140 of 220
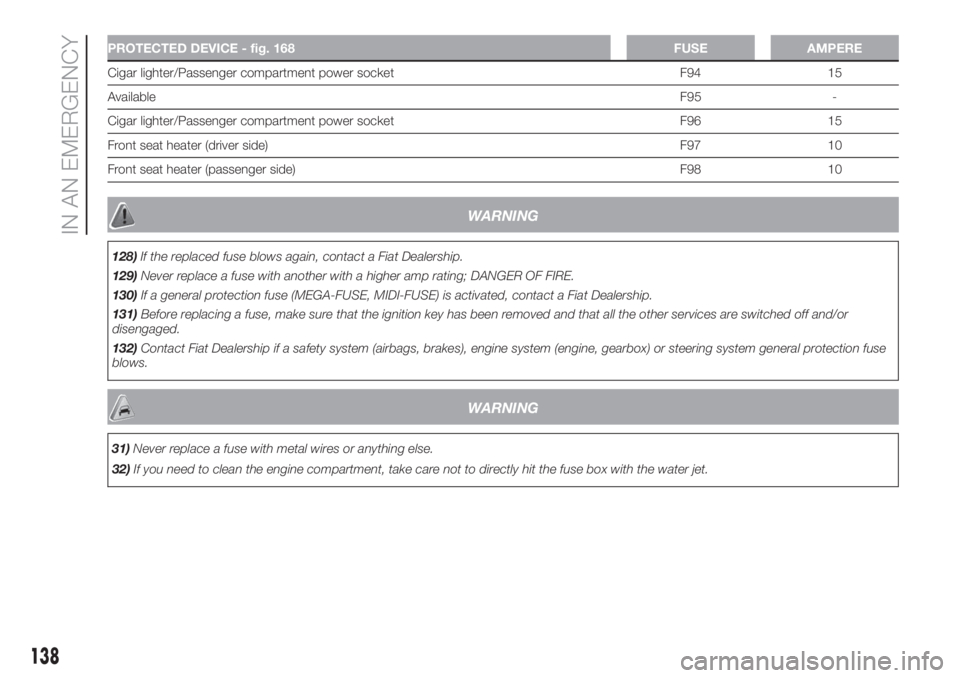
PROTECTED DEVICE - fig. 168 FUSE AMPERE
Cigar lighter/Passenger compartment power socket F94 15
AvailableF95 -
Cigar lighter/Passenger compartment power socket F96 15
Front seat heater (driver side) F97 10
Front seat heater (passenger side) F98 10
WARNING
128)If the replaced fuse blows again, contact a Fiat Dealership.
129)Never replace a fuse with another with a higher amp rating; DANGER OF FIRE.
130)If a general protection fuse (MEGA-FUSE, MIDI-FUSE) is activated, contact a Fiat Dealership.
131)Before replacing a fuse, make sure that the ignition key has been removed and that all the other services are switched off and/or
disengaged.
132)Contact Fiat Dealership if a safety system (airbags, brakes), engine system (engine, gearbox) or steering system general protection fuse
blows.
WARNING
31)Never replace a fuse with metal wires or anything else.
32)If you need to clean the engine compartment, take care not to directly hit the fuse box with the water jet.
138
IN AN EMERGENCY
Trending: tow, differential, open bonnet, CD changer, maintenance, oil temperature, service interval
