stop start FIAT FIORINO 2019 Owner handbook (in English)
[x] Cancel search | Manufacturer: FIAT, Model Year: 2019, Model line: FIORINO, Model: FIAT FIORINO 2019Pages: 220, PDF Size: 6.22 MB
Page 161 of 220

BATTERY
RECHARGING
IMPORTANT The battery recharging
procedure is given as information only.
You are advised to contact a Fiat
Dealership to have this operation
carried out.
We recommend recharging the battery
slowly for approximately 24 hours at
low amperage. Charging for a longer
time may damage the battery.
To recharge, proceed as follows:
without Start&Stop system:
disconnect the terminal from the
negative battery pole;
connect the charger cables to the
battery terminals, observing the polarity;
turn on the battery charger;
when it is recharged, turn the
charger off before disconnecting it from
the battery;
reconnect the terminal to the
negative battery pole.with Start&Stop system: fig. 177
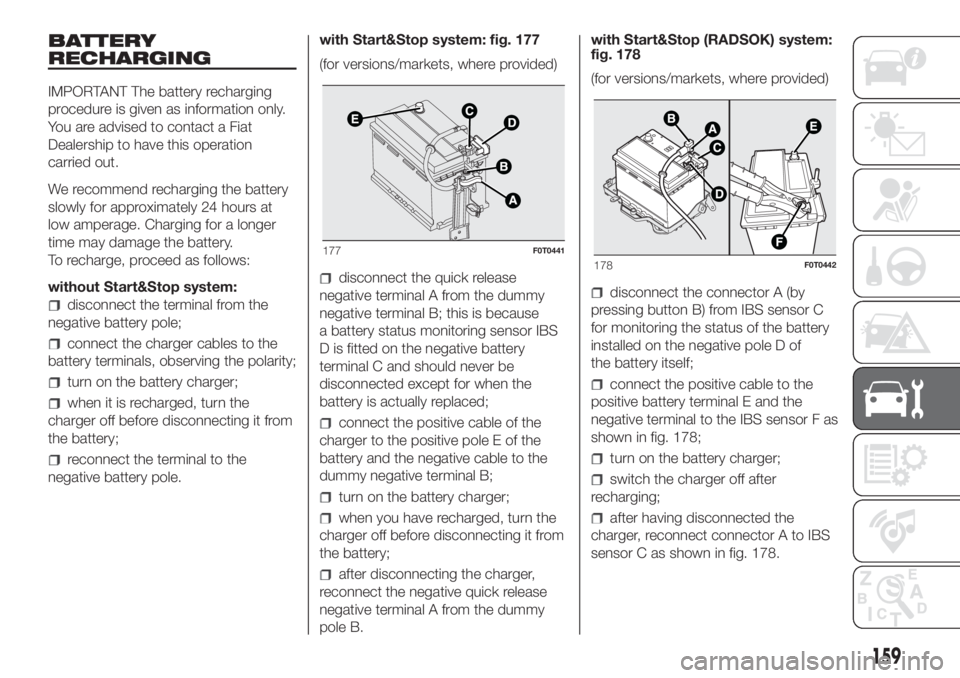
(for versions/markets, where provided)
disconnect the quick release
negative terminal A from the dummy
negative terminal B; this is because
a battery status monitoring sensor IBS
D is fitted on the negative battery
terminal C and should never be
disconnected except for when the
battery is actually replaced;
connect the positive cable of the
charger to the positive pole E of the
battery and the negative cable to the
dummy negative terminal B;
turn on the battery charger;
when you have recharged, turn the
charger off before disconnecting it from
the battery;
after disconnecting the charger,
reconnect the negative quick release
negative terminal A from the dummy
pole B.with Start&Stop (RADSOK) system:
fig. 178
(for versions/markets, where provided)
disconnect the connector A (by
pressing button B) from IBS sensor C
for monitoring the status of the battery
installed on the negative pole D of
the battery itself;
connect the positive cable to the
positive battery terminal E and the
negative terminal to the IBS sensor F as
shown in fig. 178;
turn on the battery charger;
switch the charger off after
recharging;
after having disconnected the
charger, reconnect connector A to IBS
sensor C as shown in fig. 178.
177F0T0441178F0T0442
159
Page 163 of 220

Replacing the rear
window wiper blade
(for versions/markets, where provided)
Proceed as follows:
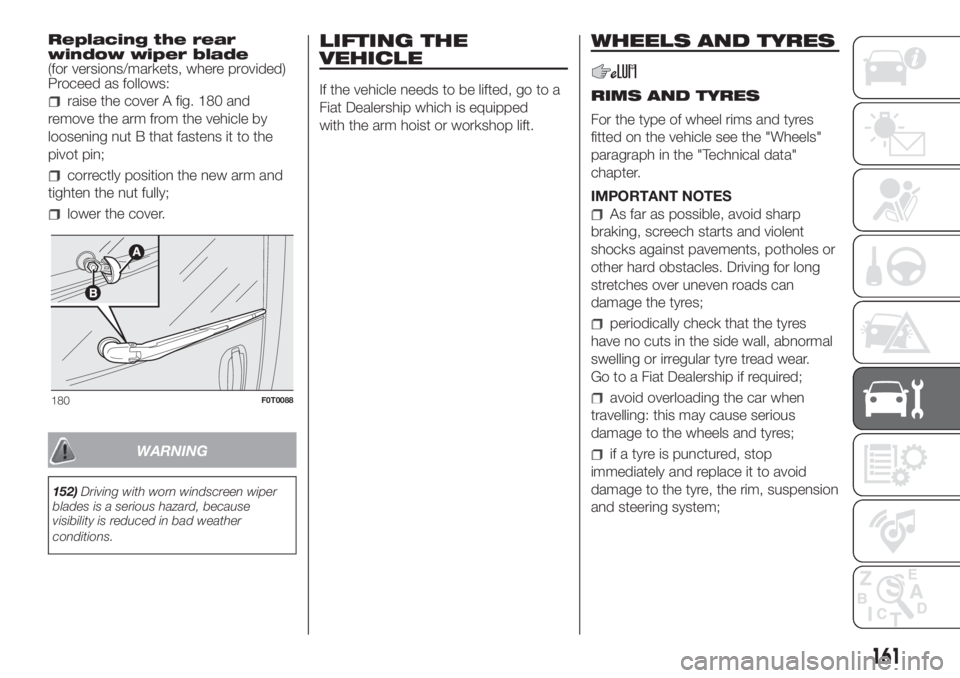
raise the cover A fig. 180 and
remove the arm from the vehicle by
loosening nut B that fastens it to the
pivot pin;
correctly position the new arm and
tighten the nut fully;
lower the cover.
WARNING
152)Driving with worn windscreen wiper
blades is a serious hazard, because
visibility is reduced in bad weather
conditions.
LIFTING THE
VEHICLE
If the vehicle needs to be lifted, go to a
Fiat Dealership which is equipped
with the arm hoist or workshop lift.
WHEELS AND TYRES
RIMS AND TYRES
For the type of wheel rims and tyres
fitted on the vehicle see the "Wheels"
paragraph in the "Technical data"
chapter.
IMPORTANT NOTES
As far as possible, avoid sharp
braking, screech starts and violent
shocks against pavements, potholes or
other hard obstacles. Driving for long
stretches over uneven roads can
damage the tyres;
periodically check that the tyres
have no cuts in the side wall, abnormal
swelling or irregular tyre tread wear.
Go to a Fiat Dealership if required;
avoid overloading the car when
travelling: this may cause serious
damage to the wheels and tyres;
if a tyre is punctured, stop
immediately and replace it to avoid
damage to the tyre, the rim, suspension
and steering system;
180F0T0088
161
Page 200 of 220

Each time the button is pressed the
following bands are selected cyclically:
Pressing the FM AS button: “FM1”,
“FM2” or “FMA”;
Pressing the AM button: “MW1”,
“MW2”.
Each band is highlighted by the name
in the display. The last station selected
on the respective frequency band will
be tuned into.
PRESET BUTTONS
The buttons numbered from 1 to 6 are
used to set the following preset
stations:
18 in the AM band; 6 in FM1, 6 in
FM2, 6 in FMT or "FMA" (on some
versions);
12 in the MW band.
To listen to a preset station, select the
desired frequency band and then briefly
press the corresponding preset button
(from 1 to 6).
By pressing the preset button for more
than 2 seconds, the tuned station will
be stored. The storing phase is
confirmed by an acoustic signal.
AUTOMATIC TUNING
Briefly press the
orbutton to start
the automatic tuning search for the
next station that can be received in the
selected direction.If the button
orpressed down
longer, the fast search starts. When the
button is released, the tuner will stop
on the next station that can be
received.
If the TA function (traffic news) is on, the
tuner searches only for stations that
broadcast traffic news.
MANUAL TUNING
This is used to manually search for
stations in the preselected band. Select
the desired frequency band and then
press the
orbutton briefly and
repeatedly to start to the search in the
desired direction. If the
orbutton
is pressed longer, the fast search will
start and then stop when the button is
released.
AUTOSTORE FUNCTION (automatic
station storage)
To activate the Autostore function, hold
the FM AS button pressed until a beep
is heard. With this function, the radio
automatically stores the 6 stations with
the strongest signal in decreasing
order on the FMA frequency band.
During the automatic storing process,
the text “Autostore” flashes on the
display.Press the FM AS button again to stop
the Autostore function: the radio will
again tune into the station listened
to before the activation of the function.
When the Autostore scan is concluded,
the radio will automatically tune into
the first preset station on the FMA band
(preset 1).
The stations that have a strong signal at
that moment are then automatically
stored in the preselected band in the
buttons numbered 1 to 6.
When the Autostore function is
activated within the MW band, the FMA
band is automatically selected and the
function is performed.
IMPORTANT Sometimes the Autostore
function is not able to find 6 stations
with a strong signal. In this case, the
strongest stations stored will be
duplicated in the free preset buttons.
IMPORTANT When the Autostore
function is activated, the stations that
were previously stored in the FMA band
are deleted.
198
MULTIMEDIA
Page 217 of 220

Procedure for petrol versions.........98
Radio.............................189
Rear ceiling light...................131
Rear fog lights.......................23
Rear fog lights
(changing a bulb)................128
Rear light clusters..................128
Rear light clusters (bulb
replacement)....................128
Rear view mirrors
Door mirrors.....................21
Rear view mirrors
Interior mirror....................21
Rear window washer................26
Rear Window Wiper............26-160
Refuelling..........................178
Refuelling the vehicle...............110
Repair procedure..................122
Replacing a bulb...................124
Replacing an exterior bulb..........127
Replacing an interior bulb...........130
Replacing interior bulbs.............130
Replacing the rear window wiper
blade...........................161
Replacing the windscreen wiper
blades..........................160
SBR system........................80
Seat belts
Use .............................79Seats
Foldaway passenger seat........18
Front seats......................17
Rear seats......................18
Service schedule...................144
Setup menu.........................44
Side airbags
Side bag........................94
Side bags...........................94
Side lights.........................127
Side lights (changing a bulb)........127
Side lights/rear fog light
(changing a bulb)................128
Side/tail lights.......................22
Sliding side doors...................14
Speed block.......................105
Start&Stop system.................108
Starting the engine..................98
Steering lock........................11
Steering wheel......................20
Symbols.............................4
Third brake lights..................129
Third brake lights (changing a
bulb)............................129
Topping up Adblue diesel
emissions additive (UREA)........110
Towing the vehicle..................140
Towing trailers.....................115
Traction Plus system.................78
Transmission.......................102Trip computer.......................46
Vehicle summary identification
and paintwork plate..............164
Version with methane system
(Natural Power)...................35
Warning lights and messages.......48
Weights and loads.................176
Wheel replacement procedure......118
Wheels............................169
Wheels and tyres...................161
Rims and tyres.................161
Window washing....................26
Windscreen wiper...............26-160
Windscreen/rear window washer
fluid.............................156