bonnet FIAT FIORINO 2019 Owner handbook (in English)
[x] Cancel search | Manufacturer: FIAT, Model Year: 2019, Model line: FIORINO, Model: FIAT FIORINO 2019Pages: 220, PDF Size: 6.22 MB
Page 6 of 220
SYMBOLS
Some vehicle components have coloured labels whose symbols indicate precautions to be observed when using this
component.
A plate summarising these symbols can also be found under the bonnet.
VEHICLE MODIFICATIONS/ALTERATIONS
IMPORTANT Any modification or alteration of the vehicle might seriously affect its safety and road holding, thus causing
accidents, in which the occupants could even be fatally injured.
Page 9 of 220
KNOWING YOUR VEHICLE
In-depth knowledge of your new vehicle
starts here.
The handbook that you are reading
simply and directly explains how it
is made and how it works.
That’s why we advise you to read it
seated comfortably on board, so that
you can see what is described here for
yourself.DASHBOARD ................................. 8
KEYS .............................................. 9
IGNITION DEVICE ........................... 11
THE FIAT CODE SYSTEM ............... 11
ALARM ........................................... 12
DOORS ........................................... 14
SEATS ............................................ 17
HEADRESTS ................................... 19
STEERING WHEEL ......................... 20
REAR VIEW MIRRORS .................... 21
EXTERIOR LIGHTS ......................... 22
INTERIOR LIGHTS .......................... 24
WINDOW WASHING ....................... 26
HEATING AND VENTILATION.......... 27
MANUAL CLIMATE CONTROL
SYSTEM ......................................... 27
ELECTRIC WINDOWS .................... 28
BONNET ......................................... 29
PARTITIONS .................................. 31
LUGGAGE COMPARTMENT ........... 33
VERSION WITH METHANE
SYSTEM (NATURAL POWER) ......... 35
7
Page 10 of 220
Dashboard
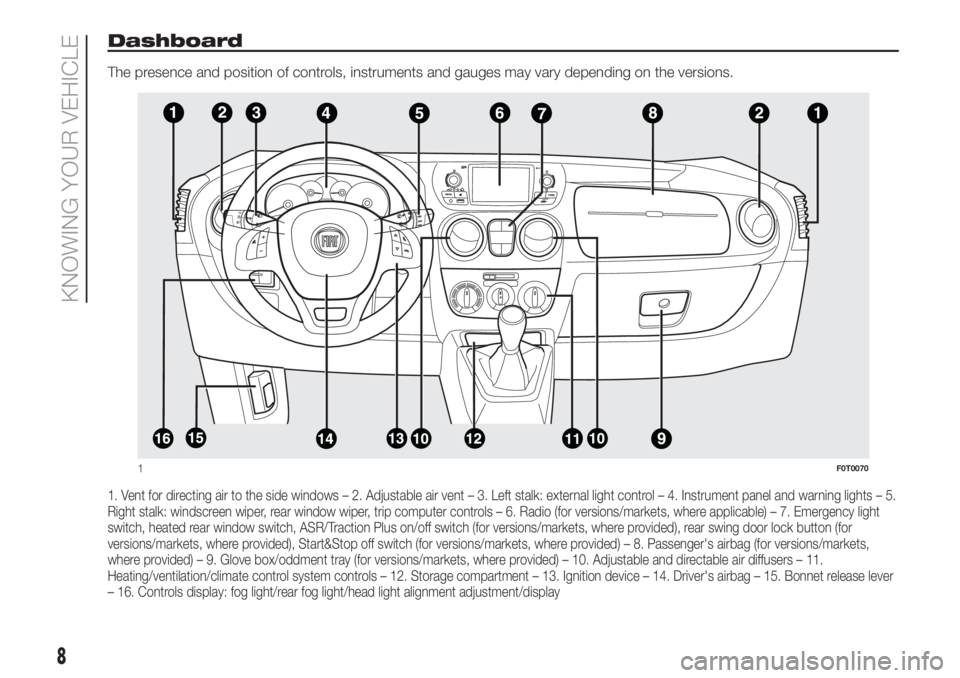
The presence and position of controls, instruments and gauges may vary depending on the versions.
1. Vent for directing air to the side windows – 2. Adjustable air vent – 3. Left stalk: external light control – 4. Instrument panel and warning lights – 5.
Right stalk: windscreen wiper, rear window wiper, trip computer controls – 6. Radio (for versions/markets, where applicable) – 7. Emergency light
switch, heated rear window switch, ASR/Traction Plus on/off switch (for versions/markets, where provided), rear swing door lock button (for
versions/markets, where provided), Start&Stop off switch (for versions/markets, where provided) – 8. Passenger's airbag (for versions/markets,
where provided) – 9. Glove box/oddment tray (for versions/markets, where provided) – 10. Adjustable and directable air diffusers – 11.
Heating/ventilation/climate control system controls – 12. Storage compartment – 13. Ignition device – 14. Driver's airbag – 15. Bonnet release lever
– 16. Controls display: fog light/rear fog light/head light alignment adjustment/display
1F0T0070
8
KNOWING YOUR VEHICLE
Page 14 of 220
Activation of thewarning light while
driving
If thewarning light (or symbol in
the display) comes on, this means
that the system is running a self-
diagnosis test (caused, for example, by
a voltage drop). When you stop for
the first time, turn the key to STOP and
then to MAR: the warning light
will
not light up if no faults are detected.
If the warning light(or symbol on
the display) stays on, repeat the
procedure described above leaving the
key at STOP for longer than 30
seconds. If the problem persists,
contact the Fiat Dealership.
The code is not recognised if the
warning light
(or symbol on the
display) stays on. In this case, turn the
key to STOP and then to MAR; if it is
still locked, try again with the other keys
that come with the vehicle. If you still
cannot start the engine, perform the
emergency start procedure (see
chapter “In an emergency”) and then
contact the Fiat Dealership.
1)
WARNING
1)The electronic components inside the
key may be damaged if the key is
subjected to strong shocks.
ALARM
(for versions/markets, where provided)
The alarm, in addition to all the
previously described remote control
functions, is controlled by the receiver
located under the dashboard near
the fuse box.
IMPORTANT The engine stop function
is guaranteed by the Fiat CODE, which
is automatically activated when the
ignition key is extracted from the
ignition switch.
TURNING THE ALARM ON
With the doors and bonnet closed and
the ignition key either turned to STOP
or removed, point the key with the
remote control towards the vehicle and
press and release button
.
With the exception of some markets,
the system emits an acoustic signal
("beep") and activates door locking.
A self-diagnostic stage precedes the
turning on of the alarm: if a fault is
detected, the system produces another
acoustic signal after approximately 4
seconds from switch-on.
In this case switch off the alarm by
pressing
, check that all the doors,
bonnet and tailgate are closed
correctly; then switch the alarm back
on by pressing
.
12
KNOWING YOUR VEHICLE
Page 15 of 220
If a door or the bonnet is not properly
shut, it will be excluded from the testing
by the alarm system.
A fault has occurred in system
operation if the alarm produces an
acoustic signal even when the doors,
bonnet and boot are correctly closed.
Contact a Fiat Dealership.
IMPORTANT The alarm does not come
on when the central locking is activated
using the metal insert in the key.
IMPORTANT The alarm is adapted to
meet requirements in various countries.
TURNING THE ALARM
OFF
Press button
on the key with the
remote control.
IMPORTANT The alarm is not turned off
using the door are opened using the
metal insert in the key.
VOLUMETRIC/ANTI-LIFT
PROTECTION
The side windows must be completely
closed for correct operation of the
protection.
If necessary, the function can be turned
off (if, for example, you are leaving a
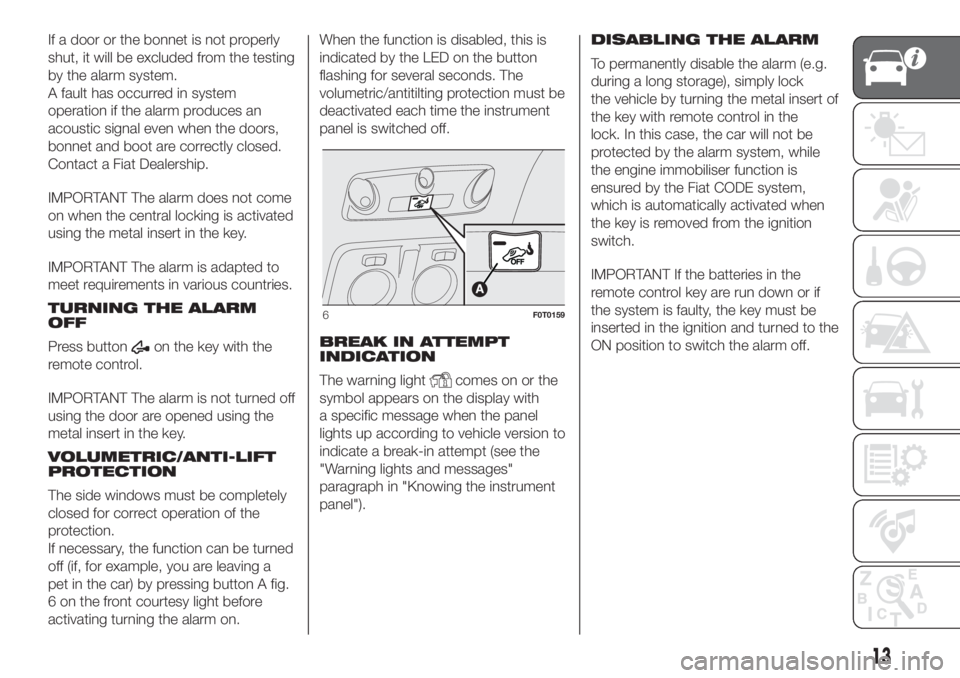
pet in the car) by pressing button A fig.
6 on the front courtesy light before
activating turning the alarm on.When the function is disabled, this is
indicated by the LED on the button
flashing for several seconds. The
volumetric/antitilting protection must be
deactivated each time the instrument
panel is switched off.
BREAK IN ATTEMPT
INDICATION
The warning light
comes on or the
symbol appears on the display with
a specific message when the panel
lights up according to vehicle version to
indicate a break-in attempt (see the
"Warning lights and messages"
paragraph in "Knowing the instrument
panel").DISABLING THE ALARM
To permanently disable the alarm (e.g.
during a long storage), simply lock
the vehicle by turning the metal insert of
the key with remote control in the
lock. In this case, the car will not be
protected by the alarm system, while
the engine immobiliser function is
ensured by the Fiat CODE system,
which is automatically activated when
the key is removed from the ignition
switch.
IMPORTANT If the batteries in the
remote control key are run down or if
the system is faulty, the key must be
inserted in the ignition and turned to the
ON position to switch the alarm off.
6F0T0159
13
Page 31 of 220
IMPORTANT If the anti-crushing
function (for versions/markets, where
provided) is activated 5 times in only 1
minute, the system will automatically
enter “recovery” mode (self-protection).
This condition is apparent from the
window closing in stages.
If this occurs, restore the system as
follows:
open the windows;
or
turn the ignition key to the STOP
position and then to MAR.
If no malfunction is present, the window
returns to its normal operation
automatically.
IMPORTANT With the key off or
removed, the windows remain activated
for about two minutes and are
deactivated as soon a door is opened.
21)
MANUAL FRONT
WINDOWS
On some versions, the front windows
are opened and closed manually.
Wind the handle to open/close.
WARNING
21)Improper use of the electric windows
can be dangerous. Before and during their
operation ensure that passengers are not
at risk from the moving glass, either by
personal objects caught in the mechanism
or struck by it directly. When leaving the
car, always remove the ignition key to
avoid the risk of injury due to accidental
operation of the electric windows.
BONNET
OPENING
Proceed as follows:
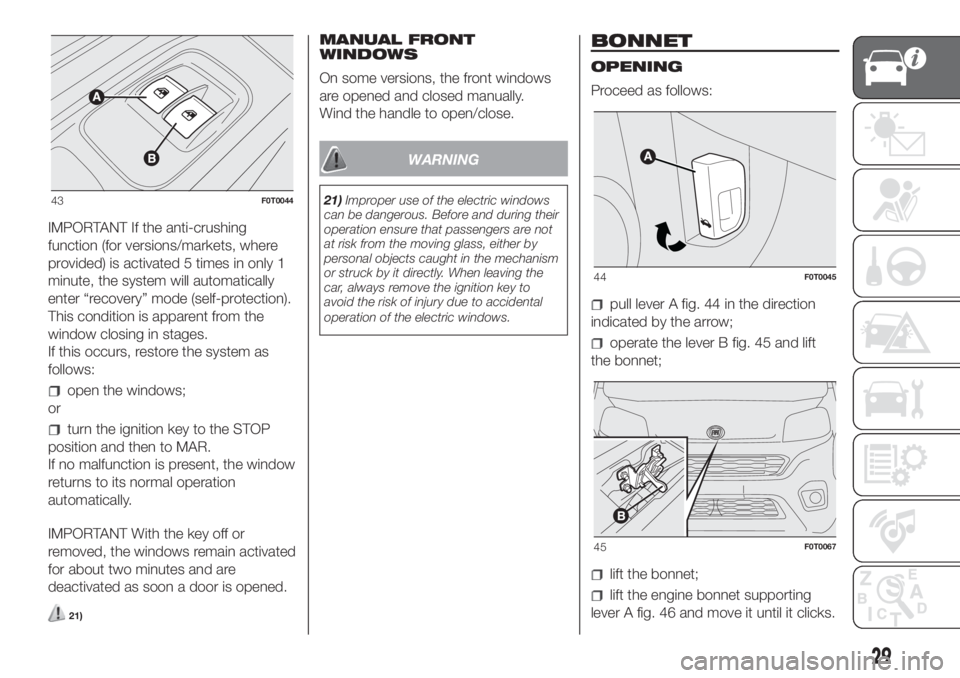
pull lever A fig. 44 in the direction
indicated by the arrow;
operate the lever B fig. 45 and lift
the bonnet;
lift the bonnet;
lift the engine bonnet supporting
lever A fig. 46 and move it until it clicks.
43F0T0044
44F0T0045
45F0T0067
29
Page 32 of 220
22)
CLOSING
Proceed as follows:
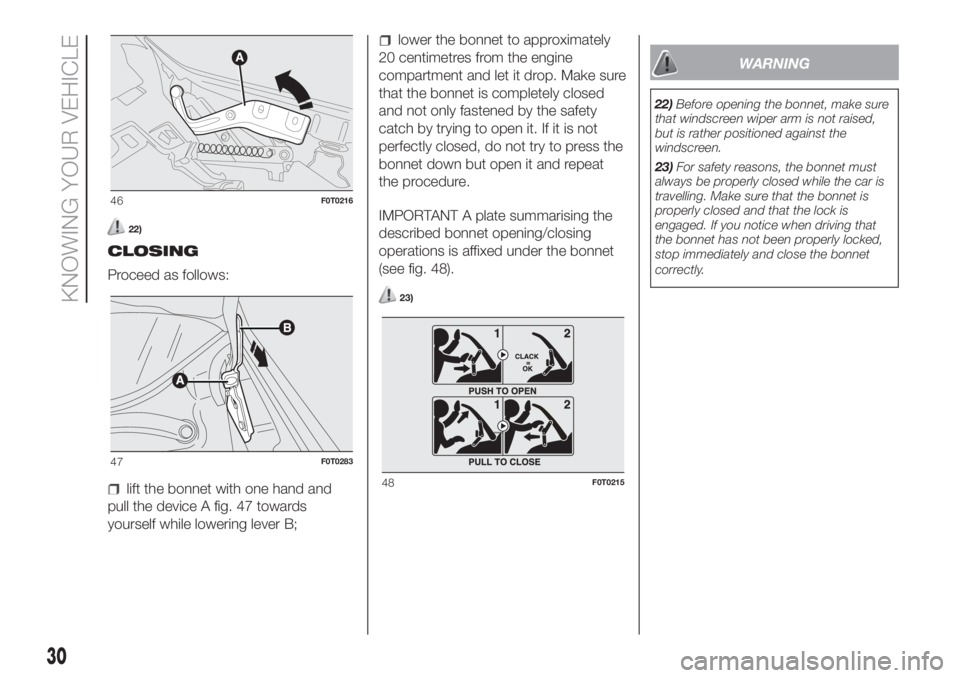
lift the bonnet with one hand and
pull the device A fig. 47 towards
yourself while lowering lever B;
lower the bonnet to approximately
20 centimetres from the engine
compartment and let it drop. Make sure
that the bonnet is completely closed
and not only fastened by the safety
catch by trying to open it. If it is not
perfectly closed, do not try to press the
bonnet down but open it and repeat
the procedure.
IMPORTANT A plate summarising the
described bonnet opening/closing
operations is affixed under the bonnet
(see fig. 48).
23)
WARNING
22)Before opening the bonnet, make sure
that windscreen wiper arm is not raised,
but is rather positioned against the
windscreen.
23)For safety reasons, the bonnet must
always be properly closed while the car is
travelling. Make sure that the bonnet is
properly closed and that the lock is
engaged. If you notice when driving that
the bonnet has not been properly locked,
stop immediately and close the bonnet
correctly.
46F0T0216
47F0T0283
48F0T0215
30
KNOWING YOUR VEHICLE
Page 111 of 220
SAFETY FUNCTIONS
In engine cut-out conditions through
the Start&Stop system, if the driver
unfastens his/her seat belt and opens
the driver's door or the passenger door,
the engine can be restarted only by
using the key. The driver is notified of
this condition by a buzzer, through the
instrument panel warning light fig.
115 flashing and, where provided, by a
message in the display.
VEHICLE INACTIVITY
In the event of vehicle inactivity, special
attention must be paid to the
disconnection of the battery power
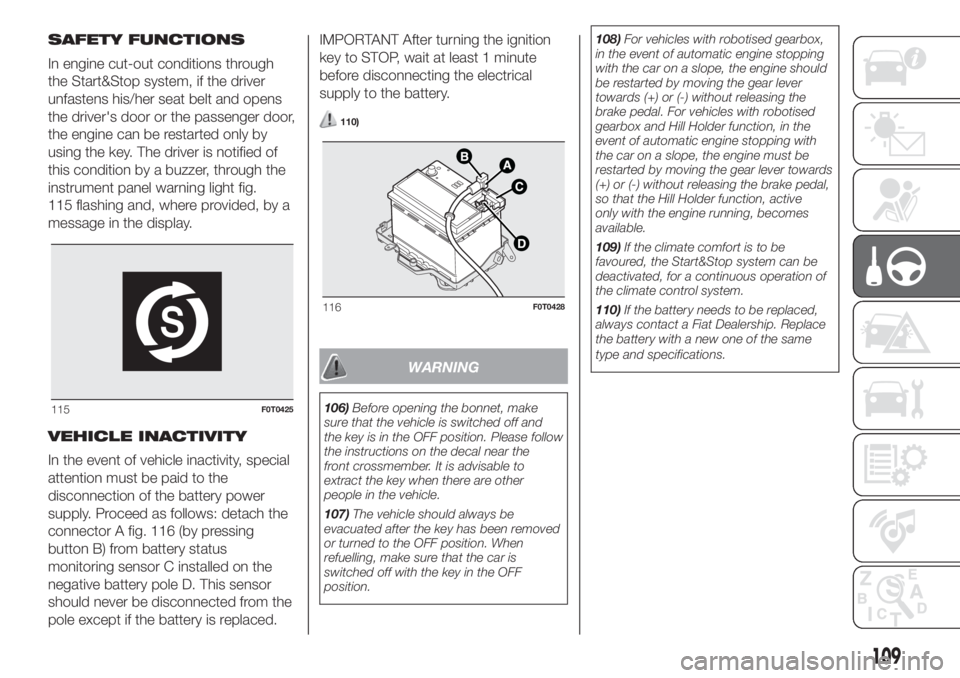
supply. Proceed as follows: detach the
connector A fig. 116 (by pressing
button B) from battery status
monitoring sensor C installed on the
negative battery pole D. This sensor
should never be disconnected from the
pole except if the battery is replaced.IMPORTANT After turning the ignition
key to STOP, wait at least 1 minute
before disconnecting the electrical
supply to the battery.
110)
WARNING
106)Before opening the bonnet, make
sure that the vehicle is switched off and
the key is in the OFF position. Please follow
the instructions on the decal near the
front crossmember. It is advisable to
extract the key when there are other
people in the vehicle.
107)The vehicle should always be
evacuated after the key has been removed
or turned to the OFF position. When
refuelling, make sure that the car is
switched off with the key in the OFF
position.108)For vehicles with robotised gearbox,
in the event of automatic engine stopping
with the car on a slope, the engine should
be restarted by moving the gear lever
towards (+) or (-) without releasing the
brake pedal. For vehicles with robotised
gearbox and Hill Holder function, in the
event of automatic engine stopping with
the car on a slope, the engine must be
restarted by moving the gear lever towards
(+) or (-) without releasing the brake pedal,
so that the Hill Holder function, active
only with the engine running, becomes
available.
109)If the climate comfort is to be
favoured, the Start&Stop system can be
deactivated, for a continuous operation of
the climate control system.
110)If the battery needs to be replaced,
always contact a Fiat Dealership. Replace
the battery with a new one of the same
type and specifications.115F0T0425
116F0T0428
109
Page 113 of 220
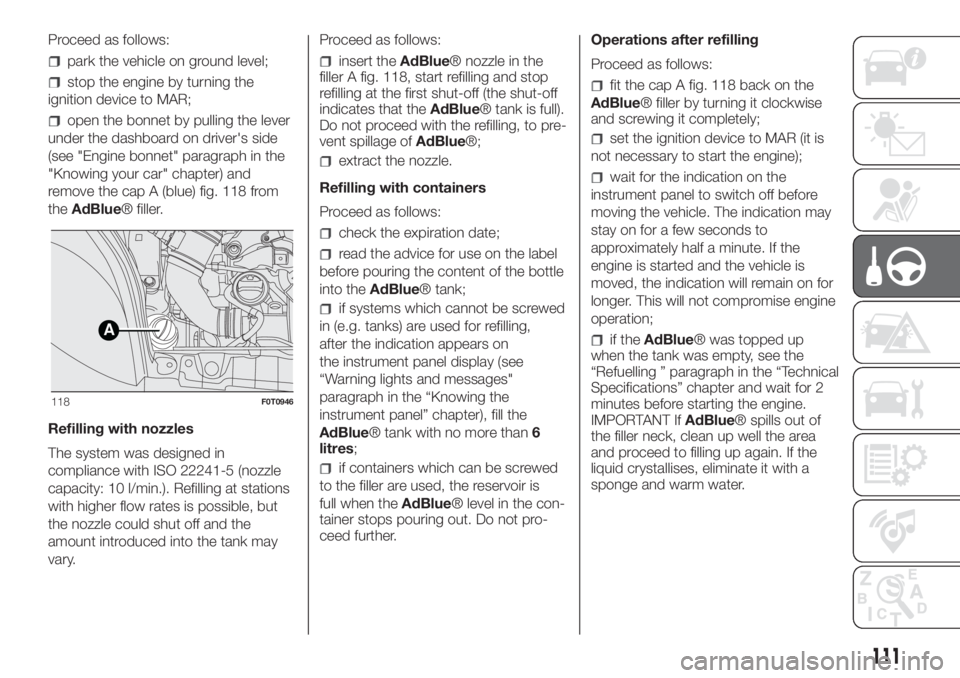
Proceed as follows:
park the vehicle on ground level;
stop the engine by turning the
ignition device to MAR;
open the bonnet by pulling the lever
under the dashboard on driver's side
(see "Engine bonnet" paragraph in the
"Knowing your car" chapter) and
remove the cap A (blue) fig. 118 from
theAdBlue® filler.
Refilling with nozzles
The system was designed in
compliance with ISO 22241-5 (nozzle
capacity: 10 l/min.). Refilling at stations
with higher flow rates is possible, but
the nozzle could shut off and the
amount introduced into the tank may
vary.Proceed as follows:
insert theAdBlue® nozzle in the
filler A fig. 118, start refilling and stop
refilling at the first shut-off (the shut-off
indicates that theAdBlue® tank is full).
Do not proceed with the refilling, to pre-
vent spillage ofAdBlue®;
extract the nozzle.
Refilling with containers
Proceed as follows:
check the expiration date;
read the advice for use on the label
before pouring the content of the bottle
into theAdBlue® tank;
if systems which cannot be screwed
in (e.g. tanks) are used for refilling,
after the indication appears on
the instrument panel display (see
“Warning lights and messages"
paragraph in the “Knowing the
instrument panel” chapter), fill the
AdBlue® tank with no more than
litres;
if containers which can be screwed
to the filler are used, the reservoir is
full when theAdBlue® level in the con-
tainer stops pouring out. Do not pro-
ceed further.Operations after refilling
Proceed as follows:
fit the cap A fig. 118 back on the
AdBlue® filler by turning it clockwise
and screwing it completely;
set the ignition device to MAR (it is
not necessary to start the engine);
wait for the indication on the
instrument panel to switch off before
moving the vehicle. The indication may
stay on for a few seconds to
approximately half a minute. If the
engine is started and the vehicle is
moved, the indication will remain on for
longer. This will not compromise engine
operation;
if theAdBlue® was topped up
when the tank was empty, see the
“Refuelling ” paragraph in the “Technical
Specifications” chapter and wait for 2
minutes before starting the engine.
IMPORTANT IfAdBlue® spills out of
the filler neck, clean up well the area
and proceed to filling up again. If the
liquid crystallises, eliminate it with a
sponge and warm water.A
118F0T0946
111
6
Page 147 of 220
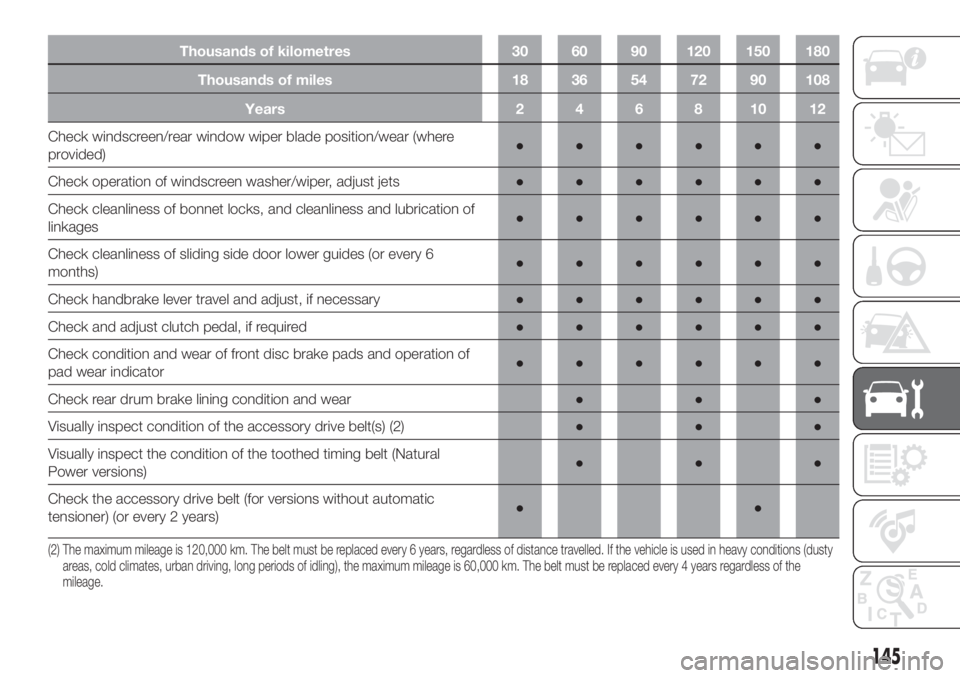
Thousands of kilometres 30 60 90 120 150 180
Thousands of miles 18 36 54 72 90 108
Years 2 4 6 8 10 12
Check windscreen/rear window wiper blade position/wear (where
provided)●●●●●●
Check operation of windscreen washer/wiper, adjust jets●●●●●●
Check cleanliness of bonnet locks, and cleanliness and lubrication of
linkages●●●●●●
Check cleanliness of sliding side door lower guides (or every 6
months)●●●●●●
Check handbrake lever travel and adjust, if necessary●●●●●●
Check and adjust clutch pedal, if required●●●●●●
Check condition and wear of front disc brake pads and operation of
pad wear indicator●●●●●●
Check rear drum brake lining condition and wear●●●
Visually inspect condition of the accessory drive belt(s) (2)●●●
Visually inspect the condition of the toothed timing belt (Natural
Power versions)●●●
Check the accessory drive belt (for versions without automatic
tensioner) (or every 2 years)●●
(2) The maximum mileage is 120,000 km. The belt must be replaced every 6 years, regardless of distance travelled. If the vehicle is used in heavy conditions (dusty
areas, cold climates, urban driving, long periods of idling), the maximum mileage is 60,000 km. The belt must be replaced every 4 years regardless of the
mileage.
145