key FIAT FREEMONT 2011 Owner handbook (in English)
[x] Cancel search | Manufacturer: FIAT, Model Year: 2011, Model line: FREEMONT, Model: FIAT FREEMONT 2011Pages: 267, PDF Size: 5.16 MB
Page 166 of 267
Supplemental Seat-Mounted Side Air Bag
(SAB) Inflator Units
The Supplemental Seat-Mounted Side Air Bags (SAB)
are designed to activate only in certain side collisions.
The ORC determines if a side collision requires the
side air bags to inflate, based on the severity and type ofcollision.
Based on the severity and type of collision, the side air
bag inflator on the crash side of the vehicle may be
triggered, releasing a quantity of non-toxic gas. The
inflating SAB exits through the seat seam into the space
between the occupant and the door. The SAB fully
inflate in about 10 milliseconds. The side air bag moves
at a very high speed and with such a high force that it
could injure you if you are not seated properly, or if
items are positioned in the area where the side air bag
inflates. This especially applies to children.
Supplemental Side Air Bag Inflatable Curtain
(SABIC) Inflator Units
During collisions where the impact is confined to a
particular area of the side of the vehicle, the ORC may
deploy the SABIC air bags, depending on the severity
and type of collision. In these events, the ORC will
deploy the SABIC only on the impact side of the
vehicle.
A quantity of non-toxic gas is generated to inflate the
side curtain air bag. The inflating side curtain air bag
pushes the outside edge of the headliner out of the way
and covers the window. The air bag inflates in about 30
milliseconds (about one-quarter of the time that ittakes to blink your eyes) with enough force to injure
you if you are not belted and seated properly, or if
items are positioned in the area where the side curtain
air bag inflates. This especially applies to children. The
side curtain air bag is only about 9 cm thick when it is
inflated.
Because air bag sensors estimate deceleration over
time, vehicle speed and damage are not good indicators
of whether or not an air bag should have deployed.
NOTE:
In a rollover the pretensioners and/or SAB
and SABIC air bags may deploy on both sides of the
vehicle.
Front And Side Impact Sensors
In front and side impacts, impact sensors can aid the
ORC in determining appropriate response to impact
events.
Enhanced Accident Response System
In the event of an impact causing air bag deployment, if
the communication network remains intact, and the
power remains intact, depending on the nature of the
event the ORC will determine whether to have the
Enhanced Accident Response System perform the fol-
lowing functions:
• Cut off fuel to the engine.
• Flash hazard lights as long as the battery has power or until the ignition is cycled off.
• Turn on the interior lights, which remain on as long as the battery has power or until the ignition key is
removed. 159
KNOWING
YOURVEHICLESAFETYSTARTING ANDDRIVING
WARNING
LIGHTS AND
MESSAGES
IN AN
EMERGENCY
SERVICING AND
CARETECHNICAL
SPECIFICATIONSCONTENTS
Page 173 of 267

STARTING AND DRIVING
ENGINE BREAK-IN
RECOMMENDATIONS
A long break-in period is not required for the engine
and drivetrain (transmission and axle) in your vehicle.
Drive moderately during the first 500 km. After the
initial 100 km, speeds up to 80 or 90 km/h are desir-
able.
While cruising, brief full-throttle acceleration, within
the limits of local traffic laws contributes to a good
break-in. Wide-open throttle acceleration in low gear
can be detrimental and should be avoided.
The engine oil installed in the engine at the factory is a
high-quality energy-conserving type lubricant. Oil
changes should be consistent with anticipated climate
conditions under which vehicle operations will occur.
For the recommended viscosity and quality grades,
refer to “Maintenance Procedures” in “Servicing And
Care”. NON-DETERGENT OR STRAIGHT MINERAL
OILS MUST NEVER BE USED.
A new engine may consume some oil during its first few
thousand kilometers of operation. This should be con-
sidered a normal part of the break-in and not inter-
preted as an indication of difficulty. STARTING PROCEDURES
Before starting your vehicle, adjust your seat, adjust
the inside and outside mirrors, fasten your seat belt,
and if present, instruct all other occupants to buckle
their seat belts.
WARNING!
Never leave children alone in a ve-
hicle. Leaving children in a vehicle unat-
tended is dangerous for a number of reasons. A
child or others could be seriously or fatally in-
jured. Children should be warned not to touch the
parking brake, brake pedal or the shift lever. Do
not leave the key fob in or near the vehicle, and
do not leave the ignition in the in the ACC or
RUN position. A child could operate power win-
dows, other controls, or move the vehicle.
Do not leave animals or children inside parked
vehicles in hot weather; interior heat buildup
may cause serious injury or death.
166
KNOWING YOUR
VEHICLE
SAFETYSTARTING AND
DRIVINGWARNING
LIGHTS AND
MESSAGES
IN AN
EMERGENCY
SERVICING AND
CARETECHNICAL
SPECIFICATIONSCONTENTS
Page 174 of 267
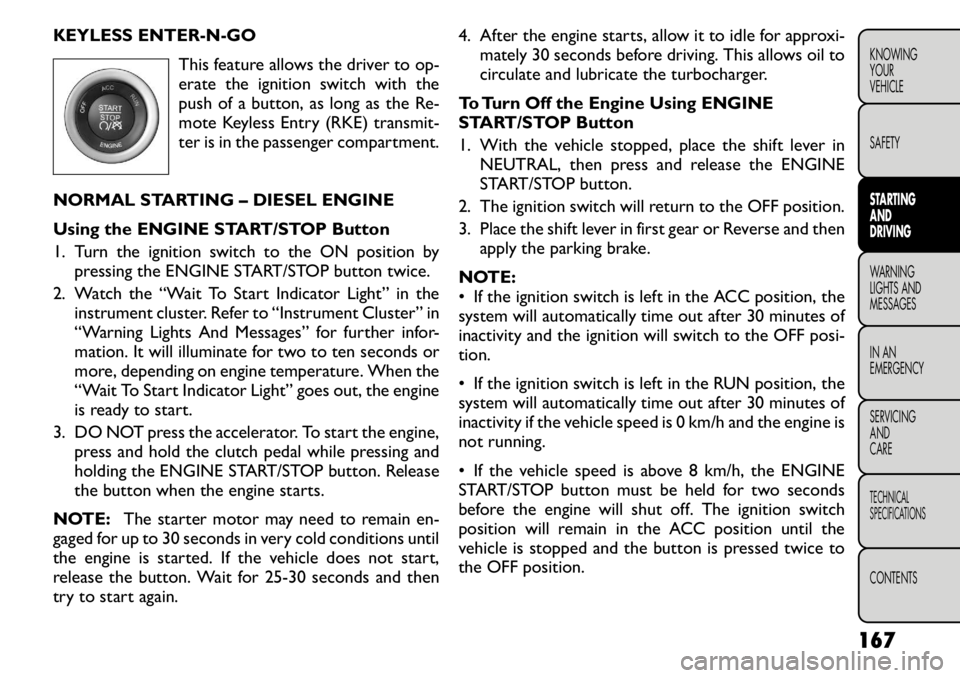
KEYLESS ENTER-N-GOThis feature allows the driver to op-
erate the ignition switch with the
push of a button, as long as the Re-
mote Keyless Entry (RKE) transmit-
ter is in the passenger compartment.
NORMAL STARTING – DIESEL ENGINE
Using the ENGINE START/STOP Button
1. Turn the ignition switch to the ON position by pressing the ENGINE START/STOP button twice.
2. Watch the “Wait To Start Indicator Light” in the instrument cluster. Refer to “Instrument Cluster” in
“Warning Lights And Messages” for further infor-
mation. It will illuminate for two to ten seconds or
more, depending on engine temperature. When the
“Wait To Start Indicator Light” goes out, the engine
is ready to start.
3. DO NOT press the accelerator. To start the engine, press and hold the clutch pedal while pressing and
holding the ENGINE START/STOP button. Release
the button when the engine starts.
NOTE: The starter motor may need to remain en-
gaged for up to 30 seconds in very cold conditions until
the engine is started. If the vehicle does not start,
release the button. Wait for 25-30 seconds and then
try to start again. 4. After the engine starts, allow it to idle for approxi-
mately 30 seconds before driving. This allows oil to
circulate and lubricate the turbocharger.
To Turn Off the Engine Using ENGINE
START/STOP Button
1. With the vehicle stopped, place the shift lever in NEUTRAL, then press and release the ENGINE
START/STOP button.
2. The ignition switch will return to the OFF position.
3. Place the shift lever in first gear or Reverse and then apply the parking brake.
NOTE:
• If the ignition switch is left in the ACC position, the
system will automatically time out after 30 minutes of
inactivity and the ignition will switch to the OFF posi-tion.
• If the ignition switch is left in the RUN position, the
system will automatically time out after 30 minutes of
inactivity if the vehicle speed is 0 km/h and the engine is
not running.
• If the vehicle speed is above 8 km/h, the ENGINE
START/STOP button must be held for two seconds
before the engine will shut off. The ignition switch
position will remain in the ACC position until the
vehicle is stopped and the button is pressed twice to
the OFF position.
167KNOWING
YOURVEHICLE SAFETYSTARTING ANDDRIVINGWARNING
LIGHTS AND
MESSAGES
IN AN
EMERGENCY
SERVICING AND
CARETECHNICAL
SPECIFICATIONSCONTENTS
Page 190 of 267
RECREATIONAL TOWING (BEHIND
MOTORHOME, ETC.)
TOWING THIS VEHICLE BEHIND ANOTHER VEHICLE
Towing
Condition Wheels OFF
the Ground Manual
Transmission
Flat Tow NONE• Trans in
NEUTRAL
• Key in ACC
Dolly Tow Front OK
Rear NO
On Trailer ALLOK
NOTE: Vehicles equipped with manual transmissions
may be recreationally towed (flat towed) at any legal
highway speed, for any distance, if the manual transmis-
sion is in NEUTRAL and the ignition key is in the ACCposition. NOTE:
This vehicle may be towed on a flatbed or
vehicle trailer provided all four wheels are OFF the
ground.
Towing this vehicle in violation of the
above requirements can cause severe
transmission damage. Damage from im-
proper towing is not covered under the New Ve-
hicle Limited Warranty.
183
KNOWING
YOURVEHICLE SAFETYSTARTING ANDDRIVINGWARNING
LIGHTS AND
MESSAGES
IN AN
EMERGENCY
SERVICING AND
CARETECHNICAL
SPECIFICATIONSCONTENTS
Page 192 of 267
INSTRUMENT CLUSTER DESCRIPTIONS1. Air Bag Warning LightThis light will turn on for four to eight sec-
onds as a bulb check when the ignition switch
is first turned to ON/RUN. If the light is
either not on during starting, stays on, or
turns on while driving, have the system inspected at an
authorized dealer as soon as possible. Refer to “Occu-
pant Restraints” in “Safety” for further information.
2. Malfunction Indicator Light (MIL) The Malfunction Indicator Light (MIL) is part of
an onboard diagnostic system, called OBD, that
monitors engine and transmission control sys-
tems. The light will illuminate when the key is in the
ON/RUN position, before engine start. If the bulb does
not come on when turning the key from OFF to
ON/RUN, have the condition checked promptly.
Certain conditions, such as a loose or missing gas cap,
poor fuel quality, etc., may illuminate the MIL after
engine start. The vehicle should be serviced if the MIL
stays on through several of your typical driving cycles.
In most situations, the vehicle will drive normally and
will not require towing.
Prolonged driving with the MIL on could
cause damage to the engine control sys-
tem. It also could affect fuel economy
and drivability. If the MIL is flashing, severe cata-
lytic converter damage and power loss will soon
occur. Immediate service is required.
WARNING!
A malfunctioning catalytic converter, as
referenced above, can reach higher tem-
peratures than in normal operating conditions.
This can cause a fire if you drive slowly or park
over flammable substances such as dry plants,
wood, cardboard, etc .This could result in death or
serious injury to the driver, occupants or others.
3. Electronic Stability Control (ESC)
Activation/Malfunction Indicator Light — IfEquipped The “ESC Activation/Malfunction Indicator
Light” in the instrument cluster will come on
when the ignition switch is turned to the
ON/RUN position. It should go out with the
engine running. If the “ESC Activation/Malfunction In-
dicator Light” comes on continuously with the engine
running, a malfunction has been detected in the ESC
system. If this light remains on after several ignition
cycles, and the vehicle has been driven several miles
(kilometers) at speeds greater than 30 mph (48 km/h),
see your authorized dealer as soon as possible to have
the problem diagnosed and corrected.
185KNOWING
YOURVEHICLE SAFETY
STARTING ANDDRIVINGWARNING
LIGHTS AND
MESSAGESIN AN
EMERGENCY
SERVICING AND
CARETECHNICAL
SPECIFICATIONSCONTENTS
Page 208 of 267
BULB REPLACEMENT
LOW BEAM/HIGH BEAM/FRONT TURN
SIGNAL AND FRONT POSITION LAMP
1. Open the hood.
NOTE:It may be necessary to remove the air cleaner
filter housing and position the Totally Integrated Power
Module (TIPM) aside to replace certain lamps in the left
headlamp housing.
2. Rotate the applicable bulb and connector assembly
1∕4turn counterclockwise and remove the assembly
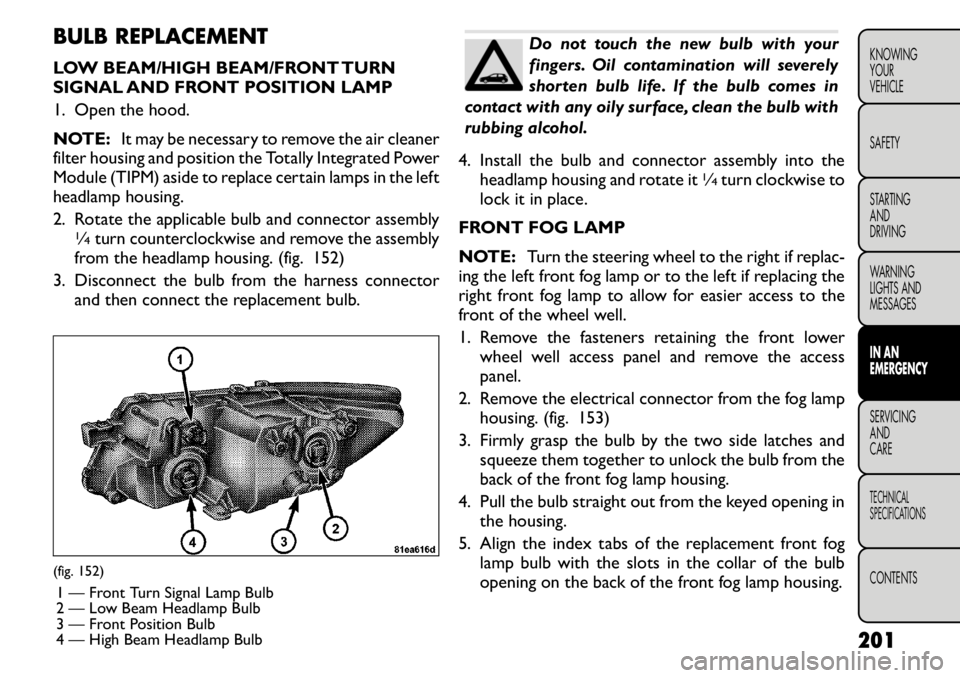
from the headlamp housing. (fig. 152)
3. Disconnect the bulb from the harness connector and then connect the replacement bulb.
Do not touch the new bulb with your
fingers. Oil contamination will severely
shorten bulb life. If the bulb comes in
contact with any oily surface, clean the bulb with
rubbing alcohol.
4. Install the bulb and connector assembly into the headlamp housing and rotate it
1∕4turn clockwise to
lock it in place.
FRONT FOG LAMP
NOTE: Turn the steering wheel to the right if replac-
ing the left front fog lamp or to the left if replacing the
right front fog lamp to allow for easier access to the
front of the wheel well.
1. Remove the fasteners retaining the front lower wheel well access panel and remove the access panel.
2. Remove the electrical connector from the fog lamp housing. (fig. 153)
3. Firmly grasp the bulb by the two side latches and squeeze them together to unlock the bulb from the
back of the front fog lamp housing.
4. Pull the bulb straight out from the keyed opening in the housing.
5. Align the index tabs of the replacement front fog lamp bulb with the slots in the collar of the bulb
opening on the back of the front fog lamp housing.
(fig. 152)
1 — Front Turn Signal Lamp Bulb
2 — Low Beam Headlamp Bulb
3 — Front Position Bulb
4 — High Beam Headlamp Bulb 201
KNOWING
YOURVEHICLE SAFETY
STARTING ANDDRIVING
WARNING
LIGHTS AND
MESSAGESIN AN
EMERGENCYSERVICING AND
CARETECHNICAL
SPECIFICATIONSCONTENTS
Page 210 of 267
4. Firmly grasp the bulb by the two side latches andsqueeze them together to unlock the bulb from the
back of the lamp housing.
5. Pull the bulb straight out from the keyed opening in the housing
6. Remove the bulb from the connector socket and install the replacement bulb.
7. Align the index tabs of the replacement rear fog lamp bulb/socket assembly with the slots in the
collar of the bulb opening on the back of the lamphousing.
8. Insert bulb into the lamp housing until the index tabs are engaged in the slots of the collar.
9. Firmly and evenly push the bulb straight into the lamp housing until both side latches lock firmly into
place.
10. Reinstall the fog lamp housing.
SIDE REPEATER LAMP
The side repeater lamps are located in both front
fender panels.
1. Push the side repeater lens to left side to release the spring tension and then pull it outward.
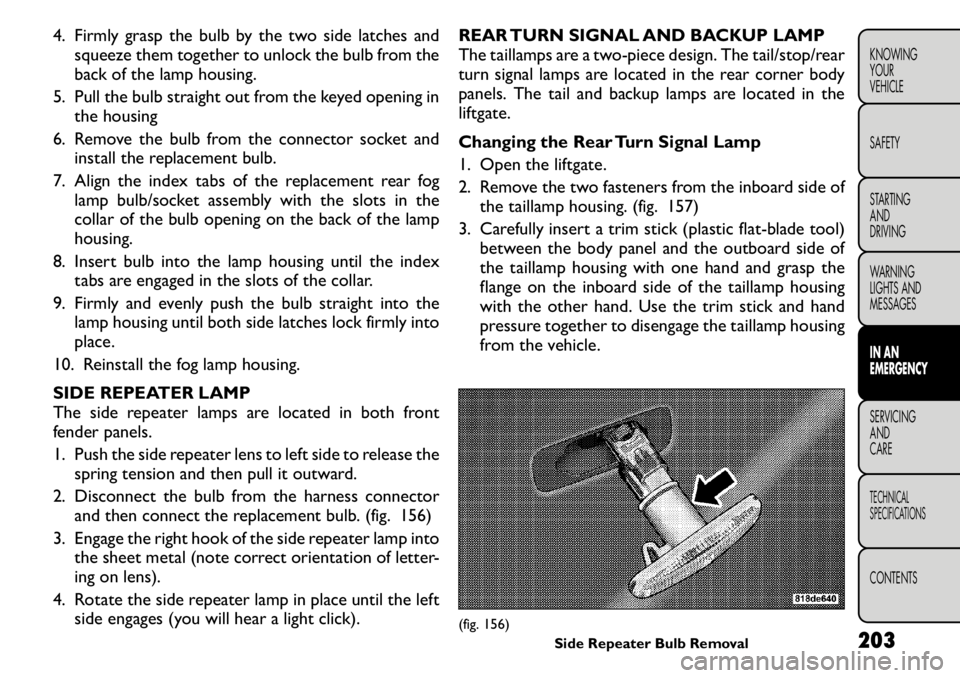
2. Disconnect the bulb from the harness connector and then connect the replacement bulb. (fig. 156)
3. Engage the right hook of the side repeater lamp into the sheet metal (note correct orientation of letter-
ing on lens).
4. Rotate the side repeater lamp in place until the left side engages (you will hear a light click). REAR TURN SIGNAL AND BACKUP LAMP
The taillamps are a two-piece design. The tail/stop/rear
turn signal lamps are located in the rear corner body
panels. The tail and backup lamps are located in the
liftgate.
Changing the Rear Turn Signal Lamp
1. Open the liftgate.
2. Remove the two fasteners from the inboard side of
the taillamp housing. (fig. 157)
3. Carefully insert a trim stick (plastic flat-blade tool) between the body panel and the outboard side of
the taillamp housing with one hand and grasp the
flange on the inboard side of the taillamp housing
with the other hand. Use the trim stick and hand
pressure together to disengage the taillamp housing
from the vehicle.
(fig. 156) Side Repeater Bulb Removal 203
KNOWING
YOURVEHICLE SAFETY
STARTING ANDDRIVING
WARNING
LIGHTS AND
MESSAGESIN AN
EMERGENCYSERVICING AND
CARETECHNICAL
SPECIFICATIONSCONTENTS
Page 219 of 267
REAR TOW EYE USAGE
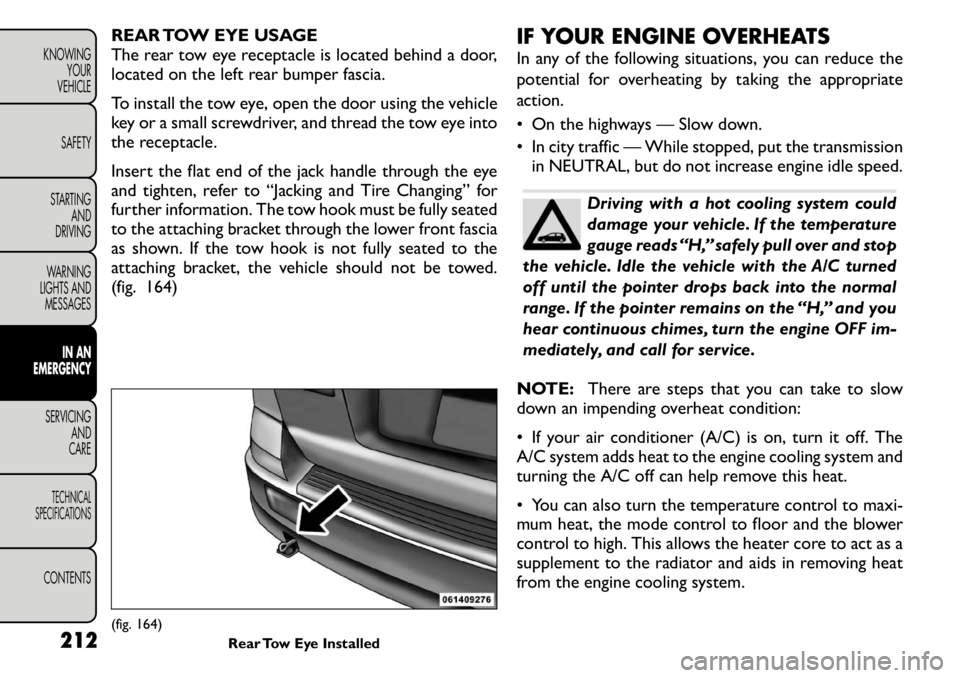
The rear tow eye receptacle is located behind a door,
located on the left rear bumper fascia.
To install the tow eye, open the door using the vehicle
key or a small screwdriver, and thread the tow eye into
the receptacle.
Insert the flat end of the jack handle through the eye
and tighten, refer to “Jacking and Tire Changing” for
further information. The tow hook must be fully seated
to the attaching bracket through the lower front fascia
as shown. If the tow hook is not fully seated to the
attaching bracket, the vehicle should not be towed.
(fig. 164)IF YOUR ENGINE OVERHEATS
In any of the following situations, you can reduce the
potential for overheating by taking the appropriate
action.
• On the highways — Slow down.
• In city traffic — While stopped, put the transmission
in NEUTRAL, but do not increase engine idle speed.
Driving with a hot cooling system could
damage your vehicle. If the temperature
gauge reads “H,” safely pull over and stop
the vehicle. Idle the vehicle with the A/C turned
off until the pointer drops back into the normal
range. If the pointer remains on the “H,” and you
hear continuous chimes, turn the engine OFF im-
mediately, and call for service.
NOTE: There are steps that you can take to slow
down an impending overheat condition:
• If your air conditioner (A/C) is on, turn it off. The
A/C system adds heat to the engine cooling system and
turning the A/C off can help remove this heat.
• You can also turn the temperature control to maxi-
mum heat, the mode control to floor and the blower
control to high. This allows the heater core to act as a
supplement to the radiator and aids in removing heat
from the engine cooling system.
(fig. 164) Rear Tow Eye Installed
212
KNOWING
YOUR
VEHICLE
SAFETY
STARTING AND
DRIVING
WARNING
LIGHTS AND
MESSAGES
IN AN
EMERGENCY
SERVICING AND
CARETECHNICAL
SPECIFICATIONSCONTENTS
Page 220 of 267
WARNING!
You or others can be badly burned by hot
engine coolant (antifreeze) or steam
from your radiator. If you see or hear steam
coming from under the hood, do not open the
hood until the radiator has had time to cool.
Never try to open a cooling system pressure cap
when the radiator or coolant bottle is hot .
TOWING A DISABLED VEHICLETowing Condition Wheels OFF The Ground MANUAL TRANSMISSION
Flat Tow NONE • Trans in NEUTRAL
• Ignition key in ACC
Wheel Lift Or Dolly Tow Rear
NO
Front OK
Flatbed ALL BEST METHOD
Proper towing or lifting equipment is required to pre-
vent damage to your vehicle. Use only tow bars and
other equipment designed for the purpose, following
equipment manufacturer’s instructions. Use of safety
chains is mandatory. Attach a tow bar or other towing
device to main structural members of the vehicle, not
to bumpers or associated brackets. State and local laws
applying to vehicles under tow must be observed. If you must use the accessories (wipers, defrosters,
etc.) while being towed, the ignition must be in the
ON/RUN position, not the ACC position.
213
KNOWING
YOURVEHICLE SAFETY
STARTING ANDDRIVING
WARNING
LIGHTS AND
MESSAGESIN AN
EMERGENCYSERVICING AND
CARETECHNICAL
SPECIFICATIONSCONTENTS
Page 221 of 267
Do not use sling type equipment when
towing. Damage to the fascia will occur.
When securing the vehicle to a flatbed
truck, do not attach to front or rear suspension
components. Damage to your vehicle may result
from improper towing.
Do not push or tow this vehicle with another
vehicle as damage to the bumper fascia and trans-
mission may result .
If the vehicle being towed requires steering, the
ignition switch must be in the ON position, not in
the LOCK or ACC position.
MANUAL TRANSMISSION
The manufacturer recommends towing your vehicle
with all four wheels OFF the ground using a flatbed.
Your vehicle may also be towed in a forward direction,
with all four wheels on the ground, the shift lever in the
NEUTRAL position, and the ignition key in the ACC
position. If the transmission is not operative, the ve-
hicle must be towed with the front wheels OFF the
ground (using a flatbed truck, towing dolly, or wheel lift
equipment with the front wheels raised). WITHOUT THE IGNITION KEY
Special care must be taken when the vehicle is towed
with the ignition in the LOCK position. Flatbed towing
is the preferred towing method. However, if a flatbed
towing vehicle is not available, wheel lift towing equip-
ment may be used. Rear towing (with the front wheels
on the ground) is not allowed, as transmission damage
will occur. If rear towing is the only alternative, the
front wheels must be placed on a towing dolly. Proper
towing equipment is necessary to prevent damage to
the vehicle.
Failure to follow these towing methods
could result in severe damage to the
transmission. Such damage is not covered
by the New Vehicle Limited Warranty.
214
KNOWING YOUR
VEHICLE
SAFETY
STARTING AND
DRIVING
WARNING
LIGHTS AND
MESSAGES
IN AN
EMERGENCY
SERVICING AND
CARETECHNICAL
SPECIFICATIONSCONTENTS