remote start FIAT FREEMONT 2012 Owner handbook (in English)
[x] Cancel search | Manufacturer: FIAT, Model Year: 2012, Model line: FREEMONT, Model: FIAT FREEMONT 2012Pages: 332, PDF Size: 5.61 MB
Page 106 of 332
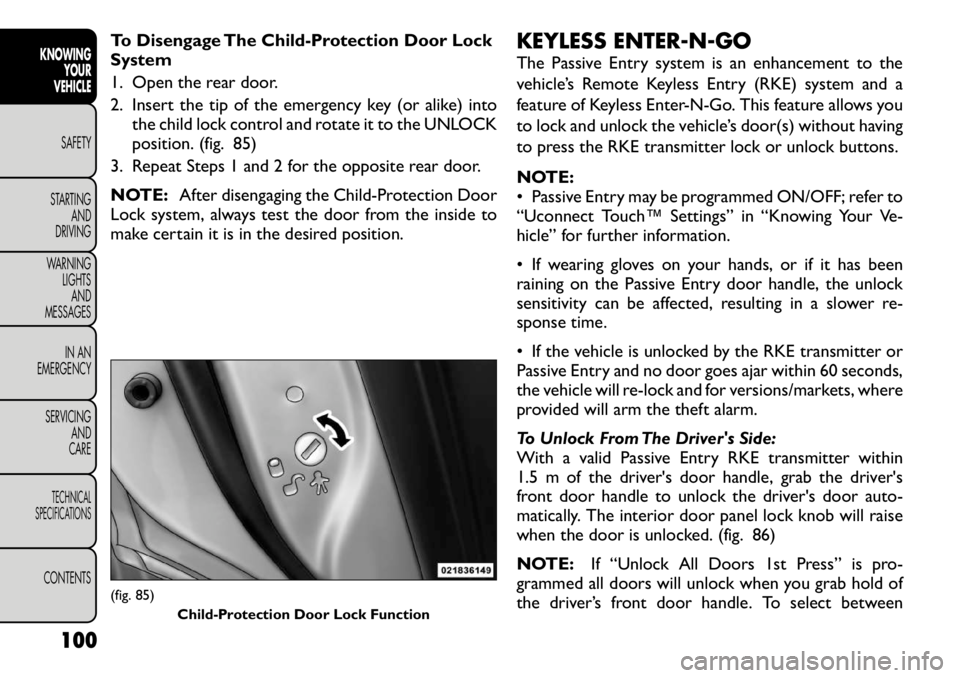
To Disengage The Child-Protection Door Lock
System
1. Open the rear door.
2. Insert the tip of the emergency key (or alike) intothe child lock control and rotate it to the UNLOCK
position. (fig. 85)
3. Repeat Steps 1 and 2 for the opposite rear door.
NOTE: After disengaging the Child-Protection Door
Lock system, always test the door from the inside to
make certain it is in the desired position. KEYLESS ENTER-N-GO
The Passive Entry system is an enhancement to the
vehicle’s Remote Keyless Entry (RKE) system and a
feature of Keyless Enter-N-Go. This feature allows you
to lock and unlock the vehicle’s door(s) without having
to press the RKE transmitter lock or unlock buttons.
NOTE:
• Passive Entry may be programmed ON/OFF; refer to
“Uconnect Touch™ Settings” in “Knowing Your Ve-
hicle” for further information.
• If wearing gloves on your hands, or if it has been
raining on the Passive Entry door handle, the unlock
sensitivity can be affected, resulting in a slower re-
sponse time.
• If the vehicle is unlocked by the RKE transmitter or
Passive Entry and no door goes ajar within 60 seconds,
the vehicle will re-lock and for versions/markets, where
provided will arm the theft alarm.
To Unlock From The Driver's Side:
With a valid Passive Entry RKE transmitter within
1.5 m of the driver's door handle, grab the driver's
front door handle to unlock the driver's door auto-
matically. The interior door panel lock knob will raise
when the door is unlocked. (fig. 86)
NOTE:
If “Unlock All Doors 1st Press” is pro-
grammed all doors will unlock when you grab hold of
the driver’s front door handle. To select between(fig. 85)
Child-Protection Door Lock Function
100
KNOWING YOUR
VEHICLE
SAFETY
STARTING AND
DRIVING
WARNING LIGHTSAND
MESSAGES
IN AN
EMERGENCY
SERVICING AND
CARETECHNICAL
SPECIFICATIONSCONTENTS
Page 143 of 332
STEERING WHEEL AUDIO
CONTROLS
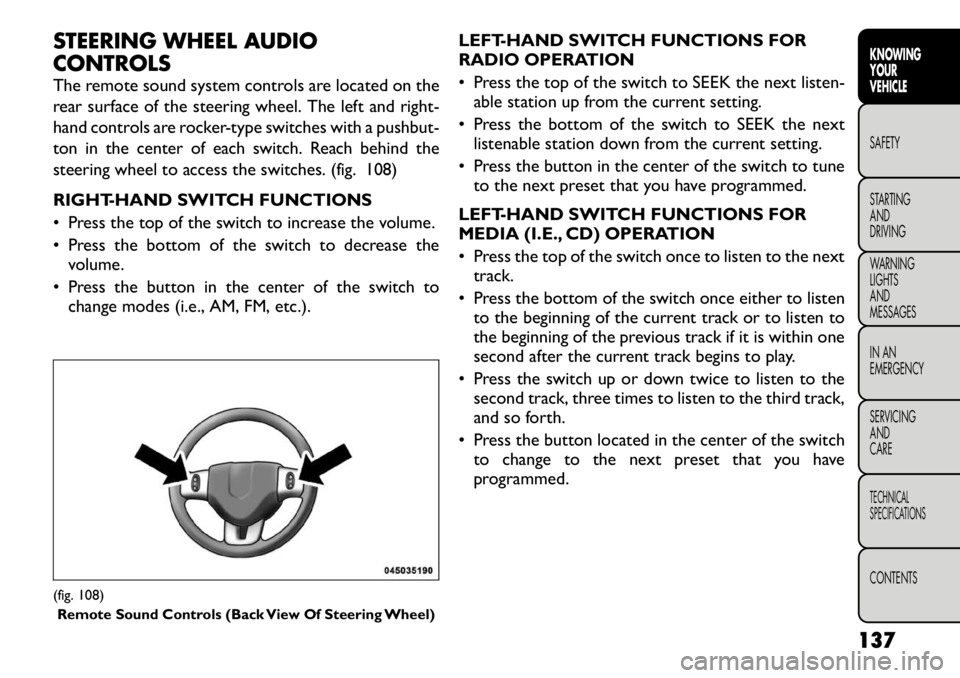
The remote sound system controls are located on the
rear surface of the steering wheel. The left and right-
hand controls are rocker-type switches with a pushbut-
ton in the center of each switch. Reach behind the
steering wheel to access the switches. (fig. 108)
RIGHT-HAND SWITCH FUNCTIONS
• Press the top of the switch to increase the volume.
• Press the bottom of the switch to decrease thevolume.
• Press the button in the center of the switch to change modes (i.e., AM, FM, etc.). LEFT-HAND SWITCH FUNCTIONS FOR
RADIO OPERATION
• Press the top of the switch to SEEK the next listen-
able station up from the current setting.
• Press the bottom of the switch to SEEK the next listenable station down from the current setting.
• Press the button in the center of the switch to tune to the next preset that you have programmed.
LEFT-HAND SWITCH FUNCTIONS FOR
MEDIA (I.E., CD) OPERATION
• Press the top of the switch once to listen to the next track.
• Press the bottom of the switch once either to listen to the beginning of the current track or to listen to
the beginning of the previous track if it is within one
second after the current track begins to play.
• Press the switch up or down twice to listen to the second track, three times to listen to the third track,
and so forth.
• Press the button located in the center of the switch to change to the next preset that you have
programmed.(fig. 108)
Remote Sound Controls (Back View Of Steering Wheel)
137
KNOWING
YOURVEHICLESAFETY
STARTING ANDDRIVING
WARNING LIGHTSAND
MESSAGES
IN AN
EMERGENCY
SERVICING AND
CARETECHNICAL
SPECIFICATIONSCONTENTS
Page 144 of 332
UCONNECT™ MULTIMEDIA VIDEO
ENTERTAINMENT SYSTEM (VES)™
(for versions/markets, where
provided)
Your rear seat Video Entertainment System (VES)™ is
designed to give your family years of enjoyment. You
can play your favorite CDs or DVDs, listen to audio
over the wireless headphones, or plug and play a variety
of standard video games or audio devices. Please re-
view this Owner's Manual to become familiar with its
features and operation.
System Overview
The rear seat Video Entertainment System (VES)™
consists of:
• Your vehicle may be equipped a single LCD overheadconsole screen system.
• One infrared remote control to allow rear seat audio and video control function capability of the VES™.
• Two infrared wireless dual channel headphones for rear passenger listening.
• Auxiliary RCA audio/video inputs (AUX jacks) for listening and viewing of other consumer electronic
device media such as MP3 players or video games.
• Radio capable of playing DVDs.
Video Entertainment System (VES)™
This manual is intended to aid with the operation of the
rear seat Video Entertainment System (VES)™. The Video Entertainment System (VES)™ expands the
vehicle’s audio and video capabilities so that rear pas-
sengers can enjoy movies, music and external audio/
video devices such as video games or MP3 players. The
VES™ integrates seamlessly with the vehicle’s radio so
the audio may be heard through the cabin speakers
and/or headphones. The system may be controlled by
the radio for front seat occupants or controlled by the
remote control for rear seat occupants.
The VES™ is a dual channel system. The video screen
displays information in a split screen format. The left
side of the screen is referred to as Channel 1 and the
right side of the screen is referred to as Channel 2. All
modes except video modes (DVD video, Aux video)
are displayed in a split screen format. When a video
mode is displayed it is displayed on the full screen. The
remote control is designed to control either channel by
the use of the selector switch located on the right side
of the remote control. The headphones are designed
to listen to either channel by use of the selector switch
located on the right ear cup.
Using the included dual channel wireless headphones,
the VES™ allows rear passengers to listen to two
different audio sources simultaneously. The wireless
remote control allows rear passengers to change sta-
tions, tracks, discs and audio/video modes.
138
KNOWING YOUR
VEHICLE
SAFETY
STARTING AND
DRIVING
WARNING LIGHTSAND
MESSAGES
IN AN
EMERGENCY
SERVICING AND
CARETECHNICAL
SPECIFICATIONSCONTENTS
Page 145 of 332
Remote Control Operation
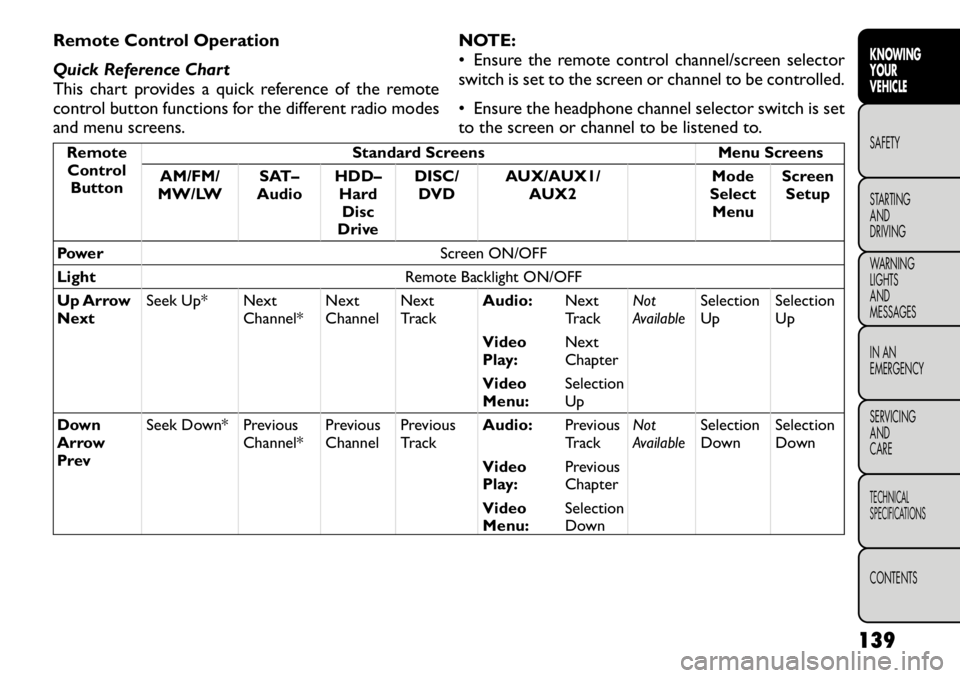
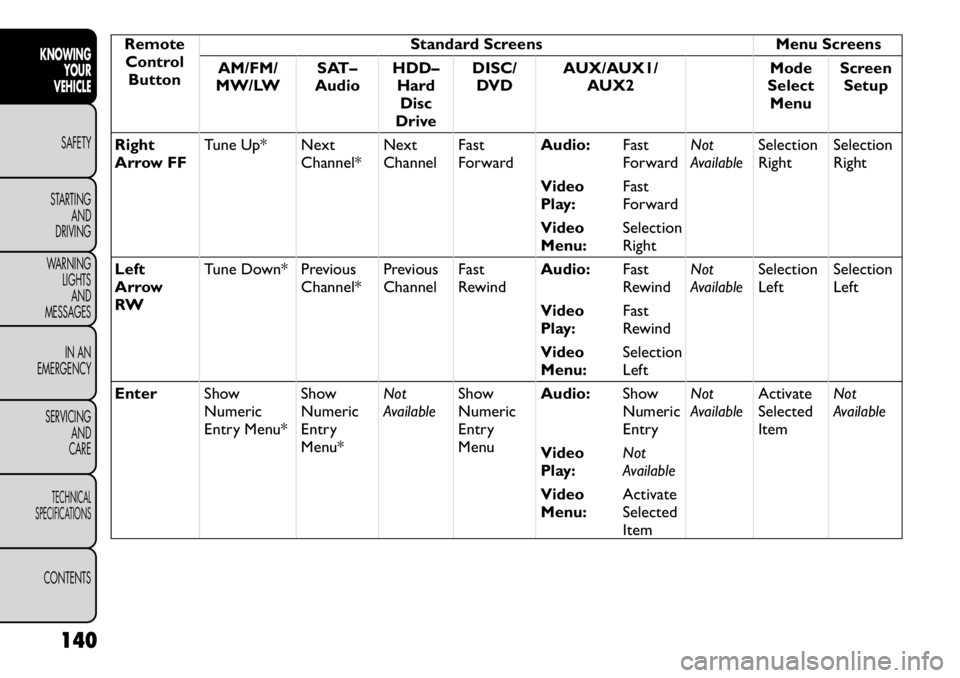
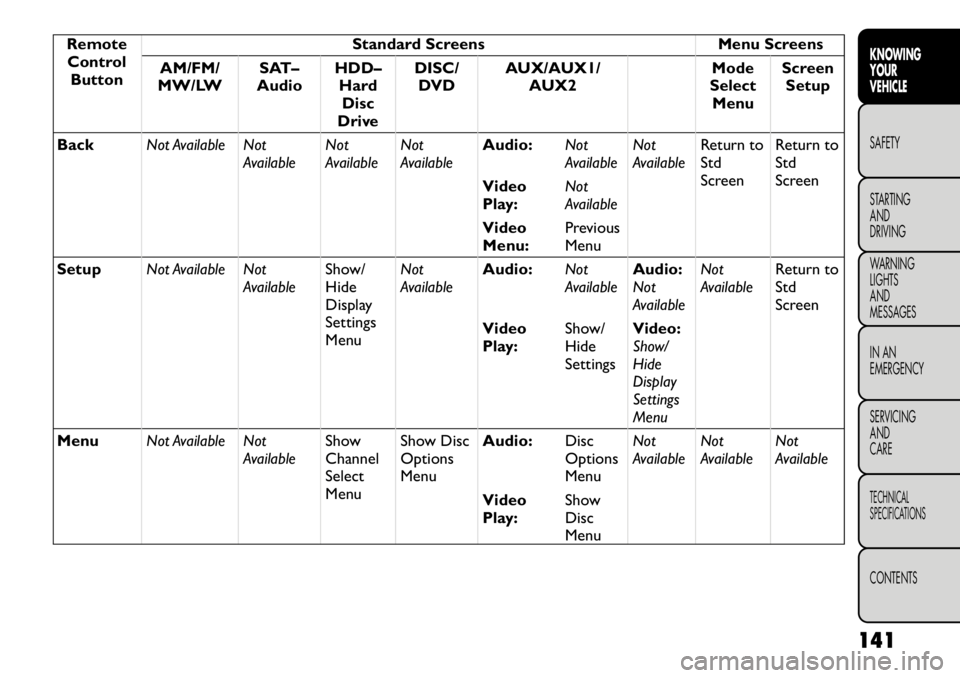
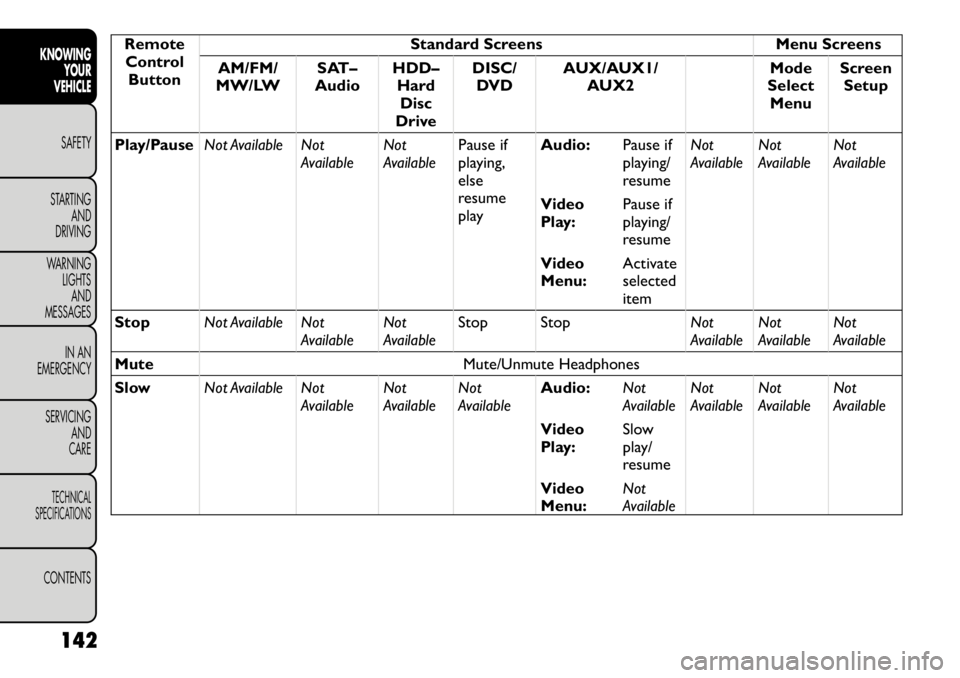
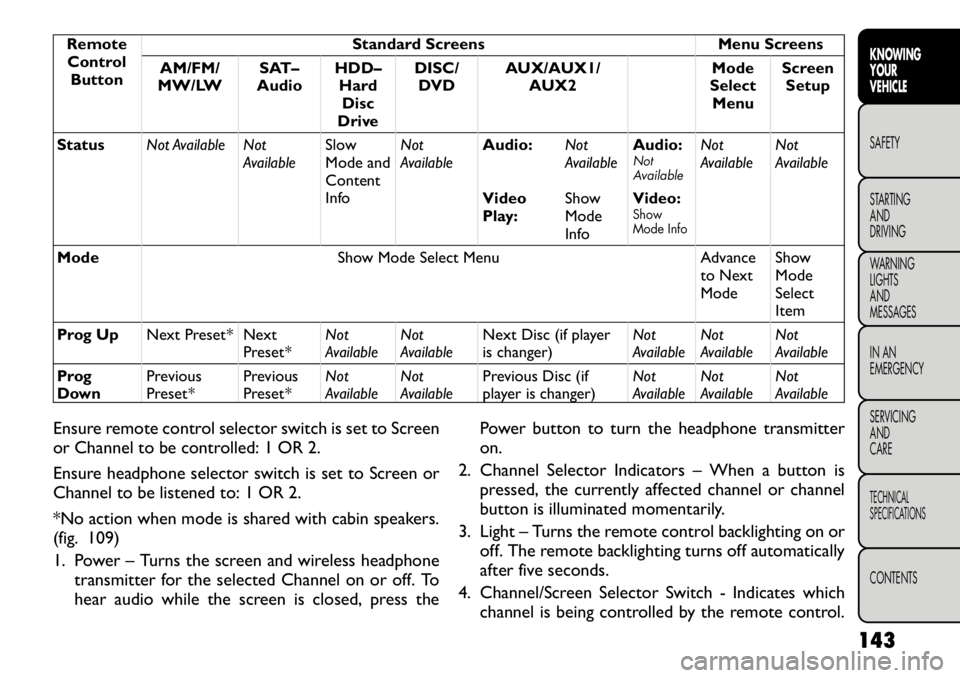
Quick Reference Chart
This chart provides a quick reference of the remote
control button functions for the different radio modes
and menu screens.NOTE:
• Ensure the remote control channel/screen selector
switch is set to the screen or channel to be controlled.
• Ensure the headphone channel selector switch is set
to the screen or channel to be listened to.Remote
Control
Button Standard Screens Menu Screens
AM/FM/
MW/LW SAT–
Audio HDD–
HardDisc
Drive DISC/
DVD AUX/AUX1/
AUX2 Mode
Select Menu Screen
Setup
Power Screen ON/OFF
Light Remote Backlight ON/OFF
Up Arrow
Next Seek Up* Next
Channel*NextChannelNext
Track Audio:
Next
TrackNot
AvailableSelectionUp SelectionUp
Video
Play: Next
Chapter
Video
Menu: SelectionUp
Down
Arrow
Prev Seek Down* Previous
Channel*PreviousChannelPrevious
Track Audio:
Previous
TrackNot
AvailableSelection
Down Selection
Down
Video
Play: Previous
Chapter
Video
Menu: Selection
Down
139
KNOWING
YOURVEHICLESAFETY
STARTING ANDDRIVING
WARNING LIGHTSAND
MESSAGES
IN AN
EMERGENCY
SERVICING AND
CARETECHNICAL
SPECIFICATIONSCONTENTS
Page 146 of 332
RemoteControl Button Standard Screens Menu Screens
AM/FM/
MW/LW SAT–
Audio HDD–
HardDisc
Drive DISC/
DVD AUX/AUX1/
AUX2 Mode
Select Menu Screen
Setup
Right
Arrow FF Tune Up* Next
Channel*NextChannelFast
Forward Audio:
Fast
ForwardNot
AvailableSelectionRight SelectionRight
Video
Play: Fast
Forward
Video
Menu: SelectionRight
Left
Arrow
RW Tune Down* Previous
Channel*PreviousChannelFast
Rewind Audio:
Fast
RewindNot
AvailableSelection
Left Selection
Left
Video
Play: Fast
Rewind
Video
Menu: Selection
Left
Enter ShowNumeric
Entry Menu* ShowNumeric
Entry
Menu*Not
Available
ShowNumeric
Entry
Menu Audio:
ShowNumeric
EntryNot
Available
Activate
Selected
Item Not
Available
Video
Play: Not
Available
Video
Menu: Activate
Selected
Item
140
KNOWING YOUR
VEHICLE
SAFETY
STARTING AND
DRIVING
WARNING LIGHTSAND
MESSAGES
IN AN
EMERGENCY
SERVICING AND
CARETECHNICAL
SPECIFICATIONSCONTENTS
Page 147 of 332
RemoteControl Button Standard Screens Menu Screens
AM/FM/
MW/LW SAT–
Audio HDD–
HardDisc
Drive DISC/
DVD AUX/AUX1/
AUX2 Mode
Select Menu Screen
Setup
Back Not Available Not
AvailableNot
AvailableNot
Available Audio:
Not
AvailableNot
AvailableReturn to
Std
Screen Return to
Std
Screen
Video
Play: Not
Available
Video
Menu: Previous
Menu
Setup Not Available Not
AvailableShow/Hide
DisplaySettings
MenuNot
Available
Audio:
Not
AvailableAudio:Not
AvailableNot
Available
Return to
Std
Screen
Video
Play: Show/HideSettingsVideo:
Show/Hide
Display
SettingsMenu
Menu Not Available Not
AvailableShowChannelSelect
MenuShow DiscOptions
Menu
Audio:
DiscOptions
MenuNot
Available
Not
Available Not
Available
Video
Play: ShowDisc
Menu
141
KNOWING
YOURVEHICLESAFETY
STARTING ANDDRIVING
WARNING LIGHTSAND
MESSAGES
IN AN
EMERGENCY
SERVICING AND
CARETECHNICAL
SPECIFICATIONSCONTENTS
Page 148 of 332
RemoteControl Button Standard Screens Menu Screens
AM/FM/
MW/LW SAT–
Audio HDD–
HardDisc
Drive DISC/
DVD AUX/AUX1/
AUX2 Mode
Select Menu Screen
Setup
Play/Pause Not Available Not
AvailableNot
AvailablePause if
playing,else
resume
play Audio:
Pause if
playing/
resumeNot
Available
Not
Available Not
Available
Video
Play: Pause if
playing/
resume
Video
Menu: Activate
selected
item
Stop Not Available Not
AvailableNot
AvailableStop Stop
Not
AvailableNot
Available Not
Available
Mute Mute/Unmute Headphones
Slow Not Available Not
AvailableNot
AvailableNot
Available Audio:
Not
AvailableNot
AvailableNot
Available Not
Available
Video
Play: Slow
play/
resume
Video
Menu: Not
Available
142
KNOWING YOUR
VEHICLE
SAFETY
STARTING AND
DRIVING
WARNING LIGHTSAND
MESSAGES
IN AN
EMERGENCY
SERVICING AND
CARETECHNICAL
SPECIFICATIONSCONTENTS
Page 149 of 332
RemoteControl Button Standard Screens Menu Screens
AM/FM/
MW/LW SAT–
Audio HDD–
HardDisc
Drive DISC/
DVD AUX/AUX1/
AUX2 Mode
Select Menu Screen
Setup
Status Not Available Not
AvailableSlow
Mode and
Content
InfoNot
Available
Audio:
Not
AvailableAudio:
Not
Available
Not
Available Not
Available
Video
Play: ShowMode
InfoVideo:
Show
Mode Info
Mode
Show Mode Select Menu Advance
to Next ModeShowModeSelect
Item
Prog Up Next Preset* Next
Preset*Not
AvailableNot
Available Next Disc (if player
is changer) Not
AvailableNot
Available Not
Available
Prog
Down Previous
Preset* Previous
Preset*Not
AvailableNot
Available Previous Disc (if
player is changer) Not
AvailableNot
Available Not
Available
Ensure remote control selector switch is set to Screen
or Channel to be controlled: 1 OR 2.
Ensure headphone selector switch is set to Screen or
Channel to be listened to: 1 OR 2.
*No action when mode is shared with cabin speakers.
(fig. 109)
1. Power – Turns the screen and wireless headphone transmitter for the selected Channel on or off. To
hear audio while the screen is closed, press the Power button to turn the headphone transmitteron.
2. Channel Selector Indicators – When a button is pressed, the currently affected channel or channel
button is illuminated momentarily.
3. Light – Turns the remote control backlighting on or off. The remote backlighting turns off automatically
after five seconds.
4. Channel/Screen Selector Switch - Indicates which channel is being controlled by the remote control.
143
KNOWING
YOURVEHICLESAFETY
STARTING ANDDRIVING
WARNING LIGHTSAND
MESSAGES
IN AN
EMERGENCY
SERVICING AND
CARETECHNICAL
SPECIFICATIONSCONTENTS
Page 150 of 332
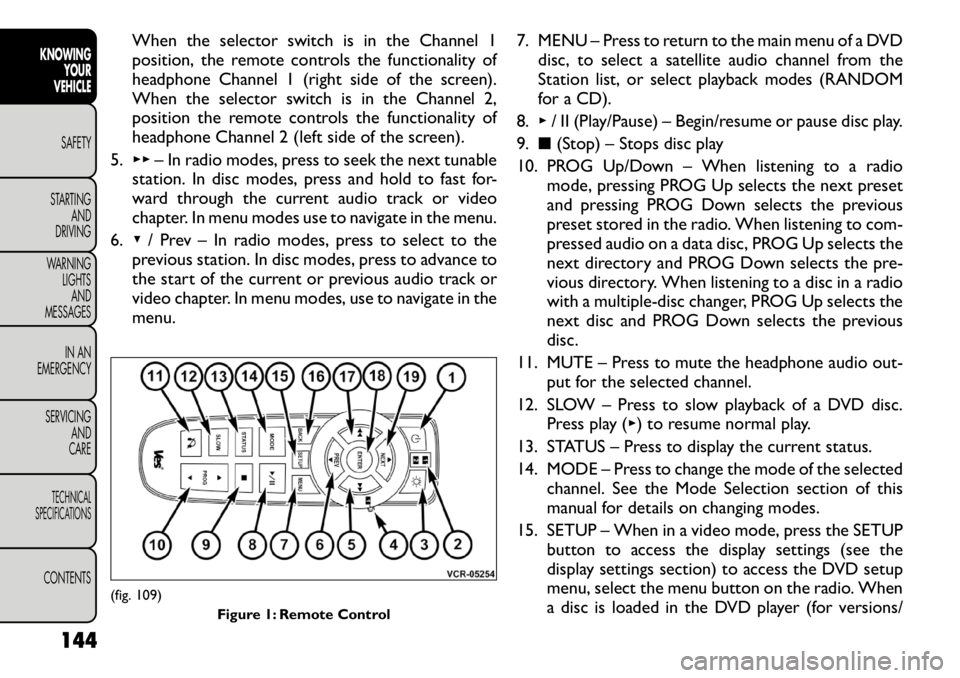
When the selector switch is in the Channel 1
position, the remote controls the functionality of
headphone Channel 1 (right side of the screen).
When the selector switch is in the Channel 2,
position the remote controls the functionality of
headphone Channel 2 (left side of the screen).
5. ▸▸ – In radio modes, press to seek the next tunable
station. In disc modes, press and hold to fast for-
ward through the current audio track or video
chapter. In menu modes use to navigate in the menu.
6. ▾/ Prev – In radio modes, press to select to the
previous station. In disc modes, press to advance to
the start of the current or previous audio track or
video chapter. In menu modes, use to navigate in the
menu. 7. MENU – Press to return to the main menu of a DVD
disc, to select a satellite audio channel from the
Station list, or select playback modes (RANDOM
for a CD).
8. ▸/ II (Play/Pause) – Begin/resume or pause disc play.
9. ■(Stop) – Stops disc play
10. PROG Up/Down – When listening to a radio mode, pressing PROG Up selects the next preset
and pressing PROG Down selects the previous
preset stored in the radio. When listening to com-
pressed audio on a data disc, PROG Up selects the
next directory and PROG Down selects the pre-
vious directory. When listening to a disc in a radio
with a multiple-disc changer, PROG Up selects the
next disc and PROG Down selects the previous
disc.
11. MUTE – Press to mute the headphone audio out- put for the selected channel.
12. SLOW – Press to slow playback of a DVD disc. Press play ( ▸) to resume normal play.
13. STATUS – Press to display the current status.
14. MODE – Press to change the mode of the selected channel. See the Mode Selection section of this
manual for details on changing modes.
15. SETUP – When in a video mode, press the SETUP button to access the display settings (see the
display settings section) to access the DVD setup
menu, select the menu button on the radio. When
a disc is loaded in the DVD player (for versions/
(fig. 109)
Figure 1: Remote Control
144
KNOWING YOUR
VEHICLE
SAFETY
STARTING AND
DRIVING
WARNING LIGHTSAND
MESSAGES
IN AN
EMERGENCY
SERVICING AND
CARETECHNICAL
SPECIFICATIONSCONTENTS
Page 151 of 332
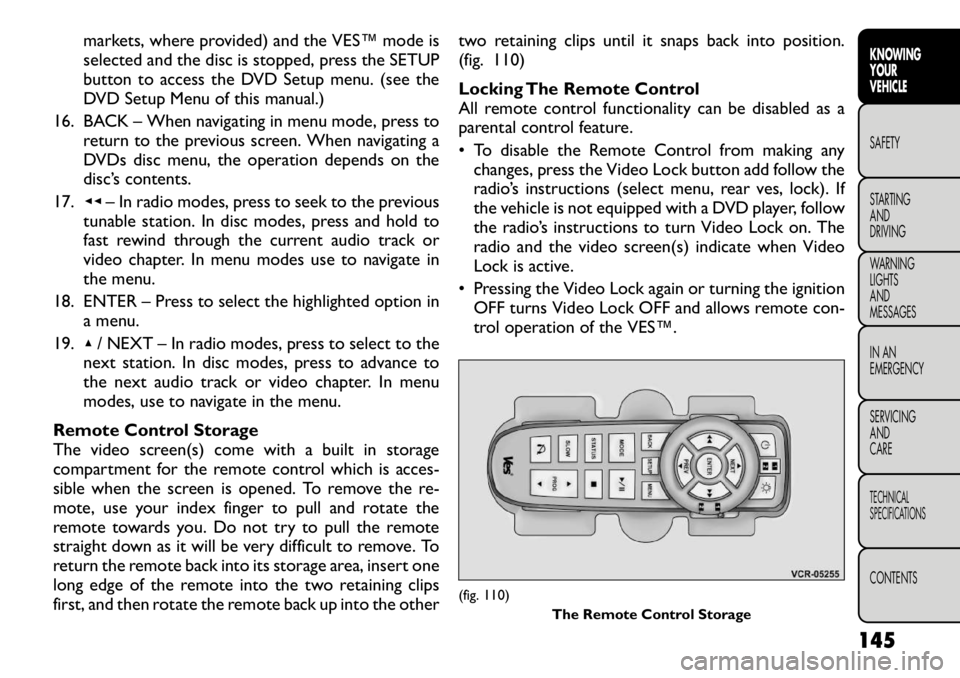
markets, where provided) and the VES™ mode is
selected and the disc is stopped, press the SETUP
button to access the DVD Setup menu. (see the
DVD Setup Menu of this manual.)
16. BACK – When navigating in menu mode, press to return to the previous screen. When navigating a
DVDs disc menu, the operation depends on the
disc’s contents.
17. ◂◂– In radio modes, press to seek to the previous
tunable station. In disc modes, press and hold to
fast rewind through the current audio track or
video chapter. In menu modes use to navigate in
the menu.
18. ENTER – Press to select the highlighted option in a menu.
19. ▴/ NEXT – In radio modes, press to select to the
next station. In disc modes, press to advance to
the next audio track or video chapter. In menu
modes, use to navigate in the menu.
Remote Control Storage
The video screen(s) come with a built in storage
compartment for the remote control which is acces-
sible when the screen is opened. To remove the re-
mote, use your index finger to pull and rotate the
remote towards you. Do not try to pull the remote
straight down as it will be very difficult to remove. To
return the remote back into its storage area, insert one
long edge of the remote into the two retaining clips
first, and then rotate the remote back up into the other two retaining clips until it snaps back into position.
(fig. 110)
Locking The Remote Control
All remote control functionality can be disabled as a
parental control feature.
• To disable the Remote Control from making any
changes, press the Video Lock button add follow the
radio’s instructions (select menu, rear ves, lock). If
the vehicle is not equipped with a DVD player, follow
the radio’s instructions to turn Video Lock on. The
radio and the video screen(s) indicate when Video
Lock is active.
• Pressing the Video Lock again or turning the ignition OFF turns Video Lock OFF and allows remote con-
trol operation of the VES™.
(fig. 110) The Remote Control Storage
145
KNOWING
YOURVEHICLESAFETY
STARTING ANDDRIVING
WARNING LIGHTSAND
MESSAGES
IN AN
EMERGENCY
SERVICING AND
CARETECHNICAL
SPECIFICATIONSCONTENTS