CD player FIAT FREEMONT 2012 Owner handbook (in English)
[x] Cancel search | Manufacturer: FIAT, Model Year: 2012, Model line: FREEMONT, Model: FIAT FREEMONT 2012Pages: 332, PDF Size: 5.61 MB
Page 53 of 332
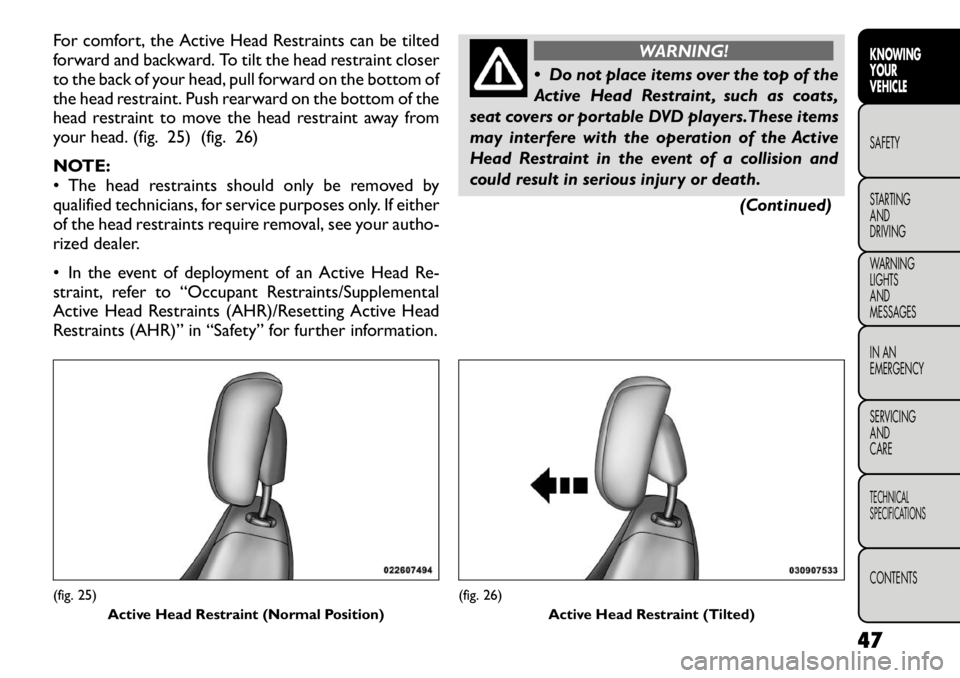
For comfort, the Active Head Restraints can be tilted
forward and backward. To tilt the head restraint closer
to the back of your head, pull forward on the bottom of
the head restraint. Push rearward on the bottom of the
head restraint to move the head restraint away from
your head. (fig. 25) (fig. 26)
NOTE:
• The head restraints should only be removed by
qualified technicians, for service purposes only. If either
of the head restraints require removal, see your autho-
rized dealer.
• In the event of deployment of an Active Head Re-
straint, refer to “Occupant Restraints/Supplemental
Active Head Restraints (AHR)/Resetting Active Head
Restraints (AHR)” in “Safety” for further information.
WARNING!
Do not place items over the top of the
Active Head Restraint , such as coats,
seat covers or portable DVD players.These items
may interfere with the operation of the Active
Head Restraint in the event of a collision and
could result in serious injury or death.
(Continued)
(fig. 25)Active Head Restraint (Normal Position)
(fig. 26) Active Head Restraint (Tilted)
47
KNOWING
YOURVEHICLESAFETY
STARTING ANDDRIVING
WARNING LIGHTSAND
MESSAGES
IN AN
EMERGENCY
SERVICING AND
CARETECHNICAL
SPECIFICATIONSCONTENTS
Page 65 of 332
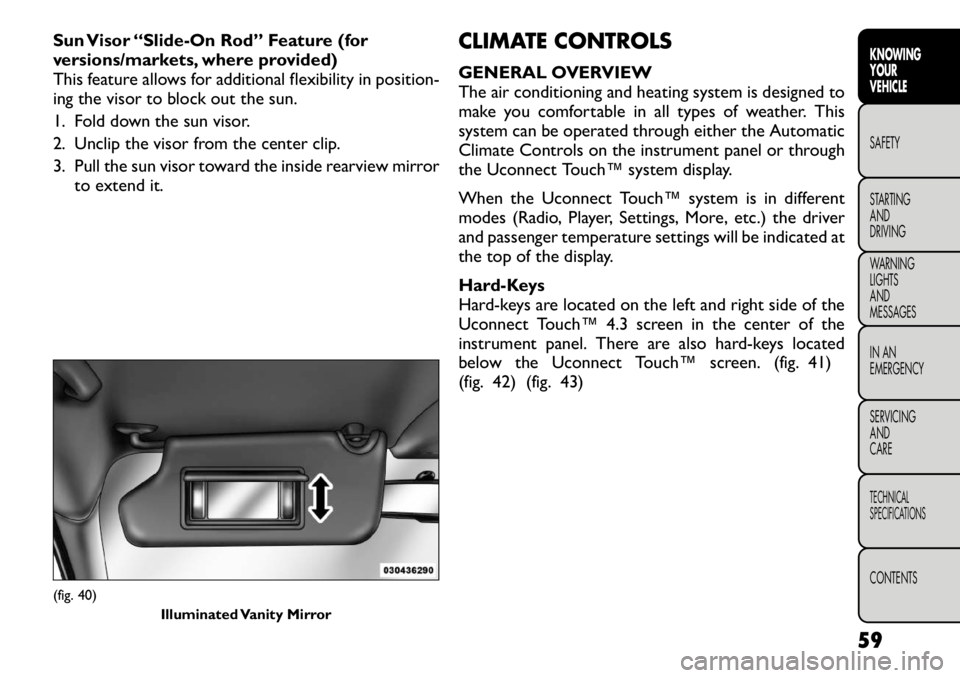
Sun Visor “Slide-On Rod” Feature (for
versions/markets, where provided)
This feature allows for additional flexibility in position-
ing the visor to block out the sun.
1. Fold down the sun visor.
2. Unclip the visor from the center clip.
3. Pull the sun visor toward the inside rearview mirrorto extend it. CLIMATE CONTROLS
GENERAL OVERVIEW
The air conditioning and heating system is designed to
make you comfortable in all types of weather. This
system can be operated through either the Automatic
Climate Controls on the instrument panel or through
the Uconnect Touch™ system display.
When the Uconnect Touch™ system is in different
modes (Radio, Player, Settings, More, etc.) the driver
and passenger temperature settings will be indicated at
the top of the display.
Hard-Keys
Hard-keys are located on the left and right side of the
Uconnect Touch™ 4.3 screen in the center of the
instrument panel. There are also hard-keys located
below the Uconnect Touch™ screen. (fig. 41)
(fig. 42) (fig. 43)(fig. 40)
Illuminated Vanity Mirror
59
KNOWING
YOURVEHICLESAFETY
STARTING ANDDRIVING
WARNING LIGHTSAND
MESSAGES
IN AN
EMERGENCY
SERVICING AND
CARETECHNICAL
SPECIFICATIONSCONTENTS
Page 93 of 332
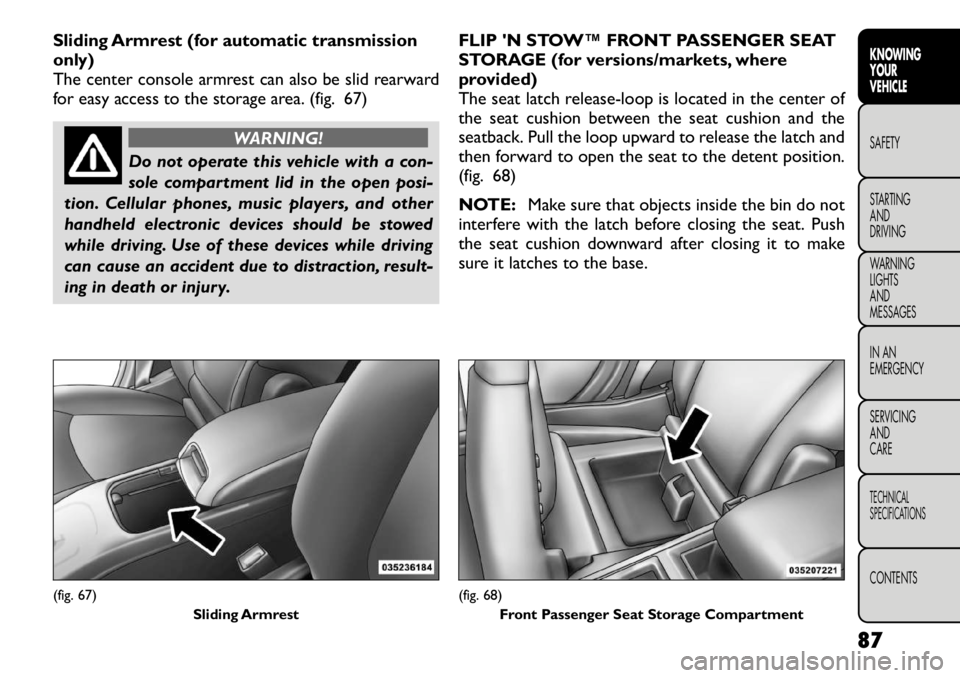
Sliding Armrest (for automatic transmission
only)
The center console armrest can also be slid rearward
for easy access to the storage area. (fig. 67)
WARNING!
Do not operate this vehicle with a con-
sole compartment lid in the open posi-
tion. Cellular phones, music players, and other
handheld electronic devices should be stowed
while driving. Use of these devices while driving
can cause an accident due to distraction, result-
ing in death or injury. FLIP 'N STOW™ FRONT PASSENGER SEAT
STORAGE (for versions/markets, where
provided)
The seat latch release-loop is located in the center of
the seat cushion between the seat cushion and the
seatback. Pull the loop upward to release the latch and
then forward to open the seat to the detent position.
(fig. 68)
NOTE:
Make sure that objects inside the bin do not
interfere with the latch before closing the seat. Push
the seat cushion downward after closing it to make
sure it latches to the base.
(fig. 67)
Sliding Armrest
(fig. 68)Front Passenger Seat Storage Compartment
87
KNOWING
YOURVEHICLESAFETY
STARTING ANDDRIVING
WARNING LIGHTSAND
MESSAGES
IN AN
EMERGENCY
SERVICING AND
CARETECHNICAL
SPECIFICATIONSCONTENTS
Page 144 of 332
UCONNECT™ MULTIMEDIA VIDEO
ENTERTAINMENT SYSTEM (VES)™
(for versions/markets, where
provided)
Your rear seat Video Entertainment System (VES)™ is
designed to give your family years of enjoyment. You
can play your favorite CDs or DVDs, listen to audio
over the wireless headphones, or plug and play a variety
of standard video games or audio devices. Please re-
view this Owner's Manual to become familiar with its
features and operation.
System Overview
The rear seat Video Entertainment System (VES)™
consists of:
• Your vehicle may be equipped a single LCD overheadconsole screen system.
• One infrared remote control to allow rear seat audio and video control function capability of the VES™.
• Two infrared wireless dual channel headphones for rear passenger listening.
• Auxiliary RCA audio/video inputs (AUX jacks) for listening and viewing of other consumer electronic
device media such as MP3 players or video games.
• Radio capable of playing DVDs.
Video Entertainment System (VES)™
This manual is intended to aid with the operation of the
rear seat Video Entertainment System (VES)™. The Video Entertainment System (VES)™ expands the
vehicle’s audio and video capabilities so that rear pas-
sengers can enjoy movies, music and external audio/
video devices such as video games or MP3 players. The
VES™ integrates seamlessly with the vehicle’s radio so
the audio may be heard through the cabin speakers
and/or headphones. The system may be controlled by
the radio for front seat occupants or controlled by the
remote control for rear seat occupants.
The VES™ is a dual channel system. The video screen
displays information in a split screen format. The left
side of the screen is referred to as Channel 1 and the
right side of the screen is referred to as Channel 2. All
modes except video modes (DVD video, Aux video)
are displayed in a split screen format. When a video
mode is displayed it is displayed on the full screen. The
remote control is designed to control either channel by
the use of the selector switch located on the right side
of the remote control. The headphones are designed
to listen to either channel by use of the selector switch
located on the right ear cup.
Using the included dual channel wireless headphones,
the VES™ allows rear passengers to listen to two
different audio sources simultaneously. The wireless
remote control allows rear passengers to change sta-
tions, tracks, discs and audio/video modes.
138
KNOWING YOUR
VEHICLE
SAFETY
STARTING AND
DRIVING
WARNING LIGHTSAND
MESSAGES
IN AN
EMERGENCY
SERVICING AND
CARETECHNICAL
SPECIFICATIONSCONTENTS
Page 149 of 332
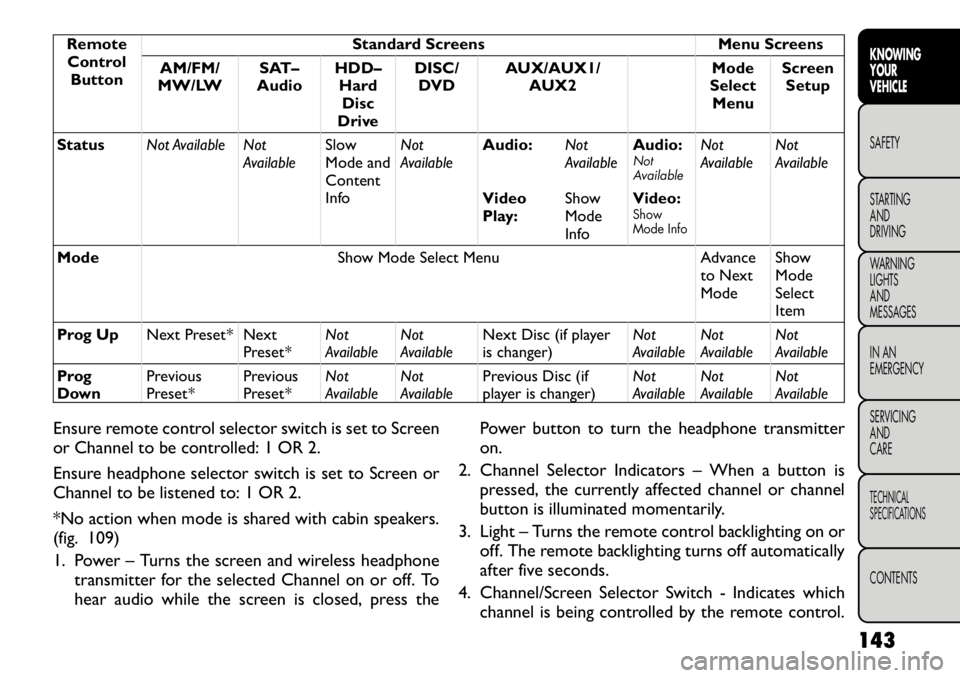
RemoteControl Button Standard Screens Menu Screens
AM/FM/
MW/LW SAT–
Audio HDD–
HardDisc
Drive DISC/
DVD AUX/AUX1/
AUX2 Mode
Select Menu Screen
Setup
Status Not Available Not
AvailableSlow
Mode and
Content
InfoNot
Available
Audio:
Not
AvailableAudio:
Not
Available
Not
Available Not
Available
Video
Play: ShowMode
InfoVideo:
Show
Mode Info
Mode
Show Mode Select Menu Advance
to Next ModeShowModeSelect
Item
Prog Up Next Preset* Next
Preset*Not
AvailableNot
Available Next Disc (if player
is changer) Not
AvailableNot
Available Not
Available
Prog
Down Previous
Preset* Previous
Preset*Not
AvailableNot
Available Previous Disc (if
player is changer) Not
AvailableNot
Available Not
Available
Ensure remote control selector switch is set to Screen
or Channel to be controlled: 1 OR 2.
Ensure headphone selector switch is set to Screen or
Channel to be listened to: 1 OR 2.
*No action when mode is shared with cabin speakers.
(fig. 109)
1. Power – Turns the screen and wireless headphone transmitter for the selected Channel on or off. To
hear audio while the screen is closed, press the Power button to turn the headphone transmitteron.
2. Channel Selector Indicators – When a button is pressed, the currently affected channel or channel
button is illuminated momentarily.
3. Light – Turns the remote control backlighting on or off. The remote backlighting turns off automatically
after five seconds.
4. Channel/Screen Selector Switch - Indicates which channel is being controlled by the remote control.
143
KNOWING
YOURVEHICLESAFETY
STARTING ANDDRIVING
WARNING LIGHTSAND
MESSAGES
IN AN
EMERGENCY
SERVICING AND
CARETECHNICAL
SPECIFICATIONSCONTENTS
Page 150 of 332
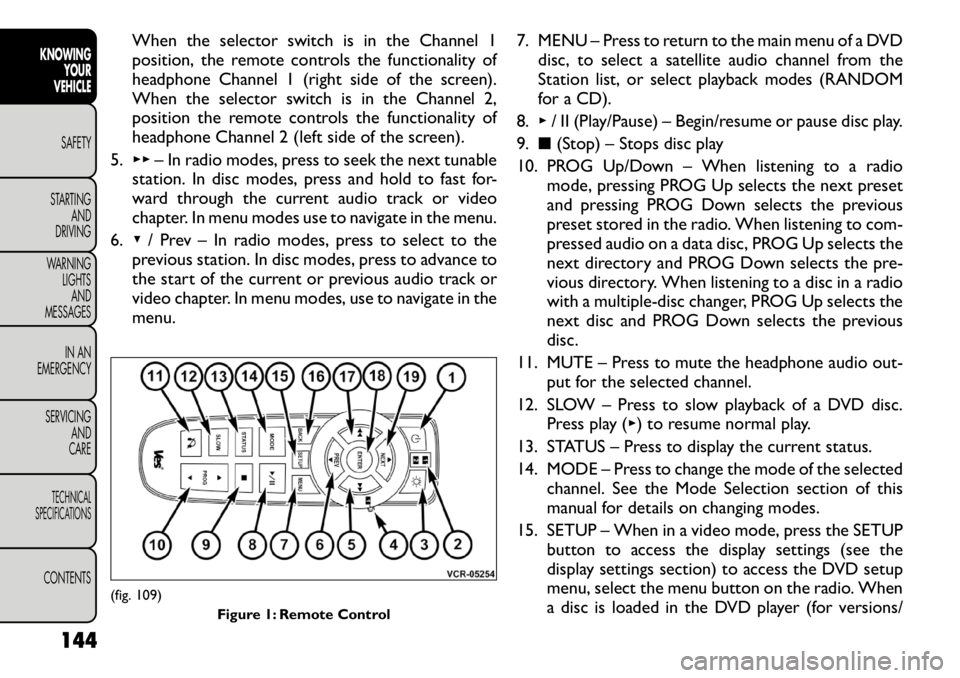
When the selector switch is in the Channel 1
position, the remote controls the functionality of
headphone Channel 1 (right side of the screen).
When the selector switch is in the Channel 2,
position the remote controls the functionality of
headphone Channel 2 (left side of the screen).
5. ▸▸ – In radio modes, press to seek the next tunable
station. In disc modes, press and hold to fast for-
ward through the current audio track or video
chapter. In menu modes use to navigate in the menu.
6. ▾/ Prev – In radio modes, press to select to the
previous station. In disc modes, press to advance to
the start of the current or previous audio track or
video chapter. In menu modes, use to navigate in the
menu. 7. MENU – Press to return to the main menu of a DVD
disc, to select a satellite audio channel from the
Station list, or select playback modes (RANDOM
for a CD).
8. ▸/ II (Play/Pause) – Begin/resume or pause disc play.
9. ■(Stop) – Stops disc play
10. PROG Up/Down – When listening to a radio mode, pressing PROG Up selects the next preset
and pressing PROG Down selects the previous
preset stored in the radio. When listening to com-
pressed audio on a data disc, PROG Up selects the
next directory and PROG Down selects the pre-
vious directory. When listening to a disc in a radio
with a multiple-disc changer, PROG Up selects the
next disc and PROG Down selects the previous
disc.
11. MUTE – Press to mute the headphone audio out- put for the selected channel.
12. SLOW – Press to slow playback of a DVD disc. Press play ( ▸) to resume normal play.
13. STATUS – Press to display the current status.
14. MODE – Press to change the mode of the selected channel. See the Mode Selection section of this
manual for details on changing modes.
15. SETUP – When in a video mode, press the SETUP button to access the display settings (see the
display settings section) to access the DVD setup
menu, select the menu button on the radio. When
a disc is loaded in the DVD player (for versions/
(fig. 109)
Figure 1: Remote Control
144
KNOWING YOUR
VEHICLE
SAFETY
STARTING AND
DRIVING
WARNING LIGHTSAND
MESSAGES
IN AN
EMERGENCY
SERVICING AND
CARETECHNICAL
SPECIFICATIONSCONTENTS
Page 151 of 332
markets, where provided) and the VES™ mode is
selected and the disc is stopped, press the SETUP
button to access the DVD Setup menu. (see the
DVD Setup Menu of this manual.)
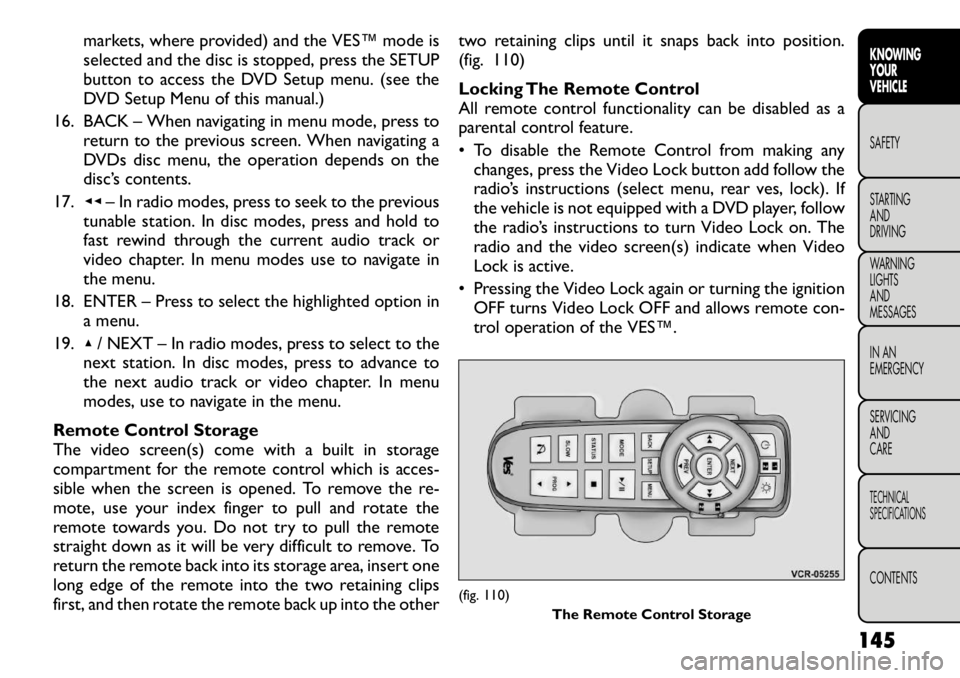
16. BACK – When navigating in menu mode, press to return to the previous screen. When navigating a
DVDs disc menu, the operation depends on the
disc’s contents.
17. ◂◂– In radio modes, press to seek to the previous
tunable station. In disc modes, press and hold to
fast rewind through the current audio track or
video chapter. In menu modes use to navigate in
the menu.
18. ENTER – Press to select the highlighted option in a menu.
19. ▴/ NEXT – In radio modes, press to select to the
next station. In disc modes, press to advance to
the next audio track or video chapter. In menu
modes, use to navigate in the menu.
Remote Control Storage
The video screen(s) come with a built in storage
compartment for the remote control which is acces-
sible when the screen is opened. To remove the re-
mote, use your index finger to pull and rotate the
remote towards you. Do not try to pull the remote
straight down as it will be very difficult to remove. To
return the remote back into its storage area, insert one
long edge of the remote into the two retaining clips
first, and then rotate the remote back up into the other two retaining clips until it snaps back into position.
(fig. 110)
Locking The Remote Control
All remote control functionality can be disabled as a
parental control feature.
• To disable the Remote Control from making any
changes, press the Video Lock button add follow the
radio’s instructions (select menu, rear ves, lock). If
the vehicle is not equipped with a DVD player, follow
the radio’s instructions to turn Video Lock on. The
radio and the video screen(s) indicate when Video
Lock is active.
• Pressing the Video Lock again or turning the ignition OFF turns Video Lock OFF and allows remote con-
trol operation of the VES™.
(fig. 110) The Remote Control Storage
145
KNOWING
YOURVEHICLESAFETY
STARTING ANDDRIVING
WARNING LIGHTSAND
MESSAGES
IN AN
EMERGENCY
SERVICING AND
CARETECHNICAL
SPECIFICATIONSCONTENTS
Page 155 of 332
image. A popup banner at the bottom of the screen is
displayed momentarily over the video image showing
any change in status of Channel 2.
When Channel 2 is in video mode, the image is dis-
played on the second rear seat screen as a full screen
image. A popup banner at the bottom of the screen is
displayed momentarily over the video image showing
any change in status of Channel 1.
Playing A Disc On The VES™
The following actions occur automatically when a disc
is inserted into the radio on a single screen system and
into the remote DVD player on a two screen system:
• If the video screen is in the open position (the LCDscreen is visible), then the screen turns on and the
wireless headphone transmitter turns on. If the video
screen is closed, the wireless headphone transmitter
must be turned on by using the power button on the
remote control (headphones only receive audio sig-
nals if the headphones are powered on).
• After the disc is inserted, the disc begins playing to cabin speakers, wireless headphones, and rear video
screens.
Shared Modes
The VES™ and radio are capable of communicating
with each other. This allows the VES™ to output radio
audio to the headphones and the radio to output
VES™ audio to the vehicle speakers. When the radio
and VES™ are in the same (shared) mode, a VES™ icon will be visible on the radio’s display and the shared icon
will be visible on the VES™ screen. When in shared
mode, the same audio source is heard in the head-
phones and vehicle speakers simultaneously.
If the radio functions (FM, AM, or SAT) are in the
shared mode with the VES™, only the radio is able to
control the radio functions. In this case, VES™ can
share the radio mode, but not change stations until the
radio mode is changed to a mode that is different from
the VES™ selected radio mode. When shared, the
radio has priority over the VES™ or all radio modes
(FM, AM, and SAT). The VES™ has the ability to switch
tuner (AM/FM/MW/LW), SEEK, TUNE, and recall pre-
sets in radio modes as long as it is not in shared mode.
When in shared disc or satellite video mode both the
radio and the VES™ have control of the video func-
tions. The VES™ has the ability to control the follow-
ing video modes:
1. CD: Ability to Fast Forward, Rewind, and Track
Up/Down.
2. CD Changer (in radio): Ability to Disk Up/Down and program all listed CD controls (Fast Forward,
Rewind, and Track Up/Down).
The VES™ can even control radio modes or video
modes while the radio is turned off. The VES™ can
access the radio modes or disc modes by navigating to
those modes on the VES™ and activating a radio mode
or disc mode.
149
KNOWING
YOURVEHICLESAFETY
STARTING ANDDRIVING
WARNING LIGHTSAND
MESSAGES
IN AN
EMERGENCY
SERVICING AND
CARETECHNICAL
SPECIFICATIONSCONTENTS
Page 159 of 332
Disc Features control the remote DVD player's (for
versions/markets, where provided) settings of DVD
being watched in the remote player.
Listening To Audio With The Screen Closed
To listen to only audio portion of the channel with the
screen closed:
• Set the audio to the desired source and channel.
• Close the video screen.
• To change the current audio mode, press the remotecontrol’s MODE button. This will automatically se-
lect the next available audio mode without using the
Mode Select menu.
• When the screen is reopened, the video screen will automatically turn back on and show the appropriate
display menu or media.
If the screen is closed and there is no audio heard,
verify that the headphones are turned on (the ON
indicator is illuminated) and the headphone selector
switch is on the desired channel. If the headphones are
turned on, press the remote control’s power button to
turn audio on. If audio is still not heard, check that fully
charged batteries are installed in the headphones. Why Does The Screen Mode Change
Automatically?
In order to make the operation of the VES™ simple
and with the least amount of driver distraction, specific
events will cause the screen(s) to automatically switch
to DVD mode. These events are:
• Loading a disc in the DVD player (if so equipped),
• Pressing the PLAY button on the DVD player face-
plate when the disc is stopped or paused, or
• AM/FM band selection via Radio.
If your vehicle is not equipped with the separate DVD
player, the following events in the Radio will cause the
screen(s) to automatically switch to Radio Disc mode.
• Loading a disc in the radio CD/DVD player
• AM/FM band selection via Radio
Auxiliary Inputs
For each video screen there is an auxiliary (Aux jack)
device input which is used to connect external audio/
video sources to the VES™. Examples of devices that
can be connected to the Aux inputs include portable
music players, video cameras, VCR’s, game systems,
and other devices with audio and/or video outputs.
The Aux jacks are typically located on the back of the
center console or on one of the vehicles side panels in
the rear occupant area.
153
KNOWING
YOURVEHICLESAFETY
STARTING ANDDRIVING
WARNING LIGHTSAND
MESSAGES
IN AN
EMERGENCY
SERVICING AND
CARETECHNICAL
SPECIFICATIONSCONTENTS
Page 161 of 332
CD/DVD DISC MAINTENANCE
To keep a CD/DVD in good condition, take the follow-
ing precautions:
1. Handle the disc by its edge; avoid touching thesurface.
2. If the disc is stained, clean the surface with a soft cloth, wiping from center to edge.
3. Do not apply paper or tape to the disc; avoid scratching the disc.
4. Do not use solvents such as benzene, thinner, clean- ers, or anti-static sprays.
5. Store the disc in its case after playing.
6. Do not expose the disc to direct sunlight.
7. Do not store the disc where temperatures may become too high.
NOTE: If you experience difficulty in playing a par-
ticular disc, it may be damaged (i.e., scratched, reflec-
tive coating removed, a hair, moisture or dew on the
disc) oversized, or have protection encoding. Try a
known good disc before considering disc player ser-
vice. RADIO OPERATION AND MOBILE PHONES
Under certain conditions, the mobile phone being on in
your vehicle can cause erratic or noisy performance
from your radio. This condition may be lessened or
eliminated by relocating the mobile phone antenna.
This condition is not harmful to the radio. If your radio
performance does not satisfactorily “clear” by the
repositioning of the antenna, it is recommended that
the radio volume be turned down or off during mobile
phone operation.
155
KNOWING
YOURVEHICLESAFETY
STARTING ANDDRIVING
WARNING LIGHTSAND
MESSAGES
IN AN
EMERGENCY
SERVICING AND
CARETECHNICAL
SPECIFICATIONSCONTENTS