stop start FIAT FREEMONT 2013 Owner handbook (in English)
[x] Cancel search | Manufacturer: FIAT, Model Year: 2013, Model line: FREEMONT, Model: FIAT FREEMONT 2013Pages: 352, PDF Size: 5.22 MB
Page 266 of 352

If the tire inflates to the recommended pres-
sure or is at least 1.8 Bar pressure within 15
minutes:
1. Press the Power Button (4) to turn off the TIREFITkit.
2. Remove the Speed Limit sticker from the top of the Sealant Bottle (1) and place the sticker on the
instrument panel.
3. Immediately disconnect the Sealant Hose (6) from the valve stem, reinstall the cap on the fitting at the
end of the hose, and place the TIREFIT kit in the
vehicle storage location. Quickly proceed to (D)
“Drive Vehicle”.
The metal end fitting from Power Plug
(8) may get hot after use, so it should be
handled carefully.
Failure to reinstall the cap on the fitting at the
end of the Sealant Hose (6) can result in sealant
contacting your skin, clothing, and the vehicle’s
interior. It can also result in sealant contacting
internalTIREFIT kit components which may cause
permanent damage to the kit .
(A) Whenever You Stop To Use TIREFIT:
1. Pull over to a safe location and turn on the vehicle’s Hazard Warning flashers. 2. Verify that the valve stem (on the wheel with the
deflated tire) is in a position that is near to the
ground. This will allow the TIREFIT Hoses (6) and
(7) to reach the valve stem and keep the TIREFIT kit
flat on the ground. This will provide the best posi-
tioning of the kit when injecting the sealant into the
deflated tire and running the air pump. Move the
vehicle as necessary to place the valve stem in this
position before proceeding.
3. Place the transmission in PARK (auto transmission) or in Gear (manual transmission) and turn Off the
ignition.
4. Set the parking brake.
(B) Setting Up To Use TIREFIT:
1. Turn the Mode Select Knob (5) to the Sealant Mode position.
2. Uncoil the Sealant Hose (6) and then remove the cap from the fitting at the end of the hose.
3. Place the TIREFIT kit flat on the ground next to the deflated tire.
4. Remove the cap from the valve stem and then screw the fitting at the end of the Sealant Hose (6) onto
the valve stem.
5. Uncoil the Power Plug (8) and insert the plug into the vehicle’s 12 Volt power outlet.
260
KNOWING YOUR
VEHICLE
SAFETY
STARTING AND
DRIVING
WARNING LIGHTSAND
MESSAGES
IN AN
EMERGENC
Y
SERVICING AND
C
ARETECHNICAL
SPECIFICATIONSCONTENTS
Page 269 of 352
(E) After Driving:
Pull over to a safe location. Refer to “Whenever You
Stop to Use TIREFIT” before continuing.
1. Turn the Mode Select Knob (5) to the Air Modeposition.
2. Uncoil the power plug and insert the plug into the vehicle's 12 Volt power outlet.
3. Uncoil the Air Pump Hose (7) (black in color) and screw the fitting at the end of hose (7) onto the
valve stem.
4. Check the pressure in the tire by reading the Pres- sure Gauge (3).
If tire pressure is less than 1.3 Bar, the tire is too
badly damaged. Do not attempt to drive the vehicle
further. Call for assistance.
If the tire pressure is 1.3 bar or higher:
1. Press the Power Button (4) to turn on TIREFIT and inflate the tire to the pressure indicated on the tire
and loading information label on the driver-side
door opening.
NOTE: If the tire becomes over-inflated, press the
Deflation Button to reduce the tire pressure to the
recommended inflation pressure before continuing. 2. Disconnect the TIREFIT kit from the valve stem,
reinstall the cap on the valve stem and unplug from
12 Volt outlet.
3. Place the TIREFIT kit in its proper storage area in the vehicle.
4. Have the tire inspected and repaired or replaced at the earliest opportunity at an authorized dealer or
tire service center.
5. Replace the Sealant Bottle (1) and Sealant Hose (6) assembly at your authorized dealer as soon as pos-
sible. Refer to “(F) Sealant Bottle and Hose Replace-
ment.”
NOTE: When having the tire serviced, advise the
authorized dealer or service center that the tire has
been sealed using the TIREFIT service kit.
(F) Sealant Bottle And Hose Replacement:
1. Uncoil the Sealant Hose (6) (clear in color).
2. Locate the round Sealant Bottle release button in the recessed area under the sealant bottle.
3. Press the Sealant Bottle release button. The Sealant Bottle (1) will pop up. Remove the bottle and
dispose of it accordingly.
4. Clean any remaining sealant from the TIREFIT hous- ing.
263
KNOWING
YOUR
VEHICLE
SAFETY
STARTING
AND
DRIVING
WARNING
LIGHTS
AND
MESSAGES
IN AN
EMERGENCY
SERVICING
AND
C ARETECHNICAL
SPECIFICATIONSCONTENTS
Page 271 of 352
LIGHTS BULBS – Outside Bulb No.
Low Beam Headlamp . . . . . . . . . . . . . . . . . . . . H11
High Beam Headlamp . . . . . . . . . . . . . . . HB3/9005
Front Turn Signal . . . . . . . . . . . . . . PY27W/3757AK
Front Position Lamp . . . . . . . . . . . . . . . . . . . W5W
Front Fog Lamp . . . . . . . . . . . . . . . . . . . . PSX24W
Rear Fog Lamp . . . . . . . . . . . . . . . . . . . . . . PS19W
Side Repeater Lamp . . . . . . . . . . . . . . . . . . WY5W
Center High Mounted Stop Lamp (CHMSL) . . . LED(Serviced at Authorized Dealer)
Rear Tail/Stop . . . . . . . . . . . . . . . . . . . . . . . . . LED (Serviced at Authorized Dealer)
Rear Tail Liftgate . . . . . . . . . . . . . . . . . . . . . . . LED
(Serviced at Authorized Dealer)
Rear Turn Signal . . . . . . . . . . . . . . . . . . . . WY21W
Backup Lamp . . . . . . . . . . . . . . . . . . . . . . . W21W
License Lamp . . . . . . . . . . . . . . . . . . . . . . . . . . 168 BULB REPLACEMENT
Where possible, it is advisable to have
bulbs changed at a FIAT Dealership.
Proper operation and orientation of the
external lights are essential for driving safety and
complying with the law.
LOW BEAM/HIGH BEAM/FRONT TURN
SIGNAL AND FRONT POSITION LAMP
1. Open the hood.
NOTE: It may be necessary to remove the air cleaner
filter housing and position the Totally Integrated Power
Module (TIPM) aside to replace certain lamps in the left
headlamp housing.
2. Rotate the applicable bulb and connector assembly ¼ turn counterclockwise and remove the assembly
from the headlamp housing. (fig. 161)
3. Disconnect the bulb from the harness connector and then connect the replacement bulb.Do not touch the new bulb with your
fingers. Oil contamination will severely
shorten bulb life. If the bulb comes in
contact with any oily surface, clean the bulb with
rubbing alcohol.
265
KNOWING
YOUR
VEHICLE
SAFETY
STARTING
AND
DRIVING
WARNING
LIGHTS
AND
MESSAGES
IN AN
EMERGENCY
SERVICING
AND
C ARETECHNICAL
SPECIFICATIONSCONTENTS
Page 274 of 352
7. Align the index tabs of the replacement rear foglamp bulb/socket assembly with the slots in the
collar of the bulb opening on the back of the lamp
housing.
8. Insert bulb into the lamp housing until the index tabs are engaged in the slots of the collar.
9. Firmly and evenly push the bulb straight into the lamp housing until both side latches lock firmly into
place.
10. Reinstall the fog lamp housing.
SIDE REPEATER LAMP
The side repeater lamps are located in both front
fender panels.
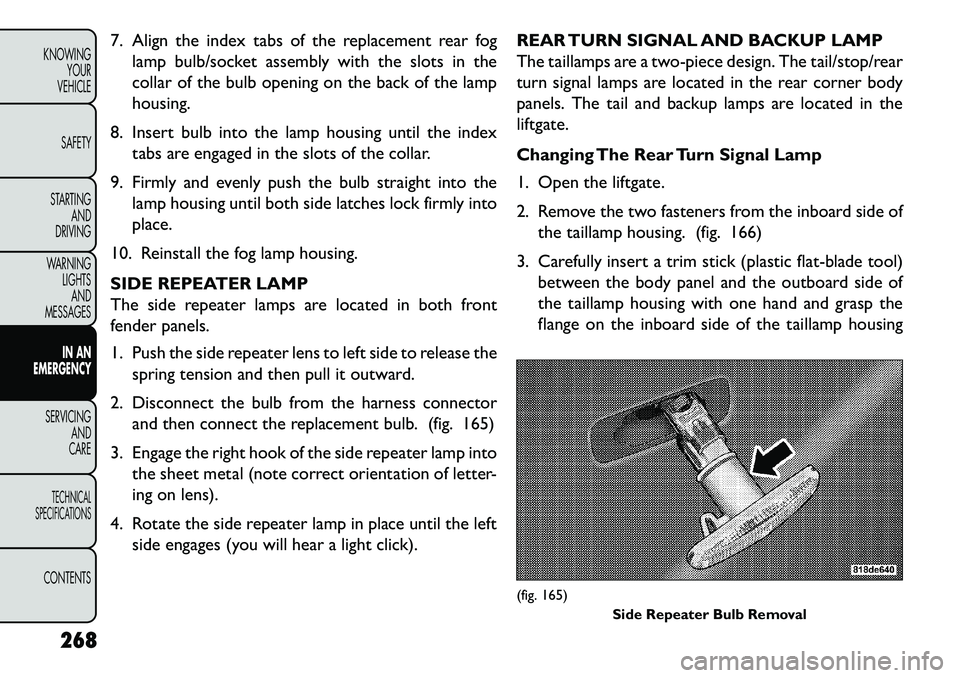
1. Push the side repeater lens to left side to release the spring tension and then pull it outward.
2. Disconnect the bulb from the harness connector and then connect the replacement bulb. (fig. 165)
3. Engage the right hook of the side repeater lamp into the sheet metal (note correct orientation of letter-
ing on lens).
4. Rotate the side repeater lamp in place until the left side engages (you will hear a light click). REAR TURN SIGNAL AND BACKUP LAMP
The taillamps are a two-piece design. The tail/stop/rear
turn signal lamps are located in the rear corner body
panels. The tail and backup lamps are located in the
liftgate.
Changing The Rear Turn Signal Lamp
1. Open the liftgate.
2. Remove the two fasteners from the inboard side of
the taillamp housing. (fig. 166)
3. Carefully insert a trim stick (plastic flat-blade tool) between the body panel and the outboard side of
the taillamp housing with one hand and grasp the
flange on the inboard side of the taillamp housing
(fig. 165) Side Repeater Bulb Removal
268
KNOWING YOUR
VEHICLE
SAFETY
STARTING AND
DRIVING
WARNING LIGHTSAND
MESSAGES
IN AN
EMERGENC
Y
SERVICING AND
C
ARETECHNICAL
SPECIFICATIONSCONTENTS
Page 283 of 352
NOTE:Press the "ESC Off" switch, to place the
Electronic Stability Control (ESC) system in
"Partial Off" mode, before rocking the ve-
hicle. Refer to “Electronic Brake Control” in
“Knowing Your Vehicle” for further informa-
tion. Once the vehicle has been freed, press the "ESC
Off" switch again to restore "ESC On" mode.
When “rocking” a stuck vehicle by
shifting between DRIVE and REVERSE,
do not spin the wheels faster than
15 mph (24 km/h), or drivetrain damage may
result .
Revving the engine or spinning the wheels too
fast may lead to transmission overheating and
failure. It can also damage the tires. Do not spin
the wheels above 30 mph (48 km/h) while in gear
(no transmission shifting occurring).
WARNING!
Fast spinning tires can be dangerous.
F
orces generated by excessive wheel
speeds may cause damage, or even failure, of the
axle and tires. A tire could explode and injure
someone. Do not spin your vehicle's wheels faster
than 48 km/h or for longer than 30 seconds
continuously without stopping when you are
stuck and do not let anyone near a spinning
wheel, no matter what the speed.
277KNOWING
YOUR
VEHICLE
SAFETY
STARTING
AND
DRIVING
WARNING
LIGHTS
AND
MESSAGES
IN AN
EMERGENC Y
SERVICING
AND
C ARETECHNICAL
SPECIFICATIONSCONTENTS
Page 300 of 352
MAINTENANCE PROCEDURES
The pages that follow contain therequiredmainte-
nance services determined by the engineers who de-
signed your vehicle.
Besides those maintenance items specified in the fixed
maintenance schedule, there are other components
which may require servicing or replacement in the
future.
Failure to properly maintain your ve-
hicle or perform repairs and service when
necessary could result in more costly re-
pairs, damage to other components or negatively
impact vehicle performance. Immediately have
potential malfunctions examined by an autho-
rized dealership or qualified repair center.
Car maintenance should be done at a FIAT
Dealership. For routine and minor maintenance
operations you wish to carry out yourself, we do
recommend you have the proper equipment ,
genuine FIAT parts and the necessary fluids; do
not however carry out these operations if you
have no experience.
(Continued)(Continued)
Your vehicle has been built with improved fluids
that protect the performance and durability of
your vehicle and also allow extended mainte-
nance intervals. Do not use chemical flushes in
these components as the chemicals can damage
your engine, transmission, power steering or air
conditioning. Such damage is not covered by the
New Vehicle Limited Warranty. If a flush is needed
because of component malfunction, use only the
specified fluid for the flushing procedure.
ENGINE OIL
Checking Oil Level – Gasoline Engine
To assure proper engine lubrication, the engine oil
must be maintained at the correct level. Check the oil
level at regular intervals, such as every fuel stop.
The best time to check the engine oil level is about five
minutes after a fully warmed engine is shut off. Do not
check oil level before starting the engine after it has sat
overnight. Checking engine oil level when the engine is
cold will give you an incorrect reading.
Checking the oil while the vehicle is on level ground
and only when the engine is hot, will improve the
accuracy of the oil level readings. Maintain the oil level
between the range markings on the dipstick. Either the
range markings consist of a crosshatch zone marked
294
KNOWING YOUR
VEHICLE
SAFETY
STARTING AND
DRIVING
WARNING LIGHTSAND
MESSAGES
IN AN
EMERGENCY
SERVICING AND
C
ARETECHNICAL
SPECIFICATIONSCONTENTS
Page 301 of 352
SAFE or a crosshatch zone marked with MIN at the low
end of the range and MAX at the high end of the range.
Adding 1 Liter of oil when the reading is at the low end
of the range marking will raise the oil level to the high
end of the range marking.
Do not overfill the engine. Overfilling the
engine will cause oil aeration, which can
lead to loss of oil pressure and an in-
crease in oil temperature.This could damage your
engine.Also, be sure the oil fill cap is replaced and
tightened after adding oil.
Checking Oil Level – Diesel Engine
To assure proper engine lubrication, the engine oil
must be maintained at the correct level. Check the oil
level at regular intervals, such as every fuel stop.
The best time to check the engine oil level is about five
minutes after a fully warmed engine is shut off or
before starting the engine after it has sat overnight.
Checking the oil while the vehicle is on level ground will
improve the accuracy of the oil level readings. Maintain
the oil level between the MIN and MAX markings on
the dipstick. Adding 1 Liter of oil when the reading is at
the MIN mark will result in a MAX reading on these
engines.
Car maintenance should be done at a
FIAT Dealership. For routine and minor
maintenance operations you wish to
carry out yourself, we do recommend you have
the proper equipment , genuine FIAT spare parts
and the necessary fluids; do not however carry out
these operations if you have no experience.
Change Engine Oil – Gasoline Engine
Refer to the “Maintenance Schedule” for the proper
maintenance intervals.
Change Engine Oil – Diesel Engine
Refer to the “Maintenance Schedule” for the proper
maintenance intervals.
Engine Oil Viscosity – 2.4L And 3.6L Gasoline
Engine
SAE 5W-30 engine oil is recommended for all operating
temperatures. This engine oil improves low tempera-
ture starting and vehicle fuel economy.
The engine oil filler cap also shows the recommended
engine oil viscosity for your vehicle. For information on
engine oil filler cap location, refer to “Engine Compart-
ment” in “Servicing And Care” for further information.
295
KNOWING
YOUR
VEHICLE
SAFETY
STARTING
AND
DRIVING
WARNING
LIGHTS
AND
MESSAGES
IN AN
EMERGENCY
SERVICING
AND
CARETECHNICAL
SPECIFICATIONSCONTENTS
Page 304 of 352
WARNING!
Us
e only refrigerants and compressor
lubricants approved by the manufac-
turer for your air conditioning system. Some un-
approved refrigerants are flammable and can
explode, injuring you. Other unapproved refrig-
erants or lubricants can cause the system to fail,
requiring costly repairs.
The air conditioning system contains refriger-
ant under high pressure.To avoid risk of personal
injury or damage to the system, adding refriger-
ant or any repair requiring lines to be discon-
nected should be done by an experienced techni-
cian.
Refrigerant Recovery And Recycling
R-134a Air Conditioning Refrigerant is a hydrofluoro-
carbon (HFC) that is endorsed by the Environmental
Protection Agency and is an ozone-saving product.
However, the manufacturer recommends that air con-
ditioning service be performed by authorized dealer
or other service facilities using recovery and recycling
equipment.
NOTE: Use only manufacturer approved A/C system
sealers, stop leak products, seal conditioners, com-
pressor oil, and refrigerants. A/C AIR FILTER
Refer to the “Maintenance Schedule” for the proper
maintenance intervals.
Car maintenance should be done at a
FIAT Dealership. For routine and minor
maintenance operations you wish to
carry out yourself, we do recommend you have
the proper equipment , genuine FIAT spare parts
and the necessary fluids; do not however carry out
these operations if you have no experience.
WARNING!
Do not remove the A/C air filter while
t
he blower is operating or personal in-
jury may result .
The A/C air filter is located in the fresh air inlet behind
the glove box. Perform the following steps to replace
the filter:
1. Open the glove box and remove all contents.
2. Push the retaining tab on each side of the glove box inward while gently pulling the glove box door
outward until both tabs clear the door opening in
the instrument panel. (fig. 177)
3. Pivot the glove box downward.
4. Disengage the two retaining tabs that secure the
298
KNOWING YOUR
VEHICLE
SAFETY
STARTING AND
DRIVING
WARNING LIGHTSAND
MESSAGES
IN AN
EMERGENCY
SERVICING AND
C
ARETECHNICAL
SPECIFICATIONSCONTENTS
Page 309 of 352
WARNING!
Exhaust gases can injure or kill. They
c
ontain carbon monoxide (CO), which is
colorless and odorless. Breathing it can make you
unconscious and can eventually poison you. To
avoid breathing CO, refer to “Safety Tips/Exhaust
Gas” in “Safety” for further information.
NOTE: Intentional tampering with emissions control
systems can result in civil penalties being assessed
against you.
WARNING!
A hot exhaust system can start a fire if
y
ou park over materials that can burn.
Such materials might be grass or leaves coming
into contact with your exhaust system. Do not
park or operate your vehicle in areas where your
exhaust system can contact anything that can
burn.
In unusual situations involving grossly malfunctioning
engine operation, a scorching odor may indicate severe
and abnormal catalyst overheating. If this occurs, safely
bring the vehicle to a complete stop, shut the engine
OFF, and allow the vehicle to cool. Thereafter, obtain
service, including a tune-up to manufacturer’s specifi-
cations immediately. To minimize the possibility of catalyst damage:
Do not shut OFF the engine or interrupt the ignition
when the transmission is in gear and the vehicle is in
motion.
Do not try to start the engine by pushing or towing the vehicle.
Do not idle the engine with any ignition coil connec- tors disconnected for prolonged periods.
COOLING SYSTEM
WARNING!
Wh
en working near the radiator cool-
ing fan, disconnect the fan motor lead or
turn the ignition switch to the LOCK position.The
fan is temperature controlled and can start at
any time the ignition switch is in the ON position.
You or others can be badly burned by hot
engine coolant (antifreeze) or steam from your
radiator. If you see or hear steam coming from
under the hood, do not open the hood until the
radiator has had time to cool. Never try to open a
cooling system pressure cap when the radiator is
hot .
303
KNOWING
YOUR
VEHICLE
SAFETY
STARTING
AND
DRIVING
WARNING
LIGHTS
AND
MESSAGES
IN AN
EMERGENCY
SERVICING
AND
CARETECHNICAL
SPECIFICATIONSCONTENTS
Page 312 of 352
Cooling System Pressure Cap
The cap must be fully tightened to prevent loss of
engine coolant (antifreeze), and to ensure that engine
coolant (antifreeze) will return to the radiator from the
coolant recovery tank.
The cap should be inspected and cleaned if there is any
accumulation of foreign material on the sealing sur-
faces.
WARNING!
Th
e warning words “DO NOT OPEN
HOT” on the cooling system pressure
cap are a safety precaution. Never add engine
coolant (antifreeze) when the engine is over-
heated. Do not loosen or remove the cap to cool
an overheated engine. Heat causes pressure to
build up in the cooling system.To prevent scalding
or injury, do not remove the pressure cap while
the system is hot or under pressure.
Do not use a pressure cap other than the one
specified for your vehicle. Personal injury or en-
gine damage may result .
Disposal Of Used Coolant
Used ethylene glycol-based engine coolant is a regu-
lated substance requiring proper disposal. Check with
your local authorities to determine the disposal rules
for your community. To prevent ingestion by animals or children, do not store ethylene glycol-based engine
coolant in open containers or allow it to remain in
puddles on the ground. If ingested by a child, contact a
physician immediately. Clean up any ground spills im-
mediately.
Coolant Level
The radiator normally remains completely full, so there
is no need to remove the radiator cap unless checking
for coolant freeze point or replacing coolant. Advise
your service attendant of this. As long as the engine
operating temperature is satisfactory, the coolant
bottle need only be checked once a month. When
additional coolant is needed to maintain the proper
level, it should be added to the coolant bottle. Do not
overfill.
Points To Remember
NOTE:
When the vehicle is stopped after a few
kilometers of operation, you may observe vapor com-
ing from the front of the engine compartment. This is
normally a result of moisture from rain, snow, or high
humidity accumulating on the radiator and being vapor-
ized when the thermostat opens, allowing hot coolant
to enter the radiator.
If an examination of your engine compartment shows
no evidence of radiator or hose leaks, the vehicle may
be safely driven. The vapor will soon dissipate.
306
KNOWING YOUR
VEHICLE
SAFETY
STARTING AND
DRIVING
WARNING LIGHTSAND
MESSAGES
IN AN
EMERGENCY
SERVICING AND
C
ARETECHNICAL
SPECIFICATIONSCONTENTS