fuel pressure FIAT FREEMONT 2013 Owner handbook (in English)
[x] Cancel search | Manufacturer: FIAT, Model Year: 2013, Model line: FREEMONT, Model: FIAT FREEMONT 2013Pages: 352, PDF Size: 5.22 MB
Page 26 of 352
Tire Pressure
Vehicle Information
Warning Message Displays
Turn Menu OFF
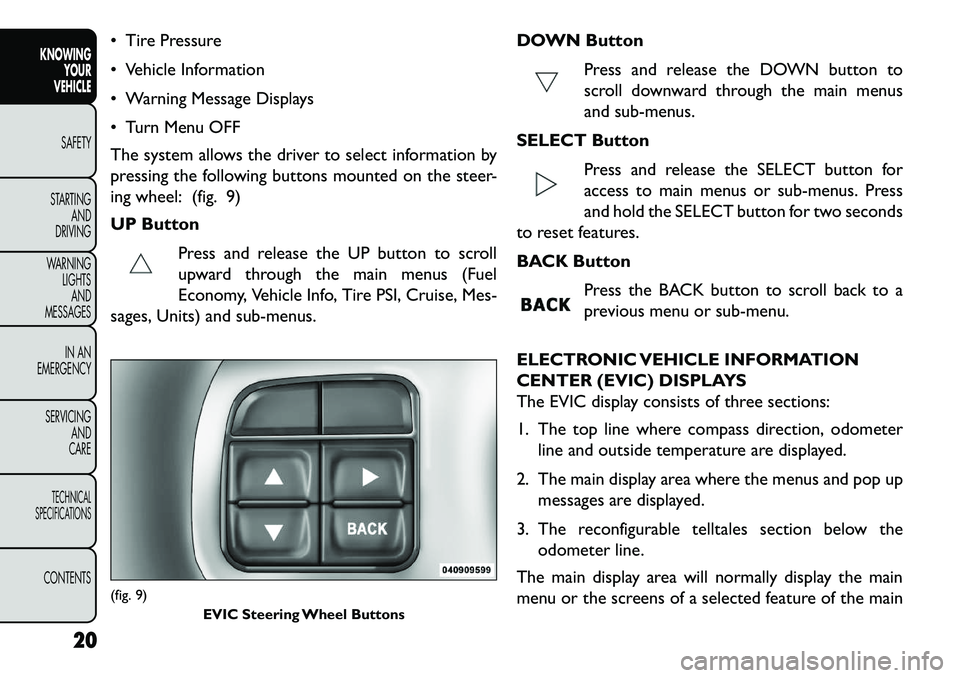
The system allows the driver to select information by
pressing the following buttons mounted on the steer-
ing wheel: (fig. 9)
UP ButtonPress and release the UP button to scroll
upward through the main menus (Fuel
Economy, Vehicle Info, Tire PSI, Cruise, Mes-
sages, Units) and sub-menus. DOWN Button
Press and release the DOWN button to
scroll downward through the main menus
and sub-menus.
SELECT Button Press and release the SELECT button for
access to main menus or sub-menus. Press
and hold the SELECT button for two seconds
to reset features.
BACK Button
Press the BACK button to scroll back to a
previous menu or sub-menu.
ELECTRONIC VEHICLE INFORMATION
CENTER (EVIC) DISPLAYS
The EVIC display consists of three sections:
1. The top line where compass direction, odometer line and outside temperature are displayed.
2. The main display area where the menus and pop up messages are displayed.
3. The reconfigurable telltales section below the odometer line.
The main display area will normally display the main
menu or the screens of a selected feature of the main(fig. 9) EVIC Steering Wheel Buttons
20
KNOWINGYOUR
VEHICLE
SAFETY
S
TARTING AND
DRIVING
WARNING LIGHTSAND
MESSAGES
IN AN
EMERGENCY
SERVICING AND
CARETECHNICAL
SPECIFICATIONSCONTENTS
Page 28 of 352
Left/Right Front Door Ajar (one or more doorsopen, with a single chime if speed is above 1.6 km/h)
Left/Right Rear Door Ajar (one or more doors open, with a single chime if speed is above 1.6 km/h)
Door(s) Ajar (with a single chime if vehicle is in motion)
Liftgate Ajar (with a single chime)
Low Washer Fluid (with a single chime)
Ignition or Accessory On
Vehicle Not in Park (for versions/markets, where provided)
Key Left Vehicle
Key Not Detected
Low Tire Pressure (with a single chime). Refer to information on “Tire Pressure” and “Tire Pressure
Monitor” in “Starting And Operating”.
Service TPM System (with a single chime). Refer to information on “Tire Pressure Monitor” in “Starting
And Operating”.
Check Gascap (refer to “Adding Fuel” in “Technical Specifications”)
Oil Change Required (with a single chime) Check Gascap (refer to “Adding Fuel” in “Starting
And Operating”)
Oil Change Due (with a single chime)
Exhaust System — Regeneration Required Now. Under conditions of exclusive short duration and
low speed driving and low speed driving cycles, the
engine and exhaust after-treatment system may
never reach the conditions required to remove the
trapped PM. If this occurs the “Exhaust System Re-
generation Required Now” message will be displayed
on the EVIC. By driving your vehicle at highway
speeds for as little as 30 minutes, you can remedy the
condition in the particulate filter system by allowing
the trapped PM to be removed to restore the system
to normal operating condition.
Exhaust Service Required — See Dealer Now. The engine will be de-rated to prevent permanent dam-
age to the after-treatment system. If this condition
occurs, it is necessary to have your vehicle serviced
by your local authorized dealer.
22
KNOWING YOUR
VEHICLE
SAFETY
S
TARTING AND
DRIVING
WARNING LIGHTSAND
MESSAGES
IN AN
EMERGENCY
SERVICING AND
CARETECHNICAL
SPECIFICATIONSCONTENTS
Page 136 of 352
The TPMS has been optimized for the
original equipment tires and wheels.
TPMS pressures and warning have been
established for the tire size equipped on your
vehicle. Undesirable system operation or sensor
damage may result when using replacement
equipment that is not of the same size, type,
and/or style.Aftermarket wheels can cause sensor
damage. Do not use aftermarket tire sealants or
balance beads if your vehicle is equipped with a
TPMS, as damage to the sensors may result .
After inspecting or adjusting the tire pressure,
always reinstall the valve stem cap.This will pre-
vent moisture and dirt from entering the valve
stem, which could damage theTire Pressure Moni-
toring Sensor.
NOTE:
The TPMS is not intended to replace normal tire care and maintenance, or to provide warning of a tire
failure or condition.
The TPMS should not be used as a tire pressure gauge while adjusting your tire pressure.
Driving on a significantly under-inflated tire causes the tire to overheat and can lead to tire failure.
Under-inflation also reduces fuel efficiency and tire tread life, and may affect the vehicle’s handling and
stopping ability.
The TPMS is not a substitute for proper tire mainte- nance, and it is the driver’s responsibility to maintain
correct tire pressure using an accurate tire pressure
gauge, even if under-inflation has not reached the
level to trigger illumination of the Tire Pressure
Monitoring Telltale Light.
Seasonal temperature changes will affect tire pres- sure, and the TPMS will monitor the actual tire
pressure in the tire.
BASE SYSTEM
The Tire Pressure Monitor System (TPMS) uses wire-
less technology with wheel rim mounted electronic
sensors to monitor tire pressure levels. Sensors,
mounted to each wheel as part of the valve stem,
transmit tire pressure readings to the receiver module.
NOTE: It is particularly important for you to check
the tire pressure in all of the tires on your vehicle
monthly and to maintain the proper pressure.
The TPMS consists of the following components:
Receiver Module
Four Tire Pressure Monitoring Sensors
Tire Pressure Monitoring Telltale Light
130
KNOWING YOUR
VEHICLE
SAFETY
S
TARTING AND
DRIVING
WARNING LIGHTSAND
MESSAGES
IN AN
EMERGENCY
SERVICING AND
CARETECHNICAL
SPECIFICATIONSCONTENTS
Page 207 of 352
PERIODIC SAFETY CHECKS YOU SHOULD
MAKE OUTSIDE THE VEHICLE
Tires
Examine tires for excessive tread wear and uneven
wear patterns. Check for stones, nails, glass, or other
objects lodged in the tread or sidewall. Inspect the
tread for cuts and cracks. Inspect sidewalls for cuts,
cracks and bulges. Check the wheel nuts for tightness.
Check the tires (including spare) for proper cold infla-
tion pressure.
Lights
Have someone observe the operation of brake lights
and exterior lights while you work the controls. Check
turn signal and high beam indicator lights on the instru-
ment panel.Door Latches
Check for positive closing, latching, and locking.
Fluid Leaks
Check area under vehicle after overnight parking for
fuel, engine coolant, oil, or other fluid leaks. Also, if
gasoline fumes are detected or if fuel, power steering
fluid, or brake fluid leaks are suspected, the cause
should be located and corrected immediately.
201
KNOWING
YOUR
VEHICLE
SAFETY
STARTING
AND
DRIVING
WARNING
LIGHTS
AND
MESSAGES
IN AN
EMERGENCY
SERVICING
AND
CARETECHNICAL
SPECIFICATIONSCONTENTS
Page 247 of 352
8. Park/Headlight ON IndicatorThis indicator will illuminate when the park
lights or headlights are turned on. (Refer to
“Lights” in “Knowing Your Vehicle” for fur-
ther information).
9. Tire Pressure Monitoring Telltale Light Each tire, including the spare (if provided),
should be checked monthly when cold and
inflated to the inflation pressure recom-
mended by the vehicle manufacturer on the
vehicle placard or tire inflation pressure label.
As an added safety feature, your vehicle has been
equipped with a tire pressure monitoring system
(TPMS) that illuminates a low tire pressure telltale
when one or more of your tires is significantly under-
inflated. Accordingly, when the low tire pressure tell-
tale light illuminates, you should stop and check your
tires as soon as possible, and inflate them to the proper
pressure. Driving on a significantly under-inflated tire
causes the tire to overheat and can lead to tire failure.
Under-inflation also reduces fuel efficiency and tire
tread life, and may affect the vehicle’s handling and
stopping ability. Please note that the TPMS is not a substitute for
proper tire maintenance, and it is the driver’s respon-
sibility to maintain correct tire pressure, even if under-
inflation has not reached the level to trigger illumina-
tion of the TPMS low tire pressure telltale.
Your vehicle has also been equipped with a TPMS
malfunction indicator to indicate when the system is
not operating properly. The TPMS malfunction indica-
tor is combined with the low tire pressure telltale.
When the system detects a malfunction, the telltale
will flash for approximately one minute and then re-
main continuously illuminated. This sequence will con-
tinue upon subsequent vehicle start-ups as long as the
malfunction exists. When the malfunction indicator is
illuminated, the system may not be able to detect or
signal low tire pressure as intended. TPMS malfunctions
may occur for a variety of reasons, including the instal-
lation of replacement or alternate tires or wheels on
the vehicle that prevent the TPMS from functioning
properly. Always check the TPMS malfunction telltale
light after replacing one or more tires or wheels on
your vehicle to ensure that the replacement or alter-
nate tires and wheels allow the TPMS to continue to
function properly.
241KNOWING
YOUR
VEHICLE
SAFETY
STARTING
AND
DRIVING
WARNING
LIGHTS
AND
MESSA
GES
IN AN
EMERGENC Y
SERVICING
AND
CARETECHNICAL
SPECIFICATIONSCONTENTS
Page 290 of 352
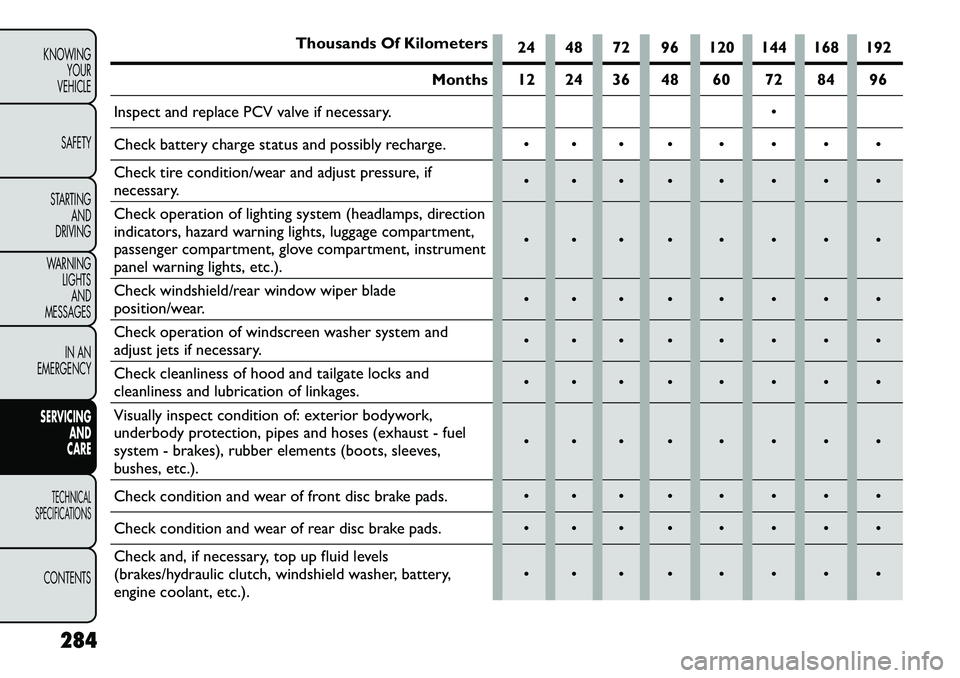
Thousands Of Kilometers24 48 72 96 120 144 168 192
Months 12 24 36 48 60 72 84 96
Inspect and replace PCV valve if necessary.
Check battery charge status and possibly recharge.
Check tire condition/wear and adjust pressure, if
necessary.
Check operation of lighting system (headlamps, direction
indicators, hazard warning lights, luggage compartment,
passenger compartment, glove compartment, instrument
panel warning lights, etc.).
Check windshield/rear window wiper blade
position/wear.
Check operation of windscreen washer system and
adjust jets if necessary.
Check cleanliness of hood and tailgate locks and
cleanliness and lubrication of linkages.
Visually inspect condition of: exterior bodywork,
underbody protection, pipes and hoses (exhaust - fuel
system - brakes), rubber elements (boots, sleeves,
bushes, etc.).
Check condition and wear of front disc brake pads.
Check condition and wear of rear disc brake pads.
Check and, if necessary, top up fluid levels
(brakes/hydraulic clutch, windshield washer, battery,
engine coolant, etc.).
284
KNOWING YOUR
VEHICLE
SAFETY
STARTING AND
DRIVING
WARNING LIGHTSAND
MESSAGES
IN AN
EMERGENCY
SERVICING AND
C
ARETECHNICAL
SPECIFICATIONSCONTENTS
Page 292 of 352
Periodic Checks
Every1,000 km or before long journeys, check and, if
necessary, restore:
engine coolant;
brake fluid;
windshield washer fluid level;
power steering fluid;
tire inflation pressure and condition;
operation of lighting system (headlights, direction indicators, hazard warning lights, etc.);
operation of windshield washer/wiper system and positioning/wear of windshield/rear window wiper
blades.
Every 3,000 km, check and top up, if required, the
engine oil level.
Heavy-Duty Use Of The Car
If the car is used mainly under one of the following
conditions:
towing a trailer or caravan;
dusty roads;
short, repeated journeys (less than 7-8 km) at sub- zero outside temperatures; engine often idling or driving long distances at low
speeds or long periods of idleness.
You should perform the following inspections more
frequently than shown on the Scheduled Servicing Plan:
check front disc brake pad conditions and wear;
check cleanliness of hood and trunk locks, cleanli- ness and lubrication of linkage;
visually inspect conditions of: engine, transmission, pipes and hoses (exhaust - fuel system - brakes) and
rubber elements (boots - sleeves - bushes - etc.);
check battery charge and battery fluid level (electro- lyte);
visually inspect condition of the accessory drive belts;
check and, if necessary, change engine oil and replace oil filter;
check and, if necessary, replace pollen filter;
check and, if necessary, replace air cleaner.
MAINTENANCE SCHEDULE — DIESEL
ENGINE
Required Maintenance Intervals
Refer to the Maintenance Schedules on the following
pages for the required maintenance intervals.
286
KNOWING YOUR
VEHICLE
SAFETY
STARTING AND
DRIVING
WARNING LIGHTSAND
MESSAGES
IN AN
EMERGENCY
SERVICING AND
C
ARETECHNICAL
SPECIFICATIONSCONTENTS
Page 293 of 352
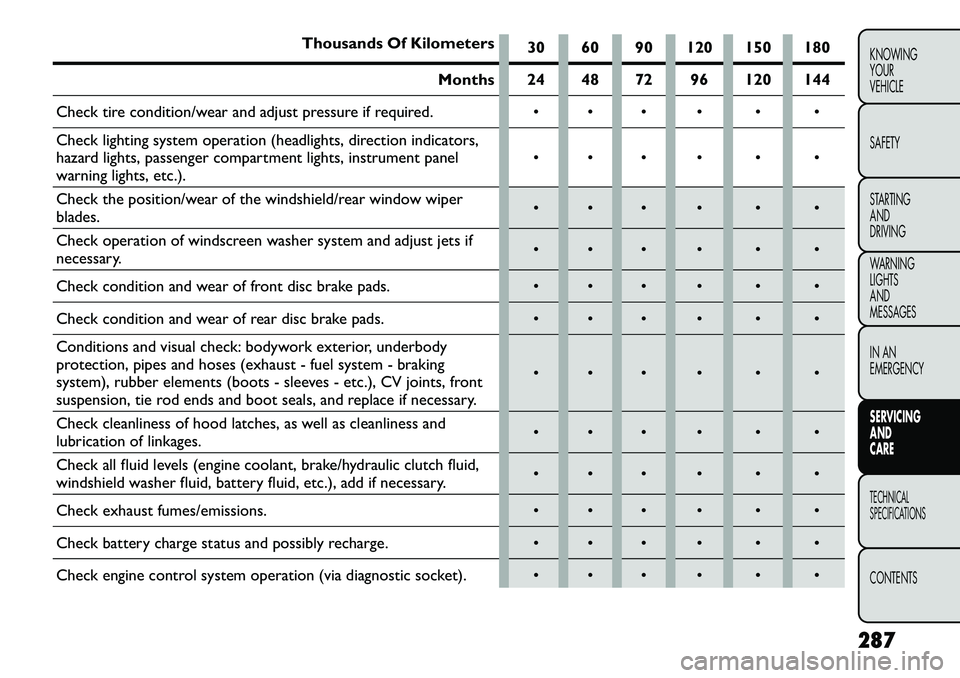
Thousands Of Kilometers30 60 90 120 150 180
Months 24 48 72 96 120 144
Check tire condition/wear and adjust pressure if required.
Check lighting system operation (headlights, direction indicators,
hazard lights, passenger compartment lights, instrument panel
warning lights, etc.).
Check the position/wear of the windshield/rear window wiper
blades.
Check operation of windscreen washer system and adjust jets if
necessary.
Check condition and wear of front disc brake pads.
Check condition and wear of rear disc brake pads.
Conditions and visual check: bodywork exterior, underbody
protection, pipes and hoses (exhaust - fuel system - braking
system), rubber elements (boots - sleeves - etc.), CV joints, front
suspension, tie rod ends and boot seals, and replace if necessary.
Check cleanliness of hood latches, as well as cleanliness and
lubrication of linkages.
Check all fluid levels (engine coolant, brake/hydraulic clutch fluid,
windshield washer fluid, battery fluid, etc.), add if necessary.
Check exhaust fumes/emissions.
Check battery charge status and possibly recharge.
Check engine control system operation (via diagnostic socket).
287
KNOWING
YOUR
VEHICLE
SAFETY
STARTING
AND
DRIVING
WARNING
LIGHTS
AND
MESSAGES
IN AN
EMERGENCY
SERVICING
AND
CARETECHNICAL
SPECIFICATIONSCONTENTS
Page 301 of 352
SAFE or a crosshatch zone marked with MIN at the low
end of the range and MAX at the high end of the range.
Adding 1 Liter of oil when the reading is at the low end
of the range marking will raise the oil level to the high
end of the range marking.
Do not overfill the engine. Overfilling the
engine will cause oil aeration, which can
lead to loss of oil pressure and an in-
crease in oil temperature.This could damage your
engine.Also, be sure the oil fill cap is replaced and
tightened after adding oil.
Checking Oil Level – Diesel Engine
To assure proper engine lubrication, the engine oil
must be maintained at the correct level. Check the oil
level at regular intervals, such as every fuel stop.
The best time to check the engine oil level is about five
minutes after a fully warmed engine is shut off or
before starting the engine after it has sat overnight.
Checking the oil while the vehicle is on level ground will
improve the accuracy of the oil level readings. Maintain
the oil level between the MIN and MAX markings on
the dipstick. Adding 1 Liter of oil when the reading is at
the MIN mark will result in a MAX reading on these
engines.
Car maintenance should be done at a
FIAT Dealership. For routine and minor
maintenance operations you wish to
carry out yourself, we do recommend you have
the proper equipment , genuine FIAT spare parts
and the necessary fluids; do not however carry out
these operations if you have no experience.
Change Engine Oil – Gasoline Engine
Refer to the “Maintenance Schedule” for the proper
maintenance intervals.
Change Engine Oil – Diesel Engine
Refer to the “Maintenance Schedule” for the proper
maintenance intervals.
Engine Oil Viscosity – 2.4L And 3.6L Gasoline
Engine
SAE 5W-30 engine oil is recommended for all operating
temperatures. This engine oil improves low tempera-
ture starting and vehicle fuel economy.
The engine oil filler cap also shows the recommended
engine oil viscosity for your vehicle. For information on
engine oil filler cap location, refer to “Engine Compart-
ment” in “Servicing And Care” for further information.
295
KNOWING
YOUR
VEHICLE
SAFETY
STARTING
AND
DRIVING
WARNING
LIGHTS
AND
MESSAGES
IN AN
EMERGENCY
SERVICING
AND
CARETECHNICAL
SPECIFICATIONSCONTENTS
Page 323 of 352
Safety
WARNING!
Impro
perly inflated tires are danger-
ous and can cause collisions.
Under-inflation increases tire flexing and can
result over-heating and in tire failure.
Over-inflation reduces a tire's ability to cush-
ion shock. Objects on the road and chuckholes
can cause damage that result in tire failure.
Over-inflated or under-inflated tires can af-
fect vehicle handling and can fail suddenly, result-
ing in loss of vehicle control.
Unequal tire pressures can cause steering
problems.You could lose control of your vehicle.
Unequal tire pressures from one side of the
vehicle to the other can cause the vehicle to drift
to the right or left .
Always drive with each tire inflated to the
recommended cold tire inflation pressure.
Economy
Improper inflation pressures can cause uneven wear
patterns to develop across the tire tread. These abnor-
mal wear patterns will reduce tread life resulting in a
need for earlier tire replacement. Under-inflation also
increases tire rolling resistance resulting in higher fuel
consumption. Ride Comfort And Vehicle Stability
Proper tire inflation contributes to a comfortable ride.
Over-inflation produces a jarring and uncomfortable
ride.
TIRE INFLATION PRESSURES
The proper cold tire inflation pressure is listed on the
driver's side B-Pillar or rear edge of the driver's side
door.
The pressure should be checked and adjusted as well as
inspecting for signs of tire wear or visible damage at
least once a month. Use a good quality pocket-type
gauge to check tire pressure. Do not make a visual
judgement when determining proper inflation. Radial
tires may look properly inflated even when they are
under-inflated.
After inspecting or adjusting the tire
pressure, always reinstall the valve stem
cap. This will prevent moisture and dirt
from entering the valve stem, which could damage
the valve stem.
Inflation pressures specified on the placard are always
“cold tire inflation pressure.” Cold tire inflation pres-
sure is defined as the tire pressure after the vehicle has
not been driven for at least three hours, or driven less
than 1.6 km after a three hour period. The cold tire
317
KNOWING
YOUR
VEHICLE
SAFETY
STARTING
AND
DRIVING
WARNING
LIGHTS
AND
MESSAGES
IN AN
EMERGENCY
SERVICING
AND
CARETECHNICAL
SPECIFICATIONSCONTENTS