manual transmission FIAT FREEMONT 2014 1.G User Guide
[x] Cancel search | Manufacturer: FIAT, Model Year: 2014, Model line: FREEMONT, Model: FIAT FREEMONT 2014 1.GPages: 388, PDF Size: 4.13 MB
Page 251 of 388
• The transmission fluid has reached an adequate tem-perature.
• The engine coolant has reached an adequate tem- perature.
• The vehicle speed is sufficiently high and the driver is not heavily pressing the accelerator.
Torque Converter Clutch
A feature designed to improve fuel economy has been
included in the automatic transmission on your vehicle.
A clutch within the torque converter engages auto-
matically at calibrated speeds. This may result in a
slightly different feeling or response during normal
operation in the upper gears. When the vehicle speed
drops or during some accelerations, the clutch auto-
matically disengages.
NOTE: The torque converter clutch will not engage
until the transmission fluid and engine coolant are
warm (usually after 2 to 5 km of driving). Because the
engine speed is higher when the torque converter
clutch is not engaged, it may seem as if the transmission
is not shifting into Overdrive when cold. This is normal.
Using the AutoStick® shift control, when the transmis-
sion is sufficiently warm, will demonstrate that the
transmission is able to shift into and out of Overdrive.
AUTOSTICK® (for versions/
markets, where provided)
AutoStick® is a driver-interactive transmission feature
providing manual shift control, giving you more control
of the vehicle. AutoStick® allows you to maximize
engine braking, eliminate undesirable upshifts and
downshifts, and improve overall vehicle performance.
This system can also provide you with more control
during passing, city driving, cold slippery conditions,
mountain driving, trailer towing, and many other situ-
ations.
Operation
When the shift lever is in the AutoStick® position
(below the DRIVE position), it can be moved from side
to side. This allows the driver to manually select the
transmission gear being used. Moving the shift lever to
the left (-) triggers a downshift and to the right (+) an
upshift. The current gear will be displayed in the instru-
ment cluster.
245
KNOWING
YOUR
VEHICLE
SAFETY
STARTING
AND
DRIVING
WARNING
LIGHTS
AND
MESSAGES
IN AN
EMERGENCY
SERVICING
AND CARE
TECHNICAL
SPECIFICATIONS
CONTENTS
Page 252 of 388
In AutoStick® mode, the transmission will shift up or
down when the driver moves the shift lever to the right
(+) or left (-), unless an engine lugging or overspeed
condition would result. It will remain in the selected
gear until another upshift or downshift is chosen,
except as described below.
• The transmission will automatically upshift whennecessary to prevent engine over-speed.
• The transmission will automatically downshift as the vehicle slows (to prevent engine lugging) and will
display the current gear.
• The transmission will automatically downshift to first gear when coming to a stop. After a stop, the driver
should manually upshift (+) the transmission as the
vehicle is accelerated.
• You can start out, from a stop, in any gear except top gear. Tapping (+) (at a stop) will allow starting in
second gear. Starting out in second gear is helpful in
snow or icy conditions. • If a requested downshift would cause the engine to
over-speed, that shift will not occur.
• Avoid using speed control when AutoStick® is en- gaged.
• Transmission shifting will be more noticeable when AutoStick® is engaged.
• The system may revert to automatic shift mode if a fault or overheat condition is detected.
To disengage AutoStick® mode, return the shift lever
to the DRIVE position. You can shift in or out of the
AutoStick® position at any time without taking your
foot off the accelerator pedal.
WARNING!
Do not downshift for additional engine
braking on
a slippery surface. The drive
wheels could lose their grip and the vehicle could
skid, causing a collision or personal injury.
246
KNOWING YOUR
VEHICLE
SAFETY
STARTING AND
DRIVING
WARNING LIGHTSAND
MESSAGES
IN AN
EMERGENCY
SERVICING AND CARE
TECHNICAL
SPECIFICATIONS
CONTENTS
Page 259 of 388
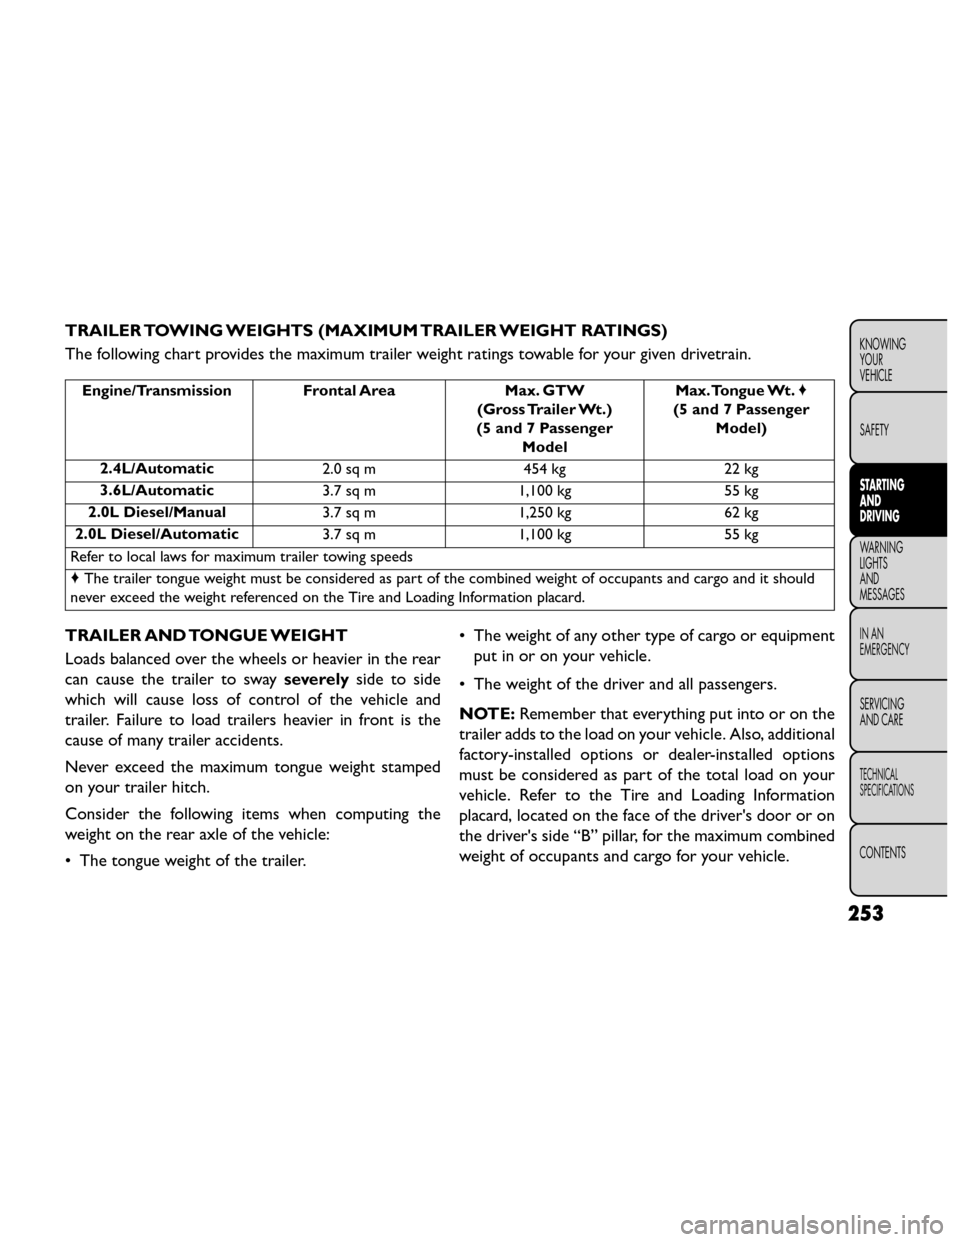
TRAILER TOWING WEIGHTS (MAXIMUM TRAILER WEIGHT RATINGS)
The following chart provides the maximum trailer weight ratings towable for your given drivetrain.
Engine/Transmission Frontal AreaMax. GTW
(Gross Trailer Wt.)
(5 and 7 Passenger Model Max.Tongue Wt.
♦
(5 and 7 Passenger Model)
2.4L/Automatic 2.0 sq m454 kg22 kg
3.6L/Automatic 3.7 sq m1,100 kg 55 kg
2.0L Diesel/Manual 3.7 sq m1,250 kg 62 kg
2.0L Diesel/Automatic 3.7 sq m1,100 kg 55 kg
Refer to local laws for maximum trailer towing speeds
♦ The trailer tongue weight must be considered as part of the combined weight of occupants and cargo and it should
never exceed the weight referenced on the Tire and Loading Information placard.
TRAILER AND TONGUE WEIGHT
Loads balanced over the wheels or heavier in the rear
can cause the trailer to sway severelyside to side
which will cause loss of control of the vehicle and
trailer. Failure to load trailers heavier in front is the
cause of many trailer accidents.
Never exceed the maximum tongue weight stamped
on your trailer hitch.
Consider the following items when computing the
weight on the rear axle of the vehicle:
• The tongue weight of the trailer. • The weight of any other type of cargo or equipment
put in or on your vehicle.
• The weight of the driver and all passengers.
NOTE: Remember that everything put into or on the
trailer adds to the load on your vehicle. Also, additional
factory-installed options or dealer-installed options
must be considered as part of the total load on your
vehicle. Refer to the Tire and Loading Information
placard, located on the face of the driver's door or on
the driver's side “B” pillar, for the maximum combined
weight of occupants and cargo for your vehicle.
253
KNOWING
YOUR
VEHICLE
SAFETY
STARTING
AND
DRIVING
WARNING
LIGHTS
AND
MESSAGES
IN AN
EMERGENCY
SERVICING
AND CARE
TECHNICAL
SPECIFICATIONS
CONTENTS
Page 265 of 388
TOWING TIPS
Before setting out on a trip, practice turning, stopping,
and backing up the trailer in an area located away from
heavy traffic.
Manual Transmission (for versions/markets,
where provided)
If using a manual transmission vehicle for trailer towing,
all starts must be in FIRST gear to avoid clutch slippage.
Automatic Transmission (for versions/
markets,where provided)
The DRIVE range can be selected when towing. How-
ever, if frequent shifting occurs while in DRIVE, use the
AutoStick® shift control to manually select a lower
gear.
NOTE:Using a lower gear while operating the vehicle
under heavy loading conditions will improve perfor-
mance and extend transmission life by reducing exces-
sive shifting and heat build up. This action will also
provide better engine braking.
If you REGULARLY tow a trailer for more than 45 min-
utes of continuous operation, then change the trans-
mission fluid and automatic transmission filter as speci-
fied for “police, taxi, fleet, or frequent trailer towing.”
Refer to the “Maintenance Schedule” for the proper
maintenance intervals. NOTE:
Check the transmission fluid level (four-speed
transmission only) before towing. The six-speed trans-
mission does not require a fluid level check before
towing. If, however, you notice fluid leakage or trans-
mission malfunction, see your authorized dealer imme-
diately for assistance.
Electronic Speed Control (for versions/
markets, where provided)
• Do not use in hilly terrain or with heavy loads.
• When using the speed control, if you experience speed drops greater than 16 km/h, disengage until
you can get back to cruising speed.
• Use speed control in flat terrain and with light loads to maximize fuel efficiency.
AutoStick®
• When using the AutoStick® shift control, select the highest gear that allows for adequate performance
and avoids frequent downshifts. For example, choose
“4” if the desired speed can be maintained. Choose
“3” or “2” if needed to maintain the desired speed.
• To prevent excess heat generation, avoid continuous driving at high RPM. Reduce vehicle speed as neces-
sary to avoid extended driving at high RPM. Return
to a higher gear or vehicle speed when grade and
road conditions allow.
259
KNOWING
YOUR
VEHICLE
SAFETY
STARTING
AND
DRIVING
WARNING
LIGHTS
AND
MESSAGES
IN AN
EMERGENCY
SERVICING
AND CARE
TECHNICAL
SPECIFICATIONS
CONTENTS
Page 267 of 388
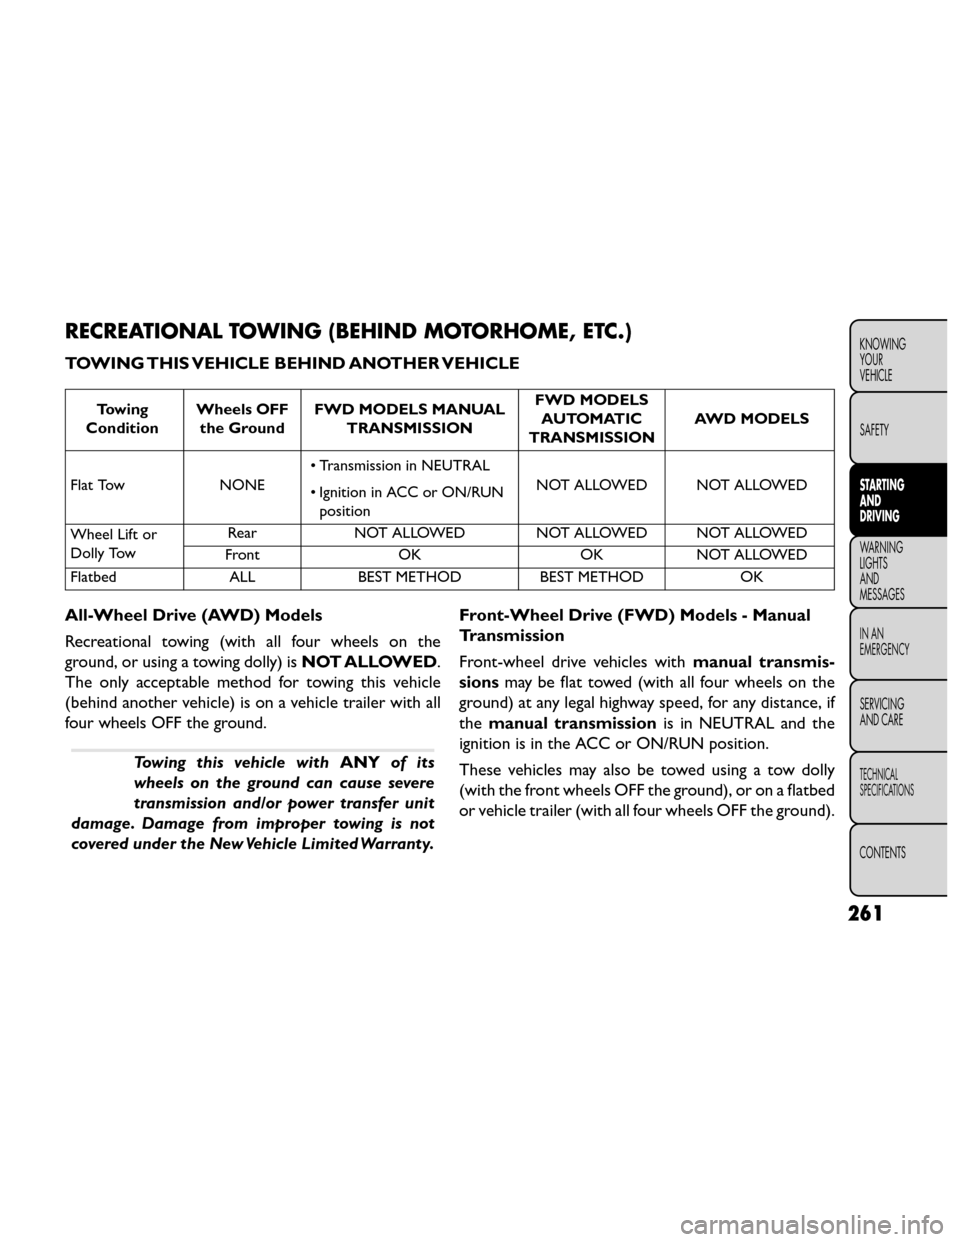
RECREATIONAL TOWING (BEHIND MOTORHOME, ETC.)
TOWING THIS VEHICLE BEHIND ANOTHER VEHICLE
To w i n g
Condition Wheels OFF
the Ground FWD MODELS MANUAL
TRANSMISSION FWD MODELS
AUTOMATIC
TRANSMISSION AWD MODELS
Flat Tow NONE• Transmission in NEUTRAL
• Ignition in ACC or ON/RUN
position NOT ALLOWED NOT ALLOWED
Wheel Lift or
Dolly Tow Rear
NOT ALLOWED NOT ALLOWED NOT ALLOWED
Front OK OKNOT ALLOWED
Flatbed ALLBEST METHOD BEST METHOD OK
All-Wheel Drive (AWD) Models
Recreational towing (with all four wheels on the
ground, or using a towing dolly) is NOT ALLOWED.
The only acceptable method for towing this vehicle
(behind another vehicle) is on a vehicle trailer with all
four wheels OFF the ground.
Towing this vehicle with ANYof its
wheels on the ground can cause severe
transmission and/or power transfer unit
damage. Damage from improper towing is not
covered under the New Vehicle Limited Warranty. Front-Wheel Drive (FWD) Models - Manual
Transmission
Front-wheel drive vehicles with
manual transmis-
sions may be flat towed (with all four wheels on the
ground) at any legal highway speed, for any distance, if
the manual transmission is in NEUTRAL and the
ignition is in the ACC or ON/RUN position.
These vehicles may also be towed using a tow dolly
(with the front wheels OFF the ground), or on a flatbed
or vehicle trailer (with all four wheels OFF the ground).
261
KNOWING
YOUR
VEHICLE
SAFETY
STARTING
AND
DRIVING
WARNING
LIGHTS
AND
MESSAGES
IN AN
EMERGENCY
SERVICING
AND CARE
TECHNICAL
SPECIFICATIONS
CONTENTS
Page 277 of 388
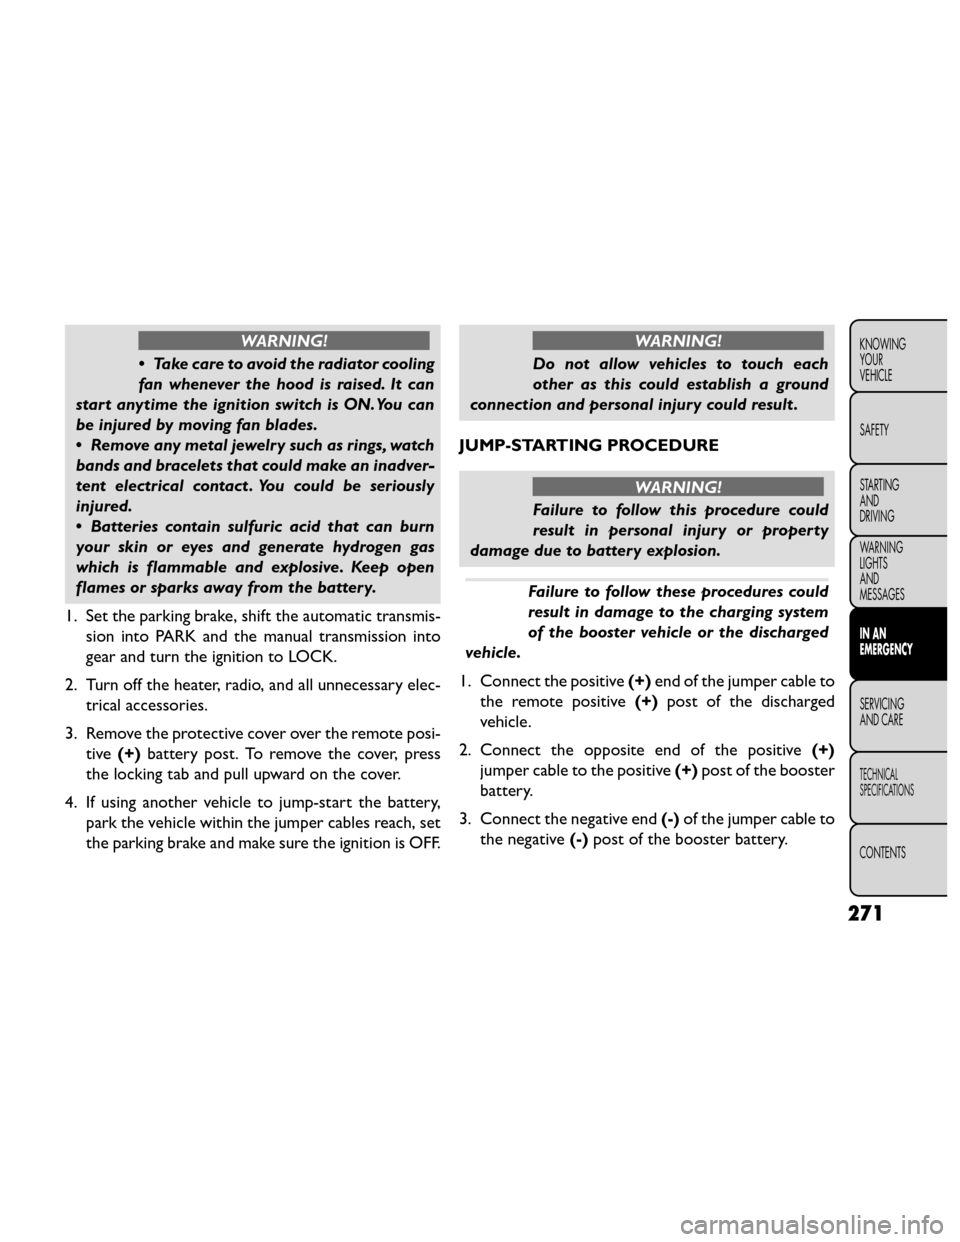
WARNING!
• Take care to avoid the radiator cooling
fan w
henever the hood is raised. It can
start anytime the ignition switch is ON.You can
be injured by moving fan blades.
• Remove any metal jewelry such as rings, watch
bands and bracelets that could make an inadver-
tent electrical contact . You could be seriously
injured.
• Batteries contain sulfuric acid that can burn
your skin or eyes and generate hydrogen gas
which is flammable and explosive. Keep open
flames or sparks away from the battery.
1. Set the parking brake, shift the automatic transmis- sion into PARK and the manual transmission into
gear and turn the ignition to LOCK.
2. Turn off the heater, radio, and all unnecessary elec- trical accessories.
3. Remove the protective cover over the remote posi- tive (+)battery post. To remove the cover, press
the locking tab and pull upward on the cover.
4. If using another vehicle to jump-start the battery, park the vehicle within the jumper cables reach, set
the parking brake and make sure the ignition is OFF.
WARNING!
Do not allow vehicles to touch each
other as
this could establish a ground
connection and personal injury could result .
JUMP-STARTING PROCEDURE
WARNING!
Failure to follow this procedure could
result in per
sonal injury or property
damage due to battery explosion.
Failure to follow these procedures could
result in damage to the charging system
of the booster vehicle or the discharged
vehicle.
1. Connect the positive (+)end of the jumper cable to
the remote positive (+)post of the discharged
vehicle.
2. Connect the opposite end of the positive (+)
jumper cable to the positive (+)post of the booster
battery.
3. Connect the negative end (-)of the jumper cable to
the negative (-)post of the booster battery.
271
KNOWING
YOUR
VEHICLE
SAFETY
STARTING
AND
DRIVING
WARNING
LIGHTS
AND
MESSAGES
IN AN
EMERGENCY
SERVICING
AND CARE
TECHNICAL
SPECIFICATIONS
CONTENTS
Page 281 of 388
Jack Location
The jack and jack-handle are stowed underneath a
cover in the rear storage bin in the cargo area.
(fig. 166)
Spare Tire Location
The spare tire is stowed underneath the rear of the
vehicle and is held in place by means of a cable winch
mechanism.Preparations For Jacking
1. Park the vehicle on a firm, level surface as far from
the edge of the roadway as possible. Avoid icy or
slippery areas.
WARNING!
Do not attempt to change a tire on the
side of t
he vehicle close to moving traf-
fic . Pull far enough off the road to avoid the
danger of being hit when operating the jack or
changing the wheel.
2. Turn on the Hazard Warning flashers.
3. Set the parking brake.
4. Place the shift lever in PARK (automatic transmis- sion) or in GEAR (manual transmission).
5. Turn OFF the ignition.
6. Block both the front and rear of the wheel diago- nally opposite of the jacking posi-
tion. For example, if changing the
right front tire, block the left rear
wheel.
NOTE: Passengers should not remain in the vehicle
when the vehicle is being jacked.
(fig. 166)
Jack Storage Location
275
KNOWING
YOUR
VEHICLE
SAFETY
STARTING
AND
DRIVING
WARNING
LIGHTS
AND
MESSAGES
IN AN
EMERGENCY
SERVICING
AND CARE
TECHNICAL
SPECIFICATIONS
CONTENTS
Page 284 of 388
JACKING INSTRUCTIONS
WARNING!
Carefully follow these tire changing
warnin gs
to help prevent personal injury
or damage to your vehicle:
•Always park on a firm, level surface as far from
the edge of the roadway as possible before rais-
ing the vehicle.
• Turn on the Hazard Warning flashers.
• Block the wheel diagonally opposite the wheel
to be raised.
• Set the parking brake firmly and set an auto-
matic transmission in PARK; a manual transmis-
sion in REVERSE.
• Never start or run the engine with the vehicle
onajack.
• Do not let anyone sit in the vehicle when it is on
ajack.
• Do not get under the vehicle when it is on a
jack. If you need to get under a raised vehicle,
take it to a service center where it can be raised
on a lift .
• Only use the jack in the positions indicated and
for lifting this vehicle during a tire change.
(Continued)(Continued)
• If working on or near a roadway, be extremely
careful of motor traffic .
• To assure that spare tires, flat or inflated, are
securely stowed, spares must be stowed with the
valve stem facing the ground.
(fig. 169)
(fig. 169) Jack Warning Label
278
KNOWINGYOUR
VEHICLE
SAFETY
STARTING AND
DRIVING
WARNING LIGHTSAND
MESSAGES
IN AN
EMERGENCY
SERVICING AND CARE
TECHNICAL
SPECIFICATIONS
CONTENTS
Page 293 of 388
SEALING A TIRE WITH TIREFIT
(A) Whenever You Stop To Use TIREFIT:
1. Pull over to a safe location and turn on the vehicle’sHazard Warning flashers.
2. Verify that the valve stem (on the wheel with the deflated tire) is in a position that is near to the
ground. This will allow the TIREFIT Hoses (6) and
(7) to reach the valve stem and keep the TIREFIT kit
flat on the ground. This will provide the best posi-
tioning of the kit when injecting the sealant into the
deflated tire and running the air pump. Move the
vehicle as necessary to place the valve stem in this
position before proceeding.
3. Place the transmission in PARK (auto transmission) or in Gear (manual transmission) and turn Off the
ignition.
4. Set the parking brake.
(B) Setting Up To Use TIREFIT:
1. Push in the Mode Select Knob (5) and turn to the Sealant Mode position.
2. Uncoil the Sealant Hose (6) and then remove the cap from the fitting at the end of the hose.
3. Place the TIREFIT kit flat on the ground next to the deflated tire. 4. Remove the cap from the valve stem and then screw
the fitting at the end of the Sealant Hose (6) onto
the valve stem.
5. Uncoil the Power Plug (8) and insert the plug into the vehicle’s 12 Volt power outlet.
NOTE: Do not remove foreign objects (e.g., screws or
nails) from the tire.
(C) Injecting TIREFIT Sealant Into The
Deflated Tire:
• Always start the engine before turning ON the TIREFIT kit.
NOTE: Manual transmission vehicles must have the
parking brake engaged and the shift lever in NEUTRAL.
• After pressing the Power Button (4), the sealant (white fluid) will flow from the Sealant Bottle (1)
through the Sealant Hose (6) and into the tire.
NOTE: Sealant may leak out through the puncture in
the tire.
If the sealant (white fluid) does not flow within
0 – 10 seconds through the Sealant Hose (6):
1. Press the Power Button (4) to turn Off the TIREFIT kit. Disconnect the Sealant Hose (6) from the valve
stem. Make sure the valve stem is free of debris.
Reconnect the Sealant Hose (6) to the valve stem.
287
KNOWING
YOUR
VEHICLE
SAFETY
STARTING
AND
DRIVING
WARNING
LIGHTS
AND
MESSAGES
IN AN
EMERGENCY
SERVICING
AND CARE
TECHNICAL
SPECIFICATIONS
CONTENTS
Page 310 of 388
4. Press and maintain firm pressure on the brake pedal.
5. Insert a screwdriver or similar small tool into theaccess port, and push and hold the override release
lever forward.
6. Move the shift lever to the NEUTRAL position.
7. The vehicle may then be started in NEUTRAL.
8. Reinstall the shift lever override access cover.FREEING A STUCK VEHICLE
If your vehicle becomes stuck in mud, sand, or snow, it
can often be moved using a rocking motion. Turn the
steering wheel right and left to clear the area around
the front wheels. Then shift back and forth between
DRIVE and REVERSE (with automatic transmission) or
2nd gear and REVERSE (with manual transmission),
while gently pressing the accelerator. Use the least
amount of accelerator pedal pressure that will maintain
the rocking motion, without spinning the wheels or
racing the engine.
NOTE: Press the "ESC Off" switch, to place the
Electronic Stability Control (ESC) system in
"Partial Off" mode, before rocking the ve-
hicle. Refer to “Electronic Brake Control” in
“Knowing Your Vehicle” for further informa-
tion. Once the vehicle has been freed, press the "ESC
Off" switch again to restore "ESC On" mode.
304
KNOWING YOUR
VEHICLE
SAFETY
STARTING AND
DRIVING
WARNING LIGHTSAND
MESSAGES
IN AN
EMERGENCY
SERVICING AND CARE
TECHNICAL
SPECIFICATIONS
CONTENTS