brake fluid FIAT FREEMONT 2015 1.G Owners Manual
[x] Cancel search | Manufacturer: FIAT, Model Year: 2015, Model line: FREEMONT, Model: FIAT FREEMONT 2015 1.GPages: 412, PDF Size: 3.37 MB
Page 146 of 412
BRAKE SYSTEM
Your vehicle is equipped with dual hydraulic
brake systems. If either of the two hydraulic
systems loses normal capability, the remaining system
will still function. However, there will be some loss of
overall braking effectiveness. This will be evident by
increased pedal travel during application and greater
pedal force required to slow or stop the vehicle. In
addition, if the malfunction is caused by a leak in the
hydraulic system, the “Brake System Warning Light”
will turn on as the brake fluid level drops in the master
cylinder.
In the event power assist is lost for any reason (i.e.,
repeated brake applications with the engine OFF) the
brakes will still function. However, the effort required
to brake the vehicle will be much greater than that
required with the power system operating.
WARNING!
• Riding the brakes can lead to brake
f ailure
and possibly a collision. Driving
with your foot resting or riding on the brake
pedal can result in abnormally high brake tem-
peratures, excessive lining wear, and possible
brake damage.You would not have your full brak-
ing capacity in an emergency.
• Driving a vehicle with the “Brake Warning
Light” on is dangerous. A significant decrease in
braking performance or vehicle stability during
braking may occur. It will take you longer to stop
the vehicle or will make your vehicle harder to
control. You could have a collision. Have the ve-
hicle checked immediately.
140
KNOWING YOUR
VEHICLE
SAFETY
STAR
TINGAND
DRIVING
WARNING LIGHTSAND
MESSAGES
IN AN
EMERGENCY
SERVICINGAND CARE
TECHNICAL
SPECIFICATIONS
CONTENTS
Page 242 of 412
WARNING! (Continued)
• If required, mounting posts must be properly
installed, if not equipped from the factory. Fail-
ure to properly follow floor mat installation or
mounting can cause interference with the brake
pedal and accelerator pedal operation causing
loss of control of the vehicle.
Periodic Safety Checks You Should Make
Outside The Vehicle
Tires
Examine tires for excessive tread wear and uneven
wear patterns. Check for stones, nails, glass, or other
objects lodged in the tread or sidewall. Inspect the
tread for cuts and cracks. Inspect sidewalls for cuts,
cracks and bulges. Check the wheel nuts for tightness.
Check the tires (including spare) for proper cold infla-
tion pressure. Lights
Have someone observe the operation of brake lights
and exterior lights while you work the controls. Check
turn signal and high beam indicator lights on the instru-
ment panel.
Door Latches
Check for positive closing, latching, and locking.
Fluid Leaks
Check area under vehicle after overnight parking for
fuel, engine coolant, oil, or other fluid leaks. Also, if
gasoline fumes are detected or if fuel, power steering
fluid (for versions/markets, where provided), or brake
fluid leaks are suspected, the cause should be located
and corrected immediately.
236
KNOWING
YOUR
VEHICLE
SAFETY
STARTING AND
DRIVING
WARNING LIGHTSAND
MESSAGES
IN
AN
EMERGENCY
SERVICINGAND CARE
TECHNICAL
SPECIFICATIONS
CONTENTS
Page 282 of 412
signal low tire pressure as intended. TPMS malfunctions
may occur for a variety of reasons, including the instal-
lation of replacement or alternate tires or wheels on
the vehicle that prevent the TPMS from functioning
properly. Always check the TPMS malfunction telltale
light after replacing one or more tires or wheels on
your vehicle to ensure that the replacement or alter-
nate tires and wheels allow the TPMS to continue to
function properly.
The TPMS has been optimized for the
original equipment tires and wheels.
TPMS pressures and warning have been
established for the tire size equipped on your
vehicle. Undesirable system operation or sensor
damage may result when using replacement
equipment that is not of the same size, type,
and/or style.Aftermarket wheels can cause sensor
damage. Do not use aftermarket tire sealants or
balance beads if your vehicle is equipped with a
TPMS, as damage to the sensors may result . (Re-
fer to “Tire Inflation Pressures” under “Tires —
General Information” and to “Tire Pressure Moni-
tor System (TPMS)” in “Knowing Your Vehicle” for
further information). 10. Seat Belt Reminder Light
When the ignition switch is first turned to
ON/RUN, this light will turn on for four to eight
seconds as a bulb check. During the bulb check,
if the driver's seat belt is unbuckled, a chime will sound.
After the bulb check or when driving, if the driver seat
belt remains unbuckled, the Seat Belt Warning Light
will flash or remain on continuously. Refer to “Occu-
pant Restraints” in “Safety” for further information.
11. Brake Warning Light This light monitors various brake functions,
including brake fluid level and parking brake
application. If the brake light turns on it may
indicate that the parking brake is applied, that
the brake fluid level is low, or that there is a problem
with the anti-lock brake system reservoir.
If the light remains on when the parking brake has been
disengaged, and the fluid level is at the full mark on the
master cylinder reservoir, it indicates a possible brake
hydraulic system malfunction or that a problem with
the Brake Booster has been detected by the Anti-Lock
Brake System (ABS) / Electronic Stability Program
(ESP) system. In this case, the light will remain on until
the condition has been corrected. If the problem is
related to the brake booster, the ABS pump will run
when applying the brake and a brake pedal pulsation
may be felt during each stop.
276
KNOWING YOUR
VEHICLE
SAFETY
STARTING AND
DRIVING
WARNING LIGHTSAND
MESSAGES
INAN
EMERGENC
Y
SERVICING AND
CARE
TECHNICAL
SPECIFICATIONS
CONTENTS
Page 283 of 412
The dual brake system provides a reserve braking
capacity in the event of a failure to a portion of the
hydraulic system. A leak in either half of the dual brake
system is indicated by the Brake Warning Light, which
will turn on when the brake fluid level in the master
cylinder has dropped below a specified level.
The light will remain on until the cause is corrected.
NOTE:The light may flash momentarily during sharp
cornering maneuvers, which change fluid level condi-
tions. The vehicle should have service performed, and
the brake fluid level checked.
If brake failure is indicated, immediate repair is
necessary.
WARNING!
Driving a vehicle with the red brake light
on is dan
gerous. Part of the brake sys-
tem may have failed. It will take longer to stop
the vehicle. You could have a collision. Have the
vehicle checked immediately. Vehicles equipped with the Anti-Lock Brake System
(ABS), are also equipped with Electronic Brake Force
Distribution (EBD). In the event of an EBD failure, the
Brake Warning Light will turn on along with the ABS
Light. Immediate repair to the ABS system is required.
Operation of the Brake Warning Light can be checked
by turning the ignition switch from the OFF position to
the ON/RUN position. The light should illuminate for
approximately two seconds. The light should then turn
off unless the parking brake is applied or a brake fault
is detected. If the light does not illuminate, have the
light inspected by an authorized dealer.
The light also will turn on when the parking brake is
applied with the ignition switch in the ON/RUN posi-
tion.
NOTE: This light shows only that the parking brake is
applied. It does not show the degree of brake
application.
277
KNOWING
YOUR
VEHICLE
SAFETY
STARTING
AND
DRIVING
WARNING
LIGHTS
AND
MESSAGES
IN AN
EMERGENC
Y
SERVICING
AND
CARE
TECHNICAL
SPECIFICATIONS
CONTENTS
Page 303 of 412
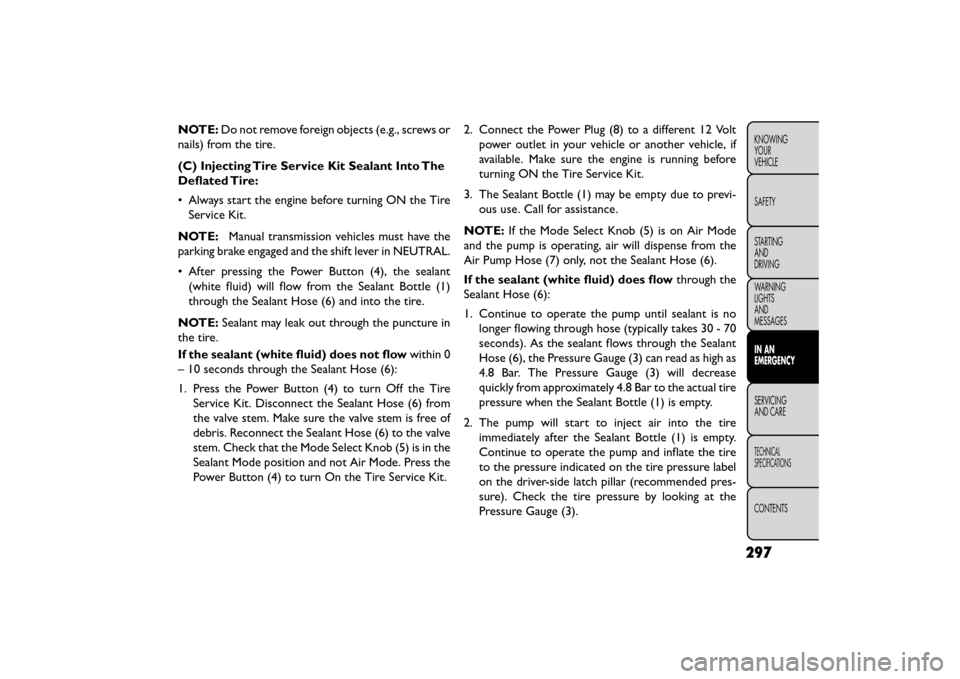
NOTE:Do not remove foreign objects (e.g., screws or
nails) from the tire.
(C) Injecting Tire Service Kit Sealant Into The
Deflated Tire:
• Always start the engine before turning ON the Tire Service Kit.
NOTE: Manual transmission vehicles must have the
parking brake engaged and the shift lever in NEUTRAL.
• After pressing the Power Button (4), the sealant (white fluid) will flow from the Sealant Bottle (1)
through the Sealant Hose (6) and into the tire.
NOTE: Sealant may leak out through the puncture in
the tire.
If the sealant (white fluid) does not flow within 0
– 10 seconds through the Sealant Hose (6):
1. Press the Power Button (4) to turn Off the Tire Service Kit. Disconnect the Sealant Hose (6) from
the valve stem. Make sure the valve stem is free of
debris. Reconnect the Sealant Hose (6) to the valve
stem. Check that the Mode Select Knob (5) is in the
Sealant Mode position and not Air Mode. Press the
Power Button (4) to turn On the Tire Service Kit. 2. Connect the Power Plug (8) to a different 12 Volt
power outlet in your vehicle or another vehicle, if
available. Make sure the engine is running before
turning ON the Tire Service Kit.
3. The Sealant Bottle (1) may be empty due to previ- ous use. Call for assistance.
NOTE: If the Mode Select Knob (5) is on Air Mode
and the pump is operating, air will dispense from the
Air Pump Hose (7) only, not the Sealant Hose (6).
If the sealant (white fluid) does flow through the
Sealant Hose (6):
1. Continue to operate the pump until sealant is no longer flowing through hose (typically takes 30 - 70
seconds). As the sealant flows through the Sealant
Hose (6), the Pressure Gauge (3) can read as high as
4.8 Bar. The Pressure Gauge (3) will decrease
quickly from approximately 4.8 Bar to the actual tire
pressure when the Sealant Bottle (1) is empty.
2. The pump will start to inject air into the tire immediately after the Sealant Bottle (1) is empty.
Continue to operate the pump and inflate the tire
to the pressure indicated on the tire pressure label
on the driver-side latch pillar (recommended pres-
sure). Check the tire pressure by looking at the
Pressure Gauge (3).
297
KNOWING
YOUR
VEHICLE
SAFETY
STARTING
AND
DRIVING
WARNING
LIGHTS
AND
MESSAGES
IN AN
EMERGENCY
SER VICING
AND
CARE
TECHNICAL
SPECIFICATIONS
CONTENTS
Page 328 of 412
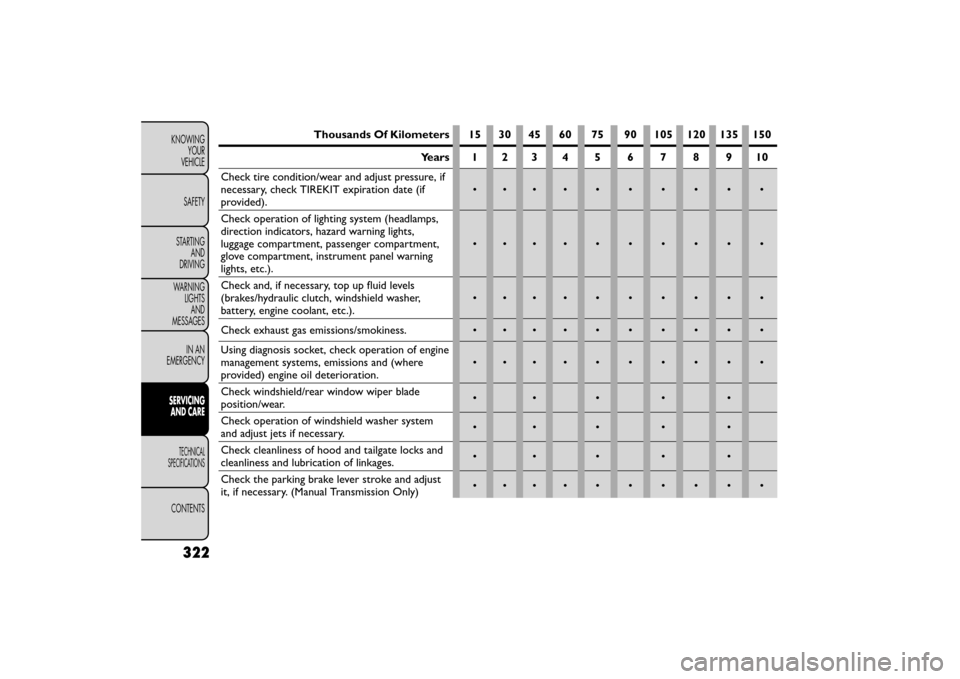
Thousands Of Kilometers 15 30 45 60 75 90 105 120 135 150Years 1 2 3 4 5678910
Check tire condition/wear and adjust pressure, if
necessary, check TIREKIT expiration date (if
provided). ••••••••••
Check operation of lighting system (headlamps,
direction indicators, hazard warning lights,
luggage compartment, passenger compartment,
glove compartment, instrument panel warning
lights, etc.). ••••••••••
Check and, if necessary, top up fluid levels
(brakes/hydraulic clutch, windshield washer,
battery, engine coolant, etc.). ••••••••••
Check exhaust gas emissions/smokiness. • • • • ••••••
Using diagnosis socket, check operation of engine
management systems, emissions and (where
provided) engine oil deterioration. ••••••••••
Check windshield/rear window wiper blade
position/wear. •••••
Check operation of windshield washer system
and adjust jets if necessary. •••••
Check cleanliness of hood and tailgate locks and
cleanliness and lubrication of linkages. •••••
Check the parking brake lever stroke and adjust
it, if necessary. (Manual Transmission Only) ••••••••••
322
KNOWING
YOUR
VEHICLE
SAFETY
STARTING AND
DRIVING
WARNING LIGHTSAND
MESSAGES
IN AN
EMERGENCY
SERVICINGAND C ARE
TECHNICAL
SPECIFICATIONS
CONTENTS
Page 329 of 412
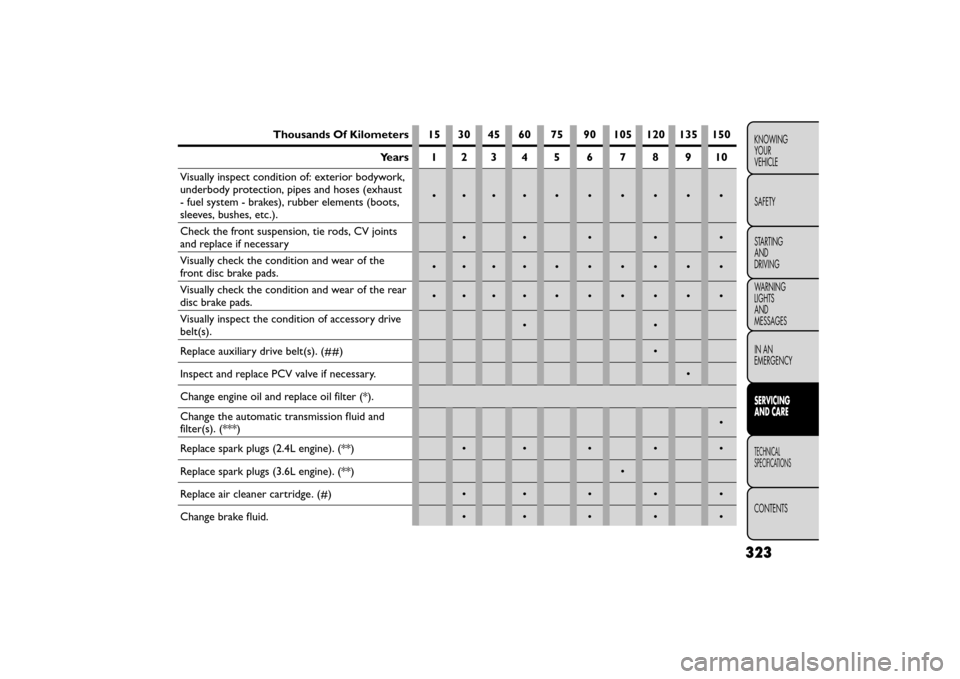
Thousands Of Kilometers 15 30 45 60 75 90 105 120 135 150Years 1 2 3 4 5678910
Visually inspect condition of: exterior bodywork,
underbody protection, pipes and hoses (exhaust
- fuel system - brakes), rubber elements (boots,
sleeves, bushes, etc.). ••••••••••
Check the front suspension, tie rods, CV joints
and replace if necessary •••••
Visually check the condition and wear of the
front disc brake pads. ••••••••••
Visually check the condition and wear of the rear
disc brake pads. ••••••••••
Visually inspect the condition of accessory drive
belt(s). ••
Replace auxiliary drive belt(s). (##) •
Inspect and replace PCV valve if necessary. •
Change engine oil and replace oil filter (*).
Change the automatic transmission fluid and
filter(s). (***) •
Replace spark plugs (2.4L engine). (**) • • • • •
Replace spark plugs (3.6L engine). (**) •
Replace air cleaner cartridge. (#) • • • • •
Change brake fluid. • • • • •
323
KNOWING
YOUR
VEHICLE
SAFETY
STARTING
AND
DRIVING
WARNING
LIGHTS
AND
MESSAGES
IN AN
EMERGENCY
SERVICING
AND C ARE
TECHNICAL
SPECIFICATIONS
CONTENTS
Page 330 of 412
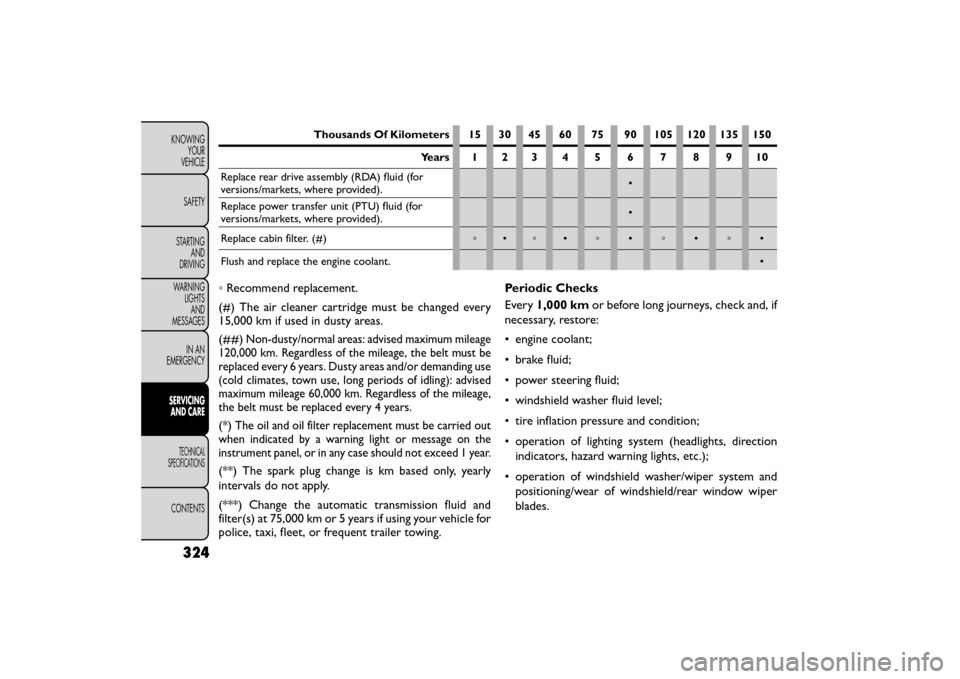
Thousands Of Kilometers 15 30 45 60 75 90 105 120 135 150Years 1 2 3 4 5678910
Replace rear drive assembly (RDA) fluid (for
versions/markets, where provided). •
Replace power transfer unit (PTU) fluid (for
versions/markets, where provided). •
Replace cabin filter. (#) ◦•◦ • ◦ •◦•◦•
Flush and replace the engine coolant. •
◦Recommend replacement.
(#) The air cleaner cartridge must be changed every
15,000 km if used in dusty areas.
(##)
Non-dusty/normal areas: advised maximum mileage
120,000 km. Regardless of the mileage, the belt must be
replaced every 6 years. Dusty areas and/or demanding use
(cold climates, town use, long periods of idling): advised
maximum mileage 60,000 km. Regardless of the mileage,
the belt must be replaced every 4 years.
(*)The oil and oil filter replacement must be carried out
when indicated by a warning light or message on the
instrument panel, or in any case should not exceed 1 year.
(**) The spark plug change is km based only, yearly
intervals do not apply.
(***) Change the automatic transmission fluid and
filter(s) at 75,000 km or 5 years if using your vehicle for
police, taxi, fleet, or frequent trailer towing. Periodic Checks
Every
1,000 km or before long journeys, check and, if
necessary, restore:
• engine coolant;
• brake fluid;
• power steering fluid;
• windshield washer fluid level;
• tire inflation pressure and condition;
• operation of lighting system (headlights, direction indicators, hazard warning lights, etc.);
• operation of windshield washer/wiper system and positioning/wear of windshield/rear window wiper
blades.
324
KNOWING YOUR
VEHICLE
SAFETY
STARTING AND
DRIVING
WARNING LIGHTSAND
MESSAGES
IN AN
EMERGENCY
SERVICINGAND C ARE
TECHNICAL
SPECIFICATIONS
CONTENTS
Page 331 of 412
Every3,000 km, check and top up, if required, the
engine oil level and automatic transmission fluid level
(four-speed automatic only).
Heavy-Duty Use Of The Car
If the car is used mainly under one of the following
conditions:
• towing a trailer or caravan;
• dusty roads;
• short, repeated journeys (less than 7-8 km) at sub- zero outside temperatures;
• engine often idling or driving long distances at low speeds or long periods of idleness.
You should perform the following inspections more
frequently than shown on the Scheduled Servicing Plan:
• check front disc brake pad conditions and wear;
• check cleanliness of hood and trunk locks, cleanli- ness and lubrication of linkage;
• visually inspect conditions of: engine, transmission, pipes and hoses (exhaust - fuel system - brakes) and
rubber elements (boots - sleeves - bushes - etc.);
• check battery charge and battery fluid level (electro- lyte); • visually inspect condition of the accessory drive
belts;
• check and, if necessary, change engine oil and replace oil filter;
• check and, if necessary, replace pollen filter;
• check and, if necessary, replace air cleaner.
MAINTENANCE SCHEDULE — DIESEL
ENGINE
To help you have the best driving experience possible,
the manufacturer has identified the specific vehicle
maintenance service intervals that are required to keep
your vehicle operating properly and safely.
The manufacturer recommends that these mainte-
nance intervals be performed at your selling dealer. The
technicians at your dealership know your vehicle best,
and have access to factory trained information, genuine
FIAT parts, and specially designed electronic and me-
chanical tools that can help prevent future costly re-
pairs.
The maintenance intervals shown should be performed
as indicated in this section.
325
KNOWING
YOUR
VEHICLE
SAFETY
STARTING
AND
DRIVING
WARNING
LIGHTS
AND
MESSAGES
IN AN
EMERGENCY
SERVICING
AND C ARE
TECHNICAL
SPECIFICATIONS
CONTENTS
Page 333 of 412
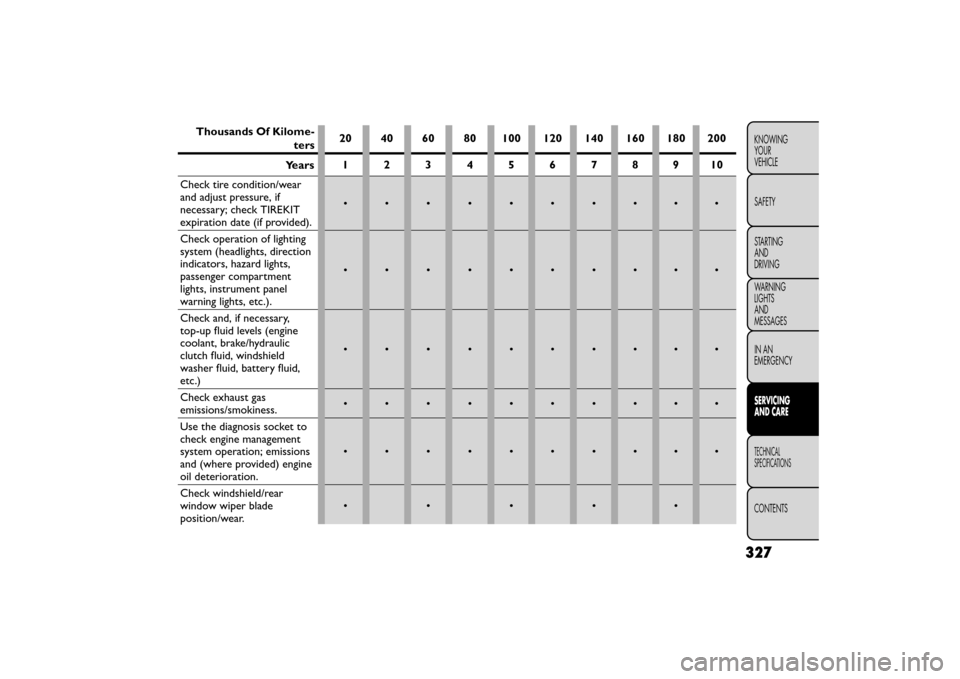
Thousands Of Kilome-
ters20 40 60 80 100 120 140 160 180 200
12345678910
Check tire condition/wear
and adjust pressure, if
necessary; check TIREKIT
expiration date (if provided).
••••••••••
Check operation of lighting
system (headlights, direction
indicators, hazard lights,
passenger compartment
lights, instrument panel
warning lights, etc.).
••••••••••
Check and, if necessary,
top-up fluid levels (engine
coolant, brake/hydraulic
clutch fluid, windshield
washer fluid, battery fluid,
etc.)
••••••••••
Check exhaust gas
emissions/smokiness.••••••••••
Use the diagnosis socket to
check engine management
system operation; emissions
and (where provided) engine
oil deterioration.
••••••••••
Check windshield/rear
window wiper blade
position/wear.
•••••
327
KNOWING YOURVEHICLE
SAFETY
STARTING ANDDRIVING
WARNING LIGHTSANDMESSAGES
IN AN EMERGENCY
SERVICING AND CARE
TECHNICALSPECIFICATIONS
CONTENTS
Years