instrument panel FIAT FULLBACK 2016 1.G Owners Manual
[x] Cancel search | Manufacturer: FIAT, Model Year: 2016, Model line: FULLBACK, Model: FIAT FULLBACK 2016 1.GPages: 312, PDF Size: 13.67 MB
Page 9 of 312
GRAPHICAL INDEX
GETTING TO KNOW YOUR VEHICLE
KNOWING THE INSTRUMENT PANEL
SAFETY
STARTING AND DRIVING
IN CASE OF EMERGENCY
SERVICING AND MAINTENANCE
TECHNICAL SPECIFICATIONS
INDEX
Page 13 of 312
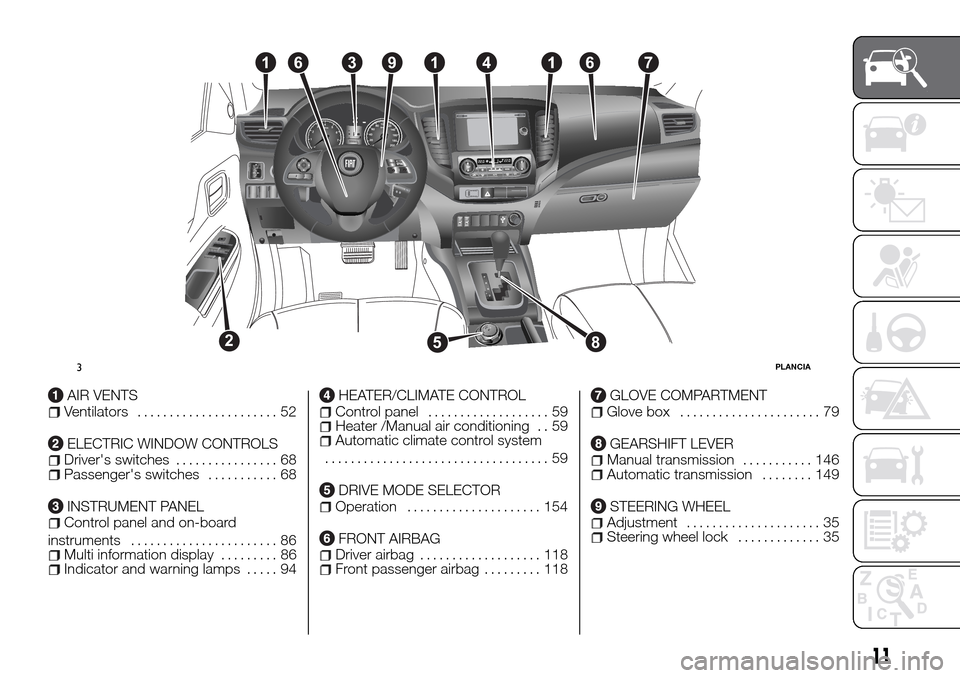
AIR VENTSVentilators...................... 52
ELECTRIC WINDOW CONTROLSDriver's switches................ 68Passenger's switches........... 68
INSTRUMENT PANELControl panel and on-board
instruments....................... 86
Multi information display......... 86Indicator and warning lamps..... 94
HEATER/CLIMATE CONTROLControl panel................... 59Heater /Manual air conditioning . . 59Automatic climate control system
................................... 59
DRIVE MODE SELECTOROperation..................... 154
FRONT AIRBAGDriver airbag................... 118Front passenger airbag......... 118
GLOVE COMPARTMENTGlove box...................... 79
GEARSHIFT LEVERManual transmission........... 146Automatic transmission........ 149
STEERING WHEELAdjustment..................... 35Steering wheel lock............. 35
16
528
3914167
3PLANCIA
11
Page 20 of 312
NOTE If the keyless operation key is
within the operating range, even
someone not carrying the key can lock
and unlock the doors by pressing the
driver’s or front passenger’s door
lock/unlock switch.
Operating range for starting the
engine and changing the operation
mode
The operating range is the interior of the
vehicle.
NOTE Even if it is within the operating
range, if the keyless operation key is in
a small item holder such as the glove
box, on top of the instrument panel,
door pocket or in the luggage
compartment, it may be impossible to
start the engine and change the
operation mode.
NOTE If a keyless operation key is too
close to the door or door window, it
may be possible to start the engine or
change the operation mode even when
the key is outside the vehicle.To operate using the keyless
operation function
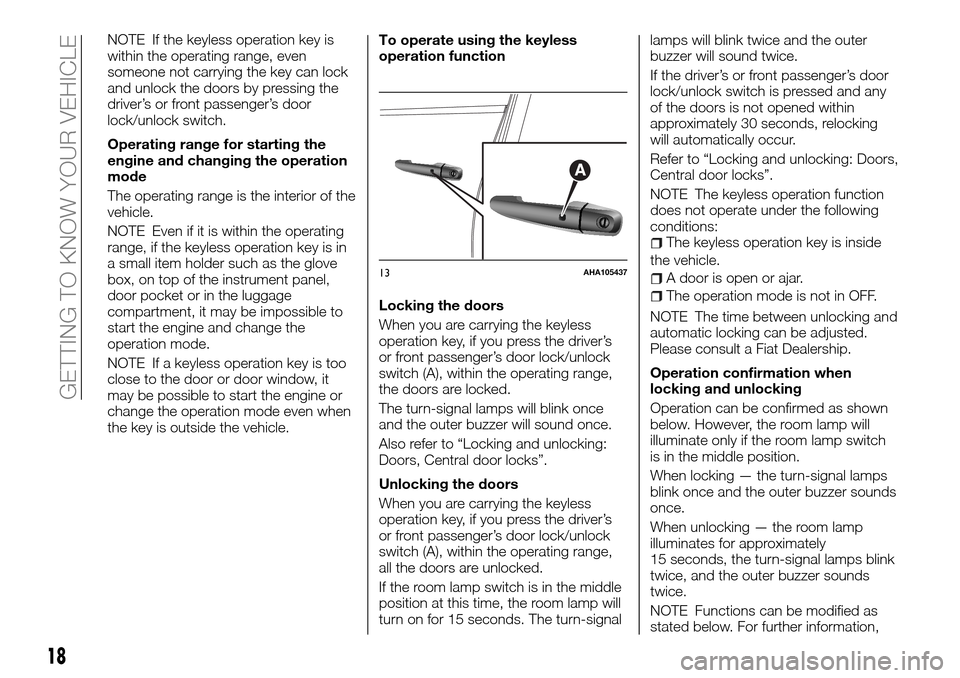
Locking the doors
When you are carrying the keyless
operation key, if you press the driver’s
or front passenger’s door lock/unlock
switch (A), within the operating range,
the doors are locked.
The turn-signal lamps will blink once
and the outer buzzer will sound once.
Also refer to “Locking and unlocking:
Doors, Central door locks”.
Unlocking the doors
When you are carrying the keyless
operation key, if you press the driver’s
or front passenger’s door lock/unlock
switch (A), within the operating range,
all the doors are unlocked.
If the room lamp switch is in the middle
position at this time, the room lamp will
turn on for 15 seconds. The turn-signallamps will blink twice and the outer
buzzer will sound twice.
If the driver’s or front passenger’s door
lock/unlock switch is pressed and any
of the doors is not opened within
approximately 30 seconds, relocking
will automatically occur.
Refer to “Locking and unlocking: Doors,
Central door locks”.
NOTE The keyless operation function
does not operate under the following
conditions:
The keyless operation key is inside
the vehicle.
A door is open or ajar.
The operation mode is not in OFF.
NOTE The time between unlocking and
automatic locking can be adjusted.
Please consult a Fiat Dealership.
Operation confirmation when
locking and unlocking
Operation can be confirmed as shown
below. However, the room lamp will
illuminate only if the room lamp switch
is in the middle position.
When locking — the turn-signal lamps
blink once and the outer buzzer sounds
once.
When unlocking — the room lamp
illuminates for approximately
15 seconds, the turn-signal lamps blink
twice, and the outer buzzer sounds
twice.
NOTE Functions can be modified as
stated below. For further information,
A
13AHA105437
18
GETTING TO KNOW YOUR VEHICLE
Page 43 of 312
OFF— all lamps off
— position, tail, licence plate and
instrument panel lamps on
— headlamps and other lamps go
on
Type 2
Rotate the switch to turn on the lamps.
OFF— all lamps off
AUTO— with the ignition switch or the
operation mode is in ON, headlamps,
position, tail, licence plate and
instrument panel lamps turn on and off
automatically in accordance with
outside light level. All lamps turn off
automatically when the ignition switch is
turned to “OFF” position or the
operation mode is put in OFF.
— position, tail, licence plate and
instrument panel lamps on
— headlamps and other lamps go
onNOTE The sensitivity of the automatic
on/off control can be adjusted. For
further information, contact a Fiat
Dealership.
NOTE If the front fog lamps (if so
equipped) turn on when they are
supposed to with the switch in the
“AUTO” position, the lamps turn off
automatically with the ignition switch or
operation mode off.
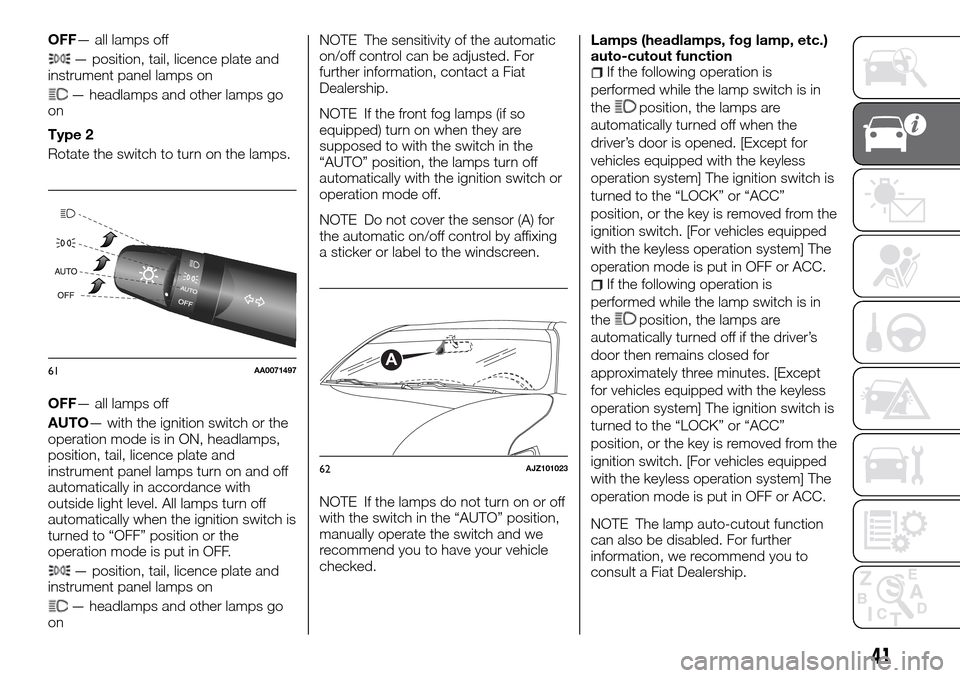
NOTE Do not cover the sensor (A) for
the automatic on/off control by affixing
a sticker or label to the windscreen.
NOTE If the lamps do not turn on or off
with the switch in the “AUTO” position,
manually operate the switch and we
recommend you to have your vehicle
checked.Lamps (headlamps, fog lamp, etc.)
auto-cutout function
If the following operation is
performed while the lamp switch is in
the
position, the lamps are
automatically turned off when the
driver’s door is opened. [Except for
vehicles equipped with the keyless
operation system] The ignition switch is
turned to the “LOCK” or “ACC”
position, or the key is removed from the
ignition switch. [For vehicles equipped
with the keyless operation system] The
operation mode is put in OFF or ACC.
If the following operation is
performed while the lamp switch is in
the
position, the lamps are
automatically turned off if the driver’s
door then remains closed for
approximately three minutes. [Except
for vehicles equipped with the keyless
operation system] The ignition switch is
turned to the “LOCK” or “ACC”
position, or the key is removed from the
ignition switch. [For vehicles equipped
with the keyless operation system] The
operation mode is put in OFF or ACC.
NOTE The lamp auto-cutout function
can also be disabled. For further
information, we recommend you to
consult a Fiat Dealership.
61AA0071497A
62AJZ101023
41
Page 54 of 312
59)With the ignition switch or the
operation mode in ON and the lever in the
“AUTO” position, the wipers may
automatically operate in the situations
described below. If your hands get
trapped, you could suffer injuries or the
wipers could malfunction. Be sure to turn
the ignition switch to the “LOCK” position
or put the operation mode in OFF, or move
lever to the “OFF” position to deactivate
the rain sensor: when cleaning the outside
surface of the windscreen, if you touch or
wipe with a cloth on top of the rain sensor;
when using an automatic car wash; when a
physical shock is applied to the windscreen
or to the rain sensor.
IMPORTANT
17)Do not activate the rain sensor when
washing the car in an automatic car wash.
AIR CONDITIONING
SYSTEM
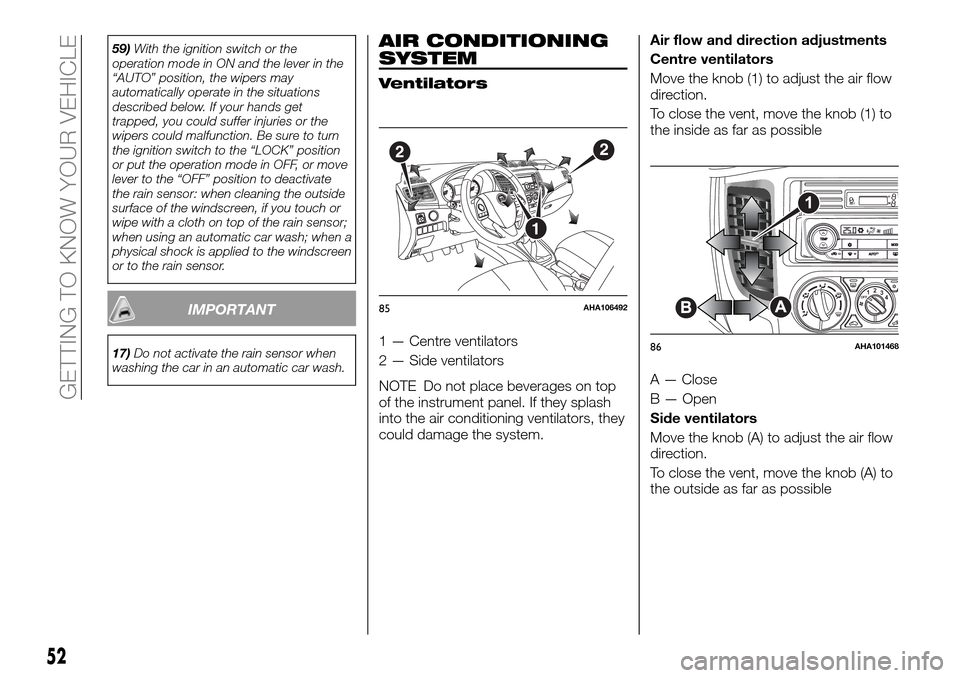
Ventilators
1 — Centre ventilators
2 — Side ventilators
NOTE Do not place beverages on top
of the instrument panel. If they splash
into the air conditioning ventilators, they
could damage the system.Air flow and direction adjustments
Centre ventilators
Move the knob (1) to adjust the air flow
direction.
To close the vent, move the knob (1) to
the inside as far as possible
A — Close
B — Open
Side ventilators
Move the knob (A) to adjust the air flow
direction.
To close the vent, move the knob (A) to
the outside as far as possible
56
7
8120
140
160
180
200
LROFF3 2 14
22
1
85AHA106492
SETH
M
OFF12
3
4
86AHA101468
52
GETTING TO KNOW YOUR VEHICLE
Page 76 of 312
CARGO AREA
CARGO LOADS
77) 78)
Cargo loads precautions
When loading luggage, be careful to the
following.
Stow cargo and luggage in the cargo
area whenever possible.
Distribute cargo or luggage evenly
not to be unbalanced in weight of a
load.
Do not place cargo or luggage on
the instrument panel. Also, do not stack
up cargo or luggage on the front
passenger’s seat or the rear seat.
Having the driver’s vision blocked, and
your cargo being thrown inside the
cabin if you suddenly have to brake can
cause a serious accident or injury.
WARNING
77)If a vehicle is parked on a very steep
gradient or with a side gradient, opening
the rear door or side door could cause any
unsecured items to emerge suddenly.
78)If you wish to carry a reserve of petrol
in a can, observe the legal restrictions and
only use a can that is type-approved and
properly secured to the load anchorage
eyebolts. Anyway, by doing so, you
increase the risk of fire in the event of an
accident with your vehicle.
INTERIOR FEATURES
SUN VISORS
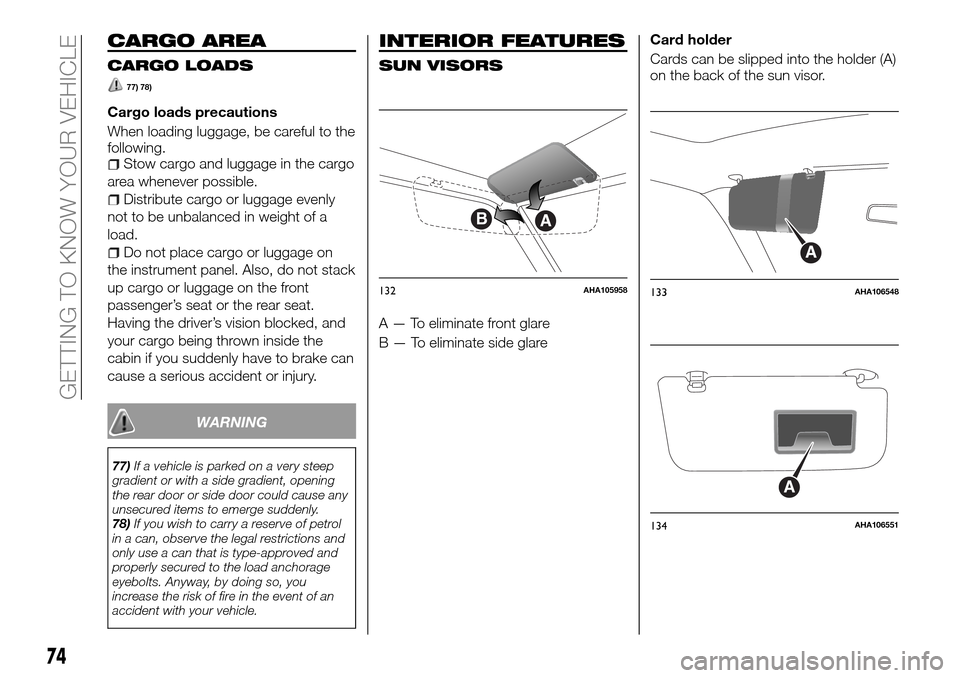
A — To eliminate front glare
B — To eliminate side glareCard holder
Cards can be slipped into the holder (A)
on the back of the sun visor.
AB
132AHA105958
A
133AHA106548
A
134AHA106551
74
GETTING TO KNOW YOUR VEHICLE
Page 84 of 312
engine warning lamp flashes, have the
system checked as soon as possible at
an authorised Fiat Dealership.
In diesel-powered vehicles, in case
cetane number (EN590) 51 or higher is
not available, use cetane number 45 or
higher.
In diesel-powered vehicles, poor-quality
diesel fuel can cause deposits form in
the injector, resulting in black smoke
and rough idling. If these problems
occur, you are advised to add a
cleaning additive to the diesel fuel when
you refuel the vehicle. The additive will
break up and remove the deposits,
thereby returning the engine to a normal
condition. Be sure to use a FCA
GENUINE DIESEL FUEL SYSTEM
CLEANER. Using an unsuitable additive
could make the engine malfunction. For
detailed, please contact the nearest
authorised Fiat Dealership.
IMPORTANT
33)For unleaded petrol-powered vehicles,
the use of leaded fuel can result in serious
damage to the engine and catalytic
converter. Do not use the leaded fuel.
34)Do not use more than 10 %
concentration of ethanol (grain alcohol) by
volume. Use of more than 10 %
concentration may lead to damage to your
vehicle fuel system, engine, engine sensors
and exhaust system.35)Do not operate your vehicle on petrol
containing methanol. Using this type of
alcohol could adversely affect the vehicle’s
performance and damage critical parts of
the vehicle’s fuel system.
36)Diesel-powered vehicles to comply with
the Euro 4 and Euro 5 regulation are
designed to use only diesel fuel that meets
the EN 590 standard. Use of any other type
of diesel fuel would adversely affect the
engine’s performance and durability.
37)Your vehicle is designed to use only
diesel fuel that meets the EN 590 standard.
Use of any other type of diesel fuel (bio
diesel, methylester, etc.) would adversely
affect the engine’s performance and
durability.
38)For diesel engines, only use diesel fuel
for motor vehicles in accordance with EN
590 European specifications. The use of
other products or mixtures may damage
the engine beyond repair and consequently
invalidate the warranty, due to the damage
caused. If you accidentally introduce other
types of fuel into the tank, do not start the
engine. Empty the tank. If the engine has
been run for even an extremely limited
amount of time, you must not only drain the
fuel tank, but the rest of the supply circuit
as well.
FILLING THE FUEL
TANK
86) 87) 88) 89) 90) 91) 92) 93) 94) 95) 96)
Fuel tank capacity: 75 litres.
1. Before filling with fuel, stop the
engine.
2. The fuel tank filler is located on the
rear left side of your vehicle.
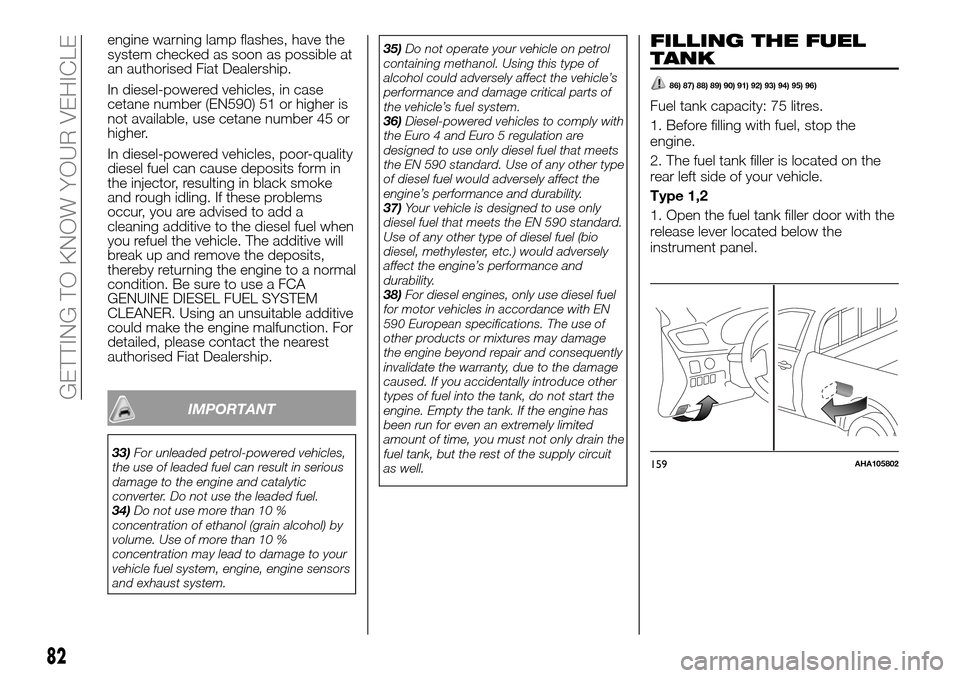
Type 1,2
1. Open the fuel tank filler door with the
release lever located below the
instrument panel.
159AHA105802
82
GETTING TO KNOW YOUR VEHICLE
Page 87 of 312
KNOWING THE INSTRUMENT PANEL
This section of the booklet gives you all
the information you need to
understand, interpret and use the
instrument panel correctly.INSTRUMENTS..............86
MULTI INFORMATION DISPLAY....86
INDICATOR AND WARNING
LAMPS...................94
85
Page 88 of 312
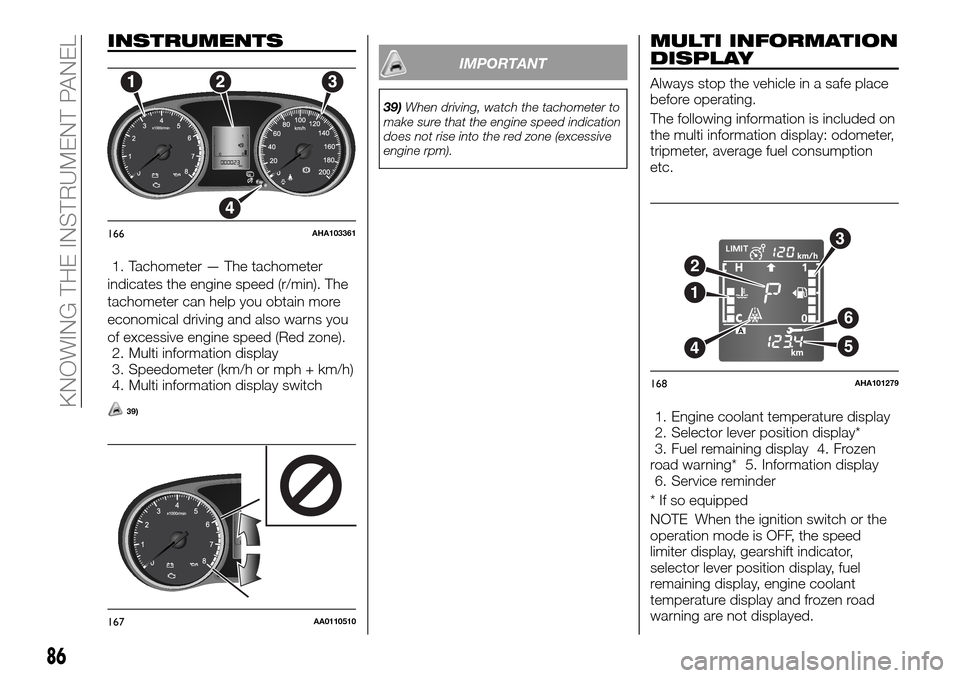
INSTRUMENTS
1. Tachometer — The tachometer
indicates the engine speed (r/min). The
tachometer can help you obtain more
economical driving and also warns you
of excessive engine speed (Red zone).
2. Multi information display
3. Speedometer (km/h or mph + km/h)
4. Multi information display switch
39)
IMPORTANT
39)When driving, watch the tachometer to
make sure that the engine speed indication
does not rise into the red zone (excessive
engine rpm).
MULTI INFORMATION
DISPLAY
Always stop the vehicle in a safe place
before operating.
The following information is included on
the multi information display: odometer,
tripmeter, average fuel consumption
etc.
1. Engine coolant temperature display
2. Selector lever position display*
3. Fuel remaining display 4. Frozen
road warning* 5. Information display
6. Service reminder
* If so equipped
NOTE When the ignition switch or the
operation mode is OFF, the speed
limiter display, gearshift indicator,
selector lever position display, fuel
remaining display, engine coolant
temperature display and frozen road
warning are not displayed.
166AHA103361
167AA0110510
6
5
3
2
4
1
168AHA101279
86
KNOWING THE INSTRUMENT PANEL
Page 90 of 312
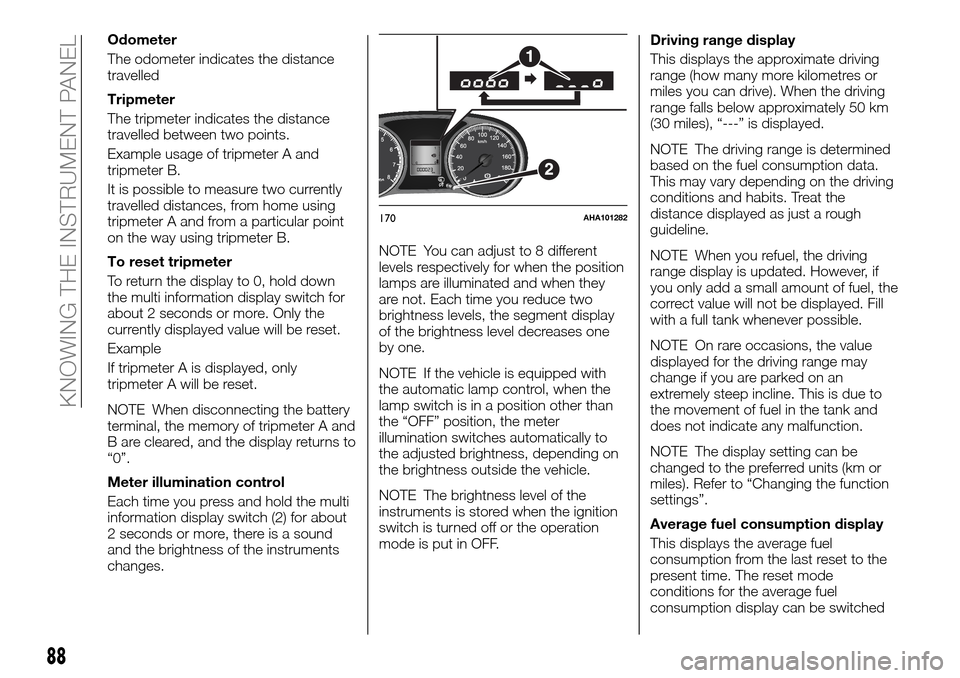
Odometer
The odometer indicates the distance
travelled
Tripmeter
The tripmeter indicates the distance
travelled between two points.
Example usage of tripmeter A and
tripmeter B.
It is possible to measure two currently
travelled distances, from home using
tripmeter A and from a particular point
on the way using tripmeter B.
To reset tripmeter
To return the display to 0, hold down
the multi information display switch for
about 2 seconds or more. Only the
currently displayed value will be reset.
Example
If tripmeter A is displayed, only
tripmeter A will be reset.
NOTE When disconnecting the battery
terminal, the memory of tripmeter A and
B are cleared, and the display returns to
“0”.
Meter illumination control
Each time you press and hold the multi
information display switch (2) for about
2 seconds or more, there is a sound
and the brightness of the instruments
changes.NOTE You can adjust to 8 different
levels respectively for when the position
lamps are illuminated and when they
are not. Each time you reduce two
brightness levels, the segment display
of the brightness level decreases one
by one.
NOTE If the vehicle is equipped with
the automatic lamp control, when the
lamp switch is in a position other than
the “OFF” position, the meter
illumination switches automatically to
the adjusted brightness, depending on
the brightness outside the vehicle.
NOTE The brightness level of the
instruments is stored when the ignition
switch is turned off or the operation
mode is put in OFF.Driving range display
This displays the approximate driving
range (how many more kilometres or
miles you can drive). When the driving
range falls below approximately 50 km
(30 miles), “---” is displayed.
NOTE The driving range is determined
based on the fuel consumption data.
This may vary depending on the driving
conditions and habits. Treat the
distance displayed as just a rough
guideline.
NOTE When you refuel, the driving
range display is updated. However, if
you only add a small amount of fuel, the
correct value will not be displayed. Fill
with a full tank whenever possible.
NOTE On rare occasions, the value
displayed for the driving range may
change if you are parked on an
extremely steep incline. This is due to
the movement of fuel in the tank and
does not indicate any malfunction.
NOTE The display setting can be
changed to the preferred units (km or
miles). Refer to “Changing the function
settings”.
Average fuel consumption display
This displays the average fuel
consumption from the last reset to the
present time. The reset mode
conditions for the average fuel
consumption display can be switched
170AHA101282
88
KNOWING THE INSTRUMENT PANEL