engine FIAT FULLBACK 2017 Owner handbook (in English)
[x] Cancel search | Manufacturer: FIAT, Model Year: 2017, Model line: FULLBACK, Model: FIAT FULLBACK 2017Pages: 312, PDF Size: 12.31 MB
Page 46 of 312
WARNING
56)As the driver's exterior mirror is curved,
it may slightly alter the perception of
distance of the reflected image. Further, the
reflective surface of the lower part of the
exterior mirrors is parabolic to increase the
field of view. The reflected image size is
thus reduced and gives the impression that
the reflected item is further away than it
actually is.
57)Do not attempt to adjust the rear view
mirrors while driving. This can be
dangerous. Always adjust the mirrors
before driving.
58)Your vehicle is equipped with convex
type mirrors. Remind that objects that you
see in the mirror will look smaller and
farther away compared to a normal flat
mirror. Do not use this mirror to estimate
distance of following vehicles when
changing lanes.
59)Do not drive the vehicle with the mirror
folded in. The lack of rearward visibility
normally provided by the mirror could lead
to an accident.
IMPORTANT
20)It is possible to retract and extend the
mirrors by hand. After retracting a mirror
using the mirror retractor switch, however,
you should extend it by using the switch
again, not by hand. If you extended the
mirror by hand after retracting it using the
switch, it would not properly lock in
position. As a result, it could move because
of the wind or vibration while you are
driving, taking away your rearward visibility.
EXTERNAL LIGHTS
COMBINATION
HEADLAMPS AND
DIPPER SWITCH
Headlamps
NOTE Do not leave the lamps on for a
long time while the engine is stationary
(not running). A run-down battery could
result.
NOTE When it rains, or when the
vehicle has been washed, the inside of
the lens sometimes becomes foggy, but
this does not indicate a functional
problem. When the lamp is switched
on, the heat will remove the fog.
However, if water gathers inside the
lamp, we recommend you to have
checked.
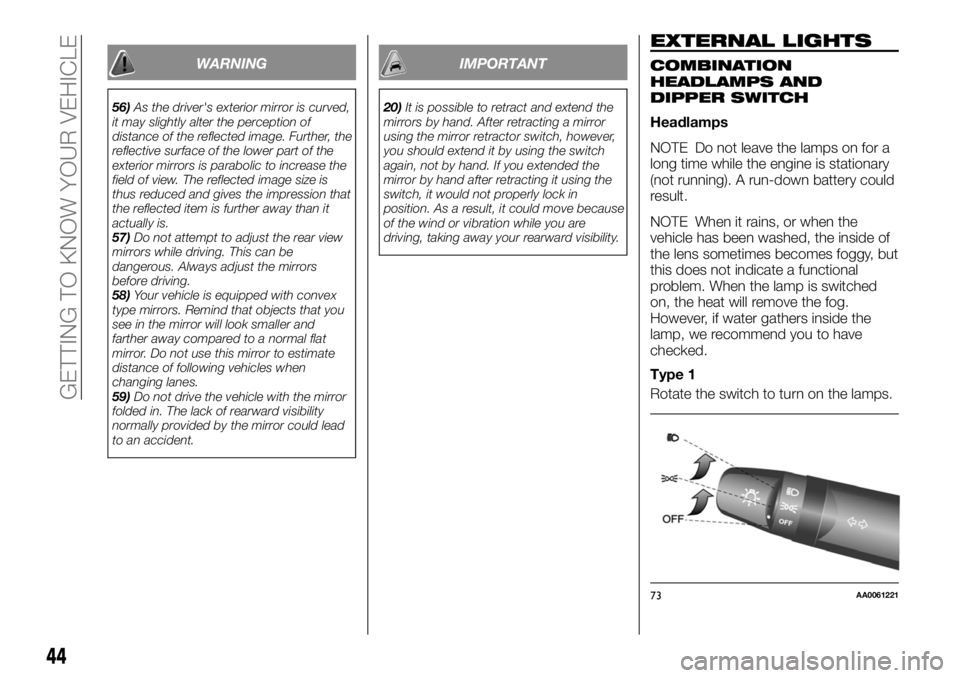
Type 1
Rotate the switch to turn on the lamps.
73AA0061221
44
GETTING TO KNOW YOUR VEHICLE
Page 48 of 312
NOTE The lamp auto-cutout function
can also be disabled. For further
information, we recommend you to
consult a Fiat Dealership.
Lamp monitor buzzer
If the following operation is performed,
a buzzer will sound to remind the driver
to turn off the lamps. [Except for
vehicles equipped with the keyless
operation system]
If the driver’s door is opened when the
key is in the “LOCK” or “ACC” position
or removed from the ignition switch
while the lamps are on. [For vehicles
equipped with the keyless operation
system] If the driver’s door is opened
when the operation mode is in ACC or
OFF while the lamps are on. In both
cases, the buzzer will automatically
stop if the auto-cutoff function is
activated, the lamp switch is turned off,
or the door is closed.
Daytime running lamp
The daytime running lamps comes on
when the engine is running and the
lamp switch is in the “OFF” or “AUTO”
position and the tail lamps are off.
60) 61)
Dipper (High/Low beam change)
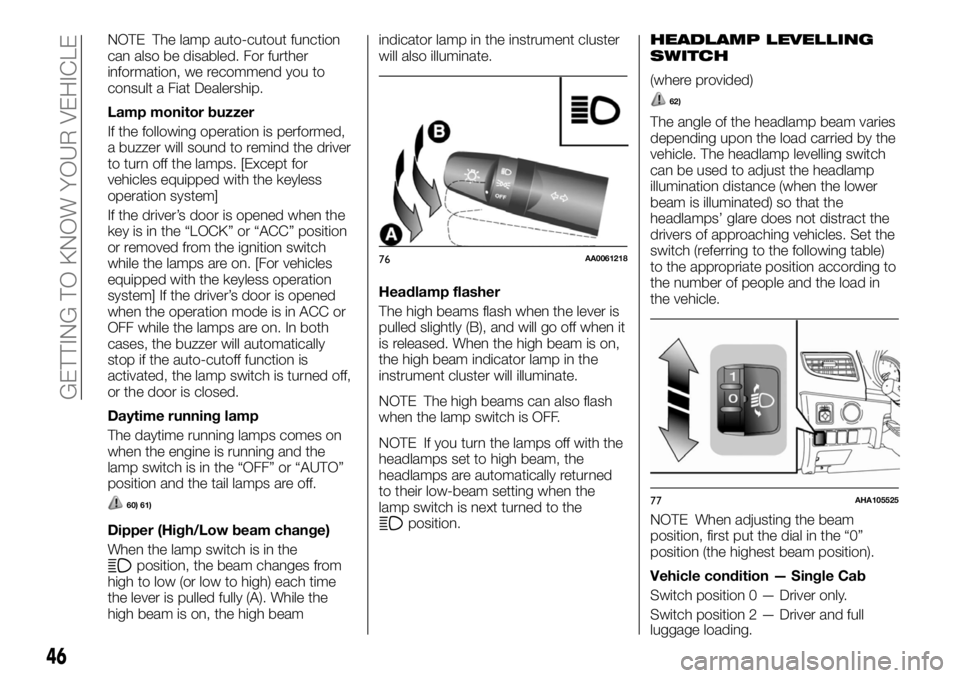
When the lamp switch is in the
position, the beam changes from
high to low (or low to high) each time
the lever is pulled fully (A). While the
high beam is on, the high beamindicator lamp in the instrument cluster
will also illuminate.
Headlamp flasher
The high beams flash when the lever is
pulled slightly (B), and will go off when it
is released. When the high beam is on,
the high beam indicator lamp in the
instrument cluster will illuminate.
NOTE The high beams can also flash
when the lamp switch is OFF.
NOTE If you turn the lamps off with the
headlamps set to high beam, the
headlamps are automatically returned
to their low-beam setting when the
lamp switch is next turned to the
position.
HEADLAMP LEVELLING
SWITCH
(where provided)
62)
The angle of the headlamp beam varies
depending upon the load carried by the
vehicle. The headlamp levelling switch
can be used to adjust the headlamp
illumination distance (when the lower
beam is illuminated) so that the
headlamps’ glare does not distract the
drivers of approaching vehicles. Set the
switch (referring to the following table)
to the appropriate position according to
the number of people and the load in
the vehicle.
NOTE When adjusting the beam
position, first put the dial in the “0”
position (the highest beam position).
Vehicle condition — Single Cab
Switch position 0 — Driver only.
Switch position 2 — Driver and full
76AA0061218
77AHA105525
46
GETTING TO KNOW YOUR VEHICLE
luggage loading.
Page 52 of 312
61)Daytime running lights cannot replace
dipped beam headlights when driving at
night or through tunnels. The use of
daytime running lights is governed by the
highway code of the country in which you
are driving. Comply with legal
requirements.
62)Always perform adjustments before
driving. Do not attempt to adjust while
driving, as it could cause an accident.INTERIOR LAMPS
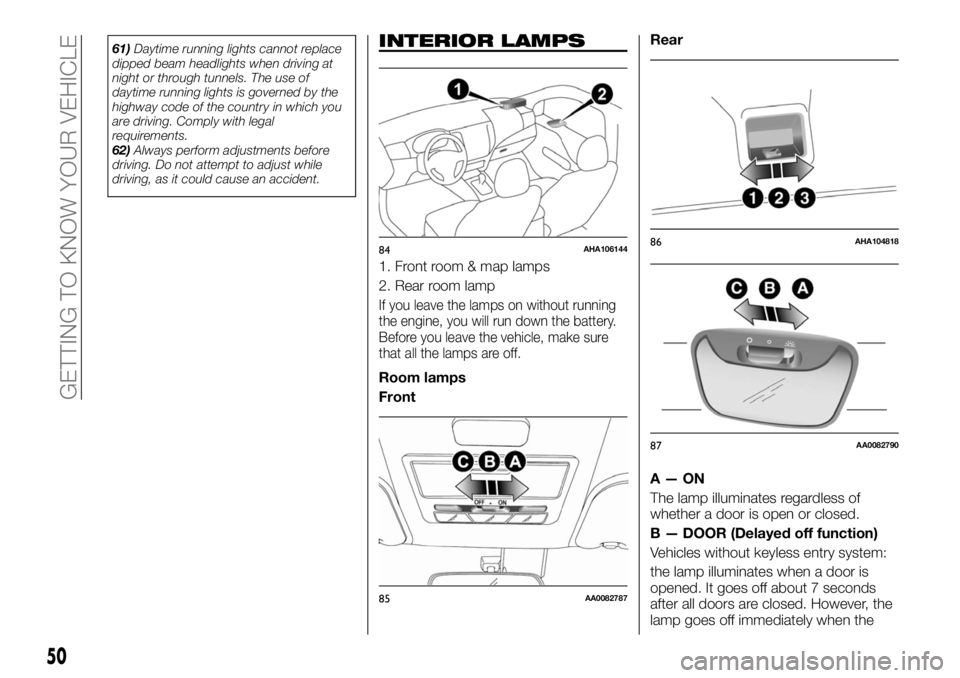
1. Front room & map lamps
2. Rear room lamp
If you leave the lamps on without running
the engine, you will run down the battery.
Before you leave the vehicle, make sure
that all the lamps are off.
Room lamps
FrontRear
A—ON
The lamp illuminates regardless of
whether a door is open or closed.
B — DOOR (Delayed off function)
Vehicles without keyless entry system:
the lamp illuminates when a door is
opened. It goes off about 7 seconds
after all doors are closed. However, the
lamp goes off immediately when the
84AHA106144
85AA0082787
86AHA104818
87AA0082790
50
GETTING TO KNOW YOUR VEHICLE
Page 53 of 312
ignition switch is turned to the “ON”
position with all doors closed.
Vehicles with keyless entry system:
the lamp illuminates when a door is
opened. It goes off about 15 seconds
after the all doors are closed. However,
the lamp goes off immediately with all
doors closed in the following cases:
When the ignition switch is turned to
the “ON” position or the operation
mode is put in ON.
When the central door lock function
is used to lock the vehicle.
When the keyless entry key or the
keyless operation key is used to lock
the vehicle.
If the vehicle is equipped with the
keyless operation system, when the
keyless operation function is used to
lock the vehicle.
Auto cut-out function:
if the lamp is left switched on with the
ignition switch is in the “LOCK” or
“ACC” position or the operation mode
is in OFF or ACC, and a door is
opened, it goes off automatically after
approximately 30 minutes. The lamp will
illuminate again after it automatically
goes off in the following cases:
When the ignition switch is turned to
the “ON” position or the operation
mode is put in ON.
When the keyless entry system or
the keyless operation system is
operated.
When all doors are closed.
C — OFF
The lamp goes off regardless of
whether a door is open or closed.
NOTE When the key was used to start
the engine, if the key is removed while
the doors are closed, the lamp is
illuminated and after a few seconds it
goes off.
NOTE When the keyless operation
function was used to start the engine, if
the operation mode is put in OFF while
the door are closed, the lamp
illuminates and after about 15 seconds
it goes off (if so equipped).
NOTE The time until the lamp goes off
(delayed off) can be adjusted. For
details, please consult a Fiat Dealership.
NOTE The auto cut-out function
cannot be operated when the room
lamp switch is in the “ON” position (1).
Also, this function can be deactivated.
For details, please consult a Fiat
Dealership.Map lamps
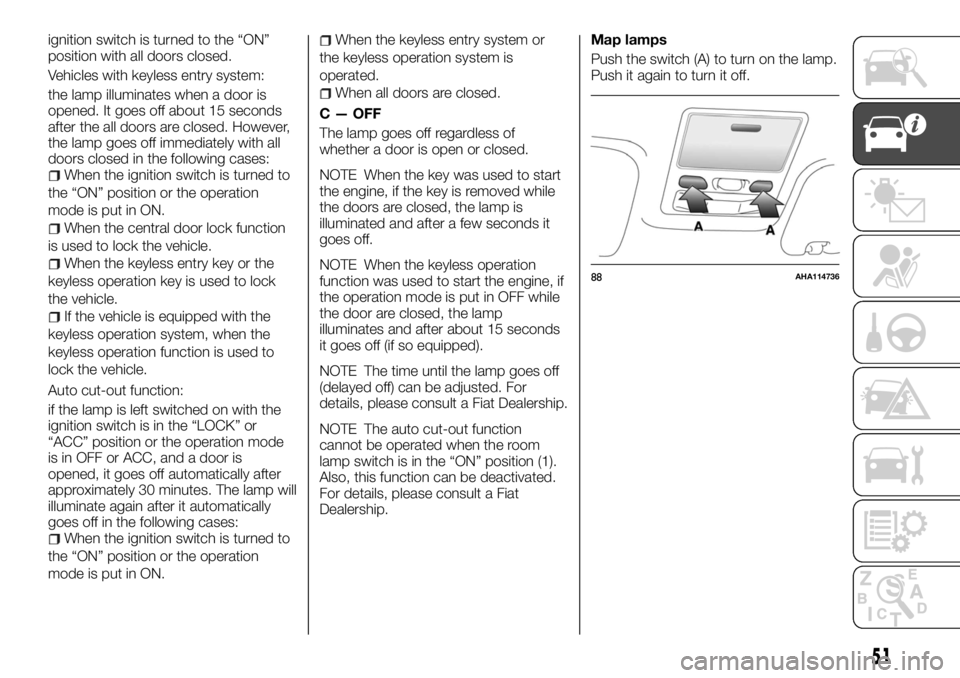
Push the switch (A) to turn on the lamp.
Push it again to turn it off.
88AHA114736
51
Page 60 of 312
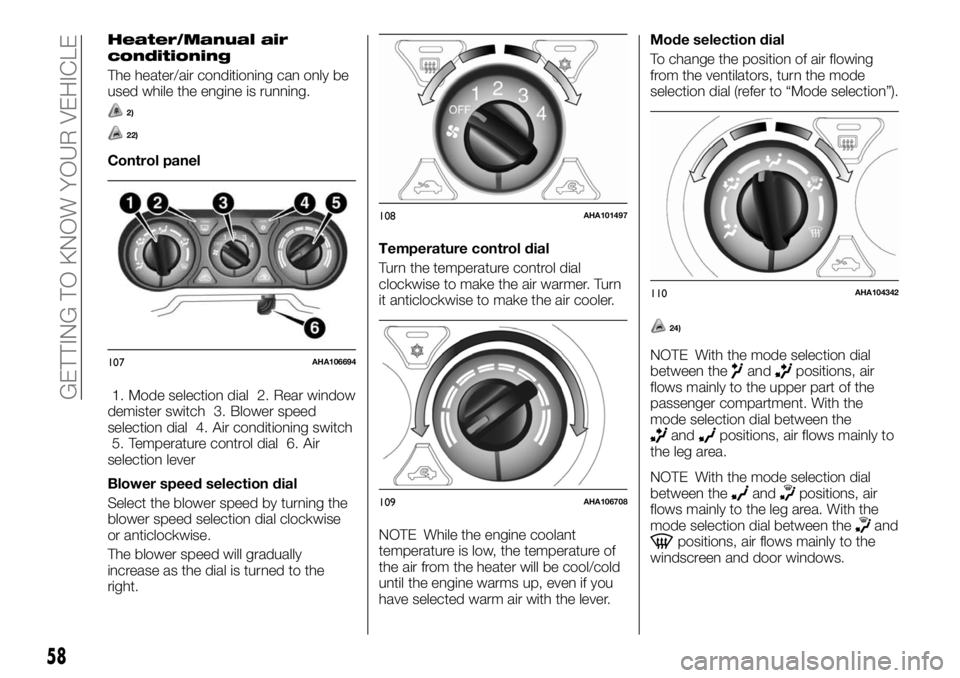
Heater/Manual air
conditioning
The heater/air conditioning can only be
used while the engine is running.
2)
22)
Control panel
1. Mode selection dial 2. Rear window
demister switch 3. Blower speed
selection dial 4. Air conditioning switch
5. Temperature control dial 6. Air
selection lever
Blower speed selection dial
Select the blower speed by turning the
blower speed selection dial clockwise
or anticlockwise.
The blower speed will gradually
increase as the dial is turned to the
right.Temperature control dial
Turn the temperature control dial
clockwise to make the air warmer. Turn
it anticlockwise to make the air cooler.
NOTE While the engine coolant
temperature is low, the temperature of
the air from the heater will be cool/cold
until the engine warms up, even if you
have selected warm air with the lever.Mode selection dial
To change the position of air flowing
from the ventilators, turn the mode
selection dial (refer to “Mode selection”).
24)
NOTE With the mode selection dial
between theandpositions, air
flows mainly to the upper part of the
passenger compartment. With the
mode selection dial between the
andpositions, air flows mainly to
the leg area.
NOTE With the mode selection dial
between the
andpositions, air
flows mainly to the leg area. With the
mode selection dial between the
andpositions, air flows mainly to the
windscreen and door windows.
107AHA106694
108AHA101497
109AHA106708
110AHA104342
58
GETTING TO KNOW YOUR VEHICLE
Page 63 of 312
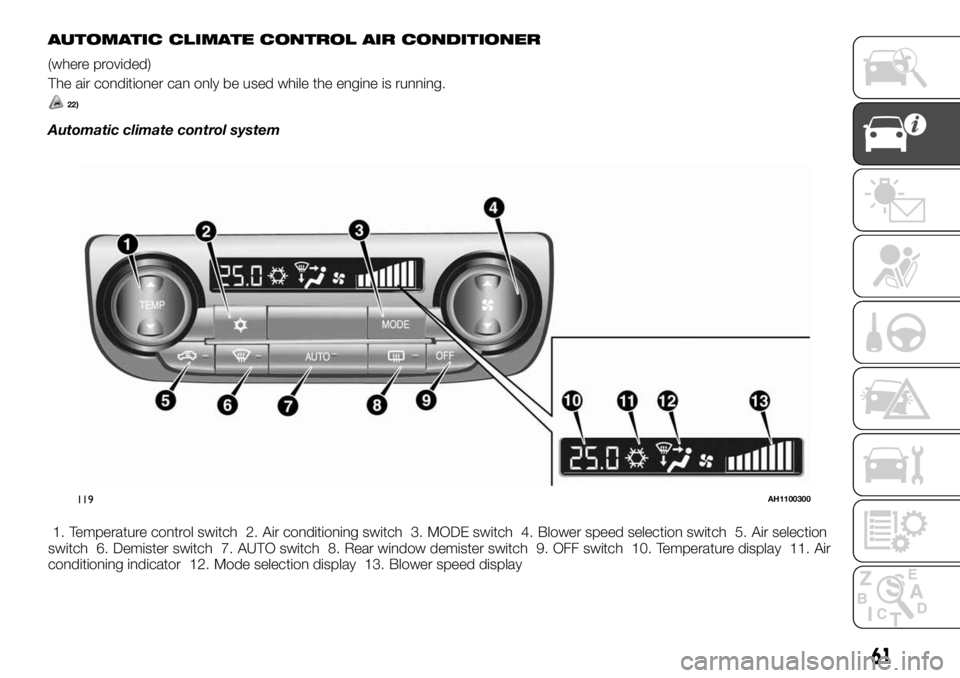
AUTOMATIC CLIMATE CONTROL AIR CONDITIONER
(where provided)
The air conditioner can only be used while the engine is running.
22)
Automatic climate control system
1. Temperature control switch 2. Air conditioning switch 3. MODE switch 4. Blower speed selection switch 5. Air selection
switch 6. Demister switch 7. AUTO switch 8. Rear window demister switch 9. OFF switch 10. Temperature display 11. Air
conditioning indicator 12. Mode selection display 13. Blower speed display
119AH1100300
61
Page 65 of 312
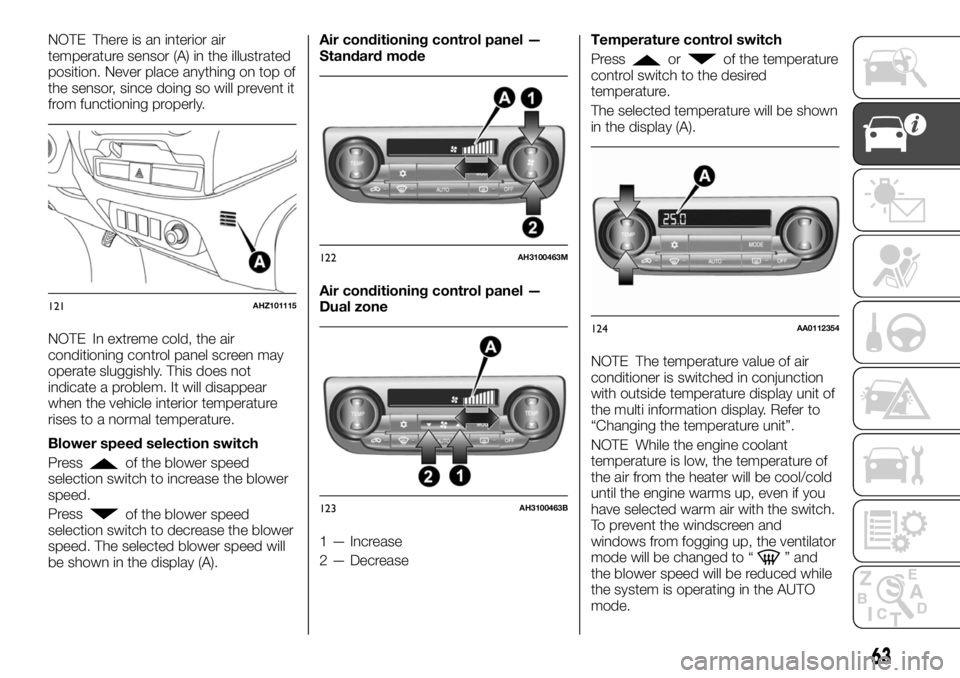
NOTE There is an interior air
temperature sensor (A) in the illustrated
position. Never place anything on top of
the sensor, since doing so will prevent it
from functioning properly.
NOTE In extreme cold, the air
conditioning control panel screen may
operate sluggishly. This does not
indicate a problem. It will disappear
when the vehicle interior temperature
rises to a normal temperature.
Blower speed selection switch
Press
of the blower speed
selection switch to increase the blower
speed.
Press
of the blower speed
selection switch to decrease the blower
speed. The selected blower speed will
be shown in the display (A).Air conditioning control panel —
Standard mode
Air conditioning control panel —
Dual zone
1 — Increase
2 — DecreaseTemperature control switch
Press
orof the temperature
control switch to the desired
temperature.
The selected temperature will be shown
in the display (A).
NOTE The temperature value of air
conditioner is switched in conjunction
with outside temperature display unit of
the multi information display. Refer to
“Changing the temperature unit”.
NOTE While the engine coolant
temperature is low, the temperature of
the air from the heater will be cool/cold
until the engine warms up, even if you
have selected warm air with the switch.
To prevent the windscreen and
windows from fogging up, the ventilator
mode will be changed to “
” and
the blower speed will be reduced while
the system is operating in the AUTO
mode.
121AHZ101115
122AH3100463M
123AH3100463B
124AA0112354
63
Page 66 of 312
NOTE When the temperature is set to
the highest or the lowest, the air
selection and the air conditioner will be
automatically changed as follows. Also,
if the air selection is operated manually
after an automatic changeover, manual
operation will be selected.
Quick Heating(When the
temperature is set to the highest
setting): outside air will be introduced
and the air conditioner will stop.
Quick Cooling(When the
temperature is set to the lowest
setting): inside air will be recirculated
and the air conditioner will operate.
The settings described above are the
factory settings.
The air selection and air conditioning
switches can be customised (function
setting changed), and the automatic
switching of outside air and the air
conditioner according to operating
conditions can be changed as desired.
For further information, we recommend
you to consult a Fiat Dealership.
Refer to “Customising the air
conditioning switch” and to
“Customising the air selection”.
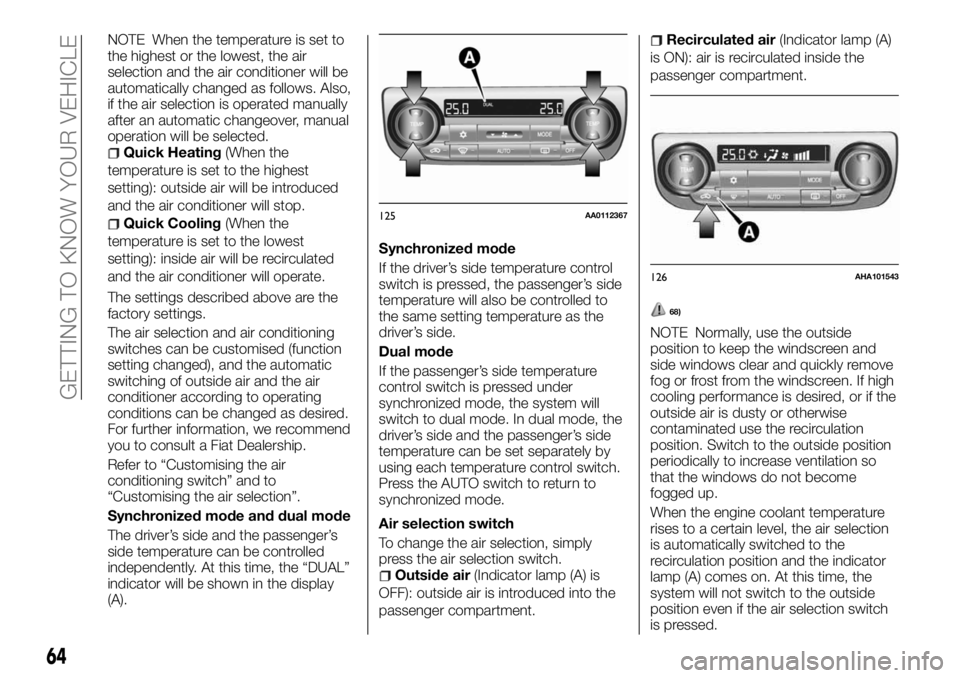
Synchronized mode and dual mode
The driver’s side and the passenger’s
side temperature can be controlled
independently. At this time, the “DUAL”
indicator will be shown in the display
(A).Synchronized mode
If the driver’s side temperature control
switch is pressed, the passenger’s side
temperature will also be controlled to
the same setting temperature as the
driver’s side.
Dual mode
If the passenger’s side temperature
control switch is pressed under
synchronized mode, the system will
switch to dual mode. In dual mode, the
driver’s side and the passenger’s side
temperature can be set separately by
using each temperature control switch.
Press the AUTO switch to return to
synchronized mode.
Air selection switch
To change the air selection, simply
press the air selection switch.
Outside air(Indicator lamp (A) is
OFF): outside air is introduced into the
passenger compartment.
Recirculated air(Indicator lamp (A)
is ON): air is recirculated inside the
passenger compartment.
68)
NOTE Normally, use the outside
position to keep the windscreen and
side windows clear and quickly remove
fog or frost from the windscreen. If high
cooling performance is desired, or if the
outside air is dusty or otherwise
contaminated use the recirculation
position. Switch to the outside position
periodically to increase ventilation so
that the windows do not become
fogged up.
When the engine coolant temperature
rises to a certain level, the air selection
is automatically switched to the
recirculation position and the indicator
lamp (A) comes on. At this time, the
system will not switch to the outside
position even if the air selection switch
is pressed.
125AA0112367
126AHA101543
64
GETTING TO KNOW YOUR VEHICLE
Page 69 of 312
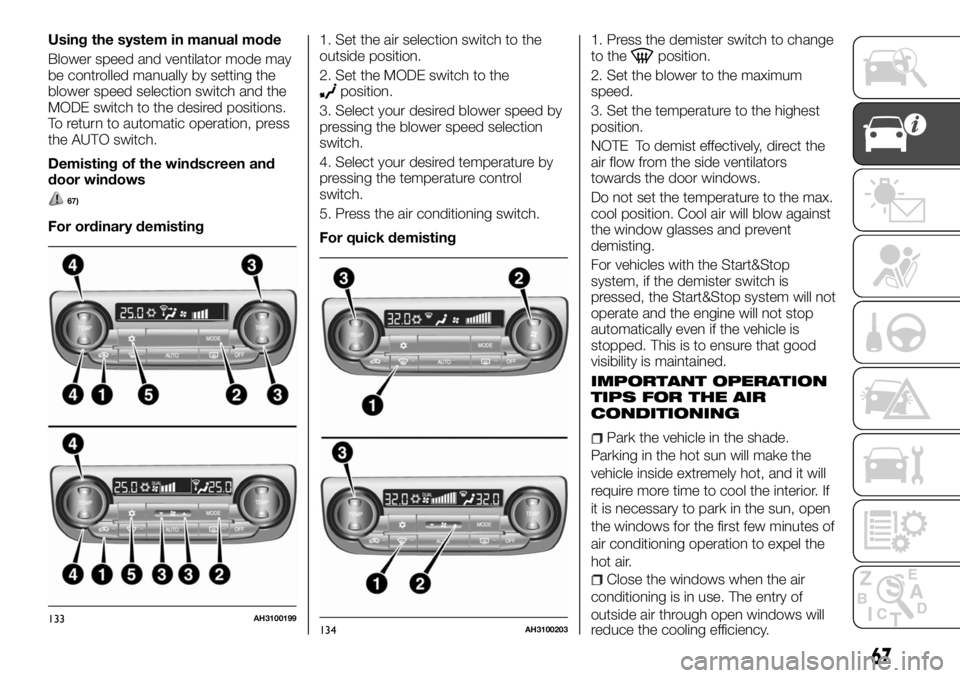
Using the system in manual mode
Blower speed and ventilator mode may
be controlled manually by setting the
blower speed selection switch and the
MODE switch to the desired positions.
To return to automatic operation, press
the AUTO switch.
Demisting of the windscreen and
door windows
67)
For ordinary demisting1. Set the air selection switch to the
outside position.
2. Set the MODE switch to the
position.
3. Select your desired blower speed by
pressing the blower speed selection
switch.
4. Select your desired temperature by
pressing the temperature control
switch.
5. Press the air conditioning switch.
For quick demisting1. Press the demister switch to change
to the
position.
2. Set the blower to the maximum
speed.
3. Set the temperature to the highest
position.
NOTE To demist effectively, direct the
air flow from the side ventilators
towards the door windows.
Do not set the temperature to the max.
cool position. Cool air will blow against
the window glasses and prevent
demisting.
For vehicles with the Start&Stop
system, if the demister switch is
pressed, the Start&Stop system will not
operate and the engine will not stop
automatically even if the vehicle is
stopped. This is to ensure that good
visibility is maintained.
IMPORTANT OPERATION
TIPS FOR THE AIR
CONDITIONING
Park the vehicle in the shade.
Parking in the hot sun will make the
vehicle inside extremely hot, and it will
require more time to cool the interior. If
it is necessary to park in the sun, open
the windows for the first few minutes of
air conditioning operation to expel the
hot air.
Close the windows when the air
conditioning is in use. The entry of
outside air through open windows will
133AH3100199134AH3100203
67
reduce the cooling efficiency.
Page 70 of 312
Too much cooling is not good for the
health. The inside air temperature
should only be 5 to 6 °C below the
outside air temperature.
When operating the system, make
sure the air intake, which is located in
front of the windscreen, is free of
obstructions such as leaves and snow.
Leaves collected in the air-intake
plenum may reduce air flow and plug
the plenum water drains.
Air conditioning system refrigerant
recommendations
If the air conditioning seems less
effective than usual, the cause might be
a refrigerant leak. We recommend you
to have the system inspected.
The air conditioning system in your
vehicle must be charged with the
refrigerant HFC-134a (R134a).
Use of any other refrigerant or lubricant
will cause severe damage which will
result in the need to replace your
vehicle’s entire air conditioning system.
The release of refrigerant into the
atmosphere should be prevented.
It is recommended that the refrigerant
be recovered and recycled for further
use.
During a long period of disuse
The air conditioning should be operated
for at least five minutes each week,
even in cold weather. This is to preventpoor lubrication of the compressor
internal parts and to maintain the air
conditioning in the best operating
condition.PASSENGER
COMPARTMENT AIR
CLEANER / POLLEN
FILTER
An air filter has been incorporated into
this air conditioner so that dirt and dust
are cleaned from the air.
Replace the air filter periodically as its
ability to clean the air will be reduced as
it collects pollen and dirt.
NOTE Operation in certain conditions
such as driving on a dusty road and
frequent use of the air conditioner can
lead to reduction of service life of the
filter. When you feel that the airflow is
lower than normal or when the
windscreen or windows start to fog up
easily, replace the air filter. We
recommend you to have it checked.
REAR WINDOW
DEMISTER SWITCH
(where provided)
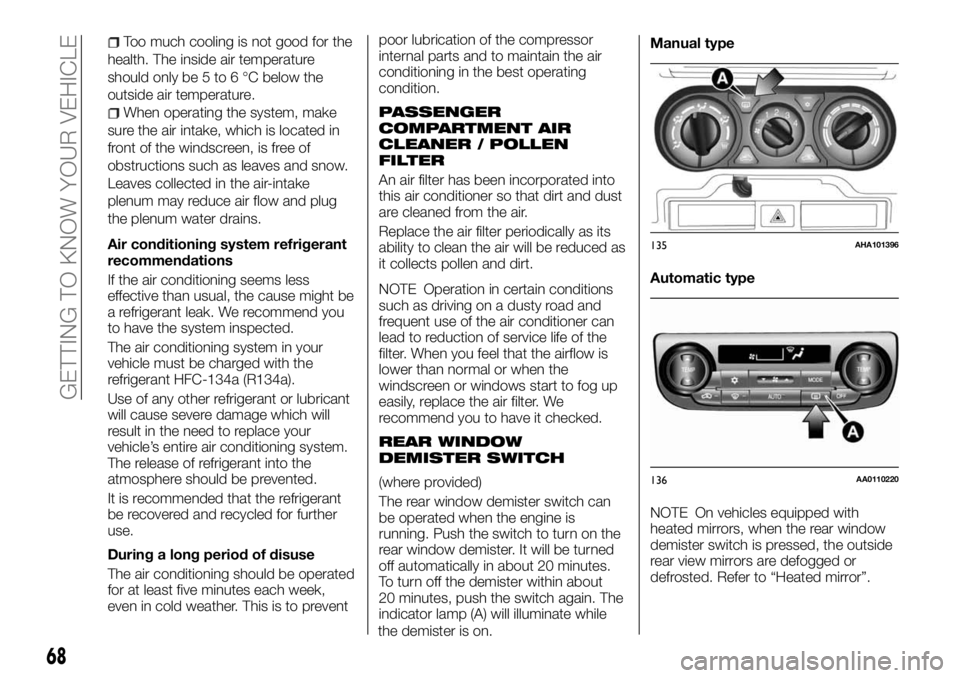
The rear window demister switch can
be operated when the engine is
running. Push the switch to turn on the
rear window demister. It will be turned
off automatically in about 20 minutes.
To turn off the demister within about
20 minutes, push the switch again. The
indicator lamp (A) will illuminate while
the demister is on.Manual type
Automatic type
NOTE On vehicles equipped with
heated mirrors, when the rear window
demister switch is pressed, the outside
rear view mirrors are defogged or
defrosted. Refer to “Heated mirror”.
135AHA101396
136AA0110220
68
GETTING TO KNOW YOUR VEHICLE