tow FIAT FULLBACK 2017 Owner handbook (in English)
[x] Cancel search | Manufacturer: FIAT, Model Year: 2017, Model line: FULLBACK, Model: FIAT FULLBACK 2017Pages: 312, PDF Size: 12.31 MB
Page 154 of 312
Fuel injection amount learning
process
To keep exhaust emissions and engine
noise low, the engine very occasionally
performs a learning process for the fuel
injection amount.
The engine sounds slightly different
from usual while the learning process is
taking place. The change in the engine
sound does not indicate a fault.
If the keyless operation key is not
operating properly
Insert the keyless operation key into the
key slot. Starting the engine and
changing the operation mode should be
now possible.
Remove the keyless operation key from
the key slot after starting the engine or
changing the operation mode.
NOTE Do not insert into the key slot
anything other than the keyless
operation key. This could cause
damage or a malfunction.NOTE Remove the object or additional
key from the keyless operation key
before inserting the key into the key
slot. The vehicle may not be able to
receive the registered ID code from the
registered key. Therefore, the engine
may not start and the operation mode
may not change.
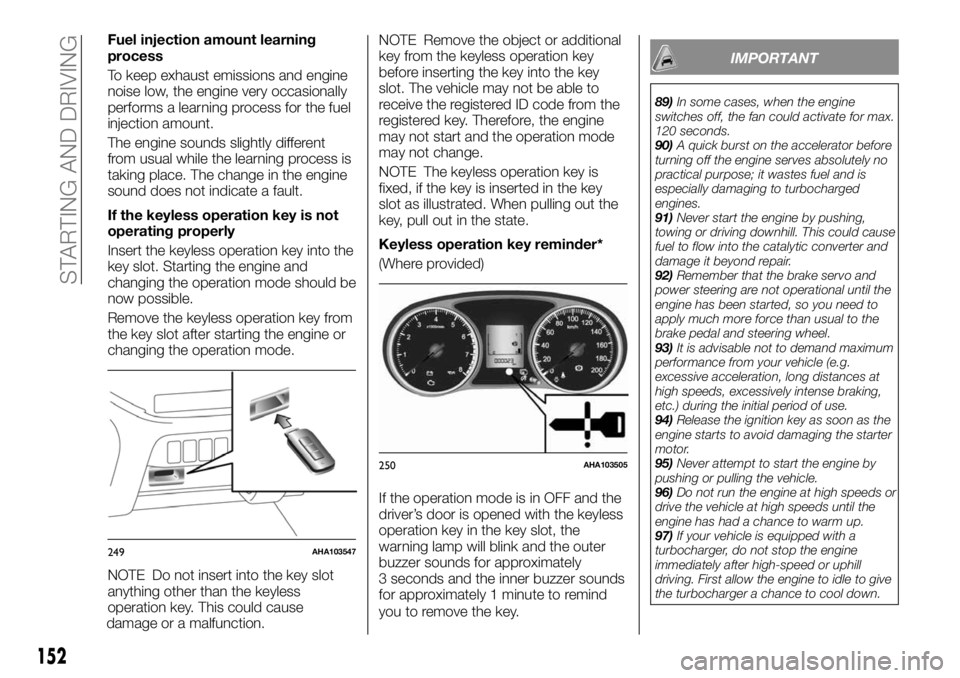
NOTE The keyless operation key is
fixed, if the key is inserted in the key
slot as illustrated. When pulling out the
key, pull out in the state.
Keyless operation key reminder*
(Where provided)
If the operation mode is in OFF and the
driver’s door is opened with the keyless
operation key in the key slot, the
warning lamp will blink and the outer
buzzer sounds for approximately
3 seconds and the inner buzzer sounds
for approximately 1 minute to remind
you to remove the key.
IMPORTANT
89)In some cases, when the engine
switches off, the fan could activate for max.
120 seconds.
90)A quick burst on the accelerator before
turning off the engine serves absolutely no
practical purpose; it wastes fuel and is
especially damaging to turbocharged
engines.
91)Never start the engine by pushing,
towing or driving downhill. This could cause
fuel to flow into the catalytic converter and
damage it beyond repair.
92)Remember that the brake servo and
power steering are not operational until the
engine has been started, so you need to
apply much more force than usual to the
brake pedal and steering wheel.
93)It is advisable not to demand maximum
performance from your vehicle (e.g.
excessive acceleration, long distances at
high speeds, excessively intense braking,
etc.) during the initial period of use.
94)Release the ignition key as soon as the
engine starts to avoid damaging the starter
motor.
95)Never attempt to start the engine by
pushing or pulling the vehicle.
96)Do not run the engine at high speeds or
drive the vehicle at high speeds until the
engine has had a chance to warm up.
97)If your vehicle is equipped with a
turbocharger, do not stop the engine
immediately after high-speed or uphill
driving. First allow the engine to idle to give
the turbocharger a chance to cool down.
249AHA103547
250AHA103505
152
STARTING AND DRIVING
Page 163 of 312
Selector lever positions
“P” PARK
This position locks the transmission to
prevent the vehicle from moving. The
engine can be started in this position.
“R” REVERSE
This position is to back up.
112)
“N” NEUTRAL
At this position the transmission is
disengaged. It is the same as the
neutral position on a manual
transmission, and should only be used
when the vehicle is stationary for an
extended length of time during driving,
such as in a traffic jam.
113) 114) 115)
“D” DRIVE
This position is used for most city and
highway driving. The transmission will
automatically change its gear
depending on road and driving
conditions.
116)
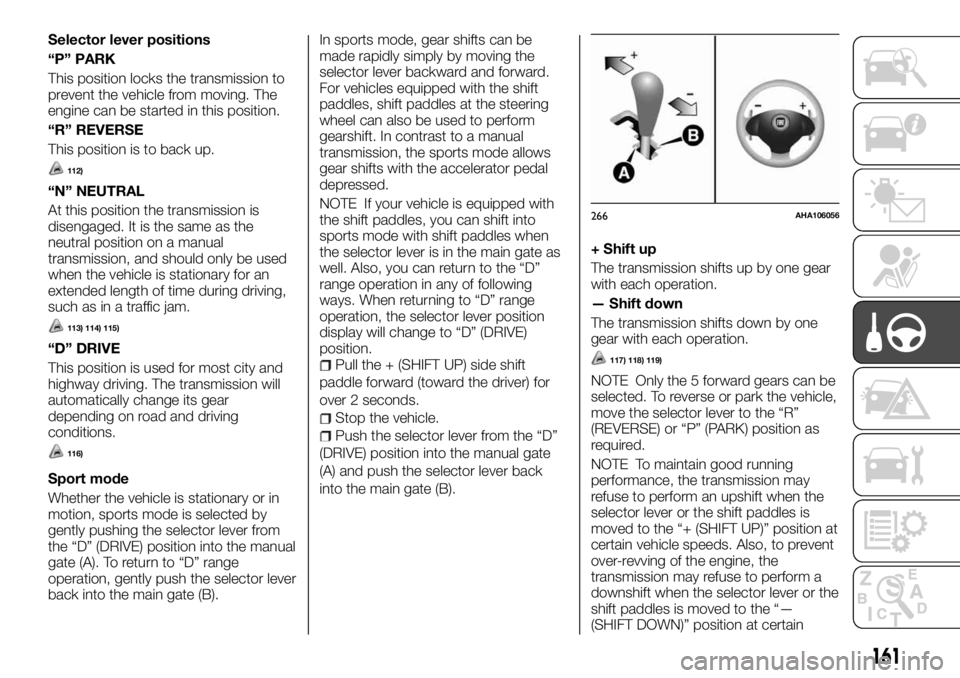
Sport mode
Whether the vehicle is stationary or in
motion, sports mode is selected by
gently pushing the selector lever from
the “D” (DRIVE) position into the manual
gate (A). To return to “D” range
operation, gently push the selector lever
back into the main gate (B).In sports mode, gear shifts can be
made rapidly simply by moving the
selector lever backward and forward.
For vehicles equipped with the shift
paddles, shift paddles at the steering
wheel can also be used to perform
gearshift. In contrast to a manual
transmission, the sports mode allows
gear shifts with the accelerator pedal
depressed.
NOTE If your vehicle is equipped with
the shift paddles, you can shift into
sports mode with shift paddles when
the selector lever is in the main gate as
well. Also, you can return to the “D”
range operation in any of following
ways. When returning to “D” range
operation, the selector lever position
display will change to “D” (DRIVE)
position.
Pull the + (SHIFT UP) side shift
paddle forward (toward the driver) for
over 2 seconds.
Stop the vehicle.
Push the selector lever from the “D”
(DRIVE) position into the manual gate
(A) and push the selector lever back
into the main gate (B).
+ Shift up
The transmission shifts up by one gear
with each operation.
— Shift down
The transmission shifts down by one
gear with each operation.
117) 118) 119)
NOTE Only the 5 forward gears can be
selected. To reverse or park the vehicle,
move the selector lever to the “R”
(REVERSE) or “P” (PARK) position as
required.
NOTE To maintain good running
performance, the transmission may
refuse to perform an upshift when the
selector lever or the shift paddles is
moved to the “+ (SHIFT UP)” position at
certain vehicle speeds. Also, to prevent
over-revving of the engine, the
transmission may refuse to perform a
downshift when the selector lever or the
shift paddles is moved to the “—
(SHIFT DOWN)” position at certain
266AHA106056
161
Page 183 of 312
WARNING
232)When attempting to rock your vehicle
out of a stuck position, be sure that the
area around the vehicle is clear of people
and physical objects. The rocking motion
may cause the vehicle to suddenly launch
forward or backward, causing injury or
damage to nearby people or objects.
233)Go straight up. Do not try to traverse
across a steep slope.
234)If you begin to lose traction, ease off
the accelerator pedal and gently turn the
steering wheel alternatively left and right to
regain adequate traction again.
235)Avoid snaking down a sharp grade.
Descend the grade as straight as possible.
CAUTIONS ON
HANDLING OF
4 WHEEL DRIVE
VEHICLES
Tyres and wheels
Since the driving torque can be applied
to the 4 wheels, the performance of the
vehicle when operating in 4-wheel drive
is greatly affected by the condition of
the tyres.
Pay close attention to the tyres.
Install specified tyres on all wheels.
Refer to “Tyres and wheels”.
Be sure to the appropriate tyre
inflation pressure according to no cargo
or cargo. Refer to “Tyre inflation
pressures”.
Be sure to fit all 4 tyres and wheels of
the same size and type. When
replacement of any of the tyres or
wheels is necessary, replace all of them.
All tyres should be rotated whenever
the wear difference between the front
and rear tyres is recognizable.
Good vehicle performance cannot be
expected if there is a difference in wear
between tyres. Refer to “Tyre rotation”.
Check the tyre inflation pressure
regularly.
146)
Towing
If towing is necessary, we recommend
you to have it done by a Fiat Dealership
or a commercial tow truck service. In
the following cases, transport the
vehicle using a tow truck.
The engine runs but the vehicle does
not move or abnormal noise is
produced.
Inspection of the vehicle’s underside
reveals that oil or some other fluid is
leaking.
If a wheel gets stuck in a ditch, do not
try to tow the vehicle. Please contact
your Fiat Dealership or a commercial
tow truck service for assistance.
Only when you cannot receive a towing
service from a Fiat Dealership or
commercial tow truck service, tow your
vehicle carefully in accordance with the
instructions given in “Towing”.
181
Page 184 of 312
147)
Jacking up a 4-wheel drive vehicles
236)
Clutch operation
Quick or slight clutch engagement
made while the engine is running at
high speed will cause damage to the
clutch and transmission because the
tractive force is very great. Operate the
pedal slowly and positively.
IMPORTANT
146)Always use tyres of the same size,
same type, and same brand which have no
wear differences. Using the tyres which
differ in size, type, brands or the degree of
wear or the inappropriate tyre inflation
pressure, will increase the differential oil
temperature, resulting in possible damage
to the driving system. Further, the drive
train will be subjected to excessive loading,
possibly leading to oil leakage, component
seizure, or other serious faults.
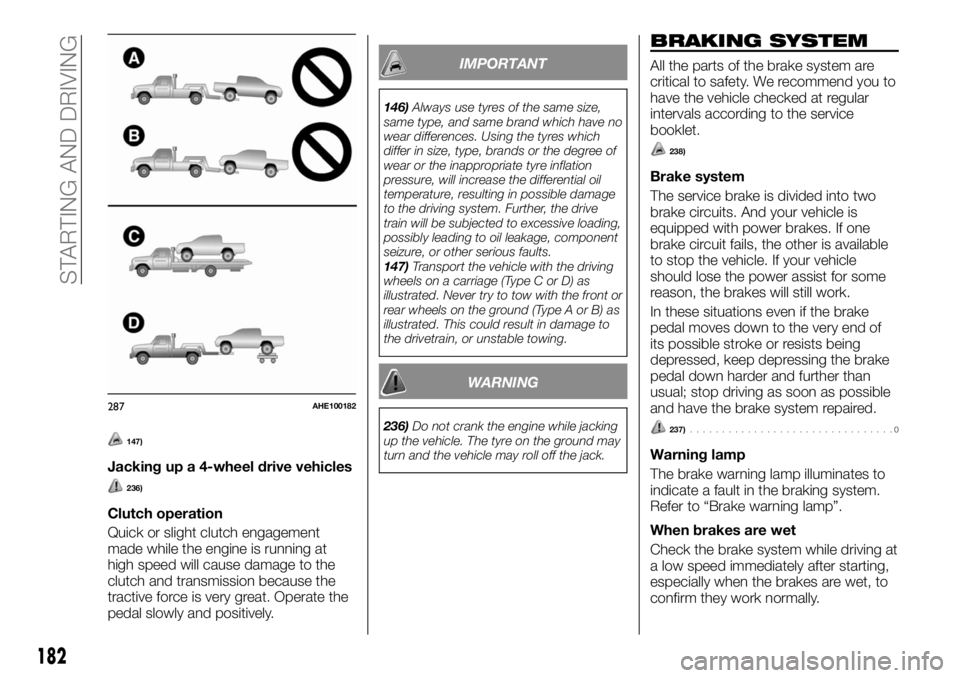
147)Transport the vehicle with the driving
wheels on a carriage (Type C or D) as
illustrated. Never try to tow with the front or
rear wheels on the ground (Type A or B) as
illustrated. This could result in damage to
the drivetrain, or unstable towing.
WARNING
236)Do not crank the engine while jacking
up the vehicle. The tyre on the ground may
turn and the vehicle may roll off the jack.
BRAKING SYSTEM
All the parts of the brake system are
critical to safety. We recommend you to
have the vehicle checked at regular
intervals according to the service
booklet.
238)
Brake system
The service brake is divided into two
brake circuits. And your vehicle is
equipped with power brakes. If one
brake circuit fails, the other is available
to stop the vehicle. If your vehicle
should lose the power assist for some
reason, the brakes will still work.
In these situations even if the brake
pedal moves down to the very end of
its possible stroke or resists being
depressed, keep depressing the brake
pedal down harder and further than
usual; stop driving as soon as possible
and have the brake system repaired.
237)................................0
Warning lamp
The brake warning lamp illuminates to
indicate a fault in the braking system.
Refer to “Brake warning lamp”.
When brakes are wet
Check the brake system while driving at
a low speed immediately after starting,
especially when the brakes are wet, to
confirm they work normally.
287AHE100182
182
STARTING AND DRIVING
Page 205 of 312
IN AN EMERGENCY
A punctured tyre or a burnt-out bulb?
At times, a problem may interfere with
our journey.
The pages on emergencies can help
you to deal with critical situations
independently and with calm.
In an emergency we recommend that
you call the freephone number found in
the Warranty Booklet.
It is also possible to call the
00 800 3428 0000 freephone number
to search the nearest Fiat Dealership.ERA GLONASS.............204
IF THE VEHICLE BREAKS DOWN. .208
EMERGENCY STARTING.......209
ENGINE OVERHEATING........210
BLEEDING THE FUEL SYSTEM . . .211
TOOLS, JACK AND JACK
HANDLE..................211
HOW TO CHANGE A TYRE.....216
TOWING..................223
OPERATION UNDER ADVERSE
DRIVING CONDITIONS........226
FUSIBLE LINKS.............227
FUSES...................227
REPLACEMENT OF LAMP BULBS .235
203
Page 208 of 312
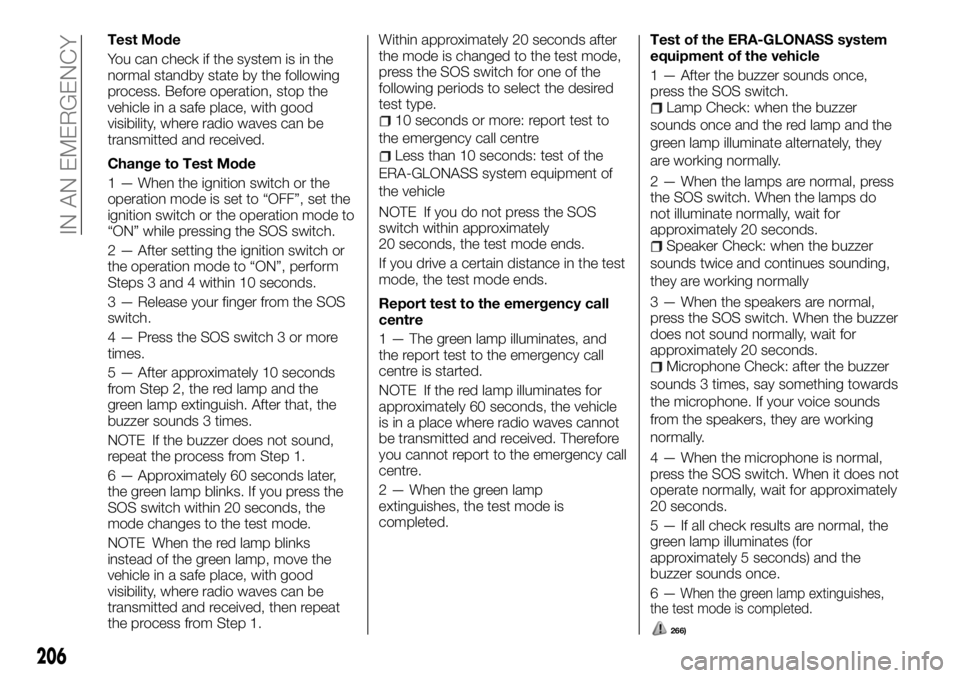
Test Mode
You can check if the system is in the
normal standby state by the following
process. Before operation, stop the
vehicle in a safe place, with good
visibility, where radio waves can be
transmitted and received.
Change to Test Mode
1 — When the ignition switch or the
operation mode is set to “OFF”, set the
ignition switch or the operation mode to
“ON” while pressing the SOS switch.
2 — After setting the ignition switch or
the operation mode to “ON”, perform
Steps 3 and 4 within 10 seconds.
3 — Release your finger from the SOS
switch.
4 — Press the SOS switch 3 or more
times.
5 — After approximately 10 seconds
from Step 2, the red lamp and the
green lamp extinguish. After that, the
buzzer sounds 3 times.
NOTE If the buzzer does not sound,
repeat the process from Step 1.
6 — Approximately 60 seconds later,
the green lamp blinks. If you press the
SOS switch within 20 seconds, the
mode changes to the test mode.
NOTE When the red lamp blinks
instead of the green lamp, move the
vehicle in a safe place, with good
visibility, where radio waves can be
transmitted and received, then repeat
the process from Step 1.Within approximately 20 seconds after
the mode is changed to the test mode,
press the SOS switch for one of the
following periods to select the desired
test type.
10 seconds or more: report test to
the emergency call centre
Less than 10 seconds: test of the
ERA-GLONASS system equipment of
the vehicle
NOTE If you do not press the SOS
switch within approximately
20 seconds, the test mode ends.
If you drive a certain distance in the test
mode, the test mode ends.
Report test to the emergency call
centre
1 — The green lamp illuminates, and
the report test to the emergency call
centre is started.
NOTE If the red lamp illuminates for
approximately 60 seconds, the vehicle
is in a place where radio waves cannot
be transmitted and received. Therefore
you cannot report to the emergency call
centre.
2 — When the green lamp
extinguishes, the test mode is
completed.Test of the ERA-GLONASS system
equipment of the vehicle
1 — After the buzzer sounds once,
press the SOS switch.
Lamp Check: when the buzzer
sounds once and the red lamp and the
green lamp illuminate alternately, they
are working normally.
2 — When the lamps are normal, press
the SOS switch. When the lamps do
not illuminate normally, wait for
approximately 20 seconds.
Speaker Check: when the buzzer
sounds twice and continues sounding,
they are working normally
3 — When the speakers are normal,
press the SOS switch. When the buzzer
does not sound normally, wait for
approximately 20 seconds.
Microphone Check: after the buzzer
sounds 3 times, say something towards
the microphone. If your voice sounds
from the speakers, they are working
normally.
4 — When the microphone is normal,
press the SOS switch. When it does not
operate normally, wait for approximately
20 seconds.
5 — If all check results are normal, the
green lamp illuminates (for
approximately 5 seconds) and the
buzzer sounds once.
266)
6—When the green lamp extinguishes,
206
IN AN EMERGENCY
the test mode is completed.
Page 215 of 312
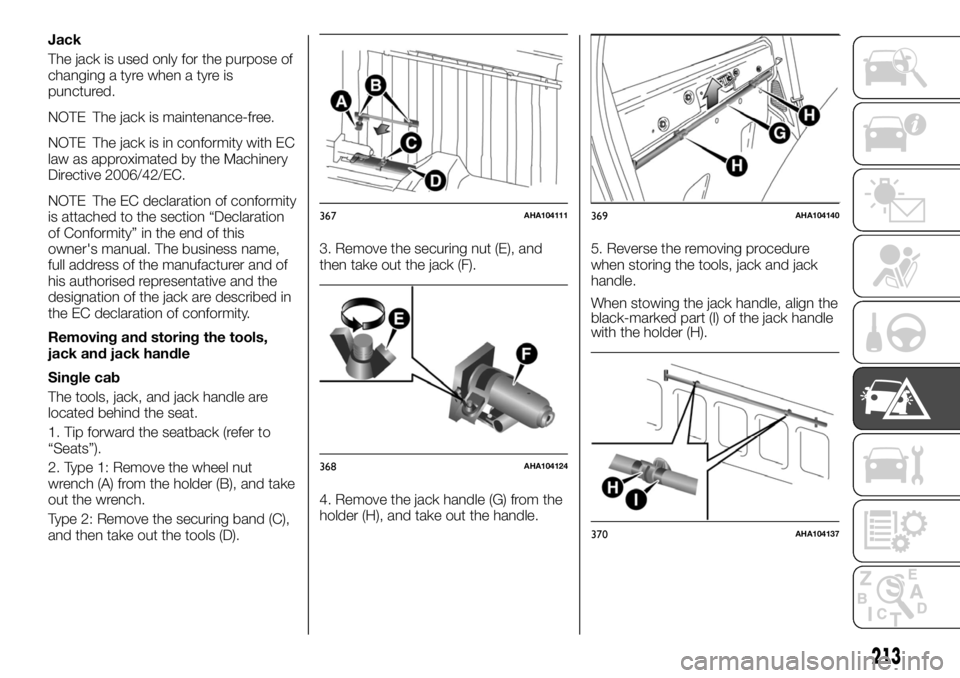
Jack
The jack is used only for the purpose of
changing a tyre when a tyre is
punctured.
NOTE The jack is maintenance-free.
NOTE The jack is in conformity with EC
law as approximated by the Machinery
Directive 2006/42/EC.
NOTE The EC declaration of conformity
is attached to the section “Declaration
of Conformity” in the end of this
owner's manual. The business name,
full address of the manufacturer and of
his authorised representative and the
designation of the jack are described in
the EC declaration of conformity.
Removing and storing the tools,
jack and jack handle
Single cab
The tools, jack, and jack handle are
located behind the seat.
1. Tip forward the seatback (refer to
“Seats”).
2. Type 1: Remove the wheel nut
wrench (A) from the holder (B), and take
out the wrench.
Type 2: Remove the securing band (C),
and then take out the tools (D).3. Remove the securing nut (E), and
then take out the jack (F).
4. Remove the jack handle (G) from the
holder (H), and take out the handle.5. Reverse the removing procedure
when storing the tools, jack and jack
handle.
When stowing the jack handle, align the
black-marked part (I) of the jack handle
with the holder (H).
367AHA104111
368AHA104124
369AHA104140
370AHA104137
213
Page 216 of 312
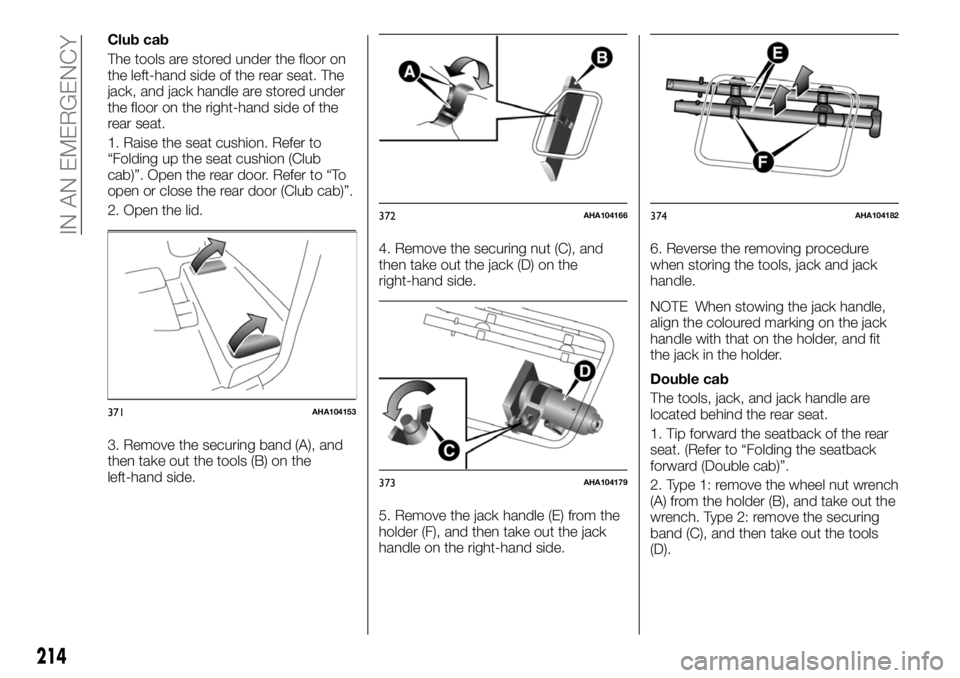
Club cab
The tools are stored under the floor on
the left-hand side of the rear seat. The
jack, and jack handle are stored under
the floor on the right-hand side of the
rear seat.
1. Raise the seat cushion. Refer to
“Folding up the seat cushion (Club
cab)”. Open the rear door. Refer to “To
open or close the rear door (Club cab)”.
2. Open the lid.
3. Remove the securing band (A), and
then take out the tools (B) on the
left-hand side.4. Remove the securing nut (C), and
then take out the jack (D) on the
right-hand side.
5. Remove the jack handle (E) from the
holder (F), and then take out the jack
handle on the right-hand side.6. Reverse the removing procedure
when storing the tools, jack and jack
handle.
NOTE When stowing the jack handle,
align the coloured marking on the jack
handle with that on the holder, and fit
the jack in the holder.
Double cab
The tools, jack, and jack handle are
located behind the rear seat.
1. Tip forward the seatback of the rear
seat. (Refer to “Folding the seatback
forward (Double cab)”.
2. Type 1: remove the wheel nut wrench
(A) from the holder (B), and take out the
wrench. Type 2: remove the securing
band (C), and then take out the tools
(D).
371AHA104153
372AHA104166
373AHA104179
374AHA104182
214
IN AN EMERGENCY
Page 217 of 312
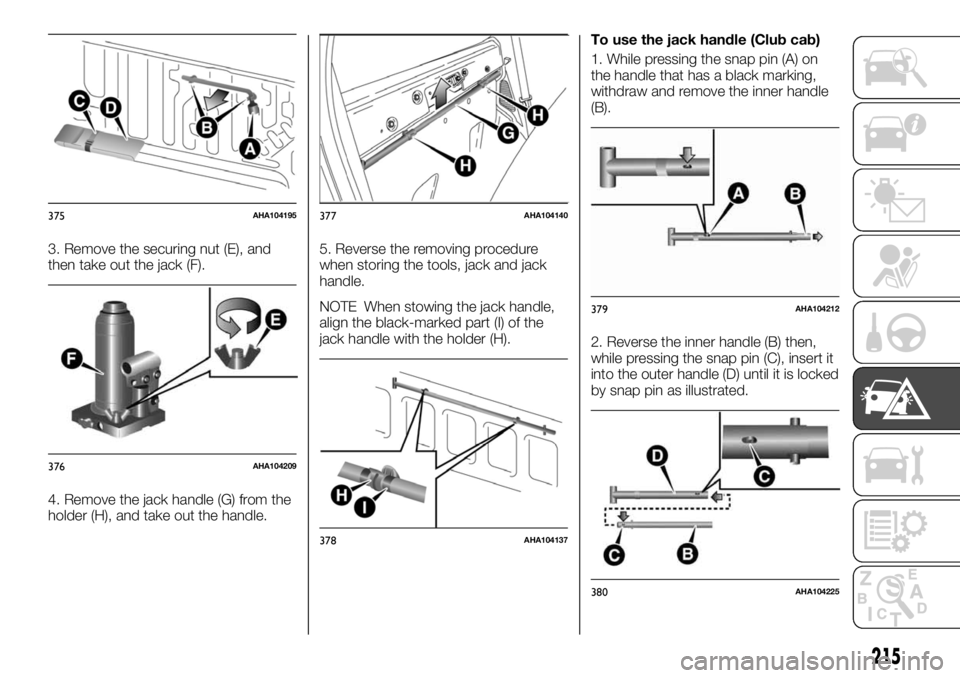
3. Remove the securing nut (E), and
then take out the jack (F).
4. Remove the jack handle (G) from the
holder (H), and take out the handle.5. Reverse the removing procedure
when storing the tools, jack and jack
handle.
NOTE When stowing the jack handle,
align the black-marked part (I) of the
jack handle with the holder (H).To use the jack handle (Club cab)
1. While pressing the snap pin (A) on
the handle that has a black marking,
withdraw and remove the inner handle
(B).
2. Reverse the inner handle (B) then,
while pressing the snap pin (C), insert it
into the outer handle (D) until it is locked
by snap pin as illustrated.
375AHA104195
376AHA104209
377AHA104140
378AHA104137
379AHA104212
380AHA104225
215
Page 223 of 312
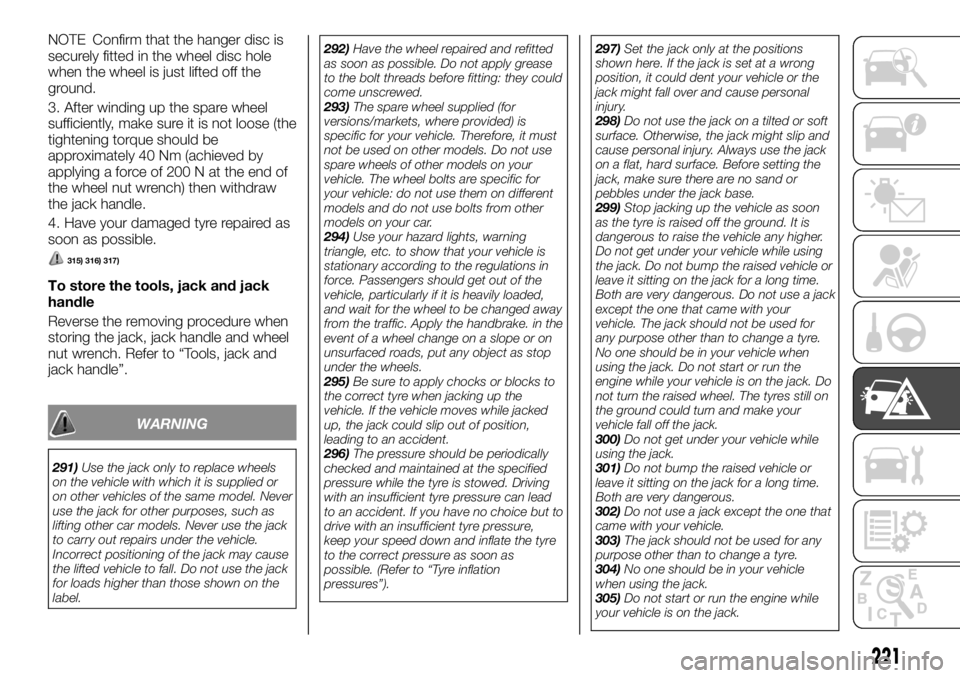
NOTE Confirm that the hanger disc is
securely fitted in the wheel disc hole
when the wheel is just lifted off the
ground.
3. After winding up the spare wheel
sufficiently, make sure it is not loose (the
tightening torque should be
approximately 40 Nm (achieved by
applying a force of 200 N at the end of
the wheel nut wrench) then withdraw
the jack handle.
4. Have your damaged tyre repaired as
soon as possible.
315) 316) 317)
To store the tools, jack and jack
handle
Reverse the removing procedure when
storing the jack, jack handle and wheel
nut wrench. Refer to “Tools, jack and
jack handle”.
WARNING
291)Use the jack only to replace wheels
on the vehicle with which it is supplied or
on other vehicles of the same model. Never
use the jack for other purposes, such as
lifting other car models. Never use the jack
to carry out repairs under the vehicle.
Incorrect positioning of the jack may cause
the lifted vehicle to fall. Do not use the jack
for loads higher than those shown on the
label.292)Have the wheel repaired and refitted
as soon as possible. Do not apply grease
to the bolt threads before fitting: they could
come unscrewed.
293)The spare wheel supplied (for
versions/markets, where provided) is
specific for your vehicle. Therefore, it must
not be used on other models. Do not use
spare wheels of other models on your
vehicle. The wheel bolts are specific for
your vehicle: do not use them on different
models and do not use bolts from other
models on your car.
294)Use your hazard lights, warning
triangle, etc. to show that your vehicle is
stationary according to the regulations in
force. Passengers should get out of the
vehicle, particularly if it is heavily loaded,
and wait for the wheel to be changed away
from the traffic. Apply the handbrake. in the
event of a wheel change on a slope or on
unsurfaced roads, put any object as stop
under the wheels.
295)Be sure to apply chocks or blocks to
the correct tyre when jacking up the
vehicle. If the vehicle moves while jacked
up, the jack could slip out of position,
leading to an accident.
296)The pressure should be periodically
checked and maintained at the specified
pressure while the tyre is stowed. Driving
with an insufficient tyre pressure can lead
to an accident. If you have no choice but to
drive with an insufficient tyre pressure,
keep your speed down and inflate the tyre
to the correct pressure as soon as
possible. (Refer to “Tyre inflation
pressures”).297)Set the jack only at the positions
shown here. If the jack is set at a wrong
position, it could dent your vehicle or the
jack might fall over and cause personal
injury.
298)Do not use the jack on a tilted or soft
surface. Otherwise, the jack might slip and
cause personal injury. Always use the jack
on a flat, hard surface. Before setting the
jack, make sure there are no sand or
pebbles under the jack base.
299)Stop jacking up the vehicle as soon
as the tyre is raised off the ground. It is
dangerous to raise the vehicle any higher.
Do not get under your vehicle while using
the jack. Do not bump the raised vehicle or
leave it sitting on the jack for a long time.
Both are very dangerous. Do not use a jack
except the one that came with your
vehicle. The jack should not be used for
any purpose other than to change a tyre.
No one should be in your vehicle when
using the jack. Do not start or run the
engine while your vehicle is on the jack. Do
not turn the raised wheel. The tyres still on
the ground could turn and make your
vehicle fall off the jack.
300)Do not get under your vehicle while
using the jack.
301)Do not bump the raised vehicle or
leave it sitting on the jack for a long time.
Both are very dangerous.
302)Do not use a jack except the one that
came with your vehicle.
303)The jack should not be used for any
purpose other than to change a tyre.
304)No one should be in your vehicle
when using the jack.
305)Do not start or run the engine while
your vehicle is on the jack.
221