instrument FIAT FULLBACK 2018 Owner handbook (in English)
[x] Cancel search | Manufacturer: FIAT, Model Year: 2018, Model line: FULLBACK, Model: FIAT FULLBACK 2018Pages: 316, PDF Size: 10.52 MB
Page 9 of 316

GRAPHICAL INDEX
GETTING TO KNOW YOUR VEHICLE
KNOWING THE INSTRUMENT PANEL
SAFETY
STARTING AND DRIVING
IN AN EMERGENCY
SERVICING AND MAINTENANCE
TECHNICAL SPECIFICATIONS
INDEX
Page 13 of 316

AIR VENTSVentilators...................... 56
ELECTRIC WINDOW CONTROLSDriver's switches................ 72Passenger's switches........... 72
INSTRUMENT PANELControl panel and on-board
instruments....................... 92
Multi information display......... 92Indicator and warning lamps.... 100
HEATER/CLIMATE CONTROLControl panel................... 60
Heater /Manual air conditioning . . 60Automatic climate control
system............................ 63
DRIVE MODE SELECTOROperation..................... 166
FRONT AIRBAGDriver airbag................... 129Front passenger airbag......... 129
GLOVE COMPARTMENTGlove box...................... 84
GEARSHIFT LEVERManual transmission........... 159Automatic transmission........ 161
STEERING WHEELAdjustment..................... 38Steering wheel lock............. 38
3
11
Page 21 of 316

NOTE If the keyless operation key is
within the operating range, even
someone not carrying the key can lock
and unlock the doors by pressing the
driver’s or front passenger’s door
lock/unlock switch.
Operating range for starting the
engine and changing the operation
mode
* — indicates front of the vehicle
The operating range is the interior of the
vehicle.
NOTE Even if it is within the operating
range, if the keyless operation key is in
a small item holder such as the glove
box, on top of the instrument panel,
door pocket or in the luggage
compartment, it may be impossible to
start the engine and change the
operation mode.NOTE If a keyless operation key is too
close to the door or door window, it
may be possible to start the engine or
change the operation mode even when
the key is outside the vehicle.
To operate using the keyless
operation function
Locking the doors
When you are carrying the keyless
operation key, if you press the driver’s
or front passenger’s door lock/unlock
switch (A), within the operating range,
the doors are locked.
The turn-signal lamps will blink once
and the outer buzzer will sound once.
Also refer to “Locking and unlocking:
Doors, Central door locks”.
Unlocking the doors
When you are carrying the keyless
operation key, if you press the driver’s
or front passenger’s door lock/unlock
switch (A), within the operating range,
all the doors are unlocked.If the room lamp switch is in the middle
position at this time, the room lamp will
turn on for 15 seconds. The turn-signal
lamps will blink twice and the outer
buzzer will sound twice.
If the driver’s or front passenger’s door
lock/unlock switch is pressed and any
of the doors is not opened within
approximately 30 seconds, relocking
will automatically occur.
Refer to “Locking and unlocking: Doors,
Central door locks”.
NOTE For vehicles equipped with the
mirror retractor switch, the outside rear
view mirrors automatically
retract/extend when all the doors are
locked/unlocked using the keyless
operation function. Refer to “Outside
rear view mirrors”.
NOTE For vehicles equipped with the
Dead Lock System, pressing the
driver’s or front passenger’s door
lock/unlock switch (A) two times in
succession causes the Dead Lock
System to be set (refer to “Setting the
system”).
NOTE The keyless operation function
does not operate under the following
conditions:
The keyless operation key is inside
the vehicle.
A door is open or ajar.
The operation mode is not in OFF.
18AHA101790
19AHA105437
19
Page 47 of 316

EXTERNAL LIGHTS
COMBINATION
HEADLAMPS AND
DIPPER SWITCH
Headlamps
NOTE Do not leave the lamps on for a
long time while the engine is stationary
(not running). A run-down battery could
result.
NOTE When it rains, or when the
vehicle has been washed, the inside of
the lens sometimes becomes foggy, but
this does not indicate a functional
problem. When the lamp is switched
on, the heat will remove the fog.
However, if water gathers inside the
lamp, we recommend you to have
checked.
NOTE The bulbs of high intensity
discharge headlamps (if so equipped)
have the following characteristics:
While the headlamps are used, the
light will gradually become a
bluish-white colour.
The life of a bulb becomes shorter as
it is repeatedly turned on and off. When
the bulb approaches the end of its life,
the brightness may decrease, the bulb
may flicker, and the light may become
reddish in colour. If this occurs, have
the vehicle inspected by a Fiat
Dealership
Type 1
Rotate the switch to turn on the lamps.
OFF— all lamps off
— position, tail, licence plate and
instrument panel lamps on
— headlamps and other lamps go
on
Type 2
Rotate the switch to turn on the lamps.OFF— all lamps off
AUTO— with the ignition switch or the
operation mode is in ON, headlamps,
position, tail, licence plate and
instrument panel lamps turn on and off
automatically in accordance with
outside light level. All lamps turn off
automatically when the ignition switch is
turned to “OFF” position or the
operation mode is put in OFF.
— position, tail, licence plate and
instrument panel lamps on
— headlamps and other lamps go
on
NOTE The sensitivity of the automatic
on/off control can be adjusted. For
further information, contact a Fiat
Dealership.
NOTE If the front fog lamps (if so
equipped) turn on when they are
supposed to with the switch in the
“AUTO” position, the lamps turn off
automatically with the ignition switch or
operation mode off.
75AA0061221
76AA0071497
45
Page 48 of 316

NOTE When the headlamps are turned
off by the automatic on/off control with
the ignition switch in the “ON” position
or the operation mode in ON, the front
fog lamps (if so equipped) and rear fog
lamps (if so equipped) also go off.
When the headlamps are subsequently
turned back on by the automatic on/off
control, the front fog lamps also come
on but the rear fog lamp stay off. If you
wish to turn the rear fog lamp back on,
operate the switch again.
NOTE Do not cover the sensor (A) for
the automatic on/off control by affixing
a sticker or label to the windscreen.
NOTE If the lamps do not turn on or off
with the switch in the “AUTO” position,
manually operate the switch and we
recommend you to have your vehicle
checked.Lamps (headlamps, fog lamp, etc.)
auto-cutout function
If the following operation is
performed while the lamp switch is in
the
position, the lamps are
automatically turned off when the
driver’s door is opened. [Except for
vehicles equipped with the keyless
operation system] The ignition switch is
turned to the “LOCK” or “ACC”
position, or the key is removed from the
ignition switch. [For vehicles equipped
with the keyless operation system] The
operation mode is put in OFF or ACC.
If the following operation is
performed while the lamp switch is in
the
position, the lamps are
automatically turned off if the driver’s
door then remains closed for
approximately three minutes. [Except
for vehicles equipped with the keyless
operation system] The ignition switch is
turned to the “LOCK” or “ACC”
position, or the key is removed from the
ignition switch. [For vehicles equipped
with the keyless operation system] The
operation mode is put in OFF or ACC.
NOTE The lamp auto-cutout function
can also be disabled. For further
information, we recommend you to
consult a Fiat Dealership.Lamp monitor buzzer
If the following operation is performed,
a buzzer will sound to remind the driver
to turn off the lamps. [Except for
vehicles equipped with the keyless
operation system]
If the driver’s door is opened when the
key is in the “LOCK” or “ACC” position
or removed from the ignition switch
while the lamps are on. [For vehicles
equipped with the keyless operation
system] If the driver’s door is opened
when the operation mode is in ACC or
OFF while the lamps are on. In both
cases, the buzzer will automatically
stop if the auto-cutoff function is
activated, the lamp switch is turned off,
or the door is closed.
Daytime running lamp
(Where provided)
The daytime running lamps comes on
when the engine is running and the
lamp switch is in the “OFF” or “AUTO”
position and the tail lamps are off.
60) 61)
Dipper (High/Low beam change)
When the lamp switch is in the
position, the beam changes from
high to low (or low to high) each time
the lever is pulled fully (A). While the
high beam is on, the high beam
indicator lamp in the instrument cluster
will also illuminate.
77AJZ101023
46
GETTING TO KNOW YOUR VEHICLE
Page 49 of 316

Headlamp flasher
The high beams flash when the lever is
pulled slightly (B), and will go off when it
is released. When the high beam is on,
the high beam indicator lamp in the
instrument cluster will illuminate.
NOTE The high beams can also flash
when the lamp switch is OFF.
NOTE If you turn the lamps off with the
headlamps set to high beam, the
headlamps are automatically returned
to their low-beam setting when the
lamp switch is next turned to the
position.
HEADLAMP LEVELLING
SWITCH
(where provided)
62)
The angle of the headlamp beam varies
depending upon the load carried by the
vehicle. The headlamp levelling switch
can be used to adjust the headlamp
illumination distance (when the lower
beam is illuminated) so that the
headlamps’ glare does not distract the
drivers of approaching vehicles. Set the
switch (referring to the following table)
to the appropriate position according to
the number of people and the load in
the vehicle.
NOTE When adjusting the beam
position, first put the dial in the “0”
position (the highest beam position).Vehicle condition — Single Cab
Switch position 0 — Driver only.
Switch position 2 — Driver and full
luggage loading.
Vehicle condition — Club Cab and
Double Cab
Switch position 0 — Driver only.
Switch position 3 — Driver and full
luggage loading (except for vehicles
with high intensity discharge headlamps
and 16 inch tyre).
Switch position 4 — Driver and full
luggage loading (vehicles with high
intensity discharge headlamps and
16 inch tyre).
TURN SIGNAL LEVER
The turn-signal lamps flash when the
lever is operated (with the ignition
switch or the operation mode is in ON).
At the same time, the turn-signal
indicator flashes.
78AA0061218
79AHA105525
80AA0061205
47
Page 50 of 316

A — Turn-signals: when making a
normal turn, use position (A). The lever
will return automatically when cornering
is completed.
B — Lane change signals: when
moving the lever to (B) slightly to
change a lane, the turn-signal lamps
and indicator lamp in the instrument
cluster will only flash while the lever is
operated. Also, when you move the
lever to (B) slightly then release it, the
turn-signal lamps and indicator lamp in
the instrument cluster will flash three
times.
NOTE If the lamp flashes unusually
quickly, the bulb in a turn-signal lamp
may have burned out. We recommend
you to have the vehicle inspected.
It is possible to activate the following
functions:
Flashing of the turn-signal lamps
when the lever is operated with the
ignition switch or the operation mode is
in ACC
The turn-signal lamps 3-flash
function for lane changes can be
deactivated.
The time required to operate the
lever for the 3-flash function can be
adjusted.
Changing of the tone of a sounding
buzzer as the turn-signal lamps flash.
For further information, we recommend
you to consult a Fiat Dealership.
HAZARD WARNING
FLASHER SWITCH
Use the hazard warning flasher switch
when the vehicle has to be parked on
the road for any emergency. The hazard
warning flashers can always be
operated, regardless of the ignition
switch position or the operation mode.
Push the switch to turn on the hazard
warning flashers, all turn signal lamps
flash continuously. To turn them off,
push the switch again.
NOTE On vehicles equipped with the
emergency brake system, while the
hazard warning lamps are blinking due
to having manually pushed the switch,
the emergency brake system does not
operate. Refer to “Emergency brake
system”.
FOG LAMP SWITCH
(where provided)
Front fog lamp switch
The front fog lamps can be operated
while the headlamps or tail lamps are
on. Turn the knob in the “ON” direction
to turn on the front fog lamps. An
indicator lamp in the instrument cluster
will also come on. Turn the knob in the
“OFF” direction to turn off the front fog
lamps. The knob will automatically
return to its original position when you
release it.
NOTE The front fog lamps are
automatically turned off when the
headlamps or tail lamps are turned off.
To turn the front fog lamps on again,
turn the knob in the “ON” direction after
turning on the headlamps or tail lamps.
81AHA101383
82AG0004596
48
GETTING TO KNOW YOUR VEHICLE
Page 51 of 316

NOTE Do not use fog lamps except in
conditions of fog, otherwise excessive
lamp glare may temporarily blind
oncoming vehicle drivers.
Rear fog lamp switch
The rear fog lamp can be operated
when the headlamps or front fog lamps
(if so equipped) turn on. An indicator
lamp in the instrument cluster comes
on when the rear fog lamp is turned on.
Vehicle without front fog lamps:
Turn the knob once in the “ON”
direction to turn on the rear fog lamp.
To turn the rear fog lamp off, turn the
knob once in the “OFF” direction. The
knob will automatically return to its
original position when you release it.
Vehicle with front fog lamps: Turn
the knob once in the “ON” direction to
turn on the front fog lamps. Turn the
knob once more in the “ON” direction
to turn on the rear fog lamp. To turn the
rear fog lamp off, turn the knob once in
the “OFF” direction. Turn the knob once
more in the “OFF” direction to turn off
the front fog lamps. The knob will
automatically return to its original
position when you release it.NOTE The rear fog lamp is
automatically turned off when the
headlamps or front fog lamps (if so
equipped) are turned off.
NOTE To turn the rear fog lamp on
again, turn the knob once in the “ON”
direction after turning on the
headlamps. (Vehicle without front fog
lamps)
To turn the rear fog lamp on again, turn
the knob twice in the “ON” direction
after turning on the headlamps. (Vehicle
with front fog lamps)MASKING THE
HEADLAMPS
When entering a country in which
vehicles are driven on the opposite side
of the road to the country in which your
vehicles is supplied, necessary
measures have to be taken to avoid
dazzling oncoming traffic.
High intensity discharge headlamp
type
Do not need any adjustment.
Halogen headlamp type
Mask the headlamps according to the
next procedure.
Turn the headlamp off and wait until
the headlamps got cold.According
to the illustrations, prepare the
sticker (A) to stick the headlamp
surface of right and left.Seeing from
the headlamp front, position (C) of
the sticker and the central mark (B)
of the headlamp and stick a sticker
along the vertical dotted line.
NOTE Use a sticker with a light
blocking effect enough. Using of a
sticker without a light blocking effect will
not acquire a blocking effect.
NOTE Align the vertical dotted line with
the line of the reflector in the headlamp.
83AG0004596
49
Page 58 of 316
not freeze in the washer reservoir.
Failure to do so could result in loss of
washer function and frost damage to
the system components.
WARNING
63)Do not use the screen wiper to remove
layers of snow or ice from the windscreen.
In such conditions, the windscreen wiper
may be subjected to excessive stress and
the motor cut-out switch, which prevents
operation for a few seconds, may
intervene. If operation is not restored,
contact a Fiat Dealership.
64)Streaks of water may cause
unnecessary blade movements.
65)If the washer is used in cold weather,
the washer fluid sprayed against the glass
may freeze, which may hinder visibility.
Warm the glass with the defroster or rear
window demister before using the washer.
66)With the ignition switch or the
operation mode in ON and the lever in the
“AUTO” position, the wipers may
automatically operate in the situations
described below. If your hands get
trapped, you could suffer injuries or the
wipers could malfunction. Be sure to turn
the ignition switch to the “LOCK” position
or put the operation mode in OFF, or move
lever to the “OFF” position to deactivate
the rain sensor: when cleaning the outside
surface of the windscreen, if you touch or
wipe with a cloth on top of the rain sensor;
when using an automatic car wash; when a
physical shock is applied to the windscreen
or to the rain sensor.
IMPORTANT
21)Do not activate the rain sensor when
washing the car in an automatic car wash.
AIR CONDITIONING
SYSTEM
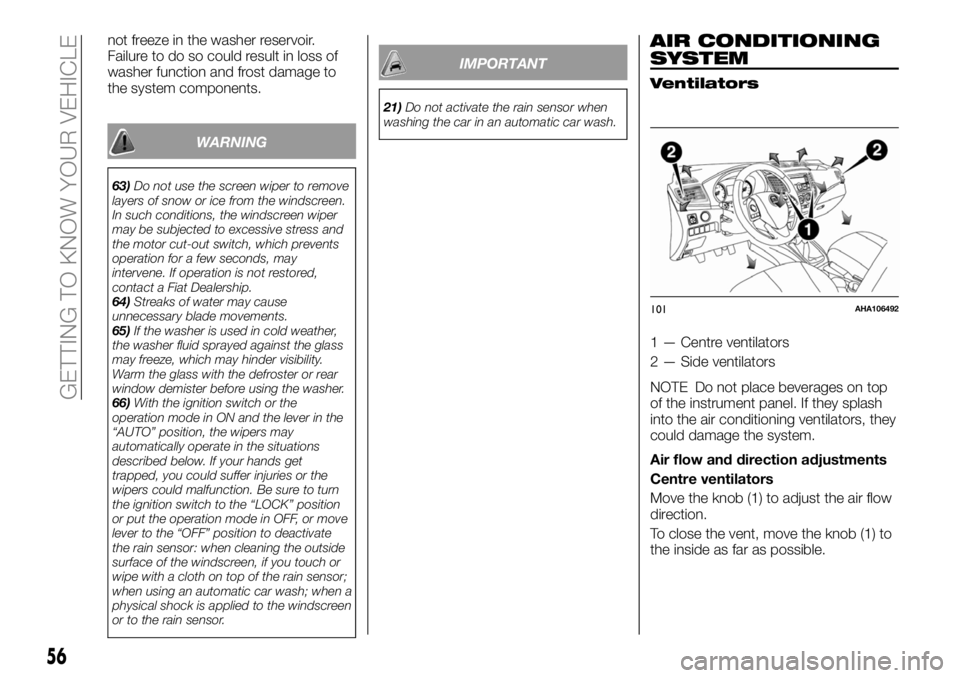
Ventilators
1 — Centre ventilators
2 — Side ventilators
NOTE Do not place beverages on top
of the instrument panel. If they splash
into the air conditioning ventilators, they
could damage the system.
Air flow and direction adjustments
Centre ventilators
Move the knob (1) to adjust the air flow
direction.
To close the vent, move the knob (1) to
the inside as far as possible.
101AHA106492
56
GETTING TO KNOW YOUR VEHICLE
Page 79 of 316
82)For safety reasons, the bonnet must
always be properly closed while the car is
travelling. Therefore, make sure that the
bonnet is properly closed and that the lock
is engaged. If you discover that the bonnet
is not perfectly closed during travel, stop
immediately and close the bonnet in the
correct manner.
IMPORTANT
30)Note that the support bar may
disengage the bonnet if the open bonnet is
lifted by a strong wind.
31)After inserting the support bar into the
slot, make sure the bar supports the
bonnet securely from falling down on to
your head or body.
CARGO AREA
CARGO LOADS
83) 84)
Cargo loads precautions
When loading luggage, be careful to the
following.
Stow cargo and luggage in the cargo
area whenever possible.
Distribute cargo or luggage evenly so
that it is not unbalanced.
Do not place cargo or luggage on
the instrument panel. Also, do not stack
up cargo or luggage on the front
passenger’s seat or the rear seat.
Having the driver’s vision blocked, and
your cargo being thrown inside the
cabin if you suddenly have to brake can
cause a serious accident or injury.
Loading a roof carrier
32) 33)
NOTE We recommend you to use a
FCA GENUINE roof carrier, since the
brackets to be used have a special
shape. For details, we recommend you
to consult an Authorised Fiat
Dealership.
Roof carrier precaution
34) 35)
NOTE To prevent wind noise or
reduction in fuel economy, remove the
roof carrier when not in use.NOTE Remove the roof carrier before
using an automatic car wash.
HIGH-LOAD SYSTEM,
PROTRUDING LOADS
Check that the load is distributed evenly
on the flatbed and that the rear side
panel is correctly closed, so that the
load, or part of it, cannot fall onto the
road surface.
Some simple suggestions can improve
driving safety, comfort and vehicle
duration:
distribute the load evenly over the
platform: if it must be concentrated it in
a single area, choose an area mid-way
between both axles;
remember that the dynamic
behaviour of the vehicle is affected by
the transported weight: in particular, the
stopping distances are longer,
especially at high speed.
Bumpy roads and heavy braking may
cause unexpected load shifting with
consequently hazardous situations:
before setting off, secure the load tightly
using the partition and appropriate
hooks, steel cables, ropes or chains
strong enough to hold the items to be
secured.
83) 84) 85) 86) 87) 88)
77