stop start FIAT GRANDE PUNTO ACTUAL 2015 1.G Service Manual
[x] Cancel search | Manufacturer: FIAT, Model Year: 2015, Model line: GRANDE PUNTO ACTUAL, Model: FIAT GRANDE PUNTO ACTUAL 2015 1.GPages: 216, PDF Size: 3.66 MB
Page 132 of 216

131
SAFETY
STARTING
AND DRIVING
IN AN
EMERGENCY
SERVICE
AND CARE
TECHNICAL
SPECIFICATIONS
INDEX
CONTROLS
AND DEVICES
WARNING
LIGHTS AND
MESSAGES
GENERIC WARNING
(amber)
The warning light turns on in the follow-
ing circumstances:
Engine oil pressure sensor fault
The warning light turns on when a failure
is detected in the engine oil pressure sen-
sor. Go to a Fiat Dealership to have the
fault fixed as soon as possible.
Start&Stop fault
(for versions/markets where provided)
The warning light comes on when a
Start&Stop failure is detected.
A specific message is displayed on certain
versions.
Exterior lights fault
See the section on warning light
6.
Fuel cut-off switch tripped
The warning light comes on when the
fuel cut-off switch is triggered.
The display will show a specific message.
è
EXTERIOR LIGHTS
FAULT (amber)
The warning light comes on (on some ver-
sions) when a failure is detected in one
of the following lights:
– sidelights
– brake lights
– rear fog lights
– direction indicators
– number plate lights
– daytime running lights (DRL) (for ver-
sions/markets, where provided)
The failure relating to these lights could
be: one or more blown bulbs, a blown
protection fuse or a break in the electri-
cal connection.
On certain versions warning light èturns
on as an alternative.
A specific message is displayed on certain
versions.
W
REAR FOG LIGHTS
(amber)
The light comes on when the rear fog
lights are turned on.
4
CAR PROTECTION
SYSTEM FAULT
– FIAT CODE
(amber)
The warning light switching on (on some
versions, with the displaying of a message)
signals the failure of the Fiat Code system
or, if installed, of the alarm system: in this
case, contact a Fiat Dealership as soon as
possible.
Y
123-134 ACTUAL 1ed EN 31-08-2010 9:24 Pagina 131
Page 137 of 216

136
SAFETY
STARTING
AND DRIVING
WARNING
LIGHTS AND
MESSAGES
SERVICE
AND CARE
TECHNICAL
SPECIFICATIONS
INDEX
CONTROLS
AND DEVICES
IN AN
EMERGENCY
STARTING THE ENGINE
EMERGENCY START-UP
If the instrument panel warning light
Ystays on permanently, contact a Fiat
Dealership immediately.
JUMP STARTING fig. 1
If the battery is flat, the engine may be
started using an auxiliary battery with an
equal or slightly higher capacity than the
flat one. Proceed as follows to start the car:
❒connect the positive terminals (+near
the terminal) of the two batteries with
a jump lead;
❒with a second lead, connect the nega-
tive terminal (–) of the auxiliary battery
to an earthing point
Eon the engine or
the gearbox of the car to be started;
❒start the engine.
❒when the engine has been started, fol-
low the sequence above in reverse or-
der to remove the leads.
If after a few attempts the engine does not
start, do not keep trying but contact a Fiat
Dealership.IMPORTANT Do not directly connect the
negative terminals of the two batteries:
sparks could ignite explosive gas released
from the battery. If the auxiliary battery is
installed on another car, prevent acciden-
tal contact between metallic parts of the
two cars.
IMPORTANT For cars with Start&Stop
system, in case of starting by booster bat-
tery, refer to "Dashboard and controls"
chapter, paragraph "Start&Stop system".
BUMP STARTING
Never bump start the engine by pushing,
towing or driving downhill. This could
cause fuel to flow into the catalytic con-
verter and damage it beyond repair.
IMPORTANT Remember that the brake
booster and the power steering system
are not active until the engine is started,
so you will need to apply much more force
to the brake pedal or steering wheel.
This procedure must be per-
formed by expert personnel
because incorrect actions may cause
considerable electrical discharge. Fur-
thermore, battery fluid is poisonous
and corrosive: avoid contact with skin
and eyes. Keep naked flames and lit
cigarettes away from the battery. Do
not create sparks.
WARNING
fig. 1F0M0414m
135-166 ACTUAL 1ed EN 26-07-2010 16:00 Pagina 136
Page 139 of 216
138
SAFETY
STARTING
AND DRIVING
WARNING
LIGHTS AND
MESSAGES
SERVICE
AND CARE
TECHNICAL
SPECIFICATIONS
INDEX
CONTROLS
AND DEVICES
IN AN
EMERGENCY
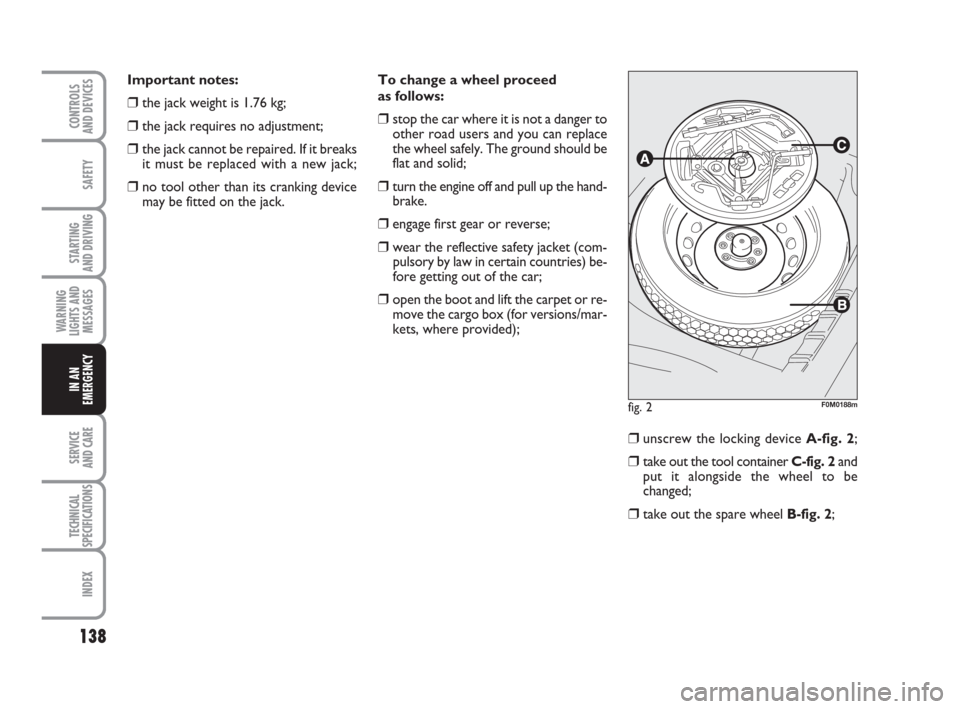
To change a wheel proceed
as follows:
❒stop the car where it is not a danger to
other road users and you can replace
the wheel safely. The ground should be
flat and solid;
❒turn the engine off and pull up the hand-
brake.
❒engage first gear or reverse;
❒ wear the reflective safety jacket (com-
pulsory by law in certain countries) be-
fore getting out of the car;
❒open the boot and lift the carpet or re-
move the cargo box (for versions/mar-
kets, where provided);
❒unscrew the locking device A-fig. 2;
❒take out the tool container C-fig. 2and
put it alongside the wheel to be
changed;
❒take out the spare wheel B-fig. 2;
fig. 2F0M0188m
Important notes:
❒the jack weight is 1.76 kg;
❒the jack requires no adjustment;
❒the jack cannot be repaired. If it breaks
it must be replaced with a new jack;
❒no tool other than its cranking device
may be fitted on the jack.
135-166 ACTUAL 1ed EN 26-07-2010 16:00 Pagina 138
Page 146 of 216

145
SAFETY
STARTING
AND DRIVING
WARNING
LIGHTS AND
MESSAGES
SERVICE
AND CARE
TECHNICAL
SPECIFICATIONS
INDEX
CONTROLS
AND DEVICES
IN AN
EMERGENCY
❒ make sure that switch D-fig. 10of the
compressor is in position 0 (off), start
the engine, plug into the nearest sock-
et E-fig. 11and activate the compres-
sor by turning switch D-fig. 10to po-
sition I(on). Inflate the tyre to the
pressure specified in the “Inflation
pressure” paragraph in the “Technical
specifications” section. For a more accurate reading, check
pressure gauge F-fig. 10with the com-
pressor off;
❒if after 5 minutes you cannot reach at
least 1.5 bar, unplug the compressor
from the valve and the socket, then
move the car forward about ten metres
in order to distribute the sealant inside
the tyre evenly, then repeat the infla-
tion operation;
❒if after this operation you still cannot
reach at least 1.8 bar after 5 minutes,
do not resume driving because the tyre
is too damaged and the fast tyre repair
kit cannot guarantee suitable sealing.
Contact a Fiat Dealership;
❒if you do reach the tyre pressure spec-
ified in the “Inflation pressure” para-
graph in the “Technical specifications”
section, start driving immediately;
fig. 10F0M0202m
fig. 11F0M0203m
fig. 12F0M0364m
Apply the adhesive label
where it can be easily seen
by the driver as a reminder that the
tyre has been treated with the quick
repair kit. Drive carefully, particular-
ly on bends. Do not exceed 80 km/h.
Do not accelerate or brake suddenly.
WARNING
❒after driving for about 10 minutes, stop
and check the tyre pressure again; re-
member to put on the handbrake;
If the pressure has fallen be-
low 1.8 bar, do not drive any
further: the Fix&Go automatic quick
tyre repair kit cannot guarantee
proper hold because the tyre is too
damaged. Contact a Fiat Dealership.
WARNING
135-166 ACTUAL 1ed EN 26-07-2010 16:00 Pagina 145
Page 164 of 216

163
SAFETY
STARTING
AND DRIVING
WARNING
LIGHTS AND
MESSAGES
SERVICE
AND CARE
TECHNICAL
SPECIFICATIONS
INDEX
CONTROLS
AND DEVICES
IN AN
EMERGENCY
RECHARGING
THE BATTERY
IMPORTANT The battery recharging pro-
cedure is provided for information pur-
poses only. You are recommended to go
to a Fiat Dealership to have this operation
performed.
We recommend recharging the battery
slowly for approximately 24 hours at low
amperage. Rapid charging with high cur-
rents could damage the battery.
VERSIONS WITHOUT
Start&Stop SYSTEM
Charge the battery as follows:
❒disconnect battery negative terminal;
❒connect the charger cables to the bat-
tery terminals, observing the polarity;
❒turn on the charger;
❒when you have finished, turn the charg-
er off before disconnecting it from the
battery;
❒reconnect battery negative terminal.
fig. 41F0M0518m
VERSIONS WITH Start&Stop
SYSTEM (with dummy pole)
fig. 41
(for versions/markets, where provided)
To charge, proceed as follows:
❒disconnect the quick-release negative
terminal Afrom the negative dummy
pole Bbecause the battery negative
pole Chas a sensor Dmonitoring the
battery conditions, that should never
be disconnected from the negative pole
C(unless the battery is replaced);
❒connect the battery charger positive ca-
ble to the battery positive pole Eand
the negative cable to the dummy pole
B;
❒switch on the battery charger. At the
end of the charging process, switch the
charger off before disconnecting it;
❒after disconnecting the battery charg-
er, reconnect the quick-release nega-
tive terminal Ato the dummy pole B.
135-166 ACTUAL 1ed EN 26-07-2010 16:00 Pagina 163
Page 165 of 216

164
SAFETY
STARTING
AND DRIVING
WARNING
LIGHTS AND
MESSAGES
SERVICE
AND CARE
TECHNICAL
SPECIFICATIONS
INDEX
CONTROLS
AND DEVICES
IN AN
EMERGENCY
RAISING THE CAR
If the car needs to be lifted, go to a Fiat
Dealership which is equipped with the arm
hoist or workshop lift.
The car should be lifted side-on only, by
putting the ends of the arms or the work-
shop lifting device in the areas shown in
the diagram.
Do not try to rechargea frozen
battery; defrost it first to pre-
vent the risk of explosion. If the bat-
tery was frozen, have it inspected by
specialised personnel before recharg-
ing to check that the internal ele-
ments are not damaged and that the
casing is not cracked, which could
cause poisonous, corrosive gas to leak.
WARNING
fig. 42F0M0513m
Battery fluid is poisonous
and corrosive: avoid contact
with your skin and eyes. The battery
must be recharged in a ventilated
place away from naked flames or
possible sources of sparks to avoid the
risk of explosion and fire.
WARNING
VERSIONS WITH Start&Stop
SYSTEM fig. 42
(without dummy pole)
(for versions/markets, where provided)
To charge, proceed as follows:
❒disconnect the connector A(pressing
the button B) from the sensor Cmon-
itoring the battery conditions, on the
negative pole Dof the battery;
❒connect the battery charger positive ca-
ble Eand the negative cable to the ter-
minal of sensor D, according to figure;
❒turn on the battery charger. At the end
of the charging process, switch the bat-
tery charger off;
❒after disconnecting the battery charg-
er, reconnect the connector Ato the
sensor Caccording to figure.
135-166 ACTUAL 1ed EN 26-07-2010 16:00 Pagina 164
Page 177 of 216

176
SAFETY
STARTING
AND DRIVING
WARNING
LIGHTS AND
MESSAGES
IN AN
EMERGENCY
TECHNICAL
SPECIFICATIONS
INDEX
CONTROLS
AND DEVICES
SERVICE
AND CARE
If the oil level is close to or under MIN,
add oil through the filler neck A, until the
level reaches MAX.
The oil level should never exceed MAX.ENGINE OIL CONSUMPTION
The maximum engine oil consumption is
usually 400 grams every 1,000 km.
During the initial period of usage for the
vehicle, the engine is bedding in therefore
the engine oil consumption may settle
down only after the first 5,000–6,000 km.
IMPORTANT The oil consumption de-
pends on driving style and the conditions
under which the car is used.
IMPORTANT After adding or changing
the oil, let the engine turn over for a few
seconds and wait a few minutes after turn-
ing it off before you check the level. ENGINE OIL fig. 3-4
Check the oil level a few minutes (about
5) after the engine has stopped, with the
car parked on level ground.
The oil level should be between the MIN
and MAXmarks on the dipstick B.
The gap between MINand MAXis equal
to around 1 litre of oil.
fig. 3 – 1.2 and 1.4 8V versions F0M0149mfig. 4 – 1.3 Multijet versionF0M0150m
167-186 ACTUAL 1ed EN 27-07-2010 10:30 Pagina 176
Page 182 of 216

181
SAFETY
STARTING
AND DRIVING
WARNING
LIGHTS AND
MESSAGES
IN AN
EMERGENCY
TECHNICAL
SPECIFICATIONS
INDEX
CONTROLS
AND DEVICES
SERVICE
AND CARE
WHEELS AND TYRES
Check the pressure of each tyre, includ-
ing the spare, every two weeks and before
long journeys. The pressure should be
checked with the tyre rested and cold.
It is normal for the pressure to increase
when the car is used; for the correct tyre
inflation pressure, see “Wheels” in the
“Technical specifications” section.
Incorrect pressure causes abnormal tyre
wearfig. 8:
Anormal pressure: tread evenly worn.
Blow pressure: tread particularly worn
at the edges.
Chigh pressure: tread particularly worn
in the centre.
The tyres must be replaced when the
tread is less than 1.6 mm thick. In all cas-
es, follow the laws in force in the coun-
try where you are driving.
fig. 8F0M0160m
IMPORTANT NOTES
❒Where possible, avoid braking sudden-
ly, wheel-spinning and crashing into
curbs, potholes or other obstacles.
Long distances on uneven roads can
damage the tyres;
❒check the tyres regularly for cuts on the
sides, swelling or irregular tread wear.
Go to a Fiat Dealership if required.
❒avoid overloading the car when travel-
ling: this may cause serious damage to
the wheels and tyres;
❒if a tyre is punctured, stop the vehicle
immediately and change it to avoid
damage to the tyre, the rim, and the
suspension and steering systems;
❒a tyre will age even if it is not used much.
Cracks in the tread and on the sidewalls
are a sign of ageing. In any event, have
the tyres checked by specialised per-
sonnel if they have been fitted for longer
than 6 years. Remember to check the
spare wheel very carefully;
❒in case of replacement, always fit new
tyres, avoiding those with an unknown
origin;
❒if a tyre is replaced, you should also
change the inflation valve;
❒to allow even wear between the front
and rear tyres, it is advisable to switch
them every 10–15 thousand kilometres,
keeping them on the same side of the
car so as not to reverse the direction
of rotation.
Remember that the road
holding qualities of your car
also depend on correct tyre pressures.
WARNING
167-186 ACTUAL 1ed EN 27-07-2010 10:30 Pagina 181
Page 186 of 216

185
SAFETY
STARTING
AND DRIVING
WARNING
LIGHTS AND
MESSAGES
IN AN
EMERGENCY
TECHNICAL
SPECIFICATIONS
INDEX
CONTROLS
AND DEVICES
SERVICE
AND CARE
Standard upkeep of the paintwork consists
of washing the vehicle: the frequency de-
pends on the conditions and environment
where the vehicle is used. For example, it
is advisable to wash the car more often in
areas with high atmospheric pollution or
on gritted roads.
To wash the car properly, proceed as fol-
lows:
❒if taking your car through an automat-
ic car wash, remove the aerial from the
roof;
❒wash the body using a low-pressure jet
of water;
❒use a sponge to wipe a slightly soapy so-
lution over the bodywork, frequently
rinsing the sponge;
❒rinse with plenty of water and dry with
a jet of air or a chamois leather.
Take particular care when drying the less
visible parts, such as the door, bonnet and
headlight frames, where water can stagnate
more easily. It is a good idea to leave the
car in the open for a while after washing
it to give time for the water to evaporate.Do not wash the car after it has been left
in the sun or with the bonnet hot: this may
alter the shine of the paintwork.
Exterior plastic parts must be cleaned in
the same way as the rest of the car.
Where possible, do not park under trees;
the resinous substances that fall off many
species give the paint a dull appearance
and increase the possibility of triggering
rust processes.
IMPORTANT Bird droppings should be
washed off immediately and thoroughly
as the acid they contain is particularly
aggressive.Detergents pollute water. The
vehicle should be washed only
in areas equipped for collect-
ing and purifying the liquids
used in the washing process.
Windows
Use specific detergents to clean the win-
dows.
Also use clean cloths to avoid scratching
the glass or altering the transparency.
IMPORTANT Wipe the rear window
gently with a cloth in the direction of the
filaments to avoid damaging the heating
device.
Engine compartment
Wash the engine compartment thor-
oughly at the end of every winter. Be care-
ful not to direct the jet of water onto elec-
tronic control units. Adequately protect
the upper air vents to prevent damage to
the windscreen wiper motor. Have this
operation performed at a specialised
workshop.
IMPORTANT Washing should take place
with a cold engine and with the key at
STOP. After the wash, make sure that
the various protective devices (e.g. rubber
caps and guards) have not been removed
or damaged.
Front headlights
IMPORTANT Never use aromatic sub-
stances (e.g. petrol) or ketenes (e.g. ace-
tone) for cleaning the plastic lenses of the
front headlights.
167-186 ACTUAL 1ed EN 27-07-2010 10:30 Pagina 185
Page 191 of 216

190
SAFETY
STARTING
AND DRIVING
WARNING
LIGHTS AND
MESSAGES
IN AN
EMERGENCY
SERVICE
AND CARE
INDEX
CONTROLS
AND DEVICES
TECHNICAL
SPECIFICATIONS
ENGINE CODES – BODYWORK VERSIONS
Version Engine type Engine type body version code
code 3 doors 5 doors
4 seats 5 seats(Õ)4 seats 5 seats(Õ)
1.2 (EURO 4)
1.2 (EURO 5)
1.2 ECO
1.4 (EURO 4)
1.4 (EURO 5)
1.4 (Õ) (EURO 4)
1.4 (Õ) (EURO 5)
1.3 Multijet 75HP
(EURO 4)
1.3 Multijet 75HP
(EURO 5)
1.3 Multijet 70HP (Õ)
(EURO 4)
1.3 Multijet 85HP
ECO
(*) Version with DPF
(
❒) ECO versions
(
Õ) For versions/markets, where provided
(
❍) Version with Start&Stop
199A4000
169A4000
169A4000
350A1000
350A1000
199A7000
199A7000
199A2000
199A9000
199B2000
199B4000199BXA1A 01D
199BXZ1A 51B (❍)
199BXZ1A 51E (❍)
199BXB1A 03P
199BXB1A 03R (❍)
199BXH1A 20D
199BXH1A 20F (❍)
199BXC1A 05E
199BXC1A 05H (*)
199BXC1A 05G (❒)
199BXT1A 38D (❍) (*)
199BXT1A 38H (❍) (*) (❒)
199BXP1A 30F
199BXY1A 49C199BXA1A 01C
199BXZ1A 51 (❍)
199BXZ1A 51D (❍)
199BXB1A 03C
199BXB1A 03Q (❍)
199BXH1A 20
199BXH1A 20E (❍)
199BXC1A 05
199BXC1A 05C (*)
199BXC1A 05F (❒)
199BXT1A 38C (❍) (*)
199BXT1A 38G (❍) (*) (❒)
199BXP1A 30E
199BXY1A 49B 199AXA1A 00G
199AXZ1A 50B (❍)
199AXZ1A 50E (❍)
199AXB1A 02E
199AXB1A 02R (❍)
199AXH1A 19B
199AXH1A 19F (❍)
199AXC1A 04C
199AXC1A 04E (*)
199AXC1A 04G (❒)
199AXT1A 37D (❍) (*)
199AXT1A 37H (❍) (*) (❒)
199AXP1A 29F
199AXY1A 48C199AXA1A 00F
199AXZ1A 50 (❍)
199AXZ1A 50D (❍)
199AXB1A 02D
199AXB1A 02Q (❍)
199AXH1A 19
199AXH1A 19E (❍)
199AXC1A 04
199AXC1A 04D (*)
199AXC1A 04F (❒)
199AXT1A 37C (❍) (*)
199AXT1A 37G (❍) (*) (❒)
199AXP1A 29E
199AXY1A 48B
187-204 ACTUAL 1ed EN 26-07-2010 16:08 Pagina 190