change time FIAT IDEA 2008 1.G Connect NavPlus Manual
[x] Cancel search | Manufacturer: FIAT, Model Year: 2008, Model line: IDEA, Model: FIAT IDEA 2008 1.GPages: 165
Page 19 of 165
19
CONNECT NAV+
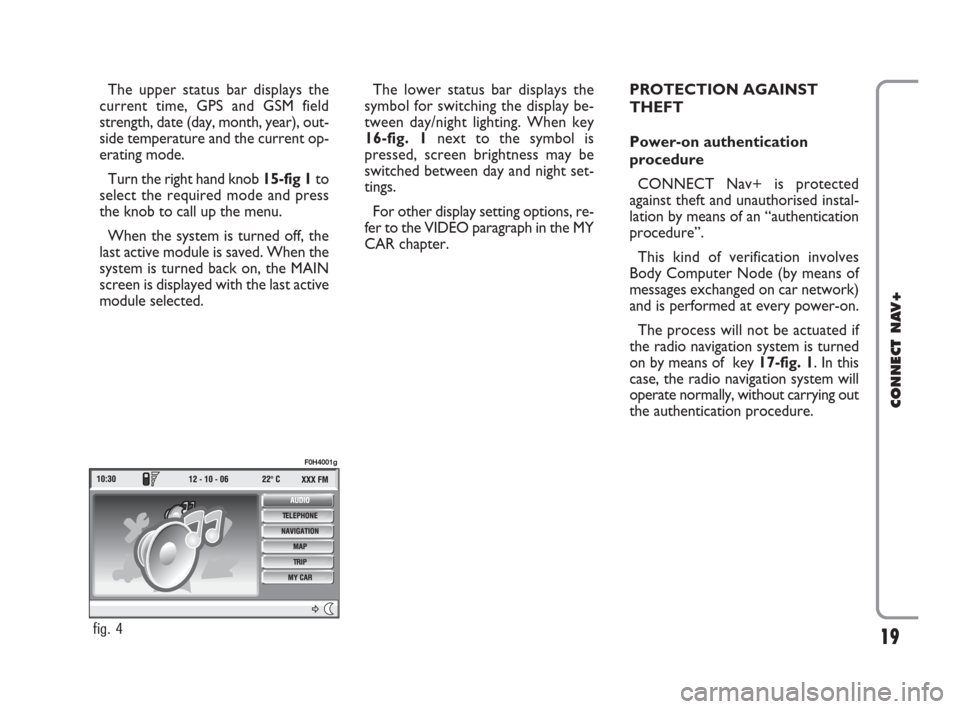
The upper status bar displays the
current time, GPS and GSM field
strength, date (day, month, year), out-
side temperature and the current op-
erating mode.
Turn the right hand knob 15-fig 1 to
select the required mode and press
the knob to call up the menu.
When the system is turned off, the
last active module is saved. When the
system is turned back on, the MAIN
screen is displayed with the last active
module selected.The lower status bar displays the
symbol for switching the display be-
tween day/night lighting. When key
16-fig. 1next to the symbol is
pressed, screen brightness may be
switched between day and night set-
tings.
For other display setting options, re-
fer to the VIDEO paragraph in the MY
CAR chapter.PROTECTION AGAINST
THEFT
Power-on authentication
procedure
CONNECT Nav+ is protected
against theft and unauthorised instal-
lation by means of an “authentication
procedure”.
This kind of verification involves
Body Computer Node (by means of
messages exchanged on car network)
and is performed at every power-on.
The process will not be actuated if
the radio navigation system is turned
on by means of key 17-fig. 1. In this
case, the radio navigation system will
operate normally, without carrying out
the authentication procedure.
fig. 4
F0H4001g
001-020 Connect IDEA GB 17-01-2008 13:32 Pagina 19
Page 25 of 165
25
CONNECT NAV+
The operations to be carried out for
each of the above two conditions are
listed below.
1) If you wish to receive traffic in-
formation while listening to a CD, be-
fore inserting the CD, tune to a sta-
tion enabled to broadcast traffic in-
formation (TP) and turn the TA func-
tion on. If, while playing the CD, this
station broadcasts traffic information,
CD playing will be temporarily
stopped and resumed automatically at
the end of the message.
If the CD player is already operat-
ing and, at the same time, you wish to
receive traffic information, actuating
the TA function will cause the radio to
tune to the latest station listened to
on the FM band (if the station controls
the “TP”); otherwise, automatic
search will be started to find a station
that controls the “TP”.2) To receive traffic information
though not listening to the radio:
– turn on the TA function, so that
the display shows the abbreviation
“TA”;
– tune to a station enabled to broad-
cast traffic information so that “TP”
is shown on the display;
This way, if that station broadcasts
traffic information, this will be heard
at a minimum predefined volume.
A telephone call has higher priority
than traffic message.IMPORTANT In certain countries,
radio stations exist which though the
TP function is active (the display shows
“TP”), do not broadcast traffic infor-
mation.
If the radio is operating on the AM
band, selecting the FM band will cause
the latest listened station to be tuned.
If the selected station does not send
traffic information (the “TP” writing
does not appear on the display), au-
tomatic search will be started to seek
an enabled station to which the radio
will tune.
If the volume is changed during a traf-
fic bulletin the value is not shown on
the display and the new value is kept
only for the bulletin in progress.
021-059 Connect IDEA GB 17-01-2008 13:33 Pagina 25
Page 37 of 165
CD MODE
IMPORTANTNever use 8 cm au-
dio or MP3 CDs, even with the spe-
cial adapter, since this format damages
the system.
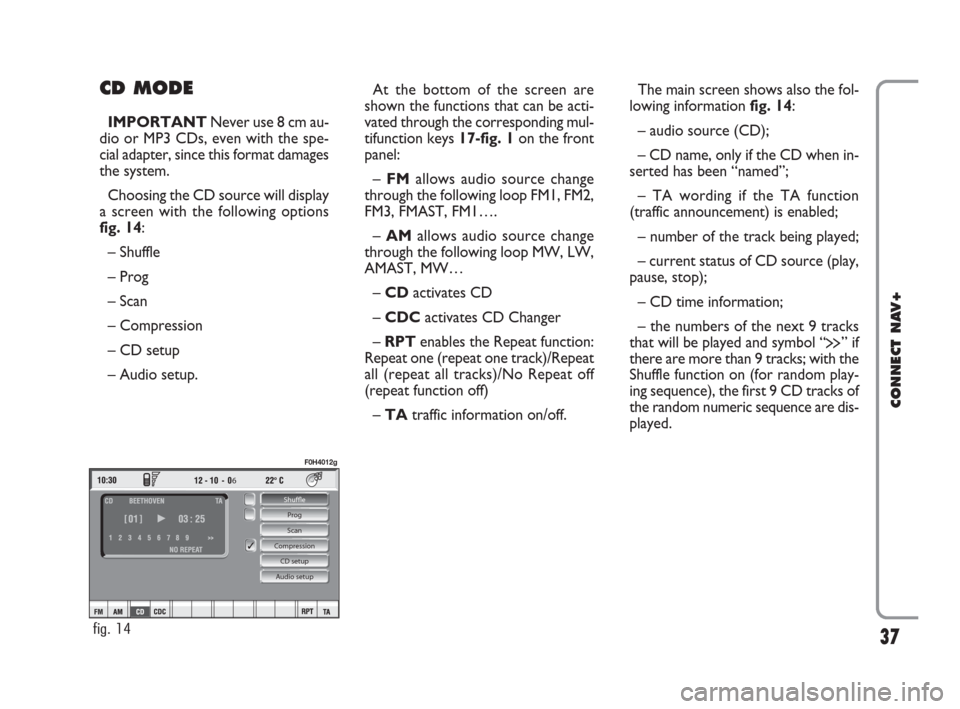
Choosing the CD source will display
a screen with the following options
fig. 14:
– Shuffle
– Prog
– Scan
– Compression
– CD setup
– Audio setup.At the bottom of the screen are
shown the functions that can be acti-
vated through the corresponding mul-
tifunction keys 17-fig. 1on the front
panel:
– FMallows audio source change
through the following loop FM1, FM2,
FM3, FMAST, FM1….
– AMallows audio source change
through the following loop MW, LW,
AMAST, MW…
– CDactivates CD
– CDCactivates CD Changer
– RPTenables the Repeat function:
Repeat one (repeat one track)/Repeat
all (repeat all tracks)/No Repeat off
(repeat function off)
– TAtraffic information on/off.The main screen shows also the fol-
lowing information fig. 14:
– audio source (CD);
– CD name, only if the CD when in-
serted has been “named”;
– TA wording if the TA function
(traffic announcement) is enabled;
– number of the track being played;
– current status of CD source (play,
pause, stop);
– CD time information;
– the numbers of the next 9 tracks
that will be played and symbol “
§” if
there are more than 9 tracks; with the
Shuffle function on (for random play-
ing sequence), the first 9 CD tracks of
the random numeric sequence are dis-
played.
37
CONNECT NAV+
6
Shuffle
Prog
Scan
Compression
CD setup
Audio setup
fig. 14
F0H4012g
021-059 Connect IDEA GB 17-01-2008 13:33 Pagina 37
Page 43 of 165
43
CONNECT NAV+
The CONNECT Nav+ system can
control 10 CDs.
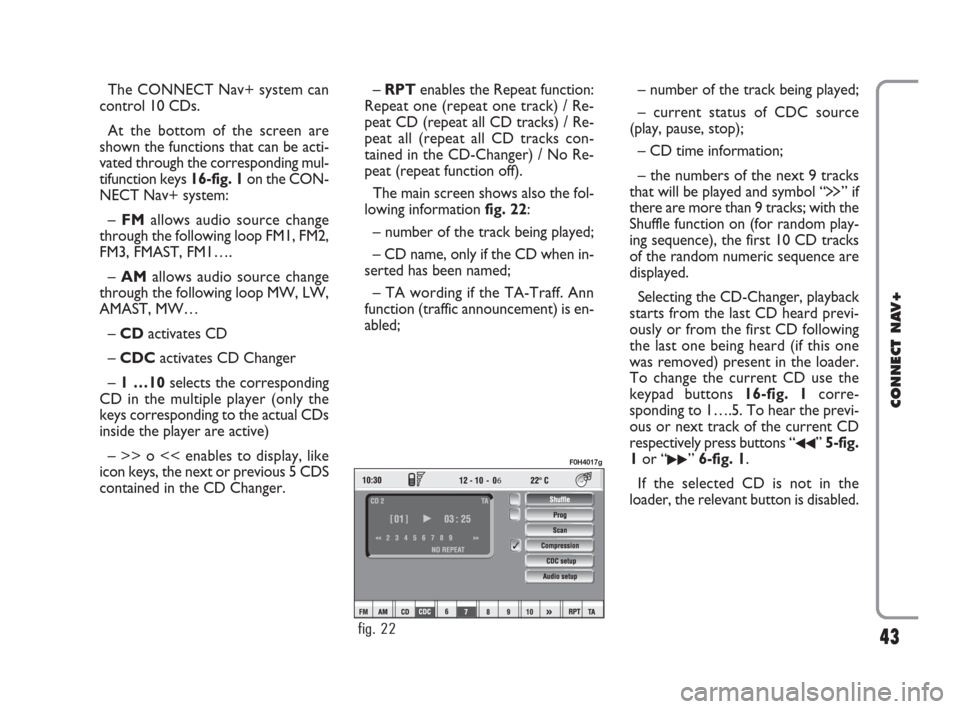
At the bottom of the screen are
shown the functions that can be acti-
vated through the corresponding mul-
tifunction keys 16-fig. 1on the CON-
NECT Nav+ system:
– FMallows audio source change
through the following loop FM1, FM2,
FM3, FMAST, FM1….
– AMallows audio source change
through the following loop MW, LW,
AMAST, MW…
– CDactivates CD
– CDC activates CD Changer
– 1 …10selects the corresponding
CD in the multiple player (only the
keys corresponding to the actual CDs
inside the player are active)
– >> o << enables to display, like
icon keys, the next or previous 5 CDS
contained in the CD Changer.– RPTenables the Repeat function:
Repeat one (repeat one track) / Re-
peat CD (repeat all CD tracks) / Re-
peat all (repeat all CD tracks con-
tained in the CD-Changer) / No Re-
peat (repeat function off).
The main screen shows also the fol-
lowing information fig. 22:
– number of the track being played;
– CD name, only if the CD when in-
serted has been named;
– TA wording if the TA-Traff. Ann
function (traffic announcement) is en-
abled;– number of the track being played;
– current status of CDC source
(play, pause, stop);
– CD time information;
– the numbers of the next 9 tracks
that will be played and symbol “
§” if
there are more than 9 tracks; with the
Shuffle function on (for random play-
ing sequence), the first 10 CD tracks
of the random numeric sequence are
displayed.
Selecting the CD-Changer, playback
starts from the last CD heard previ-
ously or from the first CD following
the last one being heard (if this one
was removed) present in the loader.
To change the current CD use the
keypad buttons 16-fig. 1corre-
sponding to 1….5. To hear the previ-
ous or next track of the current CD
respectively press buttons “
¯¯” 5-fig.
1or “
˙˙” 6-fig. 1.
If the selected CD is not in the
loader, the relevant button is disabled.
6
fig. 22
F0H4017g
021-059 Connect IDEA GB 17-01-2008 13:33 Pagina 43
Page 49 of 165
49
CONNECT NAV+
MAIN SCREEN OPTIONS
AND FUNCTIONS
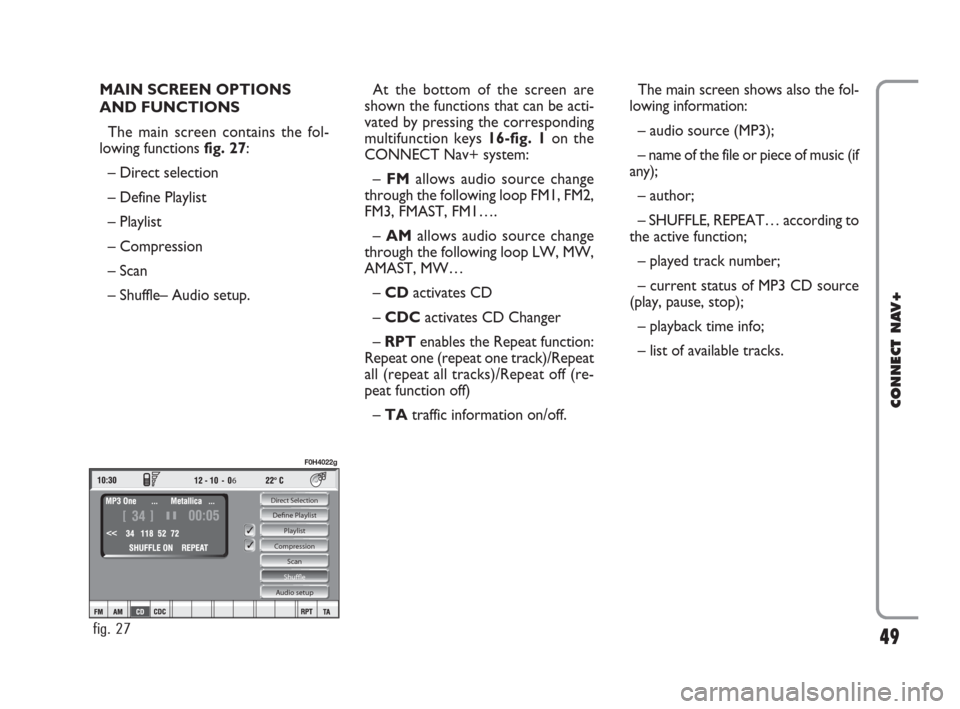
The main screen contains the fol-
lowing functions fig. 27:
– Direct selection
– Define Playlist
– Playlist
– Compression
– Scan
– Shuffle– Audio setup.At the bottom of the screen are
shown the functions that can be acti-
vated by pressing the corresponding
multifunction keys 16-fig. 1 on the
CONNECT Nav+ system:
– FMallows audio source change
through the following loop FM1, FM2,
FM3, FMAST, FM1….
–AMallows audio source change
through the following loop LW, MW,
AMAST, MW…
– CDactivates CD
– CDC activates CD Changer
– RPT enables the Repeat function:
Repeat one (repeat one track)/Repeat
all (repeat all tracks)/Repeat off (re-
peat function off)
– TAtraffic information on/off.The main screen shows also the fol-
lowing information:
– audio source (MP3);
– name of the file or piece of music (if
any);
– author;
– SHUFFLE, REPEAT… according to
the active function;
– played track number;
– current status of MP3 CD source
(play, pause, stop);
– playback time info;
– list of available tracks.
6
Direct Selection
Define Playlist
Playlist
Compression
Scan
Shuffle
Audio setup
fig. 27
F0H4022g
021-059 Connect IDEA GB 17-01-2008 13:33 Pagina 49
Page 93 of 165
IMPORTANT NOTES
– Accurate self-adjustment of the
navigation system requires approx.
100 km of travel the first time and
when tyres are changed; during this
stage the calculated position could be
less accurate.
– Continuous lack of grip at the
wheels (for example skidding on ice),
makes the system temporarily detect
an incorrect position.
The navigation system is completely
managed by the telematic system,
therefore the only operations that
may be required are replacement of
the CD-ROM to set the map of an-
other area or an updated map.
Access to the navigation main func-
tions is gained by short push on “NAV”
key 18-fig. 1 , whereas a long push
(over 2 seconds) on the same key will
activate the NAV RPT function: navi-
gation voice instructions will be un-
available. To switch the function on
again press the “NAV” key 18-fig. 1for
over 2 seconds.When the system is switched on, the
display will, upon the first selection of
the navigating function, show the in-
structions for using the system. The
text will be as follows:
“The FIAT navigation system guides
you in traffic and helps you reach your
destination. Comply with all local traf-
fic regulations, which take precedence
over the manoeuvres indicated by the
navigation system. Full responsibility
for operating the vehicle and observ-
ing all traffic regulations lies with the
driver”.
This page will not be displayed as
long as the ignition key is to ON.SCREEN OPTIONS
AND FUNCTIONS
The main information and functions
provided and managed by the naviga-
tion system are:
– GPS signal symbol which differs in
colour depending on the quality of re-
ception ;
– voice and visual instructions with
indications of distance from the des-
tination and planned arrival time;
– detailed map in different colours
and with different scales to clearly
show the car position, route and des-
tination;
– customisation of the navigation sys-
tem with possibility of entering pre-
memorised destinations;
– automatic memorising of the last
10 destinations;
– name of current street;
93
CONNECT NAV+
092-115 Connect IDEA GB 17-01-2008 13:34 Pagina 93
Page 120 of 165
120
CONNECT NAV+
– Select one of the three multifunc-
tion keys 16-fig. 1corresponding to
the SYSTEM string to display the
screen for changing certain settings.
– Select “Units” icon key with the
knob 15 fig. 1and then press it to
confirm.
To change any set data, select
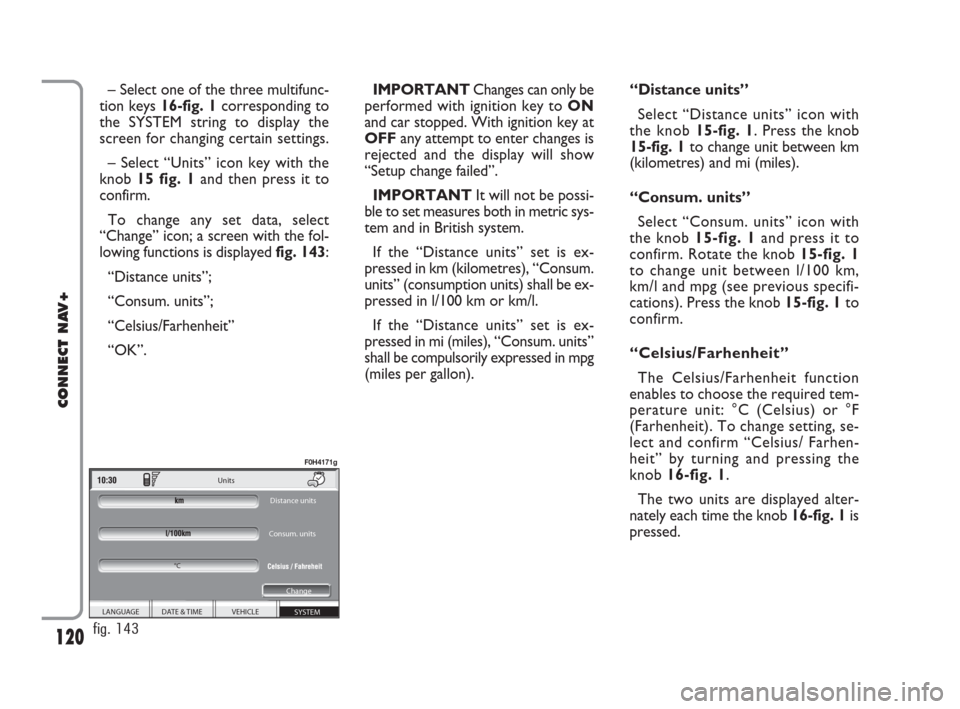
“Change” icon; a screen with the fol-
lowing functions is displayed fig. 143:
“Distance units”;
“Consum. units”;
“Celsius/Farhenheit”
“OK”.IMPORTANTChanges can only be
performed with ignition key to ON
and car stopped. With ignition key at
OFFany attempt to enter changes is
rejected and the display will show
“Setup change failed”.
IMPORTANTIt will not be possi-
ble to set measures both in metric sys-
tem and in British system.
If the “Distance units” set is ex-
pressed in km (kilometres), “Consum.
units” (consumption units) shall be ex-
pressed in l/100 km or km/l.
If the “Distance units” set is ex-
pressed in mi (miles), “Consum. units”
shall be compulsorily expressed in mpg
(miles per gallon).“Distance units”
Select “Distance units” icon with
the knob15-fig. 1. Press the knob
15-fig. 1to change unit between km
(kilometres) and mi (miles).
“Consum. units”
Select “Consum. units” icon with
the knob 15-fig. 1and press it to
confirm. Rotate the knob 15-fig. 1
to change unit between l/100 km,
km/l and mpg (see previous specifi-
cations). Press the knob 15-fig. 1to
confirm.
“Celsius/Farhenheit”
The Celsius/Farhenheit function
enables to choose the required tem-
perature unit: °C (Celsius) or °F
(Farhenheit). To change setting, se-
lect and confirm “Celsius/ Farhen-
heit” by turning and pressing the
knob 16-fig. 1.
The two units are displayed alter-
nately each time the knob 16-fig. 1is
pressed.
SYSTEM VEHICLE DATE & TIME
LANGUAGE Units
Distance units
Consum. units
Change
°C
fig. 143
F0H4171g
116-123 Connect IDEA GB 17-01-2008 13:35 Pagina 120
Page 125 of 165
125
CONNECT NAV+
125Nero603 46 620 CONNECT CROMA ING
VOICE COMMANDS
Voice commands, identified as “key-
words”, that the system is able to rec-
ognize are organized according to four
increasing levels: 1st level, 2nd level,
3rd level, 4th level. 1st level keywords
activate the following main system
functions: Memo; Radio; CD player;
CD Changer; Navigator, Telephone.
When a 1st level keyword is pro-
nounced, the system will activate 2nd
level keywords; when a 2nd level key-
word is pronounced, the system will
activate 3rd level keywords; when a
3rd level keyword is pronounced, thesystem will activate 4th level key-
words.
If the user pronounces a 1st level
keyword, then the submenu relevant
to that command will remain active
until another 1st level keyword is giv-
en; the same rule applies for the oth-
er lower levels (2, 3 and 4).
If too much time passes between a
command and another of lower level
the system will invite the user to con-
tinue by voice message “Can I help
you?”.1st level keywords are the following:
– Memo
– Radio
– CD player
– CD changer
– Navigator
– Call
– Dial
– Redial
– PIN code
– Address book
– Abort.
REQUIRED FUNCTION
Memo (“Voice memo” function)
Read a message
Delete all messages
Go to next message
Go to previous message
Record memo
KEYWORDS - Summary
The following tables show the list /divided according to function) of voice commands (“keywords”) that the system can
receive.
“Memo” function
VOICE COMMANDS - KEYWORDS
1
stLEVEL
KEYWORDS
Memo
2ndLEVEL
KEYWORDS
Read
Delete
Next
Previous
Record
3rdLEVEL
KEYWORDS4thLEVEL
KEYWORDS
124-140 Connect IDEA GB 17-01-2008 13:37 Pagina 125
Page 148 of 165
148
CONNECT NAV+
The MY CAR mode enables to set
different car and CONNECT Nav+
system operating modes and parame-
ters.
Parameters and operating modes
have been grouped in the following
four areas:
– LANGUAGE
– DATE & TIME
– VEHICLE
– SYSTEM.
Every above area is then divided in
different sub-areas. Read carefully
through this chapter to learn any fea-
tures offered by CONNECT Nav+
system.
To enter MY CAR mode, when in
the MAIN screen, select MY CAR
mode using knob 15-fig. 1and con-
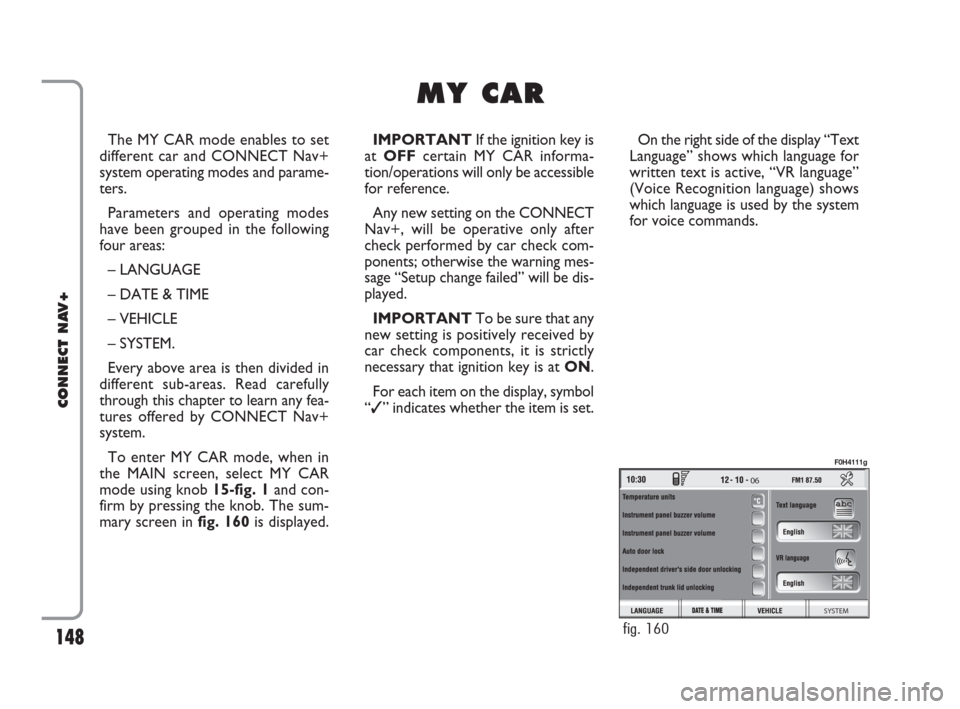
firm by pressing the knob. The sum-
mary screen infig. 160is displayed.IMPORTANTIf the ignition key is
at OFFcertain MY CAR informa-
tion/operations will only be accessible
for reference.
Any new setting on the CONNECT
Nav+, will be operative only after
check performed by car check com-
ponents; otherwise the warning mes-
sage “Setup change failed” will be dis-
played.
IMPORTANTTo be sure that any
new setting is positively received by
car check components, it is strictly
necessary that ignition key is at ON.
For each item on the display, symbol
“✓” indicates whether the item is set.On the right side of the display “Text
Language” shows which language for
written text is active, “VR language”
(Voice Recognition language) shows
which language is used by the system
for voice commands.
M M
Y Y
C C
A A
R R
06
SYSTEM
fig. 160
F0H4111g
148-158 Connect IDEA GB 15-02-2008 11:32 Pagina 148
Page 149 of 165
149
CONNECT NAV+
IMPORTANTSetting (whatever)
language will start the updating pro-
cedure for both the written text and
for voice commands and instructions.
The written text (strings) will be up-
dated immediately upon selecting the
language. To update voice command
and message language the Setup CD
shall be inserted. if the Setup CD is not
inserted when requested, the required
voice command and message language
will not be updated.
To change parameters and operating
modes, press keypad keys 16-fig. 1
under LANGUAGE, DATE & TIME,
VEHICLE or SYSTEM.
This operation will display the spe-
cific screen thus allowing the desired
operations.LANGUAGE
To display the relevant screen page,
press one of the keypad keys 16-
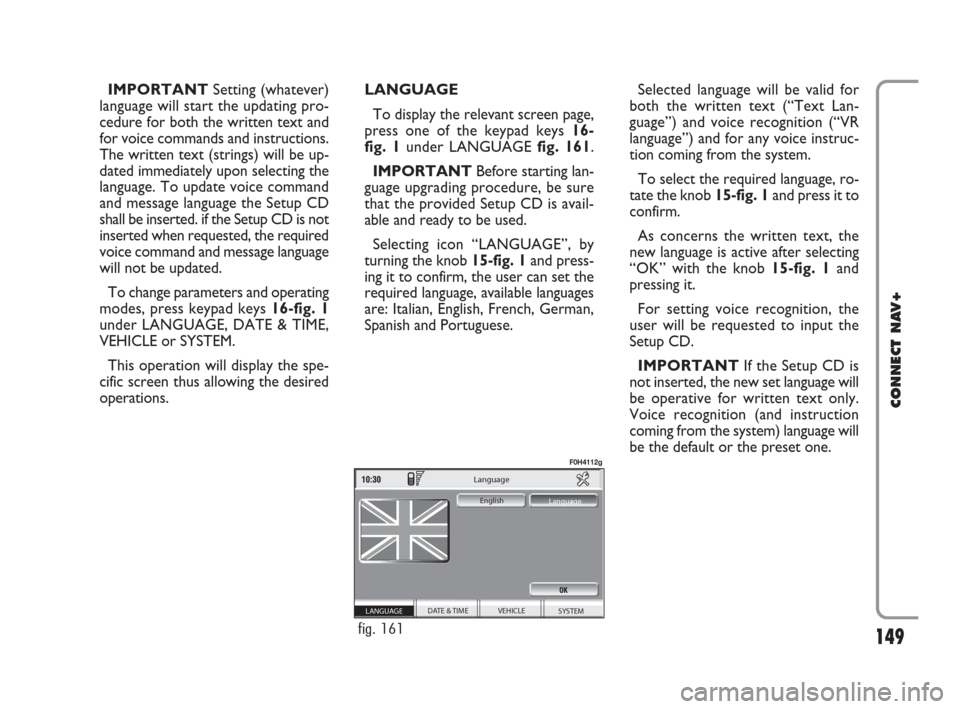
fig. 1under LANGUAGE fig. 161.
IMPORTANTBefore starting lan-
guage upgrading procedure, be sure
that the provided Setup CD is avail-
able and ready to be used.
Selecting icon “LANGUAGE”, by
turning the knob 15-fig. 1and press-
ing it to confirm, the user can set the
required language, available languages
are: Italian, English, French, German,
Spanish and Portuguese.Selected language will be valid for
both the written text (“Text Lan-
guage”) and voice recognition (“VR
language”) and for any voice instruc-
tion coming from the system.
To select the required language, ro-
tate the knob 15-fig. 1and press it to
confirm.
As concerns the written text, the
new language is active after selecting
“OK” with the knob 15-fig. 1and
pressing it.
For setting voice recognition, the
user will be requested to input the
Setup CD.
IMPORTANTIf the Setup CD is
not inserted, the new set language will
be operative for written text only.
Voice recognition (and instruction
coming from the system) language will
be the default or the preset one.
SYSTEM VEHICLE
DATE & TIME
Language
English
Language
LANGUAGE
fig. 161
F0H4112g
148-158 Connect IDEA GB 15-02-2008 11:32 Pagina 149