key FIAT IDEA 2008 1.G Owner's Manual
[x] Cancel search | Manufacturer: FIAT, Model Year: 2008, Model line: IDEA, Model: FIAT IDEA 2008 1.GPages: 210, PDF Size: 3.64 MB
Page 59 of 210
58
SAFETY
DEVICES
CORRECT USE
OF THE CAR
WARNING
LIGHTS AND
MESSAGES
IN AN
EMERGENCY
CAR
MAINTENANCE
TECHNICAL
SPECIFICATIONS
INDEX
DASHBOARD
AND CONTROLS
EXTERNAL LIGHTS
The left-hand lever includes the controls
for the external lights.
The external lights can only be switched
on when the ignition key is at MAR.
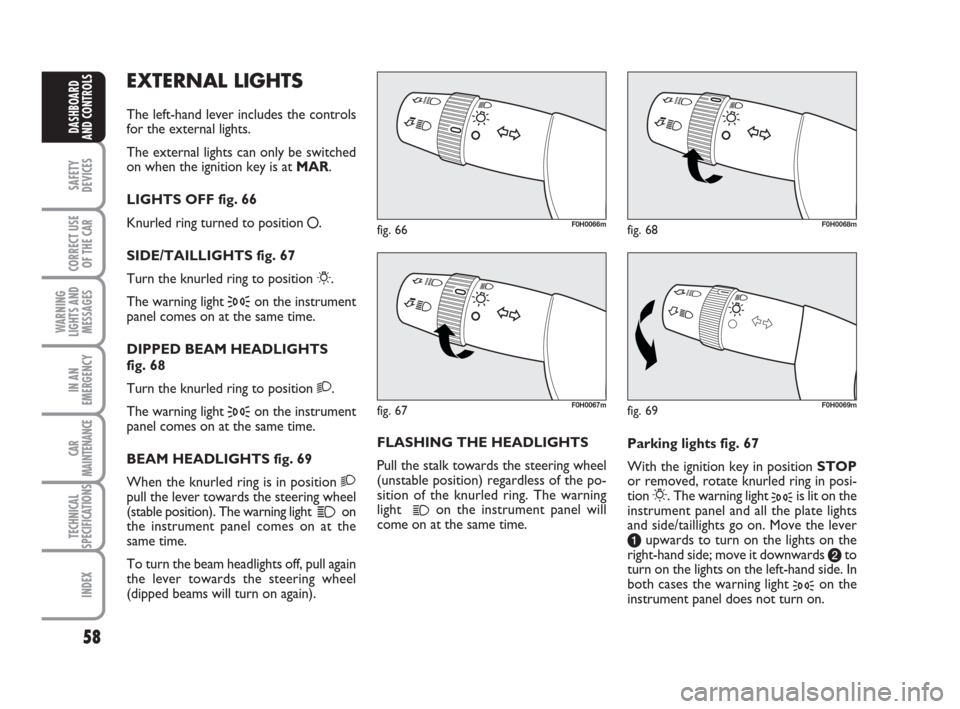
LIGHTS OFF fig. 66
Knurled ring turned to position
å.
SIDE/TAILLIGHTS fig. 67
Turn the knurled ring to position
6.
The warning light
3on the instrument
panel comes on at the same time.
DIPPED BEAM HEADLIGHTS
fig. 68
Turn the knurled ring to position 2.
The warning light
3on the instrument
panel comes on at the same time.
BEAM HEADLIGHTS fig. 69
When the knurled ring is in position 2
pull the lever towards the steering wheel
(stable position). The warning light
1on
the instrument panel comes on at the
same time.
To turn the beam headlights off, pull again
the lever towards the steering wheel
(dipped beams will turn on again).FLASHING THE HEADLIGHTS
Pull the stalk towards the steering wheel
(unstable position) regardless of the po-
sition of the knurled ring. The warning
light
1on the instrument panel will
come on at the same time.Parking lights fig. 67
With the ignition key in position STOP
or removed, rotate knurled ring in posi-
tion 6. The warning light 3is lit on the
instrument panel and all the plate lights
and side/taillights go on. Move the lever
aupwards to turn on the lights on the
right-hand side; move it downwards bto
turn on the lights on the left-hand side. In
both cases the warning light
3on the
instrument panel does not turn on.
fig. 66F0H0066m
fig. 69F0H0069m
fig. 68F0H0068m
fig. 67F0H0067m
036-092 idea GB 1 ed 10-07-2008 16:12 Pagina 58
Page 60 of 210
59
SAFETY
DEVICES
CORRECT USE
OF THE CAR
WARNING
LIGHTS AND
MESSAGES
IN AN
EMERGENCY
CAR
MAINTENANCE
TECHNICAL
SPECIFICATIONS
INDEX
DASHBOARD
AND CONTROLS
fig. 70F0H0071mfig. 71F0H0070mfig. 72F0H0072m
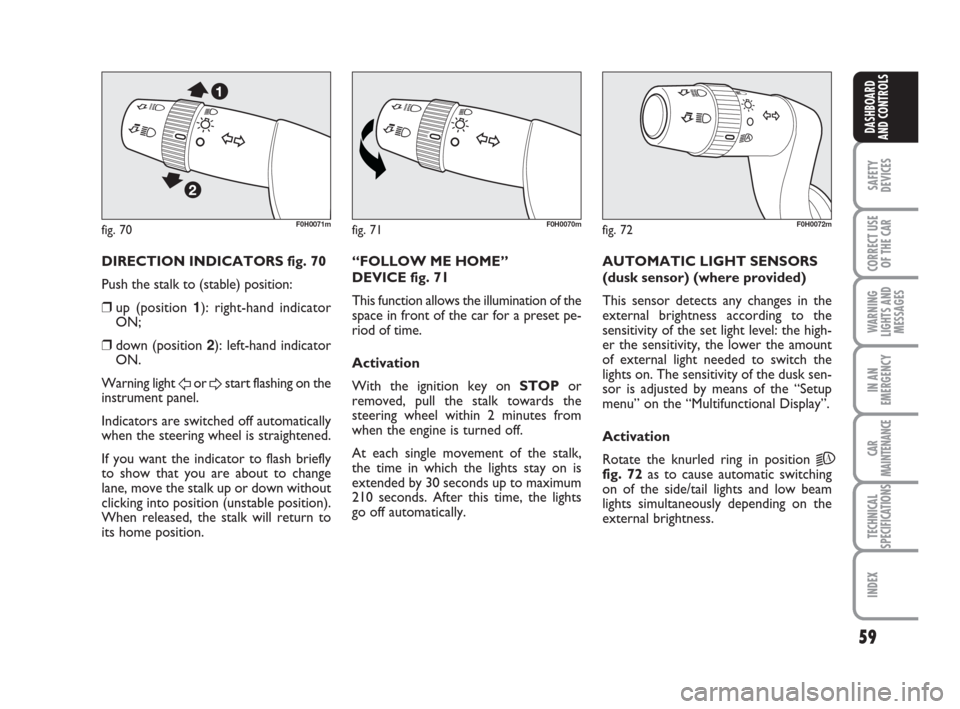
DIRECTION INDICATORS fig. 70
Push the stalk to (stable) position:
❒up (position 1): right-hand indicator
ON;
❒down (position 2): left-hand indicator
ON.
Warning light
For Dstart flashing on the
instrument panel.
Indicators are switched off automatically
when the steering wheel is straightened.
If you want the indicator to flash briefly
to show that you are about to change
lane, move the stalk up or down without
clicking into position (unstable position).
When released, the stalk will return to
its home position.“FOLLOW ME HOME”
DEVICE fig. 71
This function allows the illumination of the
space in front of the car for a preset pe-
riod of time.
Activation
With the ignition key on STOPor
removed, pull the stalk towards the
steering wheel within 2 minutes from
when the engine is turned off.
At each single movement of the stalk,
the time in which the lights stay on is
extended by 30 seconds up to maximum
210 seconds. After this time, the lights
go off automatically. AUTOMATIC LIGHT SENSORS
(dusk sensor) (where provided)
This sensor detects any changes in the
external brightness according to the
sensitivity of the set light level: the high-
er the sensitivity, the lower the amount
of external light needed to switch the
lights on. The sensitivity of the dusk sen-
sor is adjusted by means of the “Setup
menu” on the “Multifunctional Display”.
Activation
Rotate the knurled ring in position
2A
fig. 72as to cause automatic switching
on of the side/tail lights and low beam
lights simultaneously depending on the
external brightness.
036-092 idea GB 1 ed 10-07-2008 16:12 Pagina 59
Page 61 of 210
60
SAFETY
DEVICES
CORRECT USE
OF THE CAR
WARNING
LIGHTS AND
MESSAGES
IN AN
EMERGENCY
CAR
MAINTENANCE
TECHNICAL
SPECIFICATIONS
INDEX
DASHBOARD
AND CONTROLS
WINDOW WASHING
WINDSCREEN
WASHER/WIPER
The device can work only when the igni-
tion key is on MAR.
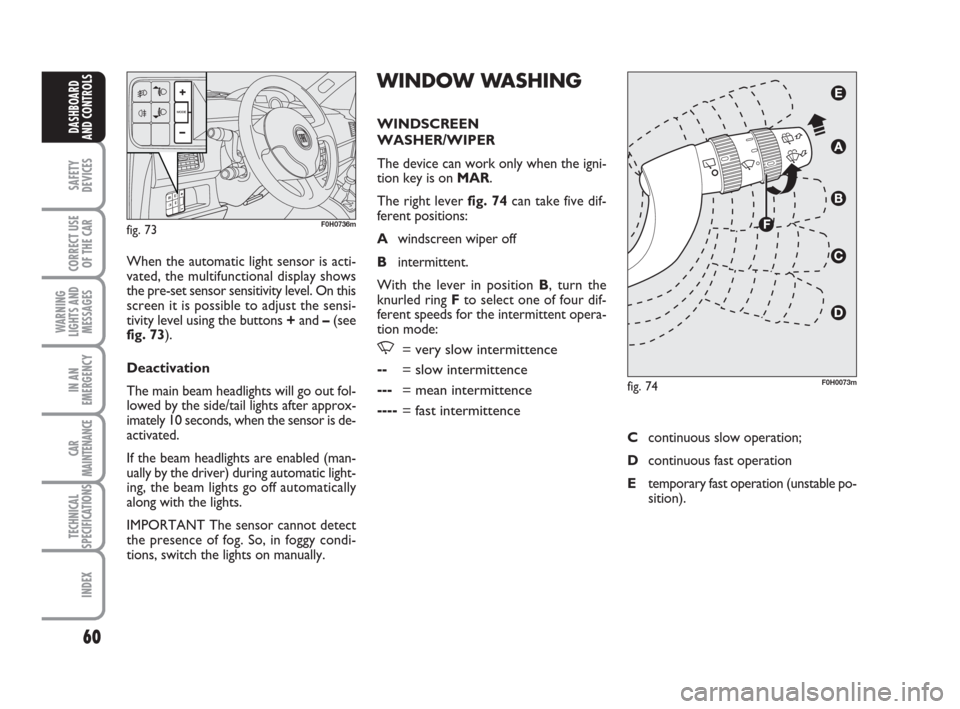
The right lever fig. 74can take five dif-
ferent positions:
Awindscreen wiper off
Bintermittent.
With the lever in position B, turn the
knurled ring Fto select one of four dif-
ferent speeds for the intermittent opera-
tion mode:
,= very slow intermittence
--= slow intermittence
---= mean intermittence
----= fast intermittence
When the automatic light sensor is acti-
vated, the multifunctional display shows
the pre-set sensor sensitivity level. On this
screen it is possible to adjust the sensi-
tivity level using the buttons +and –(see
fig. 73).
Deactivation
The main beam headlights will go out fol-
lowed by the side/tail lights after approx-
imately 10 seconds, when the sensor is de-
activated.
If the beam headlights are enabled (man-
ually by the driver) during automatic light-
ing, the beam lights go off automatically
along with the lights.
IMPORTANT The sensor cannot detect
the presence of fog. So, in foggy condi-
tions, switch the lights on manually.
fig. 73F0H0736m
fig. 74F0H0073m
Ccontinuous slow operation;
Dcontinuous fast operation
Etemporary fast operation (unstable po-
sition).
036-092 idea GB 1 ed 10-07-2008 16:12 Pagina 60
Page 63 of 210
62
SAFETY
DEVICES
CORRECT USE
OF THE CAR
WARNING
LIGHTS AND
MESSAGES
IN AN
EMERGENCY
CAR
MAINTENANCE
TECHNICAL
SPECIFICATIONS
INDEX
DASHBOARD
AND CONTROLS
The sensor reactivation is signalled by a
windscreen wiper “stroke”.
The rain sensor is able to recognize and
automatically adjust itself in the presence
of the following particular conditions:
❒impurities on the controlled surface
(salt, dirt, etc.);
❒difference between day and night.
Deactivation
Change the stalk knurled ring position
from Bor turn the ignition key to STOP.
At the next start-up (key at MAR), the
sensor will not be reactivated even if the
stalk is at B. To activate the sensor, move
the stalk to position Aor Cand then to
position Bor turn the sensitivity adjust-
ment knurled ring.
fig. 76F0H0073m
Streaks of water may cause
unnecessary blade moving.
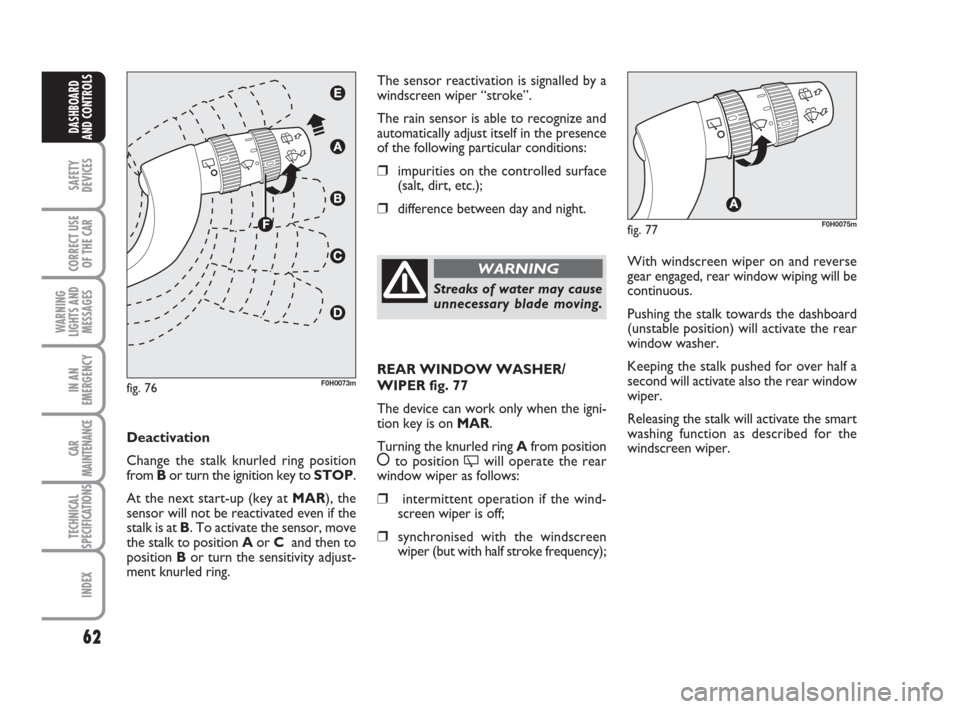
WARNINGWith windscreen wiper on and reverse
gear engaged, rear window wiping will be
continuous.
Pushing the stalk towards the dashboard
(unstable position) will activate the rear
window washer.
Keeping the stalk pushed for over half a
second will activate also the rear window
wiper.
Releasing the stalk will activate the smart
washing function as described for the
windscreen wiper.
fig. 77F0H0075m
REAR WINDOW WASHER/
WIPER fig. 77
The device can work only when the igni-
tion key is on MAR.
Turning the knurled ring Afrom position
åto position 'will operate the rear
window wiper as follows:
❒intermittent operation if the wind-
screen wiper is off;
❒synchronised with the windscreen
wiper (but with half stroke frequency);
036-092 idea GB 1 ed 10-07-2008 16:12 Pagina 62
Page 65 of 210
64
SAFETY
DEVICES
CORRECT USE
OF THE CAR
WARNING
LIGHTS AND
MESSAGES
IN AN
EMERGENCY
CAR
MAINTENANCE
TECHNICAL
SPECIFICATIONS
INDEX
DASHBOARD
AND CONTROLS
TO REDUCE MEMORISED
SPEED
The speed memorised can be increased in
two ways:
❒disengaging the device and then
memorising the new speed;
or
❒moving the stalk downwards (–) until
reaching the new speed which will be
memorised automatically.
Each operation of the stalk will corre-
spond to a slight reduction in speed (about
1 km/h), while keeping the stalk down-
wards continuously will correspond to a
continuous speed reduction.
DEVICE DISENGAGEMENT
Turn the ring A-fig. 78to OFFor the ig-
nition key to STOP. The device is auto-
matically deactivated also in one of the fol-
lowing cases:
❒pressing the brake or clutch pedal.
In the event of device mal-
function or failure, turn the
knurled ring A to OFF and contact a
Fiat Dealership after checking the
protective fuse integrity.
WARNING
CEILING LIGHTS
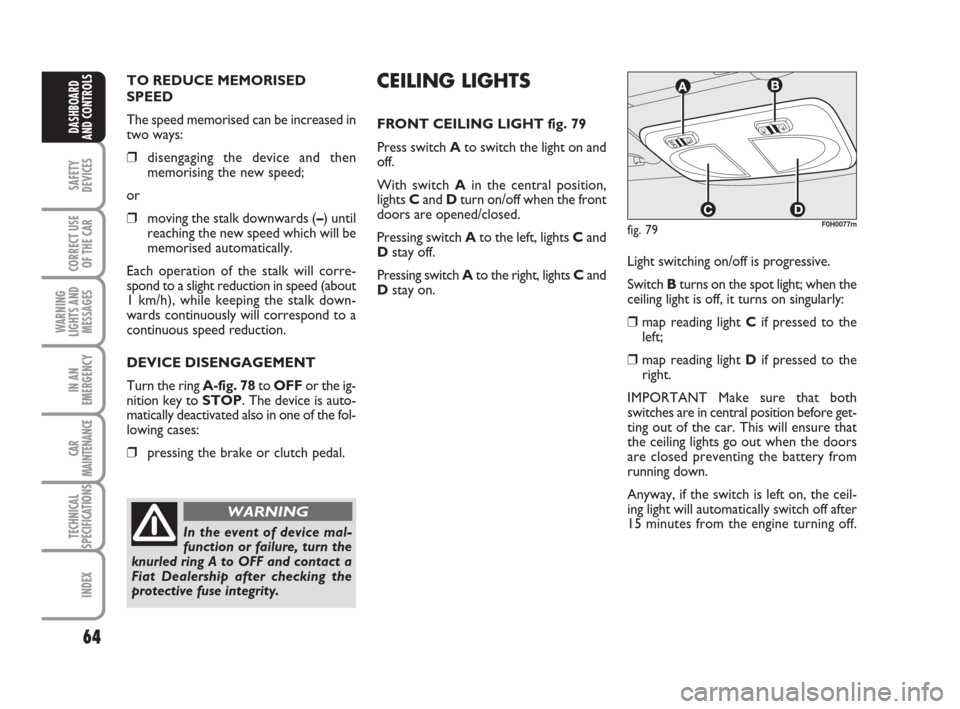
FRONT CEILING LIGHT fig. 79
Press switch Ato switch the light on and
off.
With switch Ain the central position,
lights Cand Dturn on/off when the front
doors are opened/closed.
Pressing switch Ato the left, lights Cand
Dstay off.
Pressing switch Ato the right, lights Cand
Dstay on.
fig. 79F0H0077m
Light switching on/off is progressive.
Switch Bturns on the spot light; when the
ceiling light is off, it turns on singularly:
❒map reading light Cif pressed to the
left;
❒map reading light Dif pressed to the
right.
IMPORTANT Make sure that both
switches are in central position before get-
ting out of the car. This will ensure that
the ceiling lights go out when the doors
are closed preventing the battery from
running down.
Anyway, if the switch is left on, the ceil-
ing light will automatically switch off after
15 minutes from the engine turning off.
036-092 idea GB 1 ed 10-07-2008 16:12 Pagina 64
Page 66 of 210
65
SAFETY
DEVICES
CORRECT USE
OF THE CAR
WARNING
LIGHTS AND
MESSAGES
IN AN
EMERGENCY
CAR
MAINTENANCE
TECHNICAL
SPECIFICATIONS
INDEX
DASHBOARD
AND CONTROLS
Ceiling light timing
Two timing strategies are available in or-
der to facilitate getting in and out of the
car, especially at night in dark areas:
T
IMING FOR GETTING INTO THE CAR
The ceiling lights will come on as follows:
❒for about 10 seconds when a door is
unlocked;
❒for about 3 minutes when a door is
opened;
❒for about 10 seconds when a door is
closed (within the 3 minutes).
Timing will be stopped when the ignition
key is turned to MAR.
T
IMING FOR GETTING OUT OF THE CAR
The ceiling lights will come on as follows
when the key is removed from the igni-
tion switch:
❒for about 10 seconds within 2 min-
utes after stopping the engine;
❒for about 3 minutes when a door is
opened;
❒for about 10 seconds when a door is
closed (within the three minutes).
The timeout will automatically end when
the doors are locked.
fig. 80F0H0078mfig. 81F0H0079m
fig. 82F0H0254m
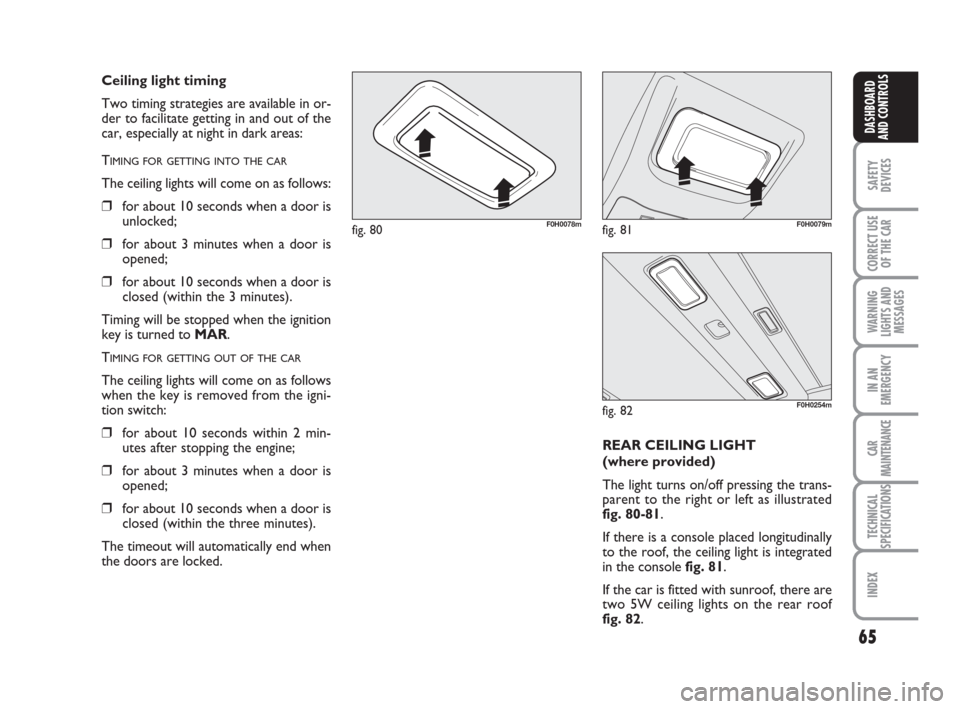
REAR CEILING LIGHT
(where provided)
The light turns on/off pressing the trans-
parent to the right or left as illustrated
fig. 80-81.
If there is a console placed longitudinally
to the roof, the ceiling light is integrated
in the console fig. 81.
If the car is fitted with sunroof, there are
two 5W ceiling lights on the rear roof
fig. 82.
036-092 idea GB 1 ed 10-07-2008 16:12 Pagina 65
Page 67 of 210
66
SAFETY
DEVICES
CORRECT USE
OF THE CAR
WARNING
LIGHTS AND
MESSAGES
IN AN
EMERGENCY
CAR
MAINTENANCE
TECHNICAL
SPECIFICATIONS
INDEX
DASHBOARD
AND CONTROLS
CONTROLS
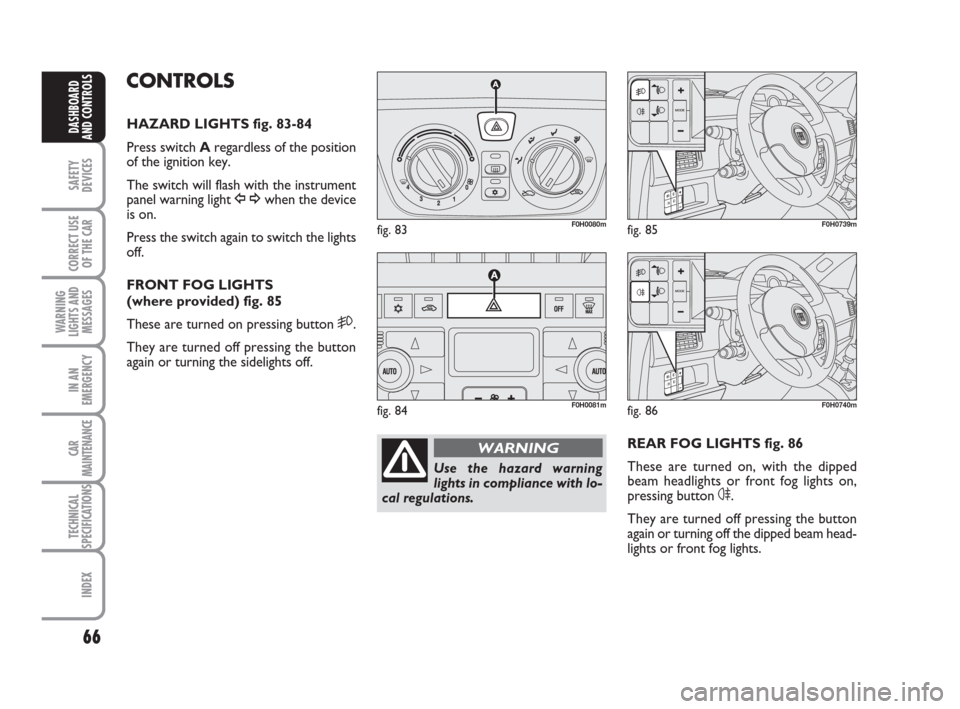
HAZARD LIGHTS fig. 83-84
Press switch Aregardless of the position
of the ignition key.
The switch will flash with the instrument
panel warning light
Î¥when the device
is on.
Press the switch again to switch the lights
off.
FRONT FOG LIGHTS
(where provided) fig. 85
These are turned on pressing button
5.
They are turned off pressing the button
again or turning the sidelights off.
REAR FOG LIGHTS fig. 86
These are turned on, with the dipped
beam headlights or front fog lights on,
pressing button
4.
They are turned off pressing the button
again or turning off the dipped beam head-
lights or front fog lights.
fig. 83F0H0080m
fig. 84F0H0081m
fig. 85F0H0739m
Use the hazard warning
lights in compliance with lo-
cal regulations.
WARNING
fig. 86F0H0740m
036-092 idea GB 1 ed 10-07-2008 16:12 Pagina 66
Page 68 of 210
67
SAFETY
DEVICES
CORRECT USE
OF THE CAR
WARNING
LIGHTS AND
MESSAGES
IN AN
EMERGENCY
CAR
MAINTENANCE
TECHNICAL
SPECIFICATIONS
INDEX
DASHBOARD
AND CONTROLS
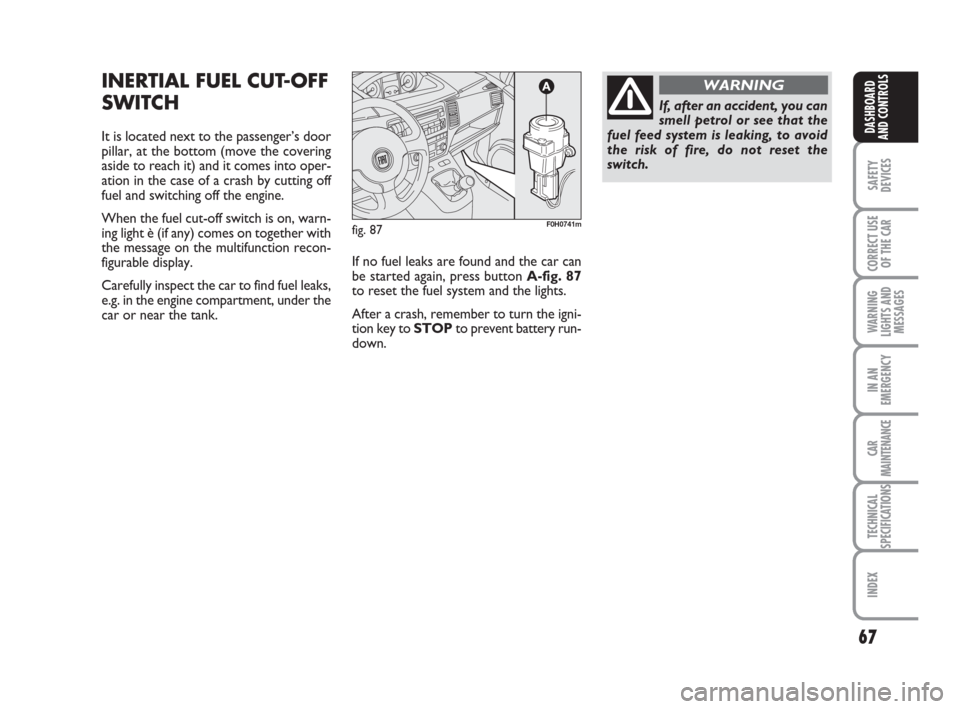
INERTIAL FUEL CUT-OFF
SWITCH
It is located next to the passenger’s door
pillar, at the bottom (move the covering
aside to reach it) and it comes into oper-
ation in the case of a crash by cutting off
fuel and switching off the engine.
When the fuel cut-off switch is on, warn-
ing light è (if any) comes on together with
the message on the multifunction recon-
figurable display.
Carefully inspect the car to find fuel leaks,
e.g. in the engine compartment, under the
car or near the tank.If no fuel leaks are found and the car can
be started again, press button A-fig. 87
to reset the fuel system and the lights.
After a crash, remember to turn the igni-
tion key to STOPto prevent battery run-
down.
fig. 87F0H0741m
If, after an accident, you can
smell petrol or see that the
fuel feed system is leaking, to avoid
the risk of fire, do not reset the
switch.
WARNING
036-092 idea GB 1 ed 10-07-2008 16:12 Pagina 67
Page 71 of 210
70
SAFETY
DEVICES
CORRECT USE
OF THE CAR
WARNING
LIGHTS AND
MESSAGES
IN AN
EMERGENCY
CAR
MAINTENANCE
TECHNICAL
SPECIFICATIONS
INDEX
DASHBOARD
AND CONTROLS
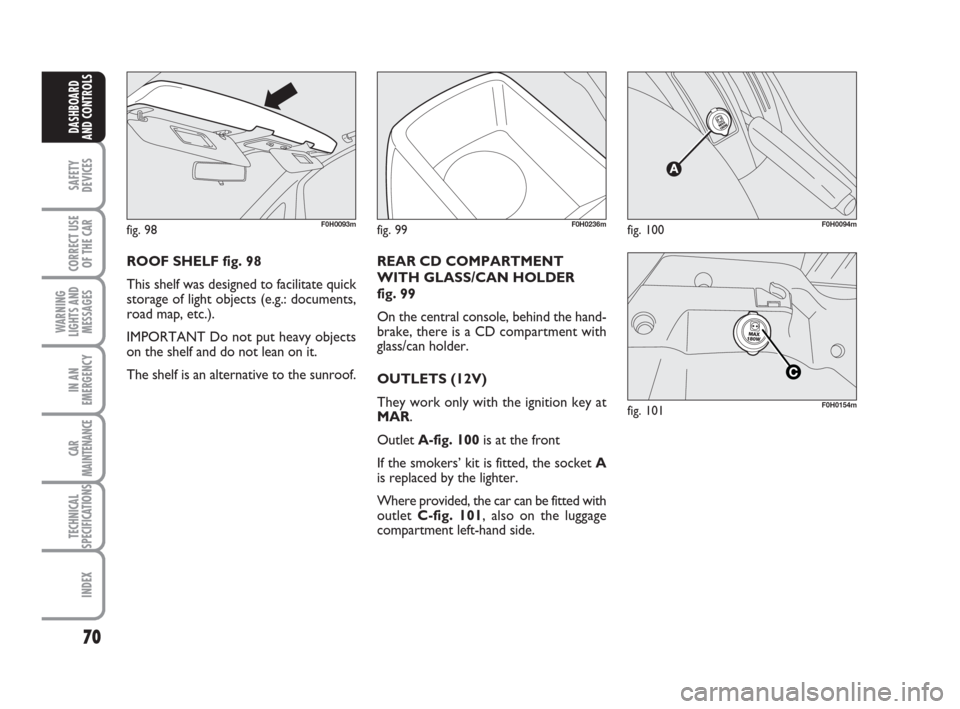
fig. 98F0H0093m
ROOF SHELF fig. 98
This shelf was designed to facilitate quick
storage of light objects (e.g.: documents,
road map, etc.).
IMPORTANT Do not put heavy objects
on the shelf and do not lean on it.
The shelf is an alternative to the sunroof.
fig. 99F0H0236mfig. 100F0H0094m
REAR CD COMPARTMENT
WITH GLASS/CAN HOLDER
fig. 99
On the central console, behind the hand-
brake, there is a CD compartment with
glass/can holder.
OUTLETS (12V)
They work only with the ignition key at
MAR.
Outlet A-fig. 100is at the front
If the smokers’ kit is fitted, the socket A
is replaced by the lighter.
Where provided, the car can be fitted with
outlet C-fig. 101, also on the luggage
compartment left-hand side.
fig. 101F0H0154m
036-092 idea GB 1 ed 10-07-2008 16:12 Pagina 70
Page 72 of 210
71
SAFETY
DEVICES
CORRECT USE
OF THE CAR
WARNING
LIGHTS AND
MESSAGES
IN AN
EMERGENCY
CAR
MAINTENANCE
TECHNICAL
SPECIFICATIONS
INDEX
DASHBOARD
AND CONTROLS
SMOKER’S KIT
(where provided)
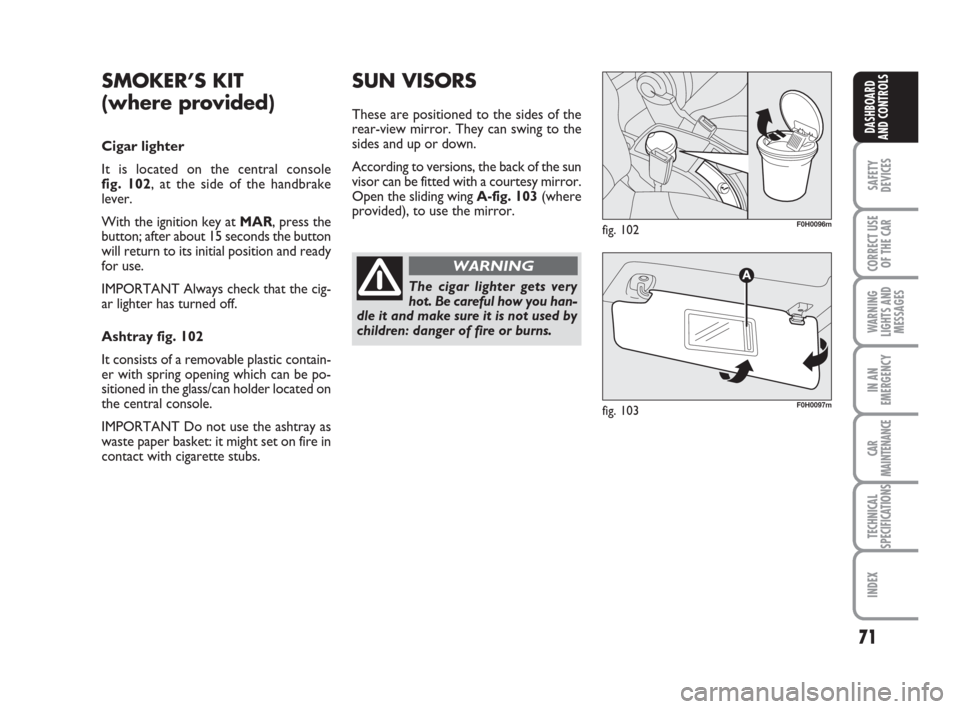
Cigar lighter
It is located on the central console
fig. 102, at the side of the handbrake
lever.
With the ignition key at MAR, press the
button; after about 15 seconds the button
will return to its initial position and ready
for use.
IMPORTANT Always check that the cig-
ar lighter has turned off.
Ashtray fig. 102
It consists of a removable plastic contain-
er with spring opening which can be po-
sitioned in the glass/can holder located on
the central console.
IMPORTANT Do not use the ashtray as
waste paper basket: it might set on fire in
contact with cigarette stubs.
SUN VISORS
These are positioned to the sides of the
rear-view mirror. They can swing to the
sides and up or down.
According to versions, the back of the sun
visor can be fitted with a courtesy mirror.
Open the sliding wing A-fig. 103(where
provided), to use the mirror.
fig. 102F0H0096m
fig. 103F0H0097m
The cigar lighter gets very
hot. Be careful how you han-
dle it and make sure it is not used by
children: danger of fire or burns.
WARNING
036-092 idea GB 1 ed 10-07-2008 16:12 Pagina 71