ECU FIAT IDEA 2009 1.G Owners Manual
[x] Cancel search | Manufacturer: FIAT, Model Year: 2009, Model line: IDEA, Model: FIAT IDEA 2009 1.GPages: 210, PDF Size: 3.62 MB
Page 11 of 210
10
SAFETY
STARTING
AND DRIVING
WARNING
LIGHTS AND
MESSAGES
IN AN
EMERGENCY
MAINTENANCE
AND CARE
TECHNICAL
SPECIFICATIONS
ALPHABETICAL
INDEX
DASHBOARD
AND CONTROLS
KEY KIT AND DOOR
LOCKING SYSTEM
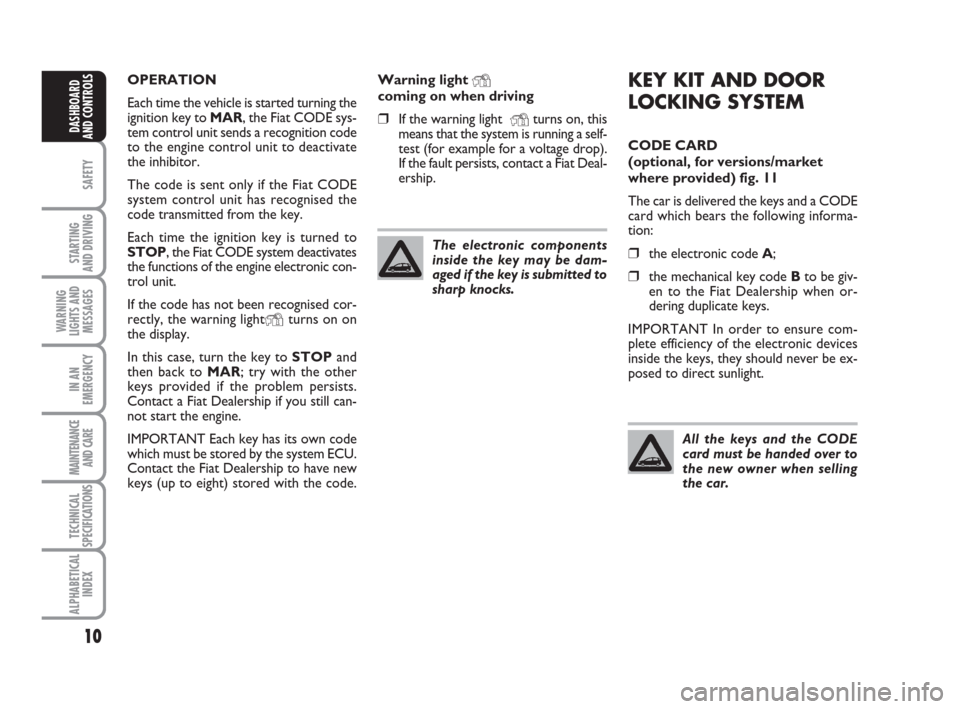
CODE CARD
(optional, for versions/market
where provided) fig. 11
The car is delivered the keys and a CODE
card which bears the following informa-
tion:
❒the electronic code A;
❒the mechanical key code Bto be giv-
en to the Fiat Dealership when or-
dering duplicate keys.
IMPORTANT In order to ensure com-
plete efficiency of the electronic devices
inside the keys, they should never be ex-
posed to direct sunlight. OPERATION
Each time the vehicle is started turning the
ignition key to MAR, the Fiat CODE sys-
tem control unit sends a recognition code
to the engine control unit to deactivate
the inhibitor.
The code is sent only if the Fiat CODE
system control unit has recognised the
code transmitted from the key.
Each time the ignition key is turned to
STOP, the Fiat CODE system deactivates
the functions of the engine electronic con-
trol unit.
If the code has not been recognised cor-
rectly, the warning light
Yturns on on
the display.
In this case, turn the key to STOPand
then back to MAR; try with the other
keys provided if the problem persists.
Contact a Fiat Dealership if you still can-
not start the engine.
IMPORTANT Each key has its own code
which must be stored by the system ECU.
Contact the Fiat Dealership to have new
keys (up to eight) stored with the code.Warning light
Ycoming on when driving
❒If the warning light Yturns on, this
means that the system is running a self-
test (for example for a voltage drop).
If the fault persists, contact a Fiat Deal-
ership.
The electronic components
inside the key may be dam-
aged if the key is submitted to
sharp knocks.
All the keys and the CODE
card must be handed over to
the new owner when selling
the car.
Page 38 of 210
37
SAFETY
STARTING
AND DRIVING
WARNING
LIGHTS AND
MESSAGES
IN AN
EMERGENCY
MAINTENANCE
AND CARE
TECHNICAL
SPECIFICATIONS
ALPHABETICAL
INDEX
DASHBOARD
AND CONTROLS
fig. 33F0H0041mfig. 34F0H0042m
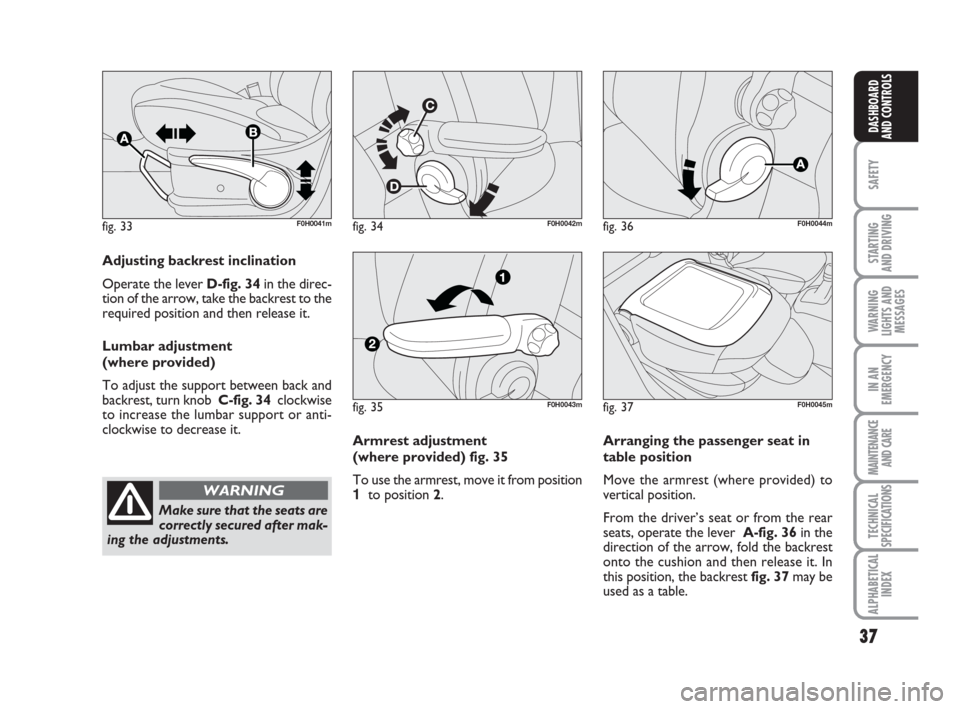
Adjusting backrest inclination
Operate the lever D-fig. 34in the direc-
tion of the arrow, take the backrest to the
required position and then release it.
Lumbar adjustment
(where provided)
To adjust the support between back and
backrest, turn knob C-fig. 34clockwise
to increase the lumbar support or anti-
clockwise to decrease it.
Make sure that the seats are
correctly secured after mak-
ing the adjustments.
WARNING
fig. 35F0H0043m
fig. 36F0H0044m
Arranging the passenger seat in
table position
Move the armrest (where provided) to
vertical position.
From the driver’s seat or from the rear
seats, operate the lever A-fig. 36in the
direction of the arrow, fold the backrest
onto the cushion and then release it. In
this position, the backrest fig. 37 may be
used as a table. Armrest adjustment
(where provided) fig. 35
To use the armrest, move it from position
1to position 2.
fig. 37F0H0045m
Page 40 of 210
39
SAFETY
STARTING
AND DRIVING
WARNING
LIGHTS AND
MESSAGES
IN AN
EMERGENCY
MAINTENANCE
AND CARE
TECHNICAL
SPECIFICATIONS
ALPHABETICAL
INDEX
DASHBOARD
AND CONTROLS
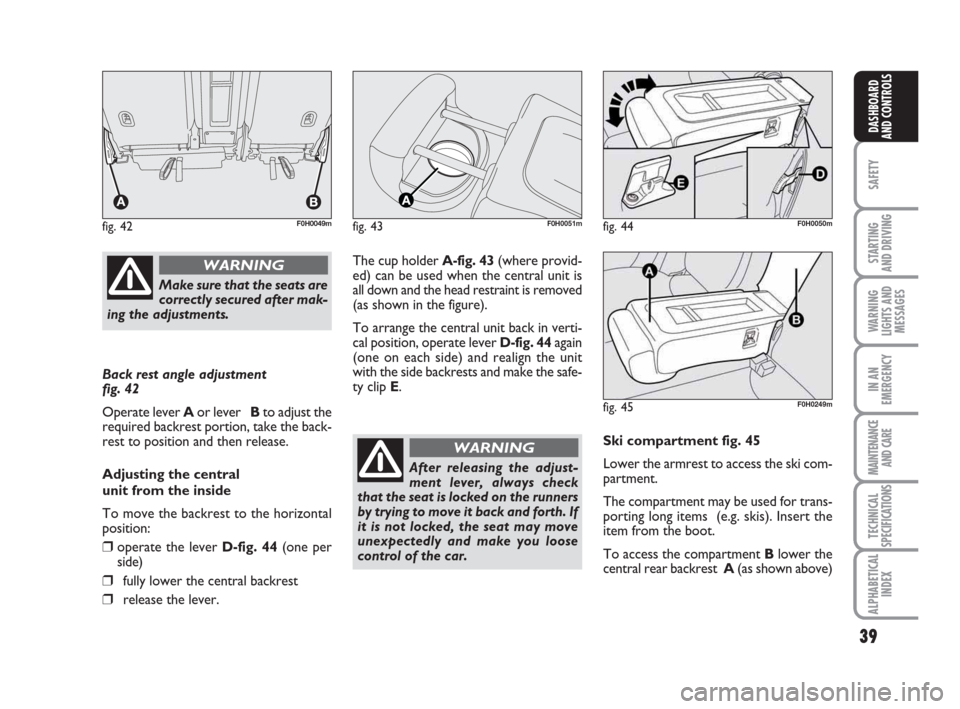
Back rest angle adjustment
fig. 42
Operate lever Aor lever Bto adjust the
required backrest portion, take the back-
rest to position and then release.
Adjusting the central
unit from the inside
To move the backrest to the horizontal
position:
❒operate the lever D-fig. 44 (one per
side)
❒fully lower the central backrest
❒release the lever.The cup holder A-fig. 43(where provid-
ed) can be used when the central unit is
all down and the head restraint is removed
(as shown in the figure).
To arrange the central unit back in verti-
cal position, operate lever D-fig. 44again
(one on each side) and realign the unit
with the side backrests and make the safe-
ty clip E.
fig. 42F0H0049mfig. 43F0H0051mfig. 44F0H0050m
Make sure that the seats are
correctly secured after mak-
ing the adjustments.
WARNING
After releasing the adjust-
ment lever, always check
that the seat is locked on the runners
by trying to move it back and forth. If
it is not locked, the seat may move
unexpectedly and make you loose
control of the car.
WARNINGSki compartment fig. 45
Lower the armrest to access the ski com-
partment.
The compartment may be used for trans-
porting long items (e.g. skis). Insert the
item from the boot.
To access the compartment Blower the
central rear backrest A(as shown above)
fig. 45F0H0249m
Page 41 of 210
40
SAFETY
STARTING
AND DRIVING
WARNING
LIGHTS AND
MESSAGES
IN AN
EMERGENCY
MAINTENANCE
AND CARE
TECHNICAL
SPECIFICATIONS
ALPHABETICAL
INDEX
DASHBOARD
AND CONTROLS
For maximum safety, keep
the back of your seat up-
right, lean back into it and make sure
the seat belt fits closely across your
hips.
WARNING
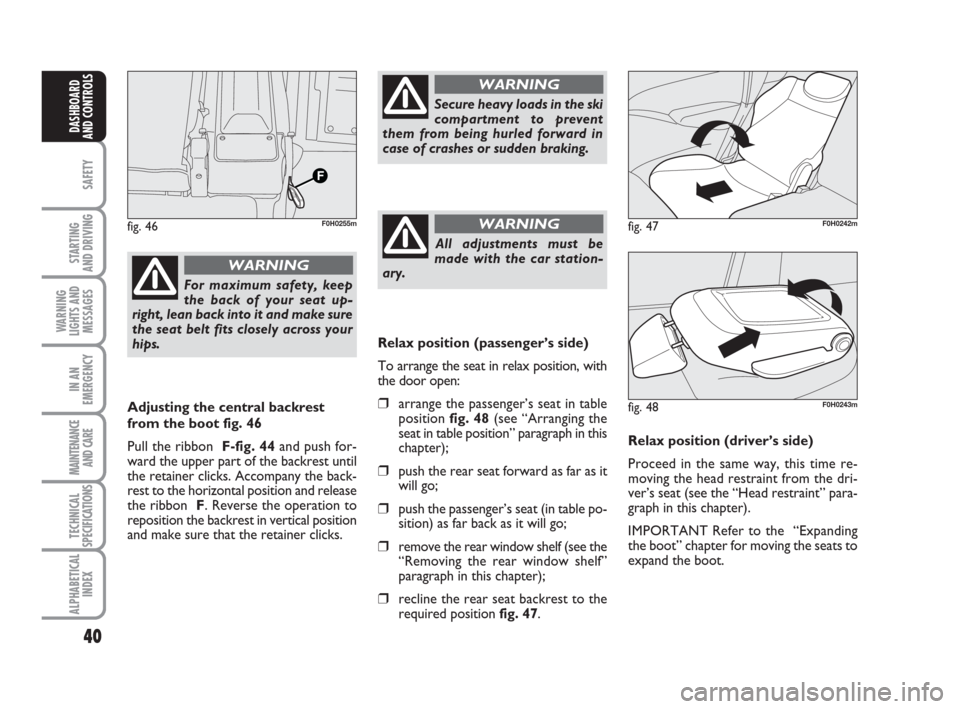
Adjusting the central backrest
from the boot fig. 46
Pull the ribbon F-fig. 44and push for-
ward the upper part of the backrest until
the retainer clicks. Accompany the back-
rest to the horizontal position and release
the ribbon F. Reverse the operation to
reposition the backrest in vertical position
and make sure that the retainer clicks.
Secure heavy loads in the ski
compartment to prevent
them from being hurled forward in
case of crashes or sudden braking.
WARNING
All adjustments must be
made with the car station-
ary.
WARNINGfig. 46F0H0255m
Relax position (passenger’s side)
To arrange the seat in relax position, with
the door open:
❒arrange the passenger’s seat in table
position fig. 48(see “Arranging the
seat in table position” paragraph in this
chapter);
❒push the rear seat forward as far as it
will go;
❒push the passenger’s seat (in table po-
sition) as far back as it will go;
❒remove the rear window shelf (see the
“Removing the rear window shelf”
paragraph in this chapter);
❒recline the rear seat backrest to the
required position fig. 47.Relax position (driver’s side)
Proceed in the same way, this time re-
moving the head restraint from the dri-
ver’s seat (see the “Head restraint” para-
graph in this chapter).
IMPORTANT Refer to the “Expanding
the boot” chapter for moving the seats to
expand the boot.
fig. 47F0H0242m
fig. 48F0H0243m
Page 101 of 210
100
STARTING
AND DRIVING
WARNING
LIGHTS AND
MESSAGES
IN AN
EMERGENCY
MAINTENANCE
AND CARE
TECHNICAL
SPECIFICATIONS
ALPHABETICAL
INDEX
DASHBOARD
AND
CONTROLS
SAFETY
SEVERE DANGER If you
need to carry a baby on the
front passenger seat in a
cradle restraint system fa-
cing backwards, the passen-
ger side airbags (front and
side bags, where provided) must be
deactivated using the setup menu.
Check the warning light on the in-
strument panel. Move the passenger
seat as far back as possible to avoid
contact between the child seat and
the dashboard.
WARNING
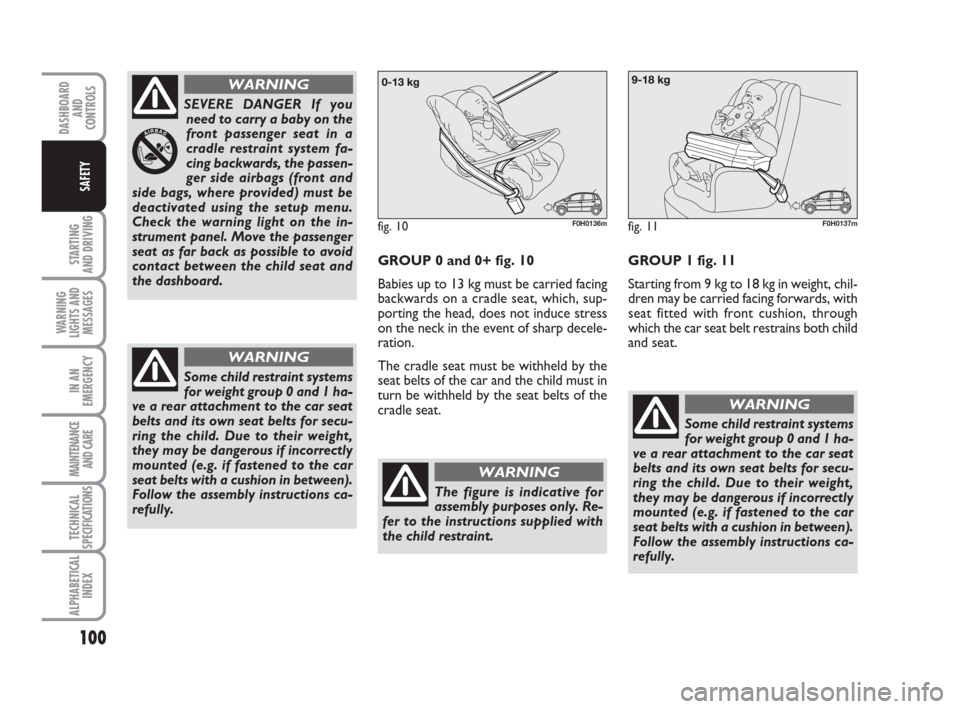
GROUP 0 and 0+ fig. 10
Babies up to 13 kg must be carried facing
backwards on a cradle seat, which, sup-
porting the head, does not induce stress
on the neck in the event of sharp decele-
ration.
The cradle seat must be withheld by the
seat belts of the car and the child must in
turn be withheld by the seat belts of the
cradle seat.
fig. 10F0H0136m
The figure is indicative for
assembly purposes only. Re-
fer to the instructions supplied with
the child restraint.
WARNING
Some child restraint systems
for weight group 0 and 1 ha-
ve a rear attachment to the car seat
belts and its own seat belts for secu-
ring the child. Due to their weight,
they may be dangerous if incorrectly
mounted (e.g. if fastened to the car
seat belts with a cushion in between).
Follow the assembly instructions ca-
refully.
WARNING
fig. 11F0H0137m
GROUP 1 fig. 11
Starting from 9 kg to 18 kg in weight, chil-
dren may be carried facing forwards, with
seat fitted with front cushion, through
which the car seat belt restrains both child
and seat.
Some child restraint systems
for weight group 0 and 1 ha-
ve a rear attachment to the car seat
belts and its own seat belts for secu-
ring the child. Due to their weight,
they may be dangerous if incorrectly
mounted (e.g. if fastened to the car
seat belts with a cushion in between).
Follow the assembly instructions ca-
refully.
WARNING
Page 102 of 210
101
STARTING
AND DRIVING
WARNING
LIGHTS AND
MESSAGES
IN AN
EMERGENCY
MAINTENANCE
AND CARE
TECHNICAL
SPECIFICATIONS
ALPHABETICAL
INDEX
DASHBOARD
AND
CONTROLS
SAFETY
fig. 12F0H0138m
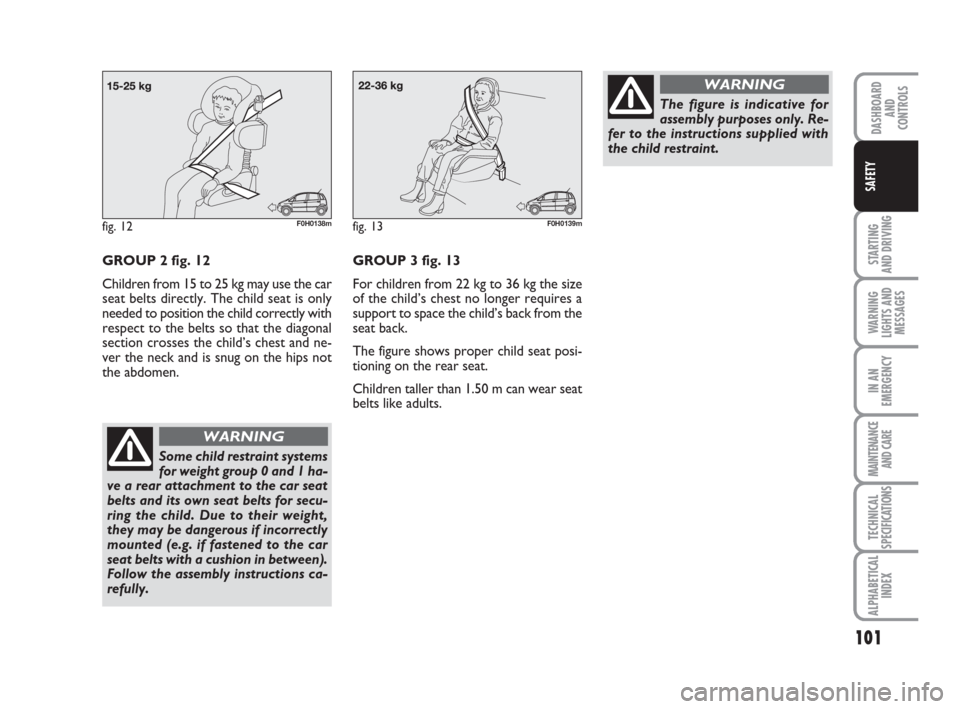
GROUP 2 fig. 12
Children from 15 to 25 kg may use the car
seat belts directly. The child seat is only
needed to position the child correctly with
respect to the belts so that the diagonal
section crosses the child’s chest and ne-
ver the neck and is snug on the hips not
the abdomen.
Some child restraint systems
for weight group 0 and 1 ha-
ve a rear attachment to the car seat
belts and its own seat belts for secu-
ring the child. Due to their weight,
they may be dangerous if incorrectly
mounted (e.g. if fastened to the car
seat belts with a cushion in between).
Follow the assembly instructions ca-
refully.
WARNING
fig. 13F0H0139m
The figure is indicative for
assembly purposes only. Re-
fer to the instructions supplied with
the child restraint.
WARNING
GROUP 3 fig. 13
For children from 22 kg to 36 kg the size
of the child’s chest no longer requires a
support to space the child’s back from the
seat back.
The figure shows proper child seat posi-
tioning on the rear seat.
Children taller than 1.50 m can wear seat
belts like adults.
Page 105 of 210
104
STARTING
AND DRIVING
WARNING
LIGHTS AND
MESSAGES
IN AN
EMERGENCY
MAINTENANCE
AND CARE
TECHNICAL
SPECIFICATIONS
ALPHABETICAL
INDEX
DASHBOARD
AND
CONTROLS
SAFETY
fig. 15F0H0140m
Fit the child seat when the
car is stationary. The child
seat is correctly anchored to the
brackets when you hear the click. Fol-
low the instructions for assembly, di-
sassembly and positioning that the
manufacturer must supply with the
child seat.
WARNING
fig. 14F0H0019m
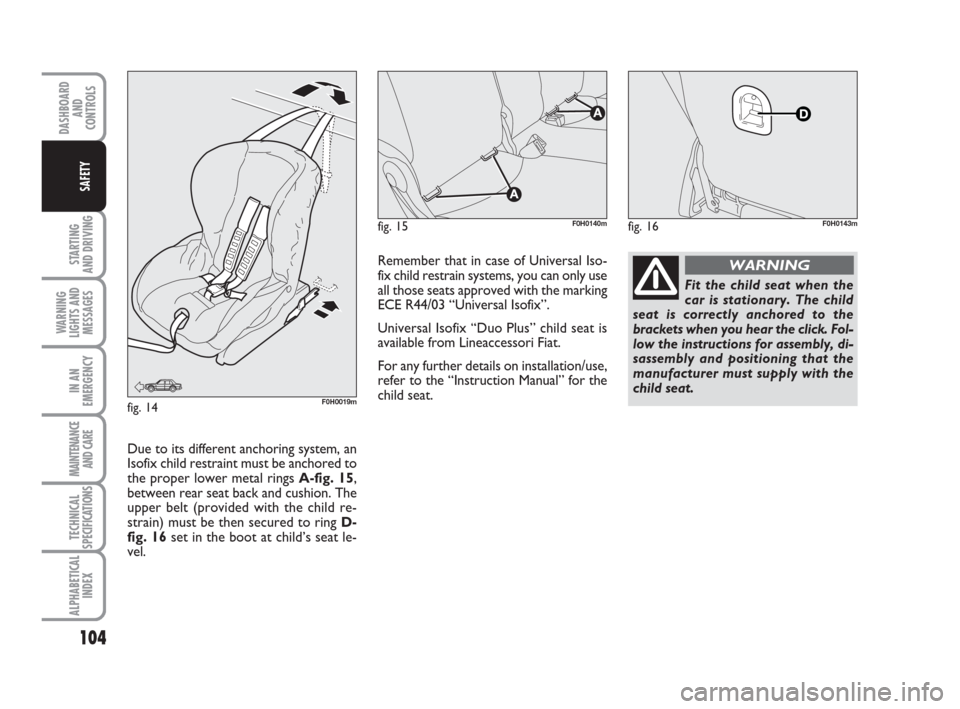
Due to its different anchoring system, an
Isofix child restraint must be anchored to
the proper lower metal rings A-fig. 15,
between rear seat back and cushion. The
upper belt (provided with the child re-
strain) must be then secured to ring D-
fig. 16set in the boot at child’s seat le-
vel.
fig. 16F0H0143m
Remember that in case of Universal Iso-
fix child restrain systems, you can only use
all those seats approved with the marking
ECE R44/03 “Universal Isofix”.
Universal Isofix “Duo Plus” child seat is
available from Lineaccessori Fiat.
For any further details on installation/use,
refer to the “Instruction Manual” for the
child seat.
Page 119 of 210
118
WARNING
LIGHTS AND
MESSAGES
IN AN
EMERGENCY
MAINTENANCE
AND CARE
TECHNICAL
SPECIFICATIONS
ALPHABETICAL
INDEX
DASHBOARD
AND
CONTROLS
SAFETY
STARTING
AND DRIVING
Respect the speed limits specific for each
country for vehicles towing trailers. In all
cases, the top speed must not exceed 100
km/h.
The ABS with which the car
may be equipped will not
control the braking system of the trai-
ler. Particular caution is required on
slippery roads.
Never modify the braking sy-
stem of the car to control
the trailer brake. The trailer braking
system must be fully independent
from the hydraulic system of the car.
WARNING
WARNING
INSTALLING THE TOW HOOK
The towing device should be fastened to
the body by specialised personnel accor-
ding to any additional and/or integrative
information supplied by the Manufacturer
of the device.
The towing device must meet current re-
gulations with reference to 94/20/EC Di-
rective and subsequent amendments.
For any version the towing device used
must match the towable weight of the car
on which it is to be installed.
For the electric connection a unified con-
nector should be used which is generally
placed on a special bracket normally fa-
stened to the towing device, and a spe-
cial ECU for external trailer light control
shall be installed on the car. For the electrical connection, 7 or 13 pin
12VDC connection is to be used (CU-
NA/UNI and ISO/DIN Standards). Follow
the instructions provided by the car ma-
nufacturer and/or the tow hitch manufac-
turer.
An electric brake should be supplied di-
rectly by the battery through a cable with
a cross section of no less than 2.5 mm2,5.
IMPORTANT Electric brake or other de-
vice shall be used with running engine.
In addition to the electrical branches, the
car’s electric system can only be connec-
ted to the supply cable for an electric
brake and to the cable for an internal li-
ght, though not above 15W.
For connections use the preset control
unit with battery cable no less than 2.5
mm
2.
Page 138 of 210
137
STARTING
AND DRIVING
MAINTENANCE
AND CARE
TECHNICAL
SPECIFICATIONS
ALPHABETICAL
INDEX
DASHBOARD
AND
CONTROLS
SAFETY
WARNING
LIGHTS AND
MESSAGES
IN AN
EMERGENCY
The kit cannot be used to re-
pair damage to the tyre si-
dewall. Do not use the quick repair
kit if the tyre was damaged by run-
ning on a flat.
WARNING
The damage cannot be re-
paired with the kit if the
wheel rim is damaged (deformation
of the channel causing leakage of air).
Do not remove the foreign body
(screw or nail) from the tyre.
WARNING
Do not operate the com-
pressor for longer than 20
minutes consecutively. Risk of
overheating. The quick repair kit is
not suitable for definitive repairs. The
tyres may only be repaired tempora-
rily.
WARNING
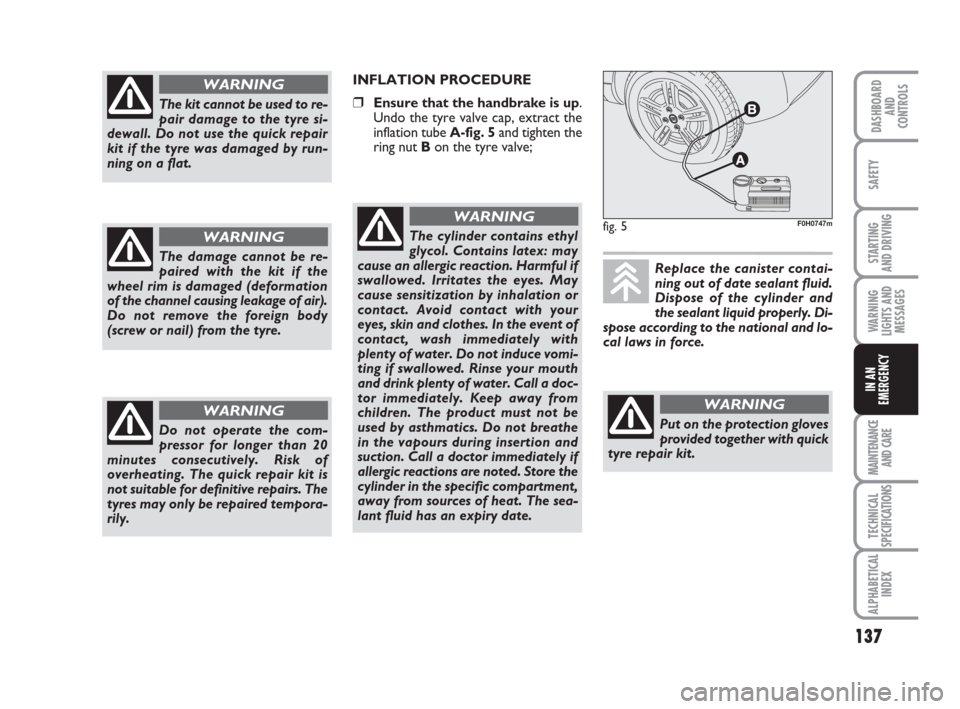
INFLATION PROCEDURE
❒Ensure that the handbrake is up.
Undo the tyre valve cap, extract the
inflation tube A-fig. 5and tighten the
ring nut Bon the tyre valve;
fig. 5F0H0747mThe cylinder contains ethyl
glycol. Contains latex: may
cause an allergic reaction. Harmful if
swallowed. Irritates the eyes. May
cause sensitization by inhalation or
contact. Avoid contact with your
eyes, skin and clothes. In the event of
contact, wash immediately with
plenty of water. Do not induce vomi-
ting if swallowed. Rinse your mouth
and drink plenty of water. Call a doc-
tor immediately. Keep away from
children. The product must not be
used by asthmatics. Do not breathe
in the vapours during insertion and
suction. Call a doctor immediately if
allergic reactions are noted. Store the
cylinder in the specific compartment,
away from sources of heat. The sea-
lant fluid has an expiry date.
WARNING
Replace the canister contai-
ning out of date sealant fluid.
Dispose of the cylinder and
the sealant liquid properly. Di-
spose according to the national and lo-
cal laws in force.
Put on the protection gloves
provided together with quick
tyre repair kit.
WARNING
Page 145 of 210
144
STARTING
AND DRIVING
MAINTENANCE
AND CARE
TECHNICAL
SPECIFICATIONS
ALPHABETICAL
INDEX
DASHBOARD
AND
CONTROLS
SAFETY
WARNING
LIGHTS AND
MESSAGES
IN AN
EMERGENCY
WHEN NEEDING TO
CHANGE A BULB
GENERAL INSTRUCTIONS
❒When a bulb is not working, check
that the corresponding fuse is intact
before replacing it: refer to the “If a fu-
se blows” paragraph in this chapter for
fuse location.
❒before changing a bulb check the con-
tacts for oxidation;
❒Burnt bulbs must be replaced by
others of the same type and power.
❒Always check the height of the head-
light beam after changing a bulb. Versions with alloy rims
❒Check that the hub contact surfaces
are clean;
❒fit the normal wheel centring it on the
pins, lead in the fastening screws and
tighten them using the wrench provi-
ded;
❒lower the car and remove the jack;
❒using the wrench provided, fully tigh-
ten the bolts in the sequence shown
in fig. 16.
❒snap fit the wheel cup on the hub.
When you have finished
❒stow the spare wheel C-fig. 11 in the
space provided in the boot;
❒Fit the jack partially open in its box B-
fig. 11forcing it lightly to prevent it
from vibrating when travelling;
❒put the tools back into their places in
the container;
❒arrange the container and tools in the
spare wheel and secure the fastening
device A-fig. 11;
❒rearrange the preformed boot cover
correctly.
Modifications or repairs to
the electrical system (elec-
tronic control units) that are not car-
ried out properly or do not take the
technical specifications of the system
into account can cause malfunctions
leading to the risk of fire.
WARNING
Halogen bulbs contain pres-
surised gas which may cau-
se small fragments of glass to be
projected outwards if the bulb is
broken.
WARNING
Halogen lamps must be hand-
led holding the metallic part
only. Touching the transpa-
rent part of the bulb with
your fingers may reduce the intensity
of the emitted light and even compro-
mise duration of the lamp itself. In the
case of accidental contact, rub the
lamp with a cloth and spirit and leave
to dry.IMPORTANT A slight misting may appear
on the internal surface of the headlight:
this does not indicate a fault and is cau-
sed by low temperature and the degree of
humidity in the air. Misting will rapidly di-
sappear when the headlights are switched
on. The presence of drops inside the head-
lights indicates infiltration of water. Go to
a Fiat Dealership.