lock FIAT IDEA 2012 1.G User Guide
[x] Cancel search | Manufacturer: FIAT, Model Year: 2012, Model line: IDEA, Model: FIAT IDEA 2012 1.GPages: 210, PDF Size: 3.65 MB
Page 21 of 210
20
SAFETY
DEVICES
CORRECT USE
OF THE CAR
WARNING
LIGHTS AND
MESSAGES
IN AN
EMERGENCY
CAR
MAINTENANCE
TECHNICAL
SPECIFICATIONS
INDEX
DASHBOARD
AND CONTROLS
This shows the temperature of the engine
coolant fluid and begins working when the
fluid temperature exceeds approx. 50°C.
Under normal conditions, the needle
should hover around the middle of the
scale according to the working conditions.
IMPORTANT If the needle reaches the
low temperature area with warning light
Aon, this means that there is a failure.
Contact a Fiat Dealership.
If the needle reaches the red
area, stop the engine imme-
diately and contact a Fiat
Dealership.MULTIFUNCTIONAL
DISPLAY
(on two-line modal
panel)
The car can be equipped with a multi-
function display that shows useful infor-
mation for car driving according to the
settings made.
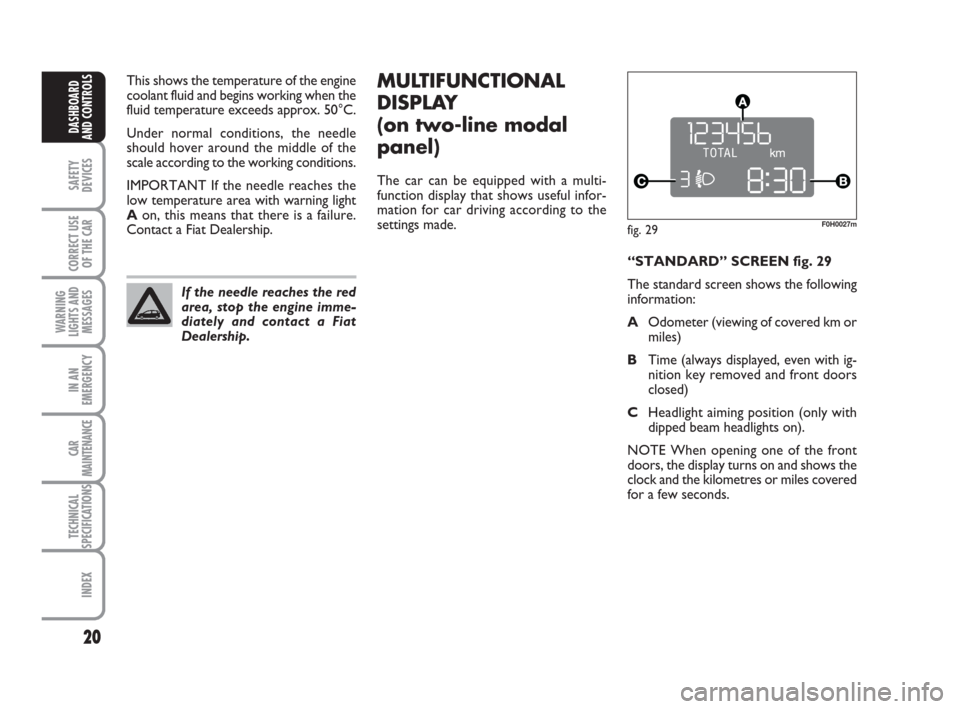
fig. 29F0H0027m
“STANDARD” SCREEN fig. 29
The standard screen shows the following
information:
AOdometer (viewing of covered km or
miles)
BTime (always displayed, even with ig-
nition key removed and front doors
closed)
CHeadlight aiming position (only with
dipped beam headlights on).
NOTE When opening one of the front
doors, the display turns on and shows the
clock and the kilometres or miles covered
for a few seconds.
001-035 idea GB 1 ed 10-07-2008 8:27 Pagina 20
Page 22 of 210

21
SAFETY
DEVICES
CORRECT USE
OF THE CAR
WARNING
LIGHTS AND
MESSAGES
IN AN
EMERGENCY
CAR
MAINTENANCE
TECHNICAL
SPECIFICATIONS
INDEX
DASHBOARD
AND CONTROLS
CONTROL BUTTONS fig. 30
+To scroll the next items on the dis-
played menu and the related options
or increase the displayed value.
MODEPress briefly to access the menu
and/or go to next screen or con-
firm the required menu option.
Hold pressed to go back to the
standard screen.
–To scroll the previous items on the
displayed menu and the related op-
tions or reduce the displayed value.
NOTE Buttons +and –activate different
functions according to the following situ-
ations.Adjusting the buzzer volume
To adjust the desired volume proceed as
follows:
❒press the button MODEseveral times
until the text “bUZZ” appears;
❒press the button +to increase the
volume;
❒press the button –to reduce the vol-
ume;
❒press the button MODEand hold it
pressed for over 2 seconds to confirm
the volume change.
Indication that the set peed limit has
been exceeded
Proceed as described below to set a ref-
erence car speed value beyond which the
system warns the driver about this by dis-
playing a message and starting the buzzer.
The car is delivered with this function in
“OFF”mode. SETUP MENU
The “Setup Menu” is used to make the fol-
lowing settings and/or adjustments:
❒ADJUSTING THE CLOCK
❒ADJUSTING THE BUZZER VOLUME
❒SETTING THE SPEED LIMIT
❒SETTING THE UNIT
Adjusting the clock
The car is delivered with the clock ad-
justed for 24 hours.
To set the required time proceed as fol-
lows:
❒press the button MODEseveral times
until the text “Hour” appears;
❒press the button +to increase the
time by one minute;
❒press the button –to reduce the time
by one minute;
Hold the buttons +or –pressed for a few
seconds to automatically start quick in-
crease or reduction of the time until the
buttons are released.
❒Press the button MODEand hold it
pressed for over 2 seconds to confirm
the time change.
fig. 30F0H0736m
001-035 idea GB 1 ed 10-07-2008 8:27 Pagina 21
Page 24 of 210
23
SAFETY
DEVICES
CORRECT USE
OF THE CAR
WARNING
LIGHTS AND
MESSAGES
IN AN
EMERGENCY
CAR
MAINTENANCE
TECHNICAL
SPECIFICATIONS
INDEX
DASHBOARD
AND CONTROLS
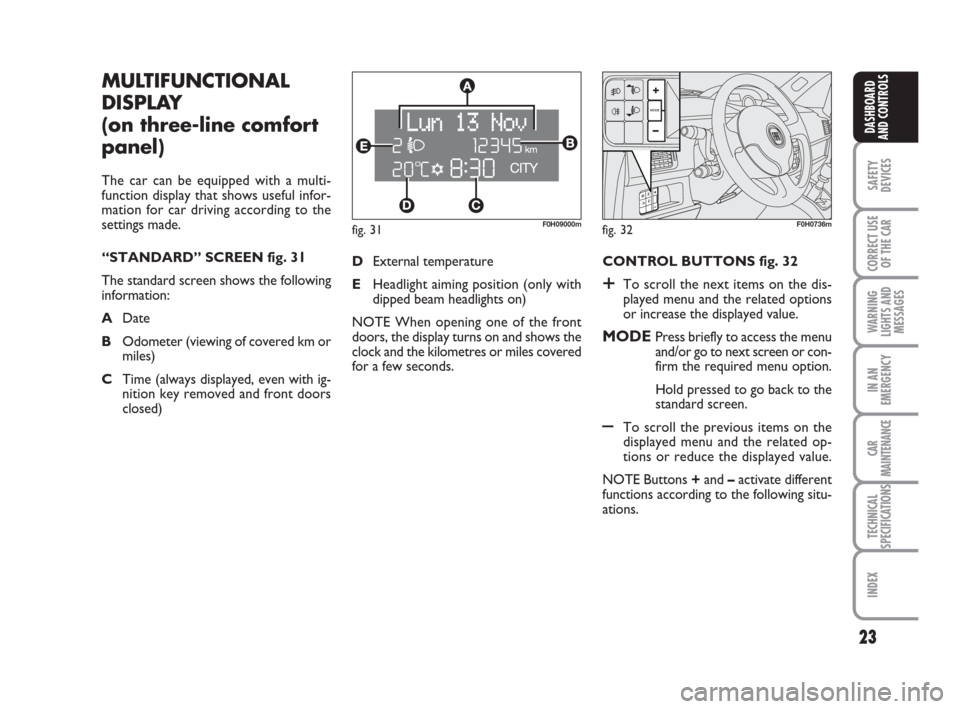
fig. 31F0H09000m
MULTIFUNCTIONAL
DISPLAY
(on three-line comfort
panel)
The car can be equipped with a multi-
function display that shows useful infor-
mation for car driving according to the
settings made.
“STANDARD” SCREEN fig. 31
The standard screen shows the following
information:
ADate
BOdometer (viewing of covered km or
miles)
CTime (always displayed, even with ig-
nition key removed and front doors
closed)CONTROL BUTTONS fig. 32
+To scroll the next items on the dis-
played menu and the related options
or increase the displayed value.
MODEPress briefly to access the menu
and/or go to next screen or con-
firm the required menu option.
Hold pressed to go back to the
standard screen.
–To scroll the previous items on the
displayed menu and the related op-
tions or reduce the displayed value.
NOTE Buttons +and –activate different
functions according to the following situ-
ations. DExternal temperature
EHeadlight aiming position (only with
dipped beam headlights on)
NOTE When opening one of the front
doors, the display turns on and shows the
clock and the kilometres or miles covered
for a few seconds.
fig. 32F0H0736m
001-035 idea GB 1 ed 10-07-2008 8:27 Pagina 23
Page 26 of 210
25
SAFETY
DEVICES
CORRECT USE
OF THE CAR
WARNING
LIGHTS AND
MESSAGES
IN AN
EMERGENCY
CAR
MAINTENANCE
TECHNICAL
SPECIFICATIONS
INDEX
DASHBOARD
AND CONTROLS
Day
YearMonth Example:
CONSUMPTION EXITING THE MENUSPEED BEEP.CLOCK SETTING LIGHT SENS.TRIP B
CLOCK MODE
SETTING THE DATE
KEY
DIST. UNIT
VOL. BUTTONS
VOL. BUZZER SERVICE
LANGUAGETEMP. UNIT
Example:
– +
+– – –
+ +
–
–
+
+++
–––
+ +
–
MODE
brief button
pressing
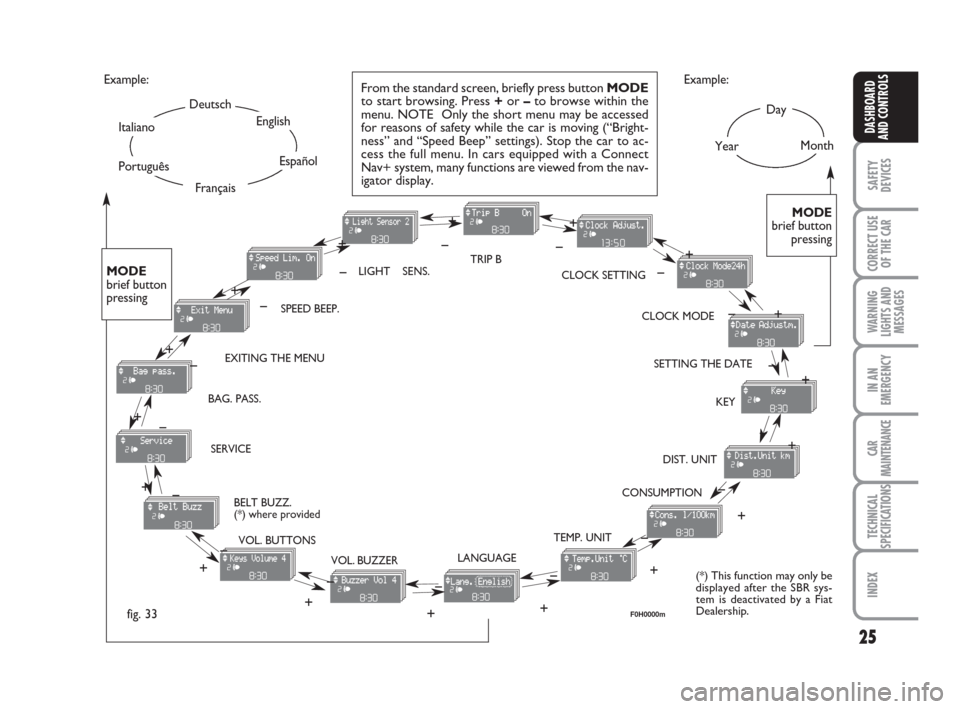
From the standard screen, briefly press button MODE
to start browsing. Press +or –to browse within the
menu. NOTE Only the short menu may be accessed
for reasons of safety while the car is moving (“Bright-
ness” and “Speed Beep” settings). Stop the car to ac-
cess the full menu. In cars equipped with a Connect
Nav+ system, many functions are viewed from the nav-
igator display.
–
+ +
–
MODE
brief button
pressing
Deutsch
English
Español
Italiano
Português
Français
(*) This function may only be
displayed after the SBR sys-
tem is deactivated by a Fiat
Dealership.
fig. 33
+
– +
–+
–
+
–
+ –
BELT BUZZ.
(*) where provided BAG. PASS.
F0H0000m
001-035 idea GB 1 ed 10-07-2008 8:27 Pagina 25
Page 28 of 210
27
SAFETY
DEVICES
CORRECT USE
OF THE CAR
WARNING
LIGHTS AND
MESSAGES
IN AN
EMERGENCY
CAR
MAINTENANCE
TECHNICAL
SPECIFICATIONS
INDEX
DASHBOARD
AND CONTROLS
Adjusting the sensitivity
of the automatic headlight sensor
(Light sensor) (where provided)
This function is used to adjust the dusk
sensor sensitivity according to three lev-
els (level 1 = minimum, level 2 = medium,
level 3 = maximum); the higher the sen-
sitivity, the lower the quantity of exter-
nal light needed to switch the headlights
on. The car is delivered with this function
set to level “2”.
To change this setting:
– briefly press button MODE: the previ-
ously set level flashes on the display;
– press button +or –for selecting the de-
sired level;
– briefly press button MODEto go back
to the menu screen or press the button
for a prolonged time to go back to the
standard screen without storing the set-
tings.Trip B On/Off (Trip B)
Through this option it is possible to acti-
vate (On) or deactivate (Off) the Trip B
(partial trip) display.
For further information see section “Trip
computer”.
For activation / deactivation, proceed as
follows:
– briefly press button MODE: ON or
OFF flashes on the display (according to
previous setting);
– press button +or –for selecting the de-
sired value;
– briefly press button MODEto go back
to the menu screen or press the button
for a prolonged time to go back to the
standard screen without storing the set-
tings.Setting the clock (Set time)
This function enables setting of the clock.
To set the clock proceed as follows:
– briefly press button MODE: the display
shows the “hours” flashing;
– press button +or –to set the clock;
– briefly press button MODE: “min-
utes”starts flashing on the display;
– press button +or –to set the clock.
Note The setting increases or decreases
by one unit each time button +or –is
pressed. Hold the button pressed to au-
tomatically start a quick increase/decrease
of the set value. Complete the setting by
briefly pressing the button when the re-
quired setting is approached.
– briefly press button MODEto go back
to the menu screen or press the button
for a prolonged time to go back to the
standard screen without storing the set-
tings.
001-035 idea GB 1 ed 10-07-2008 8:27 Pagina 27
Page 29 of 210
28
SAFETY
DEVICES
CORRECT USE
OF THE CAR
WARNING
LIGHTS AND
MESSAGES
IN AN
EMERGENCY
CAR
MAINTENANCE
TECHNICAL
SPECIFICATIONS
INDEX
DASHBOARD
AND CONTROLS
Release of doors and tailgate (Key)
This function enables the release of the
front and rear doors, the release of the
driver's door only or the release of all the
doors including the tailgate.
To set the function, proceed as follows:
– press the MODEbutton for a short
time, the display shows “Open doors”,
“Op. drv.door” and “Open all”.
– press +or –to select; the selected item
will flash.
– Press MODEfor a short time to return
to the menu screen or press the button
for a longer time to return to the standard
screen without confirming the selection. – briefly press button MODE: the month
starts flashing on the display;
– press button +or –to set the month;
– briefly press button MODE: the day
starts flashing on the display;
– press button +or –to set the day.
NOTE The setting increases or decreas-
es by one unit each time button + or –
is pressed. Hold the button pressed to
start automatic quick increase/ decrease
of the setting. Complete the setting by
briefly pressing the button when the re-
quired setting is approached.
– briefly press button MODEto go back
to the menu screen or press the button
for a prolonged time to go back to the
standard screen without storing the set-
tings. 12h/24h clock mode
(Clock mode)
This function enables setting the screen to
either 12 or 24 hour mode.
Proceed as follows:
– briefly press button MODE: 12h or 24h
starts flashing on the display (depending
on the previously set parameter);
– press button +or –for selecting the de-
sired value;
– briefly press button MODEto go back
to the menu screen or press the button
for a prolonged time to go back to the
standard screen without storing the set-
tings.
Setting the date (Set Date)
This function enables updating the date
(year - month - day).
To update the date proceed as follows:
– briefly press button MODE: the year
starts flashing on the display;
– briefly press button +or –to set the
year;
001-035 idea GB 1 ed 10-07-2008 8:27 Pagina 28
Page 37 of 210
36
SAFETY
DEVICES
CORRECT USE
OF THE CAR
WARNING
LIGHTS AND
MESSAGES
IN AN
EMERGENCY
CAR
MAINTENANCE
TECHNICAL
SPECIFICATIONS
INDEX
DASHBOARD
AND CONTROLS
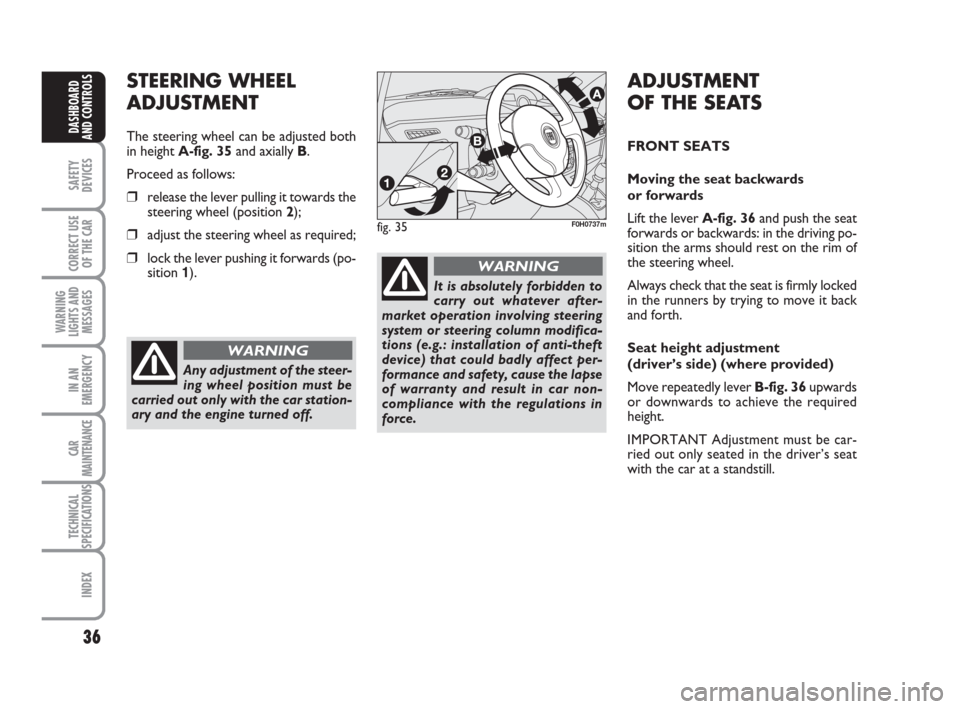
fig. 35F0H0737m
STEERING WHEEL
ADJUSTMENT
The steering wheel can be adjusted both
in height A-fig. 35and axially B.
Proceed as follows:
❒release the lever pulling it towards the
steering wheel (position 2);
❒adjust the steering wheel as required;
❒lock the lever pushing it forwards (po-
sition 1).
Any adjustment of the steer-
ing wheel position must be
carried out only with the car station-
ary and the engine turned off.
WARNING
It is absolutely forbidden to
carry out whatever after-
market operation involving steering
system or steering column modifica-
tions (e.g.: installation of anti-theft
device) that could badly affect per-
formance and safety, cause the lapse
of warranty and result in car non-
compliance with the regulations in
force.
WARNING
ADJUSTMENT
OF THE SEATS
FRONT SEATS
Moving the seat backwards
or forwards
Lift the lever A-fig. 36and push the seat
forwards or backwards: in the driving po-
sition the arms should rest on the rim of
the steering wheel.
Always check that the seat is firmly locked
in the runners by trying to move it back
and forth.
Seat height adjustment
(driver’s side) (where provided)
Move repeatedly lever B-fig. 36upwards
or downwards to achieve the required
height.
IMPORTANT Adjustment must be car-
ried out only seated in the driver’s seat
with the car at a standstill.
036-092 idea GB 1 ed 10-07-2008 16:12 Pagina 36
Page 38 of 210
37
SAFETY
DEVICES
CORRECT USE
OF THE CAR
WARNING
LIGHTS AND
MESSAGES
IN AN
EMERGENCY
CAR
MAINTENANCE
TECHNICAL
SPECIFICATIONS
INDEX
DASHBOARD
AND CONTROLS
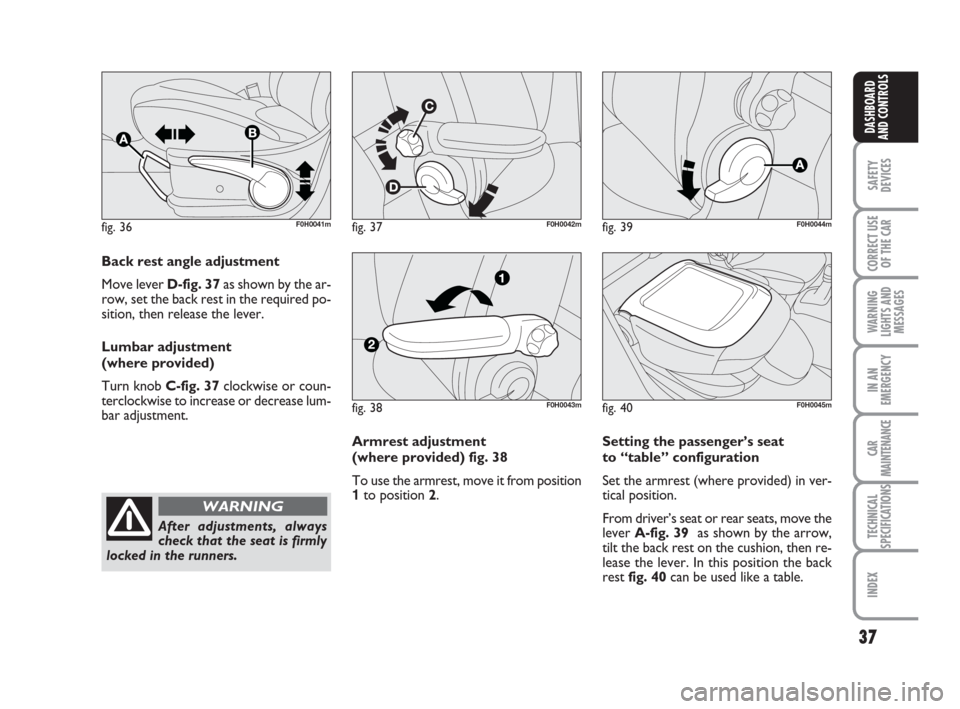
fig. 36F0H0041mfig. 37F0H0042m
Back rest angle adjustment
Move lever D-fig. 37as shown by the ar-
row, set the back rest in the required po-
sition, then release the lever.
Lumbar adjustment
(where provided)
Turn knob C-fig. 37clockwise or coun-
terclockwise to increase or decrease lum-
bar adjustment.
After adjustments, always
check that the seat is firmly
locked in the runners.
WARNING
fig. 38F0H0043m
fig. 39F0H0044m
Setting the passenger’s seat
to “table” configuration
Set the armrest (where provided) in ver-
tical position.
From driver’s seat or rear seats, move the
lever A-fig. 39 as shown by the arrow,
tilt the back rest on the cushion, then re-
lease the lever. In this position the back
rest fig. 40 can be used like a table. Armrest adjustment
(where provided) fig. 38
To use the armrest, move it from position
1to position 2.
fig. 40F0H0045m
036-092 idea GB 1 ed 10-07-2008 16:12 Pagina 37
Page 40 of 210
39
SAFETY
DEVICES
CORRECT USE
OF THE CAR
WARNING
LIGHTS AND
MESSAGES
IN AN
EMERGENCY
CAR
MAINTENANCE
TECHNICAL
SPECIFICATIONS
INDEX
DASHBOARD
AND CONTROLS
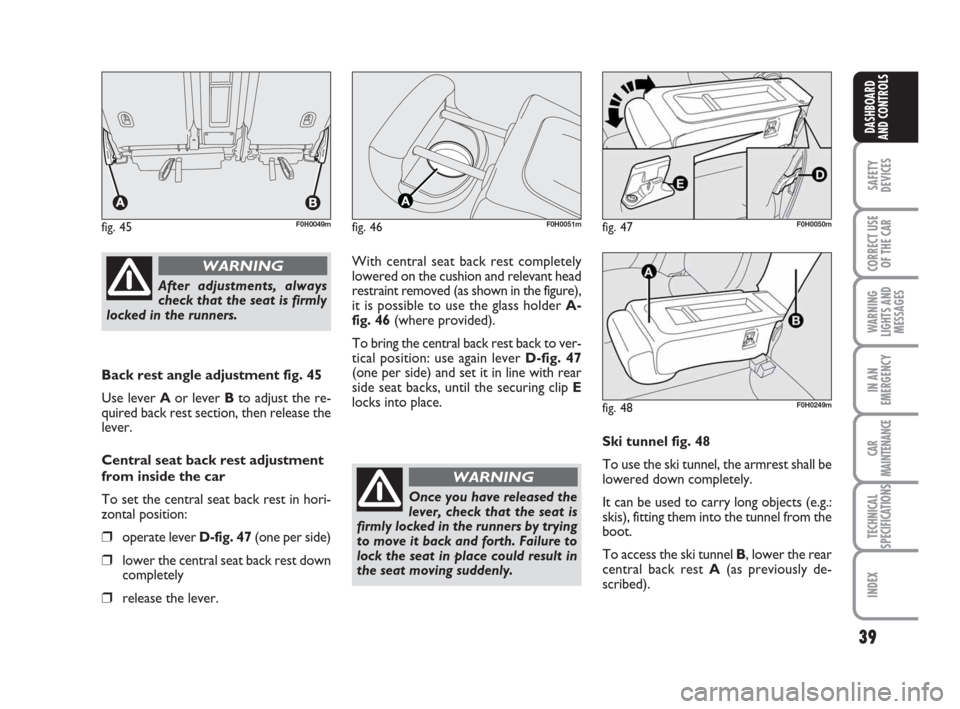
Back rest angle adjustment fig. 45
Use lever Aor lever Bto adjust the re-
quired back rest section, then release the
lever.
Central seat back rest adjustment
from inside the car
To set the central seat back rest in hori-
zontal position:
❒operate lever D-fig. 47(one per side)
❒lower the central seat back rest down
completely
❒release the lever.With central seat back rest completely
lowered on the cushion and relevant head
restraint removed (as shown in the figure),
it is possible to use the glass holder A-
fig. 46(where provided).
To bring the central back rest back to ver-
tical position: use again lever D-fig. 47
(one per side) and set it in line with rear
side seat backs, until the securing clip E
locks into place.
fig. 45F0H0049mfig. 46F0H0051mfig. 47F0H0050m
After adjustments, always
check that the seat is firmly
locked in the runners.
WARNING
Once you have released the
lever, check that the seat is
firmly locked in the runners by trying
to move it back and forth. Failure to
lock the seat in place could result in
the seat moving suddenly.
WARNING
Ski tunnel fig. 48
To use the ski tunnel, the armrest shall be
lowered down completely.
It can be used to carry long objects (e.g.:
skis), fitting them into the tunnel from the
boot.
To access the ski tunnel B, lower the rear
central back rest A(as previously de-
scribed).
fig. 48F0H0249m
036-092 idea GB 1 ed 10-07-2008 16:12 Pagina 39
Page 41 of 210
40
SAFETY
DEVICES
CORRECT USE
OF THE CAR
WARNING
LIGHTS AND
MESSAGES
IN AN
EMERGENCY
CAR
MAINTENANCE
TECHNICAL
SPECIFICATIONS
INDEX
DASHBOARD
AND CONTROLS
For maximum safety, keep
the back of your seat up-
right, lean back into it and make sure
the seat belt fits closely across your
hips.
WARNING
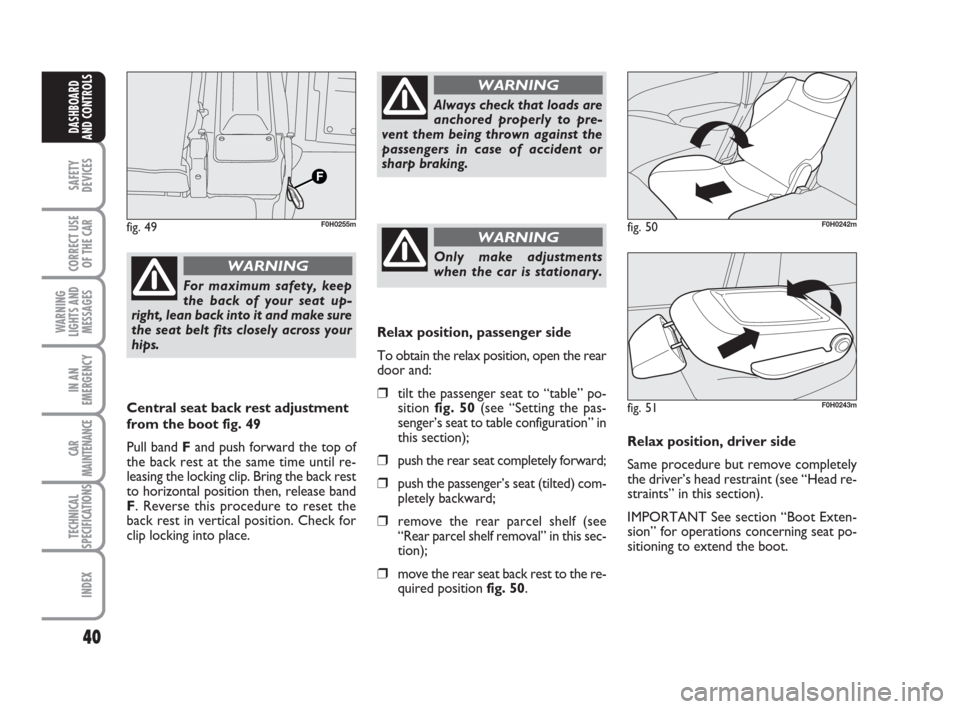
Central seat back rest adjustment
from the boot fig. 49
Pull band Fand push forward the top of
the back rest at the same time until re-
leasing the locking clip. Bring the back rest
to horizontal position then, release band
F. Reverse this procedure to reset the
back rest in vertical position. Check for
clip locking into place.
Always check that loads are
anchored properly to pre-
vent them being thrown against the
passengers in case of accident or
sharp braking.
WARNING
Only make adjustments
when the car is stationary.
WARNINGfig. 49F0H0255m
Relax position, passenger side
To obtain the relax position, open the rear
door and:
❒tilt the passenger seat to “table” po-
sition fig. 50(see “Setting the pas-
senger’s seat to table configuration” in
this section);
❒push the rear seat completely forward;
❒push the passenger’s seat (tilted) com-
pletely backward;
❒remove the rear parcel shelf (see
“Rear parcel shelf removal” in this sec-
tion);
❒move the rear seat back rest to the re-
quired position fig. 50.Relax position, driver side
Same procedure but remove completely
the driver’s head restraint (see “Head re-
straints” in this section).
IMPORTANT See section “Boot Exten-
sion” for operations concerning seat po-
sitioning to extend the boot.
fig. 50F0H0242m
fig. 51F0H0243m
036-092 idea GB 1 ed 10-07-2008 16:12 Pagina 40