driver seat adjustment FIAT IDEA 2012 1.G Owners Manual
[x] Cancel search | Manufacturer: FIAT, Model Year: 2012, Model line: IDEA, Model: FIAT IDEA 2012 1.GPages: 210, PDF Size: 3.65 MB
Page 37 of 210
36
SAFETY
DEVICES
CORRECT USE
OF THE CAR
WARNING
LIGHTS AND
MESSAGES
IN AN
EMERGENCY
CAR
MAINTENANCE
TECHNICAL
SPECIFICATIONS
INDEX
DASHBOARD
AND CONTROLS
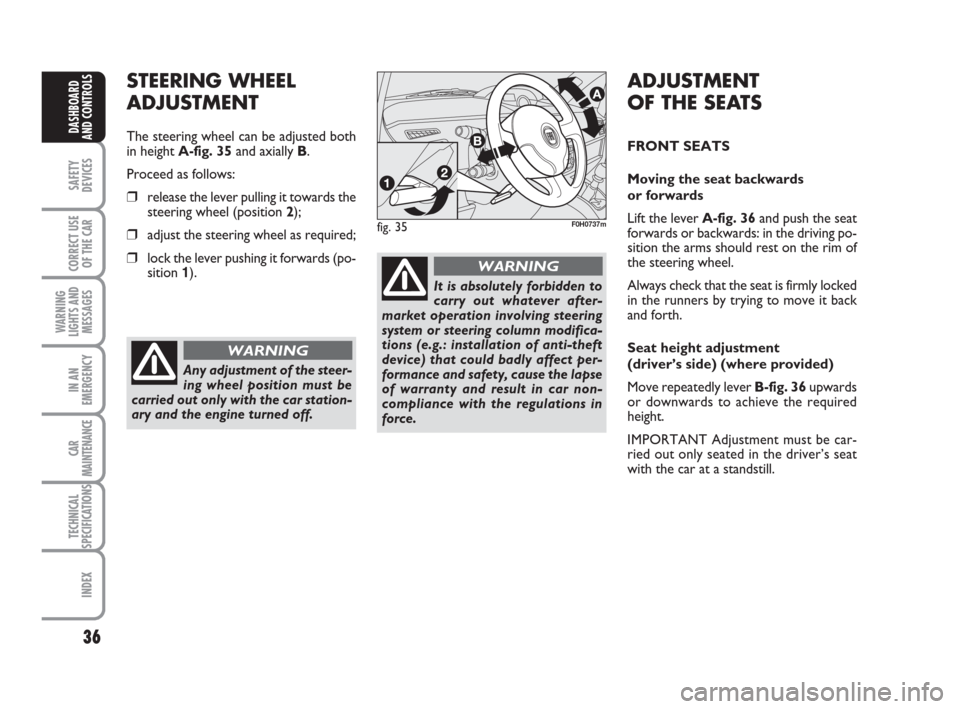
fig. 35F0H0737m
STEERING WHEEL
ADJUSTMENT
The steering wheel can be adjusted both
in height A-fig. 35and axially B.
Proceed as follows:
❒release the lever pulling it towards the
steering wheel (position 2);
❒adjust the steering wheel as required;
❒lock the lever pushing it forwards (po-
sition 1).
Any adjustment of the steer-
ing wheel position must be
carried out only with the car station-
ary and the engine turned off.
WARNING
It is absolutely forbidden to
carry out whatever after-
market operation involving steering
system or steering column modifica-
tions (e.g.: installation of anti-theft
device) that could badly affect per-
formance and safety, cause the lapse
of warranty and result in car non-
compliance with the regulations in
force.
WARNING
ADJUSTMENT
OF THE SEATS
FRONT SEATS
Moving the seat backwards
or forwards
Lift the lever A-fig. 36and push the seat
forwards or backwards: in the driving po-
sition the arms should rest on the rim of
the steering wheel.
Always check that the seat is firmly locked
in the runners by trying to move it back
and forth.
Seat height adjustment
(driver’s side) (where provided)
Move repeatedly lever B-fig. 36upwards
or downwards to achieve the required
height.
IMPORTANT Adjustment must be car-
ried out only seated in the driver’s seat
with the car at a standstill.
036-092 idea GB 1 ed 10-07-2008 16:12 Pagina 36
Page 38 of 210
37
SAFETY
DEVICES
CORRECT USE
OF THE CAR
WARNING
LIGHTS AND
MESSAGES
IN AN
EMERGENCY
CAR
MAINTENANCE
TECHNICAL
SPECIFICATIONS
INDEX
DASHBOARD
AND CONTROLS
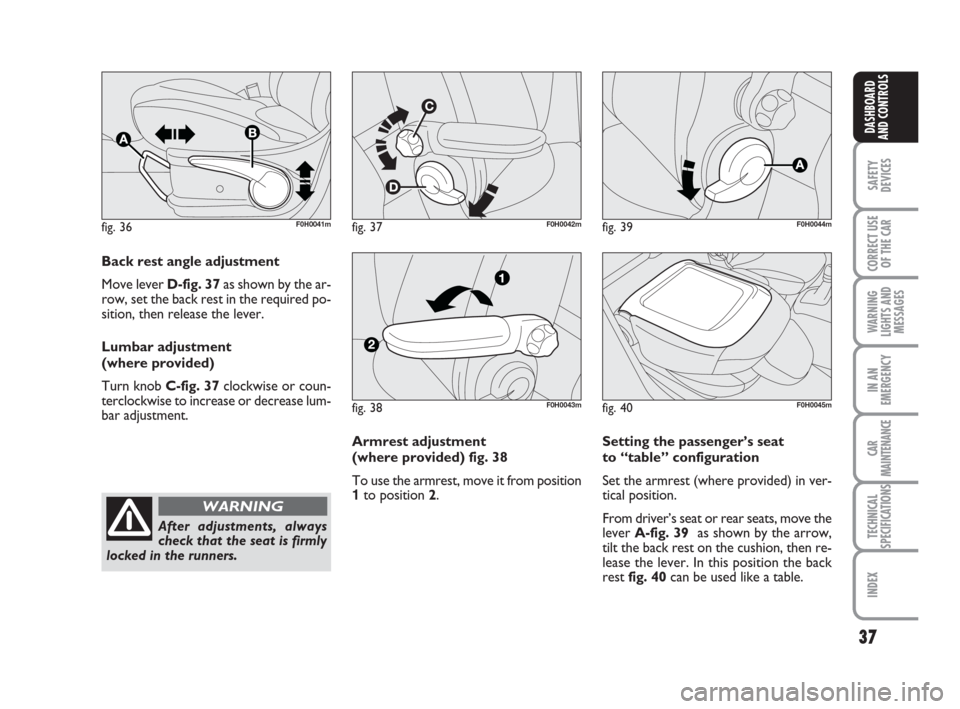
fig. 36F0H0041mfig. 37F0H0042m
Back rest angle adjustment
Move lever D-fig. 37as shown by the ar-
row, set the back rest in the required po-
sition, then release the lever.
Lumbar adjustment
(where provided)
Turn knob C-fig. 37clockwise or coun-
terclockwise to increase or decrease lum-
bar adjustment.
After adjustments, always
check that the seat is firmly
locked in the runners.
WARNING
fig. 38F0H0043m
fig. 39F0H0044m
Setting the passenger’s seat
to “table” configuration
Set the armrest (where provided) in ver-
tical position.
From driver’s seat or rear seats, move the
lever A-fig. 39 as shown by the arrow,
tilt the back rest on the cushion, then re-
lease the lever. In this position the back
rest fig. 40 can be used like a table. Armrest adjustment
(where provided) fig. 38
To use the armrest, move it from position
1to position 2.
fig. 40F0H0045m
036-092 idea GB 1 ed 10-07-2008 16:12 Pagina 37
Page 39 of 210
38
SAFETY
DEVICES
CORRECT USE
OF THE CAR
WARNING
LIGHTS AND
MESSAGES
IN AN
EMERGENCY
CAR
MAINTENANCE
TECHNICAL
SPECIFICATIONS
INDEX
DASHBOARD
AND CONTROLS
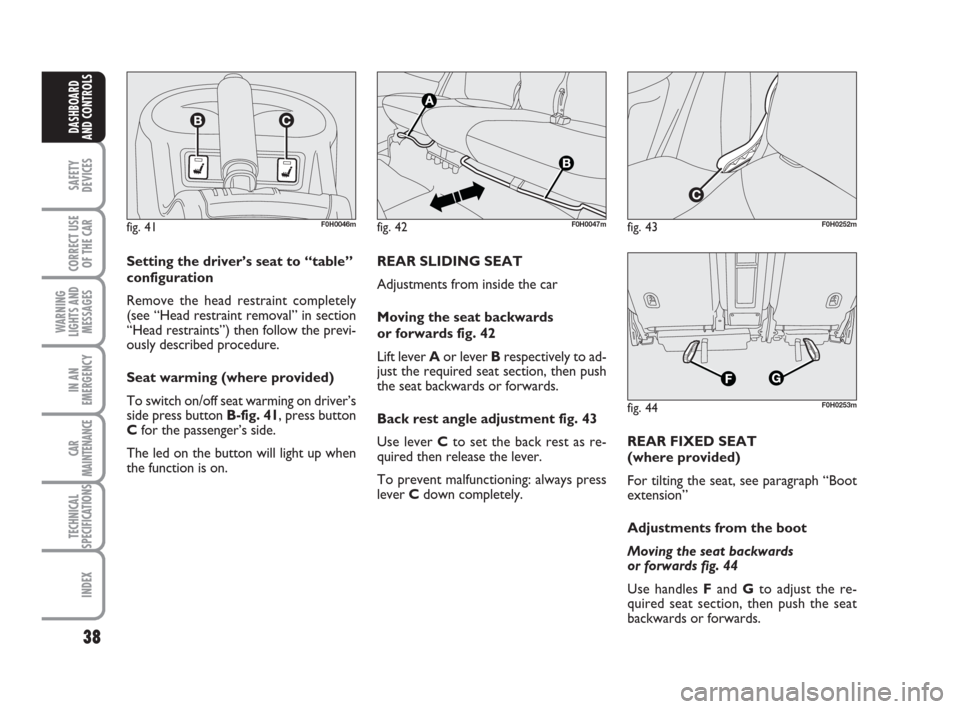
fig. 41F0H0046m
Setting the driver’s seat to “table”
configuration
Remove the head restraint completely
(see “Head restraint removal” in section
“Head restraints”) then follow the previ-
ously described procedure.
Seat warming (where provided)
To switch on/off seat warming on driver’s
side press button B-fig. 41, press button
Cfor the passenger’s side.
The led on the button will light up when
the function is on.REAR SLIDING SEAT
Adjustments from inside the car
Moving the seat backwards
or forwards fig. 42
Lift lever Aor lever Brespectively to ad-
just the required seat section, then push
the seat backwards or forwards.
Back rest angle adjustment fig. 43
Use lever Cto set the back rest as re-
quired then release the lever.
To prevent malfunctioning: always press
lever Cdown completely.
fig. 42F0H0047mfig. 43F0H0252m
fig. 44F0H0253m
REAR FIXED SEAT
(where provided)
For tilting the seat, see paragraph “Boot
extension”
Adjustments from the boot
Moving the seat backwards
or forwards fig. 44
Use handles Fand Gto adjust the re-
quired seat section, then push the seat
backwards or forwards.
036-092 idea GB 1 ed 10-07-2008 16:12 Pagina 38
Page 41 of 210
40
SAFETY
DEVICES
CORRECT USE
OF THE CAR
WARNING
LIGHTS AND
MESSAGES
IN AN
EMERGENCY
CAR
MAINTENANCE
TECHNICAL
SPECIFICATIONS
INDEX
DASHBOARD
AND CONTROLS
For maximum safety, keep
the back of your seat up-
right, lean back into it and make sure
the seat belt fits closely across your
hips.
WARNING
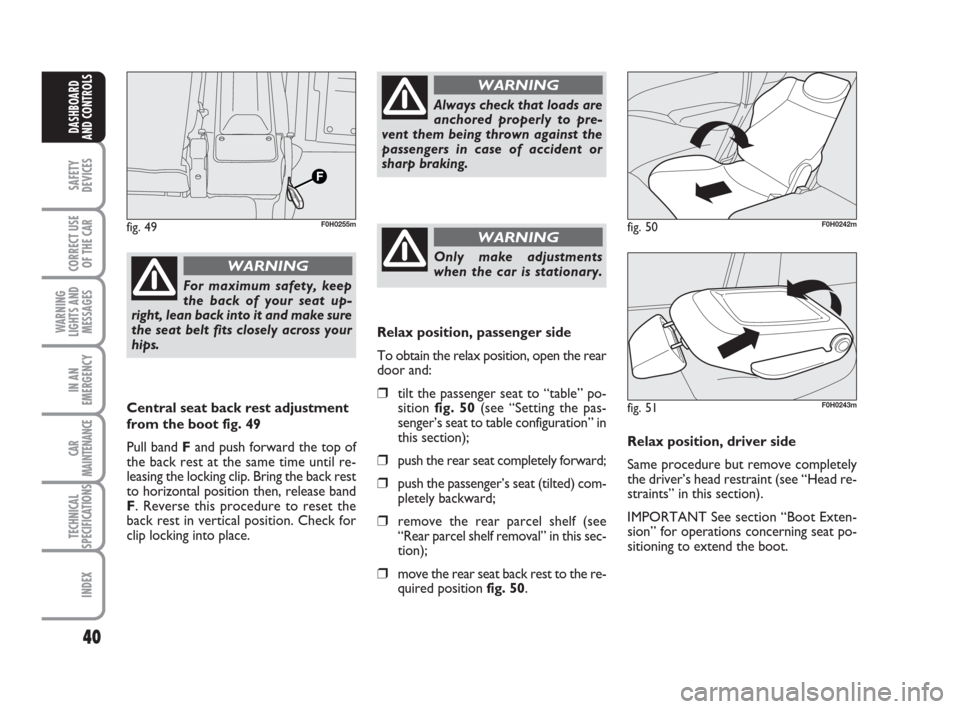
Central seat back rest adjustment
from the boot fig. 49
Pull band Fand push forward the top of
the back rest at the same time until re-
leasing the locking clip. Bring the back rest
to horizontal position then, release band
F. Reverse this procedure to reset the
back rest in vertical position. Check for
clip locking into place.
Always check that loads are
anchored properly to pre-
vent them being thrown against the
passengers in case of accident or
sharp braking.
WARNING
Only make adjustments
when the car is stationary.
WARNINGfig. 49F0H0255m
Relax position, passenger side
To obtain the relax position, open the rear
door and:
❒tilt the passenger seat to “table” po-
sition fig. 50(see “Setting the pas-
senger’s seat to table configuration” in
this section);
❒push the rear seat completely forward;
❒push the passenger’s seat (tilted) com-
pletely backward;
❒remove the rear parcel shelf (see
“Rear parcel shelf removal” in this sec-
tion);
❒move the rear seat back rest to the re-
quired position fig. 50.Relax position, driver side
Same procedure but remove completely
the driver’s head restraint (see “Head re-
straints” in this section).
IMPORTANT See section “Boot Exten-
sion” for operations concerning seat po-
sitioning to extend the boot.
fig. 50F0H0242m
fig. 51F0H0243m
036-092 idea GB 1 ed 10-07-2008 16:12 Pagina 40
Page 83 of 210
82
SAFETY
DEVICES
CORRECT USE
OF THE CAR
WARNING
LIGHTS AND
MESSAGES
IN AN
EMERGENCY
CAR
MAINTENANCE
TECHNICAL
SPECIFICATIONS
INDEX
DASHBOARD
AND CONTROLS
HEADLIGHTS
ADJUSTING THE HEADLIGHT
BEAM
Proper adjustment of the headlight beams
is of vital importance for your safety and
comfort and also for the other road users.
To ensure you and other drivers have the
best visibility conditions when travelling
with the headlights on, the headlights must
be set properly. Contact Fiat Dealership
to have the headlights properly adjusted.
Headlight aiming device
The device can be operated with the ig-
nition key at MARand dipped beam head-
lights on. When the car is loaded, it slopes
backwards. This means that the headlight
beam rises. In this case, it is necessary to
return it to the correct position.
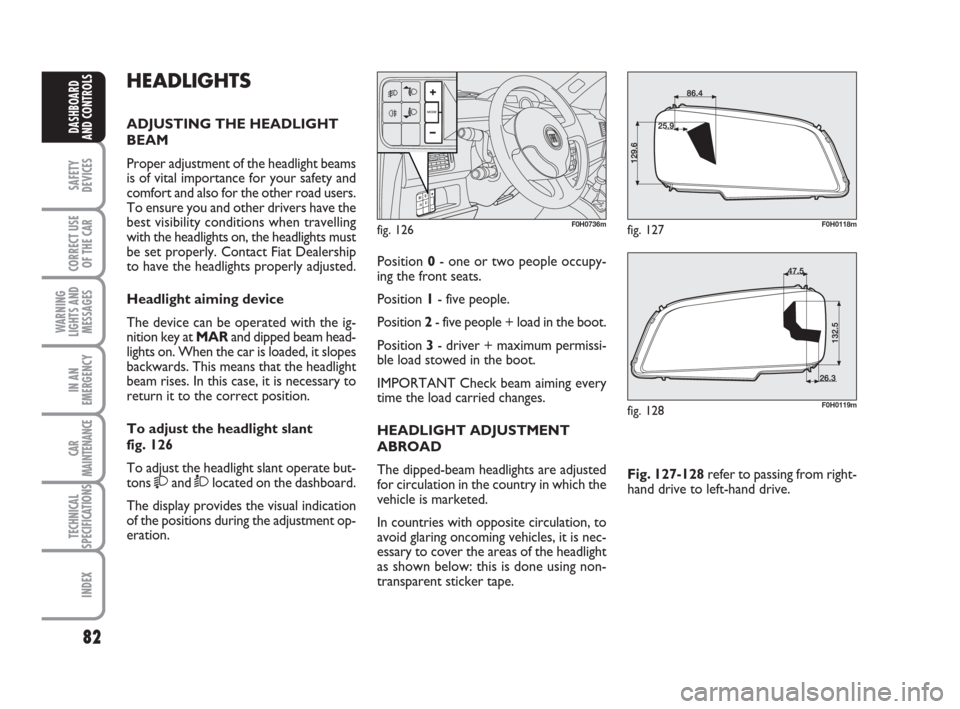
To adjust the headlight slant
fig. 126
To adjust the headlight slant operate but-
tons
and Òlocated on the dashboard.
The display provides the visual indication
of the positions during the adjustment op-
eration.
fig. 126F0H0736m
Position 0- one or two people occupy-
ing the front seats.
Position 1- five people.
Position 2- five people + load in the boot.
Position 3- driver + maximum permissi-
ble load stowed in the boot.
IMPORTANT Check beam aiming every
time the load carried changes.
HEADLIGHT ADJUSTMENT
ABROAD
The dipped-beam headlights are adjusted
for circulation in the country in which the
vehicle is marketed.
In countries with opposite circulation, to
avoid glaring oncoming vehicles, it is nec-
essary to cover the areas of the headlight
as shown below: this is done using non-
transparent sticker tape.Fig. 127-128refer to passing from right-
hand drive to left-hand drive.
fig. 127F0H0118m
fig. 128F0H0119m
036-092 idea GB 1 ed 10-07-2008 16:12 Pagina 82
Page 96 of 210
95
CORRECT USE
OF THE CAR
WARNING
LIGHTS AND
MESSAGES
IN AN
EMERGENCY
CAR
MAINTENANCE
TECHNICAL
SPECIFICATIONS
INDEX
DASHBOARD
AND CONTROLS
SAFETY
DEVICES
The buzzer can be deactivated (until the
the next engine stop) as follows:
❒fasten the driver’s seat belt.
❒turn the ignition key to MAR
❒wait for over 20 seconds and then re-
lease at least one of the seat belts.
For permanent deactivation, contact Fiat
Dealership.
On versions fitted with reconfigurable
multifunction display (Comfort) it is pos-
sible to reset the S.B.R. system only
through the set-up menu (see “Warning
lights and messages” section at paragraph
“Unfastened seat belts”).
For the other versions system can be re-
set only by Fiat Dealership.
FRONT SEAT BELT HEIGHT
ADJUSTMENT (where provided)
Always adjust the height of the seat belt
to fit the person wearing it. This precau-
tion could greatly reduce the risk of injury
in case of collision.
Correct adjustment is obtained when the
belt passes half way between the end of
the shoulder and the neck.
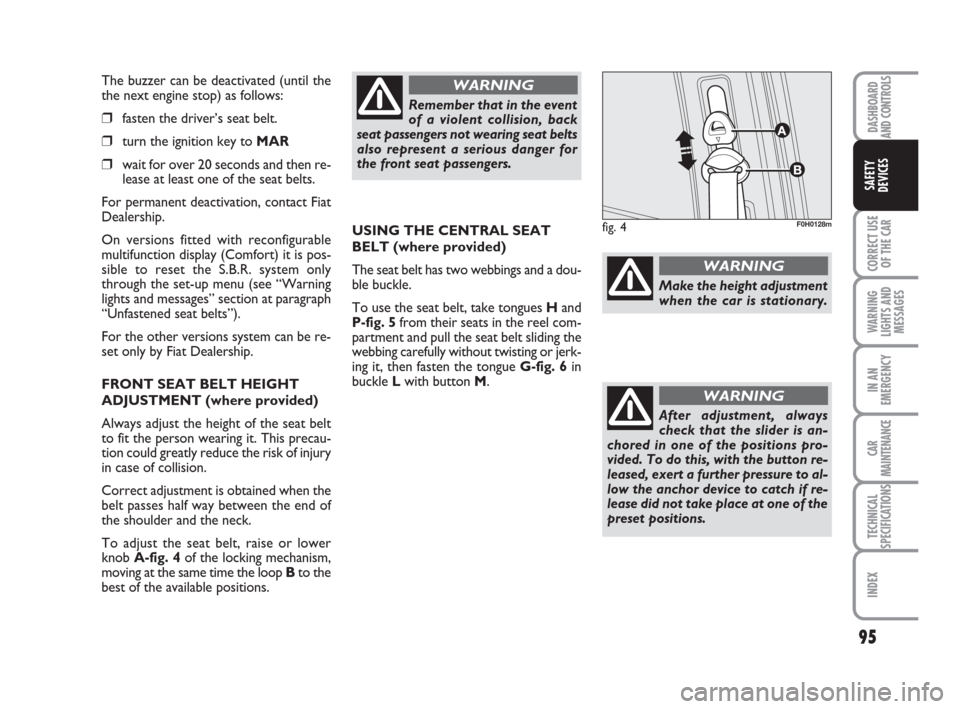
To adjust the seat belt, raise or lower
knob A-fig. 4of the locking mechanism,
moving at the same time the loop Bto the
best of the available positions.USING THE CENTRAL SEAT
BELT (where provided)
The seat belt has two webbings and a dou-
ble buckle.
To use the seat belt, take tongues Hand
P-fig. 5from their seats in the reel com-
partment and pull the seat belt sliding the
webbing carefully without twisting or jerk-
ing it, then fasten the tongue G-fig. 6in
buckle Lwith button M.
Remember that in the event
of a violent collision, back
seat passengers not wearing seat belts
also represent a serious danger for
the front seat passengers.
WARNING
Make the height adjustment
when the car is stationary.
WARNING
After adjustment, always
check that the slider is an-
chored in one of the positions pro-
vided. To do this, with the button re-
leased, exert a further pressure to al-
low the anchor device to catch if re-
lease did not take place at one of the
preset positions.
WARNING
fig. 4F0H0128m
093-110 idea GB 1 ed 10-07-2008 8:28 Pagina 95