FIAT LINEA 2007 1.G Repair Manual
Manufacturer: FIAT, Model Year: 2007, Model line: LINEA, Model: FIAT LINEA 2007 1.GPages: 230, PDF Size: 3.31 MB
Page 61 of 230
60
SAFETY
DEVICES
CORRECT USE
OF THE
CAR
WARNING
LIGHTS AND
MESSAGES
IN AN
EMERGENCY
CAR
MAINTENANCE
TECHNICAL
SPECIFICATIONS
INDEX
DASHBOARD
AND CONTROLS
The following parameters and functions
can be set or changed manually:
❒air temperature;
❒fan speed (continuous variation);
❒air distribution setting to seven posi-
tions;
❒compressor enabling;
❒fast defrosting/demisting;
❒air recirculation;
❒system off.
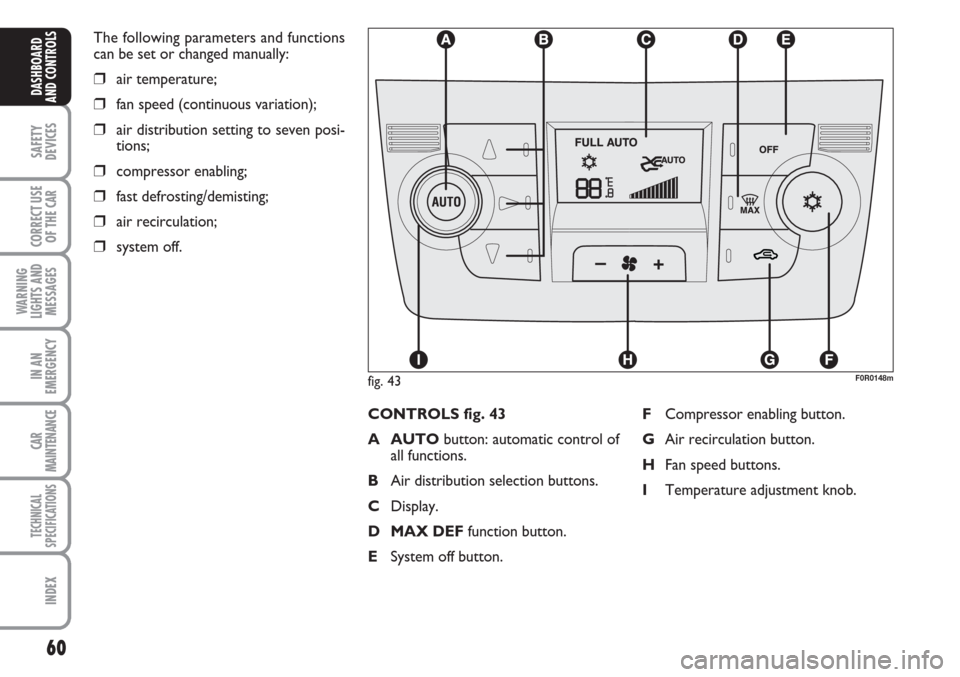
FCompressor enabling button.
GAir recirculation button.
HFan speed buttons.
ITemperature adjustment knob.
fig. 43F0R0148m
CONTROLS fig. 43
A AUTObutton: automatic control of
all functions.
BAir distribution selection buttons.
CDisplay.
D MAX DEFfunction button.
ESystem off button.
Page 62 of 230
61
SAFETY
DEVICES
CORRECT USE
OF THE
CAR
WARNING
LIGHTS AND
MESSAGES
IN AN
EMERGENCY
CAR
MAINTENANCE
TECHNICAL
SPECIFICATIONS
INDEX
DASHBOARD
AND CONTROLS
USING THE CLIMATE
CONTROL SYSTEM
The system can be started in different
ways, but it is advisable to start by press-
ing the AUTObutton and then turning
the knobs to set the temperature required
on the display.
The system will start running automatically
in this way and the set comfortable tem-
perature will be reached as quickly as pos-
sible. The system will adjust the temper-
ature, the quantity and the distribution of
the air introduced into the passenger com-
partment and will manage the recircula-
tion function and the compressor.
Manual intervention is only required for
the following functions during fully auto-
matic operation.
❒Tair recirculation, to keep the
function always either on or off;
❒Zto speed up demisting/defrosting of
windscreen, rear window and exter-
nal rearview mirrors;During completely automatic system op-
eration, you can vary the set temperature,
the air distribution and the fan speed us-
ing the corresponding buttons or knobs
at any time: the system will automatically
change settings to adapt to the new re-
quest.
During fully automatic operation (FULL
AUTO), the word FULLwill disappear
if the air distribution, air speed, compres-
sor and/or recirculation settings are
changed. In this way, the functions will
switch from automatic to manual control
until AUTOis pressed again. With on or
more manually set functions, the intro-
duced air temperature is still managed au-
tomatically by the system, except for when
the compressor is off: in the case, the air
introduced into the passenger compart-
ment cannot be cooler than the outside
air.Air temperature adjustment
knob (I)
Turn the knob either clockwise or anti-
clockwise to increase or lower the re-
quested temperature in the passenger
compartment. The set temperature is
shown on the display.
Turn the knob either all to the right or
all to the left to the extreme HIor LO
position to use the maximum heating or
maximum cooling functions:
❒HI function (maximum heating):
select by turning the temperature knob
clockwise over the maximum value
(32 °C).
This function may be used to heat up the
passenger compartment exploiting the
system potential to the maximum. In this
condition, the system stop controlling
temperature automatically and sets air
mixing to maximum heating. The air speed
and distribution are fixed.
Specifically, if the heating fluid is not suffi-
ciently warm, the fan will not start up at
the maximum speed immediately to limit
introducing excessively cool air into the
passenger compartment.
All manual settings will be allowed when
this function is on.
Page 63 of 230
62
SAFETY
DEVICES
CORRECT USE
OF THE
CAR
WARNING
LIGHTS AND
MESSAGES
IN AN
EMERGENCY
CAR
MAINTENANCE
TECHNICAL
SPECIFICATIONS
INDEX
DASHBOARD
AND CONTROLS
To switch the function off, simply turn the
temperature knob anticlockwise and set
the required temperature.
❒LOfunction (maximum cooling):
select by turning the temperature knob
anticlockwise under the minimum value
(16 °C).
This function may be used to cool down
the passenger compartment exploiting the
system potential to the maximum. In this
condition, the system stop controlling
temperature automatically and sets air
mixing to maximum cooling. The air speed
and distribution are fixed. All manual set-
tings will be allowed when this function
is on.
To switch the function off, simply turn the
temperature knob anticlockwise and set
the required temperature.Air distribution buttons (B)
Press these buttons to manually set one
of the seven air distribution settings:▲Air flow to the windscreen and front
side window vents to demist or de-
frost them.
˙Air flow at central and side dashboard
vents to ventilate the chest and the
face during the hot season.
▼Air flow to the front and rear foot well
vents. Thanks to the natural tenden-
cy of hot air to spread upwards, this
distribution pattern allows to warm
the passenger compartment up as
quickly as possible, providing an im-
mediate feeling of warmth.
˙
▼Air flow distributed between foot well
vents (hotter air) and central and side
dashboard vents (cooler air). This dis-
tribution is particularly useful in spring
and autumn on a sunny day.
▲
▼Air flow distributed between foot well
vents and windscreen and front side
window defrosting/demisting vents.
This allows an adequate warming of
the passenger compartment and pre-
vents the windows from misting up.
▲
˙Air flow distributed between wind-
screen and front side window de-
froster/demister and central and side
dashboard vents. This distribution al-
lows to maintain good levels of com-
fort and the passenger compartment
adequately cool (summer).
▲
˙
▼Air flow distributed between wind-
screen and front side window de-
froster/demister and central and side
dashboard vents. This distribution al-
lows adequate air diffusion and main-
tains a good level of comfort both in
summer and winter.
The set distribution is shown by the cor-
responding LEDs on the selected buttons.
To restore automatic air distribution con-
trol after a manual adjustment, press but-
ton AUTO.
Page 64 of 230
63
SAFETY
DEVICES
CORRECT USE
OF THE
CAR
WARNING
LIGHTS AND
MESSAGES
IN AN
EMERGENCY
CAR
MAINTENANCE
TECHNICAL
SPECIFICATIONS
INDEX
DASHBOARD
AND CONTROLS
Fan speed adjusting buttons (H)
Press button Hto increase or to decrease
the fan speed and therefore the amount
of air admitted into the passenger com-
partment, although keeping the required
temperature set.
The fan speed is shown by the lit bars on
the display:
❒max fan speed = all bars lit;
❒min fan speed = one bar lit.
The fan can be cut off only if the climate
control compressor has been switched
off pressing button F-fig. 40.
IMPORTANT To restore automatic fan
speed control after a manual adjustment,
press button AUTO.
IMPORTANT At high speeds, the dynamic
effect may increase the flow of air into the
passenger compartment which in this case
will not directly correspond to the fan
speed bar display.AUTO (A) (automatic operation)
Press AUTO to make the system auto-
matically adjust the quantity and distribu-
tion of the air introduced into the pas-
senger compartment. All previous manu-
al settings will be cancelled.
The message FULL AUTOwill appear
on the front display in this condition.
By manually intervening on at least of the
functions automatically managed by the
system (air recirculation, fan speed or
compressor on/off), the word FULL will
disappear from the display indicating that
the system is no longer automatically con-
trolling all the functions (the temperature
will still be controlled automatically by the
system).
IMPORTANT Should the system (after
manual settings) be no longer able to
guarantee the required temperature set
in the passenger compartment, the set
temperature value will start flashing to in-
dicate this condition, after one minute the
AUTOmessage will turn off.
To restore system automatic control at
any time, after one or more manual ad-
justments, press button AUTO.Air recirculation on/off button (G)
Air recirculation works according to the
following operating logics:
❒override on (inside air recirculation
always on), indicated by the the LED
on button Gand symbol Ton
the display;
❒override off (air recirculation always
off and introduction of external air),
indicated by the fact that the LED on
the button is off êis on the display.
These operating conditions are obtained
by pressing Gin sequence.
IMPORTANT The inside air recircula-
tion system makes it possible to reach
the required heating or cooling condi-
tions faster.
It is however inadvisable to use it on
rainy/cold days as it would considerably
increase the possibility of the windows
misting inside, especially if the climate
control compressor is off.
Recirculation is forced off (i.e. air is
introduced from the outside) when the
the outside temperature is cold to pre-
vent misting up.
It is advisable not to use the air recircu-
lation function when the outside tem-
perature is low to prevent the windows
from rapidly misting up.
Page 65 of 230
64
SAFETY
DEVICES
CORRECT USE
OF THE
CAR
WARNING
LIGHTS AND
MESSAGES
IN AN
EMERGENCY
CAR
MAINTENANCE
TECHNICAL
SPECIFICATIONS
INDEX
DASHBOARD
AND CONTROLS
Climate control compressor
enabling button (F)
Press √to switch the climate control
compressor off (if on). The icon on the
display will go out.
Press the button when the LED is off to
restore automatically system control
and use of the compressor. The icon
will light up on the display in this case.
The system will switch recirculation off
when the compressor is switched off to
prevent misting up. Although the system
is capable of maintaining the required tem-
perature, the word FULLwill disappear
from the display. If on the other hand the
system cannot maintain the required tem-
perature, the digits will blink and the word
AUTOwill disappear.IMPORTANT With the compressor off,
it is not possible to introduced air cooler
than ambient temperature into the pas-
senger compartment. Furthermore, in
certain conditions, the windows could
mist up rapidly because the air is not de-
humidified.The switching off of the climate
control compressor remains in storage
even when the engine has been stopped.
To restore automatic compressor control,
press √again (in this case, the system will
only work as a heater) or press AUTO.
With climate control compressor off, the
fan speed can be set to zero manually (no
bar shown).
With the compressor enabled and the en-
gine started, the fan speed may be reduced
to the minimum setting (only one bar
shown).Fast window demisting/defrosting
button (D)
Press this button: the climate control sys-
tem will automatically switch on all the
functions required for fast windscreen and
front side window demisting/defrosting,
that is:
❒switches on climate control compres-
sor when climatic conditions are suit-
able;
❒air recirculation off;
❒maximum air temperature HI on both
areas;
❒operates proper fan speed according
to engine coolant temperature to lim-
it the flow into the passenger com-
partment of air not warm enough to
demist the windows;
❒directs air flow to windscreen and
front side windows vents;
❒heated rear window on.
Page 66 of 230
65
SAFETY
DEVICES
CORRECT USE
OF THE
CAR
WARNING
LIGHTS AND
MESSAGES
IN AN
EMERGENCY
CAR
MAINTENANCE
TECHNICAL
SPECIFICATIONS
INDEX
DASHBOARD
AND CONTROLS
IMPORTANT The quick demisting/de-
frosting function will stay on for approxi-
mately 3 minutes after the engine coolant
temperature is warm enough to ensure
rapid window demisting.
When the function is on, the LED on the
rear window demister button will light up
and the message FULL AUTOwill go
out on the display.
You may only adjust the fan speed and
switch the rear window demister off man-
ually when this function is running.
To restore running operations before this
function was activated, press either but-
ton B, air recirculation button G, com-
pressor button For button AUTO A.Switching the system off (E)
Press Eto switch the climate control sys-
tem off. The display will go out as a con-
sequence.
The following climate control conditions
will be established when the system is off:
❒display off;
❒temperature not shown;
❒air recirculation on, passenger com-
partment isolated from the outside
(recirculation LED on);
❒climate control compressor off;
❒fan off.Press AUTOto switch the automatic cli-
mate control system back on.
Page 67 of 230
66
SAFETY
DEVICES
CORRECT USE
OF THE
CAR
WARNING
LIGHTS AND
MESSAGES
IN AN
EMERGENCY
CAR
MAINTENANCE
TECHNICAL
SPECIFICATIONS
INDEX
DASHBOARD
AND CONTROLS
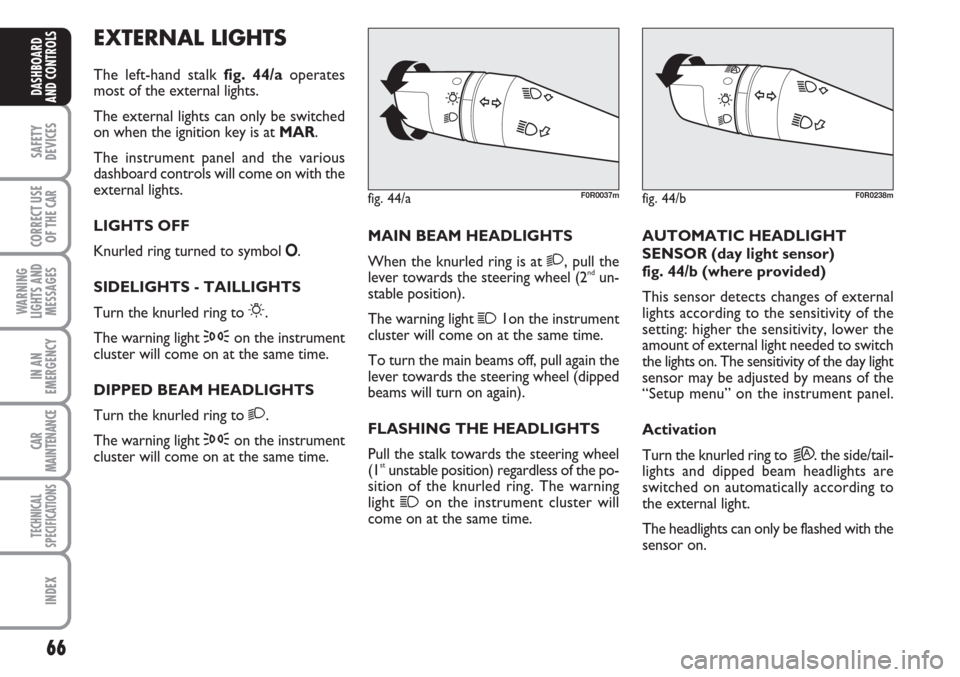
EXTERNAL LIGHTS
The left-hand stalk fig. 44/aoperates
most of the external lights.
The external lights can only be switched
on when the ignition key is at MAR.
The instrument panel and the various
dashboard controls will come on with the
external lights.
LIGHTS OFF
Knurled ring turned to symbol O.
SIDELIGHTS - TAILLIGHTS
Turn the knurled ring to
6.
The warning light
3on the instrument
cluster will come on at the same time.
DIPPED BEAM HEADLIGHTS
Turn the knurled ring to
2.
The warning light
3on the instrument
cluster will come on at the same time.MAIN BEAM HEADLIGHTS
When the knurled ring is at
2, pull the
lever towards the steering wheel (2ndun-
stable position).
The warning light
11on the instrument
cluster will come on at the same time.
To turn the main beams off, pull again the
lever towards the steering wheel (dipped
beams will turn on again).
FLASHING THE HEADLIGHTS
Pull the stalk towards the steering wheel
(1
stunstable position) regardless of the po-
sition of the knurled ring. The warning
light
1on the instrument cluster will
come on at the same time.AUTOMATIC HEADLIGHT
SENSOR (day light sensor)
fig. 44/b (where provided)
This sensor detects changes of external
lights according to the sensitivity of the
setting: higher the sensitivity, lower the
amount of external light needed to switch
the lights on. The sensitivity of the day light
sensor may be adjusted by means of the
“Setup menu” on the instrument panel.
Activation
Turn the knurled ring to
2A. the side/tail-
lights and dipped beam headlights are
switched on automatically according to
the external light.
The headlights can only be flashed with the
sensor on.
fig. 44/aF0R0037mfig. 44/bF0R0238m
Page 68 of 230
67
SAFETY
DEVICES
CORRECT USE
OF THE
CAR
WARNING
LIGHTS AND
MESSAGES
IN AN
EMERGENCY
CAR
MAINTENANCE
TECHNICAL
SPECIFICATIONS
INDEX
DASHBOARD
AND CONTROLS
Deactivation
The main beam headlights will go out fol-
lowed after approximately 10 seconds by
the side/taillights when the sensor is de-
activated.
The sensor cannot detect the presence of
fog: switch the lights on manually in this
case.
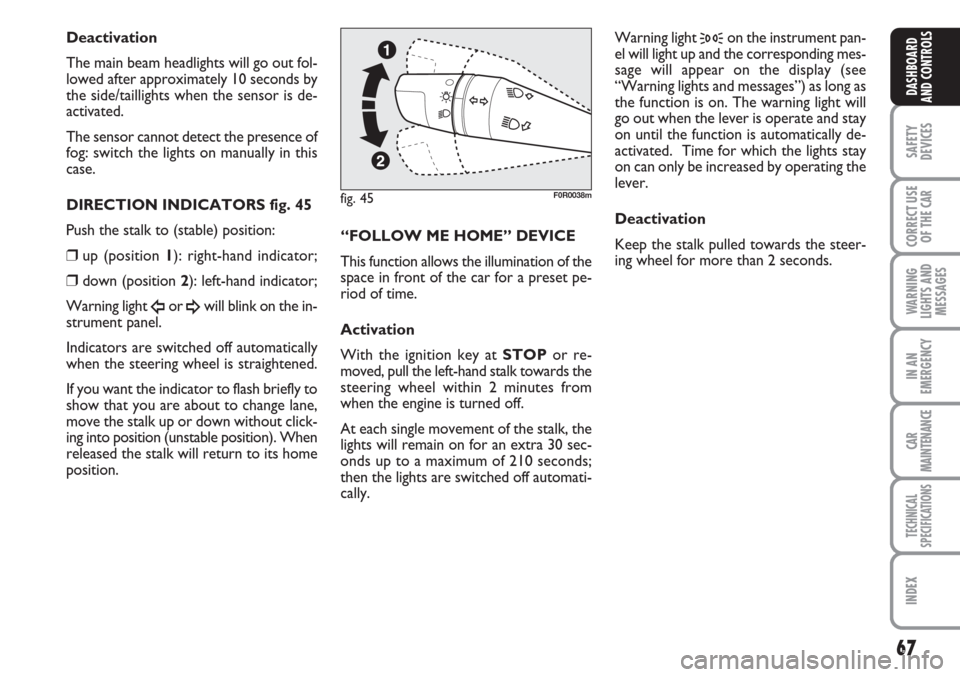
DIRECTION INDICATORS fig. 45
Push the stalk to (stable) position:
❒up (position 1): right-hand indicator;
❒down (position 2): left-hand indicator;
Warning light
Îor ¥will blink on the in-
strument panel.
Indicators are switched off automatically
when the steering wheel is straightened.
If you want the indicator to flash briefly to
show that you are about to change lane,
move the stalk up or down without click-
ing into position (unstable position). When
released the stalk will return to its home
position.“FOLLOW ME HOME” DEVICE
This function allows the illumination of the
space in front of the car for a preset pe-
riod of time.
Activation
With the ignition key at STOPor re-
moved, pull the left-hand stalk towards the
steering wheel within 2 minutes from
when the engine is turned off.
At each single movement of the stalk, the
lights will remain on for an extra 30 sec-
onds up to a maximum of 210 seconds;
then the lights are switched off automati-
cally. Warning light
3on the instrument pan-
el will light up and the corresponding mes-
sage will appear on the display (see
“Warning lights and messages”) as long as
the function is on. The warning light will
go out when the lever is operate and stay
on until the function is automatically de-
activated. Time for which the lights stay
on can only be increased by operating the
lever.
Deactivation
Keep the stalk pulled towards the steer-
ing wheel for more than 2 seconds.
fig. 45F0R0038m
Page 69 of 230
68
SAFETY
DEVICES
CORRECT USE
OF THE
CAR
WARNING
LIGHTS AND
MESSAGES
IN AN
EMERGENCY
CAR
MAINTENANCE
TECHNICAL
SPECIFICATIONS
INDEX
DASHBOARD
AND CONTROLS
WINDOW WASHING
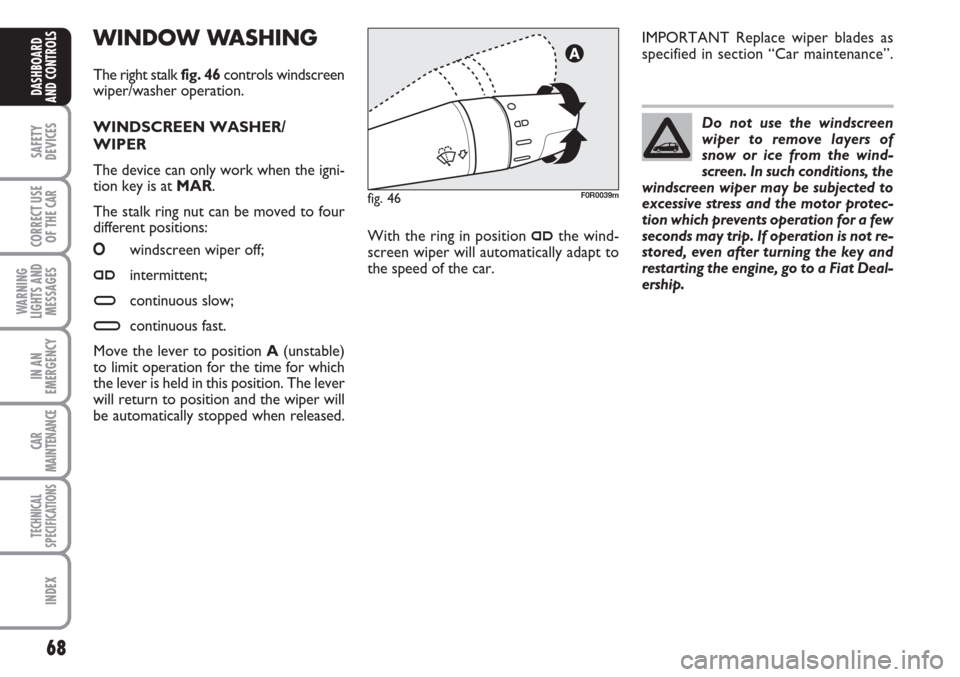
The right stalk fig. 46controls windscreen
wiper/washer operation.
WINDSCREEN WASHER/
WIPER
The device can only work when the igni-
tion key is at MAR.
The stalk ring nut can be moved to four
different positions:
Owindscreen wiper off;
≤intermittent;
≥continuous slow;
¥continuous fast.
Move the lever to position A(unstable)
to limit operation for the time for which
the lever is held in this position. The lever
will return to position and the wiper will
be automatically stopped when released.Do not use the windscreen
wiper to remove layers of
snow or ice from the wind-
screen. In such conditions, the
windscreen wiper may be subjected to
excessive stress and the motor protec-
tion which prevents operation for a few
seconds may trip. If operation is not re-
stored, even after turning the key and
restarting the engine, go to a Fiat Deal-
ership.
With the ring in position
≤the wind-
screen wiper will automatically adapt to
the speed of the car.IMPORTANT Replace wiper blades as
specified in section “Car maintenance”.
fig. 46F0R0039m
Page 70 of 230
69
SAFETY
DEVICES
CORRECT USE
OF THE
CAR
WARNING
LIGHTS AND
MESSAGES
IN AN
EMERGENCY
CAR
MAINTENANCE
TECHNICAL
SPECIFICATIONS
INDEX
DASHBOARD
AND CONTROLS
RAIN SENSOR
(where provided)
The rain sensor is located behind the dri-
ving mirror in contact with the windscreen
and has the purpose of automatically ad-
just, during the intermittent operation, the
frequency of the windscreen wiper
strokes as to the rain intensity.
IMPORTANT Keep clean the glass in the
sensor area.
Activation
Move the right-hand stalk knurled ring to
≤fig. 46.
The activation of the rain sensor is sig-
nalled by a control acquisition “stroke”.
Through the set up menu it is possible to
increase the sensitivity of the rain sensor.
The increase of the sensitivity of the rain
sensor is signalled by a control and acqui-
sition “stroke”.
Operating the windscreen washer with
the rain sensor activated the normal wash-
ing cycle is performed at the end of which
the rain sensor resumes its normal auto-
matic function.Deactivation
Change the stalk knurled ring position
from
≤fig. 46or turn the ignition key
to STOP.
At the next start-up (key at MAR), the
sensor will not be reactivated even if the
knurled ring is at
≤fig. 46. To reacti-
vate the sensor, move the ring from po-
sition
≤to any other position and then
return it to position
≤.
Rain sensor activation will be indicated by
at least one wiper “stroke” even if the
windscreen is dry.
The rain sensor is able to recognize and
automatically adjust itself in the presence
of the following particular conditions:
❒presence of dirt on the controlled sur-
face (salt, dirt, etc.);
❒difference between day and night.
IMPORTANT Streaks of water may cause
unnecessary blade moving. “Smart washing” function
Pull the stalk towards the steering wheel
(unstable position) to operate the wind-
screen washer.
Keeping the stalk pulled for more than half
a second, with just one movement it is
possible to operate the washer jet and the
wiper at the same time.
The wiper stops working three strokes af-
ter releasing the stalk.
A further stroke after 6 seconds com-
pletes the wiping operation.