ESP FIAT LINEA 2008 1.G Owner's Guide
[x] Cancel search | Manufacturer: FIAT, Model Year: 2008, Model line: LINEA, Model: FIAT LINEA 2008 1.GPages: 234, PDF Size: 3.41 MB
Page 159 of 234
158
WARNING
LIGHTS AND
MESSAGES
CAR
MAINTENANCE
TECHNICAL
SPECIFICATIONS
IINDEX
DASHBOARD
AND CONTROLS
SAFETY
DEVICES
CORRECT USE
OF THE
CAR
IN AN
EMERGENCY
WHEN NEEDING TO
CHANGE A BULB
GENERAL INSTRUCTIONS
❒When a bulb is not working, check that
the corresponding fuse is intact before
replacing it: refer to the “If a fuse
blows” paragraph in this chapter for
fuse location.
❒before changing a bulb check the con-
tacts for oxidation;
❒burnt bulbs must be replaced by others
of the same type and power;
❒always check the height of the headlight
beam after changing a bulb, for reasons
of safety.
IMPORTANT A slight misting may appear
on the internal surface of the headlight:
this does not indicate a fault and is caused
by low temperature and the degree of hu-
midity in the air. Misting will rapidly dis-
appear when the headlights are switched
on. The presence of drop inside the head-
lights indicates infiltration of water. Go to
a Fiat Dealership.
TYPES OF BULBS
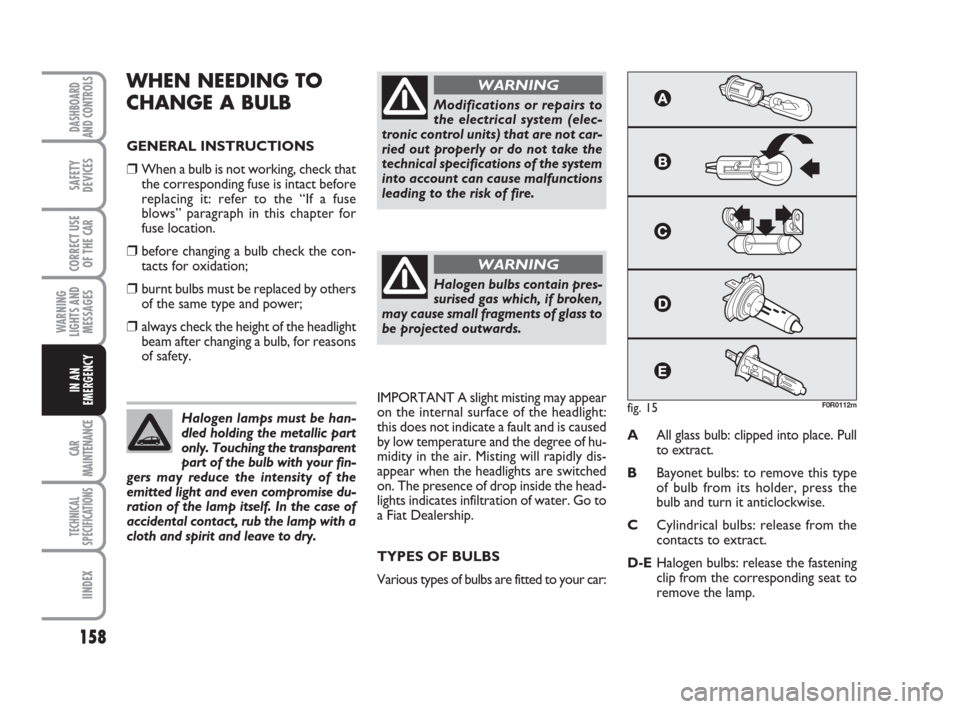
Various types of bulbs are fitted to your car:AAll glass bulb: clipped into place. Pull
to extract.
BBayonet bulbs: to remove this type
of bulb from its holder, press the
bulb and turn it anticlockwise.
CCylindrical bulbs: release from the
contacts to extract.
D-EHalogen bulbs: release the fastening
clip from the corresponding seat to
remove the lamp. Halogen lamps must be han-
dled holding the metallic part
only. Touching the transparent
part of the bulb with your fin-
gers may reduce the intensity of the
emitted light and even compromise du-
ration of the lamp itself. In the case of
accidental contact, rub the lamp with a
cloth and spirit and leave to dry.
Modifications or repairs to
the electrical system (elec-
tronic control units) that are not car-
ried out properly or do not take the
technical specifications of the system
into account can cause malfunctions
leading to the risk of fire.
WARNING
Halogen bulbs contain pres-
surised gas which, if broken,
may cause small fragments of glass to
be projected outwards.
WARNING
fig. 15F0R0112m
145-176 LINEA 1ed GB 5-09-2008 9:22 Pagina 158
Page 169 of 234
168
WARNING
LIGHTS AND
MESSAGES
CAR
MAINTENANCE
TECHNICAL
SPECIFICATIONS
IINDEX
DASHBOARD
AND CONTROLS
SAFETY
DEVICES
CORRECT USE
OF THE
CAR
IN AN
EMERGENCY
IF A FUSE BLOWS
GENERAL
The fuse is a protective device for the
electric system: it comes into action (i.e.
it cuts off) mainly due to a fault or im-
proper action on the system.
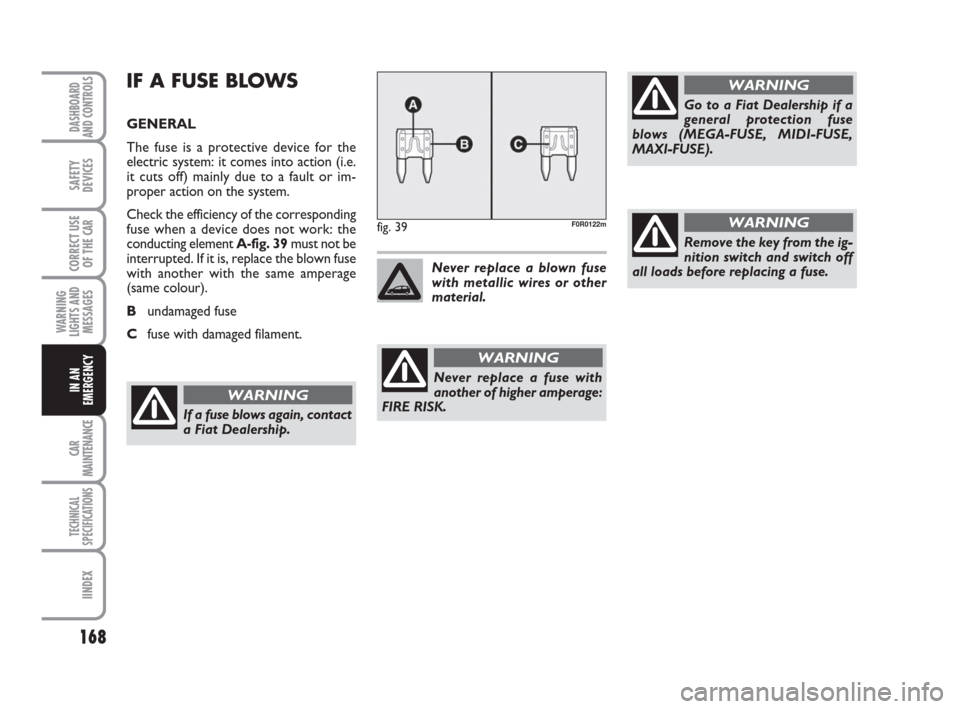
Check the efficiency of the corresponding
fuse when a device does not work: the
conducting element A-fig. 39must not be
interrupted. If it is, replace the blown fuse
with another with the same amperage
(same colour).
Bundamaged fuse
Cfuse with damaged filament.
fig. 39F0R0122m
Never replace a fuse with
another of higher amperage:
FIRE RISK.
WARNING
Never replace a blown fuse
with metallic wires or other
material.
Go to a Fiat Dealership if a
general protection fuse
blows (MEGA-FUSE, MIDI-FUSE,
MAXI-FUSE).
WARNING
If a fuse blows again, contact
a Fiat Dealership.
WARNING
Remove the key from the ig-
nition switch and switch off
all loads before replacing a fuse.
WARNING
145-176 LINEA 1ed GB 5-09-2008 9:22 Pagina 168
Page 177 of 234
176
WARNING
LIGHTS AND
MESSAGES
CAR
MAINTENANCE
TECHNICAL
SPECIFICATIONS
IINDEX
DASHBOARD
AND CONTROLS
SAFETY
DEVICES
CORRECT USE
OF THE
CAR
IN AN
EMERGENCY
FASTENING THE TOW
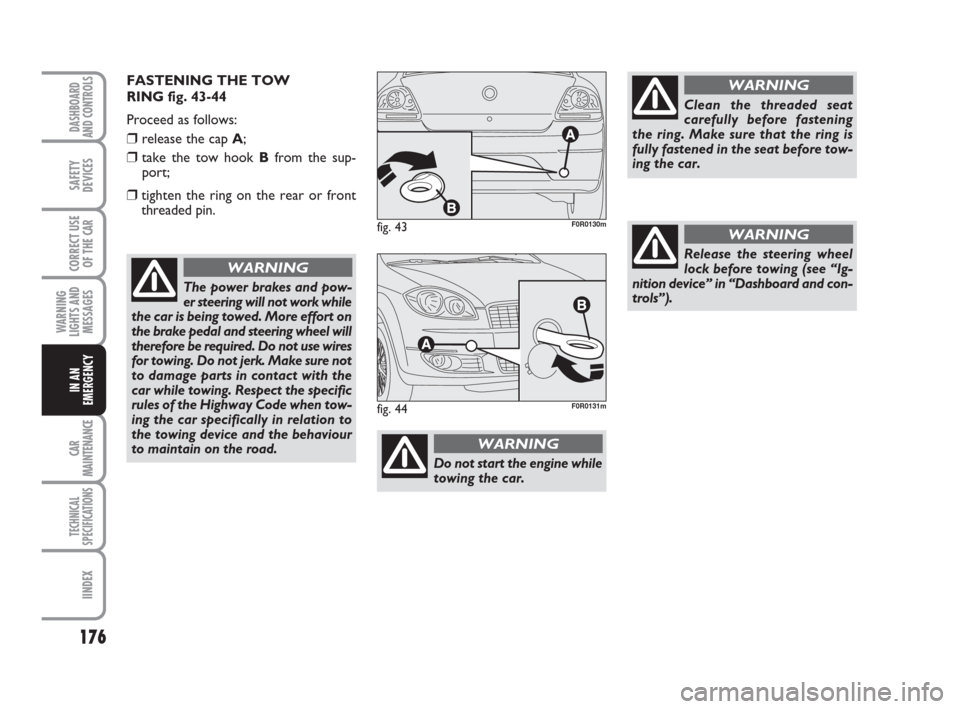
RING fig. 43-44
Proceed as follows:
❒release the cap A;
❒take the tow hook Bfrom the sup-
port;
❒tighten the ring on the rear or front
threaded pin.
The power brakes and pow-
er steering will not work while
the car is being towed. More effort on
the brake pedal and steering wheel will
therefore be required. Do not use wires
for towing. Do not jerk. Make sure not
to damage parts in contact with the
car while towing. Respect the specific
rules of the Highway Code when tow-
ing the car specifically in relation to
the towing device and the behaviour
to maintain on the road.
WARNING
fig. 43F0R0130m
fig. 44F0R0131m
Do not start the engine while
towing the car.
WARNING
Clean the threaded seat
carefully before fastening
the ring. Make sure that the ring is
fully fastened in the seat before tow-
ing the car.
WARNING
Release the steering wheel
lock before towing (see “Ig-
nition device” in “Dashboard and con-
trols”).
WARNING
145-176 LINEA 1ed GB 5-09-2008 9:22 Pagina 176
Page 187 of 234
186
WARNING
LIGHTS AND
MESSAGES
TECHNICAL
SPECIFICATIONS
INDEX
DASHBOARD
AND CONTROLS
SAFETY
DEVICES
CORRECT USE
OF THE CAR
IN AN
EMERGENCY
CAR
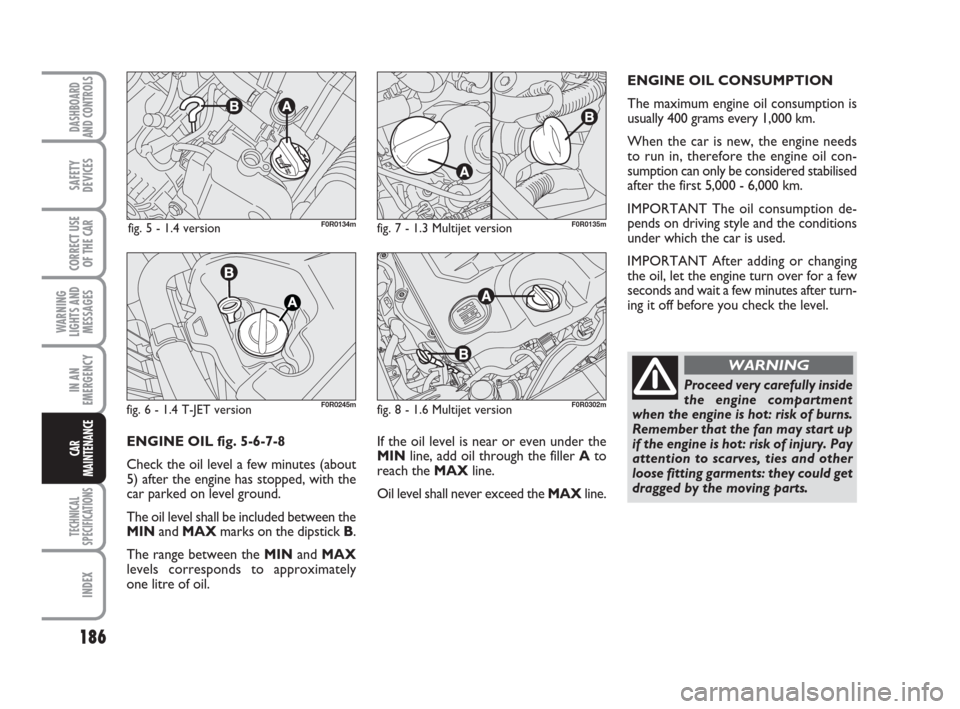
MAINTENANCEIf the oil level is near or even under the
MINline, add oil through the filler Ato
reach the MAXline.
Oil level shall never exceed the MAXline.ENGINE OIL CONSUMPTION
The maximum engine oil consumption is
usually 400 grams every 1,000 km.
When the car is new, the engine needs
to run in, therefore the engine oil con-
sumption can only be considered stabilised
after the first 5,000 - 6,000 km.
IMPORTANT The oil consumption de-
pends on driving style and the conditions
under which the car is used.
IMPORTANT After adding or changing
the oil, let the engine turn over for a few
seconds and wait a few minutes after turn-
ing it off before you check the level.
ENGINE OIL fig. 5-6-7-8
Check the oil level a few minutes (about
5) after the engine has stopped, with the
car parked on level ground.
The oil level shall be included between the
MINand MAXmarks on the dipstick B.
The range between the MINand MAX
levels corresponds to approximately
one litre of oil.
fig. 5 - 1.4 version F0R0134mfig. 7 - 1.3 Multijet versionF0R0135m
Proceed very carefully inside
the engine compartment
when the engine is hot: risk of burns.
Remember that the fan may start up
if the engine is hot: risk of injury. Pay
attention to scarves, ties and other
loose fitting garments: they could get
dragged by the moving parts.
WARNING
fig. 6 - 1.4 T-JET versionF0R0245mfig. 8 - 1.6 Multijet versionF0R0302m
177-200 LINEA 1ed GB 3-09-2008 17:31 Pagina 186
Page 192 of 234
191
WARNING
LIGHTS AND
MESSAGES
TECHNICAL
SPECIFICATIONS
INDEX
DASHBOARD
AND CONTROLS
SAFETY
DEVICES
CORRECT USE
OF THE CAR
IN AN
EMERGENCY
CAR
MAINTENANCE
CHANGING THE BATTERY
If required, replace the battery with a gen-
uine spare part having the same specifi-
cations.
If a battery with different specifications is
fitted, the service intervals given in the
“Service schedule” in this section will no
longer apply.
Follow the battery manufacturer’s in-
structions for maintenance.
IMPORTANT Check the battery charge
once a year, preferably before the begin-
ning to winter, to prevent freezing of the
electrolyte. Perform this inspection more
frequently if the car is mainly used for
short distances or if electrical devices run-
ning with the key off are installed, partic-
ularly after-market.
Incorrect assembly of electric
and electronic devices may
cause severe damage to your
car. Go to a Fiat Dealership if
you want to install accessories (alarms,
mobile phone, etc.): they will suggest
the most suitable devices and advise
you if a higher capacity battery needs
to be installed.Batteries contain very dan-
gerous substances for the en-
vironment. You are recom-
mended to go to a Fiat Deal-
ership to have the battery replaced
where the old battery will be disposed
of respecting both the environment and
the laws in force.
If the car is left for long peri-
ods in very cold environ-
ments, remove the battery and store it
in a warm place to prevent freezing.
WARNING
Battery liquid is poisonous
and corrosive. Avoid contact
with the skin and eyes. Keep naked
flames and sources of sparks away
from the battery: risk of fire and ex-
plosion.
WARNING
Running the battery with an
excessively low liquid level
will damage the battery beyond re-
pair and even cause an explosion.
WARNING
177-200 LINEA 1ed GB 3-09-2008 17:31 Pagina 191
Page 204 of 234
203
WARNING
LIGHTS AND
MESSAGES
INDEX
DASHBOARD
AND CONTROLS
SAFETY
DEVICES
CORRECT USE
OF THE
CAR
IN AN
EMERGENCY
CAR
MAINTENANCE
TECHNICAL
SPECIFICATIONS
CHASSIS MARKING fig. 3
This is printed on the passegner com-
partment floor bed near the front right
seat.
❒car model (ZFA 323000);
❒chassis number.ENGINE MARKING
Engine marking is stamped on the cylinder
block and includes the model and the
chassis number.
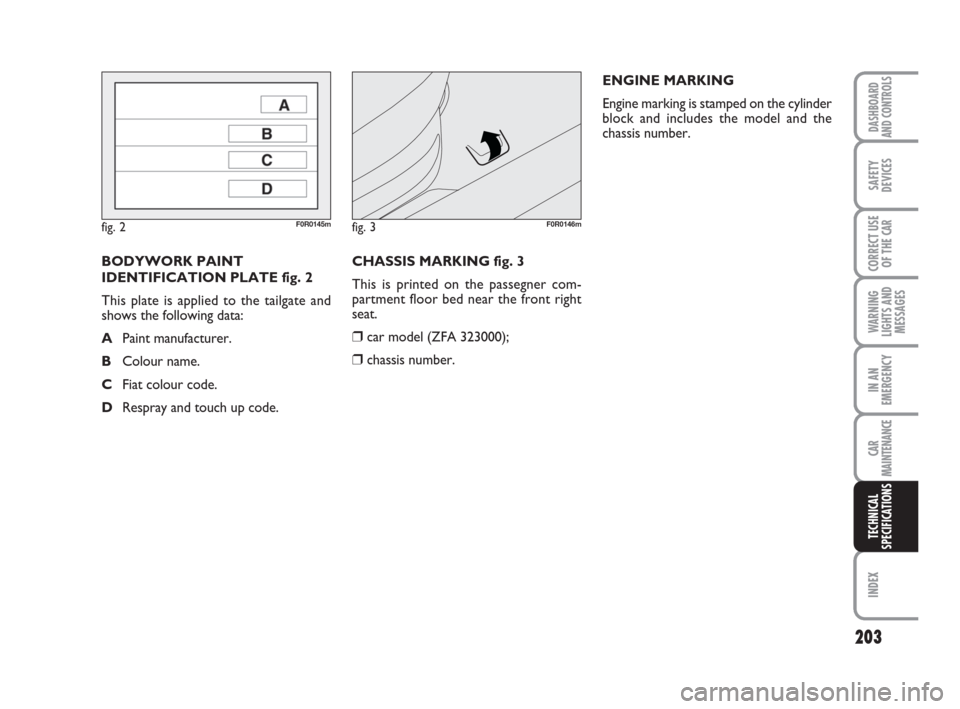
BODYWORK PAINT
IDENTIFICATION PLATE fig. 2
This plate is applied to the tailgate and
shows the following data:
APaint manufacturer.
BColour name.
CFiat colour code.
DRespray and touch up code.
fig. 2F0R0145mfig. 3F0R0146m
201-221 LINEA 1ed GB 5-09-2008 9:24 Pagina 203
Page 206 of 234

205
WARNING
LIGHTS AND
MESSAGES
INDEX
DASHBOARD
AND CONTROLS
SAFETY
DEVICES
CORRECT USE
OF THE
CAR
IN AN
EMERGENCY
CAR
MAINTENANCE
TECHNICAL
SPECIFICATIONS
ENGINE
GENERAL
Engine code
Cycle
Number and layout of cylinders
Piston bore and stroke mm
Total displacement cm3
Compression ratio
Maximum power (EEC) kW
HP
corresponding ratio rpm
Maximum torque (EEC) Nm
kgm
corresponding ratio rpm
Spark plugs
Fuel
1.4
350A1000
Otto
4 in line
72 x 84
1368
11.1 ± 0.2
57
77
6000
115
11.7
3000
NGK
ZKR7A-10
Unleaded petrol 95
RON
(EN228 Specifications)
1.4 T-JET
198A4000
Otto
4
in line
72,0 x 84,0
1368
9.8
88
120
5000
206
21
1750
NGK
IKR9F8
Unleaded petrol 95
RON
(EN228 Specifications)
1.3 Multijet
199A3000
Diesel
4 in line
69.6 x 82
1248
17.6 ± 0.4
66
90
4000
200
20.3
1750
–
Diesel fuel for motor
vehicles
(EN590 specifications)
1.6 Multijet
198A3000
Diesel
4 in line
79.5 x 80.5
1598
16.5 ± 0.4
77
105
4000
290
29.6
1500
–
Diesel fuel for motor
vehicles
(EN590 specifications)
201-221 LINEA 1ed GB 5-09-2008 9:24 Pagina 205
Page 210 of 234
209
WARNING
LIGHTS AND
MESSAGES
INDEX
DASHBOARD
AND CONTROLS
SAFETY
DEVICES
CORRECT USE
OF THE
CAR
IN AN
EMERGENCY
CAR
MAINTENANCE
TECHNICAL
SPECIFICATIONS
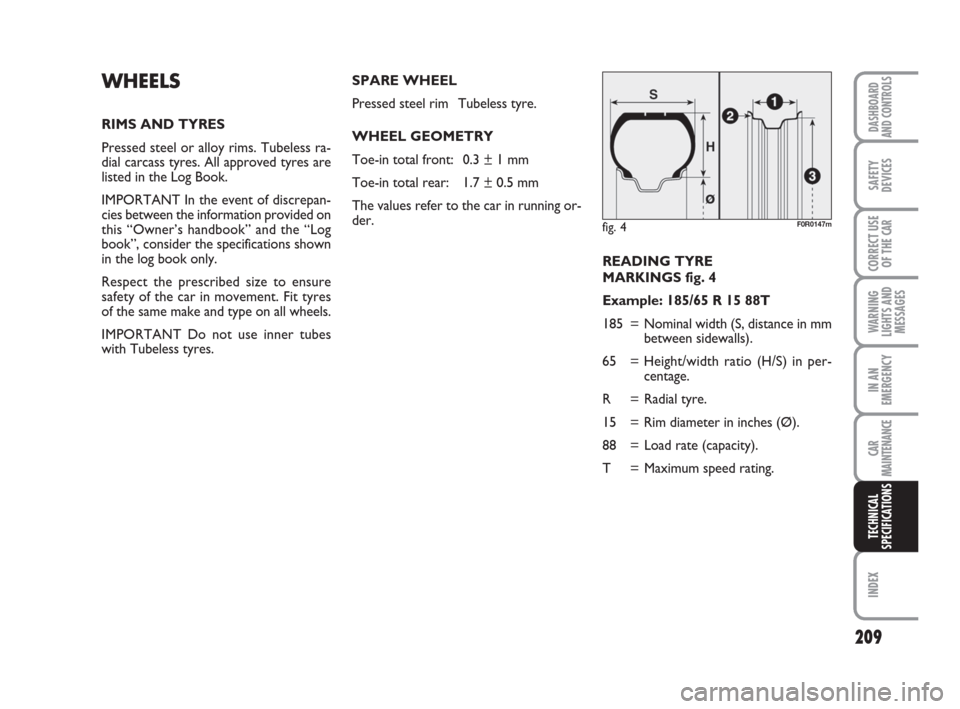
READING TYRE
MARKINGS fig. 4
Example: 185/65 R 15 88T
185 = Nominal width (S, distance in mm
between sidewalls).
65 = Height/width ratio (H/S) in per-
centage.
R = Radial tyre.
15 = Rim diameter in inches (Ø).
88 = Load rate (capacity).
T = Maximum speed rating.
WHEELS
RIMS AND TYRES
Pressed steel or alloy rims. Tubeless ra-
dial carcass tyres. All approved tyres are
listed in the Log Book.
IMPORTANT In the event of discrepan-
cies between the information provided on
this “Owner’s handbook” and the “Log
book”, consider the specifications shown
in the log book only.
Respect the prescribed size to ensure
safety of the car in movement. Fit tyres
of the same make and type on all wheels.
IMPORTANT Do not use inner tubes
with Tubeless tyres.
fig. 4F0R0147m
SPARE WHEEL
Pressed steel rim Tubeless tyre.
WHEEL GEOMETRY
Toe-in total front: 0.3 ± 1 mm
Toe-in total rear: 1.7 ± 0.5 mm
The values refer to the car in running or-
der.
201-221 LINEA 1ed GB 5-09-2008 9:24 Pagina 209
Page 211 of 234
210
WARNING
LIGHTS AND
MESSAGES
INDEX
DASHBOARD
AND CONTROLS
SAFETY
DEVICES
CORRECT USE
OF THE
CAR
IN AN
EMERGENCY
CAR
MAINTENANCE
TECHNICAL
SPECIFICATIONS
READING RIM
MARKINGS fig. 4
Example: 6J x 15 ET44
6 = rim width in inches 1.
J = rim drop centre outline (side
projection where the tyre bead
rests) 2.
15 = rim nominal diameter in inches
(corresponds to diameter of the
tyre to be mounted) 3= Ø.
ET44 = wheel camber angle (distance be-
tween the disc/rim supporting
plane and the wheel rim centre
line). Load rating (capacity)
70= 335 kg 81= 462 kg
71= 345 kg 82= 475 kg
72= 355 kg 83= 487 kg
73= 365 kg 84= 500 kg
74= 375 kg 85= 515 kg
75= 387 kg 86= 530 kg
76= 400 kg 87= 545 kg
77= 412 kg 88= 560 kg
78= 425 kg 89= 580 kg
79= 437 kg 90= 600 kg
80= 450 kg 91= 615 kg Maximum speed rating
Q= up to 160 km/h.
R= up to 170 km/h.
S= up to 180 km/h.
T= up to 190 km/h.
?U= up to 200 km/h.
H= up to 210 km/h.
V= up to 240 km/h.
Maximum speed rating
for snow tyres
QM + S= up to 160 km/h.
TM + S= up to 190 km/h.
HM + S= up to 210 km/h.
201-221 LINEA 1ed GB 5-09-2008 9:24 Pagina 210
Page 216 of 234
215
WARNING
LIGHTS AND
MESSAGES
INDEX
DASHBOARD
AND CONTROLS
SAFETY
DEVICES
CORRECT USE
OF THE
CAR
IN AN
EMERGENCY
CAR
MAINTENANCE
TECHNICAL
SPECIFICATIONS
1160
500
1000
900
1660
1200
500
75
70
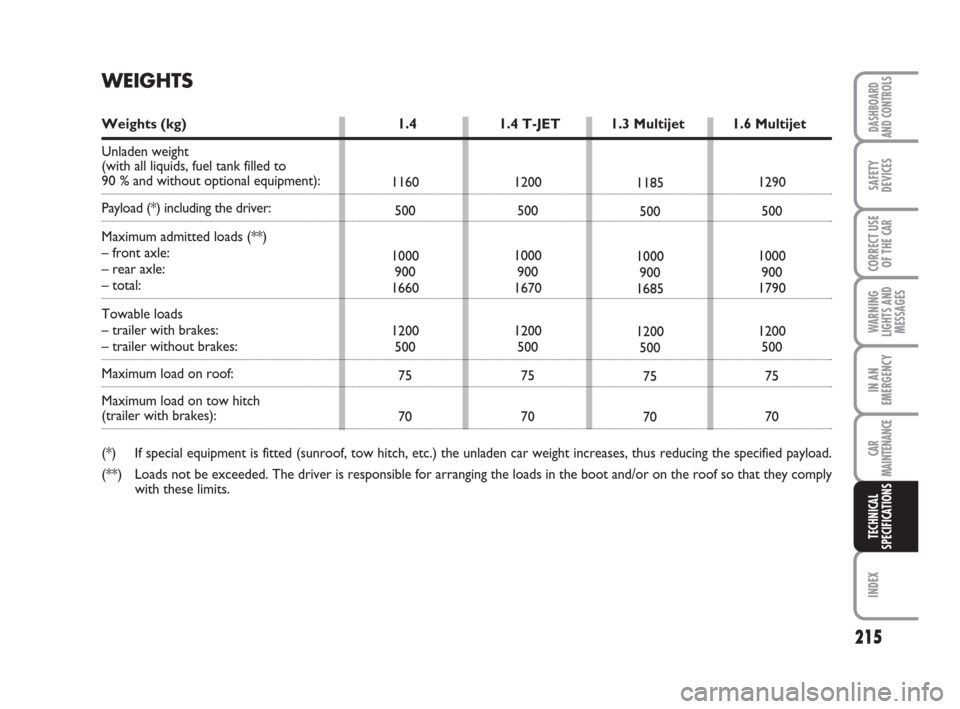
WEIGHTS
Weights (kg) 1.4 1.4 T-JET 1.3 Multijet 1.6 Multijet
Unladen weight
(with all liquids, fuel tank filled to
90 % and without optional equipment):
Payload (*) including the driver:
Maximum admitted loads (**)
– front axle:
– rear axle:
– total:
Towable loads
– trailer with brakes:
– trailer without brakes:
Maximum load on roof:
Maximum load on tow hitch
(trailer with brakes):
(*) If special equipment is fitted (sunroof, tow hitch, etc.) the unladen car weight increases, thus reducing the specified payload.
(**) Loads not be exceeded. The driver is responsible for arranging the loads in the boot and/or on the roof so that they comply
with these limits.1200
500
1000
900
1670
1200
500
75
701185
500
1000
900
1685
1200
500
75
701290
500
1000
900
1790
1200
500
75
70
201-221 LINEA 1ed GB 5-09-2008 9:24 Pagina 215