right side FIAT MAREA 2000 1.G User Guide
[x] Cancel search | Manufacturer: FIAT, Model Year: 2000, Model line: MAREA, Model: FIAT MAREA 2000 1.GPages: 330
Page 115 of 330
Marea-Marea Weekend
2000 range (j§)
1
4F029XJ02
Engine
Fuel feed system
10.
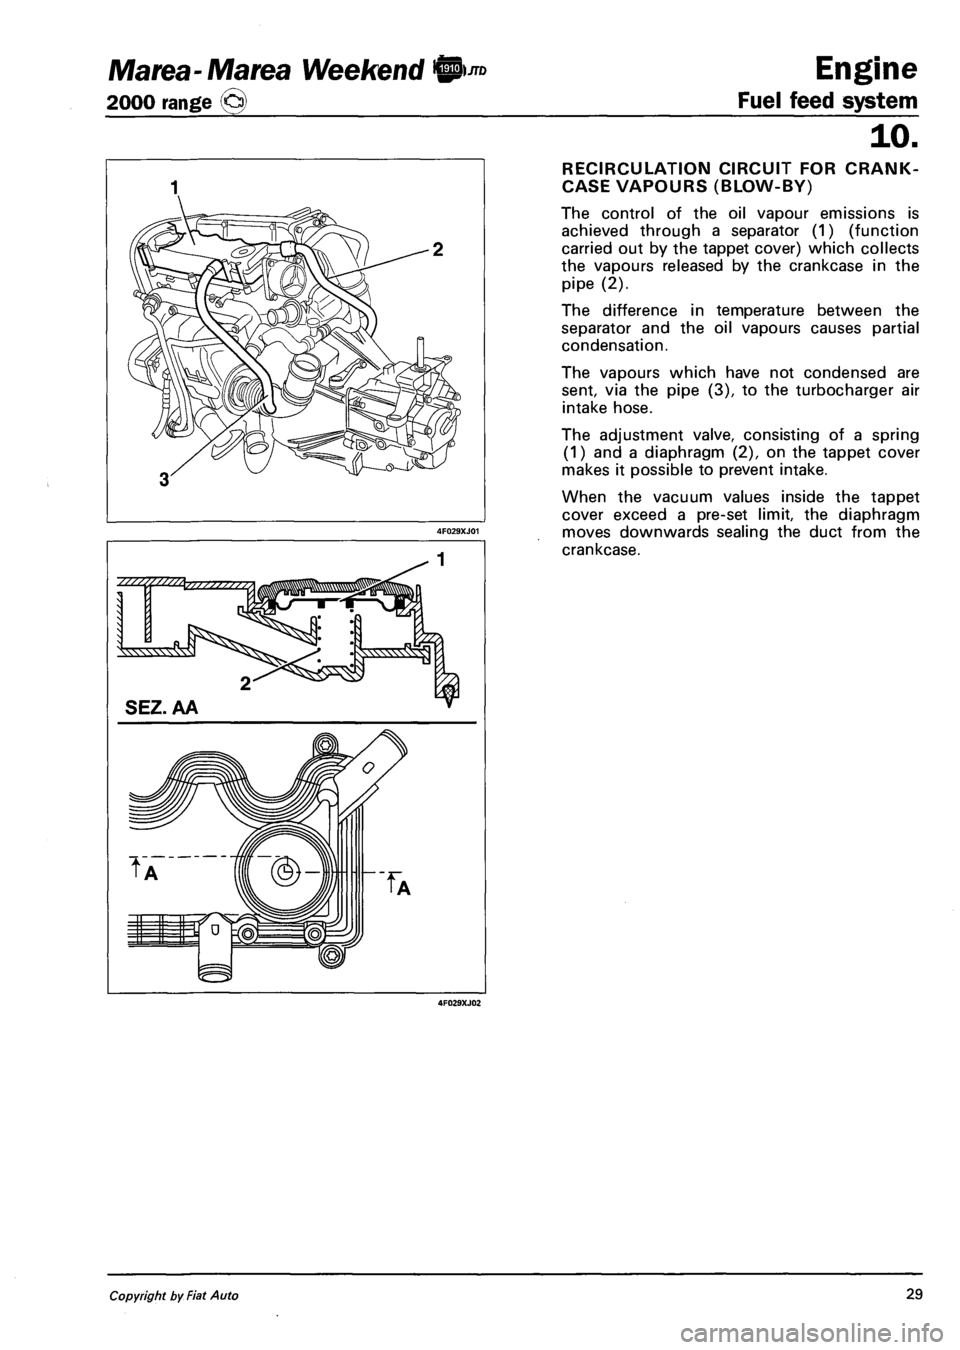
RECIRCULATION CIRCUIT FOR CRANK-
CASE VAPOURS (BLOW-BY)
The control of the oil vapour emissions is
achieved through a separator (1) (function
carried out by the tappet cover) which collects
the vapours released by the crankcase in the
pipe (2).
The difference in temperature between the
separator and the oil vapours causes partial
condensation.
The vapours which have not condensed are
sent, via the pipe (3), to the turbocharger air
intake hose.
The adjustment valve, consisting of a spring
(1) and a diaphragm (2), on the tappet cover
makes it possible to prevent intake.
When the vacuum values inside the tappet
cover exceed a pre-set limit, the diaphragm
moves downwards sealing the duct from the
crankcase.
Copyright by Fiat Auto 29
Page 123 of 330
Marea-Marea Weekend H nD Engine
2000 range (Q) Fuel feed system
10.
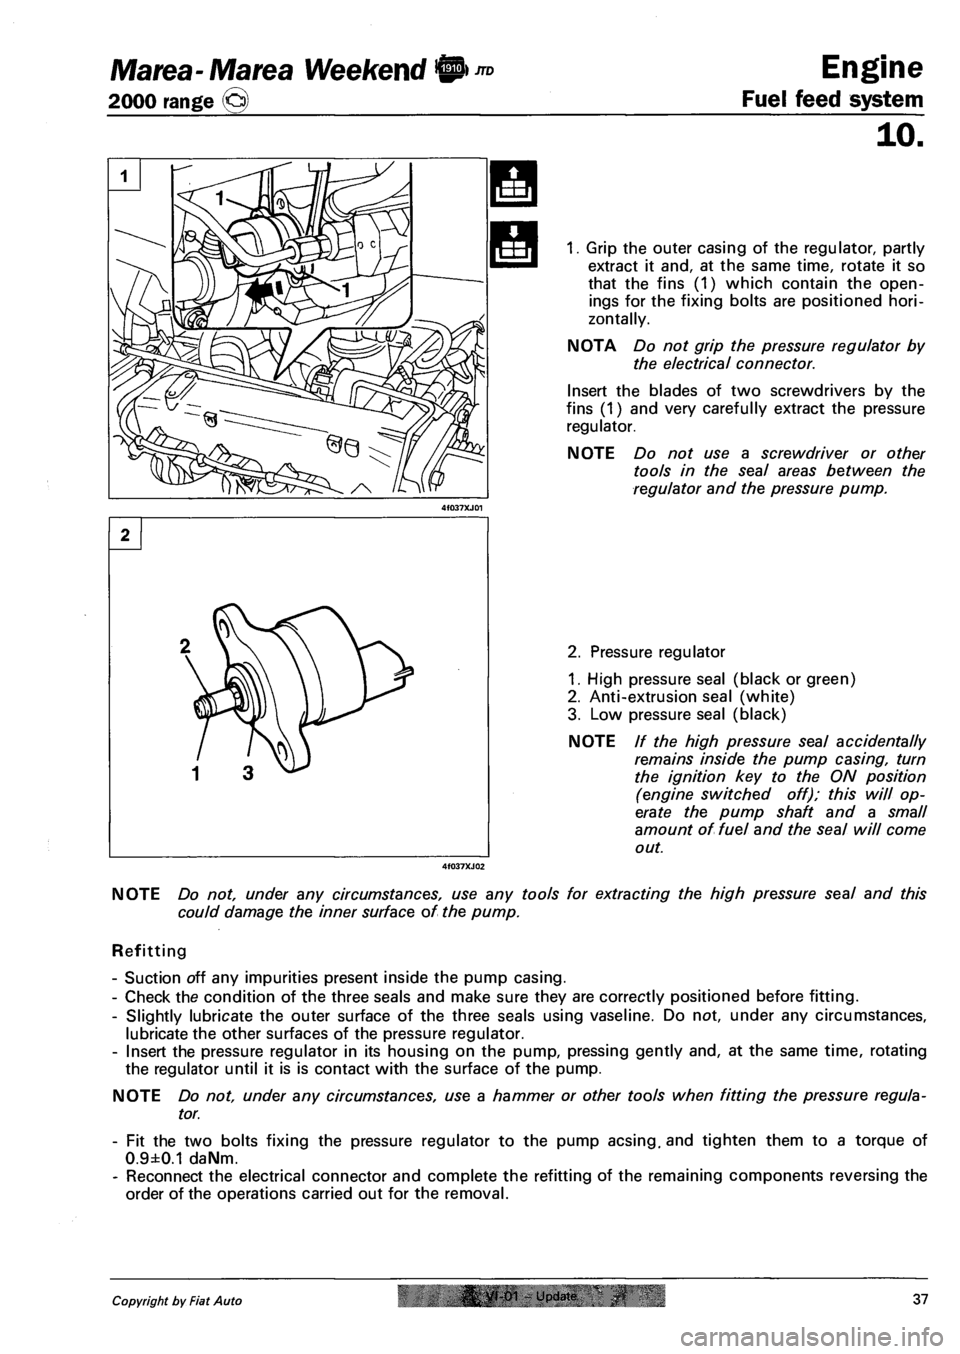
1. Grip the outer casing of the regulator, partly
extract it and, at the same time, rotate it so
that the fins (1) which contain the open
ings for the fixing bolts are positioned hori
zontally.
NOTA Do not grip the pressure regulator by
the electrical connector.
Insert the blades of two screwdrivers by the
fins (1) and very carefully extract the pressure
regulator.
NOTE Do not use a screwdriver or other
tools in the seal areas between the
regulator and the pressure pump.
2. Pressure regulator
1. High pressure seal (black or green)
2. Anti-extrusion seal (white)
3. Low pressure seal (black)
NOTE // the high pressure seal accidentally
remains inside the pump casing, turn
the ignition key to the ON position
(engine switched off); this will op
erate the pump shaft and a small
amount of fuel and the seal will come
out.
NOTE Do not, under any circumstances, use any tools for extracting the high pressure seal and this
could damage the inner surface of the pump.
Refitting
- Suction off any impurities present inside the pump casing.
- Check the condition of the three seals and make sure they are correctly positioned before fitting.
- Slightly lubricate the outer surface of the three seals using vaseline. Do not, under any circumstances,
lubricate the other surfaces of the pressure regulator.
- Insert the pressure regulator in its housing on the pump, pressing gently and, at the same time, rotating
the regulator until it is is contact with the surface of the pump.
NOTE Do not, under any circumstances, use a hammer or other tools when fitting the pressure regula
tor.
- Fit the two bolts fixing the pressure regulator to the pump acsing. and tighten them to a torque of
0.9±0.1 daNm.
- Reconnect the electrical connector and complete the refitting of the remaining components reversing the
order of the operations carried out for the removal.
Copyright by Fiat Auto |& yt-01 - Update 37
Page 126 of 330
Marea- Marea Weekend
2000 range ©
Auxiliary Units
Climate control
50
COMPRESSOR ( 1596 engine)
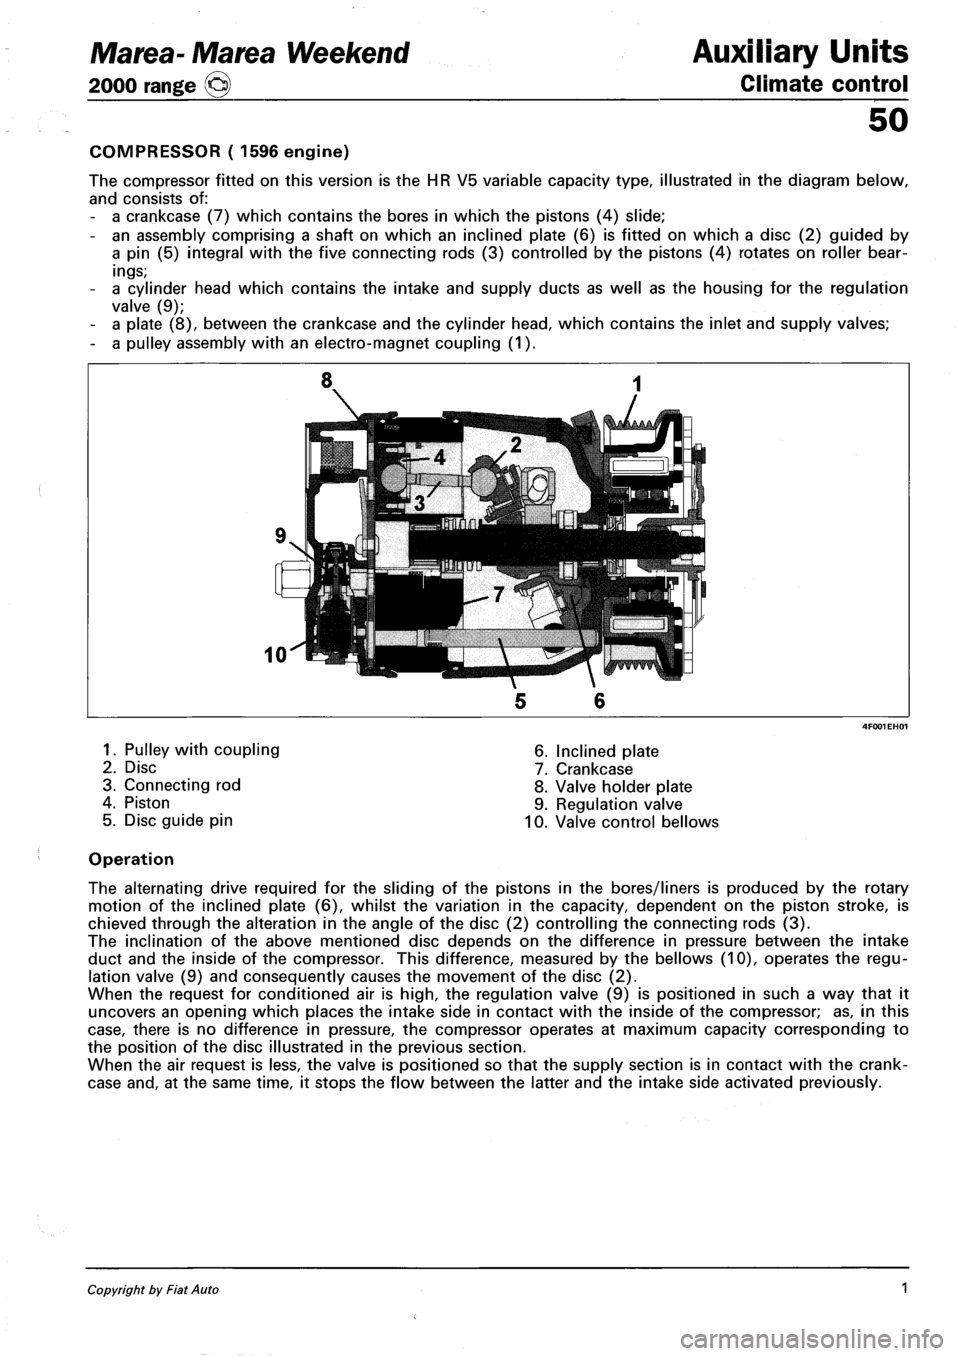
The compressor fitted on this version is the HR V5 variable capacity type, illustrated in the diagram below,
and consists of:
- a crankcase (7) which contains the bores in which the pistons (4) slide;
- an assembly comprising a shaft on which an inclined plate (6) is fitted on which a disc (2) guided by
a pin (5) integral with the five connecting rods (3) controlled by the pistons (4) rotates on roller bear
ings;
- a cylinder head which contains the intake and supply ducts as well as the housing for the regulation
valve (9);
- a plate (8), between the crankcase and the cylinder head, which contains the inlet and supply valves;
- a pulley assembly with an electro-magnet coupling (1).
1. Pulley with coupling
2. Disc
3. Connecting rod
4. Piston
5. Disc guide pin
6. Inclined plate
7. Crankcase
8. Valve holder plate
9. Regulation valve
10. Valve control bellows
Operation
The alternating drive required for the sliding of the pistons in the bores/liners is produced by the rotary
motion of the inclined plate (6), whilst the variation in the capacity, dependent on the piston stroke, is
chieved through the alteration in the angle of the disc (2) controlling the connecting rods (3).
The inclination of the above mentioned disc depends on the difference in pressure between the intake
duct and the inside of the compressor. This difference, measured by the bellows (10), operates the regu
lation valve (9) and consequently causes the movement of the disc (2).
When the request for conditioned air is high, the regulation valve (9) is positioned in such a way that it
uncovers an opening which places the intake side in contact with the inside of the compressor; as, in this
case, there is no difference in pressure, the compressor operates at maximum capacity corresponding to
the position of the disc illustrated in the previous section.
When the air request is less, the valve is positioned so that the supply section is in contact with the crank
case and, at the same time, it stops the flow between the latter and the intake side activated previously.
Copyright by Fiat Auto 1
Page 128 of 330
Marea-Marea Weekend
2000 range ©)
Auxiliary Units
Climate control
50
COMPRESSOR ( 1998 engine)
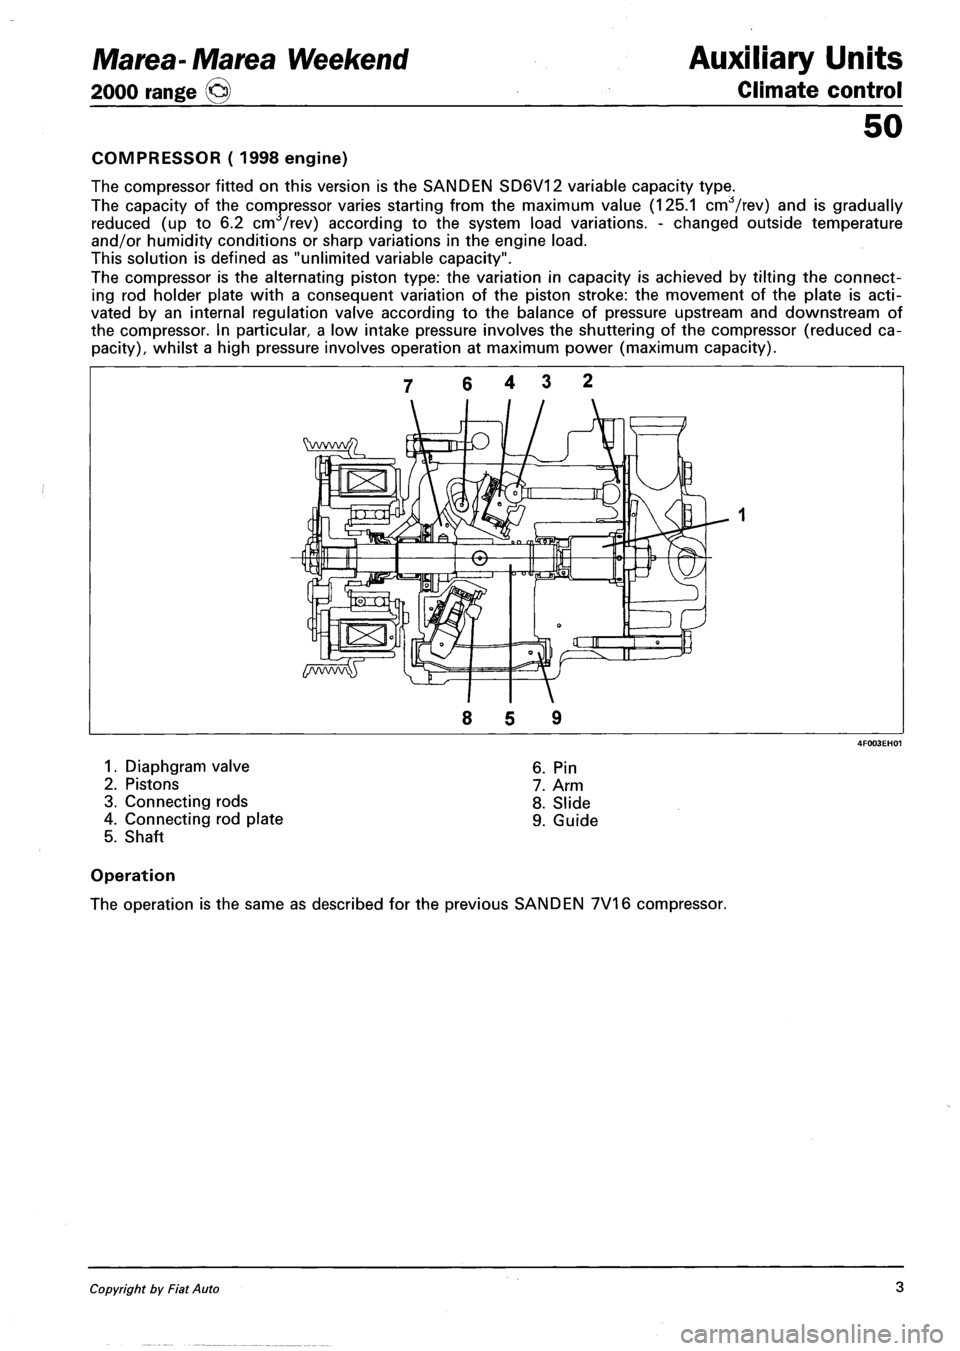
The compressor fitted on this version is the SANDEN SD6V12 variable capacity type.
The capacity of the compressor varies starting from the maximum value (125.1 cnrfVrev) and is gradually
reduced (up to 6.2 cm /rev) according to the system load variations. - changed outside temperature
and/or humidity conditions or sharp variations in the engine load.
This solution is defined as "unlimited variable capacity".
The compressor is the alternating piston type: the variation in capacity is achieved by tilting the connect
ing rod holder plate with a consequent variation of the piston stroke: the movement of the plate is acti
vated by an internal regulation valve according to the balance of pressure upstream and downstream of
the compressor. In particular a low intake pressure involves the shuttering of the compressor (reduced ca
pacity), whilst a high pressure involves operation at maximum power (maximum capacity).
1. Diaphgram valve
2. Pistons
3. Connecting rods
4. Connecting rod plate
5. Shaft
6. Pin
7. Arm
8. Slide
9. Guide
Operation
The operation is the same as described for the previous SANDEN 7V16 compressor.
Copyright by Fiat Auto 3
Page 131 of 330
Marea- Marea Weekend
2000 range ©
Electrical equipment
Protection and security devices
55.
PROTECTION AND SAFETY DEVICES
All the vehicle supply lines were designed taking into account the most up-to-date directives in terms of
safety and protection, especially to prevent fires.
There are 2 types of protection:
- active protection, aims to reduce the causes of faults "at source"
- passive protection, aims to limit the effects of a fault as much as possible
The first category includes a carefully designed wiring layout with wires positioned and carefully anchored
on tracks that are repaired and protected if necessary.
The cables connected to the alternator and the motor were modified for this reason by adding protective
caps etc. A strengthened sheath was also introduced for some of the more exposed sections of wiring.
The passive protection includes all interventions to reduce faults due to high current (overload, short cir
cuit).
All system fuses were rated based on the nominal absorbtion of the loads activated at the same time, to
ensure intervention in cases of a clear short circuit.
The introduction of a box containing 4 maxifuses with other fuses connected on the outside means all
the supplies can be protected except for the cable that connects the battery to the starter motor and the
cable that connects the starter motor to the recharging alternator. These cables are therefore protected by a
strengthened supplementary sheath.
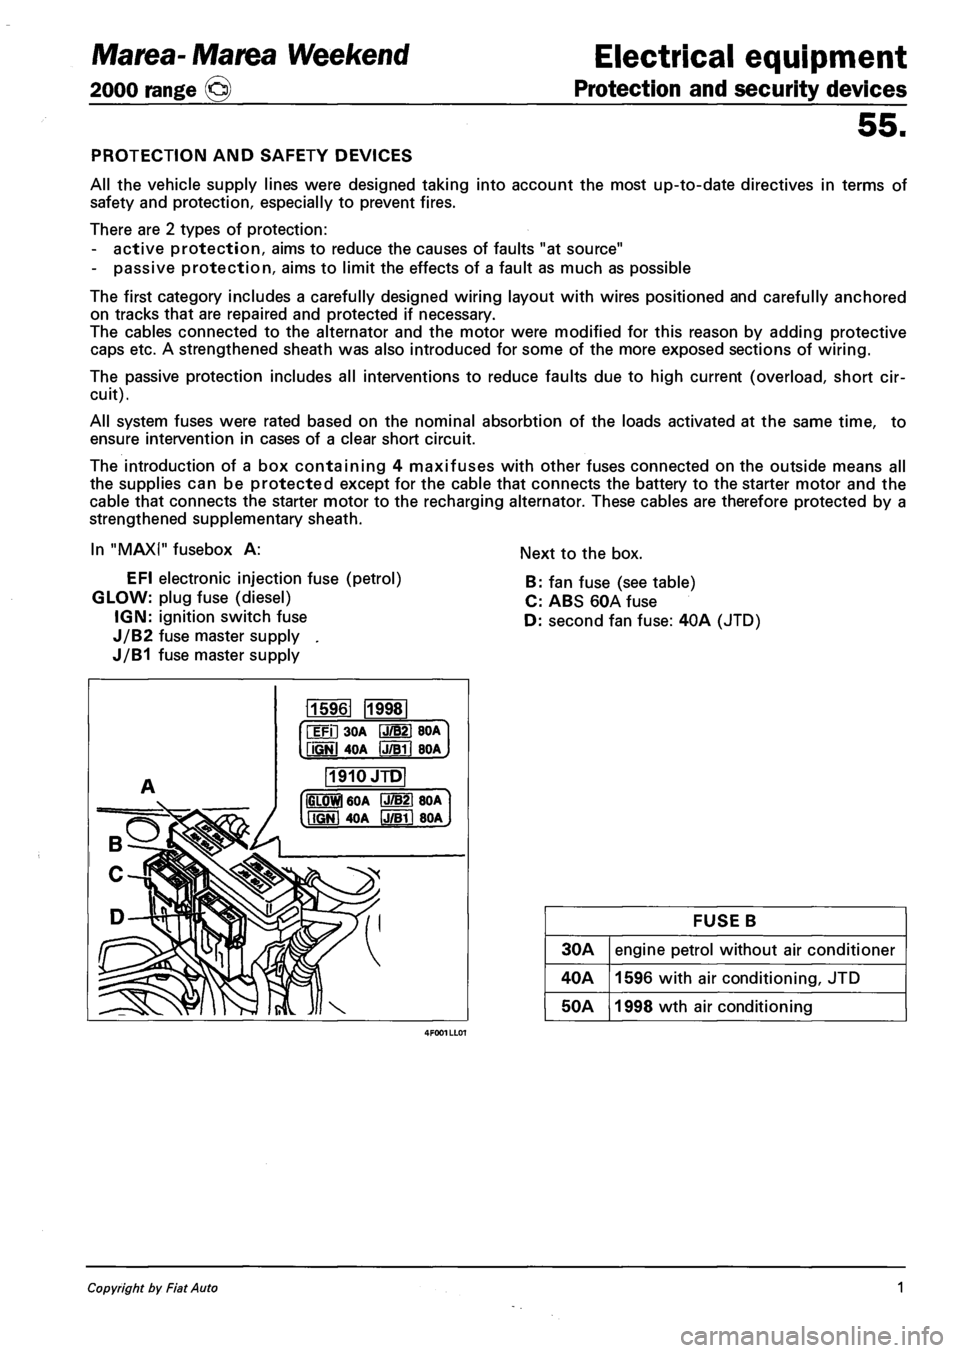
In "MAXI" fusebox A:
EFI electronic injection fuse (petrol)
GLOW: plug fuse (diesel)
IGN: ignition switch fuse
J/B2 fuse master supply .
J/B1 fuse master supply
Next to the box.
B: fan fuse (see table)
C: ABS 60A fuse
D: second fan fuse: 40A (JTD)
115961 1998
iFil 30A IJ/B21 BOA
fiGNl 4OA IJTBTI BOA
1910JTD
IGLOWl 60A P7B21 80A
MGNI 40A IJ/Bll 80A
FUSE B
30A engine petrol without air conditioner
40A 1596 with air conditioning, JTD
50A 1998 wth air conditioning
Copyright by Fiat Auto 1
Page 135 of 330
Marea-Marea Weekend
2000 range Q
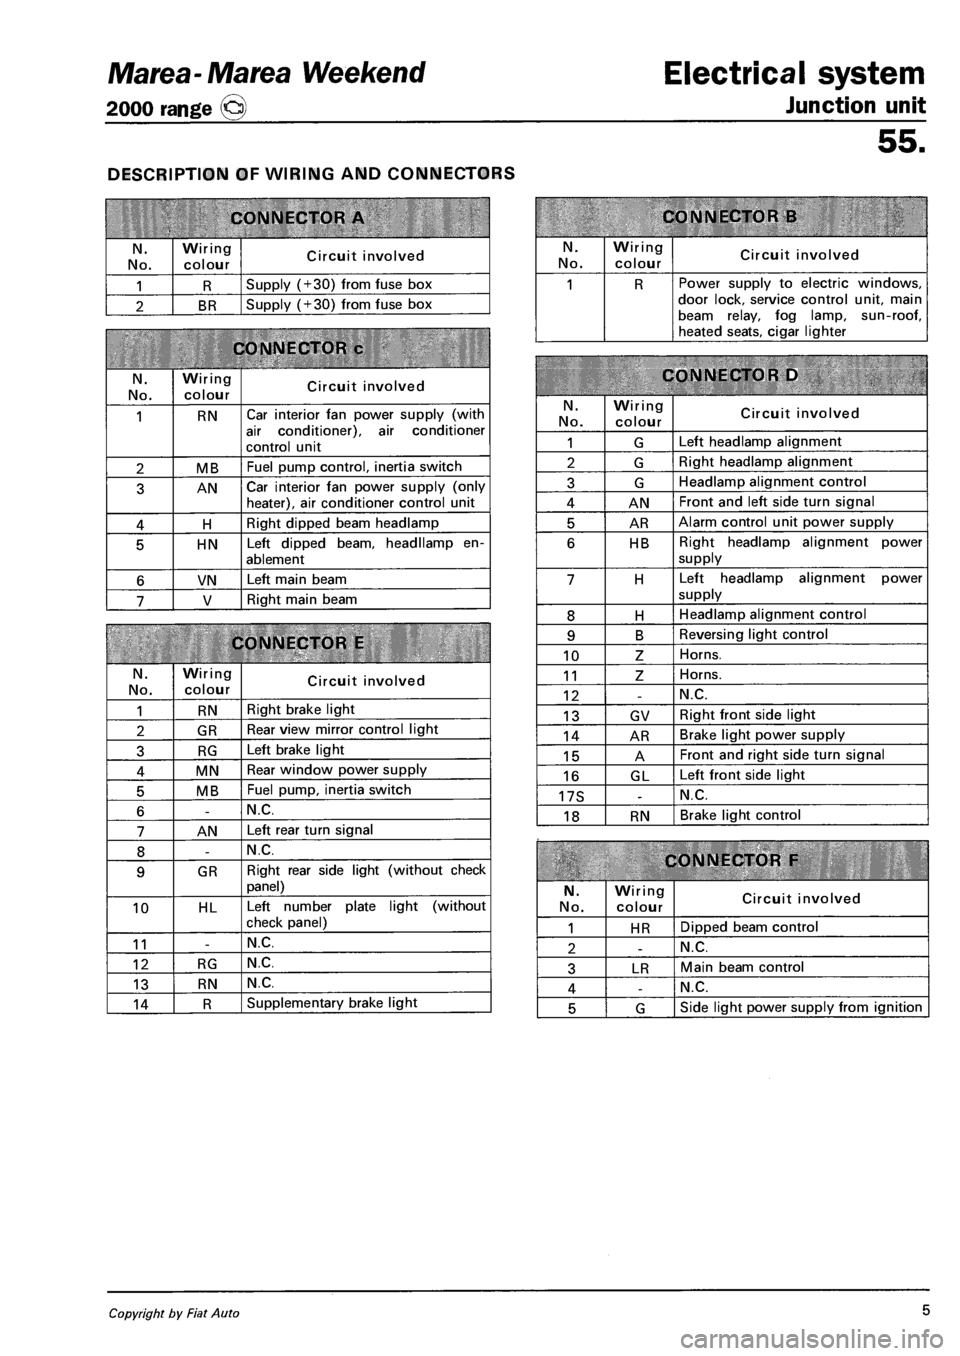
DESCRIPTION OF WIRING AND CONNECTORS
CONNECTOR A
N.
No.
Wiring
colour Circuit involved
1 R Supply (+30) from fuse box
2 BR Supply (+30) from fuse box
CONNECTOR c
N. No.
Wiring colour Circuit involved
1 RN Car interior fan power supply (with
air conditioner), air conditioner
control unit
2 MB Fuel pump control, inertia switch
3 AN Car interior fan power supply (only heater), air conditioner control unit
4 H Right dipped beam headlamp
5 HN Left dipped beam, headllamp en
ablement
6 VN Left main beam
7 V Right main beam
CONNECTOR E
N.
No.
Wiring colour Circuit involved
1 RN Right brake light
2 GR Rear view mirror control light
3 RG Left brake light
4 MN Rear window power supply
5 MB Fuel pump, inertia switch
6 -N.C.
7 AN Left rear turn signal
8 -N.C.
9 GR Right rear side light (without check
panel)
10 HL Left number plate light (without
check panel)
11 -N.C.
12 RG N.C.
13 RN N.C.
14 R Supplementary brake light
Electrical system
Junction unit
55.
CONNECTOR B
N. No.
Wiring
colour Circuit involved
1 R Power supply to electric windows, door lock, service control unit, main beam relay, fog lamp, sun-roof, heated seats, cigar lighter
CONNECTOR D
N.
No.
Wiring colour Circuit involved
1 G Left headlamp alignment
2 G Right headlamp alignment
3 G Headlamp alignment control
4 AN Front and left side turn signal
5 AR Alarm control unit power supply
6 HB Right headlamp alignment power
supply
7 H Left headlamp alignment power
supply
8 H Headlamp alignment control
9 B Reversing light control
10 Z Horns.
11 Z Horns.
12 -N.C.
13 GV Right front side light
14 AR Brake light power supply
15 A Front and right side turn signal
16 GL Left front side light
17S -N.C.
18 RN Brake light control
CONNECTOR F
N.
No.
Wiring colour Circuit involved
1 HR Dipped beam control
2 -N.C.
3 LR Main beam control
4 -N.C.
5 G Side light power supply from ignition
Copyright by Fiat Auto 5
Page 136 of 330
Electrical system
Junction unit
Marea- Marea Weekend
2000 range ©
55. 55.
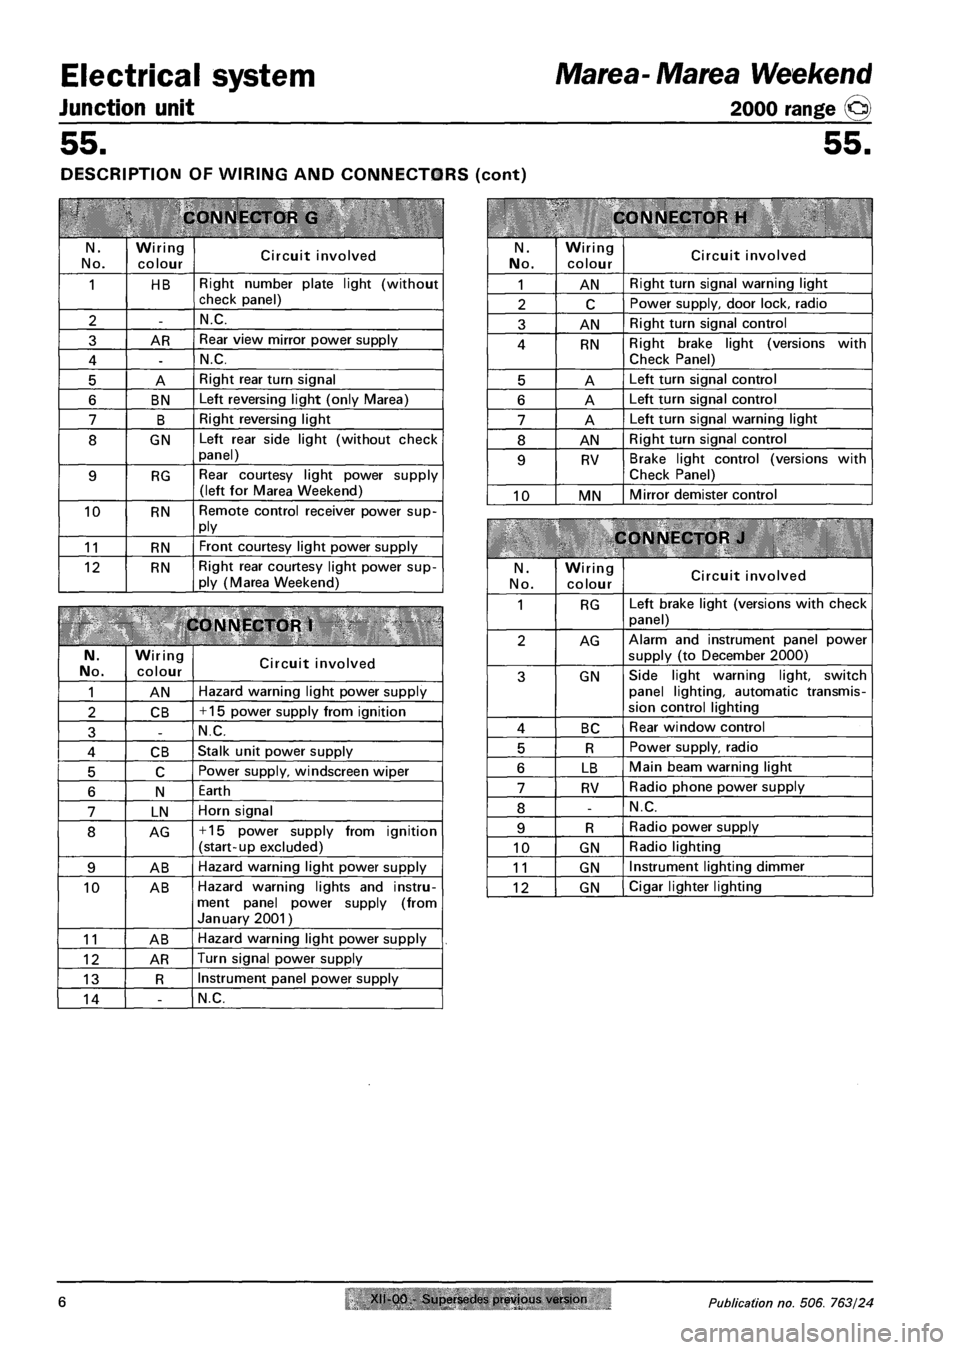
DESCRIPTION OF WIRING AND CONNECTORS (cont)
CONNECTOR G
N.
No.
Wiring
colour Circuit involved
1 HB Right number plate light (without check panel)
2 -N.C.
3 AR Rear view mirror power supply
4 -N.C.
5 A Right rear turn signal
6 BN Left reversing light (only Marea)
7 B Right reversing light
8 GN Left rear side light (without check panel)
9 RG Rear courtesy light power supply (left for Marea Weekend)
10 RN Remote control receiver power supply
11 RN Front courtesy light power supply
12 RN Right rear courtesy light power supply (Marea Weekend)
CONNECTOR 1
N. No. Wiring
colour Circuit involved
1 AN Hazard warning light power supply
2 CB + 15 power supply from ignition
3 -N.C.
4 CB Stalk unit power supply
5 C Power supply, windscreen wiper
6 N Earth
7 LN Horn signal
8 AG + 15 power supply from ignition (start-up excluded)
9 AB Hazard warning light power supply
10 AB Hazard warning lights and instrument panel power supply (from January 2001)
11 AB Hazard warning light power supply
12 AR Turn signal power supply
13 R Instrument panel power supply
14 -N.C.
CONNECTOR H
N.
No.
Wiring
colour Circuit involved
1 AN Right turn signal warning light
2 C Power supply, door lock, radio
3 AN Right turn signal control
4 RN Right brake light (versions with Check Panel)
5 A Left turn signal control
6 A Left turn signal control
7 A Left turn signal warning light
8 AN Right turn signal control
9 RV Brake light control (versions with
Check Panel)
10 MN Mirror demister control
CONNECTOR J
N.
No.
Wiring colour Circuit involved
1 RG Left brake light (versions with check
panel)
2 AG Alarm and instrument panel power
supply (to December 2000)
3 GN Side light warning light, switch panel lighting, automatic transmission control lighting
4 BC Rear window control
5 R Power supply, radio
6 LB Main beam warning light
7 RV Radio phone power supply
8 -N.C.
9 R Radio power supply
10 GN Radio lighting
11 GN Instrument lighting dimmer
12 GN Cigar lighter lighting
6 Publication no. 506. 763/24
Page 137 of 330
Marea-Marea Weekend Electrical system
2000 range @ Junction unit
55.
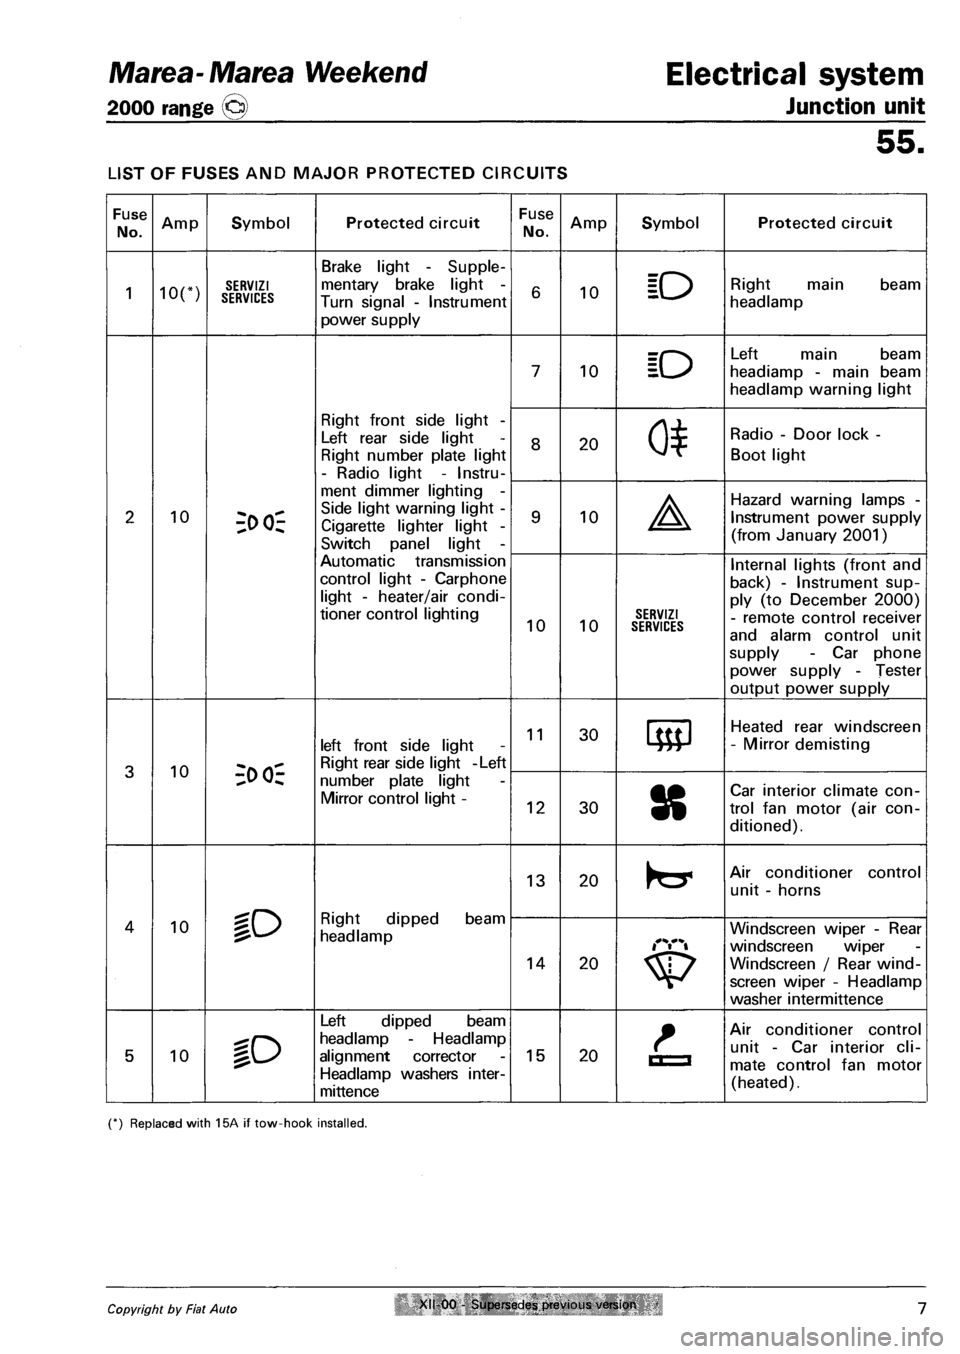
LIST OF FUSES AND MAJOR PROTECTED CIRCUITS
Fuse
No. Amp Symbol Protected circuit Fuse
No. Amp Symbol Protected circuit
1 ion SERVIZI SERVICES
Brake light - Supple
mentary brake light -
Turn signal - Instrument
power supply
6 10 ID Right main beam
headlamp
7 10 ID
Left main beam
headiamp - main beam
headlamp warning light
Right front side light -
Left rear side light
Right number plate light
- Radio light - Instru
8 20 0*
Radio - Door lock -
Boot light
2 10 3>
Side light warning light -
Cigarette lighter light -
Switch panel light -
9 10 A
Hazard warning lamps -
Instrument power supply
(from January 2001)
Automatic transmission
control light - Carphone
light - heater/air condi
tioner control lighting 10 10 SERVIZI SERVICES
Internal lights (front and
back) - Instrument sup
ply (to December 2000)
- remote control receiver
and alarm control unit
supply - Car phone
power supply - Tester
output power supply
3 10 -;o oi-
left front side light
Right rear side light -Left
11 30 Heated rear windscreen
- Mirror demisting
3 10 -;o oi-number plate light
Mirror control light -12 30 8
Car interior climate con
trol fan motor (air con
ditioned).
lO Right dipped beam
headlamp
13 20 Air conditioner control
unit - horns
4 10 lO Right dipped beam
headlamp
14 20
Windscreen wiper - Rear
windscreen wiper
Windscreen / Rear wind
screen wiper - Headlamp
washer intermittence
5 10 %o
Left dipped beam
headlamp - Headlamp
alignment corrector
Headlamp washers inter-
mittence
15 20 La
Air conditioner control
unit - Car interior cli
mate control fan motor
(heated).
(*) Replaced with 15A if tow-hook installed.
Copyright by Fiat Auto XII 00 - Supersedes previous version 7
Page 143 of 330
Marea- Marea Weekend
2000 range ©
Electrical equipment
Control module
55.
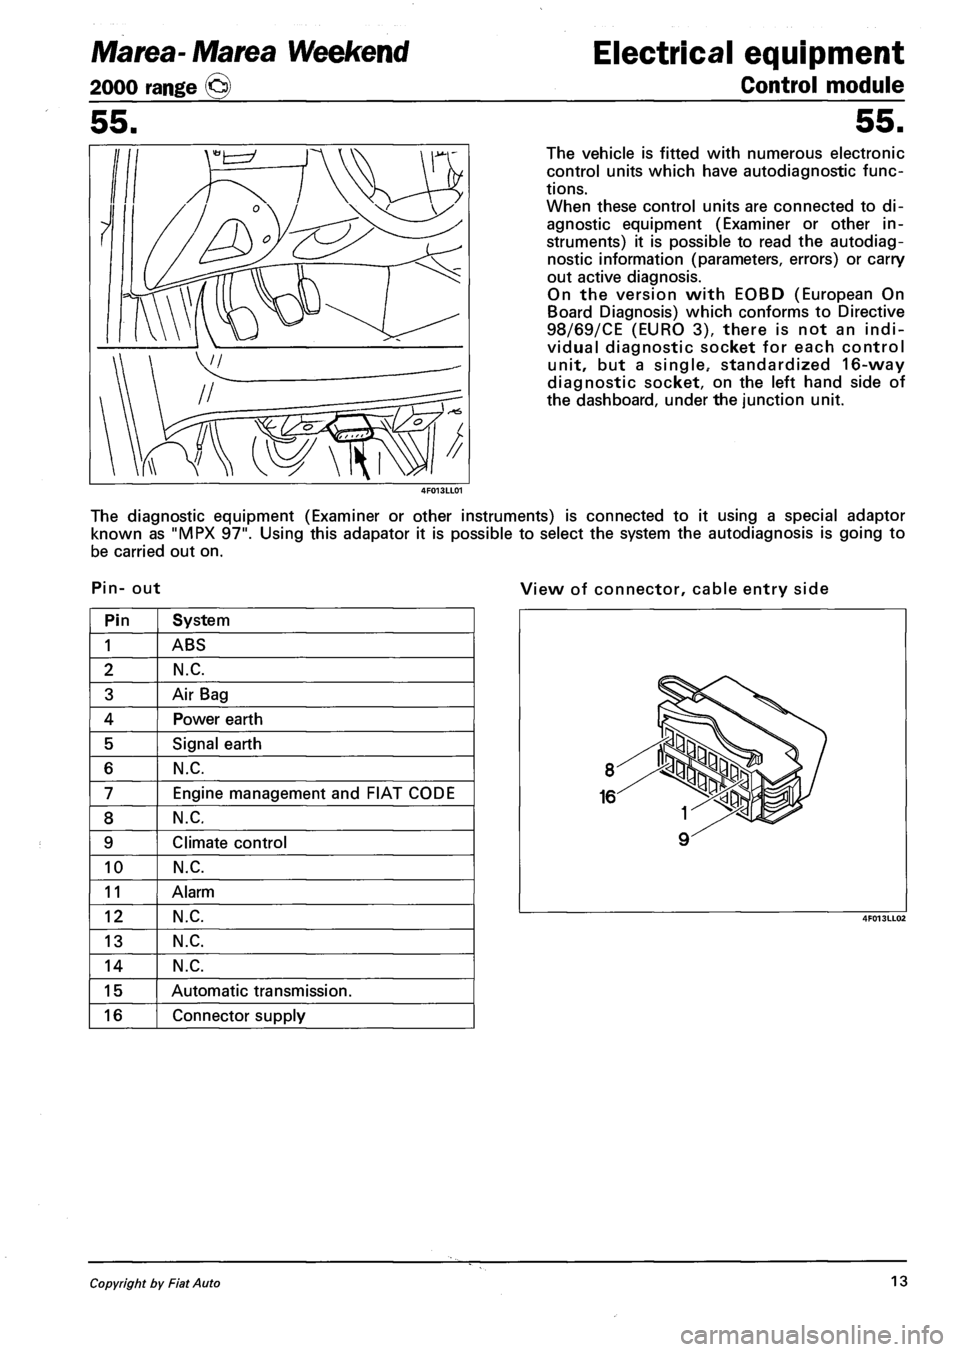
The vehicle is fitted with numerous electronic
control units which have autodiagnostic func
tions.
When these control units are connected to di
agnostic equipment (Examiner or other in
struments) it is possible to read the autodiag
nostic information (parameters, errors) or carry
out active diagnosis.
On the version with EOBD (European On
Board Diagnosis) which conforms to Directive
98/69/CE (EURO 3), there is not an indi
vidual diagnostic socket for each control
unit, but a single.- standardized 16-way
diagnostic socket, on the left hand side of
the dashboard, under the junction unit.
The diagnostic equipment (Examiner or other instruments) is connected to it using a special adaptor
known as "MPX 97". Using this adapator it is possible to select the system the autodiagnosis is going to
be carried out on.
Pin- out View of connector, cable entry side
Pin System
1 ABS
2 N.C.
3 Air Bag
4 Power earth
5 Signal earth
6 N.C.
7 Engine management and FIAT CODE
8 N.C.
9 Climate control
10 N.C.
11 Alarm
12 N.C.
13 N.C.
14 N.C.
15 Automatic transmission.
16 Connector supply
Copyright by Fiat Auto 13
Page 144 of 330
Electrical equipment
Instrument panel
Marea-Marea Weekend
2000 range ©
55.
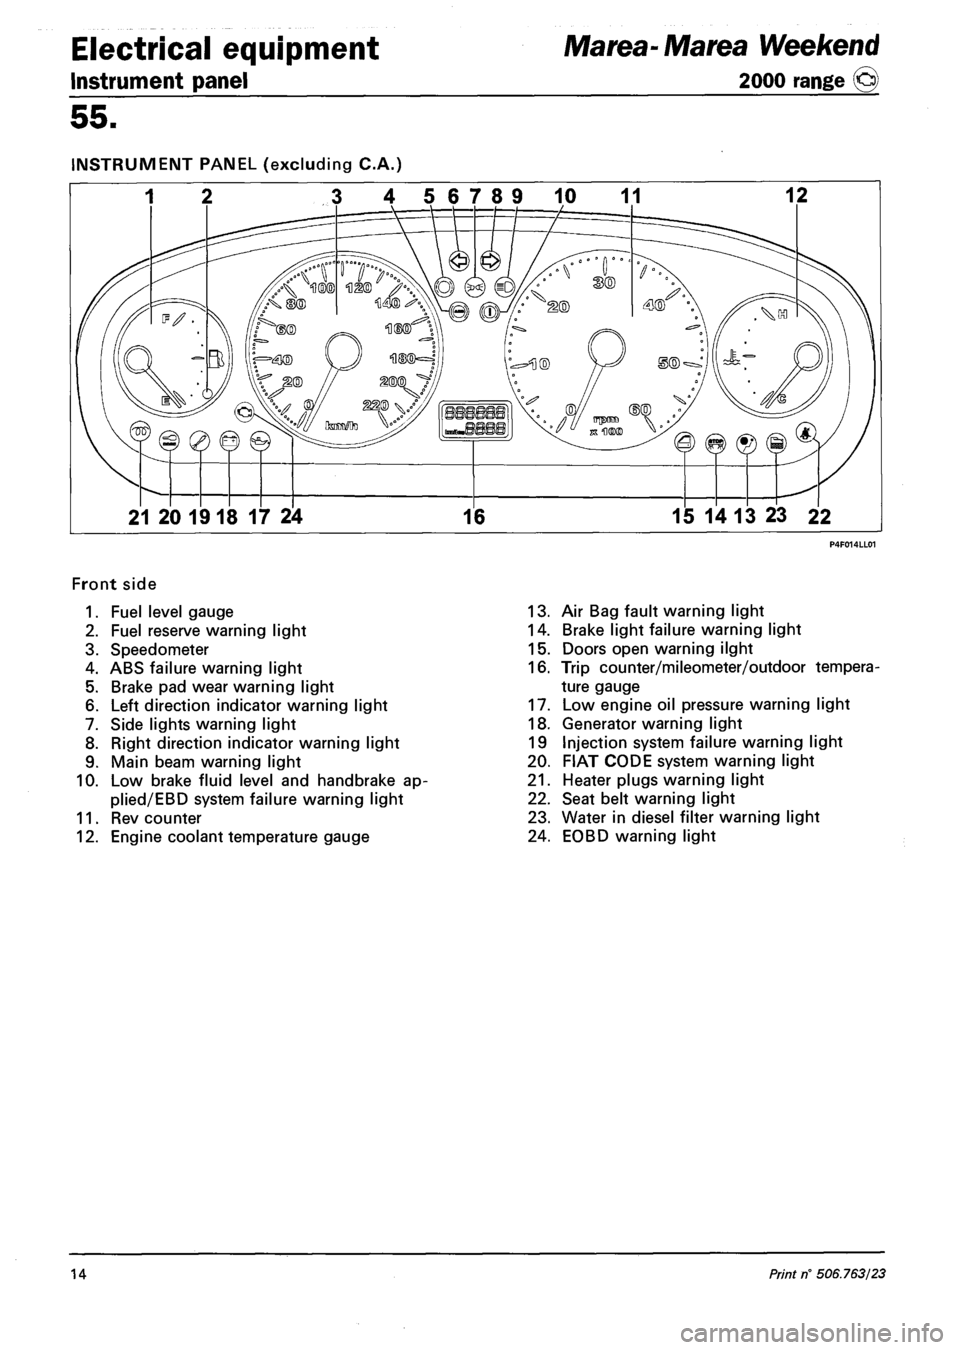
INSTRUMENT PANEL (excluding C.A.)
3 4 56789 10 11 12
21 20 1918 17 24 16 15 14 13 23 22
Front side
1. Fuel level gauge
2. Fuel reserve warning light
3. Speedometer
4. ABS failure warning light
5. Brake pad wear warning light
6. Left direction indicator warning light
7. Side lights warning light
8. Right direction indicator warning light
9. Main beam warning light
10. Low brake fluid level and handbrake ap-
plied/EBD system failure warning light
11. Rev counter
12. Engine coolant temperature gauge
13. Air Bag fault warning light
14. Brake light failure warning light
15. Doors open warning ilght
16. Trip counter/mileometer/outdoor tempera
ture gauge
17. Low engine oil pressure warning light
18. Generator warning light
19 Injection system failure warning light
20. FIAT CODE system warning light
21. Heater plugs warning light
22. Seat belt warning light
23. Water in diesel filter warning light
24. EOBD warning light
14 Print rf 506.763/23