lock FIAT MAREA 2000 1.G Owner's Manual
[x] Cancel search | Manufacturer: FIAT, Model Year: 2000, Model line: MAREA, Model: FIAT MAREA 2000 1.GPages: 330
Page 172 of 330
Electrical system Marea-Marea Weekend
2000 range (§) Radio System
55.
3 - setting maximum volume upon start-up
«0NV0L 20» appears for example, where 20 is the setting in a range that extends up to 31
- turn volume knob clockwise: VOL +
- turn volume knob anticlockwise: VOL -
Volume is limited only when volume is higher than the set value when the radio is turned off.
4 - setting minimum volume for traffic information
«TA VOL 16» appears for example (limit values from 4 to 31)
- turn volume knob clockwise = VOL +
- turn volume knob anticlockwise = VOL -
During adjustment, the volume is as selected for traffic news.
5 - automatic deactivation by means of car ignition switch
- turn volume knob clockwise: «IGN ON» appears : in this way, the radio can be turned on/off using the
car ignition switch.
- turn volume knob anticlockwise: "IGN OFF": activation/deactivation takes place only via the VOL knob.
6 - IS LEARN activation/deactivation
- turn volume knob clockwise: «IS 0N» appears
- turn volume knob anticlockwise: «ISN 0FF».
7 - LRN activation/deactivation
With «LRN OFF» (standard mode) the radio remains on the selected station until the incoming signal is
practically illegible.
In «LRN ON» mode, the radio turns to another station as soon as the incoming signal quality falls.
When in an area where the reception of RDS programmes with traffic news is uncertain, the station search
may be blocked in the radio function.
- turn volume knob clockwise: «LRN ON» appears: automatic search of traffic news broadcasts is acti
vated automatically,
- turn volume knob anticlockwise: «LRN OFF»: automatic search of traffic news broadcasts is not acti
vated.
8 - activation/deactivation of automatic regional programme change
When the same RDS programme is transmitted from various regional stations, the radio may switch be
tween stations due to the reception field.
- turn volume knob clockwise: "REG ON" appears: regional p rogramme may be changed automatically in
this mode.
- turn volume knob anticlockwise: «REG OFF»: regional programme cannot be changed automatically.
9 - delayed activation/deactivation for connected booster (BDLY)
NOTE: remember that the Booster switch signal is connected to pin C6 of the radio.
This mode eliminates the abrupt on/off manoeuvre:
- turn volume knob clockwise: »BDLY ON» appears
- turn volume knob anticlockwise: «BDLY OFF»: is disabled.
42 XII-00 Update Publication no. 506.763/24
Page 173 of 330
Marea-Marea Weekend Electrical system
2000 range (§j) Radio System
55.
10 - suppression of sound in case of incoming/outgoing phone call
- turn volume knob clockwise: «PHONE 0FF» no use of phone connection
- turn volume knob clockwise: «PH0NE 0N»: the radio sound is automatically deactivated in the case of
a phone call
The «PH0NE ON" function required the mobile phone mount base to be connected.
The «PH0NE IN» function allows a conversation via the car speakers in the case of a phone call.
The «PH0NE IN» function requires the mobile phone to be connected in handsfree mode
If the radio is off, a phone call (IN or OUT) is still possible. In this case the radio
- comes on automatically;
- allows listening under sound conditions identical to the last phone call (BASS, TREBLE, FADER,
BALANCE);
- goes off automatically at the end of the phone call
11 - setting mobile phone input sensitivity
Allows adaptation to the signal broadcast level for the type of handsfree system installed.
- turn volume knob anticlockwise: «PHONE 00» : low input sensitivity
- turn volume knob clockwise: «PHONE 03»: high input sensitivity
12 - security code activation
The code is not activated if «CODE» appears on the display.
If «SAFE» appears on the display, the code is activated.
NOTE: See next section for more detailed instructions.
13 - Controlling volume according to vehicle speed (SCV)
Standard value: «SCVOL 19»
Function off: «SCVOL - -«
Function at maximum efficiency: «SCVOL 34»
Setting:
1. Vehicle still, engine on: set required volume using the relevant knob.
2. Depress the EXP key for more than 2 seconds until «EXPERT» appears on the display.
3. Use keys A or B to select the «SCVOL» setting.
4. Set the required value using the volume knob:
- turn volume knob clockwise: VOL +
- turn volume knob anticlockwise: VOL -
14 - audible function confirmation (BEEP)
The BEEP function is active in the system
This function gives an audible confirmation (BEEP) of the functions. Function activation requires continu
ous pressing of the key for a time greater than or equal to 2 seconds.
15 - select MONO/STEREO radio reproduction
turn volume knob clockwise: «MONO ON».
turn volume knob anticlockwise: «MONO OFF».
16 - activate/deactivate LOC
The automatic search in the FM range may be used at two sensitivity levels When in search of stations,
the set may be tuned with high field intensity (local stations) or low field intensity (distant reception).
- turn volume knob clockwise: «LOC ON».
- turn volume knob anticlockwise: «LOC OFF».
Copyright by Fiat Auto XII-00 Updale 43
Page 179 of 330
Marea-Marea Weekend
2000 range ©
Electrical system
Radio System
55.
MULTIPLE COMPACT DISC PLAYER (CD changer)
The radio set (in H4 and H3 versions) is designed to work with compatible compact disc players avail
able from the Fiat Accessory range.
The Fiat Accessory range player comes with a loader that can hold up to 6 CDs.
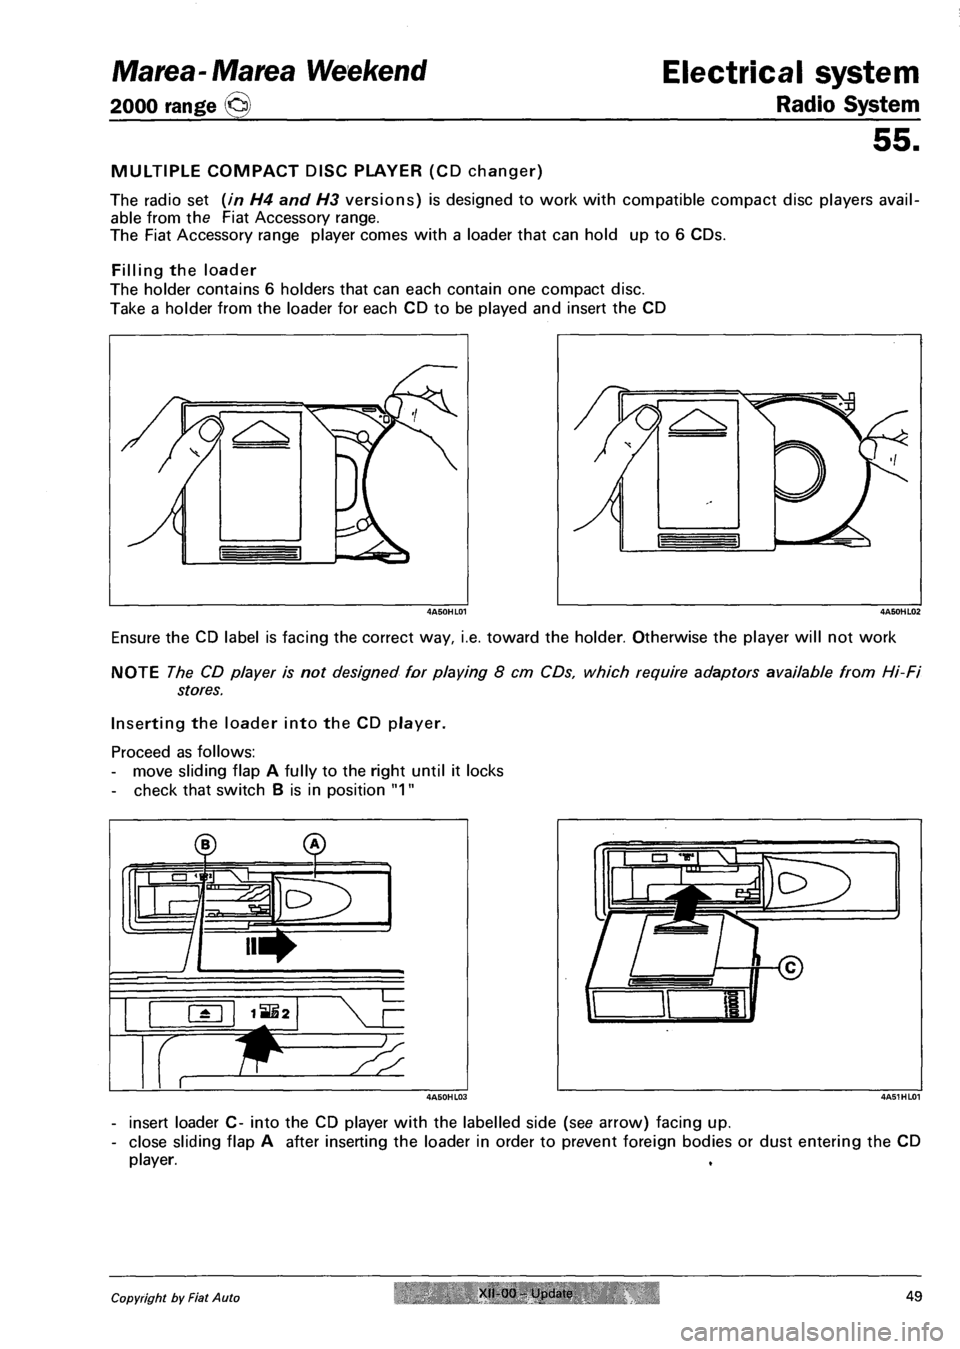
Filling the loader
The holder contains 6 holders that can each contain one compact disc.
Take a holder from the loader for each CD to be played and insert the CD
Ensure the CD label is facing the correct way, i.e. toward the holder. Otherwise the player will not work
NOTE The CD player is not designed for playing 8 cm CDs, which require adaptors available from Hi-Fi
stores.
Inserting the loader into the CD player.
Proceed as follows:
- move sliding flap A fully to the right until it locks
- check that switch B is in position "1"
- insert loader C- into the CD player with the labelled side (see arrow) facing up.
- close sliding flap A after inserting the loader in order to prevent foreign bodies or dust entering the CD
player.
Copyright by Fiat Auto XII-00 Update 49
Page 180 of 330
Electrical system Marea- Marea Weekend
Radio System 2000 range @
55.
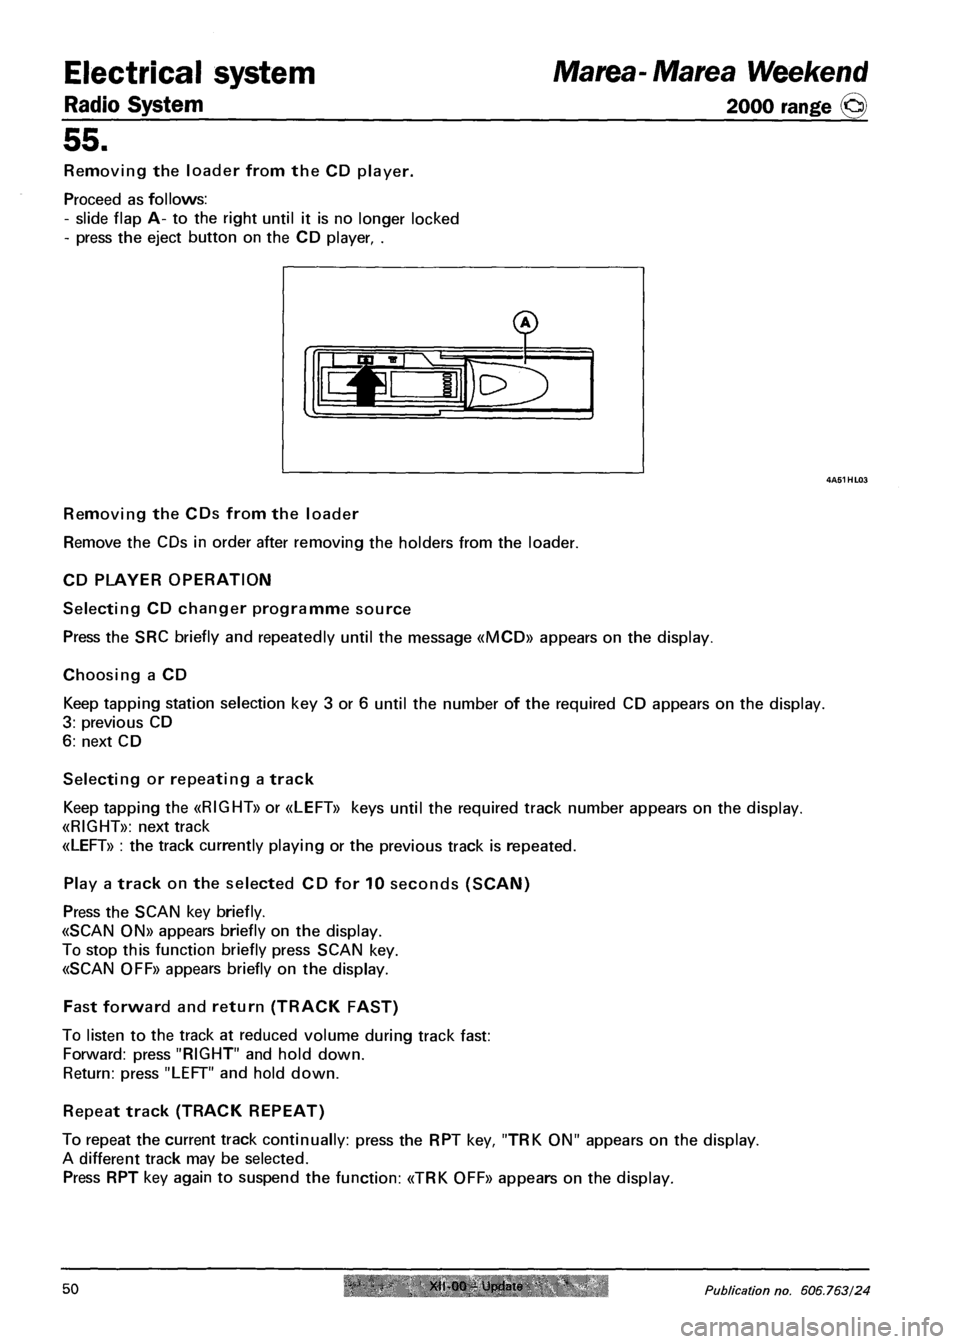
Removing the loader from the CD player.
Proceed as follows:
- slide flap A- to the right until it is no longer locked
- press the eject button on the CD player, .
f
s-
VV
Removing the CDs from the loader
Remove the CDs in order after removing the holders from the loader.
CD PLAYER OPERATION
Selecting CD changer programme source
Press the SRC briefly and repeatedly until the message «MCD» appears on the display.
Choosing a CD
Keep tapping station selection key 3 or 6 until the number of the required CD appears on the display.
3: previous CD
6: next CD
Selecting or repeating a track
Keep tapping the «RIGHT» or «LEFT» keys until the required track number appears on the display.
«RIGHT»: next track
«LEFT» : the track currently playing or the previous track is repeated.
Play a track on the selected CD for 10 seconds (SCAN)
Press the SCAN key briefly.
«SCAN ON» appears briefly on the display.
To stop this function briefly press SCAN key.
«SCAN OFF» appears briefly on the display.
Fast forward and return (TRACK FAST)
To listen to the track at reduced volume during track fast:
Forward: press "RIGHT" and hold down.
Return: press "LEFT" and hold down.
Repeat track (TRACK REPEAT)
To repeat the current track continually: press the RPT key, "TRK ON" appears on the display.
A different track may be selected.
Press RPT key again to suspend the function: «TRK OFF» appears on the display.
50 XII-00 - Update Publication no. 606.763/24
Page 181 of 330
Marea-Marea Weekend Electrical system
2000 range (§) Radio System
55.
Repetition of a CD (REPEAT)
To repeat the current CD continously: press the RPT key for longer than 2 seconds: "RPT CD" appears on
the display.
A different CD may be selected. To suspend the function, press the RPT key again for longer than 2 sec
onds: «RPT MAG» appears on the display.
Selecting tracks in a random sequence (TRACK RANDOM)
To start the random track search:
press the RND key: "RND ON" appears on the display. The selected CD tracks are played in a random se
quence.
Press the RND key again to end the random track search: "RND OFF" appears on the display.
NOTE: The TRACK RANDOM function cannot be combined with the TRACK REPEAT and CD REPEAT
functions.
Concluding CD operation
Press the EJECT key
Alternatively, press the SRC to listen to the radio again
ADVICE AND PRECAUTIONS
RECEPTION CONDITIONS
The reception conditions will vary greatly while driving.
Reception can be affected by mountains, buildings or bridges especialy when far away from the transmit
ter of the station you are listening to.
Note: when listening to traffic information (TA), the volume may rise considerably compared to normal
levels.
MAINTENANCE
The radio is built for long-term use without any special maintenance requirements.
If necessary, clean the panel with a soft, antistatic cloth. Cleaning and polishing products could damage
the surface.
TAPES
For optimal playing conditions:
- do not use poor quality tapes, with deformations or peeling labels;
- do not leave the tape inside the radio when not in use;
- do not introduce any objects into the cassette slot;
- do not expose the tapes to sunlight, excessive temperature or high moisture levels;
- replace the tapes in their cases after use;
- dirt on the playing heads caused by tapes could eventually lead to a reduction in high tones during
playing. It is therefore advisable to clean the playing heads at intervals using a special non-abrasive
head cleaning tape;
- it is preferable to C60 tapes or in the worst case C90 tapes to ensure optimum playing quality at all
times. The very fine tape contained in very long cassettes could also break very easily;
- avoid inserting cassettes with loose tapes, particularly if C90, because the tape could emerge and block
the mechanism. If the radio detects a loose tape or similar problems, the cassette is in any case auto
matically ejected;
- do not lubricate the tape mechanism;
- do not touch the playing heads with magnetic or hard items.
Copyright by Fiat Auto XII 00 - Update 51
Page 183 of 330
Marea-Marea Weekend
2000 range ©
Electrical equipment
Index
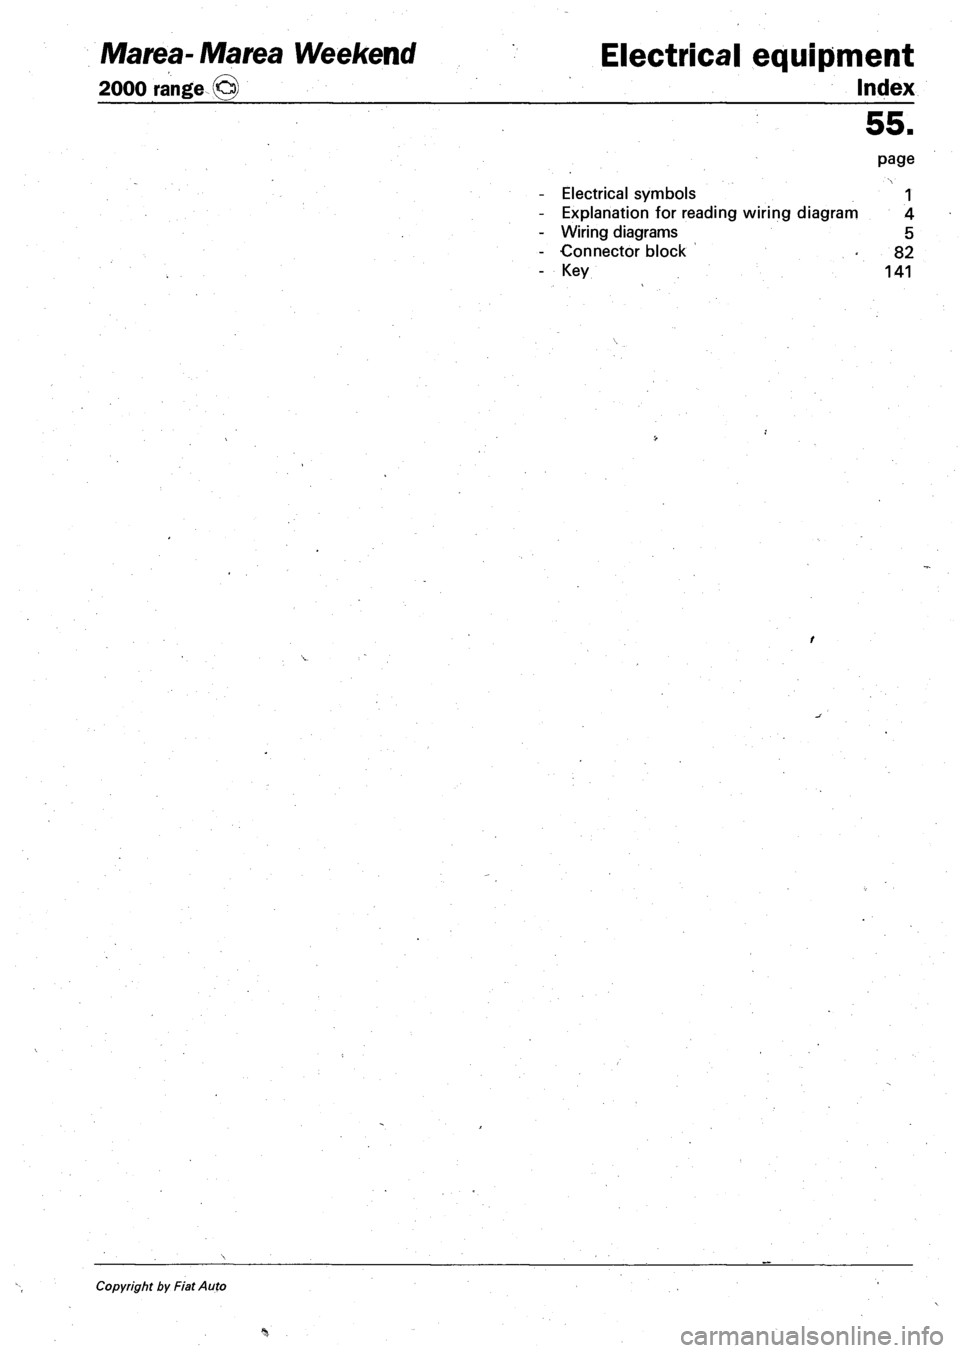
Electrical symbols
Explanation for reading wiring diagram
Wiring diagrams
Connector block
Key
55.
page
1
4
5
82
141
Copyright by Fiat Auto
Page 184 of 330
Marea-Marea Weekend Electrical system
2000 range ©> Wiring diagrams
55.
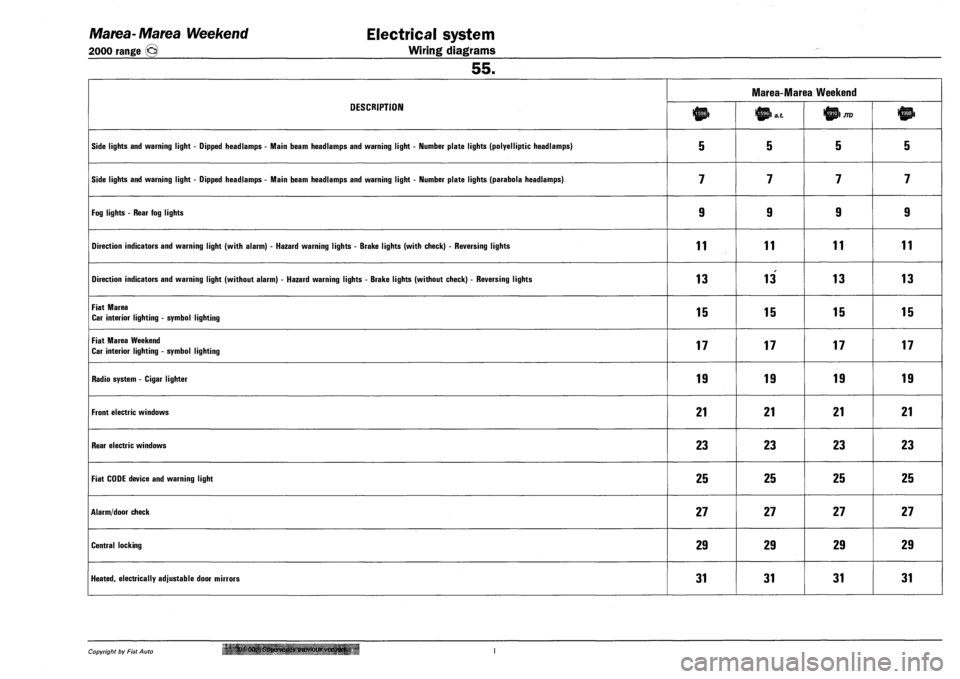
DESCRIPTION
Marea-Marea Weekend
DESCRIPTION JTD
SIDE LIGHTS AND WARNING LIGHT - DIPPED HEADLAMPS - MAIN BEAM HEADLAMPS AND WARNING LIGHT - NUMBER PLATE LIGHTS (POLYELLIPTIC HEADLAMPS) 5 5 5 5
SIDE LIGHTS AND WARNING LIGHT - DIPPED HEADLAMPS - MAIN BEAM HEADLAMPS AND WARNING LIGHT - NUMBER PLATE LIGHTS (PARABOLA HEADLAMPS) 7 7 7 7
FOG LIGHTS - REAR FOG LIGHTS 9 9 9 9
DIRECTION INDICATORS AND WARNING LIGHT (WITH ALARM) - HAZARD WARNING LIGHTS - BRAKE LIGHTS (WITH CHECK) - REVERSING LIGHTS 11 11 11 11
DIRECTION INDICATORS AND WARNING LIGHT (WITHOUT ALARM) - HAZARD WARNING LIGHTS - BRAKE LIGHTS (WITHOUT CHECK) - REVERSING LIGHTS 13 13 13 13
FIAT MAREA
CAR INTERIOR LIGHTING - SYMBOL LIGHTING 15 15 15 15
FIAT MAREA WEEKEND
CAR INTERIOR LIGHTING - SYMBOL LIGHTING 17 17 17 17
RADIO SYSTEM - CIGAR LIGHTER 19 19 19 19
FRONT ELECTRIC WINDOWS 21 21 21 21
REAR ELECTRIC WINDOWS 23 23 23 23
FIAT CODE DEVICE AND WARNING LIGHT 25 25 25 25
ALARM/DOOR CHECK 27 27 27 27
CENTRAL LOCKING 29 29 29 29
HEATED, ELECTRICALLY ADJUSTABLE DOOR MIRRORS 31 31 31 31
Copyright by Fiat Auto '' XI Supersedes previous verster*.
Page 186 of 330
Marea-Marea Weekend Electrical equipment
2000 range (§) Wiring diagrams
55.
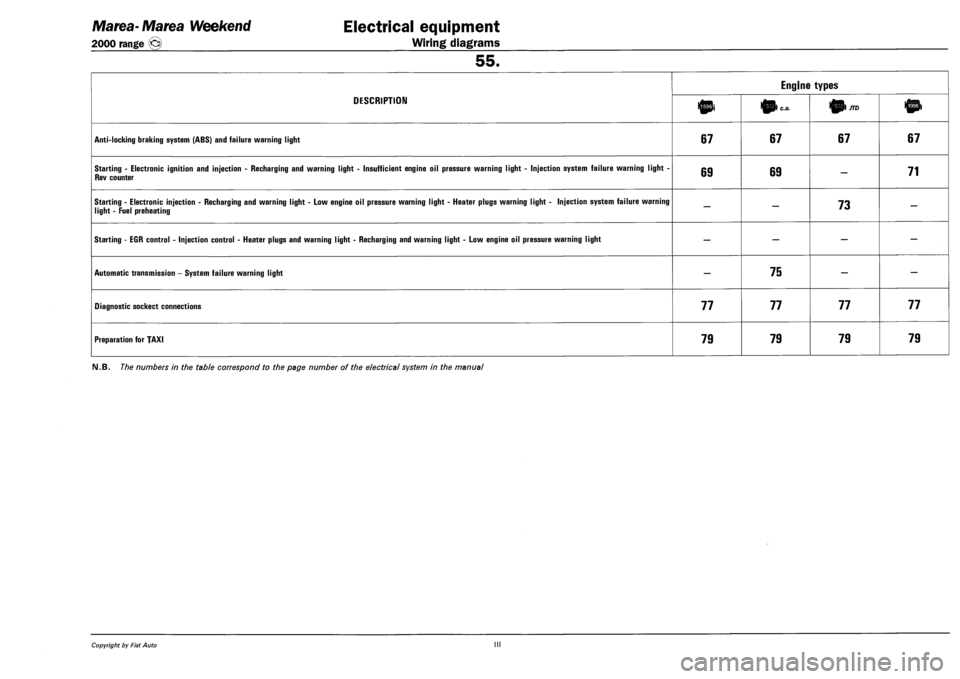
DESCRIPTION
Engine types
DESCRIPTION 10i 0) c.a. 01/70
ANTI-LOCKING BRAKING SYSTEM (ABS) AND FAILURE WARNING LIGHT 67 67 67 67
STARTING - ELECTRONIC IGNITION AND INJECTION - RECHARGING AND WARNING LIGHT - INSUFFICIENT ENGINE OIL PRESSURE WARNING LIGHT - INJECTION SYSTEM FAILURE WARNING LIGHT -
REV COUNTER 69 69 — 71
STARTING - ELECTRONIC INJECTION - RECHARGING AND WARNING LIGHT - LOW ENGINE OIL PRESSURE WARNING LIGHT - HEATER PLUGS WARNING LIGHT - INJECTION SYSTEM FAILURE WARNING
LIGHT - FUEL PREHEATING — — 73 —
STARTING - EGR CONTROL - INJECTION CONTROL - HEATER PLUGS AND WARNING LIGHT - RECHARGING AND WARNING LIGHT - LOW ENGINE OIL PRESSURE WARNING LIGHT — — — —
AUTOMATIC TRANSMISSION - SYSTEM FAILURE WARNING LIGHT — 75 — —
DIAGNOSTIC SOCKECT CONNECTIONS 77 77 77 77
PREPARATION FOR TAXI 79 79 79 79
FM.B. The numbers in the table correspond to the page number of the electrical system in the manual
Copyright by Fiat Auto III
Page 187 of 330
Marea- Marea Weekend
2000 range ©
Electrical equipment
Wiring diagrams
55.
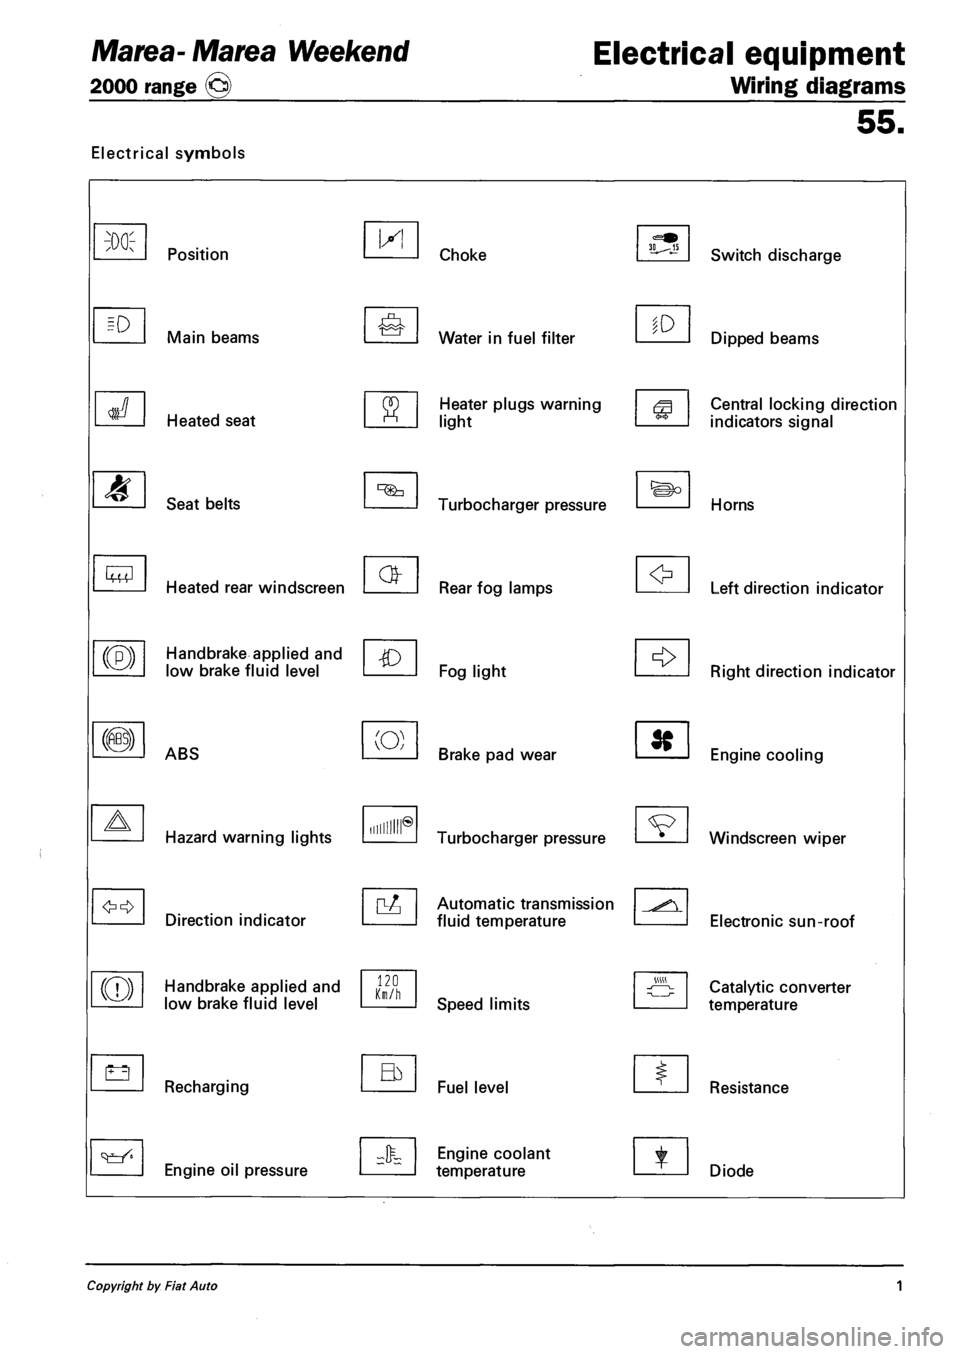
Electrical symbols
M
Lt3
Position
Main beams
Heated seat
Seat belts
Heated rear windscreen
Handbrake applied and
low brake fluid level
ABS
Hazard warning lights
Direction indicator
Handbrake applied and
low brake fluid level
Recharging
Engine oil pressure
IX!
(O)
Hum®
120 Km/h
Choke
Water in fuel filter
Heater plugs warning
light
Turbocharger pressure
Rear fog lamps
Fog light
Brake pad wear
Turbocharger pressure
Automatic transmission
fluid temperature
Speed limits
Fuel level
Engine coolant
temperature
to
Switch discharge
Dipped beams
Central locking direction
indicators signal
Horns
Left direction indicator
Right direction indicator
Engine cooling
Windscreen wiper
Electronic sun-roof
Catalytic converter
temperature
Resistance
Diode
Copyright by Fiat Auto 1
Page 188 of 330
Electrical equipment
Wiring diagrams
Marea- Marea Weekend
2000 range ©
55.
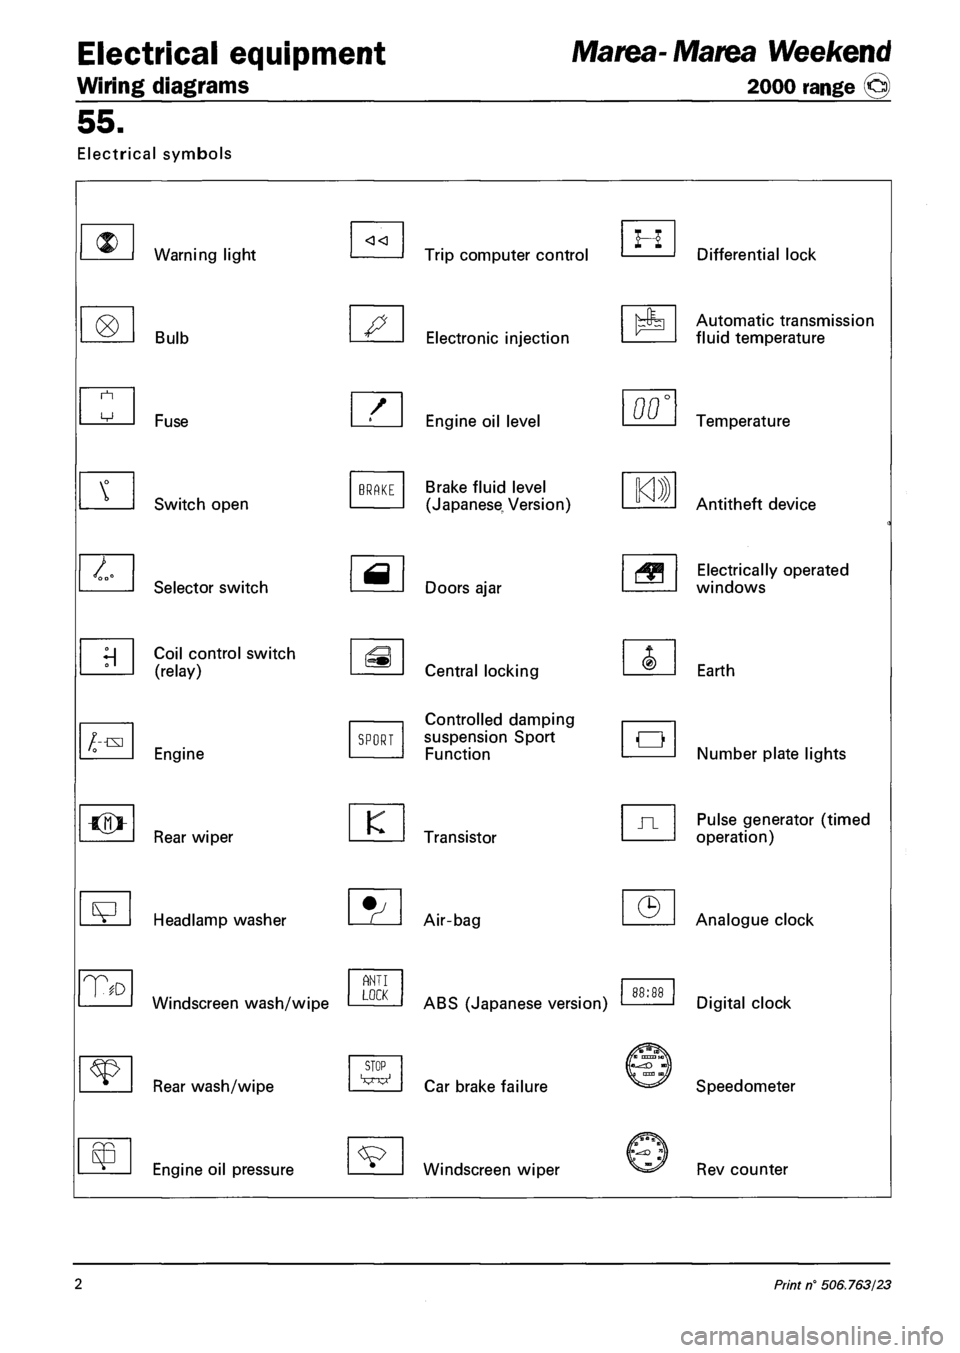
Electrical symbols
Warning light
Bulb
/--txi
T
Fuse
Switch open
Selector switch
Coil control switch
(relay)
Engine
Rear wiper
Headlamp washer
Windscreen wash/wipe
Rear wash/wipe
Engine oil pressure
BRAKE
SPORT
K
ANT I LOCK
STOP
Trip computer control
Electronic injection
Engine oil level
Brake fluid level
(Japanese, Version)
Doors ajar
Central locking
Controlled damping
suspension Sport
Function
Transistor
Air-bag
ABS (Japanese version)
Car brake failure
Windscreen wiper
H Differential lock
Automatic transmission
fluid temperature
00' Temperature
Antitheft device
Electrically operated
windows
Earth
Number plate lights
Pulse generator (timed
operation)
Analogue clock
Digital clock
Speedometer
Rev counter
2 Print n° 506.763/23