lock FIAT MAREA 2000 1.G User Guide
[x] Cancel search | Manufacturer: FIAT, Model Year: 2000, Model line: MAREA, Model: FIAT MAREA 2000 1.GPages: 330
Page 54 of 330
Marea- Marea Weekend Technical Data
2000 range (§) Electrical equipment: starting
00.55
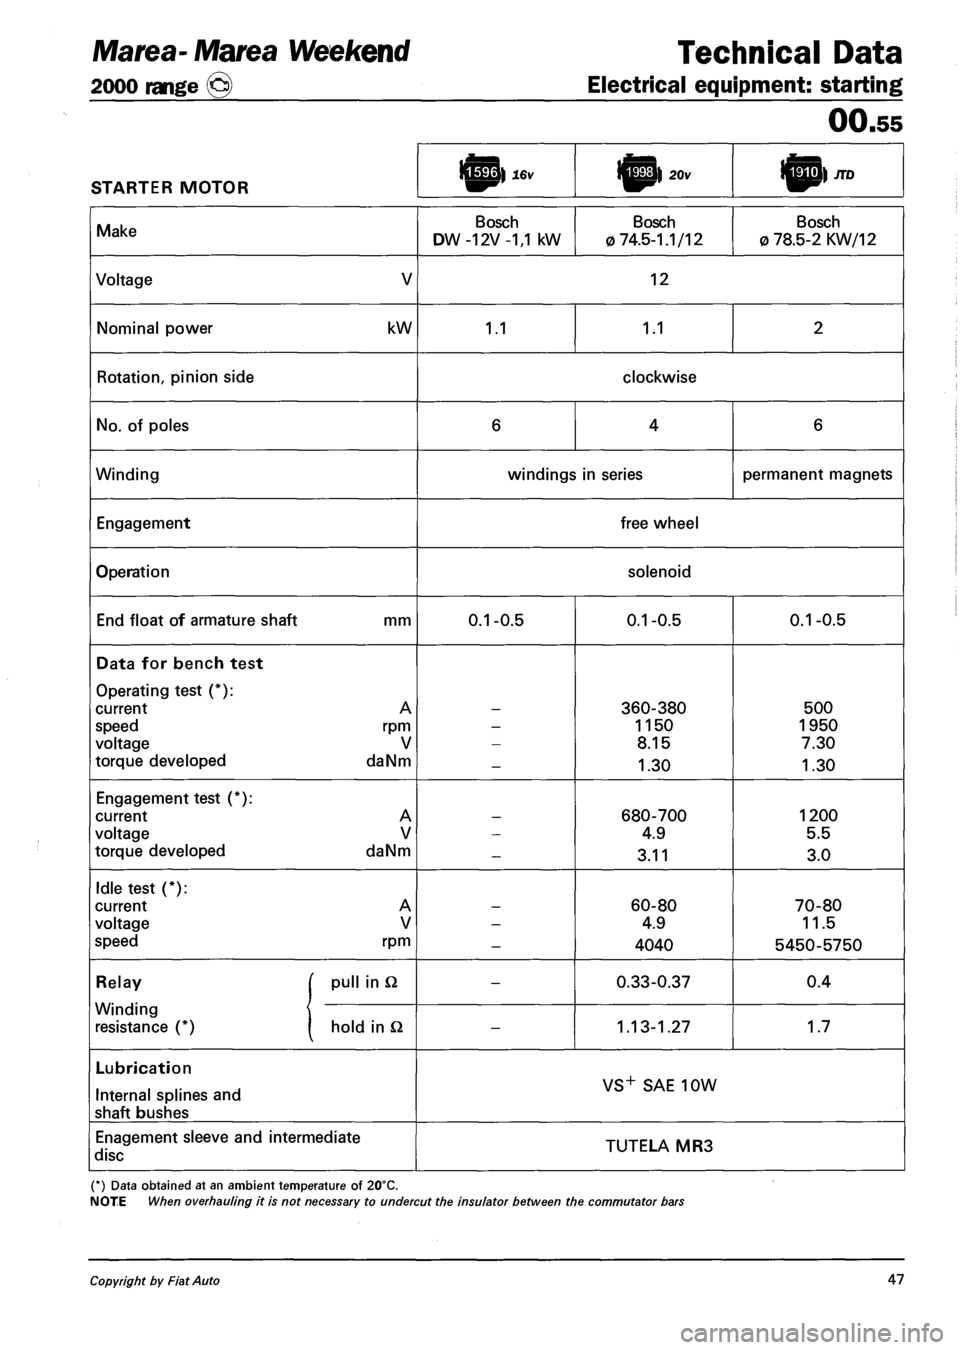
STARTER MOTOR l^p| 20v I^P) JTD
Make Bosch
DW -12V -1,1 kW
Bosch
0 74.5-1.1/12
Bosch
0 78.5-2 KW/12
Voltage V 12
Nominal power kW 1.1 1.1 2
Rotation, pinion side clockwise
No. of poles 6 4 6
Winding windings in series permanent magnets
Engagement free wheel
Operation solenoid
End float of armature shaft mm 0.1-0.5 0.1-0.5 0.1-0.5
Data for bench test
Operating test (*):
current A
speed rpm
voltage V
torque developed daNm
-
360-380
1150
8.15
1.30
500
1950
7.30
1.30
Engagement test (*):
current A
voltage V
torque developed daNm
-680-700
4.9
3.11
1200
5.5
3.0
Idle test (*):
current A
voltage V
speed rpm
-
60-80
4.9
4040
70-80
11.5
5450-5750
Relay [ pull in Q -0.33-0.37 0.4
Winding
resistance (*) 1 hold in Q -1.13-1.27 1.7
Lubrication
Internal splines and
shaft bushes
VS+ SAE 10W
Enagement sleeve and intermediate
disc TUTELA MR3
(*) Data obtained at an ambient temperature of 20°C.
NOTE When overhauling it is not necessary to undercut the insulator between the commutator bars
Copyright by Fiat Auto 47
Page 55 of 330
Technical Data Marea-Marea Weekend
Electrical equipment: recharging 2000 range @)
00.55
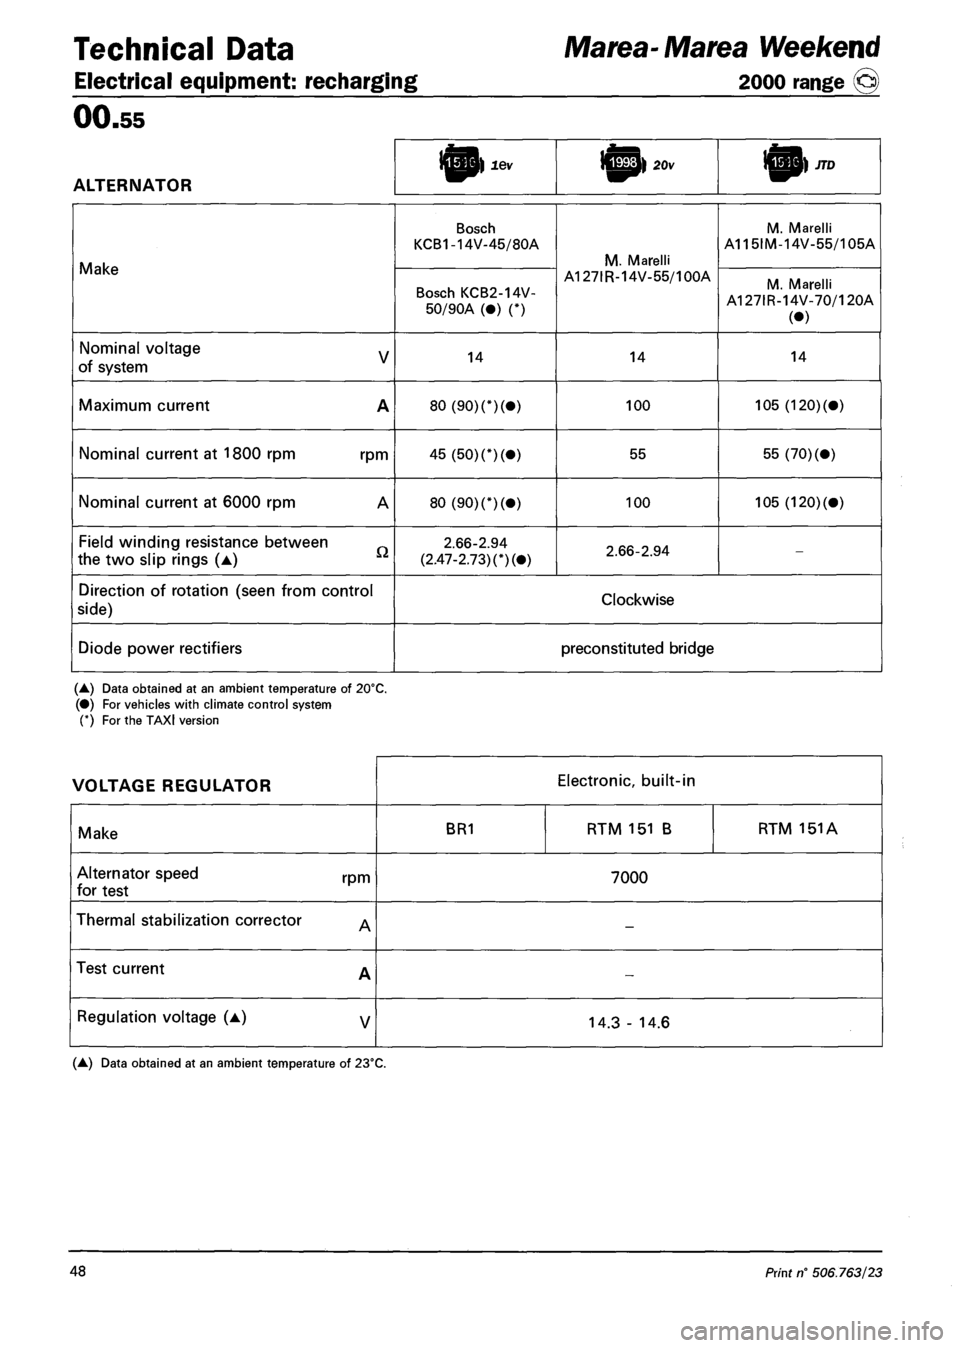
ALTERNATOR
l^p) lev rgp> JTD
Make
Bosch
KCB1-14V-45/80A
M. Marelli A127IR-14V-55/100A
M. Marelli A115IM-14V-55/105A
Make
Bosch KCB2-14V-
50/90A (•) (*)
M. Marelli A127IR-14V-55/100A M. Marelli
A127IR-14V-70/120A
(•)
Nominal voltage y
of system 14 14 14
Maximum current A 80 (90) (*)(•) 100 105 (120)(«)
Nominal current at 1800 rpm rpm 45 (50) (*)(•) 55 55 (70)(»)
Nominal current at 6000 rpm A 80 (90) (*)(•) 100 105 (120)(«)
Field winding resistance between
the two slip rings (A)
2.66-2.94
(2.47-2.73) (*)(•) 2.66-2.94 -
Direction of rotation (seen from control
side) Clockwise
Diode power rectifiers preconstituted bridge
(A) Data obtained at an ambient temperature of 20°C. (•) For vehicles with climate control system C) For the TAXI version
VOLTAGE REGULATOR Electronic, built-in
Make BR1 RTM 151 B RTM 151A
Alternator speed rpm
for test 7000
Thermal stabilization corrector ^ -
Test current A -
Regulation voltage (A) y 14.3-14.6
(A) Data obtained at an ambient temperature of 23°C.
48 Print n° 506.763/23
Page 63 of 330
Marengo 0 ™ Technical Data
2000 range Suspension and wheels
OO.o
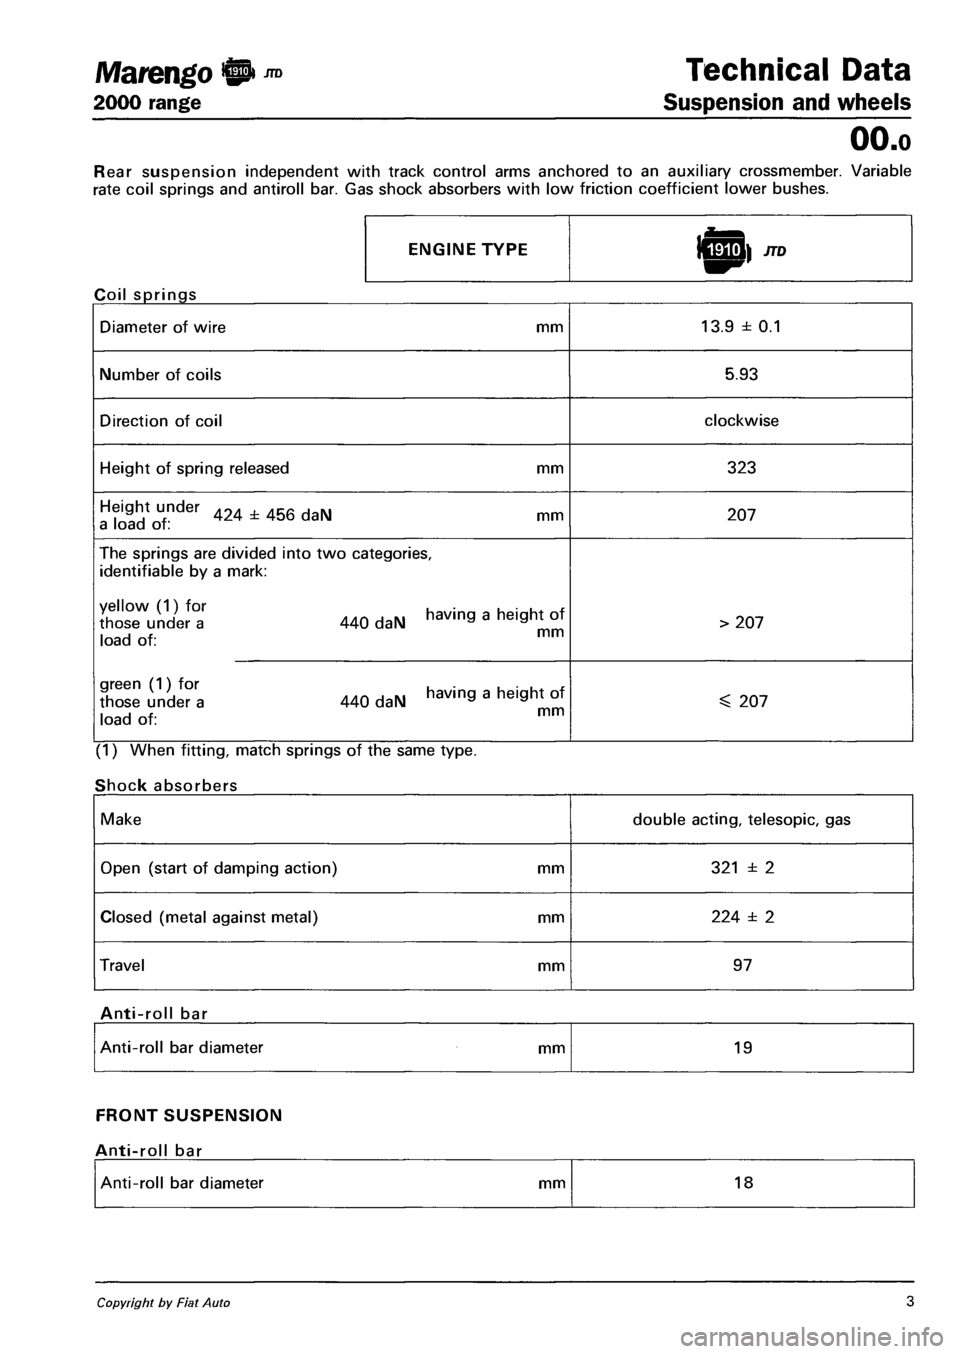
Rear suspension independent with track control arms anchored to an auxiliary crossmember. Variable
rate coil springs and antiroll bar. Gas shock absorbers with low friction coefficient lower bushes.
ENGINE TYPE
Coil springs
Diameter of wire mm 13.9 ± 0.1
Number of coils 5.93
Direction of coil clockwise
Height of spring released mm 323
Height under 424 ± 456 daN mm a load of : 207
The springs are divided into two categories,
identifiable by a mark:
XX°l 440 daN having a heigh, of i -i x mm load of:
> 207
green (1) for having a height of those under a 440 daN a a i J x. mm load of:
^ 207
(1) When fitting, match springs of the same type.
Shock absorbers
Make double acting, telesopic, gas
Open (start of damping action) mm 321 ± 2
Closed (metal against metal) mm 224 ± 2
Travel mm 97
Anti-roll bar
Anti-roll bar diameter mm 19
FRONT SUSPENSION
Anti-roll bar
Anti-roll bar diameter mm 18
Copyright by Fiat Auto 3
Page 75 of 330
Marea- Marea Weekend •
2000 range ©
16v Engine
Fuel feed system
10.
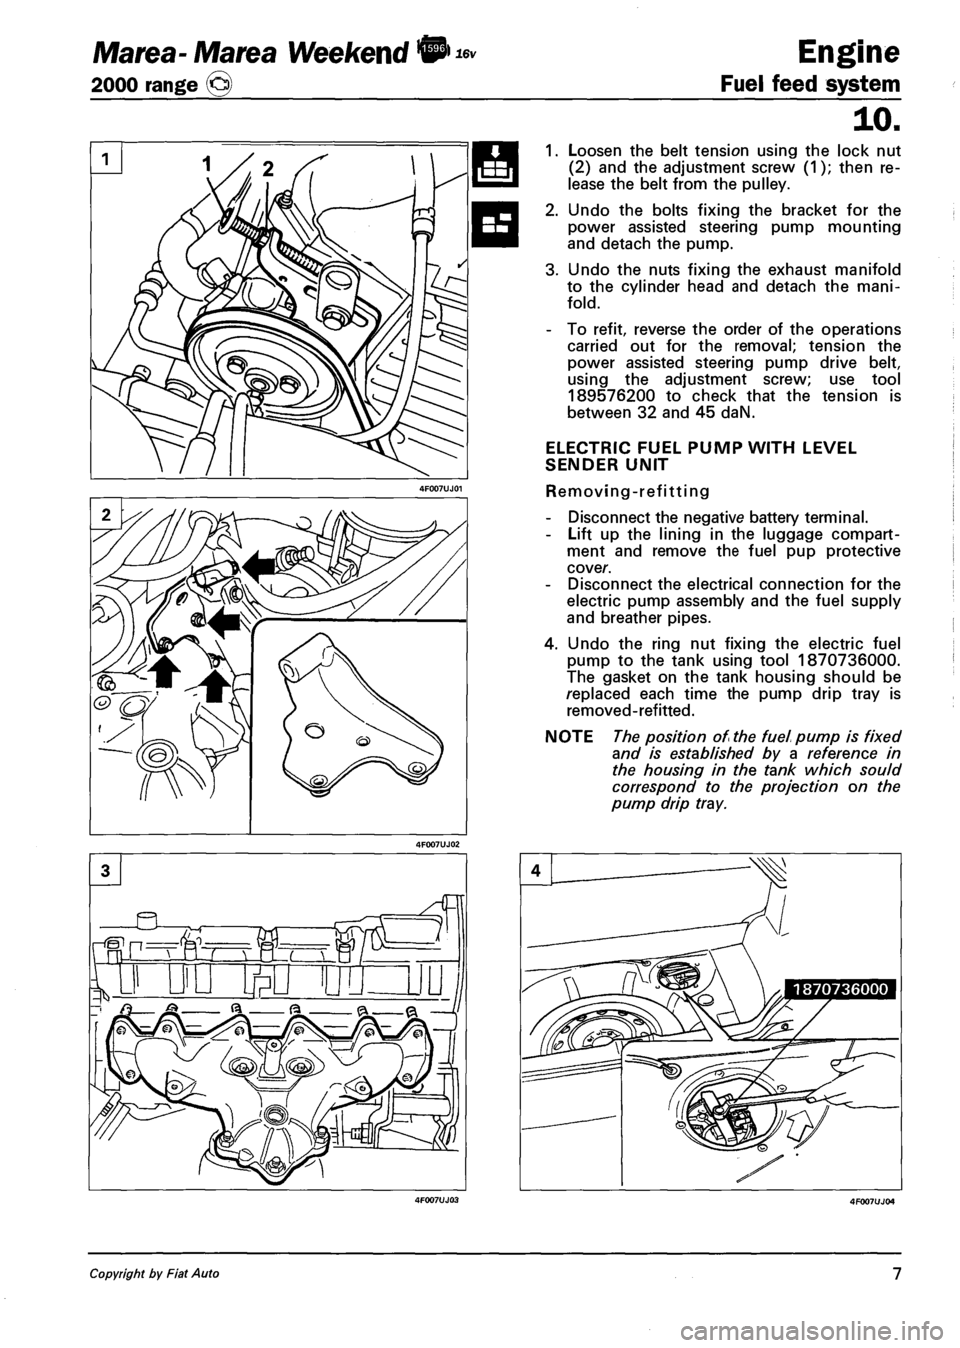
1. Loosen the belt tension using the lock nut
(2) and the adjustment screw (1); then re
lease the belt from the pulley.
2. Undo the bolts fixing the bracket for the
power assisted steering pump mounting
and detach the pump.
3. Undo the nuts fixing the exhaust manifold
to the cylinder head and detach the mani
fold.
- To refit, reverse the order of the operations
carried out for the removal; tension the
power assisted steering pump drive belt,
using the adjustment screw; use tool
189576200 to check that the tension is
between 32 and 45 daN.
ELECTRIC FUEL PUMP WITH LEVEL
SENDER UNIT
Removing-refitting
- Disconnect the negative battery terminal.
- Lift up the lining in the luggage compart
ment and remove the fuel pup protective
cover.
- Disconnect the electrical connection for the
electric pump assembly and the fuel supply
and breather pipes.
4. Undo the ring nut fixing the electric fuel
pump to the tank using tool 1870736000.
The gasket on the tank housing should be
replaced each time the pump drip tray is
removed-refitted.
NOTE The position of the fuel pump is fixed
and is established by a reference in
the housing in the tank which sou Id
correspond to the projection on the
pump drip tray.
Copyright by Fiat Auto 7
Page 135 of 330
Marea-Marea Weekend
2000 range Q
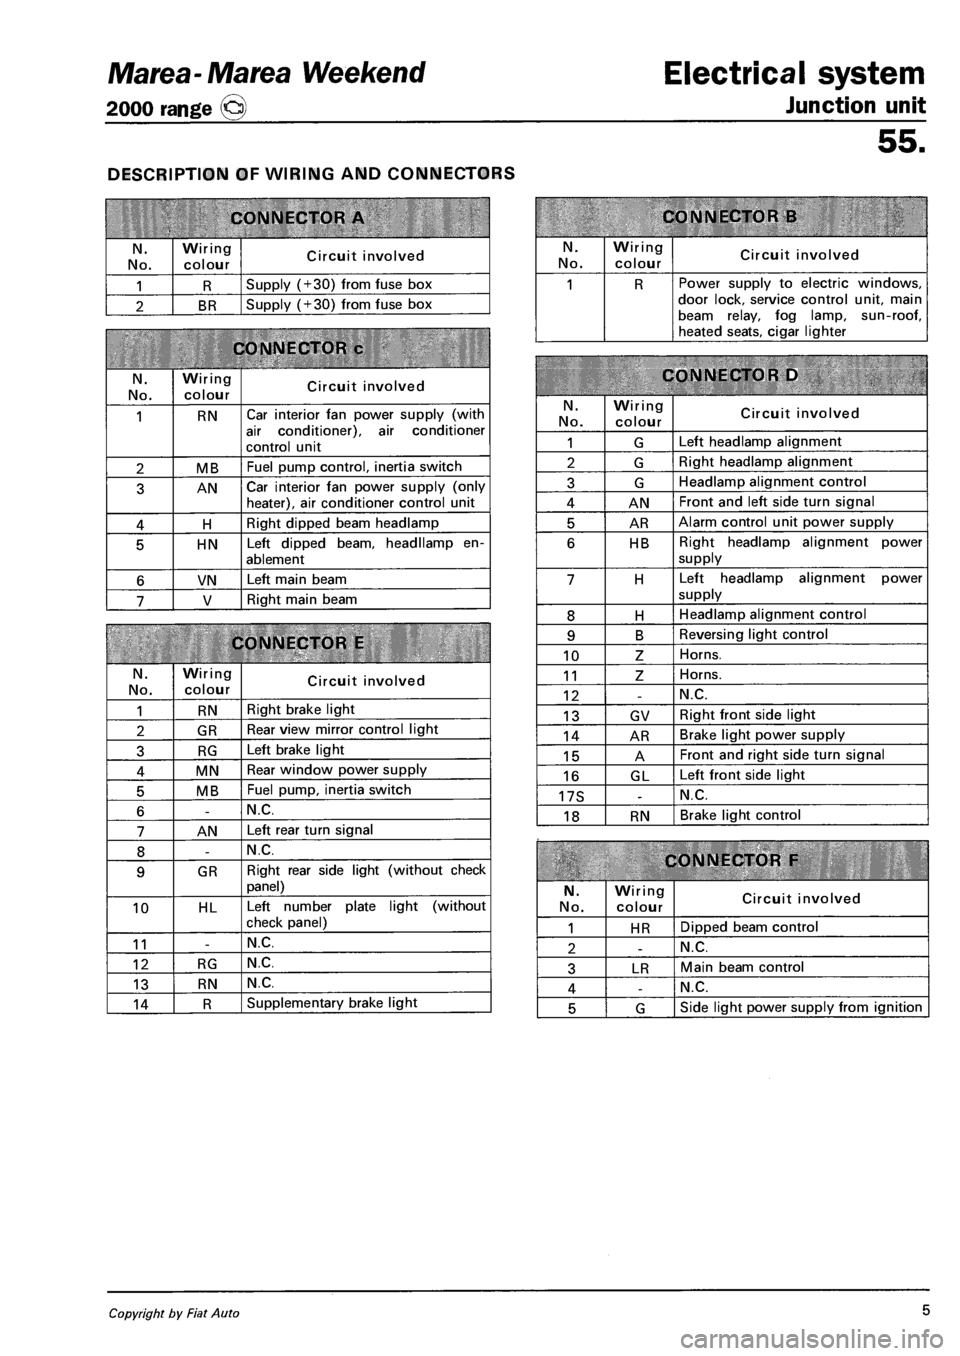
DESCRIPTION OF WIRING AND CONNECTORS
CONNECTOR A
N.
No.
Wiring
colour Circuit involved
1 R Supply (+30) from fuse box
2 BR Supply (+30) from fuse box
CONNECTOR c
N. No.
Wiring colour Circuit involved
1 RN Car interior fan power supply (with
air conditioner), air conditioner
control unit
2 MB Fuel pump control, inertia switch
3 AN Car interior fan power supply (only heater), air conditioner control unit
4 H Right dipped beam headlamp
5 HN Left dipped beam, headllamp en
ablement
6 VN Left main beam
7 V Right main beam
CONNECTOR E
N.
No.
Wiring colour Circuit involved
1 RN Right brake light
2 GR Rear view mirror control light
3 RG Left brake light
4 MN Rear window power supply
5 MB Fuel pump, inertia switch
6 -N.C.
7 AN Left rear turn signal
8 -N.C.
9 GR Right rear side light (without check
panel)
10 HL Left number plate light (without
check panel)
11 -N.C.
12 RG N.C.
13 RN N.C.
14 R Supplementary brake light
Electrical system
Junction unit
55.
CONNECTOR B
N. No.
Wiring
colour Circuit involved
1 R Power supply to electric windows, door lock, service control unit, main beam relay, fog lamp, sun-roof, heated seats, cigar lighter
CONNECTOR D
N.
No.
Wiring colour Circuit involved
1 G Left headlamp alignment
2 G Right headlamp alignment
3 G Headlamp alignment control
4 AN Front and left side turn signal
5 AR Alarm control unit power supply
6 HB Right headlamp alignment power
supply
7 H Left headlamp alignment power
supply
8 H Headlamp alignment control
9 B Reversing light control
10 Z Horns.
11 Z Horns.
12 -N.C.
13 GV Right front side light
14 AR Brake light power supply
15 A Front and right side turn signal
16 GL Left front side light
17S -N.C.
18 RN Brake light control
CONNECTOR F
N.
No.
Wiring colour Circuit involved
1 HR Dipped beam control
2 -N.C.
3 LR Main beam control
4 -N.C.
5 G Side light power supply from ignition
Copyright by Fiat Auto 5
Page 136 of 330
Electrical system
Junction unit
Marea- Marea Weekend
2000 range ©
55. 55.
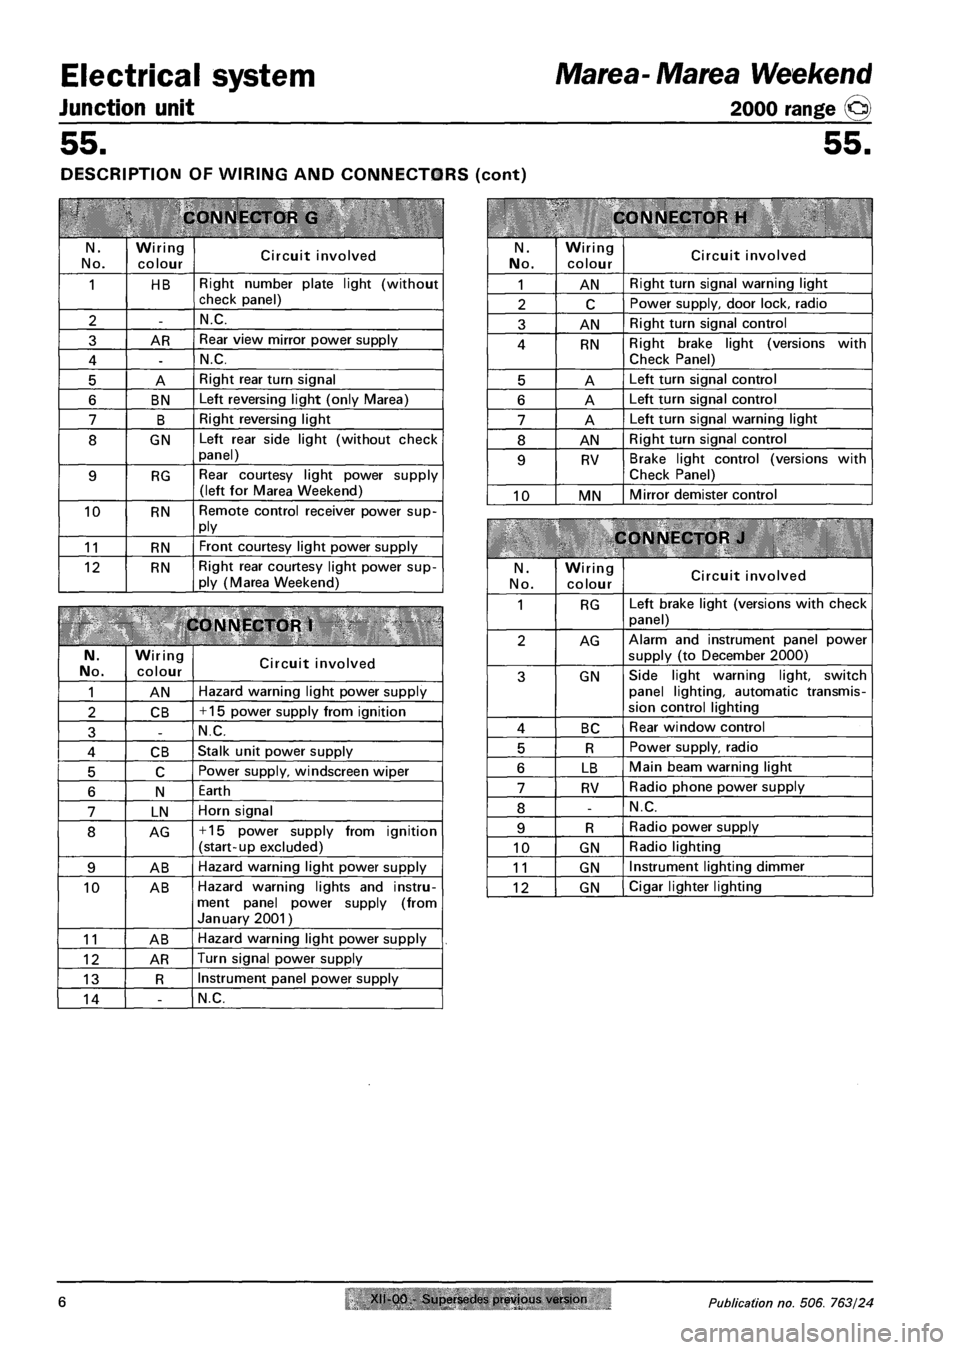
DESCRIPTION OF WIRING AND CONNECTORS (cont)
CONNECTOR G
N.
No.
Wiring
colour Circuit involved
1 HB Right number plate light (without check panel)
2 -N.C.
3 AR Rear view mirror power supply
4 -N.C.
5 A Right rear turn signal
6 BN Left reversing light (only Marea)
7 B Right reversing light
8 GN Left rear side light (without check panel)
9 RG Rear courtesy light power supply (left for Marea Weekend)
10 RN Remote control receiver power supply
11 RN Front courtesy light power supply
12 RN Right rear courtesy light power supply (Marea Weekend)
CONNECTOR 1
N. No. Wiring
colour Circuit involved
1 AN Hazard warning light power supply
2 CB + 15 power supply from ignition
3 -N.C.
4 CB Stalk unit power supply
5 C Power supply, windscreen wiper
6 N Earth
7 LN Horn signal
8 AG + 15 power supply from ignition (start-up excluded)
9 AB Hazard warning light power supply
10 AB Hazard warning lights and instrument panel power supply (from January 2001)
11 AB Hazard warning light power supply
12 AR Turn signal power supply
13 R Instrument panel power supply
14 -N.C.
CONNECTOR H
N.
No.
Wiring
colour Circuit involved
1 AN Right turn signal warning light
2 C Power supply, door lock, radio
3 AN Right turn signal control
4 RN Right brake light (versions with Check Panel)
5 A Left turn signal control
6 A Left turn signal control
7 A Left turn signal warning light
8 AN Right turn signal control
9 RV Brake light control (versions with
Check Panel)
10 MN Mirror demister control
CONNECTOR J
N.
No.
Wiring colour Circuit involved
1 RG Left brake light (versions with check
panel)
2 AG Alarm and instrument panel power
supply (to December 2000)
3 GN Side light warning light, switch panel lighting, automatic transmission control lighting
4 BC Rear window control
5 R Power supply, radio
6 LB Main beam warning light
7 RV Radio phone power supply
8 -N.C.
9 R Radio power supply
10 GN Radio lighting
11 GN Instrument lighting dimmer
12 GN Cigar lighter lighting
6 Publication no. 506. 763/24
Page 137 of 330
Marea-Marea Weekend Electrical system
2000 range @ Junction unit
55.
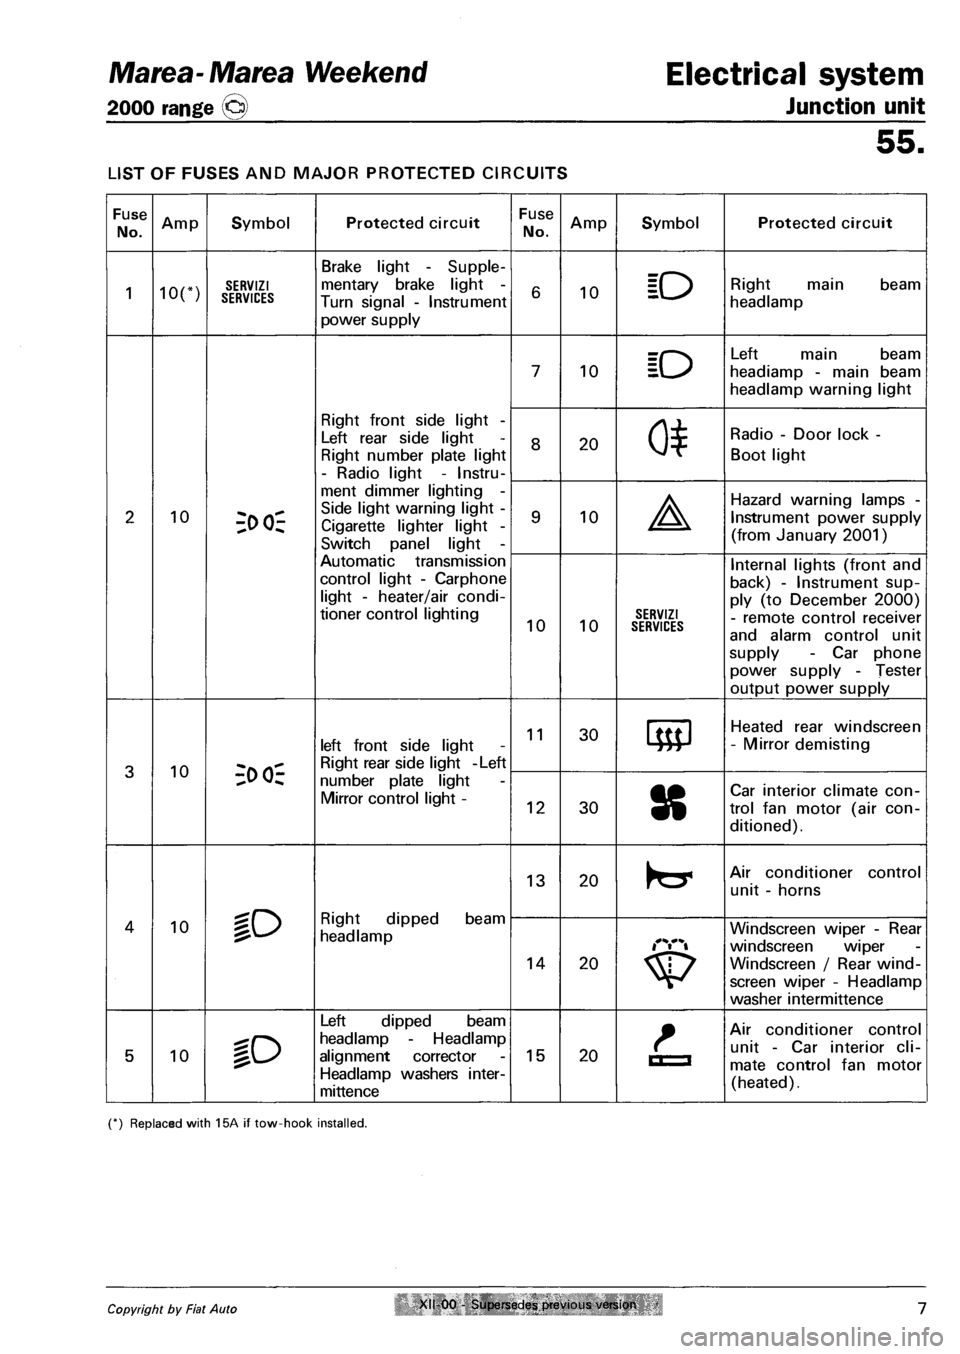
LIST OF FUSES AND MAJOR PROTECTED CIRCUITS
Fuse
No. Amp Symbol Protected circuit Fuse
No. Amp Symbol Protected circuit
1 ion SERVIZI SERVICES
Brake light - Supple
mentary brake light -
Turn signal - Instrument
power supply
6 10 ID Right main beam
headlamp
7 10 ID
Left main beam
headiamp - main beam
headlamp warning light
Right front side light -
Left rear side light
Right number plate light
- Radio light - Instru
8 20 0*
Radio - Door lock -
Boot light
2 10 3>
Side light warning light -
Cigarette lighter light -
Switch panel light -
9 10 A
Hazard warning lamps -
Instrument power supply
(from January 2001)
Automatic transmission
control light - Carphone
light - heater/air condi
tioner control lighting 10 10 SERVIZI SERVICES
Internal lights (front and
back) - Instrument sup
ply (to December 2000)
- remote control receiver
and alarm control unit
supply - Car phone
power supply - Tester
output power supply
3 10 -;o oi-
left front side light
Right rear side light -Left
11 30 Heated rear windscreen
- Mirror demisting
3 10 -;o oi-number plate light
Mirror control light -12 30 8
Car interior climate con
trol fan motor (air con
ditioned).
lO Right dipped beam
headlamp
13 20 Air conditioner control
unit - horns
4 10 lO Right dipped beam
headlamp
14 20
Windscreen wiper - Rear
windscreen wiper
Windscreen / Rear wind
screen wiper - Headlamp
washer intermittence
5 10 %o
Left dipped beam
headlamp - Headlamp
alignment corrector
Headlamp washers inter-
mittence
15 20 La
Air conditioner control
unit - Car interior cli
mate control fan motor
(heated).
(*) Replaced with 15A if tow-hook installed.
Copyright by Fiat Auto XII 00 - Supersedes previous version 7
Page 153 of 330
Marea-Marea Weekend
2000 range ©
Electrical system
Radio System
55.
A
WARNINGS
Anti-theft protection
The radio comes with a theft protection system comprising of a segret 4 digit code.
The protection system makes the rdaio inoperable if it is removed from the facia as a result of a theft. See
the following pages to activate the antitheft device
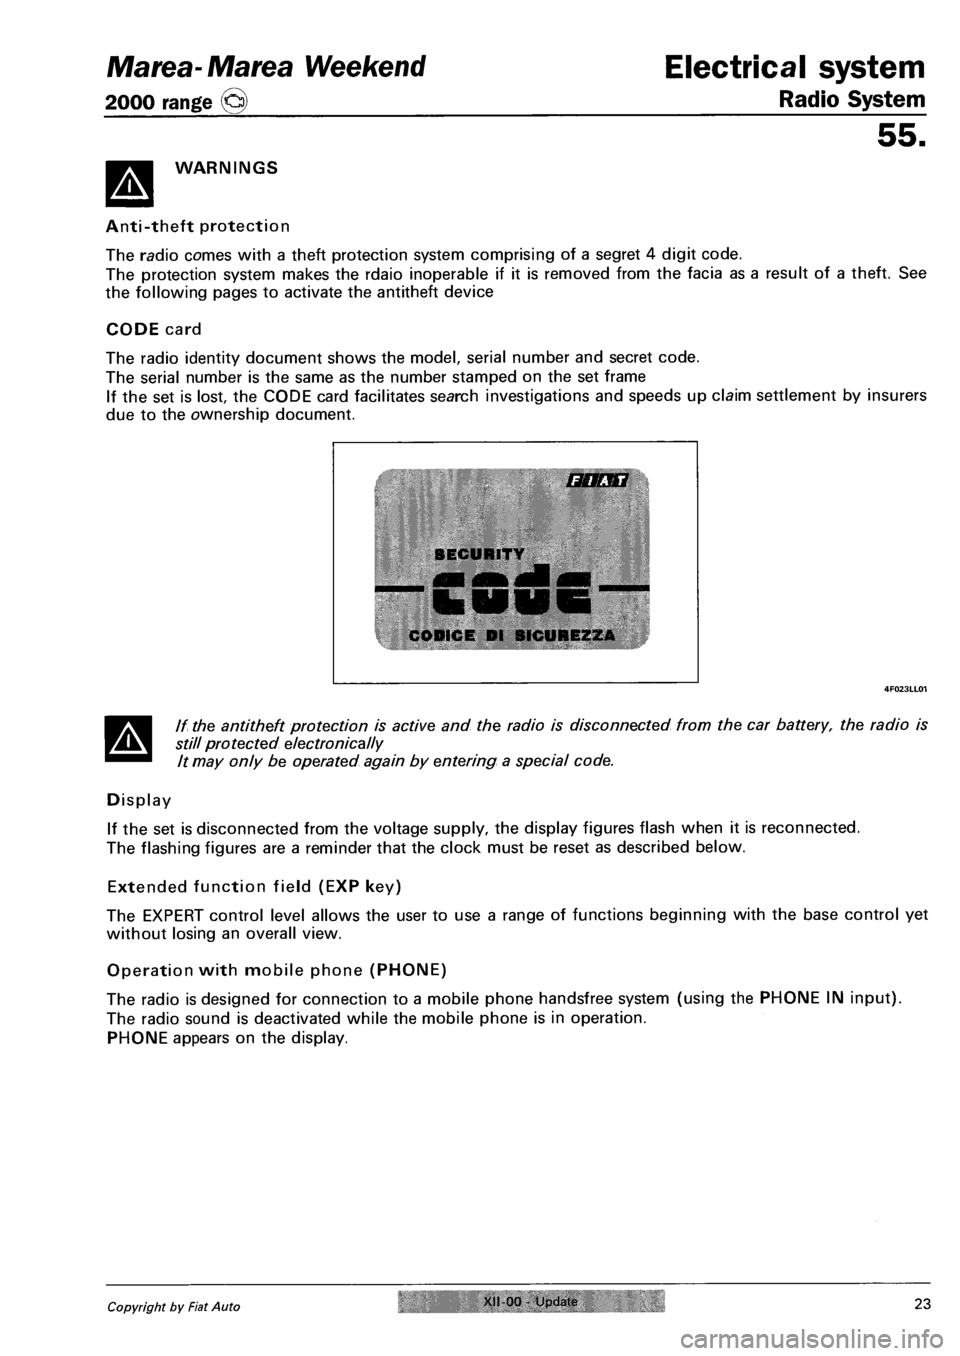
CODE card
The radio identity document shows the model, serial number and secret code.
The serial number is the same as the number stamped on the set frame
If the set is lost, the CODE card facilitates search investigations and speeds up claim settlement by insurers
due to the ownership document.
r i A T
SECURITY
CODICE Dl SICUREZZA
A
If the antitheft protection is active and the radio is disconnected from the car battery, the radio is
still protected electronically
It may only be operated again by entering a special code.
Display
If the set is disconnected from the voltage supply, the display figures flash when it is reconnected.
The flashing figures are a reminder that the clock must be reset as described below.
Extended function field (EXP key)
The EXPERT control level allows the user to use a range of functions beginning with the base control yet
without losing an overall view.
Operation with mobile phone (PHONE)
The radio is designed for connection to a mobile phone handsfree system (using the PHONE IN input).
The radio sound is deactivated while the mobile phone is in operation.
PHONE appears on the display.
Copyright by Fiat Auto XII-00 - Updatfi 23
Page 164 of 330
Radio system
Electrical system Marea-Marea Weekend
2000 range @
55.
Example 1: bass setting.
Repeatedly press the AUD key until the display shows: «BASS 00».
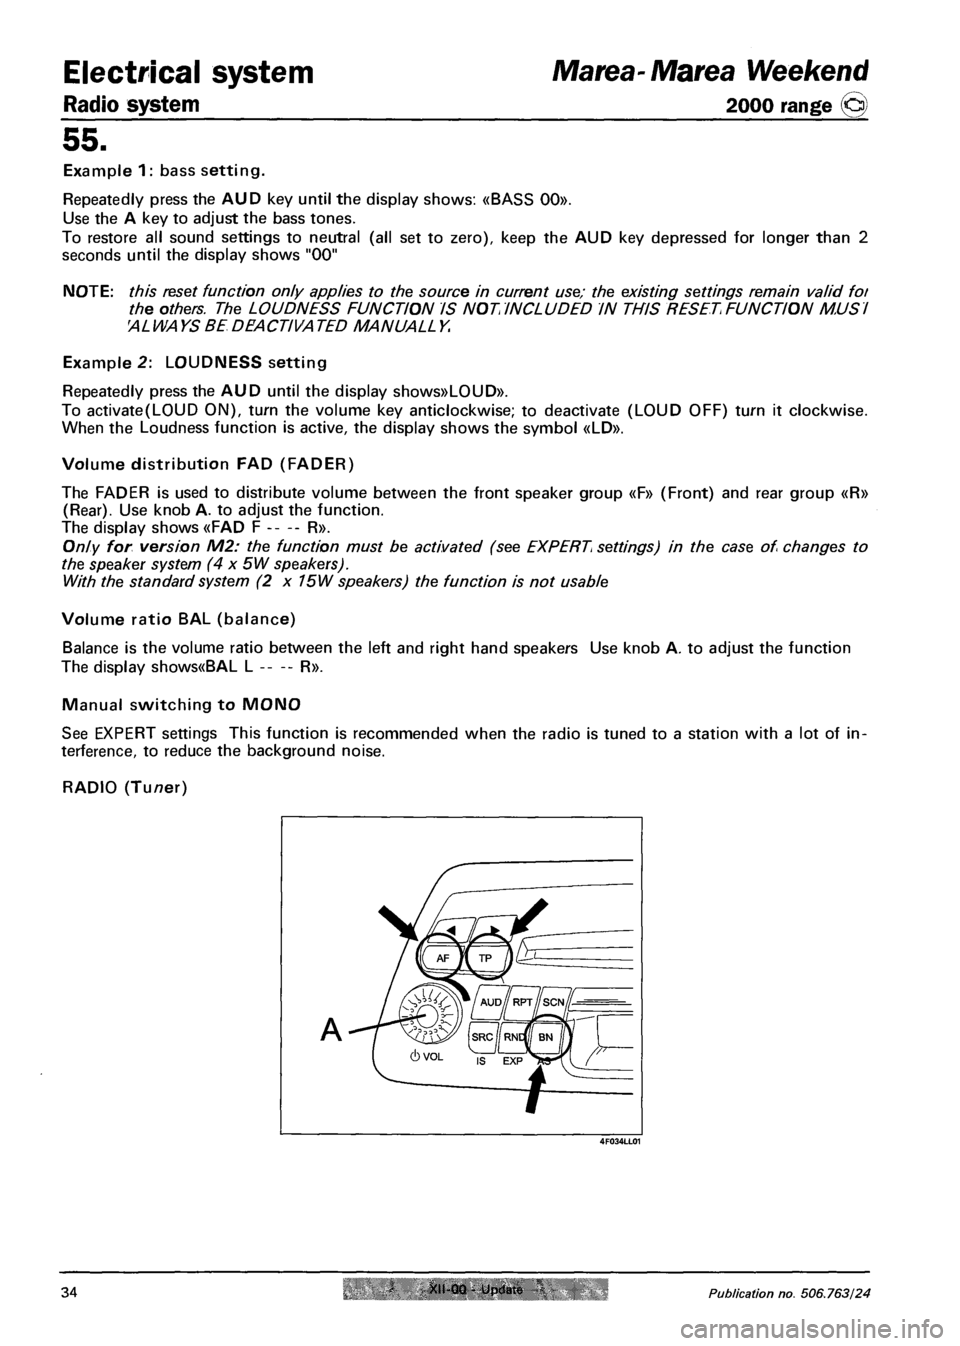
Use the A key to adjust the bass tones.
To restore all sound settings to neutral (all set to zero), keep the AUD key depressed for longer than 2
seconds until the display shows "00"
NOTE: this reset function only applies to the source in current use; the existing settings remain valid foi
the others. The LOUDNESS FUNCTION IS NOT INCLUDED IN THIS RESET FUNCTION MUSI
AL WA YS BE DEACTIVA TED MANUALL Y.
Example 2: LOUDNESS setting
Repeatedly press the AUD until the display shows»LOUD».
To activate(L0UD ON), turn the volume key anticlockwise; to deactivate (LOUD OFF) turn it clockwise.
When the Loudness function is active, the display shows the symbol «LD».
Volume distribution FAD (FADER)
The FADER is used to distribute volume between the front speaker group «F» (Front) and rear group «R»
(Rear). Use knob A. to adjust the function.
The display shows «FAD F R».
Only for version M2: the function must be activated (see EXPERT settings) in the case of changes to
the speaker system (4 x 5W speakers).
With the standard system (2 x 75W speakers) the function is not usable
Volume ratio BAL (balance)
Balance is the volume ratio between the left and right hand speakers Use knob A. to adjust the function
The display shows«BAL L R».
Manual switching to MONO
See EXPERT settings This function is recommended when the radio is tuned to a station with a lot of in
terference, to reduce the background noise.
RADIO (Tuner)
A
4F034LL01
34 XII-00 - Update I Publication no. 506.763/24
Page 171 of 330
Marea- Marea Weekend Electrical system
2000 range (Q) Radio System
55.
ALTERING EXPERT SETTINGS
Turning on EXPERT
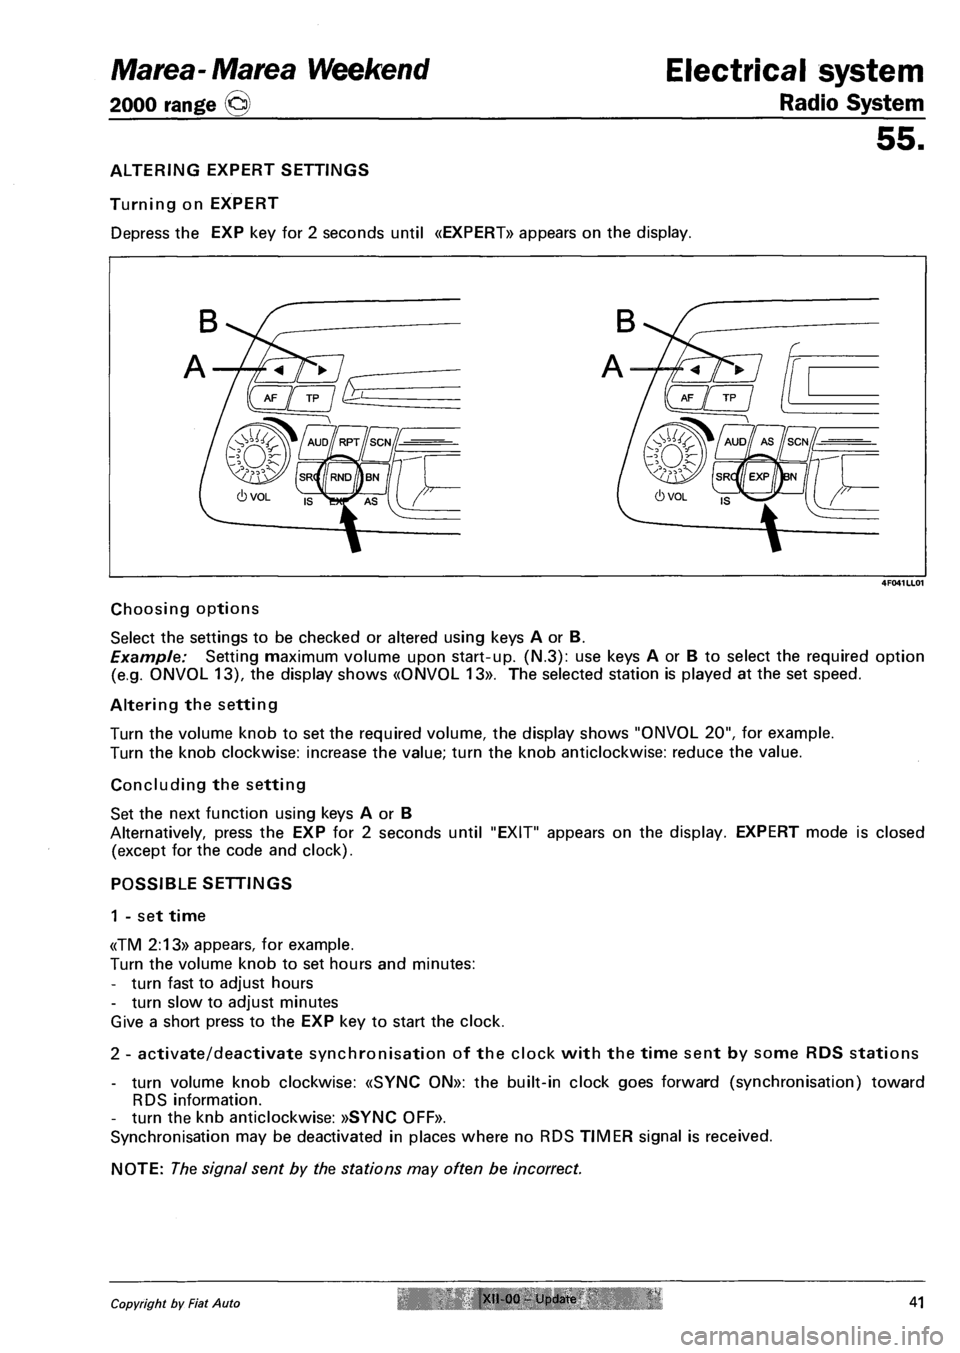
Depress the EXP key for 2 seconds until «EXPERT» appears on the display.
4F041LL01
Choosing options
Select the settings to be checked or altered using keys A or B.
Example: Setting maximum volume upon start-up. (N.3): use keys A or B to select the required option
(e.g. ONVOL 13), the display shows «ONVOL 13». The selected station is played at the set speed.
Altering the setting
Turn the volume knob to set the required volume, the display shows "ONVOL 20", for example.
Turn the knob clockwise: increase the value; turn the knob anticlockwise: reduce the value.
Concluding the setting
Set the next function using keys A or B
Alternatively, press the EXP for 2 seconds until "EXIT" appears on the display. EXPERT mode is closed
(except for the code and clock).
POSSIBLE SETTINGS
1 - set time
«TM 2:13» appears, for example.
Turn the volume knob to set hours and minutes:
- turn fast to adjust hours
- turn slow to adjust minutes
Give a short press to the EXP key to start the clock.
2 - activate/deactivate synchronisation of the clock with the time sent by some RDS stations
- turn volume knob clockwise: «SYNC ON»: the built-in clock goes forward (synchronisation) toward
RDS information.
- turn the knb anticlockwise: »SYNC OFF».
Synchronisation may be deactivated in places where no RDS TIMER signal is received.
NOTE: The signal sent by the stations may often be incorrect.
Copyright by Fiat Auto XII 00 - Update 41