lock FIAT MULTIPLA 2006 1.G Owner's Guide
[x] Cancel search | Manufacturer: FIAT, Model Year: 2006, Model line: MULTIPLA, Model: FIAT MULTIPLA 2006 1.GPages: 266, PDF Size: 4.61 MB
Page 117 of 266
116
CORRECT USE
OF THE CAR
WARNING
LIGHTS AND
MESSAGES
IN AN
EMERGENCY
CAR
MAINTENANCE
TECHNICAL
SPECIFICATIONS
INDEX
DASHBOARD
AND CONTROLS
SAFETY
DEVICES
F0E0023m
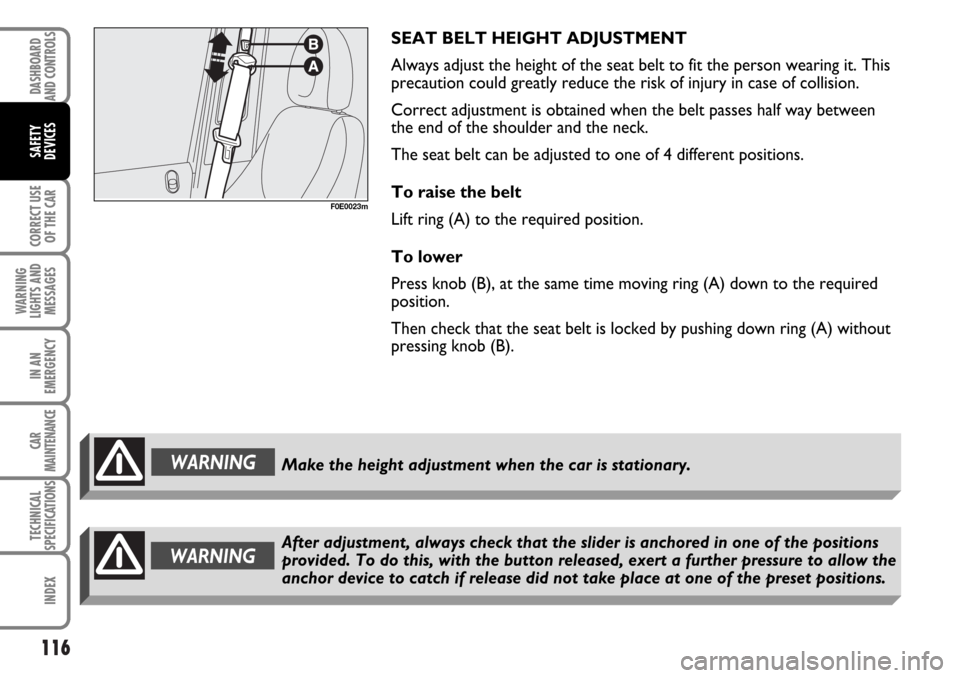
SEAT BELT HEIGHT ADJUSTMENT
Always adjust the height of the seat belt to fit the person wearing it. This
precaution could greatly reduce the risk of injury in case of collision.
Correct adjustment is obtained when the belt passes half way between
the end of the shoulder and the neck.
The seat belt can be adjusted to one of 4 different positions.
To raise the belt
Lift ring (A) to the required position.
To lower
Press knob (B), at the same time moving ring (A) down to the required
position.
Then check that the seat belt is locked by pushing down ring (A) without
pressing knob (B).
WARNINGMake the height adjustment when the car is stationary.
After adjustment, always check that the slider is anchored in one of the positions
provided. To do this, with the button released, exert a further pressure to allow the
anchor device to catch if release did not take place at one of the preset positions.WARNING
Page 118 of 266
117
CORRECT USE
OF THE CAR
WARNING
LIGHTS AND
MESSAGES
IN AN
EMERGENCY
CAR
MAINTENANCE
TECHNICAL
SPECIFICATIONS
INDEX
DASHBOARD
AND CONTROLS
SAFETY
DEVICES
PRETENSIONERS
To increase the efficiency of the front seat belts, Fiat Multipla is fitted
with pretensioners on all the three front seats.
Do not place objects under the centre seat as this could damage the
pretensioner system. These devices “feel” through a sensor, that a
violent crash is in progress and rewind the seat belts a few centimetres.
In this way they ensure that the seat belt adheres perfectly to the wearer
before the restraining action begins. The seat belt locks to indicate that
the device has intervened; the seat belt cannot be drawn back up even
when guiding it manually.
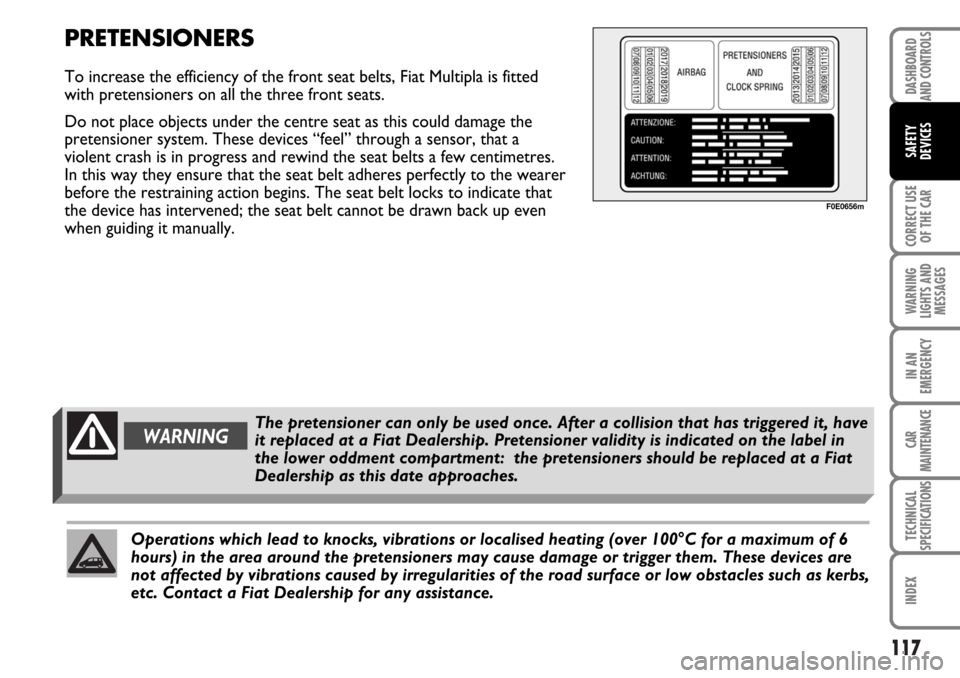
WARNINGThe pretensioner can only be used once. After a collision that has triggered it, have
it replaced at a Fiat Dealership. Pretensioner validity is indicated on the label in
the lower oddment compartment: the pretensioners should be replaced at a Fiat
Dealership as this date approaches.
Operations which lead to knocks, vibrations or localised heating (over 100°C for a maximum of 6
hours) in the area around the pretensioners may cause damage or trigger them. These devices are
not affected by vibrations caused by irregularities of the road surface or low obstacles such as kerbs,
etc. Contact a Fiat Dealership for any assistance.
F0E0656m
Page 128 of 266
127
CORRECT USE
OF THE CAR
WARNING
LIGHTS AND
MESSAGES
IN AN
EMERGENCY
CAR
MAINTENANCE
TECHNICAL
SPECIFICATIONS
INDEX
DASHBOARD
AND CONTROLS
SAFETY
DEVICES
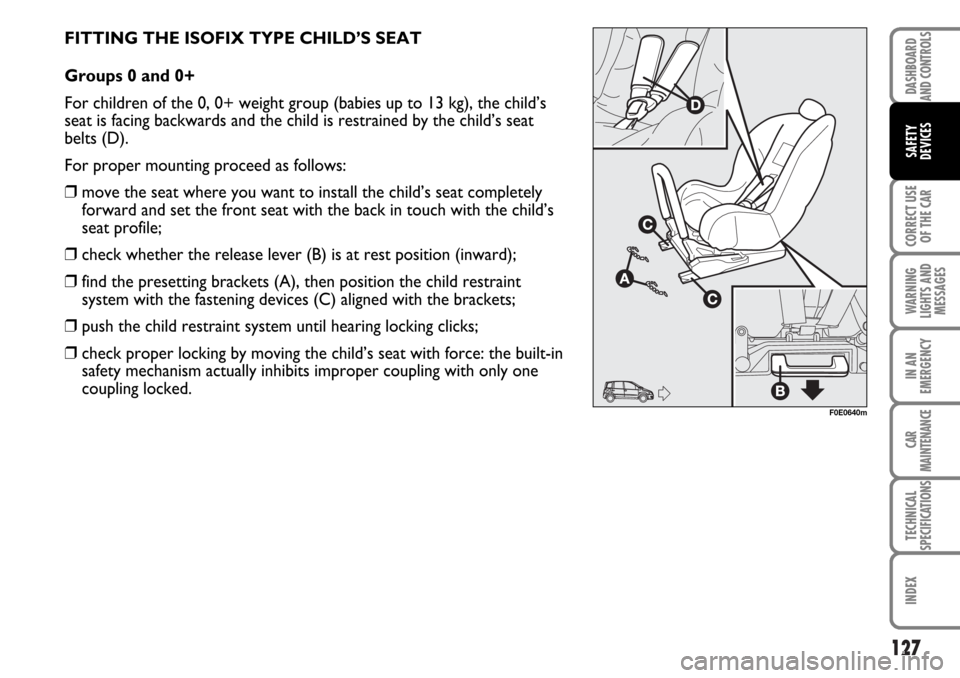
FITTING THE ISOFIX TYPE CHILD’S SEAT
Groups 0 and 0+
For children of the 0, 0+ weight group (babies up to 13 kg), the child’s
seat is facing backwards and the child is restrained by the child’s seat
belts (D).
For proper mounting proceed as follows:
❒move the seat where you want to install the child’s seat completely
forward and set the front seat with the back in touch with the child’s
seat profile;
❒check whether the release lever (B) is at rest position (inward);
❒find the presetting brackets (A), then position the child restraint
system with the fastening devices (C) aligned with the brackets;
❒push the child restraint system until hearing locking clicks;
❒check proper locking by moving the child’s seat with force: the built-in
safety mechanism actually inhibits improper coupling with only one
coupling locked.
F0E0640m
Page 129 of 266
128
CORRECT USE
OF THE CAR
WARNING
LIGHTS AND
MESSAGES
IN AN
EMERGENCY
CAR
MAINTENANCE
TECHNICAL
SPECIFICATIONS
INDEX
DASHBOARD
AND CONTROLS
SAFETY
DEVICES
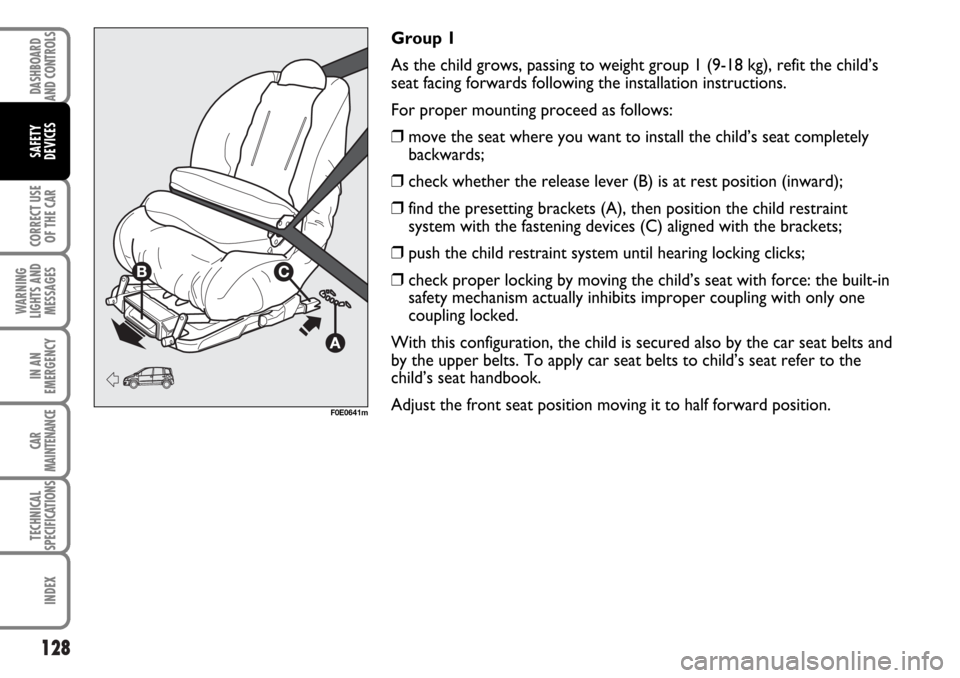
Group 1
As the child grows, passing to weight group 1 (9-18 kg), refit the child’s
seat facing forwards following the installation instructions.
For proper mounting proceed as follows:
❒move the seat where you want to install the child’s seat completely
backwards;
❒check whether the release lever (B) is at rest position (inward);
❒find the presetting brackets (A), then position the child restraint
system with the fastening devices (C) aligned with the brackets;
❒push the child restraint system until hearing locking clicks;
❒check proper locking by moving the child’s seat with force: the built-in
safety mechanism actually inhibits improper coupling with only one
coupling locked.
With this configuration, the child is secured also by the car seat belts and
by the upper belts. To apply car seat belts to child’s seat refer to the
child’s seat handbook.
Adjust the front seat position moving it to half forward position.
F0E0641m
Page 138 of 266
137
WARNING
LIGHTS AND
MESSAGES
IN AN
EMERGENCY
CAR
MAINTENANCE
TECHNICAL
SPECIFICATIONS
INDEX
DASHBOARD
AND CONTROLS
SAFETY
DEVICES
CORRECT USE
OF THE CAR
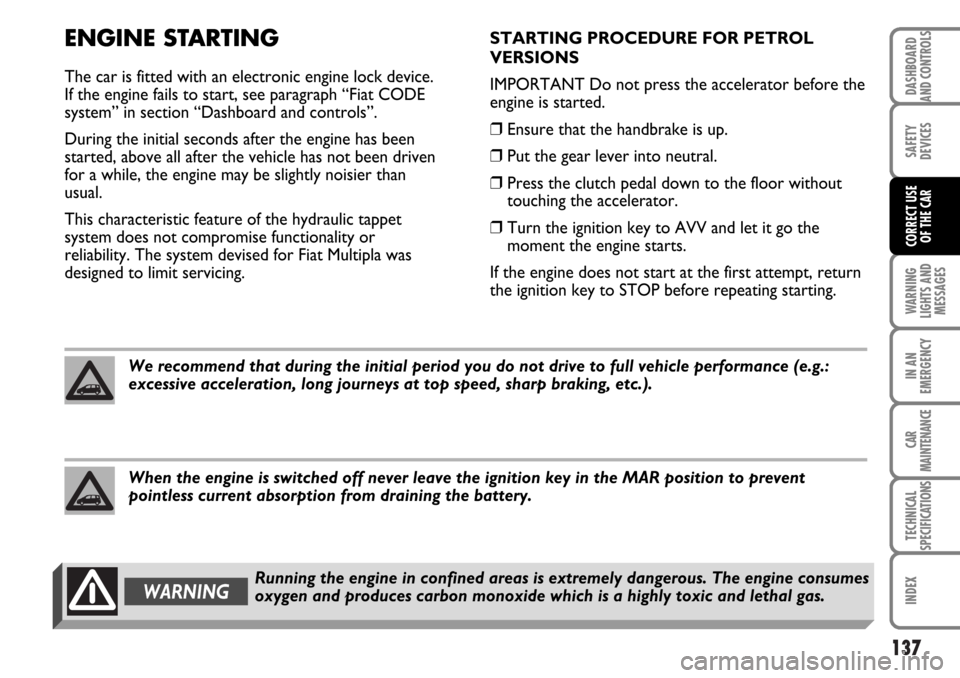
ENGINE STARTING
The car is fitted with an electronic engine lock device.
If the engine fails to start, see paragraph “Fiat CODE
system” in section “Dashboard and controls”.
During the initial seconds after the engine has been
started, above all after the vehicle has not been driven
for a while, the engine may be slightly noisier than
usual.
This characteristic feature of the hydraulic tappet
system does not compromise functionality or
reliability. The system devised for Fiat Multipla was
designed to limit servicing.STARTING PROCEDURE FOR PETROL
VERSIONS
IMPORTANT Do not press the accelerator before the
engine is started.
❒Ensure that the handbrake is up.
❒Put the gear lever into neutral.
❒Press the clutch pedal down to the floor without
touching the accelerator.
❒Turn the ignition key to AVV and let it go the
moment the engine starts.
If the engine does not start at the first attempt, return
the ignition key to STOP before repeating starting.
WARNINGRunning the engine in confined areas is extremely dangerous. The engine consumes
oxygen and produces carbon monoxide which is a highly toxic and lethal gas.
We recommend that during the initial period you do not drive to full vehicle performance (e.g.:
excessive acceleration, long journeys at top speed, sharp braking, etc.).
When the engine is switched off never leave the ignition key in the MAR position to prevent
pointless current absorption from draining the battery.
Page 141 of 266
140
WARNING
LIGHTS AND
MESSAGES
IN AN
EMERGENCY
CAR
MAINTENANCE
TECHNICAL
SPECIFICATIONS
INDEX
DASHBOARD
AND CONTROLS
SAFETY
DEVICES
CORRECT USE
OF THE CAR
STOPPING THE ENGINE
Turn the ignition to STOP while the engine is idling.
IMPORTANT After a taxing drive, you should allow
the engine to “catch its breath” before turning it off by
letting it idle to allow the temperature in the engine
compartment to fall.PARKING
Proceed as follows:
❒stop the engine and engage the handbrake;
❒engage a gear (first if the car is faced uphill or
reverse if it is faced downhill) and leave the wheels
steered.
Block the wheels with a wedge or a stone if the car is
parked on a steep slope.
Do not leave the ignition key at MAR to prevent
draining the battery. Always remove the key when you
leave the car.
Never leave children unattended in the car. Always
remove the ignition key when leaving the car and take
it out with you.
A quick burst on the accelerator before turning off the engine does not serve any practical purpose at
all. It wastes fuel and is damaging, particularly to turbo-charged engines.
Page 153 of 266
152
IN AN
EMERGENCY
CAR
MAINTENANCE
TECHNICAL
SPECIFICATIONS
INDEX
DASHBOARD
AND CONTROLS
SAFETY
DEVICES
CORRECT USE
OF THE CAR
WARNING
LIGHTS AND
MESSAGES
152
W W
A A
R R
N N
I I
N N
G G
L L
I I
G G
H H
T T
S S
A A
N N
D D
M M
E E
S S
S S
A A
G G
E E
S S
GENERAL INFORMATION .............................................. 153
ENGINE COOLANT TOO HOT ................................... 154
LOW BRAKE FLUID LEVEL .............................................. 154
BATTERY NOT RECHARGING PROPERLY ............... 155
SEAT BELTS NOT FASTENED ......................................... 155
AIRBAG FAILURE ................................................................ 155
DOORS OPEN ..................................................................... 156
FRONT BRAKES PADS WORN....................................... 156
LOW ENGINE OIL PRESSURE ........................................ 156
ABS (WHEEL ANTI-LOCKING SYSTEM) FAILURE.... 157
EBD (ELECTRONIC BRAKE FORCE DISTRIBUTOR)
FAILURE .................................................................................. 157
ESP SYSTEM ........................................................................... 157
EOBD / INJECTION SYSTEM FAILURE.......................... 158
FIAT CODE ........................................................................... 159
POSSIBLE ICE ON ROAD ................................................ 159INERTIAL FUEL CUT-OFF SWITCH .............................. 159
EXHAUST OIL ..................................................................... 160
DIESEL PARTICULATE FILTER CLOGGED ................. 161
GLOW PLUGS ..................................................................... 162
DIRECTION INDICATORS ............................................. 162
PASSENGER SIDE AIRBAG DEACTIVATED ............... 162
OUTSIDE LIGHTS ............................................................... 163
MAIN BEAM HEADLIGHTS ............................................. 163
SERVICE ................................................................................. 163
WARNING LIGHT FAILURE ........................................... 163
WATER IN DIESEL FUEL FILTER .................................... 163
Page 158 of 266
157
CORRECT USE
OF THE CAR
IN AN
EMERGENCY
CAR
MAINTENANCE
TECHNICAL
SPECIFICATIONS
INDEX
DASHBOARD
AND CONTROLS
SAFETY
DEVICES
WARNING
LIGHTS AND
MESSAGES
157
Warning Messagelight on panel on display
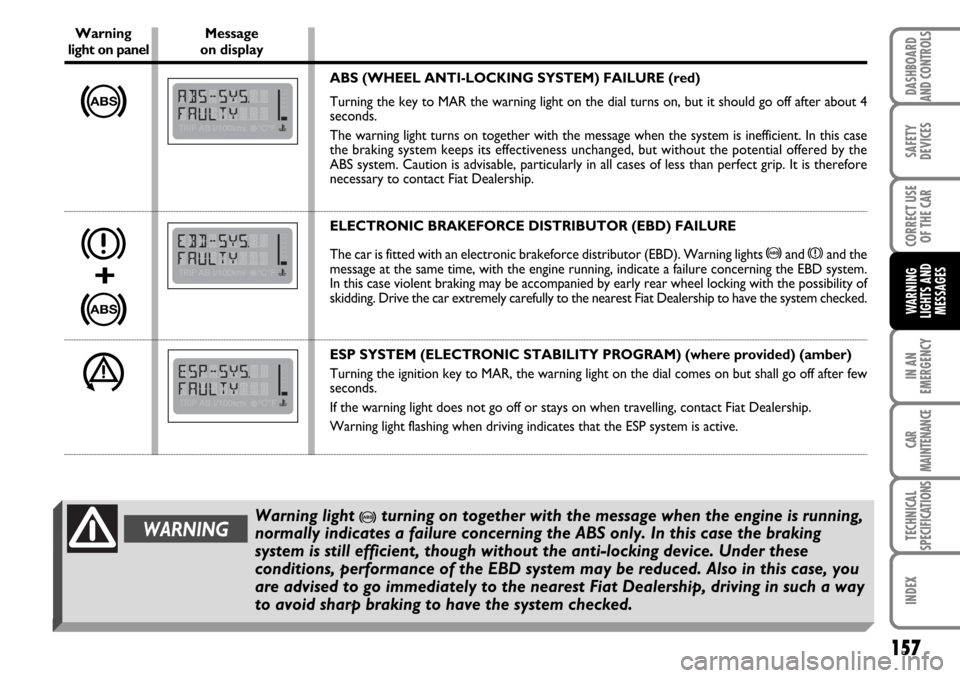
ABS (WHEEL ANTI-LOCKING SYSTEM) FAILURE (red)
Turning the key to MAR the warning light on the dial turns on, but it should go off after about 4
seconds.
The warning light turns on together with the message when the system is inefficient. In this case
the braking system keeps its effectiveness unchanged, but without the potential offered by the
ABS system. Caution is advisable, particularly in all cases of less than perfect grip. It is therefore
necessary to contact Fiat Dealership.
ELECTRONIC BRAKEFORCE DISTRIBUTOR (EBD) FAILURE
The car is fitted with an electronic brakeforce distributor (EBD). Warning lights >and xand the
message at the same time, with the engine running, indicate a failure concerning the EBD system.
In this case violent braking may be accompanied by early rear wheel locking with the possibility of
skidding. Drive the car extremely carefully to the nearest Fiat Dealership to have the system checked.
ESP SYSTEM (ELECTRONIC STABILITY PROGRAM) (where provided) (amber)
Turning the ignition key to MAR, the warning light on the dial comes on but shall go off after few
seconds.
If the warning light does not go off or stays on when travelling, contact Fiat Dealership.
Warning light flashing when driving indicates that the ESP system is active.
x
+
>
>
WARNINGWarning light >turning on together with the message when the engine is running,
normally indicates a failure concerning the ABS only. In this case the braking
system is still efficient, though without the anti-locking device. Under these
conditions, performance of the EBD system may be reduced. Also in this case, you
are advised to go immediately to the nearest Fiat Dealership, driving in such a way
to avoid sharp braking to have the system checked.
á
Page 171 of 266
170
SAFETY
DEVICES
CORRECT USE
OF THE CAR
WARNING
LIGHTS AND
MESSAGES
CAR
MAINTENANCE
TECHNICAL
SPECIFICATIONS
INDEX
DASHBOARD
AND CONTROLS
IN AN
EMERGENCY
Please note:
❒the jack weight is 3.5 kg
❒the jack requires no adjustment
❒the jack cannot be repaired and in the event of a fault it must be
replaced by another original one
❒no tool other than its cranking device may be fitted on the jack.
To change a wheel proceed as follows:
❒Stop the car is a position that is not dangerous for oncoming traffic
where you can change the wheel safely. The ground should be flat and
adequately firm. At night choose a lit area;
❒Turn the engine off and pull up the handbrake;
❒Engage first gear or reverse;
❒Take out tools, jack and space-saver spare wheel;
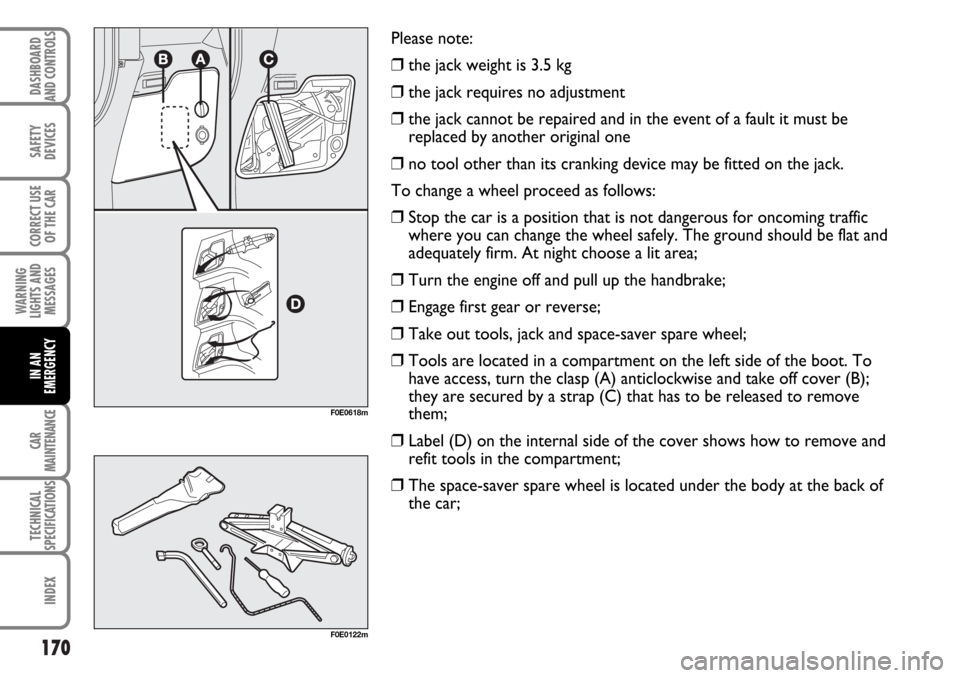
❒Tools are located in a compartment on the left side of the boot. To
have access, turn the clasp (A) anticlockwise and take off cover (B);
they are secured by a strap (C) that has to be released to remove
them;
❒Label (D) on the internal side of the cover shows how to remove and
refit tools in the compartment;
❒The space-saver spare wheel is located under the body at the back of
the car;
F0E0618m
F0E0122m
Page 172 of 266
171
SAFETY
DEVICES
CORRECT USE
OF THE CAR
WARNING
LIGHTS AND
MESSAGES
CAR
MAINTENANCE
TECHNICAL
SPECIFICATIONS
INDEX
DASHBOARD
AND CONTROLS
IN AN
EMERGENCY
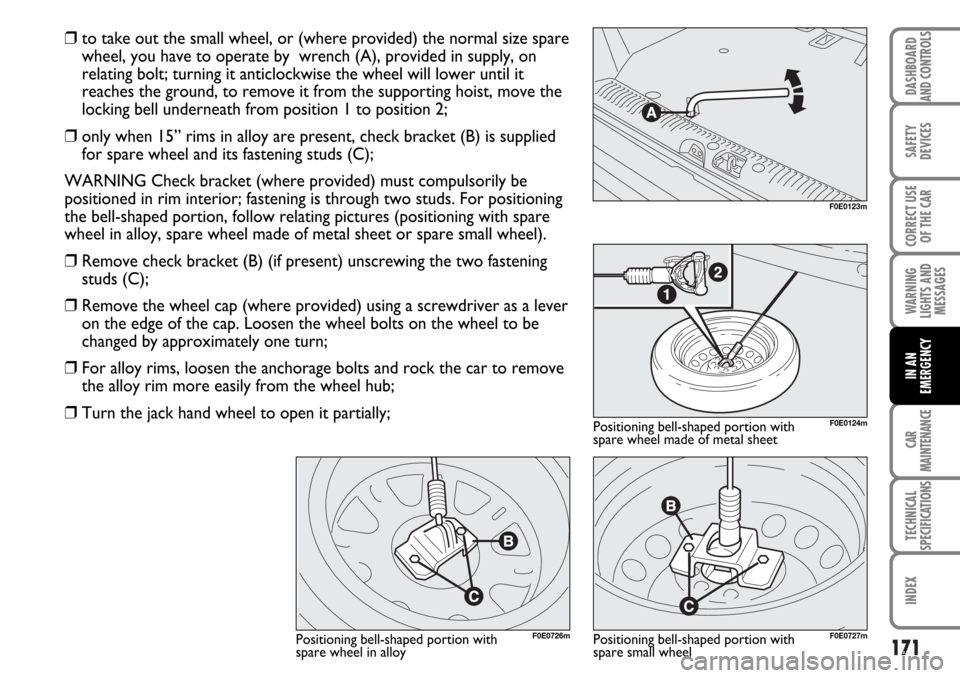
❒to take out the small wheel, or (where provided) the normal size spare
wheel, you have to operate by wrench (A), provided in supply, on
relating bolt; turning it anticlockwise the wheel will lower until it
reaches the ground, to remove it from the supporting hoist, move the
locking bell underneath from position 1 to position 2;
❒only when 15” rims in alloy are present, check bracket (B) is supplied
for spare wheel and its fastening studs (C);
WARNING Check bracket (where provided) must compulsorily be
positioned in rim interior; fastening is through two studs. For positioning
the bell-shaped portion, follow relating pictures (positioning with spare
wheel in alloy, spare wheel made of metal sheet or spare small wheel).
❒Remove check bracket (B) (if present) unscrewing the two fastening
studs (C);
❒Remove the wheel cap (where provided) using a screwdriver as a lever
on the edge of the cap. Loosen the wheel bolts on the wheel to be
changed by approximately one turn;
❒For alloy rims, loosen the anchorage bolts and rock the car to remove
the alloy rim more easily from the wheel hub;
❒Turn the jack hand wheel to open it partially;
F0E0123m
F0E0124m
F0E0727mF0E0726m
Positioning bell-shaped portion with
spare wheel made of metal sheet
Positioning bell-shaped portion with
spare small wheel Positioning bell-shaped portion with
spare wheel in alloy