change wheel FIAT MULTIPLA 2006 1.G Owners Manual
[x] Cancel search | Manufacturer: FIAT, Model Year: 2006, Model line: MULTIPLA, Model: FIAT MULTIPLA 2006 1.GPages: 266, PDF Size: 4.61 MB
Page 61 of 266
60
SAFETY
DEVICES
CORRECT USE
OF THE CAR
WARNING
LIGHTS AND
MESSAGES
IN AN
EMERGENCY
CAR
MAINTENANCE
TECHNICAL
SPECIFICATIONS
INDEX
DASHBOARD
AND CONTROLS
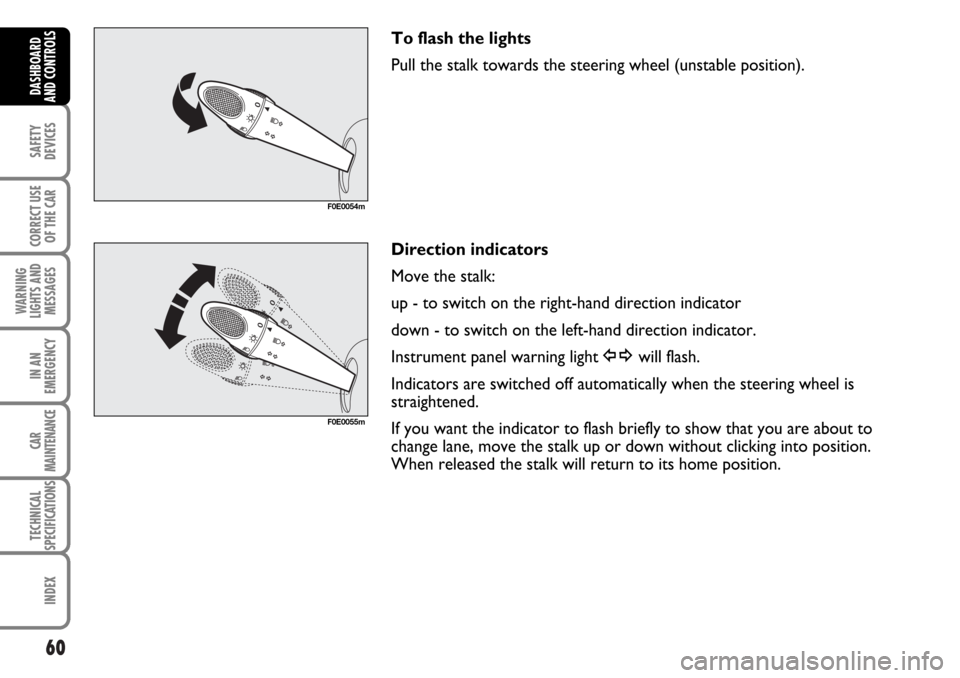
To flash the lights
Pull the stalk towards the steering wheel (unstable position).
Direction indicators
Move the stalk:
up - to switch on the right-hand direction indicator
down - to switch on the left-hand direction indicator.
Instrument panel warning light
ywill flash.
Indicators are switched off automatically when the steering wheel is
straightened.
If you want the indicator to flash briefly to show that you are about to
change lane, move the stalk up or down without clicking into position.
When released the stalk will return to its home position.
F0E0054m
F0E0055m
Page 95 of 266
94
SAFETY
DEVICES
CORRECT USE
OF THE CAR
WARNING
LIGHTS AND
MESSAGES
IN AN
EMERGENCY
CAR
MAINTENANCE
TECHNICAL
SPECIFICATIONS
INDEX
DASHBOARD
AND CONTROLS
ASR SYSTEM (Antislip Regulation)
The ASR system is an integral part of the ESP system that controls the
vehicle drive and cuts in automatically every time one or both driving
wheels slip.
In slipping conditions, two different control systems are activated:
❒if the slipping involves both the driving wheels, the ASR system
intervenes reducing the power transmitted by the engine;
❒if the slipping involves only one driving wheel, the ASR system cuts in
automatically braking the wheel that is slipping.
The action of the ASR is particularly helpful in the following
circumstances:
❒slipping of the inner wheel due to the effect of dynamic load changes
or excessive acceleration;
❒too much power transmitted to the wheels also in relation to the
conditions of the road surface;
❒acceleration on slippery, snowy or frozen surfaces;
❒in the case of loss of grip on a wet surface (aquaplaning).
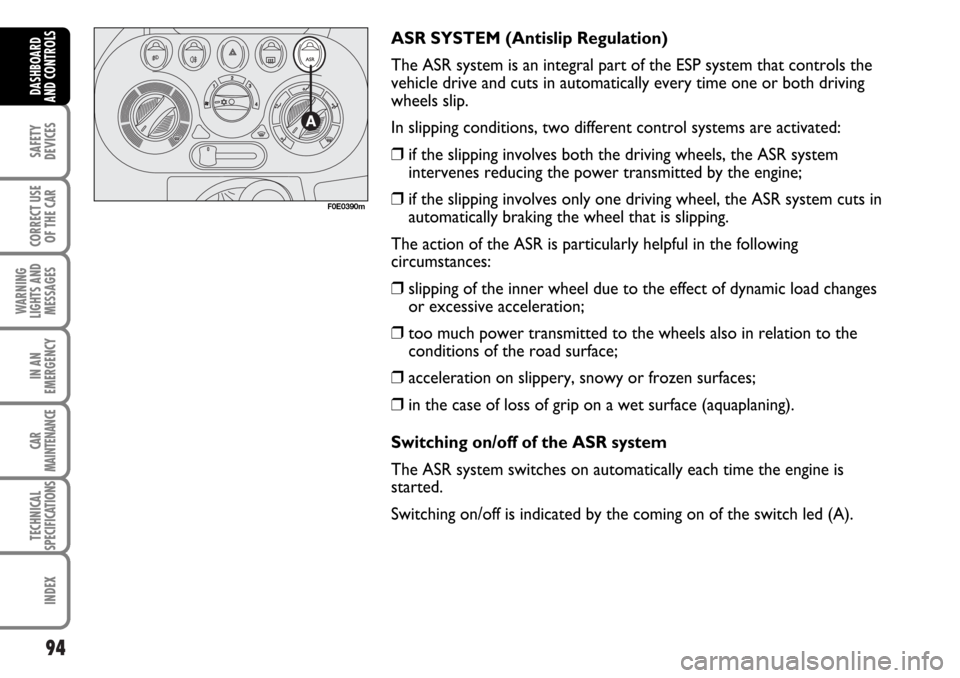
Switching on/off of the ASR system
The ASR system switches on automatically each time the engine is
started.
Switching on/off is indicated by the coming on of the switch led (A).
F0E0390m
Page 150 of 266
149
WARNING
LIGHTS AND
MESSAGES
IN AN
EMERGENCY
CAR
MAINTENANCE
TECHNICAL
SPECIFICATIONS
INDEX
DASHBOARD
AND CONTROLS
SAFETY
DEVICES
CORRECT USE
OF THE CAR
SNOW TYRES
These tyres have been specially designed for driving on
snow or ice, to be fitted in place of the standard tyres.
Use snow tyres of the same size as the standard tyres
provided with the car.
Fiat Dealership will be happy to provide advice
concerning the most suitable type of tyre for the
customer’s requirements.
For the type of tyre to be used, inflation pressures and
the specifications of snow tyres, follow the
instructions given in paragraph “Wheels” in section
“Technical specifications”.
The winter features of these tyres are reduced
considerably when the tread depth is below 4 mm. In
this case, they should be replaced.
Due to the snow tyre features, under normal
conditions of use or on long motorway journeys, the
performance of these tyres is lower than that of
standard tyres.It is therefore necessary to limit their use to the
purposes for which they are certified.
IMPORTANT When snow tyres are used with a max
speed index below the one that can be reached by the
car (increased by 5%), place a notice in the passenger
compartment, plainly in the driver’s view which states
the max permissible speed of the snow tyres (as per
EC Directive).
All four tyres should be the same (brand and track) to
ensure greater safety when driving and braking and
better driveability.
Remember that it is inappropriate to change the
direction of rotation of tyres.
The max speed for snow tyres with “Q” marking is 160 km/h. The Road Traffic
Code speed limits must however be always strictly observed.WARNING
Page 158 of 266
157
CORRECT USE
OF THE CAR
IN AN
EMERGENCY
CAR
MAINTENANCE
TECHNICAL
SPECIFICATIONS
INDEX
DASHBOARD
AND CONTROLS
SAFETY
DEVICES
WARNING
LIGHTS AND
MESSAGES
157
Warning Messagelight on panel on display
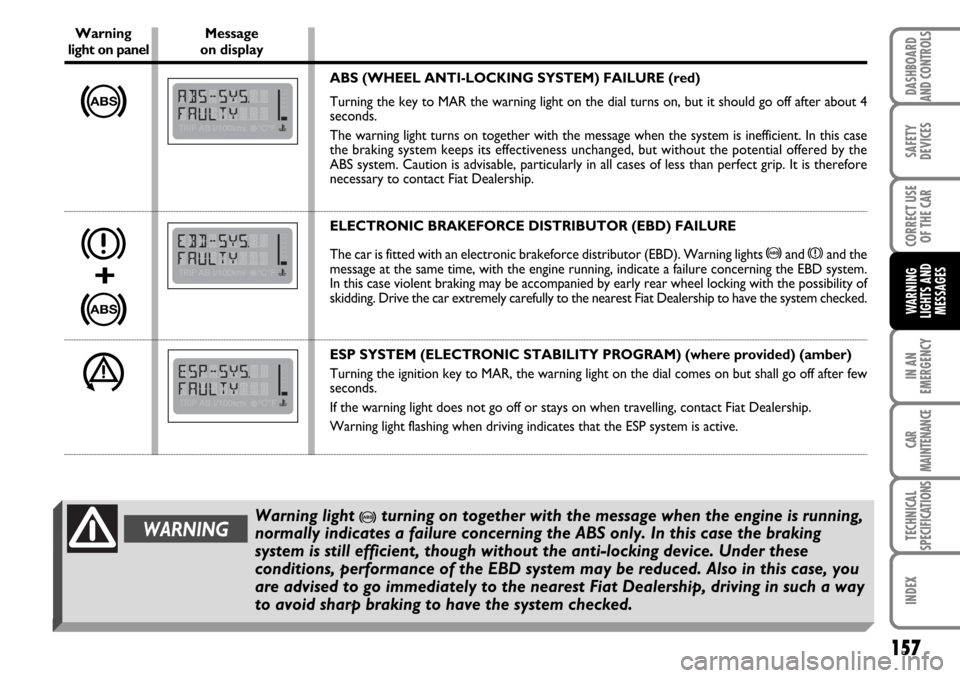
ABS (WHEEL ANTI-LOCKING SYSTEM) FAILURE (red)
Turning the key to MAR the warning light on the dial turns on, but it should go off after about 4
seconds.
The warning light turns on together with the message when the system is inefficient. In this case
the braking system keeps its effectiveness unchanged, but without the potential offered by the
ABS system. Caution is advisable, particularly in all cases of less than perfect grip. It is therefore
necessary to contact Fiat Dealership.
ELECTRONIC BRAKEFORCE DISTRIBUTOR (EBD) FAILURE
The car is fitted with an electronic brakeforce distributor (EBD). Warning lights >and xand the
message at the same time, with the engine running, indicate a failure concerning the EBD system.
In this case violent braking may be accompanied by early rear wheel locking with the possibility of
skidding. Drive the car extremely carefully to the nearest Fiat Dealership to have the system checked.
ESP SYSTEM (ELECTRONIC STABILITY PROGRAM) (where provided) (amber)
Turning the ignition key to MAR, the warning light on the dial comes on but shall go off after few
seconds.
If the warning light does not go off or stays on when travelling, contact Fiat Dealership.
Warning light flashing when driving indicates that the ESP system is active.
x
+
>
>
WARNINGWarning light >turning on together with the message when the engine is running,
normally indicates a failure concerning the ABS only. In this case the braking
system is still efficient, though without the anti-locking device. Under these
conditions, performance of the EBD system may be reduced. Also in this case, you
are advised to go immediately to the nearest Fiat Dealership, driving in such a way
to avoid sharp braking to have the system checked.
á
Page 168 of 266
167
SAFETY
DEVICES
CORRECT USE
OF THE CAR
WARNING
LIGHTS AND
MESSAGES
CAR
MAINTENANCE
TECHNICAL
SPECIFICATIONS
INDEX
DASHBOARD
AND CONTROLS
IN AN
EMERGENCY
BUMP STARTING
Never bump start the engine by pushing, towing or
coasting downhill.
This could cause fuel to flow into the catalytic
converter and damage it beyond repair.
IMPORTANT Remember that the servobrake and
electrical power steering system are not operating
until the engine is started, a greater effort will
therefore be required to press the brake pedal or turn
the steering wheel.IF A TYRE IS PUNCTURED
GENERAL INSTRUCTIONS
For versions/markets where applicable, the car can be
fitted with a quick tyre repair kit called FIX & GO,
replacing the usual tool fitting, the spare wheel lifting
winch and the space-saver spare wheel.
Normal spare small wheel, or (where provided)
normal size spare wheel, can be supplied on request;
for its use, follow what indicated below.
VAN versions are fitted as standard with a spare
wheel with steel rim of the same type and size as the
standard wheels mounted on the car.
Wheel changing and correct use of the jack and space-
saver spare wheel call for some precautions as listed
below.
WARNINGAlert other drivers that the car is stationary in compliance with local regulations:
hazard warning lights, warning triangle, etc. Any passengers on board should leave the
car, especially if it is heavily laden. Passengers should stay away from oncoming traffic
while the wheel is being changed. If parked on a slope or rough surface, chock the
wheels with wedges or other suitable devices to prevent the car from rolling.
Page 169 of 266
168
SAFETY
DEVICES
CORRECT USE
OF THE CAR
WARNING
LIGHTS AND
MESSAGES
CAR
MAINTENANCE
TECHNICAL
SPECIFICATIONS
INDEX
DASHBOARD
AND CONTROLS
IN AN
EMERGENCY
WARNINGThe space-saver spare wheel (where provided) is specific to your car, do not use it
on other models, or use the spare wheel of other models on your vehicle. The
space-saver spare wheel shall only be used in an emergency. It shall only be used
for the distance necessary to reach a service point and the car speed shall not
exceed 80 km/h. The spare wheel has an orange sticker that summarises the main
cautions for use and limitations. The sticker should never be removed or covered.
Never fit a wheel cap on a space-saver spare wheel. The sticker gives the following
information in four languages: caution! For temporary use only! 80 km/h max!
Replace by normal wheel as soon as possible. Do not cover this label in use.
If changing standard wheels (e.g.: wheels with alloy rims in place of steel rims)
change also all wheel bolts.
WARNINGWhen driving with a space-saver spare wheel fitted, the driving performance of the
car changes. Avoid accelerating or braking sharply, abrupt turns or fast cornerings.
The life of the spare wheel is approx. 3000 km, after this distance it should be
replaced with another of the same type. Never attempt to fit a conventional tyre
on a rim designed for use as a space-saver spare wheel. Have the punctured wheel
repaired and refitted as soon as possible. Two or more space-saver spare wheels
should never be used together. Do not grease the threads of bolts before installing
them: they might slip out.
Page 171 of 266
170
SAFETY
DEVICES
CORRECT USE
OF THE CAR
WARNING
LIGHTS AND
MESSAGES
CAR
MAINTENANCE
TECHNICAL
SPECIFICATIONS
INDEX
DASHBOARD
AND CONTROLS
IN AN
EMERGENCY
Please note:
❒the jack weight is 3.5 kg
❒the jack requires no adjustment
❒the jack cannot be repaired and in the event of a fault it must be
replaced by another original one
❒no tool other than its cranking device may be fitted on the jack.
To change a wheel proceed as follows:
❒Stop the car is a position that is not dangerous for oncoming traffic
where you can change the wheel safely. The ground should be flat and
adequately firm. At night choose a lit area;
❒Turn the engine off and pull up the handbrake;
❒Engage first gear or reverse;
❒Take out tools, jack and space-saver spare wheel;
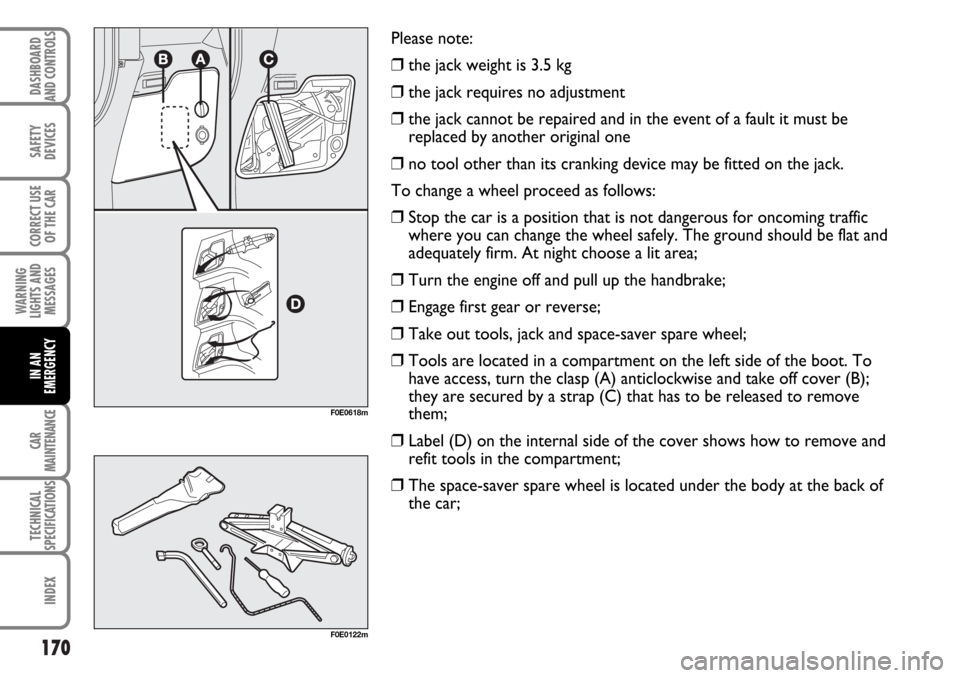
❒Tools are located in a compartment on the left side of the boot. To
have access, turn the clasp (A) anticlockwise and take off cover (B);
they are secured by a strap (C) that has to be released to remove
them;
❒Label (D) on the internal side of the cover shows how to remove and
refit tools in the compartment;
❒The space-saver spare wheel is located under the body at the back of
the car;
F0E0618m
F0E0122m
Page 172 of 266
171
SAFETY
DEVICES
CORRECT USE
OF THE CAR
WARNING
LIGHTS AND
MESSAGES
CAR
MAINTENANCE
TECHNICAL
SPECIFICATIONS
INDEX
DASHBOARD
AND CONTROLS
IN AN
EMERGENCY
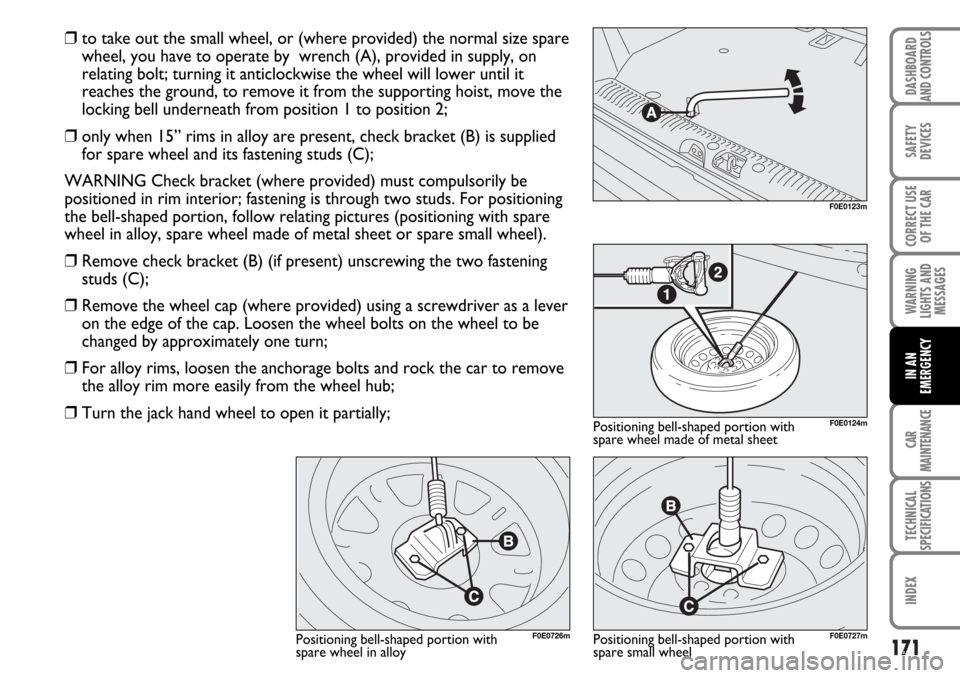
❒to take out the small wheel, or (where provided) the normal size spare
wheel, you have to operate by wrench (A), provided in supply, on
relating bolt; turning it anticlockwise the wheel will lower until it
reaches the ground, to remove it from the supporting hoist, move the
locking bell underneath from position 1 to position 2;
❒only when 15” rims in alloy are present, check bracket (B) is supplied
for spare wheel and its fastening studs (C);
WARNING Check bracket (where provided) must compulsorily be
positioned in rim interior; fastening is through two studs. For positioning
the bell-shaped portion, follow relating pictures (positioning with spare
wheel in alloy, spare wheel made of metal sheet or spare small wheel).
❒Remove check bracket (B) (if present) unscrewing the two fastening
studs (C);
❒Remove the wheel cap (where provided) using a screwdriver as a lever
on the edge of the cap. Loosen the wheel bolts on the wheel to be
changed by approximately one turn;
❒For alloy rims, loosen the anchorage bolts and rock the car to remove
the alloy rim more easily from the wheel hub;
❒Turn the jack hand wheel to open it partially;
F0E0123m
F0E0124m
F0E0727mF0E0726m
Positioning bell-shaped portion with
spare wheel made of metal sheet
Positioning bell-shaped portion with
spare small wheel Positioning bell-shaped portion with
spare wheel in alloy
Page 173 of 266
172
SAFETY
DEVICES
CORRECT USE
OF THE CAR
WARNING
LIGHTS AND
MESSAGES
CAR
MAINTENANCE
TECHNICAL
SPECIFICATIONS
INDEX
DASHBOARD
AND CONTROLS
IN AN
EMERGENCY
F0E0672m
F0E0127m
F0E0671m
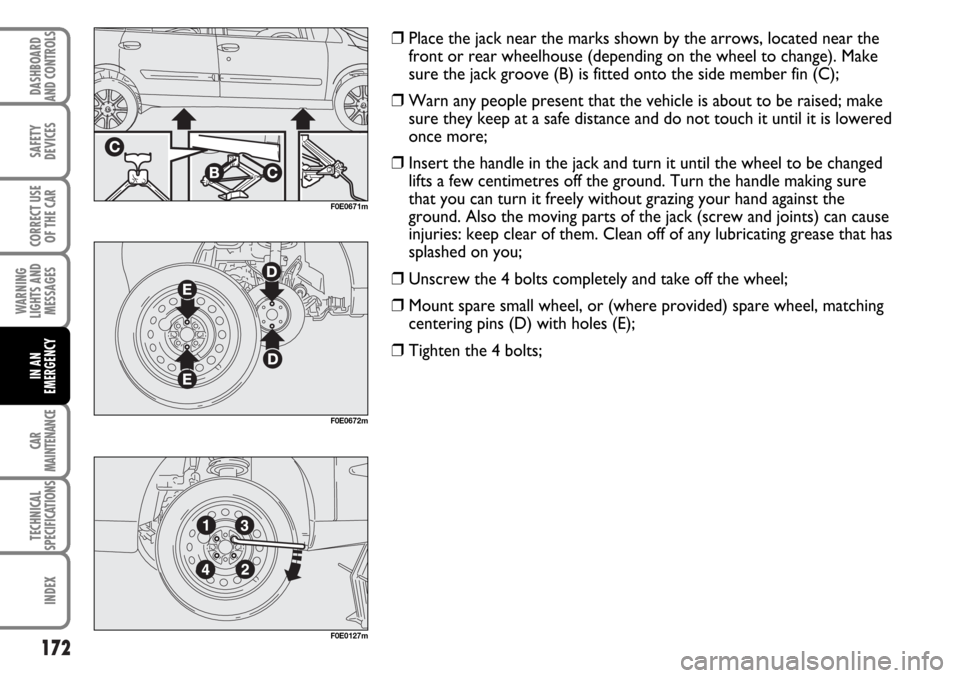
❒Place the jack near the marks shown by the arrows, located near the
front or rear wheelhouse (depending on the wheel to change). Make
sure the jack groove (B) is fitted onto the side member fin (C);
❒Warn any people present that the vehicle is about to be raised; make
sure they keep at a safe distance and do not touch it until it is lowered
once more;
❒Insert the handle in the jack and turn it until the wheel to be changed
lifts a few centimetres off the ground. Turn the handle making sure
that you can turn it freely without grazing your hand against the
ground. Also the moving parts of the jack (screw and joints) can cause
injuries: keep clear of them. Clean off of any lubricating grease that has
splashed on you;
❒Unscrew the 4 bolts completely and take off the wheel;
❒Mount spare small wheel, or (where provided) spare wheel, matching
centering pins (D) with holes (E);
❒Tighten the 4 bolts;
Page 226 of 266
225
SAFETY
DEVICES
CORRECT USE
OF THE CAR
WARNING
LIGHTS AND
MESSAGES
TECHNICAL
SPECIFICATIONS
INDEX
DASHBOARD
AND CONTROLS
IN AN
EMERGENCY
CAR
MAINTENANCE
❒if a tyre is punctured, stop immediately and change
it to avoid damage to the tyre, the rim, suspensions
and steering system.
❒tyres age even if they are not used much. Cracks in
the tread rubber are a sign of ageing. In any case, if
the tyres have been on the car for over 6 years,
they should be checked by specialised personnel, to
see if they can still be used. Also remember to
check the space-saver spare wheel.
❒in the case of replacement, always fit new tyres,
avoiding those of dubious origin.
WARNINGRemember that road holding depends also on the correct tyre inflating pressure.
WARNINGIf the pressure is too low the tyre overheats and this can cause it serious damage.❒if a tyre is changed, also change the inflation valve.
❒to allow even wear between the front and rear
tyres, it is advisable to change them over every 10-
15 thousand kilometres, keeping them on the same
side of the car so as to not reverse the direction of
rotation.
WARNINGDo not cross switch the tyres, moving them from the right of the car to the left and
vice versa.
Never submit alloy rims to repainting treatments requiring to use temperatures
exceeding 150°C since the mechanical properties of the wheels could be
impaired.WARNING