open bonnet FIAT MULTIPLA 2006 1.G Owners Manual
[x] Cancel search | Manufacturer: FIAT, Model Year: 2006, Model line: MULTIPLA, Model: FIAT MULTIPLA 2006 1.GPages: 266, PDF Size: 4.61 MB
Page 12 of 266
11
SAFETY
DEVICES
CORRECT USE
OF THE CAR
WARNING
LIGHTS AND
MESSAGES
IN AN
EMERGENCY
CAR
MAINTENANCE
TECHNICAL
SPECIFICATIONS
INDEX
DASHBOARD
AND CONTROLS
ELECTRONIC ALARM
The electronic alarm has the following functions:
❒central door locking/unlocking remote control;
❒perimetral surveillance, which picks up opened doors, bonnet and
tailgate;
❒volumetric surveillance, which picks up the movement of any intruders
inside the passenger compartment.
OPERATION
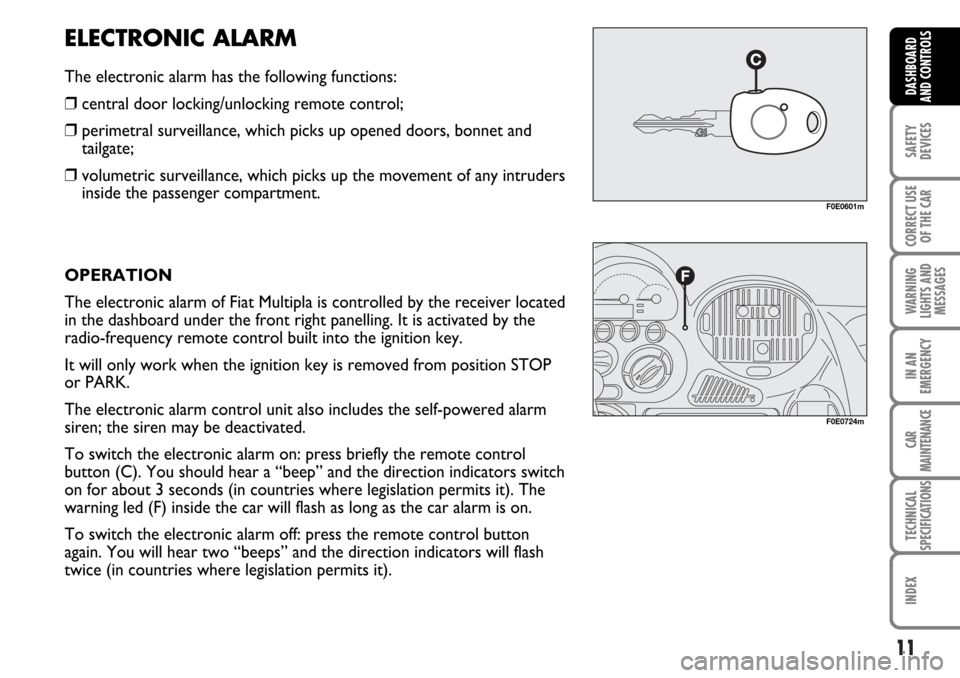
The electronic alarm of Fiat Multipla is controlled by the receiver located
in the dashboard under the front right panelling. It is activated by the
radio-frequency remote control built into the ignition key.
It will only work when the ignition key is removed from position STOP
or PARK.
The electronic alarm control unit also includes the self-powered alarm
siren; the siren may be deactivated.
To switch the electronic alarm on: press briefly the remote control
button (C). You should hear a “beep” and the direction indicators switch
on for about 3 seconds (in countries where legislation permits it). The
warning led (F) inside the car will flash as long as the car alarm is on.
To switch the electronic alarm off: press the remote control button
again. You will hear two “beeps” and the direction indicators will flash
twice (in countries where legislation permits it).
F0E0601m
F0E0724m
Page 14 of 266

13
SAFETY
DEVICES
CORRECT USE
OF THE CAR
WARNING
LIGHTS AND
MESSAGES
IN AN
EMERGENCY
CAR
MAINTENANCE
TECHNICAL
SPECIFICATIONS
INDEX
DASHBOARD
AND CONTROLS
WHEN THE ALARM IS TRIGGERED
When the system is on, the electronic alarm comes
into action in the following cases:
❒One of the doors, the bonnet or the tailgate are
opened.
❒The battery is disconnected or the electronic alarm
power supply cables are cut.
❒Something moves in the passenger compartment
(volumetric surveillance).
❒The key is turned to MAR.
When the alarm is triggered, the siren sounds for
about 26 seconds (for a maximum of 3 cycles at 6
second intervals if the cause of the alarm persists) and
the direction indicators will flash for about 5 minutes
(only in countries where legislation permits it).
Once the alarm situation has been resolved, the alarm
system continues its surveillance. To cut off the alarm
before this, press the remote control button.
HOW TO DEACTIVATE THE ALARM
To switch the alarm off, press the remote control
button on the key.
In countries where admitted by law regulations, the
system is preset for an emergency procedure to be
carried out when the alarm does not turn off (due to
flat remote control battery or system fault):❒open the door after unlocking the lock with the key,
❒fit the key into the ignition switch,
❒turn the key to MAR.
To reactivate the alarm after the emergency
procedure, turn the key to STOP and remove it. Then,
press twice the remote control button: first press will
re-align the system (this because the last operation for
excluding the alarm was performed using the key and
not the remote control), the second press will
reactivate the alarm.
When using the key, if the remote control battery is
flat the key led will flash once.
Flat battery condition is also indicated by the
dashboard led glowing steadily for 2 minutes each time
the alarm is deactivated.
In this event the key battery should be replaced by a
new one of the equivalent type on sale c/o normal
retailers.
If it is not possible to switch on the alarm with a new
remote control battery, contact Fiat Dealership to
have the system checked.
IMPORTANT If the car is to remain inactive for a
prolonged length of time (over three weeks) and
security conditions permitting, it is advisable to
operate central locking turning the key in the door
lock to avoid engaging the alarm and draining the
battery.
Page 86 of 266
85
SAFETY
DEVICES
CORRECT USE
OF THE CAR
WARNING
LIGHTS AND
MESSAGES
IN AN
EMERGENCY
CAR
MAINTENANCE
TECHNICAL
SPECIFICATIONS
INDEX
DASHBOARD
AND CONTROLS
BONNET
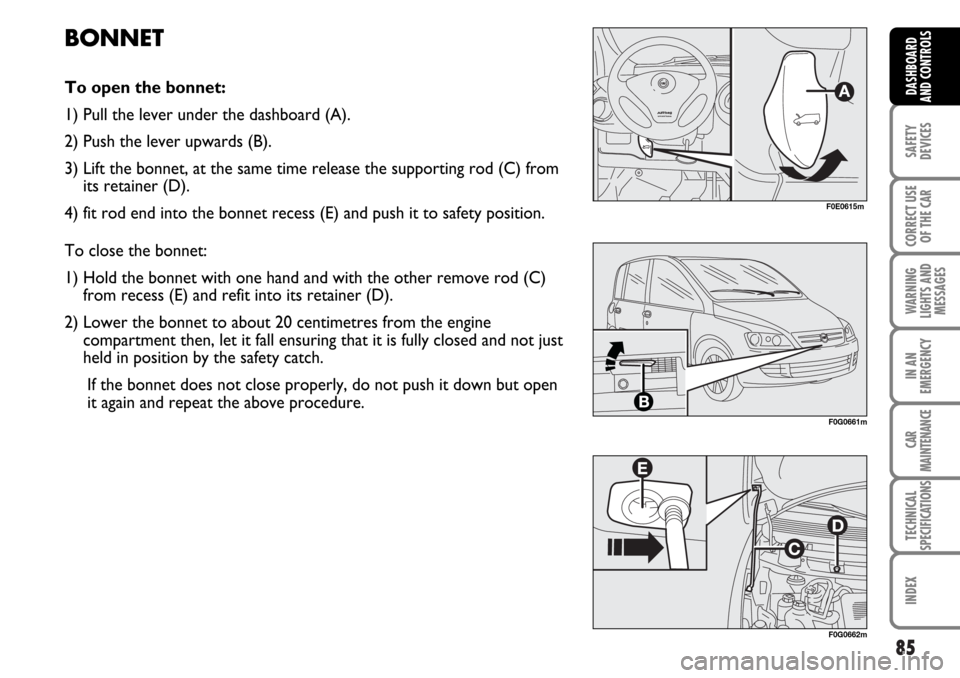
To open the bonnet:
1) Pull the lever under the dashboard (A).
2) Push the lever upwards (B).
3) Lift the bonnet, at the same time release the supporting rod (C) from
its retainer (D).
4) fit rod end into the bonnet recess (E) and push it to safety position.
To close the bonnet:
1) Hold the bonnet with one hand and with the other remove rod (C)
from recess (E) and refit into its retainer (D).
2) Lower the bonnet to about 20 centimetres from the engine
compartment then, let it fall ensuring that it is fully closed and not just
held in position by the safety catch.
If the bonnet does not close properly, do not push it down but open
it again and repeat the above procedure.
F0E0615m
F0G0661m
F0G0662m
Page 87 of 266
86
SAFETY
DEVICES
CORRECT USE
OF THE CAR
WARNING
LIGHTS AND
MESSAGES
IN AN
EMERGENCY
CAR
MAINTENANCE
TECHNICAL
SPECIFICATIONS
INDEX
DASHBOARD
AND CONTROLS
WARNINGThe bonnet might fall violently if the support rod is not positioned properly. This
should only be done when the car is stationary.
WARNINGBefore opening the bonnet make sure the windscreen wiper arm is not lifted from
the windscreen.
If the engine is hot, be very careful when you put your hands under the bonnet as
you risk burning yourself. Remember that while the engine is hot, the electric fan
can start up and cause injury. Wait for the engine to cool.WARNING
Scarves, ties and other loose articles of clothing could easily get caught up in
moving parts. This can be extremely dangerous.WARNING
WARNINGFor safety reasons the bonnet must be closed properly to avoid its opening while
the car is travelling. Therefore, always check it is properly closed and the catch
engaged. Should you notice that the catch is not perfectly engaged when
travelling, stop the car immediately and close the bonnet.
Page 231 of 266
230
SAFETY
DEVICES
CORRECT USE
OF THE CAR
WARNING
LIGHTS AND
MESSAGES
IN AN
EMERGENCY
TECHNICAL
SPECIFICATIONS
INDEX
DASHBOARD
AND CONTROLS
CAR
MAINTENANCE
ADVICE FOR PRESERVING
THE BODYWORK
Paint
Paintwork does not only serve an aesthetic purpose,
but also protects the underlying sheet metal.
In the case of deep scrapes or scores, you are advised
to have the necessary touching up carried out
immediately to avoid the formation of rust.
Only use original products when touching up the
paintwork (see section “Technical specifications”).
Ordinary paint maintenance consists in washing at
intervals depending on the conditions and environment
of use. For example, in highly polluted areas, or if the
roads are sprayed with salt, it is wise to wash the car
more frequently.
To wash the car properly:
❒remove the aerial from the roof to prevent damages
if the car is washed in an automatic carwash;
❒wash the body using a low pressure jet of water.
❒wipe a sponge with a slightly soapy solution over
the bodywork, frequently rinsing with the sponge.❒rinse well with water and dry with a jet of air or a
chamois leather.
When drying, take particular care with the less visible
parts like door frames, bonnet and around the
headlights where water may collect. The car should
not be taken to a closed area immediately, but left in
the open so that residual water can evaporate.
Do not wash the car after it has been left in the sun or
with the bonnet hot: this may alter the shine of the
paintwork.
Exterior plastic parts must be cleaned in the same way
as the rest of the car.
Where possible, do not park under trees; the resinous
substance many species release give the paint a dull
appearance and increase the possibility of triggering
rust processes.
IMPORTANT Bird droppings must be washed off
immediately and thoroughly as the acid they contain is
particularly aggressive.
Detergents cause water pollution. Therefore the engine compartment should be washed in areas
equipped for collecting and purifying the liquid used in the washing process.
Page 257 of 266
TECHNICAL
SPECIFICATIONS
256
SAFETY
DEVICES
CORRECT USE
OF THE CAR
WARNING
LIGHTS AND
MESSAGES
CAR
MAINTENANCE
INDEXDASHBOARD
AND CONTROLS
IN AN
EMERGENCY
I I
N N
D D
E E
X X
– Isofix type child restraint
system .......................................... 126
Ceiling lights
– front ............................................. 63
– front bulb replacement ............ 192
– rear .............................................. 64
– rear bulb replacement ............. 193
Cellular phone set-up ..................... 106
Changing a wheel ............................ 167
Chassis marking .............................. 235
Checking fluid levels
– brake fluid ................................... 219
– engine oil ..................................... 214
– engine oil consumption............ 215
– power steering fluid ................. 218
– windscreen/rear window
washer fluid ................................ 217
Cigar lighter ...................................... 69
Clock .................................................. 21
Clutch ................................................ 238
CO
2emissions ................................ 253
Controls
– front fog lights............................ 65
– fuel cut-off switch ..................... 66 – advice for preserving
the bodywork ............................ 230
– headlights .................................... 231
– identification plate..................... 234
– paint.............................................. 230
– versions ...................................... 236
– warranty ..................................... 229
– windows ...................................... 231
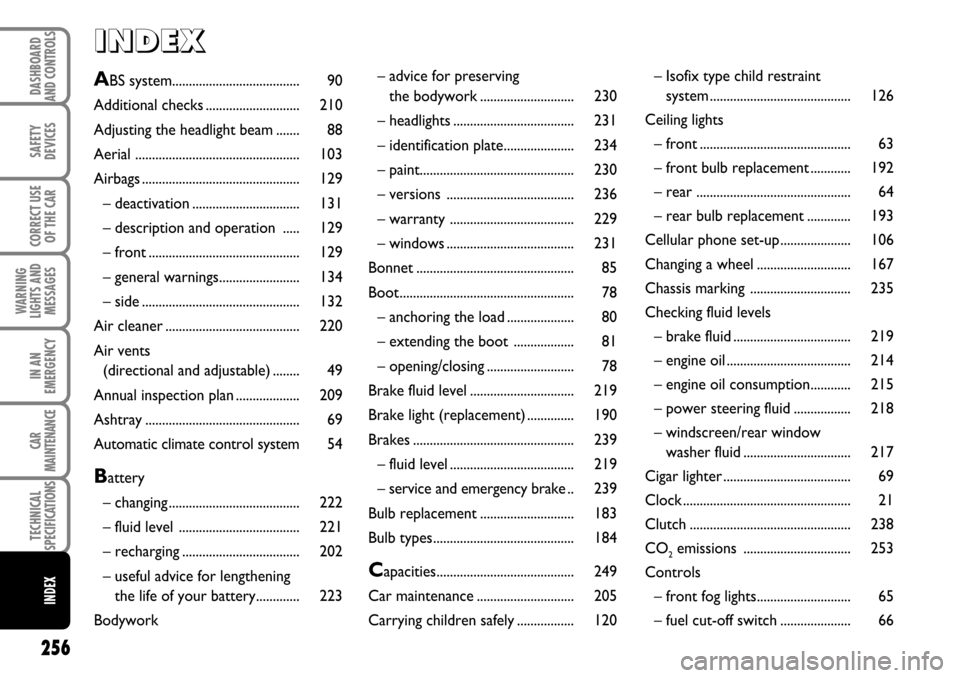
Bonnet ............................................... 85
Boot.................................................... 78
– anchoring the load .................... 80
– extending the boot .................. 81
– opening/closing .......................... 78
Brake fluid level ............................... 219
Brake light (replacement) .............. 190
Brakes ................................................ 239
– fluid level ..................................... 219
– service and emergency brake .. 239
Bulb replacement ............................ 183
Bulb types.......................................... 184
Capacities......................................... 249
Car maintenance ............................. 205
Carrying children safely ................. 120
ABS system...................................... 90
Additional checks ............................ 210
Adjusting the headlight beam ....... 88
Aerial ................................................. 103
Airbags ............................................... 129
– deactivation ................................ 131
– description and operation ..... 129
– front ............................................. 129
– general warnings........................ 134
– side ............................................... 132
Air cleaner ........................................ 220
Air vents
(directional and adjustable) ........ 49
Annual inspection plan ................... 209
Ashtray .............................................. 69
Automatic climate control system 54
Battery
– changing ....................................... 222
– fluid level .................................... 221
– recharging ................................... 202
– useful advice for lengthening
the life of your battery............. 223
Bodywork