set clock FIAT MULTIPLA 2006 1.G Owners Manual
[x] Cancel search | Manufacturer: FIAT, Model Year: 2006, Model line: MULTIPLA, Model: FIAT MULTIPLA 2006 1.GPages: 266, PDF Size: 4.61 MB
Page 22 of 266
21
SAFETY
DEVICES
CORRECT USE
OF THE CAR
WARNING
LIGHTS AND
MESSAGES
IN AN
EMERGENCY
CAR
MAINTENANCE
TECHNICAL
SPECIFICATIONS
INDEX
DASHBOARD
AND CONTROLS
TIME
For operation and instructions on how to set the time, see the “Time”
paragraph in this section.
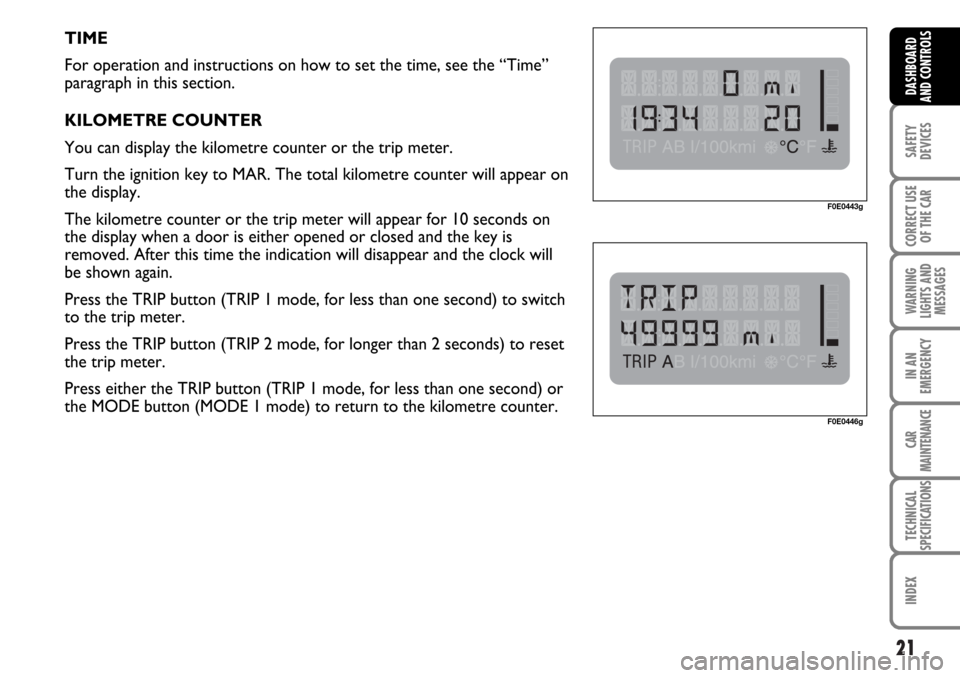
KILOMETRE COUNTER
You can display the kilometre counter or the trip meter.
Turn the ignition key to MAR. The total kilometre counter will appear on
the display.
The kilometre counter or the trip meter will appear for 10 seconds on
the display when a door is either opened or closed and the key is
removed. After this time the indication will disappear and the clock will
be shown again.
Press the TRIP button (TRIP 1 mode, for less than one second) to switch
to the trip meter.
Press the TRIP button (TRIP 2 mode, for longer than 2 seconds) to reset
the trip meter.
Press either the TRIP button (TRIP 1 mode, for less than one second) or
the MODE button (MODE 1 mode) to return to the kilometre counter.
F0E0443g
F0E0446g
Page 23 of 266
22
SAFETY
DEVICES
CORRECT USE
OF THE CAR
WARNING
LIGHTS AND
MESSAGES
IN AN
EMERGENCY
CAR
MAINTENANCE
TECHNICAL
SPECIFICATIONS
INDEX
DASHBOARD
AND CONTROLS
RICONFIGURABLE
MULTIFUNCTION DISPLAY
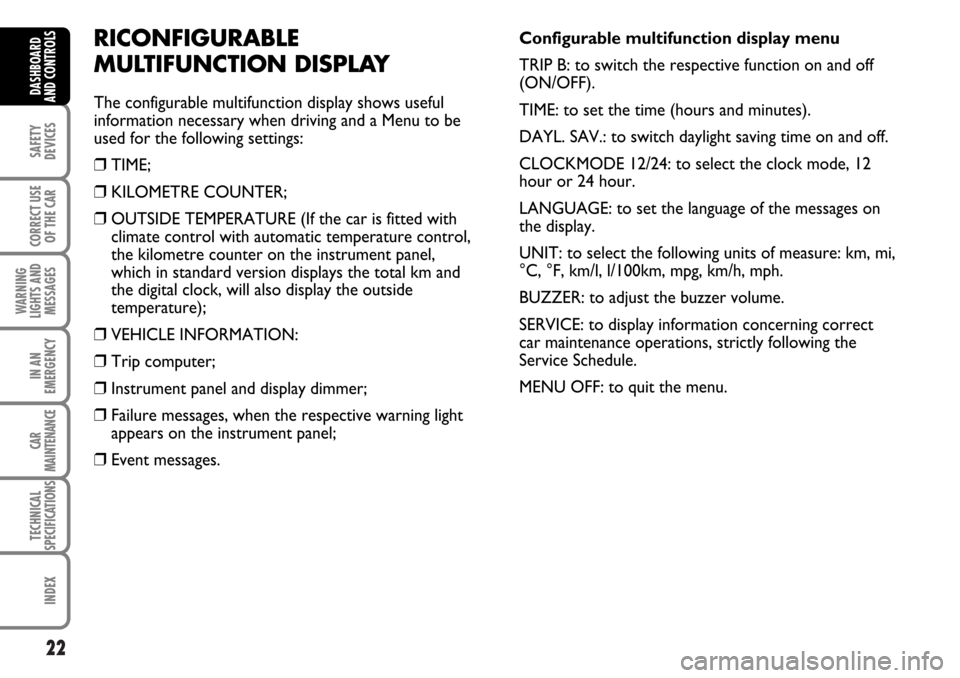
The configurable multifunction display shows useful
information necessary when driving and a Menu to be
used for the following settings:
❒TIME;
❒KILOMETRE COUNTER;
❒OUTSIDE TEMPERATURE (If the car is fitted with
climate control with automatic temperature control,
the kilometre counter on the instrument panel,
which in standard version displays the total km and
the digital clock, will also display the outside
temperature);
❒VEHICLE INFORMATION:
❒Trip computer;
❒Instrument panel and display dimmer;
❒Failure messages, when the respective warning light
appears on the instrument panel;
❒Event messages.Configurable multifunction display menu
TRIP B: to switch the respective function on and off
(ON/OFF).
TIME: to set the time (hours and minutes).
DAYL. SAV.: to switch daylight saving time on and off.
CLOCKMODE 12/24: to select the clock mode, 12
hour or 24 hour.
LANGUAGE: to set the language of the messages on
the display.
UNIT: to select the following units of measure: km, mi,
°C, °F, km/l, l/100km, mpg, km/h, mph.
BUZZER: to adjust the buzzer volume.
SERVICE: to display information concerning correct
car maintenance operations, strictly following the
Service Schedule.
MENU OFF: to quit the menu.
Page 24 of 266
23
SAFETY
DEVICES
CORRECT USE
OF THE CAR
WARNING
LIGHTS AND
MESSAGES
IN AN
EMERGENCY
CAR
MAINTENANCE
TECHNICAL
SPECIFICATIONS
INDEX
DASHBOARD
AND CONTROLS
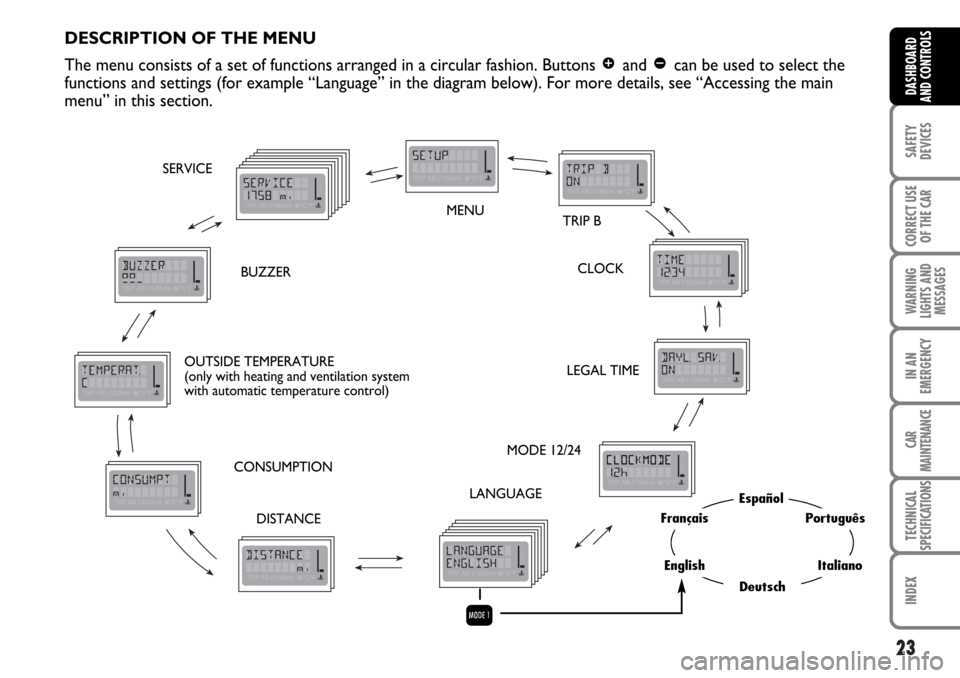
DESCRIPTION OF THE MENU
The menu consists of a set of functions arranged in a circular fashion. Buttons
âand ãcan be used to select the
functions and settings (for example “Language” in the diagram below). For more details, see “Accessing the main
menu” in this section.
MENU
TRIP B
CLOCK
LEGAL TIME
MODE 12/24
LANGUAGE
DISTANCE CONSUMPTION OUTSIDE TEMPERATURE
(only with heating and ventilation system
with automatic temperature control)BUZZER SERVICE
Q
Español
Deutsch
Português
Italiano
Français
English
Page 26 of 266
25
SAFETY
DEVICES
CORRECT USE
OF THE CAR
WARNING
LIGHTS AND
MESSAGES
IN AN
EMERGENCY
CAR
MAINTENANCE
TECHNICAL
SPECIFICATIONS
INDEX
DASHBOARD
AND CONTROLS
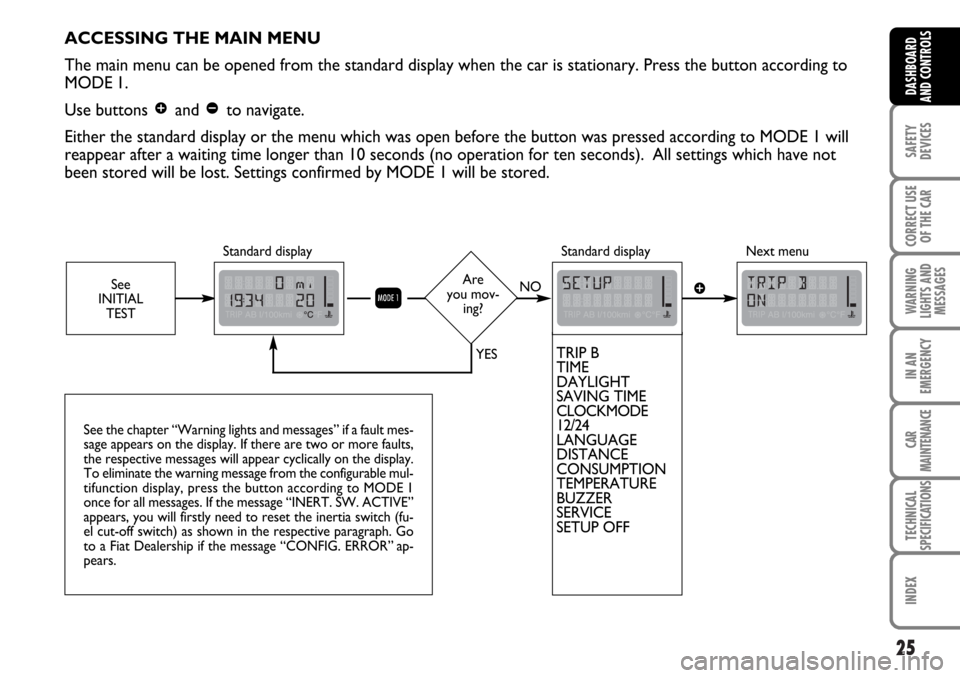
ACCESSING THE MAIN MENU
The main menu can be opened from the standard display when the car is stationary. Press the button according to
MODE 1.
Use buttons
âand ãto navigate.
Either the standard display or the menu which was open before the button was pressed according to MODE 1 will
reappear after a waiting time longer than 10 seconds (no operation for ten seconds). All settings which have not
been stored will be lost. Settings confirmed by MODE 1 will be stored.
Standard display
TRIP B
TIME
DAYLIGHT
SAVING TIME
CLOCKMODE
12/24
LANGUAGE
DISTANCE
CONSUMPTION
TEMPERATURE
BUZZER
SERVICE
SETUP OFF
See the chapter “Warning lights and messages” if a fault mes-
sage appears on the display. If there are two or more faults,
the respective messages will appear cyclically on the display.
To eliminate the warning message from the configurable mul-
tifunction display, press the button according to MODE 1
once for all messages. If the message “INERT. SW. ACTIVE”
appears, you will firstly need to reset the inertia switch (fu-
el cut-off switch) as shown in the respective paragraph. Go
to a Fiat Dealership if the message “CONFIG. ERROR” ap-
pears.
Q
Standard display Next menu
See
INITIAL
TESTâAre
you mov-
ing?NO
YES
Page 31 of 266
30
SAFETY
DEVICES
CORRECT USE
OF THE CAR
WARNING
LIGHTS AND
MESSAGES
IN AN
EMERGENCY
CAR
MAINTENANCE
TECHNICAL
SPECIFICATIONS
INDEX
DASHBOARD
AND CONTROLS
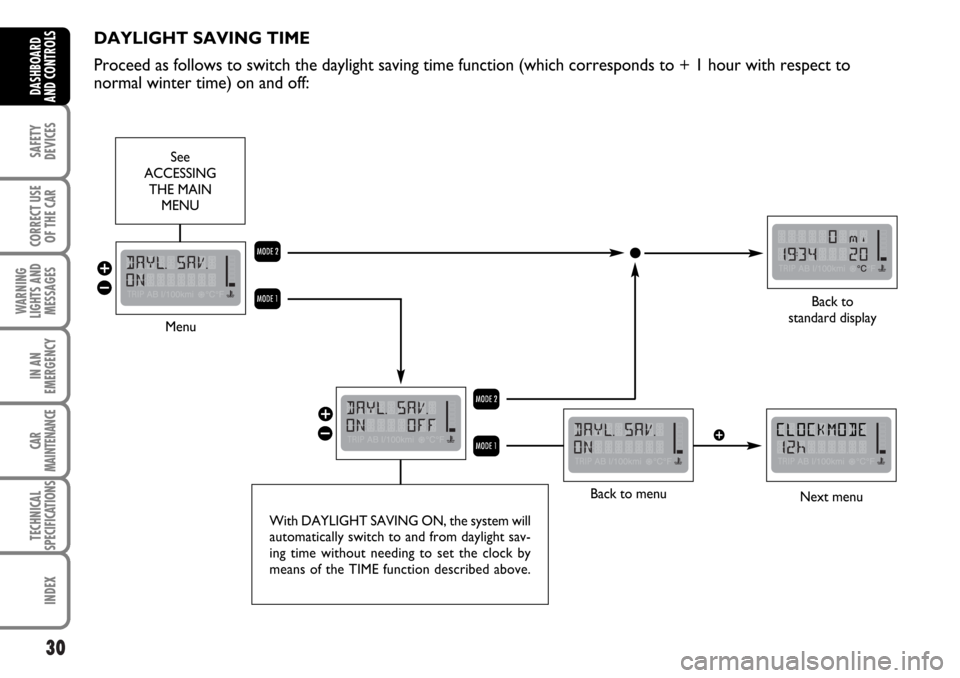
DAYLIGHT SAVING TIME
Proceed as follows to switch the daylight saving time function (which corresponds to + 1 hour with respect to
normal winter time) on and off:
Menu
Next menu
Back to
standard display
â
ã
â
ãR
Q
R
Q
With DAYLIGHT SAVING ON, the system will
automatically switch to and from daylight sav-
ing time without needing to set the clock by
means of the TIME function described above.
See
ACCESSING
THE MAIN
MENU
Back to menu
â
Page 32 of 266
31
SAFETY
DEVICES
CORRECT USE
OF THE CAR
WARNING
LIGHTS AND
MESSAGES
IN AN
EMERGENCY
CAR
MAINTENANCE
TECHNICAL
SPECIFICATIONS
INDEX
DASHBOARD
AND CONTROLS
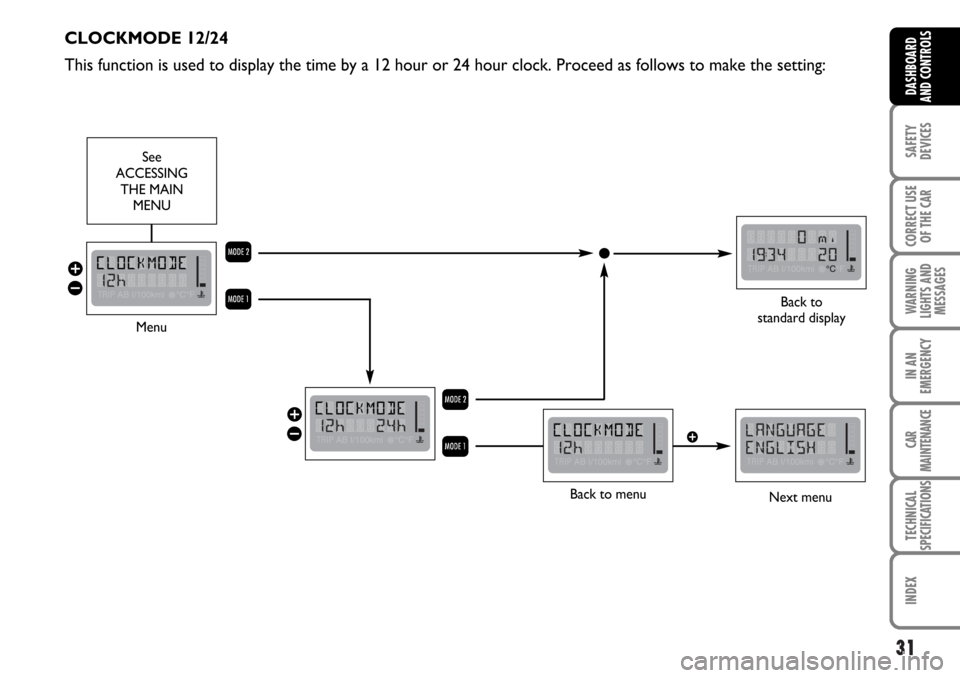
CLOCKMODE 12/24
This function is used to display the time by a 12 hour or 24 hour clock. Proceed as follows to make the setting:
Menu
Next menu
Back to
standard display
â
ã
â
ãR
Q
R
Q
See
ACCESSING
THE MAIN
MENU
Back to menu
â
Page 188 of 266
187
SAFETY
DEVICES
CORRECT USE
OF THE CAR
WARNING
LIGHTS AND
MESSAGES
CAR
MAINTENANCE
TECHNICAL
SPECIFICATIONS
INDEX
DASHBOARD
AND CONTROLS
IN AN
EMERGENCY
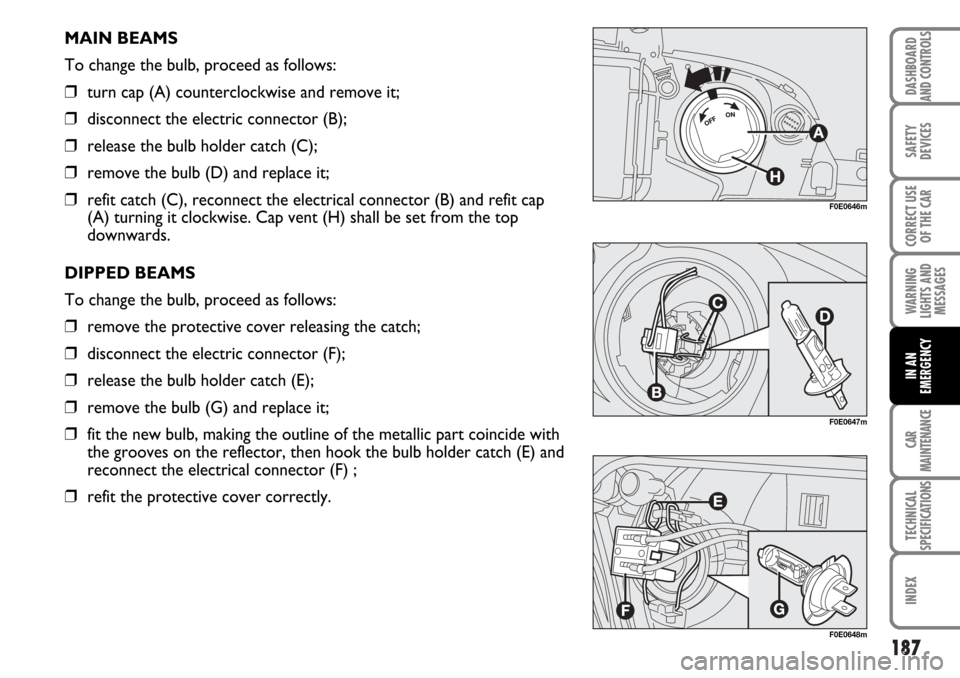
MAIN BEAMS
To change the bulb, proceed as follows:
❒turn cap (A) counterclockwise and remove it;
❒disconnect the electric connector (B);
❒release the bulb holder catch (C);
❒remove the bulb (D) and replace it;
❒refit catch (C), reconnect the electrical connector (B) and refit cap
(A) turning it clockwise. Cap vent (H) shall be set from the top
downwards.
DIPPED BEAMS
To change the bulb, proceed as follows:
❒remove the protective cover releasing the catch;
❒disconnect the electric connector (F);
❒release the bulb holder catch (E);
❒remove the bulb (G) and replace it;
❒fit the new bulb, making the outline of the metallic part coincide with
the grooves on the reflector, then hook the bulb holder catch (E) and
reconnect the electrical connector (F) ;
❒refit the protective cover correctly.
F0E0646m
F0E0647m
F0E0648m
Page 257 of 266
TECHNICAL
SPECIFICATIONS
256
SAFETY
DEVICES
CORRECT USE
OF THE CAR
WARNING
LIGHTS AND
MESSAGES
CAR
MAINTENANCE
INDEXDASHBOARD
AND CONTROLS
IN AN
EMERGENCY
I I
N N
D D
E E
X X
– Isofix type child restraint
system .......................................... 126
Ceiling lights
– front ............................................. 63
– front bulb replacement ............ 192
– rear .............................................. 64
– rear bulb replacement ............. 193
Cellular phone set-up ..................... 106
Changing a wheel ............................ 167
Chassis marking .............................. 235
Checking fluid levels
– brake fluid ................................... 219
– engine oil ..................................... 214
– engine oil consumption............ 215
– power steering fluid ................. 218
– windscreen/rear window
washer fluid ................................ 217
Cigar lighter ...................................... 69
Clock .................................................. 21
Clutch ................................................ 238
CO
2emissions ................................ 253
Controls
– front fog lights............................ 65
– fuel cut-off switch ..................... 66 – advice for preserving
the bodywork ............................ 230
– headlights .................................... 231
– identification plate..................... 234
– paint.............................................. 230
– versions ...................................... 236
– warranty ..................................... 229
– windows ...................................... 231
Bonnet ............................................... 85
Boot.................................................... 78
– anchoring the load .................... 80
– extending the boot .................. 81
– opening/closing .......................... 78
Brake fluid level ............................... 219
Brake light (replacement) .............. 190
Brakes ................................................ 239
– fluid level ..................................... 219
– service and emergency brake .. 239
Bulb replacement ............................ 183
Bulb types.......................................... 184
Capacities......................................... 249
Car maintenance ............................. 205
Carrying children safely ................. 120
ABS system...................................... 90
Additional checks ............................ 210
Adjusting the headlight beam ....... 88
Aerial ................................................. 103
Airbags ............................................... 129
– deactivation ................................ 131
– description and operation ..... 129
– front ............................................. 129
– general warnings........................ 134
– side ............................................... 132
Air cleaner ........................................ 220
Air vents
(directional and adjustable) ........ 49
Annual inspection plan ................... 209
Ashtray .............................................. 69
Automatic climate control system 54
Battery
– changing ....................................... 222
– fluid level .................................... 221
– recharging ................................... 202
– useful advice for lengthening
the life of your battery............. 223
Bodywork
Page 259 of 266
TECHNICAL
SPECIFICATIONS
258
SAFETY
DEVICES
CORRECT USE
OF THE CAR
WARNING
LIGHTS AND
MESSAGES
CAR
MAINTENANCE
INDEXDASHBOARD
AND CONTROLS
IN AN
EMERGENCY
– adjusting the headlight slant.... 88
– beam adjustment abroad ......... 89
Head restraints ................................ 44
Heated rear window
– control ........................................ 65
Heating and climate
control system ............................. 48-50
– adjustable outlets ...................... 49
– climate control with automatic
temperature control ................ 54
– controls.................................. 50-52-54
– cooling ......................................... 52-57
– demisting................................ 51-53-55
– heating ......................................... 50-55
– heating and ventilation ............. 50
– manual climate control
system .......................................... 52
– recirculation .......................... 51-53-57
– ventilation ................................... 51
If an exterior light burns out ....... 186
If an interior light burns out ......... 192
If the battery is flat .......................... 202
Ignition switch .................................. 15
– key positions .............................. 15
– steering lock ............................... 16
Individual settings ............................ 41– key without remote control... 9
– replacing the batteries ............. 10
Lubricants (specifications)............ 250
Main beam headlights
– bulb replacement ...................... 187
– control ......................................... 59
– flashing the headlights ............. 60
Manual climate control system .... 52
Number plate lights ....................... 191
Paintwork
– identification plate ................... 235
– maintenance .............................. 230
Parking ............................................... 140
– handbrake ................................... 141
Parking sensors
– acoustic signal ............................ 97
– activation ..................................... 97
– failure warnings.......................... 98
– general warnings........................ 98
Performance ..................................... 246
Pollen filter........................................ 220
Power steering ................................. 239
– fluid level ..................................... 218 Instrument panel.............................. 17
Instruments
– clock ............................................. 21
– control buttons ......................... 19
– fuel gauge .................................... 18
– rev counter................................. 18
– speedometer .............................. 21
– tachometer ................................. 18
Interior equipment
– ashtray ......................................... 69
– cigar lighter ................................. 69
– current sockets ......................... 70
– driver's oddment tray .............. 67
– food box...................................... 71
– oddment tray under seat ........ 68
– oddment tray under sun visors 68
– passenger's oddment tray ....... 67
– sun visors .................................... 70
Interiors ............................................. 231
Jacking the car ................................. 203
Keys................................................... 8
– code card .................................... 8
– duplicate ...................................... 10
– key with remote control ......... 9