engine FIAT PALIO 2003 178 / 1.G India Version Owners Manual
[x] Cancel search | Manufacturer: FIAT, Model Year: 2003, Model line: PALIO, Model: FIAT PALIO 2003 178 / 1.GPages: 156, PDF Size: 6.27 MB
Page 3 of 156
WELCOME ABOARD FIAT PALIO
Fiat Palio is a car presenting an original bodyline, designed to offer great driving satisfaction with full safety and
with maximum respect of the environment. Everything, from its new multivalve engine to its safety devices, from
its improved comfort for driver and passengers alike to its practical solutions, with the possibility of a large load-
ing volume contributes to make you appreciate the personality of your new Fiat Palio.
And you will realise it later when you discover that its driving style and performance goes hand in hand with
new manufacturing processes that help cut running costs.
For instance, Fiat Palio only needs you to take it for its first servising
2
*Replace the engine oil every 7,500 kms or every 18 months.
Moving to the Max
1-19 03/03/2003 05:44 PM Page 2
Page 5 of 156
4
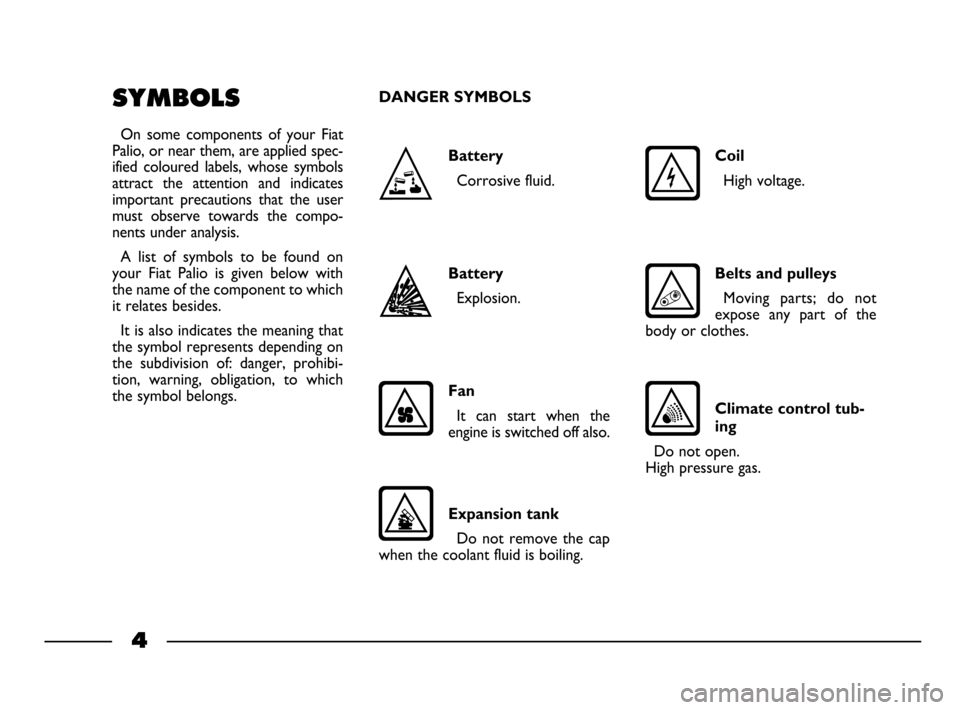
Expansion tank
Do not remove the cap
when the coolant fluid is boiling.
Climate control tub-
ing
Do not open.
High pressure gas.
Belts and pulleys
Moving parts; do not
expose any part of the
body or clothes.
SYMBOLS
On some components of your Fiat
Palio, or near them, are applied spec-
ified coloured labels, whose symbols
attract the attention and indicates
important precautions that the user
must observe towards the compo-
nents under analysis.
A list of symbols to be found on
your Fiat Palio is given below with
the name of the component to which
it relates besides.
It is also indicates the meaning that
the symbol represents depending on
the subdivision of: danger, prohibi-
tion, warning, obligation, to which
the symbol belongs.
DANGER SYMBOLS
Coil
High voltage.
Battery
Corrosive fluid.
Battery
Explosion.
Fan
It can start when the
engine is switched off also.
1-19 03/03/2003 05:44 PM Page 4
Page 7 of 156
6
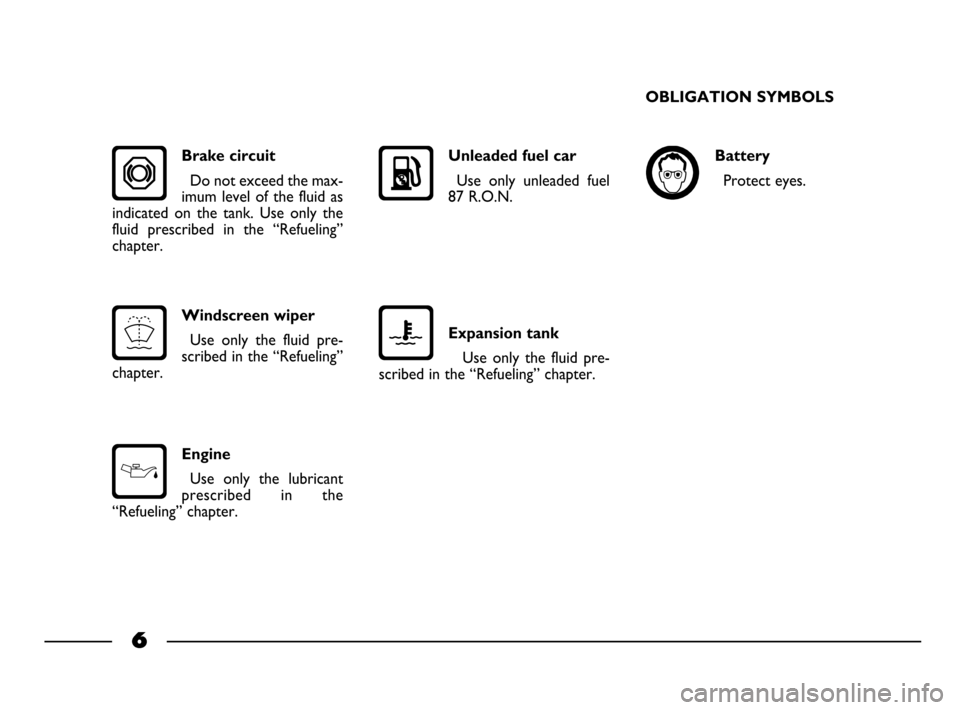
OBLIGATION SYMBOLS
Battery
Protect eyes.
Battery
Jack
Refer the owner
handbook.
Expansion tank
Use only the fluid pre-
scribed in the “Refueling” chapter.
Engine
Use only the lubricant
prescribed in the
“Refueling” chapter.
Unleaded fuel car
Use only unleaded fuel
87 R.O.N.
Windscreen wiper
Use only the fluid pre-
scribed in the “Refueling”
chapter.
Brake circuit
Do not exceed the max-
imum level of the fluid as
indicated on the tank. Use only the
fluid prescribed in the “Refueling”
chapter.
1-19 03/03/2003 05:44 PM Page 6
Page 9 of 156
READY TO GO
Sit comfortably in your car and get ready to...
read.
The following pages tell you everything you need to
know to start off in the best way: that is to say, in
total safety, right from the start.
In a few minutes you will be confident with warning
lights, instruments and main devices.
All adjustments must be made when the car is sta-
tionary.DASHBOARD INSTRUMENT HOLDER ......... PAGE 9
INSTRUMENT PANEL .......................................... PAGE 10
KEYS ............................................................................ PAGE 11
SEATS ........................................................................ PAGE 11
HEAD RESTS ........................................................... PAGE 11
SAFETY BELTS ........................................................ PAGE 12
STEERING COLUMN STALKS ........................... PAGE 13
REARVIEW MIRRORS ........................................... PAGE 14
MANUAL CLIMATE CONTROL ........................ PAGE 14
HAZARD LIGHTS .................................................. PAGE 14
COMMAND SWITCHES .......................................PAGE 15
ELECTRIC WINDOW WINDER ....................... PAGE 15
BOOT ........................................................................ PAGE 16
ENGINE BONNET ............................................... PAGE 16
DOORS ..................................................................... PAGE 17
AT THE FILLING STATION .................................. PAGE 18
8
1-19 03/03/2003 05:44 PM Page 8
Page 10 of 156
9
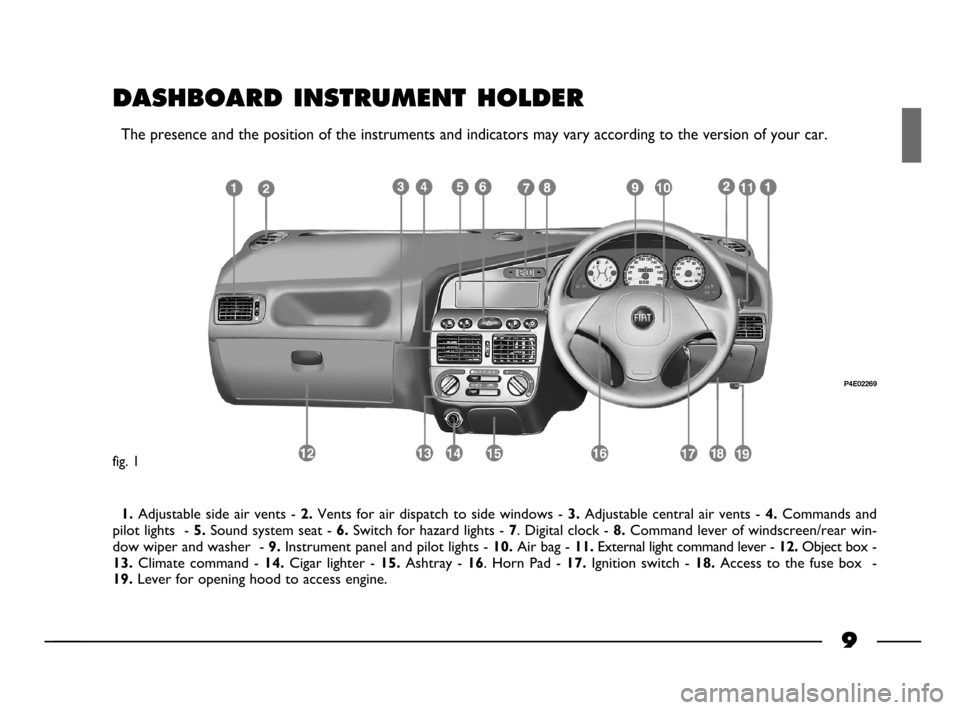
1.Adjustable side air vents - 2.Vents for air dispatch to side windows - 3.Adjustable central air vents - 4.Commands and
pilot lights -
5.Sound system seat - 6.Switch for hazard lights - 7. Digital clock - 8.Command lever of windscreen/rear win-
dow wiper and washer -
9.Instrument panel and pilot lights - 10.Air bag - 11.External light command lever - 12.Object box -
13.Climate command - 14.Cigar lighter - 15.Ashtray - 16. Horn Pad - 17.Ignition switch - 18.Access to the fuse box -
19.Lever for opening hood to access engine.
P4E02269
DASHBOARD INSTRUMENT HOLDER
The presence and the position of the instruments and indicators may vary according to the version of your car.
fig. 1
1-19 03/03/2003 05:44 PM Page 9
Page 11 of 156
10
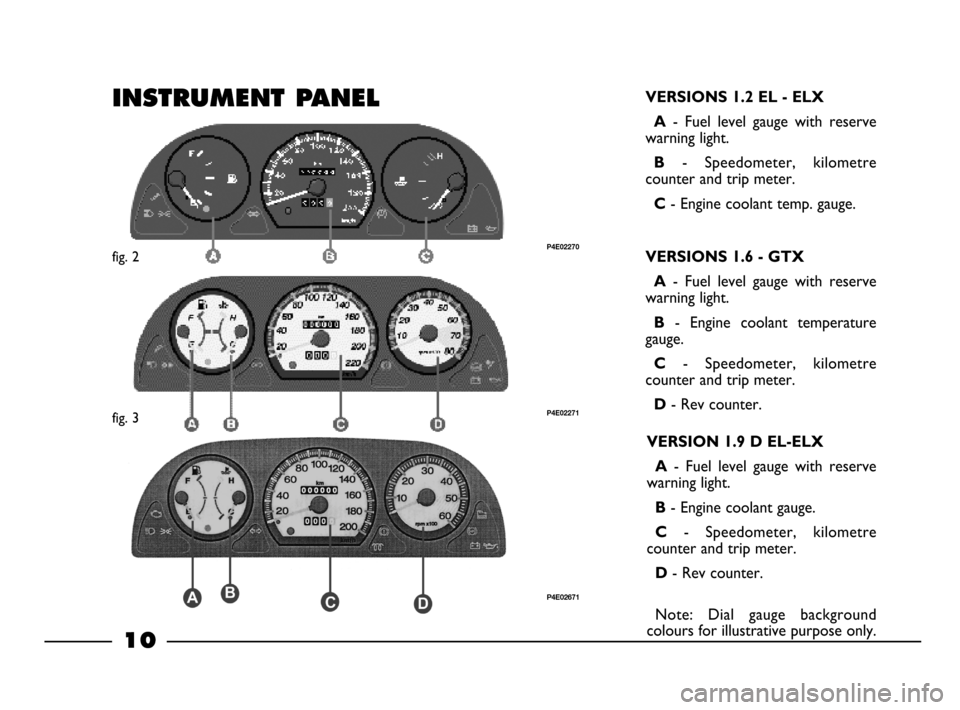
VERSIONS 1.2 EL - ELX
A
- Fuel level gauge with reserve
warning light.
B- Speedometer, kilometre
counter and trip meter.
C- Engine coolant temp. gauge.
VERSIONS 1.6 - GTX
A
- Fuel level gauge with reserve
warning light.
B- Engine coolant temperature
gauge.
C- Speedometer, kilometre
counter and trip meter.
D- Rev counter.
fig. 2P4E02270
fig. 3P4E02271
INSTRUMENT PANEL
VERSION 1.9 D EL-ELX
A
- Fuel level gauge with reserve
warning light.
B- Engine coolant gauge.
C- Speedometer, kilometre
counter and trip meter.
D- Rev counter.
P4E02671
Note: Dial gauge background
colours for illustrative purpose only.
1-19 03/03/2003 05:44 PM Page 10
Page 17 of 156
16
ENGINE BONNET
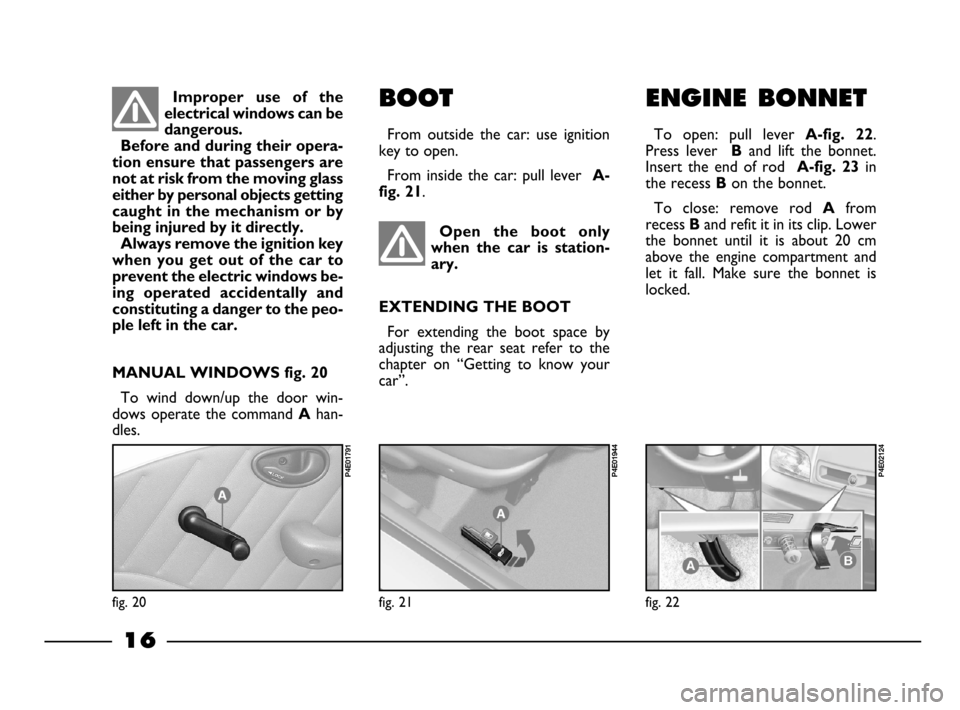
To open: pull lever A-fig. 22.
Press lever
Band lift the bonnet.
Insert the end of rod
A-fig. 23in
the recess
Bon the bonnet.
To close: remove rod
Afrom
recess
Band refit it in its clip. Lower
the bonnet until it is about 20 cm
above the engine compartment and
let it fall. Make sure the bonnet is
locked.
fig. 22
P4E02124
Open the boot only
when the car is station-
ary.
EXTENDING THE BOOT
For extending the boot space by
adjusting the rear seat refer to the
chapter on “Getting to know your
car”.
fig. 21
P4E01944
BOOT
From outside the car: use ignition
key to open.
From inside the car: pull lever
A-
fig. 21
.
Improper use of the
electrical windows can be
dangerous.
Before and during their opera-
tion ensure that passengers are
not at risk from the moving glass
either by personal objects getting
caught in the mechanism or by
being injured by it directly.
Always remove the ignition key
when you get out of the car to
prevent the electric windows be-
ing operated accidentally and
constituting a danger to the peo-
ple left in the car.
fig. 20
P4E01791
MANUAL WINDOWS fig. 20
To wind down/up the door win-
dows operate the command
Ahan-
dles.
1-19 03/03/2003 05:44 PM Page 16
Page 21 of 156
GETTING TO KNOW YOUR CAR
You should read this chapter sitting comfortably in
your new Fiat Palio. This way you can see the parts
described in the handbook at a glance and immediate-
ly check out what you have just read for yourself.
You will quickly become familiar with your Fiat Palio,
and its control and other features. Later, when you start
the engine and join the traffic, you will make a host of
other pleasant discoveries.INSTRUMENTS ......................................................... PAGE 33
WARNING LIGHTS ................................................ PAGE 35
HEATING/
CLIMATE CONTROL SYSTEM ............................ PAGE 37
MANUAL CLIMATE CONTROL SYSTEM ....... PAGE 38
STEERING COLUMN STALKS ............................. PAGE 41
CONTROLS ............................................................... PAGE 43
INTERIOR EQUIPMENT ........................................ PAGE 45
DOORS ........................................................................ PAGE 48
BOOT .......................................................................... PAGE 51
BONNET .................................................................... PAGE 54
HEADLIGHTS ............................................................ PAGE 56
ABS ............................................................................... PAGE 56
AIR BAG ...................................................................... PAGE 58
SOUND SYSTEM ....................................................... PAGE 60
AT THE FILLING STATION ................................. PAGE 62
PROTECTING THE ENVIRONMENT ............... PAGE 63
20
KEYS ............................................................................. PAGE 21
IGNITION SWITCH ............................................... PAGE 21
INDIVIDUAL SETTINGS ........................................ PAGE 22
SEAT BELTS ............................................................... PAGE 24
TRANSPORTING CHILDREN IN SAFETY ...... PAGE 29
PRETENSIONER ....................................................... PAGE 32
20-63 03/03/2003 06:02 PM Page 20
Page 22 of 156
21
IGNITION
SWITCH
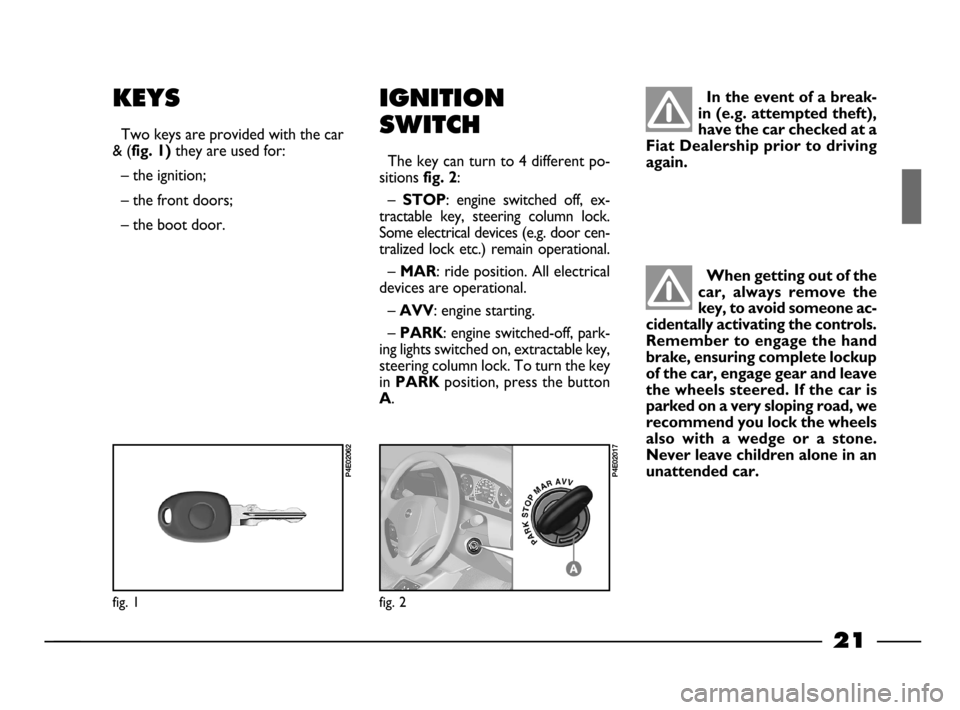
The key can turn to 4 different po-
sitions
fig. 2:
–
STOP: engine switched off, ex-
tractable key, steering column lock.
Some electrical devices (e.g. door cen-
tralized lock etc.) remain operational.
–
MAR: ride position. All electrical
devices are operational.
–
AVV: engine starting.
–
PARK: engine switched-off, park-
ing lights switched on, extractable key,
steering column lock. To turn the key
in
PARK position, press the button
A.
In the event of a break-
in (e.g. attempted theft),
have the car checked at a
Fiat Dealership prior to driving
again.
fig. 1
P4E02062
KEYS
Two keys are provided with the car
& (
fig. 1) they are used for:
– the ignition;
– the front doors;
– the boot door.
Together with the keys, a self-stick
label is supplied. On this label is re-
ported the number to be quoted to
Fiat Dealershipwhen ordering du-
plicate keys.
fig. 2
P4E02017
When getting out of the
car, always remove the
key, to avoid someone ac-
cidentally activating the controls.
Remember to engage the hand
brake, ensuring complete lockup
of the car, engage gear and leave
the wheels steered. If the car is
parked on a very sloping road, we
recommend you lock the wheels
also with a wedge or a stone.
Never leave children alone in an
unattended car.
20-63 03/03/2003 06:02 PM Page 21
Page 35 of 156
34
If the gauge reaches the
red section, stop the en-
gine immediately and go
to a Fiat Dealership.Do not travel with the fuel tank al-
most empty: as gaps in fuel delivery
could damage the catalyser.
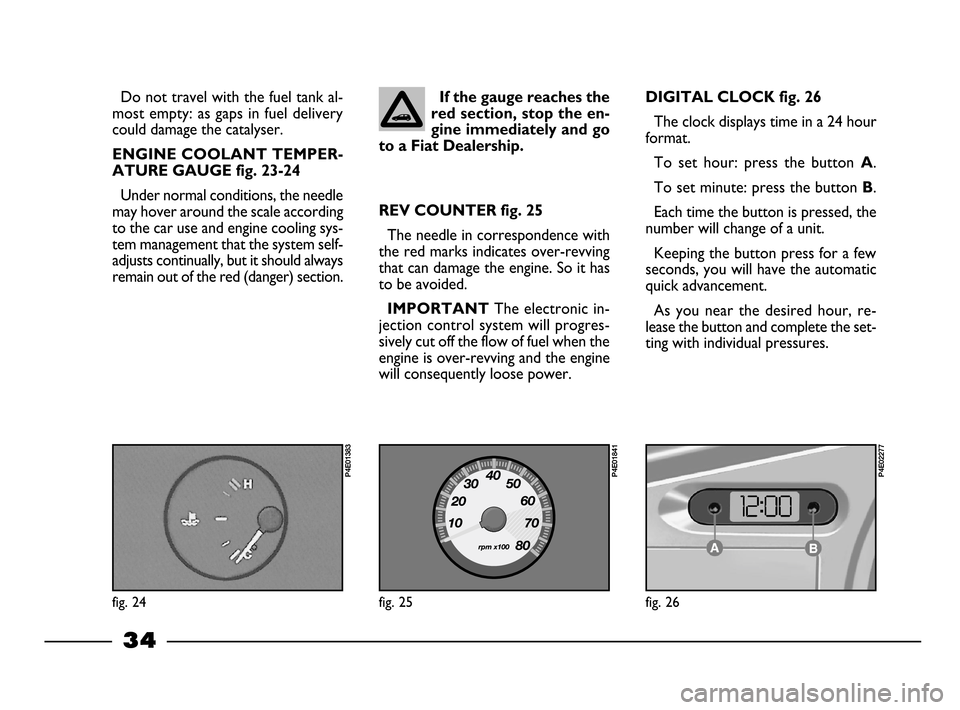
ENGINE COOLANT TEMPER-
ATURE GAUGE fig. 23-24
Under normal conditions, the needle
may hover around the scale according
to the car use and engine cooling sys-
tem management that the system self-
adjusts continually, but it should always
remain out of the red (danger) section.
REV COUNTER fig. 25
The needle in correspondence with
the red marks indicates over-revving
that can damage the engine. So it has
to be avoided.
IMPORTANT The electronic in-
jection control system will progres-
sively cut off the flow of fuel when the
engine is over-revving and the engine
will consequently loose power.
fig. 24
P4E01383
fig. 25
P4E01841
DIGITAL CLOCK fig. 26
The clock displays time in a 24 hour
format.
To set hour: press the button
A.
To set minute: press the button
B.
Each time the button is pressed, the
number will change of a unit.
Keeping the button press for a few
seconds, you will have the automatic
quick advancement.
As you near the desired hour, re-
lease the button and complete the set-
ting with individual pressures.
fig. 26
P4E02277
20-63 03/03/2003 06:02 PM Page 34