check engine light FIAT PANDA 2015 319 / 3.G User Guide
[x] Cancel search | Manufacturer: FIAT, Model Year: 2015, Model line: PANDA, Model: FIAT PANDA 2015 319 / 3.GPages: 196, PDF Size: 19.49 MB
Page 92 of 196
WARNING
119)It is dangerous to run the engine in
enclosed areas. The engine takes in
oxygen and releases carbon dioxide,
carbon monoxide and other toxic gases.
120)Remember that the brake servo
and power steering are not operational until
the engine has been started, therefore
you need to apply much more force than
usual to the brake pedal and steering
wheel.
121)If the engine fails to start with a gear
engaged, the potentially dangerous
situation due to the fact that the gearbox is
automatically placed in neutral will be
signalled by an acoustic signal.
WARNING
36)If the warning lightflashes for 60
seconds after starting or during an
extended towing period, this indicates a
problem in the glow plug preheating
system. You can use the vehicle as usual if
the engine starts but you should contact
a Fiat Dealership as soon as possible.
37)It is advisable not to demand maximum
performance from your vehicle (e.g.
excessive acceleration, long distances at
maximum rpm, excessively intense braking,
etc.) when it is first used.
38)When the engine is off, do not leave
the key turned to MAR to prevent
unnecessary electrical consumption from
draining the battery.39)Never bump start the engine by
pushing, towing or coasting downhill. This
could cause fuel to flow into the catalytic
converter and damage it beyond repair.
40)There must therefore always be some
petrol in the tank to protect the petrol
pump and to guarantee temporary
switching from LPG or Methane to petrol
operation, if high performance is required.
41)A quick burst on the accelerator
before stopping the engine serves no
practical purpose; it wastes fuel and is
especially damaging to turbocharged
engines.
HANDBRAKE
122) 123) 124)
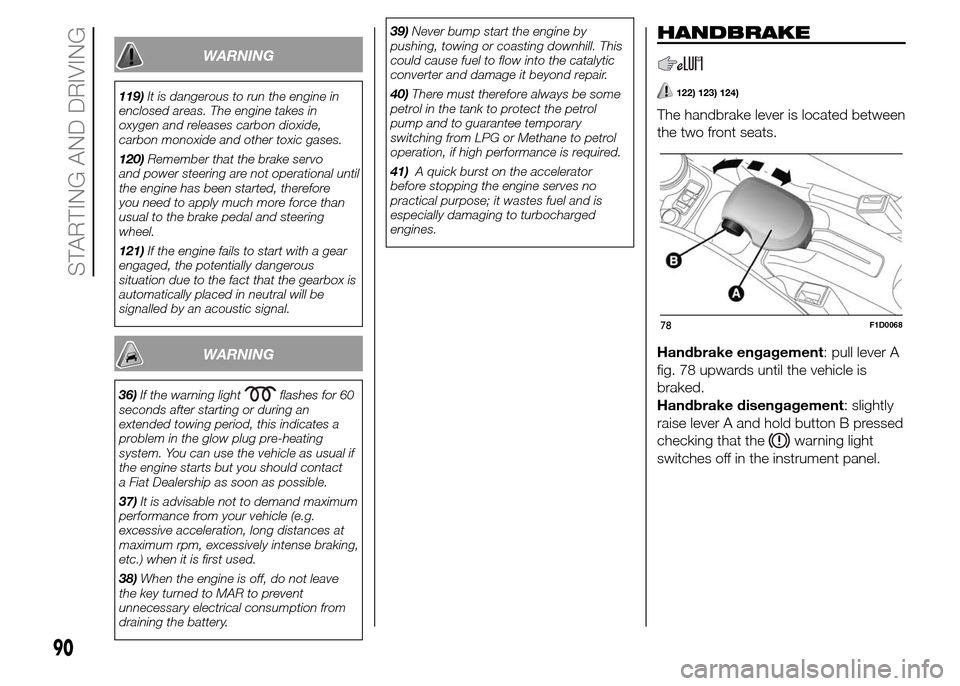
The handbrake lever is located between
the two front seats.
Handbrake engagement: pull lever A
fig. 78 upwards until the vehicle is
braked.
Handbrake disengagement: slightly
raise lever A and hold button B pressed
checking that the
warning light
switches off in the instrument panel.
78F1D0068
90
STARTING AND DRIVING
Page 119 of 196
❒connect the other end of the cable
used for positive (+) to the positive
terminal (+) of the auxiliary battery;
❒connect one end of the cable used
for negative (–) to the negative terminal
(–) of the auxiliary battery;
❒Connect the other end of the cable
used for negative (–) to an engine earth
(the visible metal part of the vehicle
engine with flat battery) away from the
battery and the fuel injection system;
❒start the vehicle engine with the
auxiliary battery, let it run for a
few minutes at idling. Start the engine
of the vehicle with flat battery.
Cable disconnection.
Once the engine has been started,
remove the cables proceeding as
follows:
❒disconnect the end of the cable used
for negative (–) from the engine earth
of the vehicle with flat battery;
❒disconnect the other end of the cable
used for negative (–) from the negative
terminal (–) of the auxiliary battery;
❒disconnect the end of the cable used
for positive (+) from the positive terminal
(+) of the auxiliary battery;
❒disconnect one end of the cable
used for positive (+) from the positive
terminal (+) of the vehicle with flat
battery;If it is often necessary to perform a
jump starting, have the vehicle battery
and the recharging system checked
by a Fiat Dealership.
IMPORTANT Any accessories (e.g.
mobile phones, etc.) connected to the
vehicle power sockets draw current
even if they are not used. These
devices, if left connected too much time
with engine off, may cause the battery
to drain with following reduction of
its life and/or failure to start the engine.
WARNING
157)This procedure must be performed by
qualified personnel as incorrect actions
may cause high-intensity electrical
discharge. Furthermore, battery fluid is
poisonous and corrosive: avoid contact
with skin and eyes. Keep naked flames and
lighted cigarettes away from the battery
and do not cause sparks.
158)Remove any metal objects (e.g. rings,
watches, bracelets), that might cause an
accidental electrical contact and cause
serious injury.
WARNING
53)Do not connect the cable to the
negative terminal (–) of the flat battery. The
following spark could lead to battery
explosion and cause serious harm. Only
use the specific earth point; do not use any
other exposed metallic part.
54)Never use a fast battery-charger to
start the engine as this could damage the
electronic systems of your vehicle,
particularly the ignition and engine fuel
supply control units.
117
Page 120 of 196
FUEL CUT-OFF
SYSTEM
159)
This intervenes in the case of an impact
causing:
❒the interruption of the fuel supply with
the engine consequently cutting out;
❒the automatic unlocking of the doors;
❒the automatic switching on of the
interior lights
❒the switching on of the hazard
warning lights.
IMPORTANT Carefully check the car for
fuel leaks, for instance in the engine
compartment, under the car or near the
tank area. After an impact, turn the
ignition key to STOP to prevent the
battery from running down.
To restore the correct operation of the
car, proceed as follows:
❒turn the ignition key to the MAR
position;
❒activate the right direction indicator;
❒deactivate the right direction
indicator;
❒activate the left direction indicator;
❒deactivate the left direction indicator;
❒activate the right direction indicator;
❒deactivate the right direction
indicator;❒activate the left direction indicator;
❒deactivate the left direction indicator;
❒turn the ignition key to STOP and
then to MAR.
LPG versions: in the event of an
impact, petrol supply is immediately
cut-off, the LPG safety valves are
closed and the injection is interrupted,
switching off the engine.
Natural Power versions: in the event
of an impact, the power supply is
immediately cut off, causing engine
switching off.
WARNING
159)If, after an impact, you smell fuel or
notice leaks from the fuel system, do
not reactivate the system to avoid the risk
of fire.
TOWING THE
VEHICLE
160) 161) 162) 163) 164)
The tow hook, which is supplied with
the vehicle, is housed in the tool box,
under the carpet in the luggage
compartment.
ATTACHING THE TOW
HOOK
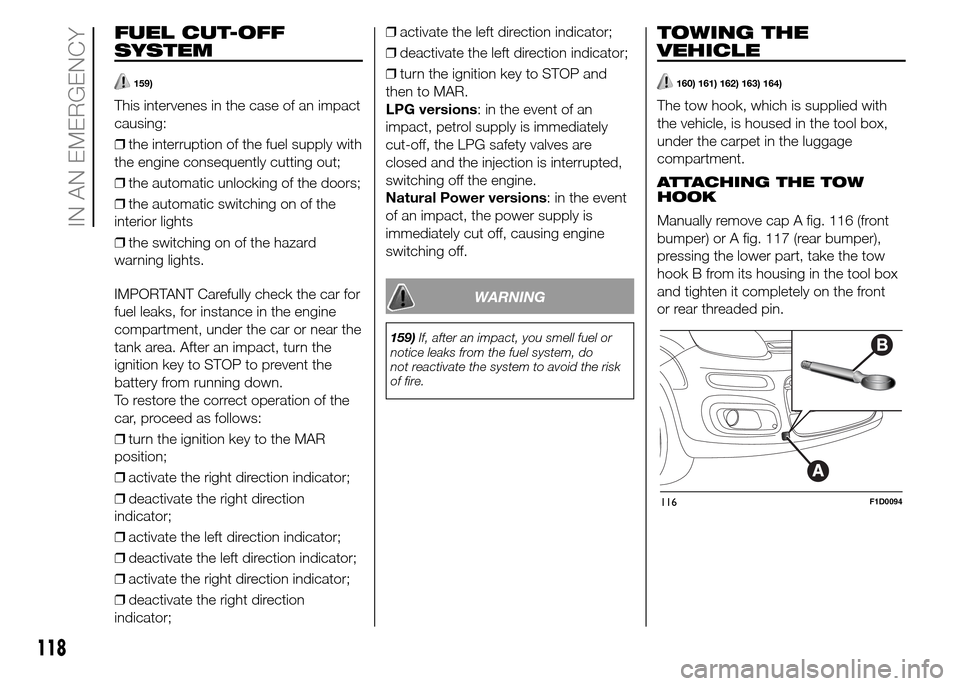
Manually remove cap A fig. 116 (front
bumper) or A fig. 117 (rear bumper),
pressing the lower part, take the tow
hook B from its housing in the tool box
and tighten it completely on the front
or rear threaded pin.
116F1D0094
118
IN AN EMERGENCY
Page 123 of 196
SCHEDULED
SERVICING
Correct servicing is crucial for
guaranteeing a long life for the vehicle
under the best conditions. For this
reason, Fiat has planned a series of
checks and services at fixed distance
intervals and, where provided, at fixed
time intervals, as described in the
Scheduled Servicing Plan.
Before each service, it is always
necessary to carefully follow the
instructions in the Scheduled Servicing
Plan (e.g. periodically check level of
fluids, tyre pressure, etc.).
Scheduled Servicing is offered by all
Fiat Dealerships according to a set time
schedule. If, during each operation, in
addition to the ones scheduled, the
need arises for further replacements or
repairs, these may be carried out with
your explicit agreement only. If your
vehicle is used frequently for towing,
the interval between one service
operation and the next should be
reduced.IMPORTANT Scheduled Servicing
interventions are set out by the
Manufacturer. Failure to have them
carried out may invalidate the warranty.
It is advisable to inform a Fiat
Dealership of any small operating
irregularities without waiting for the next
service.
PERIODIC CHECKS
Every1,000km or before long
journeys, check and if necessary, top
up: engine coolant level; brake fluid
level; screen washer fluid level; tyre
inflation pressure and condition; lighting
system operation (headlights, direction
indicators, hazard warning lights, etc.);
screen washer/wiper system operation
and positioning/wear of windscreen/
rear window wiper blades.
Every3,000km, check and top up if
required: engine oil level.HEAVY-DUTY USE OF THE
VEHICLE
If the vehicle is used under one of the
following conditions: towing a trailer
or motorhome; dusty roads; short (less
than 7-8 km) and repeated journeys
with sub-zero outside temperatures;
engine often idling or driving long
distances at low speed or long periods
of inactivity, the following checks must
be carried out more often than
indicated in the Scheduled Servicing
Plan:
❒check front disc brake pad condition
and wear;
❒check cleanliness of bonnet and
luggage compartment locks,
cleanliness and lubrication of linkage;
❒visually inspect conditions of: engine,
gearbox, transmission, pipes and
hoses (exhaust/fuel system/brakes) and
rubber elements (gaiters/sleeves/
bushes, etc.);
❒check battery charge and battery
fluid level (electrolyte);
❒visually inspect conditions of the
auxiliary drive belts;
❒check and, if necessary, change
engine oil and replace oil filter / pollen
filter / air cleaner.
121
Page 124 of 196
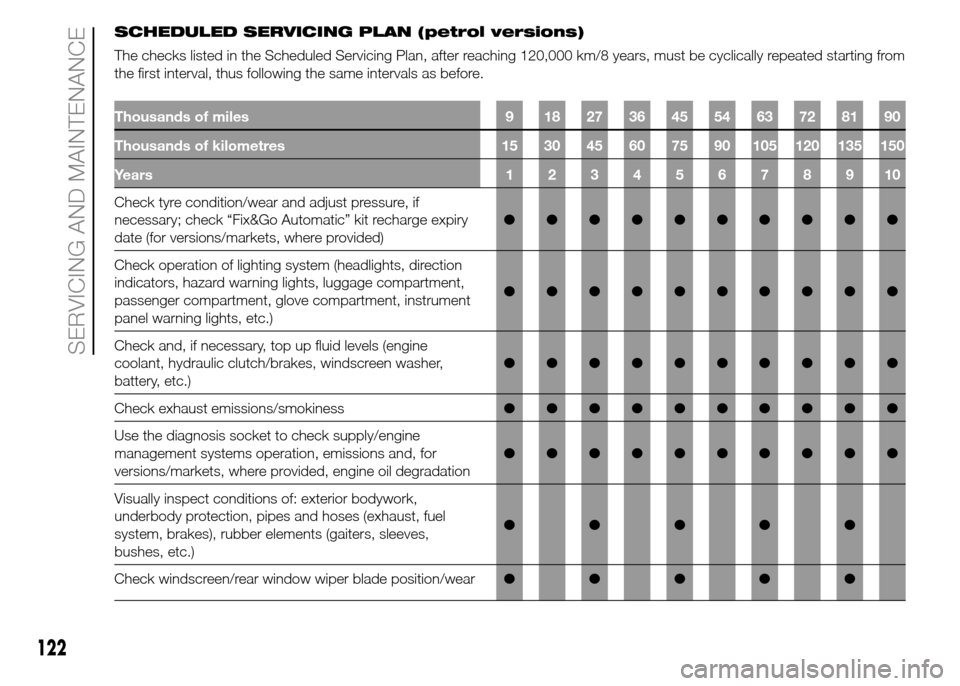
SCHEDULED SERVICING PLAN (petrol versions)
The checks listed in the Scheduled Servicing Plan, after reaching 120,000 km/8 years, must be cyclically repeated starting from
the first interval, thus following the same intervals as before.
Thousands of miles 9 18 27 36 45 54 63 72 81 90
Thousands of kilometres 15 30 45 60 75 90 105 120 135 150
Years12345678910
Check tyre condition/wear and adjust pressure, if
necessary; check “Fix&Go Automatic” kit recharge expiry
date (for versions/markets, where provided)●●●●●●●●●●
Check operation of lighting system (headlights, direction
indicators, hazard warning lights, luggage compartment,
passenger compartment, glove compartment, instrument
panel warning lights, etc.)●●●●●●●●●●
Check and, if necessary, top up fluid levels (engine
coolant, hydraulic clutch/brakes, windscreen washer,
battery, etc.)●●●●●●●●●●
Check exhaust emissions/smokiness●●●●●●●●●●
Use the diagnosis socket to check supply/engine
management systems operation, emissions and, for
versions/markets, where provided, engine oil degradation●●●●●●●●●●
Visually inspect conditions of: exterior bodywork,
underbody protection, pipes and hoses (exhaust, fuel
system, brakes), rubber elements (gaiters, sleeves,
bushes, etc.)●●●●●
Check windscreen/rear window wiper blade position/wear●●●●●
122
SERVICING AND MAINTENANCE
Page 129 of 196
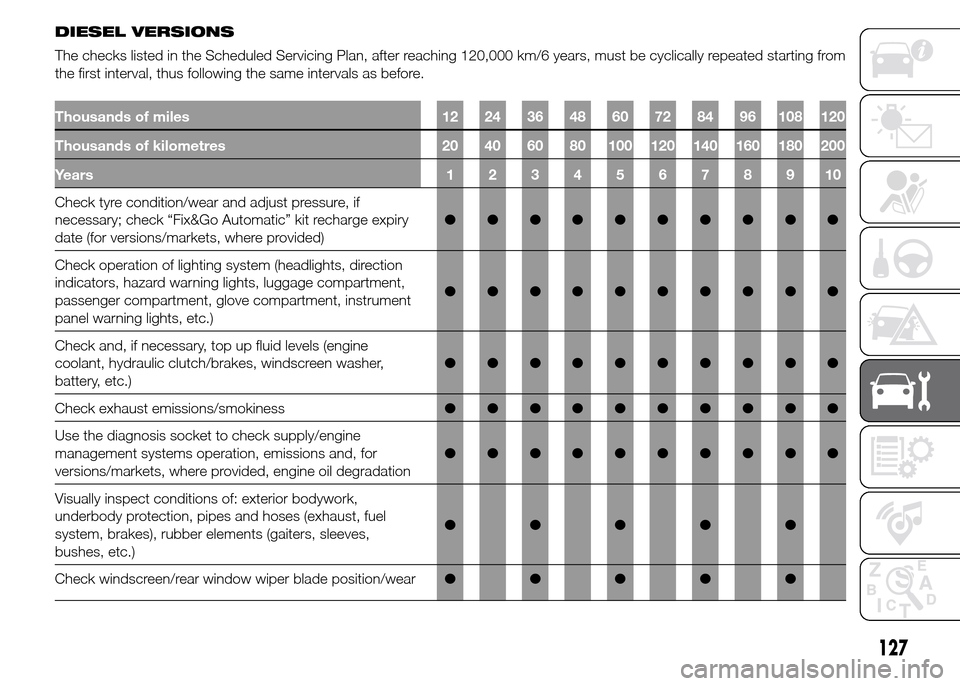
DIESEL VERSIONS
The checks listed in the Scheduled Servicing Plan, after reaching 120,000 km/6 years, must be cyclically repeated starting from
the first interval, thus following the same intervals as before.
Thousands of miles 12 24 36 48 60 72 84 96 108 120
Thousands of kilometres 20 40 60 80 100 120 140 160 180 200
Years12345678910
Check tyre condition/wear and adjust pressure, if
necessary; check “Fix&Go Automatic” kit recharge expiry
date (for versions/markets, where provided)●●●●●●●●●●
Check operation of lighting system (headlights, direction
indicators, hazard warning lights, luggage compartment,
passenger compartment, glove compartment, instrument
panel warning lights, etc.)●●●●●●●●●●
Check and, if necessary, top up fluid levels (engine
coolant, hydraulic clutch/brakes, windscreen washer,
battery, etc.)●●●●●●●●●●
Check exhaust emissions/smokiness●●●●●●●●●●
Use the diagnosis socket to check supply/engine
management systems operation, emissions and, for
versions/markets, where provided, engine oil degradation●●●●●●●●●●
Visually inspect conditions of: exterior bodywork,
underbody protection, pipes and hoses (exhaust, fuel
system, brakes), rubber elements (gaiters, sleeves,
bushes, etc.)●●●●●
Check windscreen/rear window wiper blade position/wear●●●●●
127
Page 135 of 196
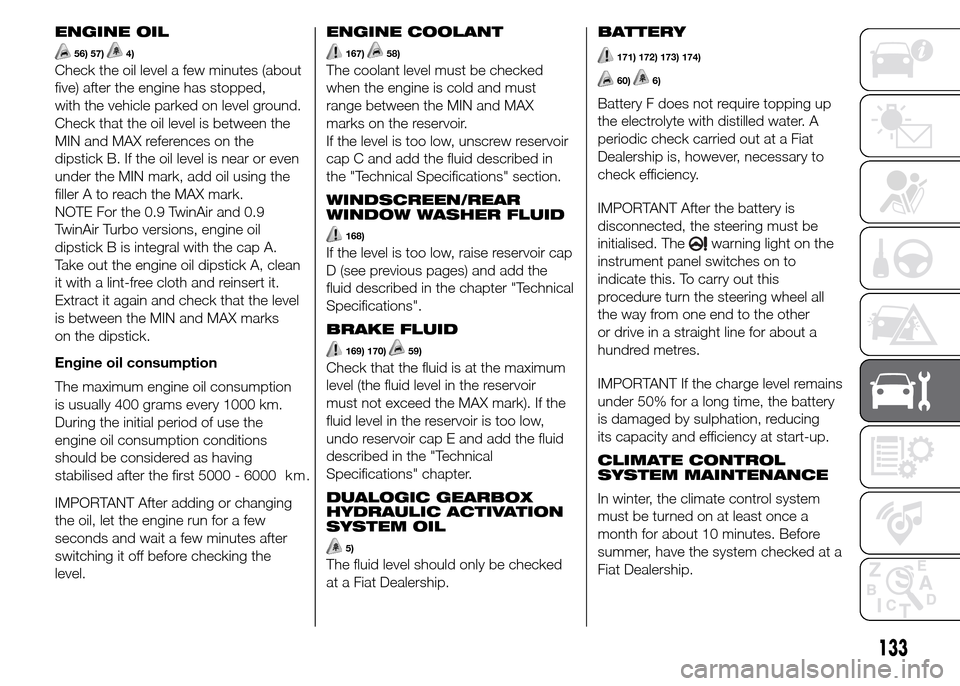
ENGINE OIL
56) 57)4)
Check the oil level a few minutes (about
five) after the engine has stopped,
with the vehicle parked on level ground.
Check that the oil level is between the
MIN and MAX references on the
dipstick B. If the oil level is near or even
under the MIN mark, add oil using the
filler A to reach the MAX mark.
NOTE For the 0.9 TwinAir and 0.9
TwinAir Turbo versions, engine oil
dipstick B is integral with the cap A.
Take out the engine oil dipstick A, clean
it with a lint-free cloth and reinsert it.
Extract it again and check that the level
is between the MIN and MAX marks
on the dipstick.
Engine oil consumption
The maximum engine oil consumption
is usually 400 grams every 1000 km.
During the initial period of use the
engine oil consumption conditions
should be considered as having
stabilised after the first 5000 - 6000 k m .
IMPORTANT After adding or changing
the oil, let the engine run for a few
seconds and wait a few minutes after
switching it off before checking the
level.ENGINE COOLANT
167)58)
The coolant level must be checked
when the engine is cold and must
range between the MIN and MAX
marks on the reservoir.
If the level is too low, unscrew reservoir
cap C and add the fluid described in
the "Technical Specifications" section.
WINDSCREEN/REAR
WINDOW WASHER FLUID
168)
If the level is too low, raise reservoir cap
D (see previous pages) and add the
fluid described in the chapter "Technical
Specifications".
BRAKE FLUID
169) 170)59)
Check that the fluid is at the maximum
level (the fluid level in the reservoir
must not exceed the MAX mark). If the
fluid level in the reservoir is too low,
undo reservoir cap E and add the fluid
described in the "Technical
Specifications" chapter.
DUALOGIC GEARBOX
HYDRAULIC ACTIVATION
SYSTEM OIL
5)
The fluid level should only be checked
at a Fiat Dealership.BATTERY
171) 172) 173) 174)
60)6)
Battery F does not require topping up
the electrolyte with distilled water. A
periodic check carried out at a Fiat
Dealership is, however, necessary to
check efficiency.
IMPORTANT After the battery is
disconnected, the steering must be
initialised. The
warning light on the
instrument panel switches on to
indicate this. To carry out this
procedure turn the steering wheel all
the way from one end to the other
or drive in a straight line for about a
hundred metres.
IMPORTANT If the charge level remains
under 50% for a long time, the battery
is damaged by sulphation, reducing
its capacity and efficiency at start-up.
CLIMATE CONTROL
SYSTEM MAINTENANCE
In winter, the climate control system
must be turned on at least once a
month for about 10 minutes. Before
summer, have the system checked at a
Fiat Dealership.
133
Page 193 of 196
INDEX
3
rd brake light (bulb
replacement) ................................ 107
ABS (system) ................................ 61
Active safety systems ..................... 61
Airbags .......................................... 82
ASR (system) ................................. 62
Battery (recharging)....................... 135
Blue&Me ........................................ 175
Bonnet ........................................... 29
CBC system ................................. 67
Checking levels .............................. 130
Child protection systems ................ 76
Climate control system ................... 22
CO2 emissions............................... 167
Control panel and on-board
instruments .................................. 38
Dashboard.................................... 7
Daytime running lights (DRL)
– "Daytime Running Lights" .......... 17
Dimensions .................................... 152
Dipped beam headlights
– control....................................... 17
Dipped/main beam headlights
(bulb replacement) ....................... 104
Direction indicators (changing a
bulb) ............................................ 104
Direction indicators
– control....................................... 17Display ........................................... 39
Doors ............................................. 10
– door locking/unlocking .............. 10
Driving assistance systems ............ 66
DRL (Daytime Running Lights) ........ 17
Dualdrive electric power steering .... 28
Dualogic gearbox ........................... 92
Dusk sensor ................................... 16
ECO function ................................ 29
Electric windows ............................ 26
Engine compartment...................... 130
Engine............................................ 141
ESC (system) ................................. 61
Exterior lights ................................. 16
Fiat CODE (system) ....................... 10
Fix&Go Automatic kit...................... 114
Fluids and lubricants ...................... 162
Fog lights (bulb replacement) ......... 105
Fog lights/rear fog lights ................. 18
Follow me home (device) ................ 18
Front airbags .................................. 82
Front roof light ................................ 19
Fuel consumption .......................... 166
Fuel cut-off system......................... 118
Fuses (replacement) ....................... 108
Gear Shift Indicator ....................... 39
Handbrake.................................... 90
Hazard warning lights..................... 102HBA (system) ................................. 62
Head restraints............................... 13
HH (system) ................................... 61
Ignition device ............................... 9
Important information and
recommendations ........................ 182
Interior lights .................................. 19
iTPMS ............................................ 68
Jump starting ................................ 116
Keys
– key without remote control ........ 8
– key with remote control ............. 8
Lifting the vehicle .......................... 137
Luggage compartment................... 31
Main beam headlights
– control....................................... 17
Manual gearbox ............................. 91
Mode selector ................................ 95
Number plate lights (bulb
replacement) ................................ 107
Occupant protection systems ....... 71
Parking lights ................................ 17
Parking sensors ............................. 94
Performance (top speed) ................ 165
Prescriptions for handling the
vehicle at the end of its life ........... 168
Pretensioners ................................. 74
Radio ............................................ 170