FIAT PANDA 2017 319 / 3.G Owners Manual
Manufacturer: FIAT, Model Year: 2017, Model line: PANDA, Model: FIAT PANDA 2017 319 / 3.GPages: 216, PDF Size: 19.25 MB
Page 101 of 216
STOP/START
SYSTEM
125) 126)46)
The Stop/Start system automatically
stops the engine when the vehicle
is stationary and starts it again when
the driver wants to move off. This
reduces consumption, the emission of
harmful gases and noise pollution.
OPERATING MODE
Engine stopping mode: with the
vehicle stopped, the engine stops with
gearbox in neutral and clutch pedal
released.
NoteThe engine can only be stopped
automatically after exceeding a speed
of about 10 km/h, to prevent the engine
from being repeatedly stopped when
driving at walking pace.
Restarting the engine: press the
clutch pedal to restart the engine.MANUAL SYSTEM
ACTIVATION/
DEACTIVATION
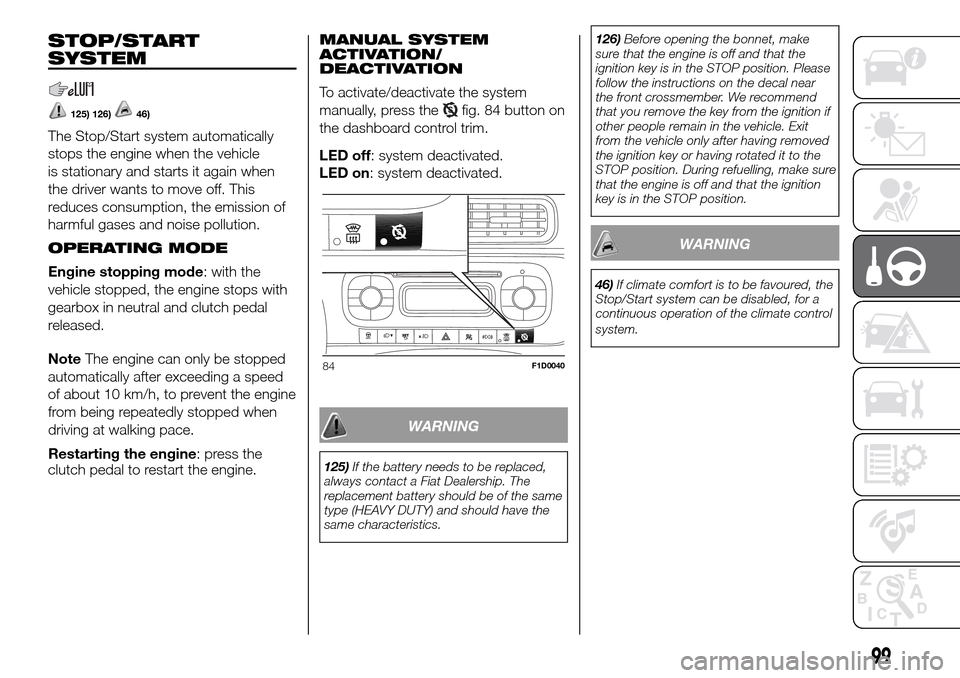
To activate/deactivate the system
manually, press the
fig. 84 button on
the dashboard control trim.
LED off: system deactivated.
LED on: system deactivated.
WARNING
125)If the battery needs to be replaced,
always contact a Fiat Dealership. The
replacement battery should be of the same
type (HEAVY DUTY) and should have the
same characteristics.126)Before opening the bonnet, make
sure that the engine is off and that the
ignition key is in the STOP position. Please
follow the instructions on the decal near
the front crossmember. We recommend
that you remove the key from the ignition if
other people remain in the vehicle. Exit
from the vehicle only after having removed
the ignition key or having rotated it to the
STOP position. During refuelling, make sure
that the engine is off and that the ignition
key is in the STOP position.
WARNING
46)If climate comfort is to be favoured, the
Stop/Start system can be disabled, for a
continuous operation of the climate control
system.
84F1D0040
99
Page 102 of 216
PARKING SENSORS
127)47)
SENSORS
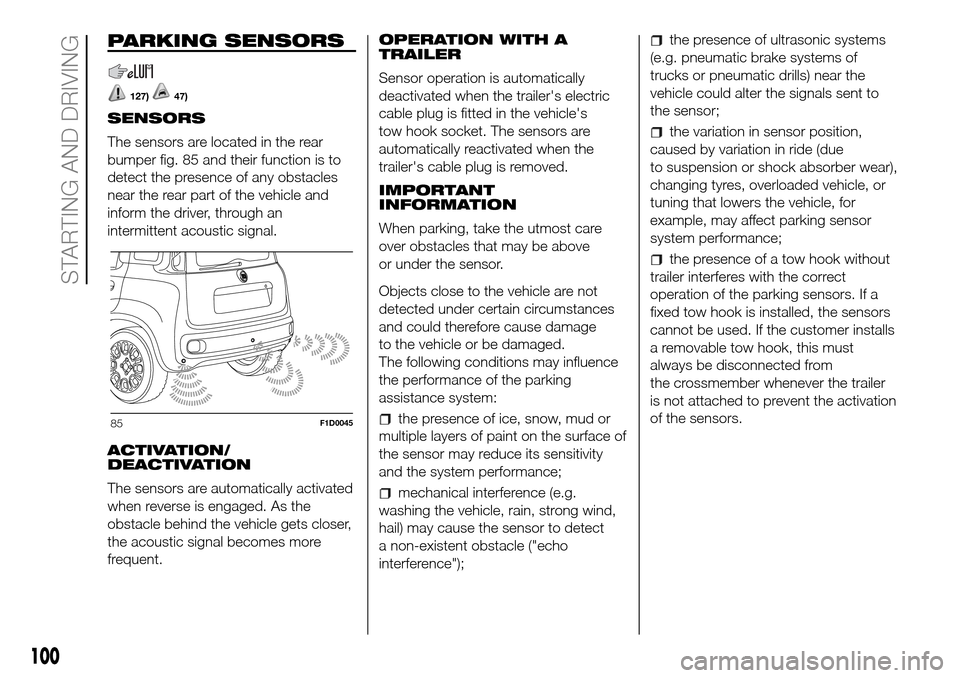
The sensors are located in the rear
bumper fig. 85 and their function is to
detect the presence of any obstacles
near the rear part of the vehicle and
inform the driver, through an
intermittent acoustic signal.
ACTIVATION/
DEACTIVATION
The sensors are automatically activated
when reverse is engaged. As the
obstacle behind the vehicle gets closer,
the acoustic signal becomes more
frequent.OPERATION WITH A
TRAILER
Sensor operation is automatically
deactivated when the trailer's electric
cable plug is fitted in the vehicle's
tow hook socket. The sensors are
automatically reactivated when the
trailer's cable plug is removed.
IMPORTANT
INFORMATION
When parking, take the utmost care
over obstacles that may be above
or under the sensor.
Objects close to the vehicle are not
detected under certain circumstances
and could therefore cause damage
to the vehicle or be damaged.
The following conditions may influence
the performance of the parking
assistance system:
the presence of ice, snow, mud or
multiple layers of paint on the surface of
the sensor may reduce its sensitivity
and the system performance;
mechanical interference (e.g.
washing the vehicle, rain, strong wind,
hail) may cause the sensor to detect
a non-existent obstacle ("echo
interference");
the presence of ultrasonic systems
(e.g. pneumatic brake systems of
trucks or pneumatic drills) near the
vehicle could alter the signals sent to
the sensor;
the variation in sensor position,
caused by variation in ride (due
to suspension or shock absorber wear),
changing tyres, overloaded vehicle, or
tuning that lowers the vehicle, for
example, may affect parking sensor
system performance;
the presence of a tow hook without
trailer interferes with the correct
operation of the parking sensors. If a
fixed tow hook is installed, the sensors
cannot be used. If the customer installs
a removable tow hook, this must
always be disconnected from
the crossmember whenever the trailer
is not attached to prevent the activation
of the sensors.
85F1D0045
100
STARTING AND DRIVING
Page 103 of 216
WARNING
127)The responsibility for parking and
other dangerous manoeuvres always and
in every case lies with the driver. While
carrying out these manoeuvres, always
make sure that no people (especially
children) or animals are in the area
concerned. The parking sensors are used
to assist the driver, who must never allow
his attention to lapse during potentially
dangerous manoeuvres, even those
executed at low speeds.
WARNING
47)The sensors must be clean of mud,
dirt, snow or ice in order for the system to
operate correctly. Be careful not to scratch
or damage the sensors while cleaning
them. Avoid using dry, rough or hard
cloths. The sensors must be washed using
clean water, with the addition of vehicle
shampoo if necessary. When using special
washing equipment such as high pressure
jets or steam cleaning, clean the sensors
very quickly keeping the jet more than
10 cm away.
REFUELLING THE
VEHICLE
128) 129) 130)
Always stop the engine before
refuelling.
PETROL ENGINES
Only use unleaded petrol, with an
octane number (R.O.N.) not lower than
95. In order to prevent damage to the
catalytic converter never introduce even
the smallest amount of leaded petrol,
even in the event of an emergency.
DIESEL ENGINES
Only use Diesel for motor vehicles
(EN590 specification).
When using or parking the car for a
long time in the mountains or cold
areas, it is advisable to refuel using
locally available diesel. In this case, it is
also advisable to keep the tank over
50% full.
REFUELLING
PROCEDURE
48)
Diesel and petrol versions
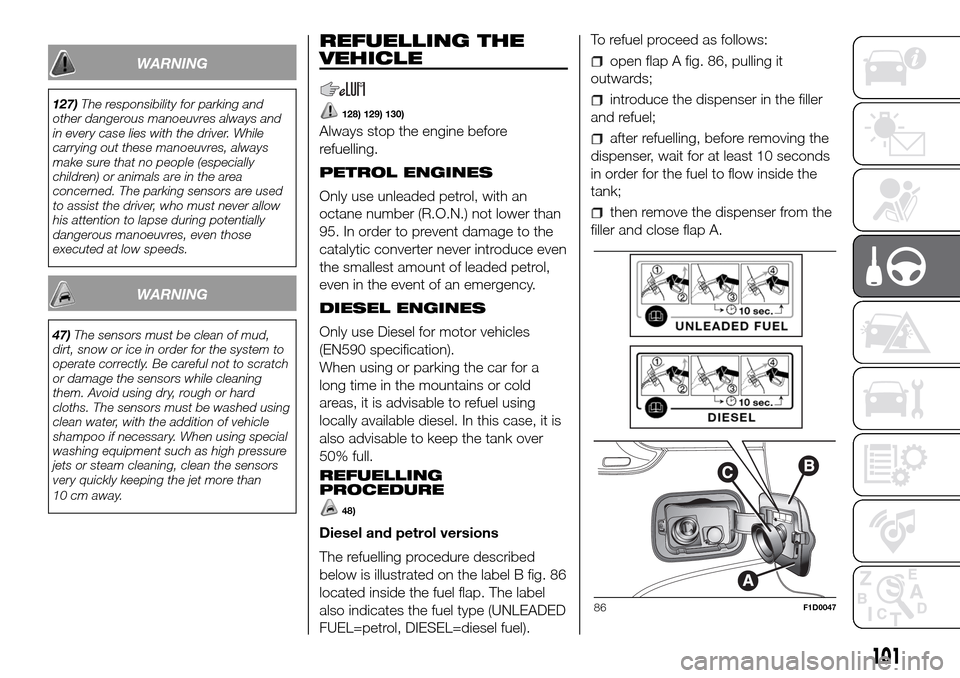
The refuelling procedure described
below is illustrated on the label B fig. 86
located inside the fuel flap. The label
also indicates the fuel type (UNLEADED
FUEL=petrol, DIESEL=diesel fuel).To refuel proceed as follows:
open flap A fig. 86, pulling it
outwards;
introduce the dispenser in the filler
and refuel;
after refuelling, before removing the
dispenser, wait for at least 10 seconds
in order for the fuel to flow inside the
tank;
then remove the dispenser from the
filler and close flap A.
86F1D0047
101
Page 104 of 216
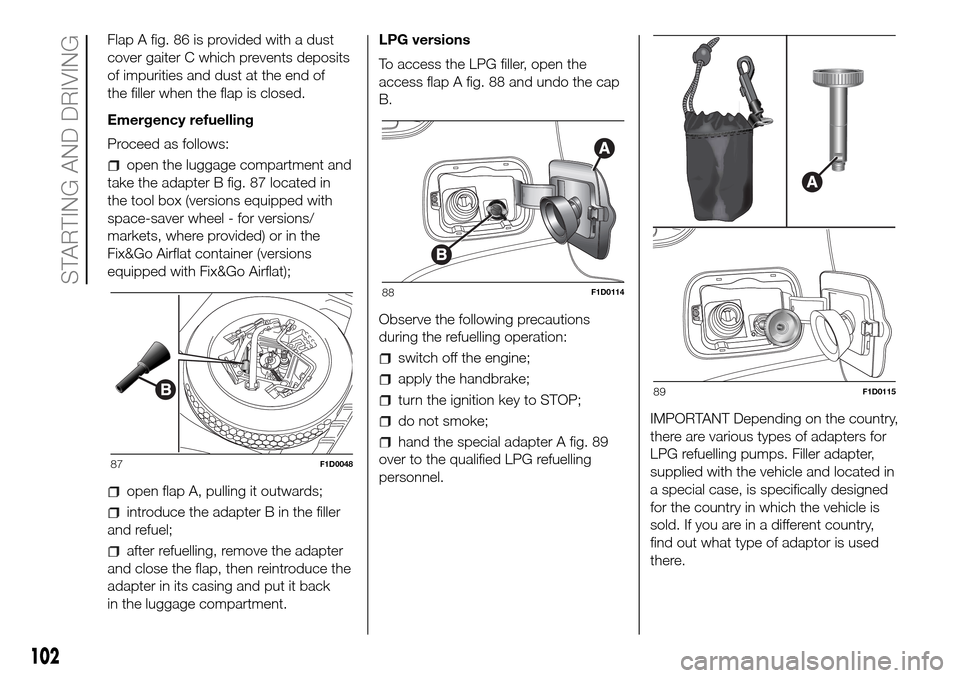
Flap A fig. 86 is provided with a dust
cover gaiter C which prevents deposits
of impurities and dust at the end of
the filler when the flap is closed.
Emergency refuelling
Proceed as follows:
open the luggage compartment and
take the adapter B fig. 87 located in
the tool box (versions equipped with
space-saver wheel - for versions/
markets, where provided) or in the
Fix&Go Airflat container (versions
equipped with Fix&Go Airflat);
open flap A, pulling it outwards;
introduce the adapter B in the filler
and refuel;
after refuelling, remove the adapter
and close the flap, then reintroduce the
adapter in its casing and put it back
in the luggage compartment.LPG versions
To access the LPG filler, open the
access flap A fig. 88 and undo the cap
B.
Observe the following precautions
during the refuelling operation:
switch off the engine;
apply the handbrake;
turn the ignition key to STOP;
do not smoke;
hand the special adapter A fig. 89
over to the qualified LPG refuelling
personnel.IMPORTANT Depending on the country,
there are various types of adapters for
LPG refuelling pumps. Filler adapter,
supplied with the vehicle and located in
a special case, is specifically designed
for the country in which the vehicle is
sold. If you are in a different country,
find out what type of adaptor is used
there.
87F1D0048
88F1D0114
89F1D0115
102
STARTING AND DRIVING
Page 105 of 216
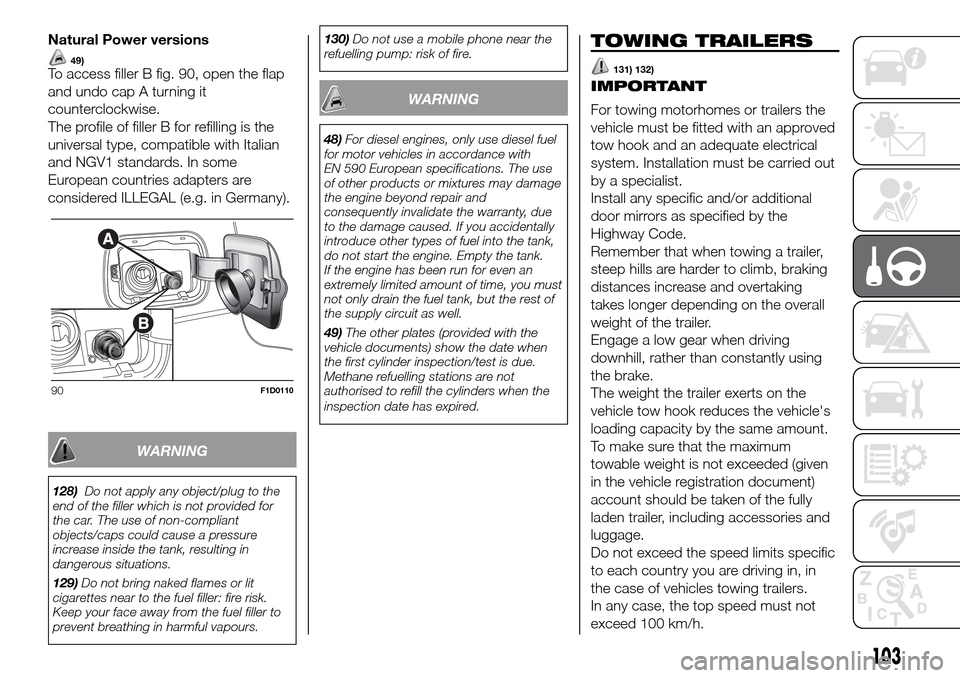
Natural Power versions
49)To access filler B fig. 90, open the flap
and undo cap A turning it
counterclockwise.
The profile of filler B for refilling is the
universal type, compatible with Italian
and NGV1 standards. In some
European countries adapters are
considered ILLEGAL (e.g. in Germany).
WARNING
128)Do not apply any object/plug to the
end of the filler which is not provided for
the car. The use of non-compliant
objects/caps could cause a pressure
increase inside the tank, resulting in
dangerous situations.
129)Do not bring naked flames or lit
cigarettes near to the fuel filler: fire risk.
Keep your face away from the fuel filler to
prevent breathing in harmful vapours.130)Do not use a mobile phone near the
refuelling pump: risk of fire.
WARNING
48)For diesel engines, only use diesel fuel
for motor vehicles in accordance with
EN 590 European specifications. The use
of other products or mixtures may damage
the engine beyond repair and
consequently invalidate the warranty, due
to the damage caused. If you accidentally
introduce other types of fuel into the tank,
do not start the engine. Empty the tank.
If the engine has been run for even an
extremely limited amount of time, you must
not only drain the fuel tank, but the rest of
the supply circuit as well.
49)The other plates (provided with the
vehicle documents) show the date when
the first cylinder inspection/test is due.
Methane refuelling stations are not
authorised to refill the cylinders when the
inspection date has expired.
TOWING TRAILERS
131) 132)
IMPORTANT
For towing motorhomes or trailers the
vehicle must be fitted with an approved
tow hook and an adequate electrical
system. Installation must be carried out
by a specialist.
Install any specific and/or additional
door mirrors as specified by the
Highway Code.
Remember that when towing a trailer,
steep hills are harder to climb, braking
distances increase and overtaking
takes longer depending on the overall
weight of the trailer.
Engage a low gear when driving
downhill, rather than constantly using
the brake.
The weight the trailer exerts on the
vehicle tow hook reduces the vehicle's
loading capacity by the same amount.
To make sure that the maximum
towable weight is not exceeded (given
in the vehicle registration document)
account should be taken of the fully
laden trailer, including accessories and
luggage.
Do not exceed the speed limits specific
to each country you are driving in, in
the case of vehicles towing trailers.
In any case, the top speed must not
exceed 100 km/h.
90F1D0110
103
Page 106 of 216
An electric brake (or electric winch)
should be supplied directly by the
battery through a cable with a cross
section of no less than 2.5 mm
2.
In addition to the electrical branches,
the vehicle electrical system can only
be connected to the supply cable for an
electric brake and to the cable for an
internal light for the trailer, not
exceeding 15 W. For connections, use
the preset control unit with a battery
cable with section not less than 2.5
mm
2.
On Panda Cross and Panda 4x4
versions, in the event of prolonged
vehicle use at maximum tow capacity
on slopes, replacing engine oil more
frequently (every 10,000 km) is
advisable.
IMPORTANT The use of auxiliary loads
other than external lights (electric brake,
winch, etc.) must be used with engine
running.
IMPORTANT To install a tow hook
contact a Fiat Dealership.
WARNING
131)The ABS with which the vehicle is
equipped will not control the braking
system of the trailer. Particular caution is
required on slippery roads.
132)Never modify the braking system of
the vehicle to control the trailer brake.
The trailer braking system must be fully
independent of the vehicle’s hydraulic
system.
104
STARTING AND DRIVING
Page 107 of 216
IN AN EMERGENCY
A punctured tyre or a burnt-out bulb?
At times, a problem may interfere
with our journey.
The pages on emergencies can help
you to deal with critical situations
independently and with calm.
In an emergency we recommend that
you call the freephone number found in
the Warranty Booklet.
It is also possible to call the national or
international universal freephone
number to search for the nearest
Dealership.HAZARD WARNING LIGHTS...........106
REPLACING A BULB ......................106
REPLACING FUSES........................112
CHANGING A WHEEL ....................115
“FIX&GO AIRFLAT” KIT ....................118
JUMP STARTING ............................121
FUEL CUT-OFF SYSTEM ................122
TOWING THE VEHICLE ..................123
105
Page 108 of 216
HAZARD WARNING
LIGHTS
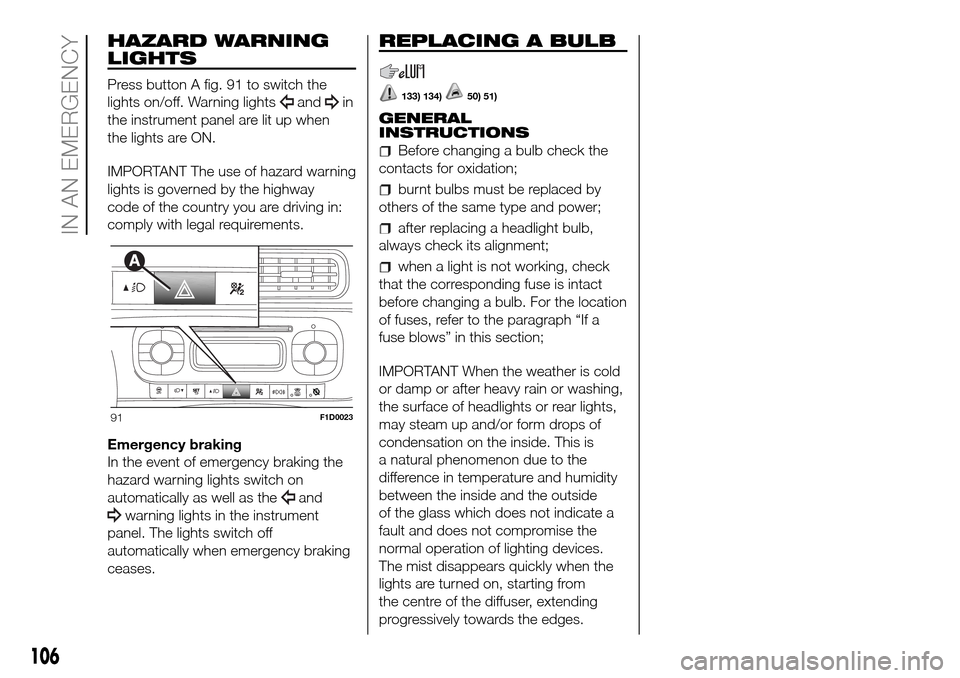
Press button A fig. 91 to switch the
lights on/off. Warning lights
andin
the instrument panel are lit up when
the lights are ON.
IMPORTANT The use of hazard warning
lights is governed by the highway
code of the country you are driving in:
comply with legal requirements.
Emergency braking
In the event of emergency braking the
hazard warning lights switch on
automatically as well as the
and
warning lights in the instrument
panel. The lights switch off
automatically when emergency braking
ceases.
REPLACING A BULB
133) 134)50) 51)
GENERAL
INSTRUCTIONS
Before changing a bulb check the
contacts for oxidation;
burnt bulbs must be replaced by
others of the same type and power;
after replacing a headlight bulb,
always check its alignment;
when a light is not working, check
that the corresponding fuse is intact
before changing a bulb. For the location
of fuses, refer to the paragraph “If a
fuse blows” in this section;
IMPORTANT When the weather is cold
or damp or after heavy rain or washing,
the surface of headlights or rear lights,
may steam up and/or form drops of
condensation on the inside. This is
a natural phenomenon due to the
difference in temperature and humidity
between the inside and the outside
of the glass which does not indicate a
fault and does not compromise the
normal operation of lighting devices.
The mist disappears quickly when the
lights are turned on, starting from
the centre of the diffuser, extending
progressively towards the edges.
91F1D0023
106
IN AN EMERGENCY
Page 109 of 216
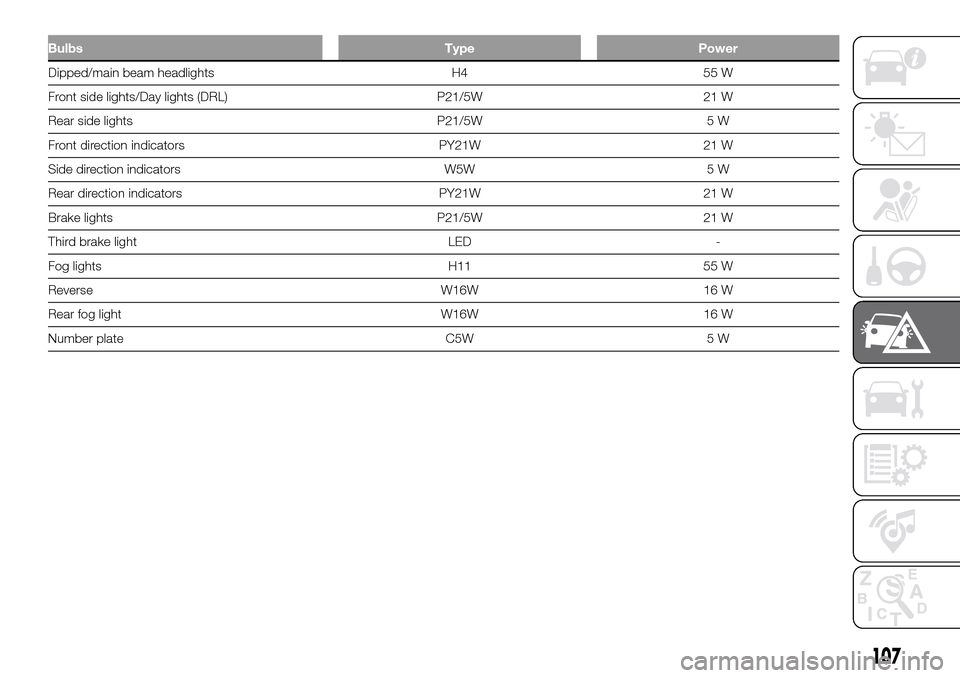
Bulbs Type Power
Dipped/main beam headlights H4 55 W
Front side lights/Day lights (DRL) P21/5W 21 W
Rear side lights P21/5W 5 W
Front direction indicators PY21W 21 W
Side direction indicators W5W 5 W
Rear direction indicators PY21W 21 W
Brake lights P21/5W 21 W
Third brake light LED -
Fog lights H11 55 W
Reverse W16W 16 W
Rear fog light W16W 16 W
Number plate C5W 5 W
107
Page 110 of 216
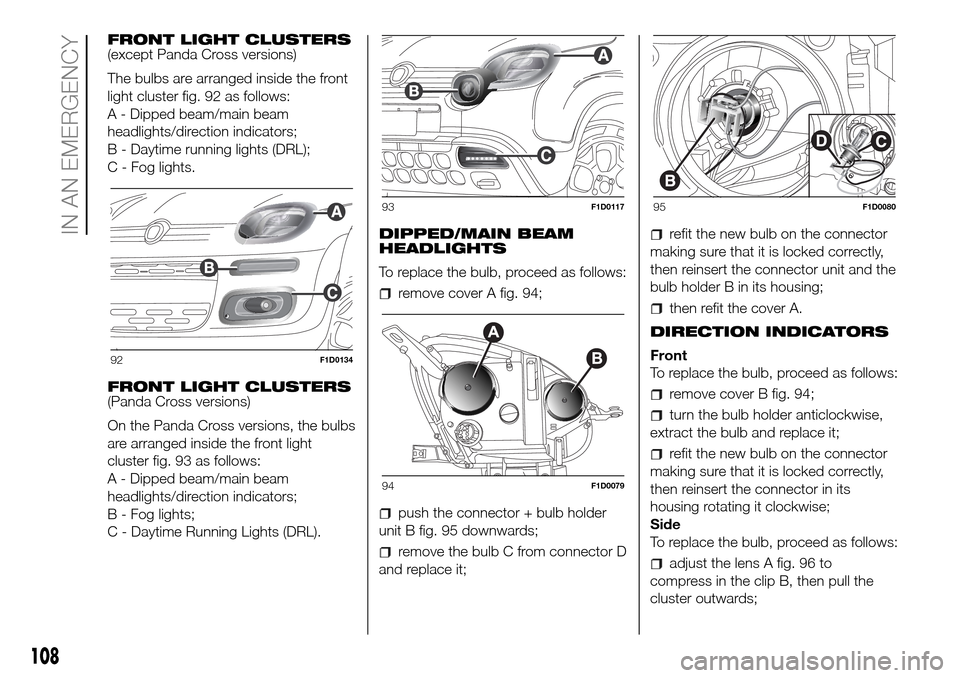
FRONT LIGHT CLUSTERS
(except Panda Cross versions)
The bulbs are arranged inside the front
light cluster fig. 92 as follows:
A - Dipped beam/main beam
headlights/direction indicators;
B - Daytime running lights (DRL);
C - Fog lights.
FRONT LIGHT CLUSTERS
(Panda Cross versions)
On the Panda Cross versions, the bulbs
are arranged inside the front light
cluster fig. 93 as follows:
A - Dipped beam/main beam
headlights/direction indicators;
B - Fog lights;
C - Daytime Running Lights (DRL).DIPPED/MAIN BEAM
HEADLIGHTS
To replace the bulb, proceed as follows:
remove cover A fig. 94;
push the connector + bulb holder
unit B fig. 95 downwards;
remove the bulb C from connector D
and replace it;
refit the new bulb on the connector
making sure that it is locked correctly,
then reinsert the connector unit and the
bulb holder B in its housing;
then refit the cover A.
DIRECTION INDICATORS
Front
To replace the bulb, proceed as follows:
remove cover B fig. 94;
turn the bulb holder anticlockwise,
extract the bulb and replace it;
refit the new bulb on the connector
making sure that it is locked correctly,
then reinsert the connector in its
housing rotating it clockwise;
Side
To replace the bulb, proceed as follows:
adjust the lens A fig. 96 to
compress in the clip B, then pull the
cluster outwards;
92F1D0134
93F1D0117
94F1D0079
95F1D0080
108
IN AN EMERGENCY