stop start FIAT PANDA 2018 Owner handbook (in English)
[x] Cancel search | Manufacturer: FIAT, Model Year: 2018, Model line: PANDA, Model: FIAT PANDA 2018Pages: 228, PDF Size: 17.05 MB
Page 96 of 228
WARNING
116)It is dangerous to run the engine in
enclosed areas. The engine consumes
oxygen and engine exhaust contains
carbon dioxide, carbon monoxide and
other toxic gasses.
117)Remember that the power brake and
electrical power steering are not
operational until the engine is started,
therefore a greater effort will be required to
press the brake pedal or turn the steering
wheel.
118)If the engine fails to start with a gear
engaged, the potentially dangerous
situation due to the fact that the gearbox is
automatically placed in neutral will be
signalled by an acoustic signal.
WARNING
38)If the warning lightflashes for 60
seconds after starting or during an
extended towing period, this indicates a
problem in the glow plug preheating
system. You can use the vehicle as usual if
the engine starts but you should contact
a Fiat Dealership as soon as possible.
39)It is advisable not to demand
maximum performance from your car (e.g.
excessive acceleration, long distances at
maximum rpm, excessively intense braking,
etc.) when it is first used.40)When the engine is switched off never
leave the key turned to MAR-ON to prevent
useless current absorption from draining
the battery.
41)Never bump start the engine by
pushing, towing or coasting downhill. This
could cause fuel to flow into the catalytic
converter and damage it beyond repair.
42)There must therefore always be some
petrol in the tank to protect the petrol
pump and to guarantee temporary
switching from LPG or Methane to petrol
operation, if high performance is required.
43)A quick burst on the accelerator
before turning off the engine serves
absolutely no practical purpose, it wastes
fuel and is especially damaging to
turbocharged engines.
WHEN PARKED
When parking and leaving the car,
proceed as follows:
engage a gear (1stgear if facing
uphill or reverse if facing downhill) and
leave the wheels turned;
stop the engine and engage the
handbrake;
always remove the ignition key.
Block the wheels with a wedge or a
stone if the car is parked on a steep
slope.
On versions equipped with Dualogic
transmission, wait for the letter P to be
displayed before releasing the brake
pedal.
IMPORTANT NEVER leave the car with
the gearbox in neutral (or, on versions
equipped with Dualogic transmission,
before placing the gear lever at P).
Handbrake
199) 200) 201)
The handbrake lever is located between
the front seats.
Handbrake engagement: pull lever A
fig. 80 upwards until the vehicle is
braked.
94
STARTING AND DRIVING
Page 100 of 228
IMPORTANT When the "Off Road"
mode is activated, the Start&Stop
system is temporarily disabled.
Temporary deactivation of the system
switches on the corresponding LED on
the trim (located on the central
dashboard). To activate the Start&Stop
function, with "Off Road" mode on,
press the
button on the dashboard
trim. However, when the "Off Road"
mode is deactivated, the Start&Stop
system is enabled again.
IMPORTANT When the "Off Road"
mode is activated, the City Brake
Control system is temporarily
deactivated. Temporarily deactivation of
the system results in the switching on
of the
warning light on the
instrument panel. When the "Off Road"
mode is deactivated, the City Brake
Control system is enabled again.
Turning off
To deactivate the "Off Road" mode and
return to the "Auto" mode, rotate the
ring nut to the left and hold in this
position for half a second. In this case,
the LED corresponding to “Auto” mode
will light up and the “Off Road” mode
deactivation indication will appear
on the display.IMPORTANT If “Off Road” or “Auto”
mode was active when the engine was
stopped, the next time it is started
the mode that was selected is
reactivated.
"GRAVITY CONTROL"
FUNCTION
This driving function permits a constant
vehicle speed to be maintained
downhill.
On/Off
For engaging/disengaging the Gravity
Control function refer to the "Active
safety systems" paragraph in the
"Safety" chapter.
FAILURE OF THE MODE
SELECTOR SYSTEM
IMPORTANT In the event of system
failure or a fault with knob, no driving
modes can be selected. The display will
show a dedicated message.
IMPORTANT In this case it is not
advisable trying to drive down roads
with a steep gradient, the system
cannot help the driver in any way.
DUALDRIVE
ELECTRIC POWER
STEERING
123) 124)
This only operates with the key turned
to MAR and the engine started. The
steering allows the force required at the
steering wheel to be adjusted to suit
driving conditions.
IMPORTANT When turning the ignition
key quickly, full power steering
functionality can be achieved after a
few seconds.
CITY FUNCTION
ACTIVATION/
DEACTIVATION
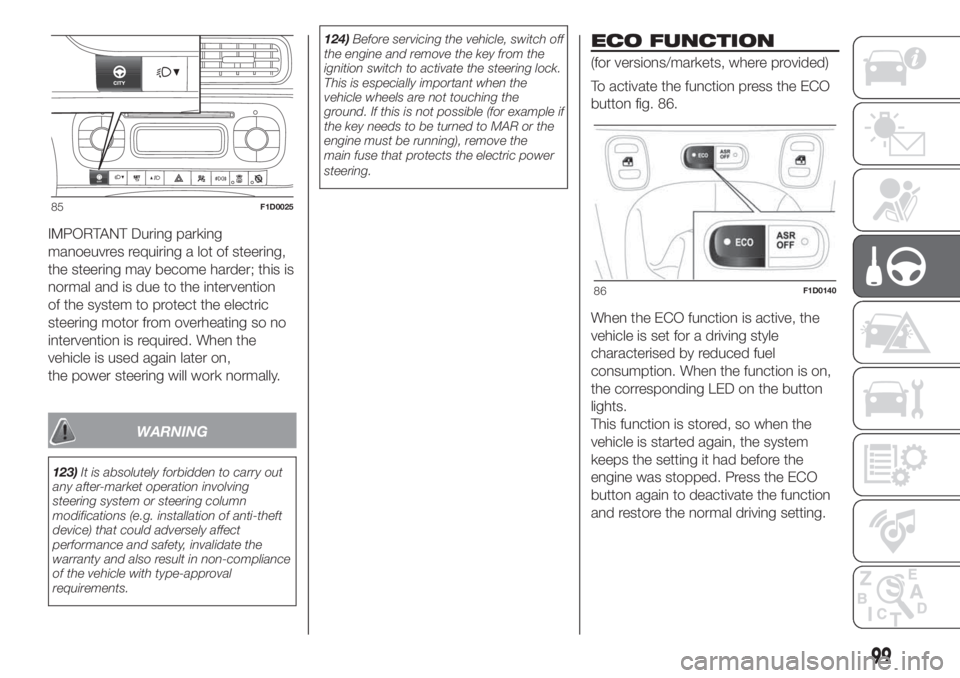
Press the CITY fig. 85 button to
activate/deactivate the function. The
activation of the function is signalled by
the word CITY on the display (in some
versions it is signalled by the word CITY
appearing on the instrument panel).
When the CITY function is on, the
steering wheel effort is lighter, making
parking easier: therefore, this function is
particularly useful for driving in city
centres.
98
STARTING AND DRIVING
Page 101 of 228
IMPORTANT During parking
manoeuvres requiring a lot of steering,
the steering may become harder; this is
normal and is due to the intervention
of the system to protect the electric
steering motor from overheating so no
intervention is required. When the
vehicle is used again later on,
the power steering will work normally.
WARNING
123)It is absolutely forbidden to carry out
any after-market operation involving
steering system or steering column
modifications (e.g. installation of anti-theft
device) that could adversely affect
performance and safety, invalidate the
warranty and also result in non-compliance
of the vehicle with type-approval
requirements.124)Before servicing the vehicle, switch off
the engine and remove the key from the
ignition switch to activate the steering lock.
This is especially important when the
vehicle wheels are not touching the
ground. If this is not possible (for example if
the key needs to be turned to MAR or the
engine must be running), remove the
main fuse that protects the electric power
steering.
ECO FUNCTION
(for versions/markets, where provided)
To activate the function press the ECO
button fig. 86.
When the ECO function is active, the
vehicle is set for a driving style
characterised by reduced fuel
consumption. When the function is on,
the corresponding LED on the button
lights.
This function is stored, so when the
vehicle is started again, the system
keeps the setting it had before the
engine was stopped. Press the ECO
button again to deactivate the function
and restore the normal driving setting.
85F1D0025
86F1D0140
99
Page 102 of 228
START&STOP
SYSTEM
125)126)
The Start&Stop system automatically
stops the engine when the vehicle
is stationary and starts it again when
the driver wants to move off. This
reduces consumption, the emission of
harmful gases and noise pollution.
OPERATING MODE
Engine stopping mode: with the
vehicle stopped, the engine stops with
gearbox in neutral and clutch pedal
released.
NOTE The engine can only be stopped
automatically after exceeding a speed
of about 10 km/h, to prevent the engine
from being repeatedly stopped when
driving at walking pace.
Restarting the engine: press the
clutch pedal to restart the engine.MANUAL SYSTEM
ACTIVATION/
DEACTIVATION
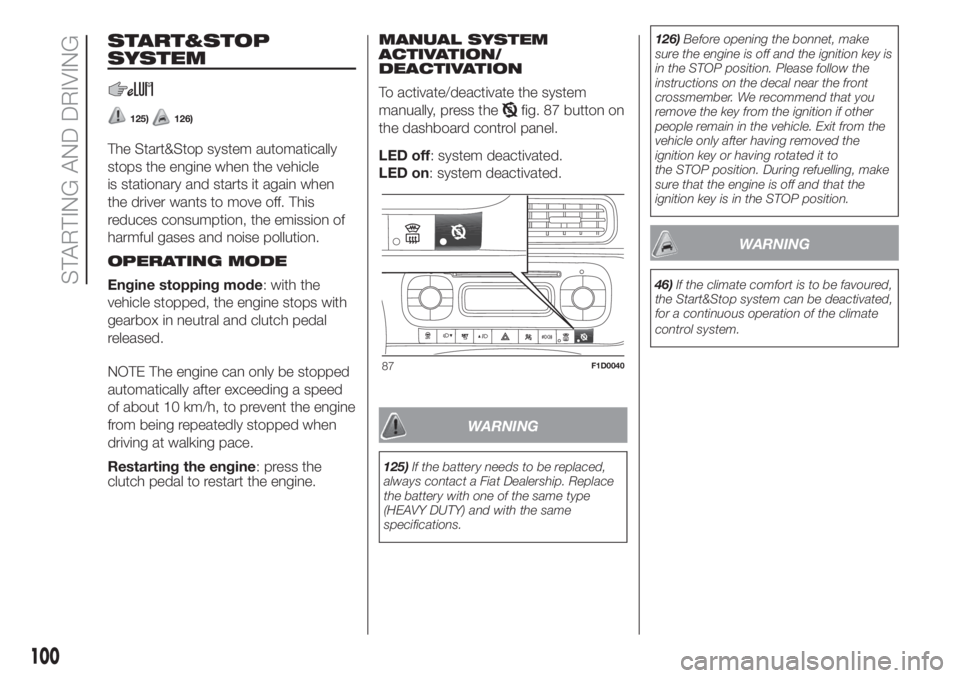
To activate/deactivate the system
manually, press the
fig. 87 button on
the dashboard control panel.
LED off: system deactivated.
LED on: system deactivated.
WARNING
125)If the battery needs to be replaced,
always contact a Fiat Dealership. Replace
the battery with one of the same type
(HEAVY DUTY) and with the same
specifications.126)Before opening the bonnet, make
sure the engine is off and the ignition key is
in the STOP position. Please follow the
instructions on the decal near the front
crossmember. We recommend that you
remove the key from the ignition if other
people remain in the vehicle. Exit from the
vehicle only after having removed the
ignition key or having rotated it to
the STOP position. During refuelling, make
sure that the engine is off and that the
ignition key is in the STOP position.
WARNING
46)If the climate comfort is to be favoured,
the Start&Stop system can be deactivated,
for a continuous operation of the climate
control system.
87F1D0040
100
STARTING AND DRIVING
Page 104 of 228
WARNING
47)For correct operation of the system,
sensors must always be clean from mud,
dirt, snow or ice. Be careful not to scratch
or damage the sensors while cleaning
them. Avoid using dry, rough or hard
cloths. The sensors must be washed using
clean water, with the addition of vehicle
shampoo if necessary. When using special
washing equipment such as high pressure
jets or steam cleaning, clean the sensors
very quickly keeping the jet more than
10 cm away.
REFUELLING THE
VEHICLE
128) 129) 130)
Always stop the engine before
refuelling.
PETROL ENGINES
Only use unleaded petrol, with an
octane number (R.O.N.) not lower than
95. In order to prevent damage to the
catalytic converter never introduce even
the smallest amount of leaded petrol,
even in the event of an emergency.
IMPORTANT An inefficient catalytic
converter leads to harmful exhaust
emissions, thus contributing to air
pollution.
IMPORTANT Never introduce leaded
petrol to the tank, even in small
amounts in an emergency, as this
would damage the catalytic converter
beyond repair.DIESEL ENGINES
Operation at low temperatures
Only use Diesel for motor vehicles
(EN590 specification).
When using or parking the car for a
long time in the mountains or cold
areas, it is advisable to refuel using
locally available diesel fuel. In this case,
it is also advisable to keep the tank
over 50% full.
REFUELLING
PROCEDURE
48)
IMPORTANT If the filler compartment is
washed with a high pressure jet, keep
it at a distance of at least 20 cm.
Diesel and petrol versions
The refuelling procedure described
below is illustrated on the label B fig. 89
located inside the fuel flap. The label
also indicates the fuel type (UNLEADED
FUEL=petrol, DIESEL=diesel fuel).
To refuel proceed as follows:
open flap A fig. 89, pulling it
outwards;
introduce the dispenser in the filler
and refuel;
102
STARTING AND DRIVING
Page 123 of 228
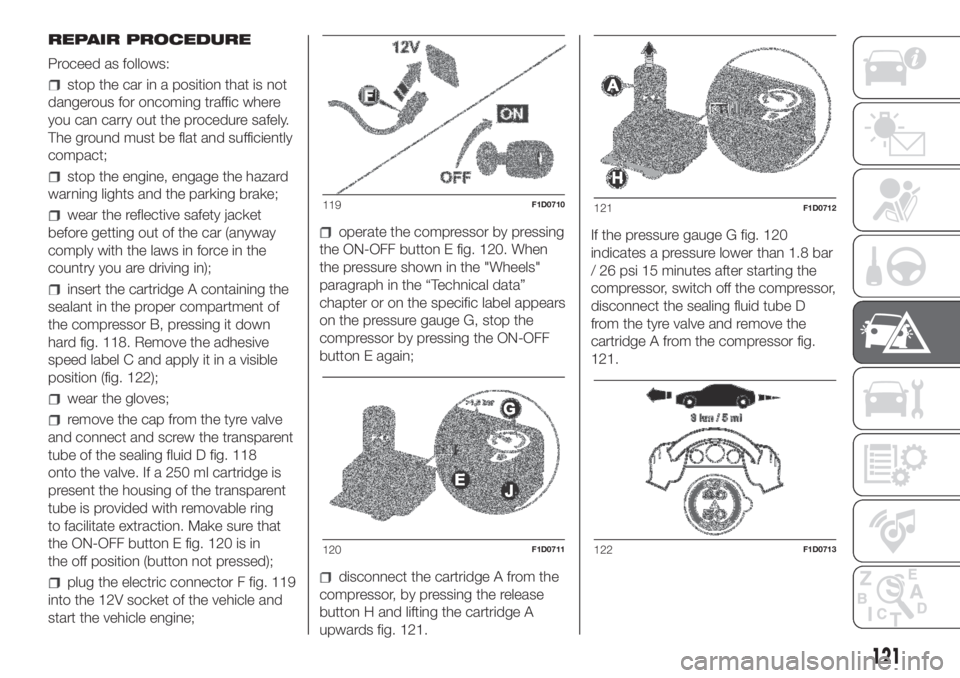
REPAIR PROCEDURE
Proceed as follows:
stop the car in a position that is not
dangerous for oncoming traffic where
you can carry out the procedure safely.
The ground must be flat and sufficiently
compact;
stop the engine, engage the hazard
warning lights and the parking brake;
wear the reflective safety jacket
before getting out of the car (anyway
comply with the laws in force in the
country you are driving in);
insert the cartridge A containing the
sealant in the proper compartment of
the compressor B, pressing it down
hard fig. 118. Remove the adhesive
speed label C and apply it in a visible
position (fig. 122);
wear the gloves;
remove the cap from the tyre valve
and connect and screw the transparent
tube of the sealing fluid D fig. 118
onto the valve. If a 250 ml cartridge is
present the housing of the transparent
tube is provided with removable ring
to facilitate extraction. Make sure that
the ON-OFF button E fig. 120 is in
the off position (button not pressed);
plug the electric connector F fig. 119
into the 12V socket of the vehicle and
start the vehicle engine;
operate the compressor by pressing
the ON-OFF button E fig. 120. When
the pressure shown in the "Wheels"
paragraph in the “Technical data”
chapter or on the specific label appears
on the pressure gauge G, stop the
compressor by pressing the ON-OFF
button E again;
disconnect the cartridge A from the
compressor, by pressing the release
button H and lifting the cartridge A
upwards fig. 121.If the pressure gauge G fig. 120
indicates a pressure lower than 1.8 bar
/ 26 psi 15 minutes after starting the
compressor, switch off the compressor,
disconnect the sealing fluid tube D
from the tyre valve and remove the
cartridge A from the compressor fig.
121.
119F1D0710
120F1D0711
121F1D0712
122F1D0713
121
Page 125 of 228
JUMP STARTING
If the battery is flat, a jump starting can
be performed using the battery and
the cables of another vehicle, or using a
booster battery.
If the warning light
remains on
continuously on the instrument panel,
contact the Fiat Dealership immediately.
IMPORTANT NOTES
When a booster battery is used, comply
with the utilisation and precaution
instructions specified by the producer.
Do not use the booster battery or
any other source of external supply with
a voltage above 12 V: the battery, the
starter, the alternator and the electrical
system of the vehicle could be
damaged.
Do not attempt jump starting if the
battery is frozen. The battery could
break and explode!PREPARATION TO JUMP
STARTING
151) 152)
56) 57)
IMPORTANT The positive terminal (+) of
the battery is shielded by a protective
cover. Lift the cover to access the
positive terminal.
Proceed as follows:
engage the handbrake, move the
Dualogic gear lever to P (Park) or,
for versions with manual gearbox, to
neutral and bring the ignition key to
STOP;
switch off all the other electrical
devices in the car;
if another vehicle is ready for jump
starting, park the vehicle within the
reach of the cables to be used for
starting, operate the handbrake and
make sure that the ignition is
deactivated.
IMPORTANT Avoid contact between
the two vehicles since this could cause
a connection to earth and may result
in serious injury to any people nearby.PROCEDURE FOR JUMP
STARTING
IMPORTANT If the procedure below is
carried out incorrectly, it can cause
severe injury to people or damage the
recharging system of one or both
vehicles. Carefully follow the
instructions given below.
Cable connection
Proceed as follows to carry out a jump
starting:
connect one end of the cable used
for positive (+) to the positive terminal
(+) of the car with flat battery;
connect the other end of the cable
used for positive (+) to the positive
terminal (+) of the auxiliary battery;
connect one end of the cable used
for negative (–) to the negative terminal
(–) of the auxiliary battery;
connect the other end of the cable
used for negative (–) to an engine earth
(the visible metal part of the car engine
with flat battery) far from the battery
and the fuel injection system;
start the vehicle engine with the
auxiliary battery, let it run for a few
minutes at idling. Start the engine of the
car with flat battery.
123
Page 126 of 228
Cable disconnection
Once the engine has been started,
remove the cables proceeding as
follows:
disconnect the end of the cable
used for negative (–) from the engine
earth of the car with flat battery;
disconnect the other end of the
cable used for negative (–) from the
negative terminal (–) of the auxiliary
battery;
disconnect the end of the cable
used for positive (+) from the positive
terminal (+) of the auxiliary battery;
disconnect one end of the cable
used for positive (+) from the positive
terminal (+) of the car with flat battery.
If it is often necessary to perform a
jump starting, have the car battery and
the recharging system checked by a
Fiat Dealership.
IMPORTANT Any accessories (e.g.
mobile phones, etc.) connected to the
vehicle power sockets draw current
even if they are not used. These
devices, if left connected too much time
with engine off, may cause the battery
to drain with following reduction of
its life and/or failure to start the engine.
WARNING
151)This starting procedure must be
performed by expert personnel because
incorrect actions could cause electrical
discharge of considerable intensity.
Furthermore, battery fluid is poisonous and
corrosive: avoid contact with skin and
eyes. Keep naked flames and lighted
cigarettes away from the battery and do
not cause sparks.
152)Remove any metal objects (e.g. rings,
watches, bracelets), that might cause an
accidental electrical contact and cause
serious injury.
WARNING
56)Do not connect the cable to the
negative terminal (–) of the flat battery. The
following spark could lead to battery
explosion and cause serious harm. Only
use the specific earth point; do not use any
other exposed metallic part.
57)Never use a fast battery-charger to
start the engine as this could damage the
electronic systems of your vehicle,
particularly the ignition and engine fuel
supply control units.
FUEL CUT-OFF
SYSTEM
153)
This intervenes in the case of an impact
causing:
the interruption of the fuel supply
with the engine consequently cutting
out;
the automatic unlocking of the
doors;
turning on the lights inside the car;
the switching on of the hazard
warning lights.
NOTE Carefully check the vehicle for
fuel leaks, for instance in the engine
compartment, under the vehicle or near
the tank area. After an impact, turn
the ignition key to STOP to prevent the
battery from running down.
To restore the correct operation of the
vehicle, proceed as follows:
turn the ignition key to the MAR
position;
activate the right direction indicator;
deactivate the right direction
indicator;
activate the left direction indicator;
deactivate the left direction indicator;
activate the right direction indicator;
124
IN AN EMERGENCY
Page 128 of 228
loaded on the flatbed of the rescue
vehicle with all the wheels on the
flatbed.
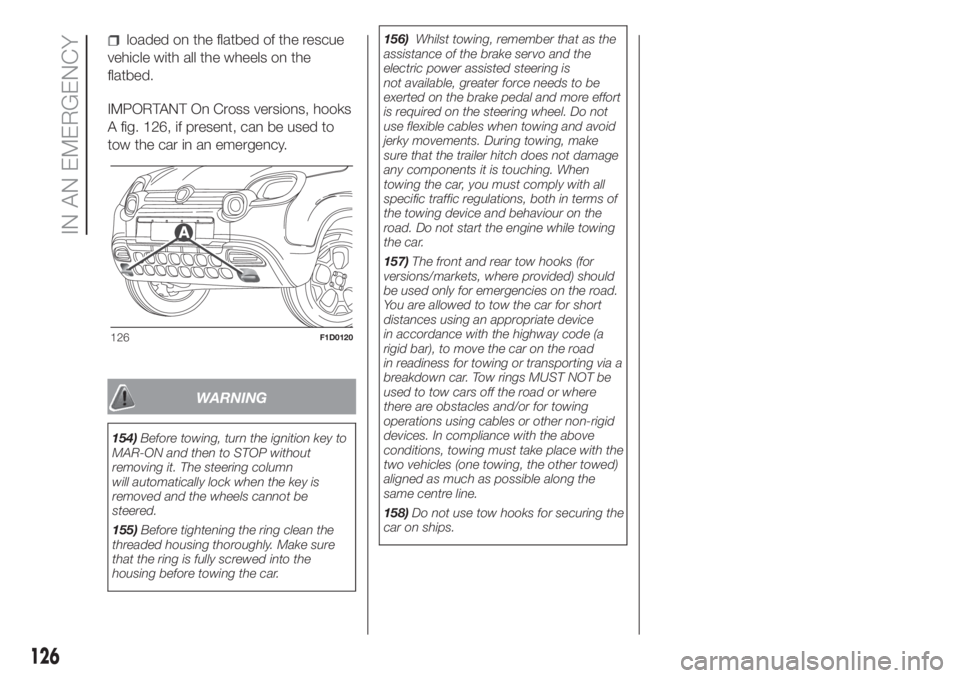
IMPORTANT On Cross versions, hooks
A fig. 126, if present, can be used to
tow the car in an emergency.
WARNING
154)Before towing, turn the ignition key to
MAR-ON and then to STOP without
removing it. The steering column
will automatically lock when the key is
removed and the wheels cannot be
steered.
155)Before tightening the ring clean the
threaded housing thoroughly. Make sure
that the ring is fully screwed into the
housing before towing the car.156)Whilst towing, remember that as the
assistance of the brake servo and the
electric power assisted steering is
not available, greater force needs to be
exerted on the brake pedal and more effort
is required on the steering wheel. Do not
use flexible cables when towing and avoid
jerky movements. During towing, make
sure that the trailer hitch does not damage
any components it is touching. When
towing the car, you must comply with all
specific traffic regulations, both in terms of
the towing device and behaviour on the
road. Do not start the engine while towing
the car.
157)The front and rear tow hooks (for
versions/markets, where provided) should
be used only for emergencies on the road.
You are allowed to tow the car for short
distances using an appropriate device
in accordance with the highway code (a
rigid bar), to move the car on the road
in readiness for towing or transporting via a
breakdown car. Tow rings MUST NOT be
used to tow cars off the road or where
there are obstacles and/or for towing
operations using cables or other non-rigid
devices. In compliance with the above
conditions, towing must take place with the
two vehicles (one towing, the other towed)
aligned as much as possible along the
same centre line.
158)Do not use tow hooks for securing the
car on ships.
126F1D0120
126
IN AN EMERGENCY
Page 141 of 228
BATTERY
RECHARGING
159) 160)
NOTE After turning the ignition key to
STOP and having closed the driver's
side door, wait at least one minute
before disconnecting and then
reconnecting the electrical supply to the
battery.
IMPORTANT Charging should be slow
at a low ampere rating for
approximately 24 hours. Charging for a
longer time may damage the battery.
IMPORTANT The cables of the
electrical system must be correctly
reconnected to the battery, i.e. the
positive cable (+) to the positive
terminal and the negative cable (–) to
the negative terminal. The battery
terminals are marked with the positive
(+) and negative (–) symbols, and are
shown on the battery cover. The battery
terminals must also be corrosion-free.IMPORTANT If a "quick-type" battery
charger is used with the battery fitted
on the vehicle, before connecting it
disconnect both cables of the battery
itself. Do not use a "quick-type" battery
charger to provide the starting voltage.
NOTE The battery recharging
procedure is given as information only.
You are advised to contact a Fiat
Dealership to have this operation
carried out.
VERSIONS WITHOUT
START&STOP SYSTEM
(for versions/markets, where provided)
To recharge, proceed as follows:
disconnect the terminal from the
negative battery pole;
connect the charger cables to the
battery terminals, observing the polarity;
turn on the battery charger;
when it is recharged, turn the
charger off before disconnecting it from
the battery;
reconnect the terminal to the
negative battery pole.VERSIONS WITH
START&STOP SYSTEM
(for versions/markets, where provided)
To recharge, proceed as follows:
disconnect the connector A fig. 127
(pressing the button B) from the sensor
C monitoring the battery conditions,
on the negative pole D of the battery;
connect the positive cable of the
battery charger to the positive battery
pole E and the negative cable to the
terminal of sensor D;
turn on the battery charger. At the
end of the charging process, switch the
battery charger off;
after having disconnected the
charging device, reconnect the
connector A to the sensor C.
139