washer fluid FIAT PUNTO 1998 176 / 1.G Workshop Manual
[x] Cancel search | Manufacturer: FIAT, Model Year: 1998, Model line: PUNTO, Model: FIAT PUNTO 1998 176 / 1.GPages: 225, PDF Size: 18.54 MB
Page 3 of 225
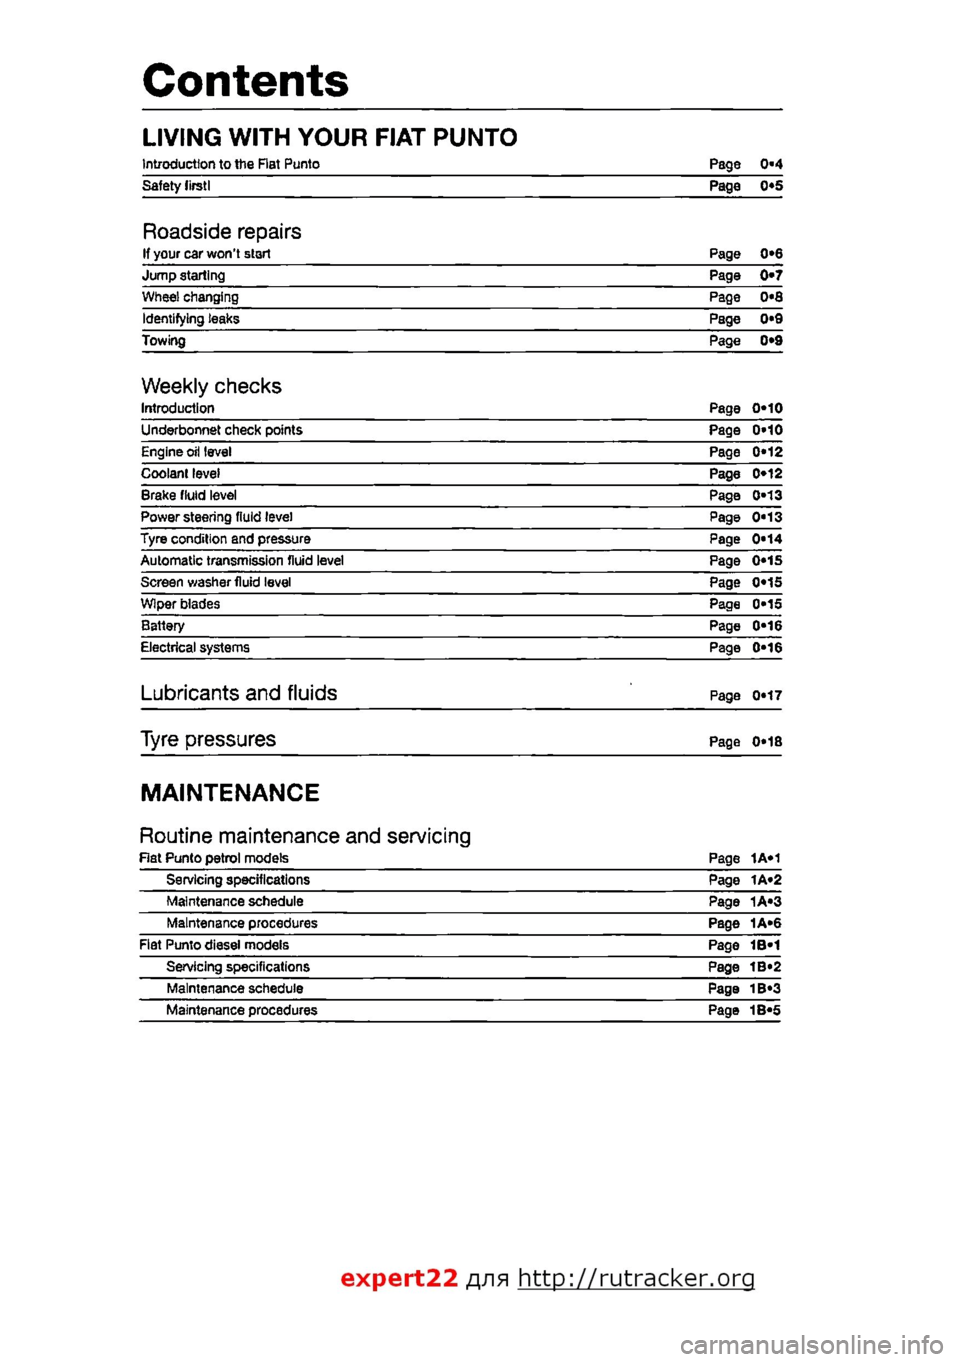
Contents
LIVING WITH YOUR FIAT PUNTO
Introduction to the Rat Punto Page 0-4 Safety lirstl Page 0*5
Roadside repairs If your car won't start Page 0*6 Jump starting Page 0*7 Wheel changing Page 0«8 Identifying teaks Page 0*9 Towing Page 0*9
Weekly checks Introduction Page 0*10 Underbonnet check points Page 0»10 Engine oil level Page 0*12 Coolant level Page 0*12 Brake fluid level Page 0*13 Power steering fluid level Page 0"13 Tyre condition and pressure Page 0*14 Automatic transmission fluid level Page 0«1S Screen washer fluid level Page 0«1S Wiper blades Page 0*15 Battery Page 0*16 Electrical systems Page 0-16
Lubricants and fluids Page 0*17
Tyre pressures Page 0*18
MAINTENANCE
Routine maintenance and servicing Rat Punto petrol models Page 1A«1 Servicing specifications Page 1A«2 Maintenance schedule Page 1A«3 Maintenance procedures Page 1A«6 Fiat Punto diesei models Page 1B-1 Servicing specifications Page 1B«2 Maintenance schedule Page 1B«3 Maintenance procedures Page 1B«5
expert22 fl/ia http://rutracker.org
Page 11 of 225
do Weekly checks
Introduction
There are some very simple checks which need only take a few minutes to carry out, but which could save you a lot of inconvenience and expense.
These Weekly checks require no great skill or special lools, and the small amount of lime they take to perform could prove to be very well spent, for example;
P Keeping an eye on tyre condition and pressures, will not only help to stop them wearing out prematurely, but could also save your life.
C Many breakdowns are caused by electacai problems. Battery-relalod faults are particularly common, and a quick check on a regular basis will ofton prevent the majority of these.
• If your car develops a brake fluid teak, the first time you might know about it is when your brakes don't work properly. Checking the level regularly will give advance warning of this kind of problem.
• If the oil or coolant levels run low. the cost of repairing any engine damage will be far greater than fixing the leak, for example.
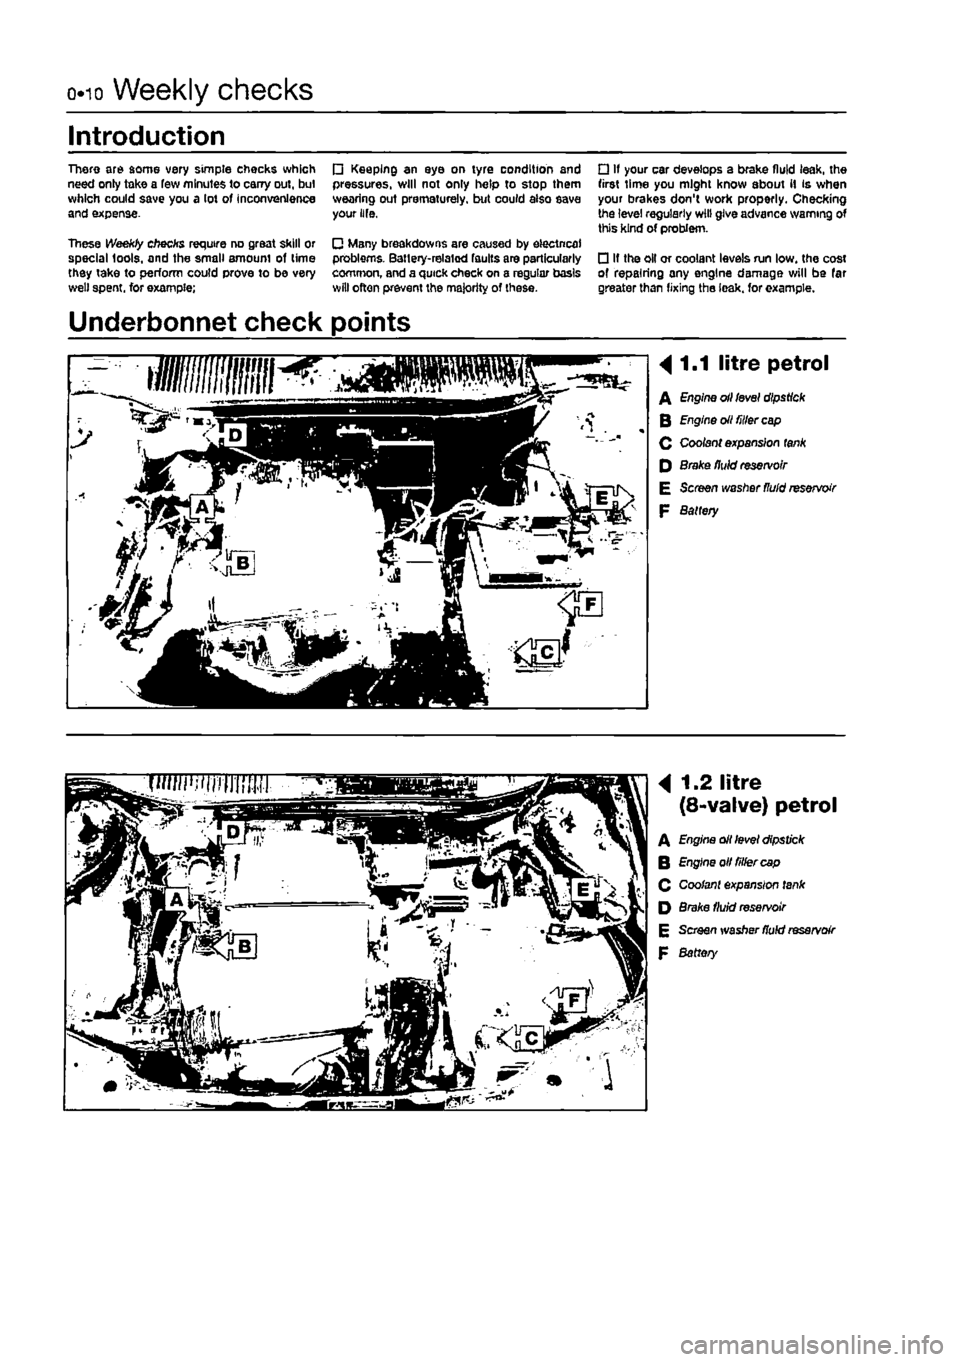
Underbonnet check points
4 1.1 litre petrol
A Engine oil level dipstick Q Engine oil filler cap C Cooteof expansion tank P Brake fluid reservoir E Screen washer fluid reservoir p Battery
< 1.2 litre
m (8-valve) petrol
^ 1 A Engine oII level dipstick
B Engine otl tiller cap
fi i: c Coolant expansion tank
D Brake fluid reservoir
E Screen washer fluid reservoir
F Battery
Page 12 of 225
Weekly checks o.n
Ulllllli
B
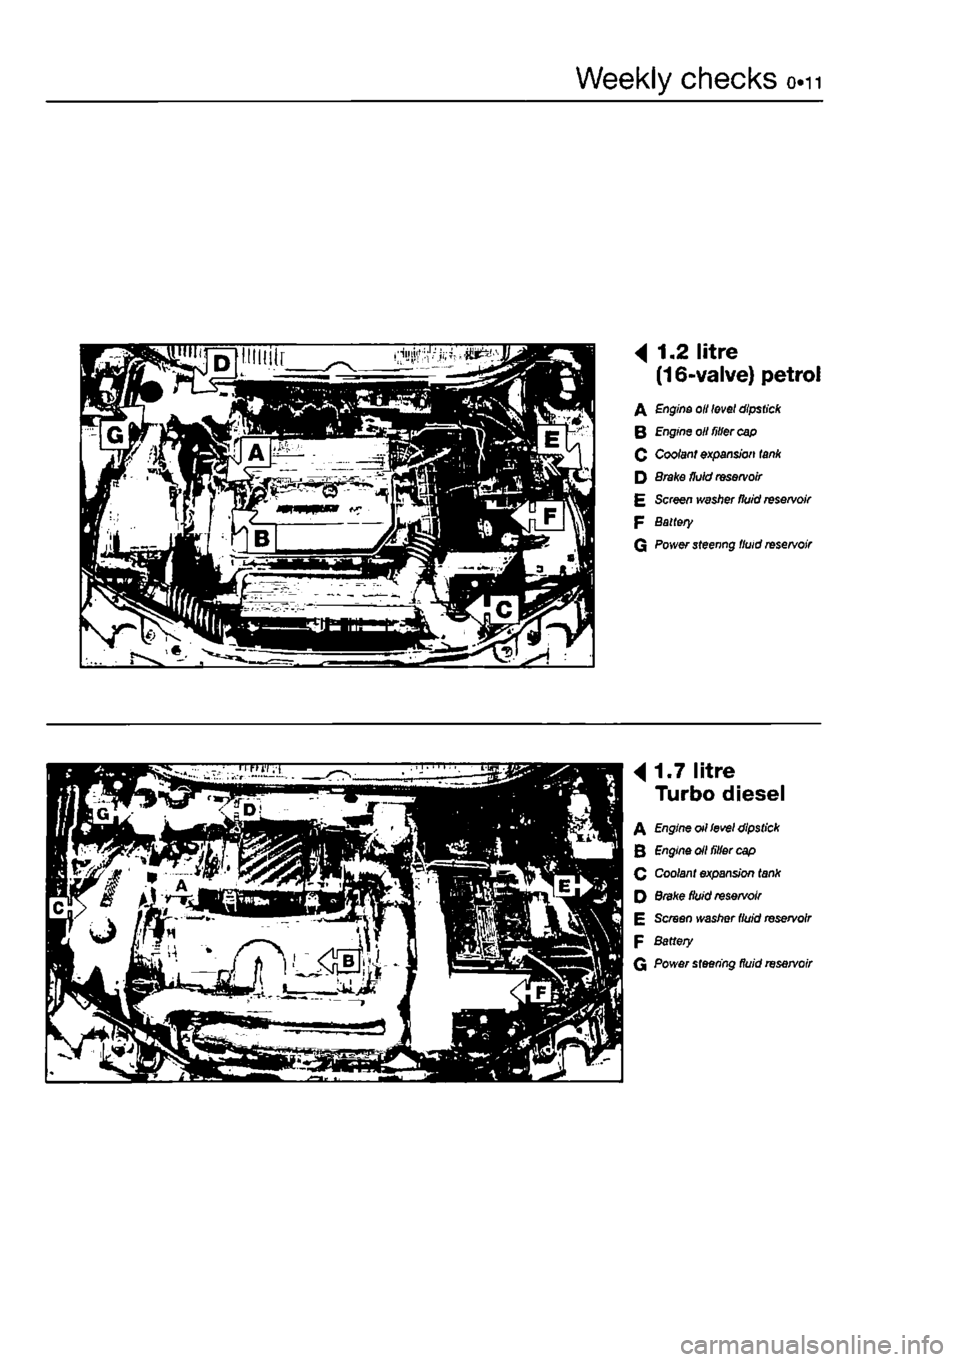
4 1.2 litre (16-valve) petrol
A Engine oil level dipstick
B Engine oil fitter cap 0 Coolant expansion tank D 8rake fluid reservoir £ Screen ivasfter fluid reservoir P Battery G Power steenng fluid reservoir
B
4
1.7 litre Turbo diesel
A Engine otl level dipstick B Engine oil filler cap Q Coolant expansion tank Q Brake fluid reservoir E Screen washer fluid reservoir F Battery
G Power steering fluid reservoir
Page 16 of 225
Weekly checks 015
Automatic transmission fluid level
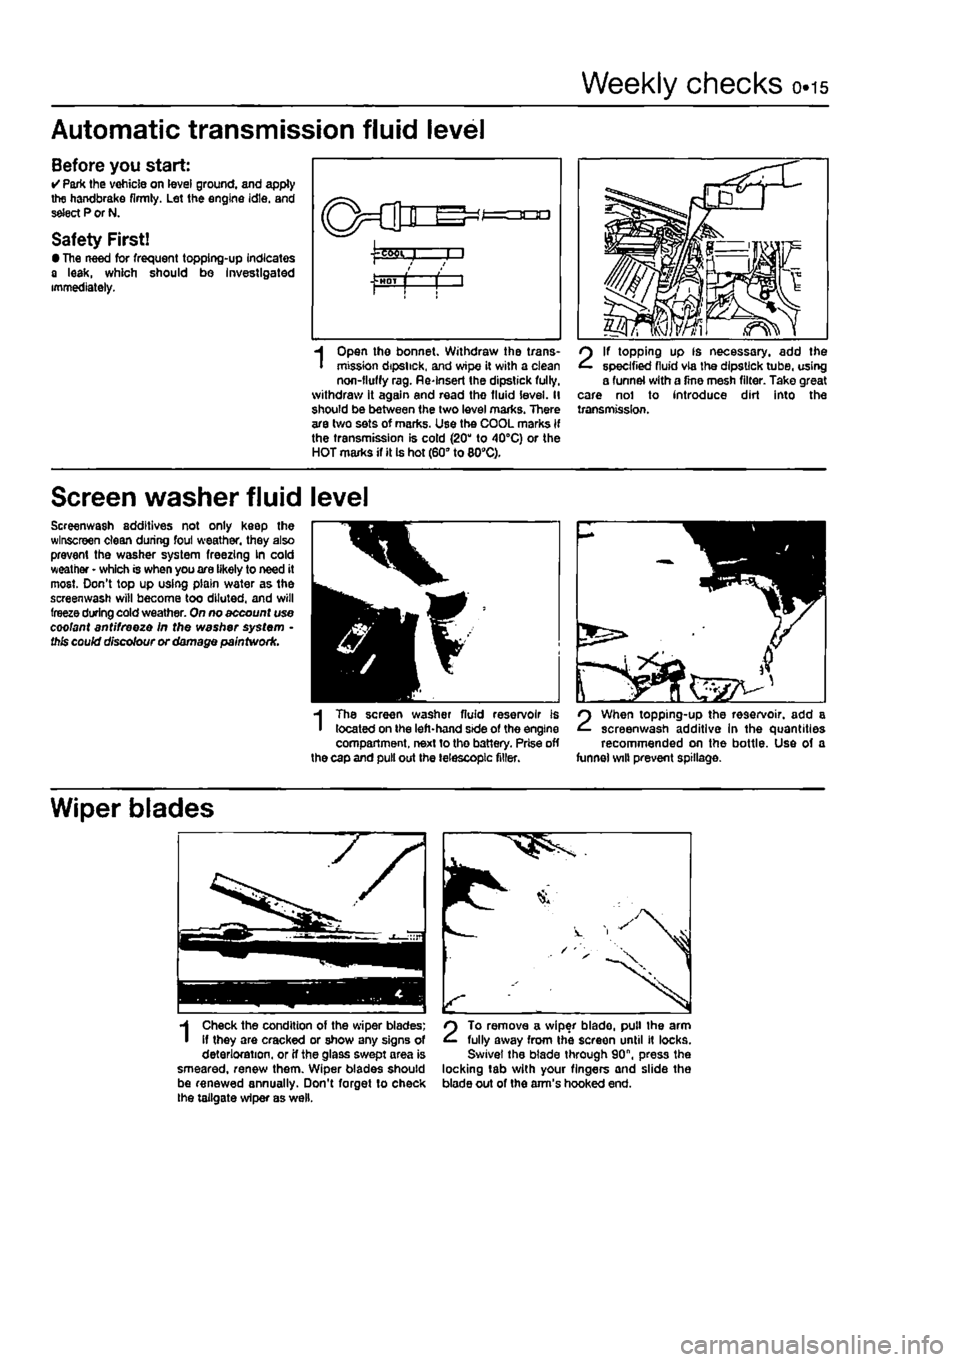
Before you start: • Park the vohicle on level ground, and apply the handbrake firmly. Let the engine idle, and select P or N.
Safety First! • The need for frequent topping-up indicates a leak, which should bo Investigated immediately.
I
Open the bonnet. Withdraw the trans-mission dipstick, and wipe it with a clean non-fluffy rag. Re-Insert the dipstick fully, withdraw it again and read the fluid level. II should be between (he two level marks. There are two sets of marks. Use the COOL marks if the transmission is cold (20" to 40°C) or the HOT marks if it Is hot (60" to 809C).
2
If topping up fs necessary, add the specified fluid via the dipstick tube, using a funnel with a fine mesh filter. Take great care nol to introduce dirt into the transmission.
Screen washer fluid level
Screenwash additives not only keep the wlnscreen clean during foul weather, they also prevent the washer system freezing kn cold weather • which is when you are likely to need it most. Don't top up using plain water as the screenwash will become too diluted, and will freeze during cold weather. On no account use coolant antifreeze In the washer system • this could discolour or damage paintwork.
3H
m
I
The screen washer fluid reservoir is located on the left-hand side of the engine compartment, next to the battery. Prise off the cap and pull out the telescopic filler.
2
When topping-up the reservoir, add a screenwash additive In the quantities recommended on the bottle. Use of a funnel wilt prevent spillage.
Wiper blades
1
Check the condition of the wiper blades; if they are cracked or show any signs of deterioration, or if the glass swept area is smeared, renew them. Wiper blades should be renewed annually. Don't forget to check the tailgate wiper as well.
2
To remove a wiper blade, pull the arm fully away from the screen until It locks. Swivel the blade through 90", press the locking tab with your fingers and slide the blade out of the arm's hooked end.
Page 21 of 225
ia.2 Servicing specifications - petrol models
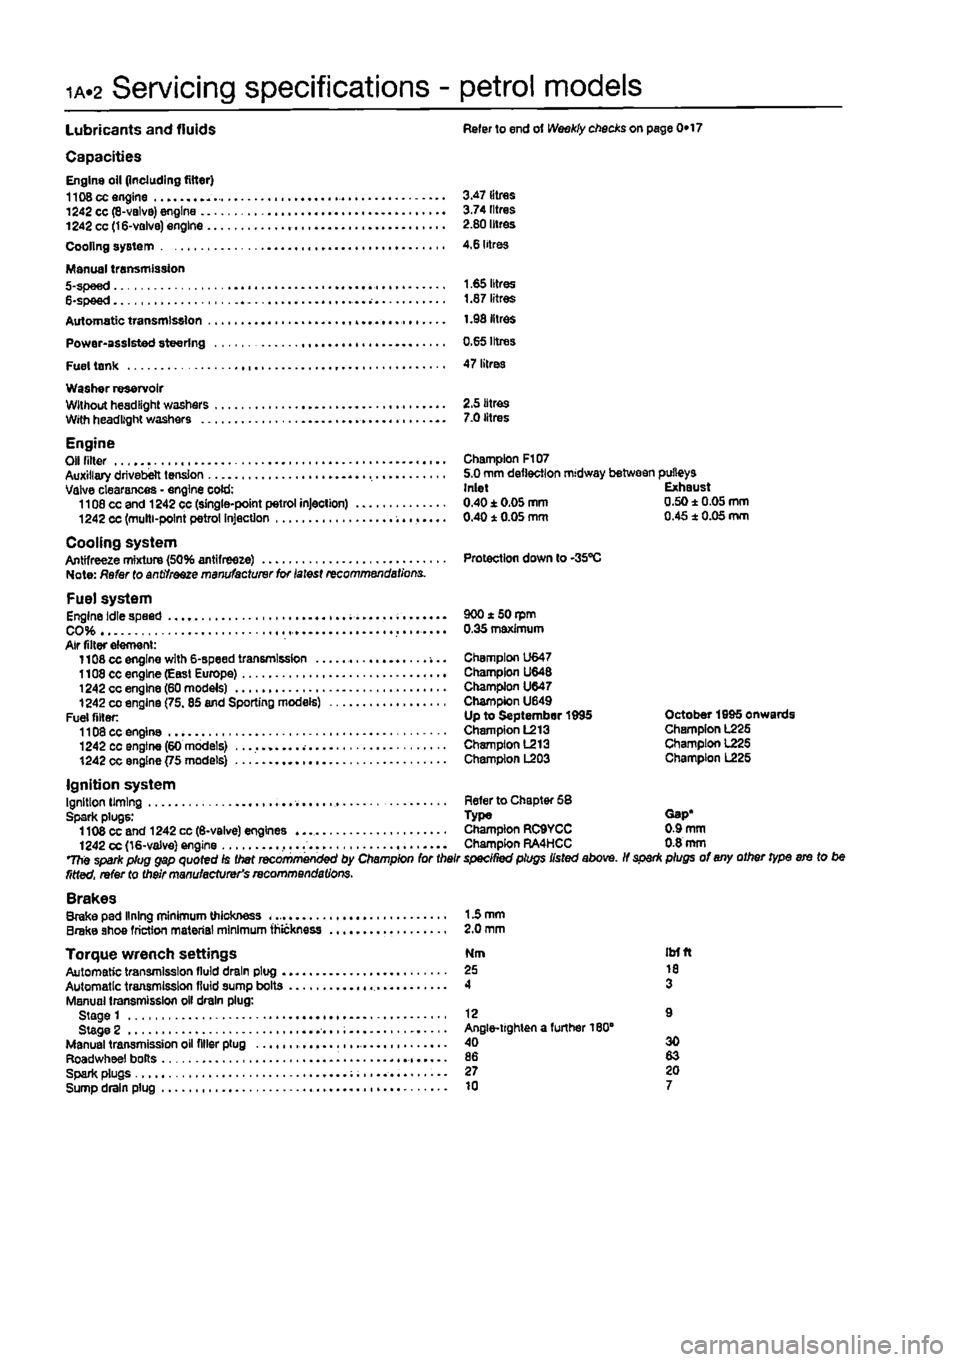
Lubricants and fluids Refer to end ot Weekly checks on page 0*17
Capacities Engine oil (including filter) 1108 cc engine 3.47 litres 1242 cc (8-valvB) engine 3.74 litres 1242 cc (16-valve) engine 2.80 litres Cooling system 4,6 litres
Manual transmission 5-spee d 1.65 litres 6-spee d 1.87 litres Automatic transmission 1.98 litres Power-assisted steering 0.65 Irtres Fuel tank 47 litres Washer reservoir Wllhouthesdllghl washers 2.5 litres With headlight washers 7.0 litres
Engine Olf niter - Champion F107 Auxiliary drivebelt tension 5.0 mm deflection midway between pulleys Valve clearances - engine cold: Inlet Exhaust 1108 cc and 1242 cc (single-point petrol injection) 0.40±0.05mm 0.50±0.05mm 1242 cc (multi-point petrol Injection 0.40 1 0.05 mm 0.45 1 0.05 mm
Cooling system Antifreeze mixture (50% antifreeze) Protection down to -35"C Note: Refer to antifreeze manufacturer for latest recommendations.
Fuel system Engine idle speed . 900 * 50 rpm CO 0.35 maximum Air filter element: 1108 cc engine with 6-speed transmission -... Champion U647 1108 cc engine (Easl Europe) Champion U648 1242 cc engine (60 models) Champion U647 1242
CO
engine (75.85 and Sporting models) Champion U649 Fuel filler: Up to September 1995 October 1995 onwards 1108 cc engine Champion L213 Champion L225 1242 cc engine (60 models) Champion L213 Champion 1225 1242 cc engine {75 models) Champion L203 Champion L225
Ignition system Ignition liming Refer to Chapter 58 Spark plugs: Type Gap* 1108 cc and 1242 cc (6-valve) engines Champion RC9YCC 0.9 mm 1242 cc (16-valve) engine ,... Champion RA4HCC 0.8 mm The spark plug gap quoted Is Diet recommenced by Champion for their specined plugs listed above. If spar* plugs of any other type ere to be fitted, refer to their manufacturer's recommendations. Brakes Brake pad lining minimum thickness 15 mm Brake shoe friction material minimum thickness 2.0 mm
Torque wrench settings Nm itrfft Automatic transmission lluld drain plug 25 10 Automatic transmission fluid sump bolts 4 3 Manual transmission oil drain plug: Stage 1 12 9 Stage 2 Angle-lighten a further 180" Manual transmission oil filler plug 40 30 Roadwheel bolts 86 83 Spark plugs 27 20 Sump drain plug 10 7
Page 23 of 225
ia«4 Component location - petrol models
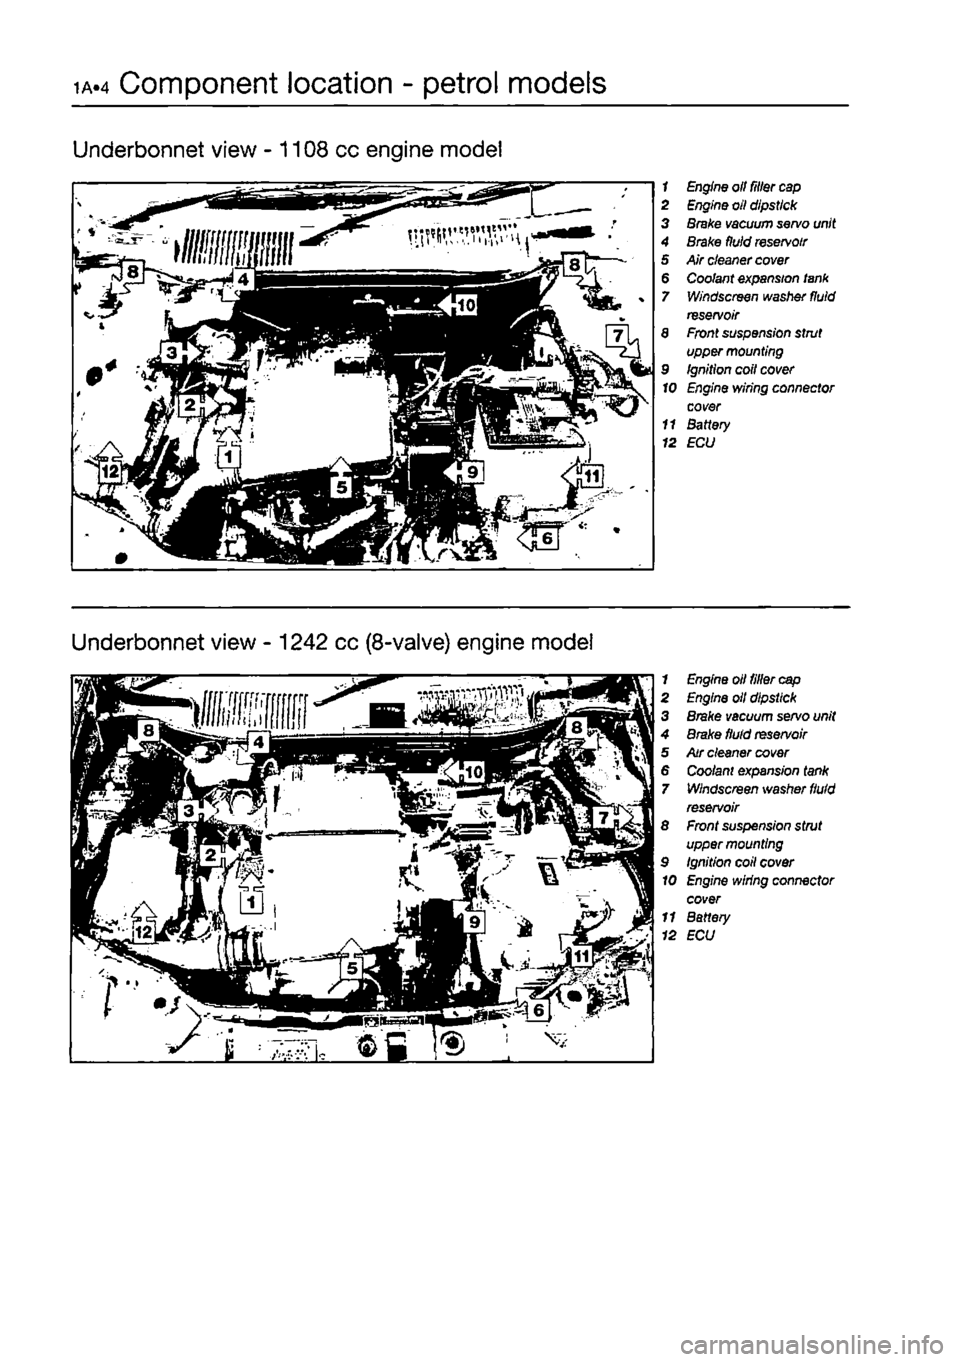
Underbonnet view -1108 cc engine model
1 Engine oil filler
cap
2 Engine oil dipstick 3 Brake vacuum servo unit 4 Brake fluid
reservoir
5 Air cleaner
cover
6 Coolant expansion lank 7 Windscreen washer fluid reservoir 8 Front suspension strut upper mounting 9 Ignition coil cover 10 Engine wiring connector cover 11 Battery 12 ECU
Underbonnet view - 1242 cc (8-valve) engine model
1 Engine oil tiller
cap
2 Engine oil dipstick 3 Brake vacuum servo unit 4 Brake fluid
reservoir
5 Air cleaner cover 6 Coo/ant expansion tank 7 Windscreen washer
fluid
reservoir 8 Front suspension strut upper mounting 9 Ignition coil cover 10 Engine wiring connector cover 11 Battery 12 ECU
Page 24 of 225
Component location - petrol models 1A.5
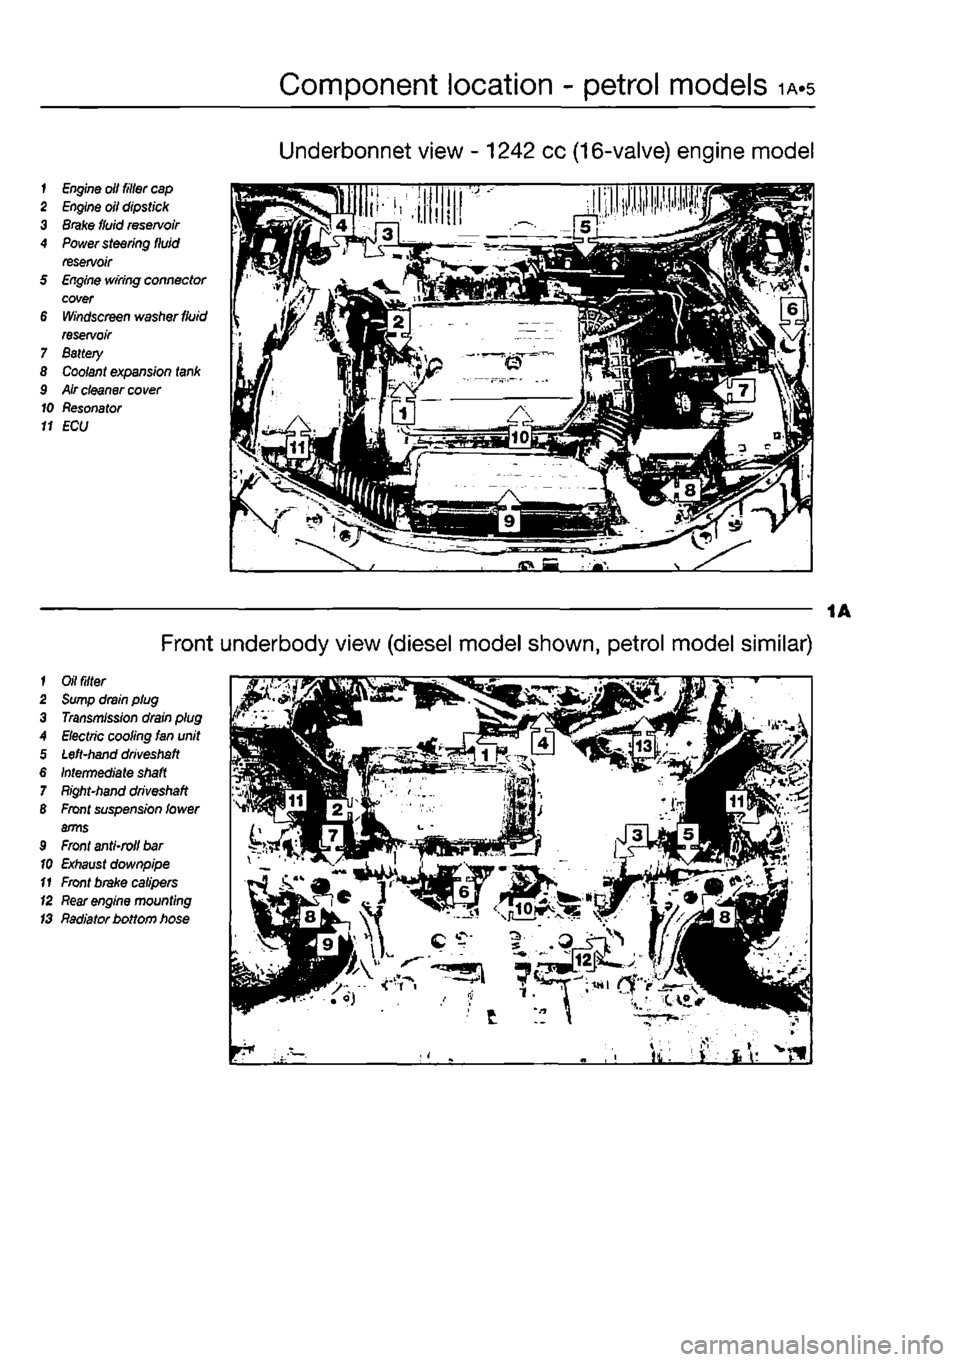
Underbonnet view - 1242 cc (16-valve) engine model
1
Engine
olt filler
cap
2
Engine
oil dipstick 3
Brake
fluid
reservoir
4
Power
steering fluid reservoir 5
Engine
wiring connector cover 6
Windscreen
washer
fluid
reservoir 7 Battery 8
Coolant
expansion
tank
9 Air cleaner
cover
10 Resonator 11 ECU
1
Oil filter
2
Sump
drain plug 3
Transmission
drain plug A
Electric
cooling Ian unit 5
Left-hand driveshaft
6
Intermediate shaft
7
Right-hand driveshaft
B
Front
suspension lower arms 9
Front
anti-roll
bar
10
Exhaust
downpipe 11
Front
brake calipers (2
Rear engine
mounting IS Radiator bottom hose
Front underbody view (diesel model shown, petrol model similar)
Page 36 of 225
Every 2 years - petrol models ia.i?
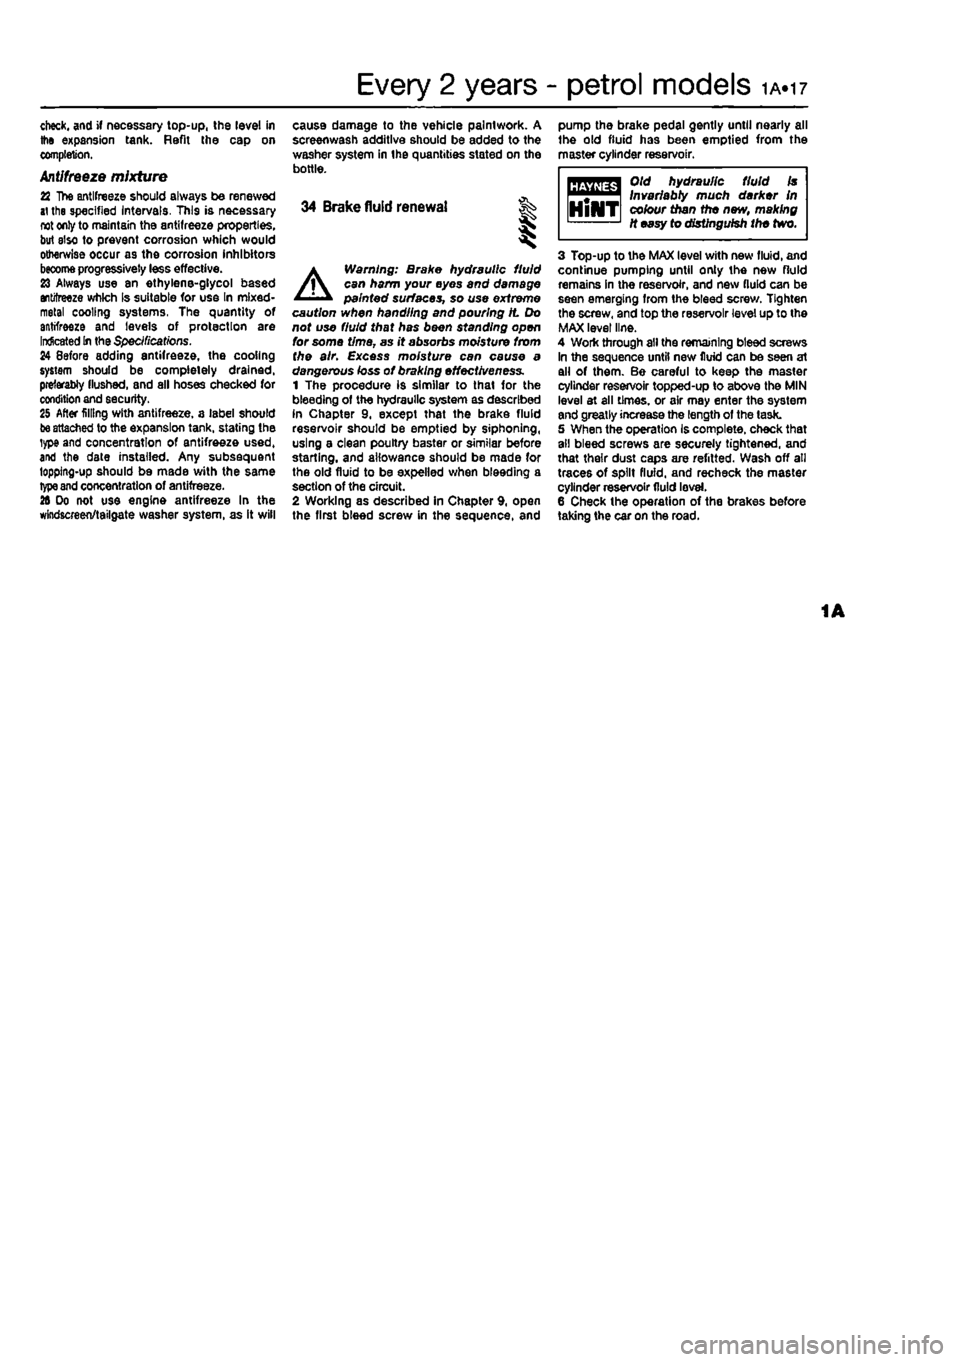
check, and if necessary top-up, the level in the expansion tank. Refit the cap on completion. Antifreeze mixture 22 The antifreeze should always be renewed at the specified Intervals. This is necessary not only to maintain the antifreeze properties, but also to prevent corrosion which would otherwise occur as the corrosion inhibitors
beoome
progressively less effective. 23 Always use an ethylene-glycol based antifreeze which Is suitable for use In mixed-metal cooling systems, The quantity of antifreeze and levels of protection are
Indicated In
the Specifications. 24 8efore adding antifreeze, the cooling system should be completely drained, preferably flushed, and all hoses checked for condition and security. 25 After filling with antifreeze, a label should
be attached
to the expansion tank, stating the type and concentration of antifreeze used, and the date installed. Any subsequent lopping-up should be made with the same
type and
concentration of antifreeze. 26 Do not use engine antifreeze In the windscreen/tailgate washer system, as it will
cause damage to the vehicle paintwork. A screenwash additive should be added to the washer system in the quantities stated on the bottle.
34 Brake fluid renewal | I
A
Warning: Brake hydraulic fluid can harm your eyes and damage painted surfaces, so use extreme caution when handling and pouring H. Do not use fluid that has been standing open for some t/me, as it absorbs moisture from the air. excess moisture can cause a dangerous ioss of braking effectiveness. 1 The procedure is similar to that for the bleeding of the hydraulic system as described in Chapter 9, except that the brake fluid reservoir should be emptied by siphoning, using a clean poultry baster or similar before starting, and allowance should be made for the old fluid to be expelled when bleeding a section of the circuit. 2 Working as described In Chapter 9, open the first bleed screw in the sequence, and
pump the brake pedal gently until nearly all the old fluid has bsen emptied from the master cylinder reservoir.
Old hydraulic fluid Is Invariably much darker In colour than the new, making It easy to distinguish the two.
3 Top-up to the MAX level with new fluid, and continue pumping until onty the new fluid remans in the reservoir, and new fluid can be seen emerging from the bleed screw. Tighten the screw, and top the reservoir level up to the MAX level line. 4 Work through all the remaining bleed screws in the sequence until new fluid can be seen at all of them. Be careful to keep the master cylinder reservoir topped-up to above the MIN level et all times, or air may enter the system and greatly increase the length of the task. 5 When the operation Is complete, check that all bleed screws are securely tightened, and that their dust caps are refitted. Wash off all traces of spilt fluid, and recheck the master cylinder reservoir fluid level. 6 Check the operation of the brakes before taking the car on the road.
1A
Page 38 of 225
1B.2
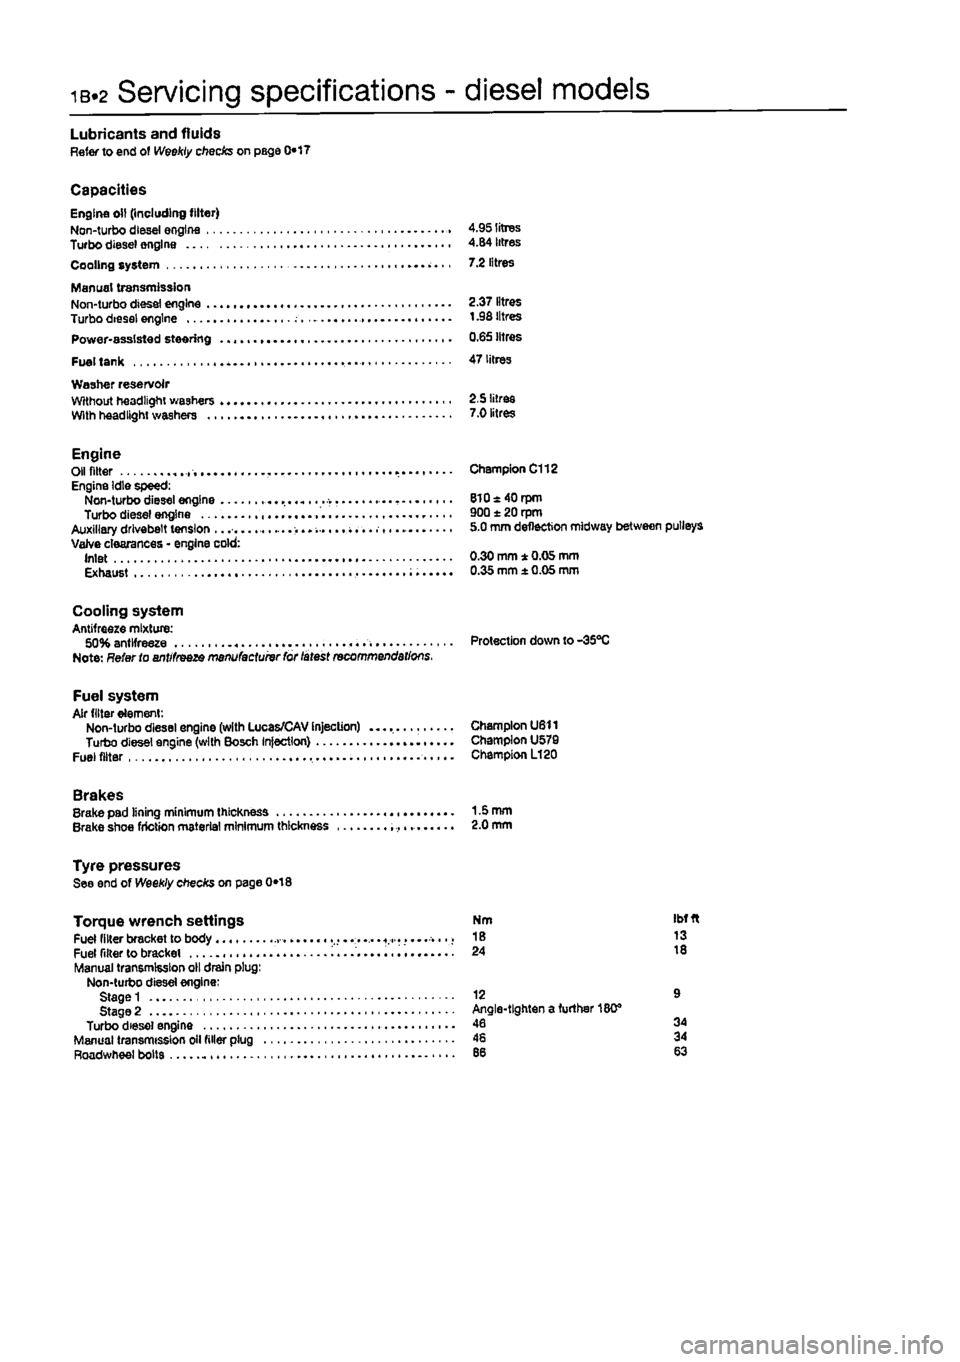
Servicing specifications - diesel models
Lubricants and fluids Refer to end of Weekly checks on page 0*17
Capacities Engine oil (including filter) Non-turbo diesei engine 4.95 litres Turbo diesel engine 4.84 litres Cooling system 7.2 litres
Manual transmission Non-turbo diesel engine 2.37 litres Turbo diesei engine t .98 litres Power-assisted steering 0.65 litres
Fuel tank 47 litres Washer reservoir Without headlight washers 2.5 litres With headlight washers 7.0 litres
Engine Oil fitter Engine Idle speed: Non-turbo diesel engine Turbo diesel engine Auxiliary drivebelt tension ...... Valve clearances • engine cold: Inlet Exhaust
Champion C112
8l0«40rpm 900 ± 20 rpm 5.0 mm deflection midway between pulleys
0.30 mm * 0.05 mm 0.35 mm ± 0.05 mm
Cooling system Antifreeze mixture: 50% antifreeze Protection down to-35°C Note: Refer to antifreeze manufactuivr for latest recommendations.
Fuel system Air filter element: Non-turbo diesel engine (with Lucas/CAV Injection) Champion U611 Turbo diesel engine (with Bosch Injection) Champion U579 Fuel filter Champion L120
Brakes Brake pad lining minimum thickness 1-5 mm Brake shoe friction material minimum thickness 2.0 mm
Tyre pressures See end of Weekly checks on page 0*18
Torque wrench settings Fuel filter bracket to body ..... « Fuel filter to bracket i........ Manual transmission oil drain plug: Non-turbo diesel engine: Stage 1 Stage 2 Turbo diesel engine Manual transmission oil filler plug Roadwheel bolts
Nm Ibfft 18 13 24 18
12 9 Angle-tighten a further 180® 46 34 46 34
Page 40 of 225
ib-4 Component location - diesel models
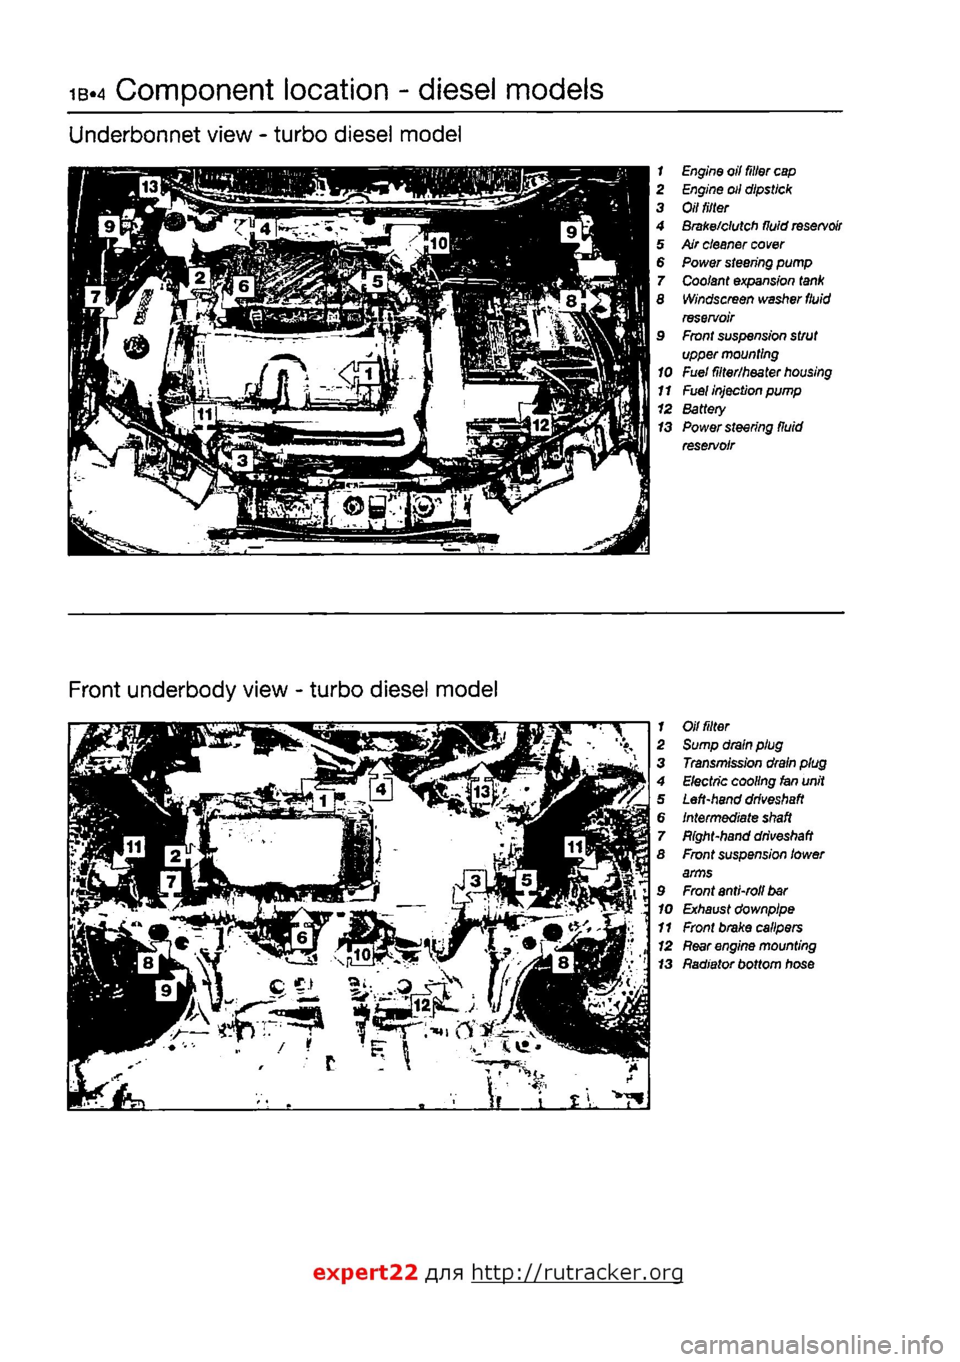
Underbonnet view - turbo diesel model
1 Engine oil filter
cap
2 Engine oil dipstick 3 Oil
tilter
4 Brake/clutch fluid
reservoir
5 Air cleaner
cover
6 Power steering pump 7 Coolant expansion
tank
8 Windscreen washer
fluid
reservoir 9 Front suspension strut upper mounting 10 Fuel filter/heater
housing
11
Fuel
injection pump 12 Battery 13 Power steering fluid reservoir
Front underbody view - turbo diesel model
1 Oil
fitter
2 Sump drain plug 3 Transmission drain plug 4 Electric cooling fan unit 5 Left-hand
driveshaft
6 Intermediate
shaft
7 Bight-hand
driveshaft
8 Front suspension lower arms 9 Front anti-roll
bar
10 Exhaust downpipe 11 Front brake calipers 12
Rear
engine mounting 13 Radiator bottom hose
expert22 fl/ia http://rutracker.org