spark FIAT PUNTO 1999 176 / 1.G User Guide
[x] Cancel search | Manufacturer: FIAT, Model Year: 1999, Model line: PUNTO, Model: FIAT PUNTO 1999 176 / 1.GPages: 225, PDF Size: 18.54 MB
Page 31 of 225
1A.12
Every 20 000 miles - petrol models
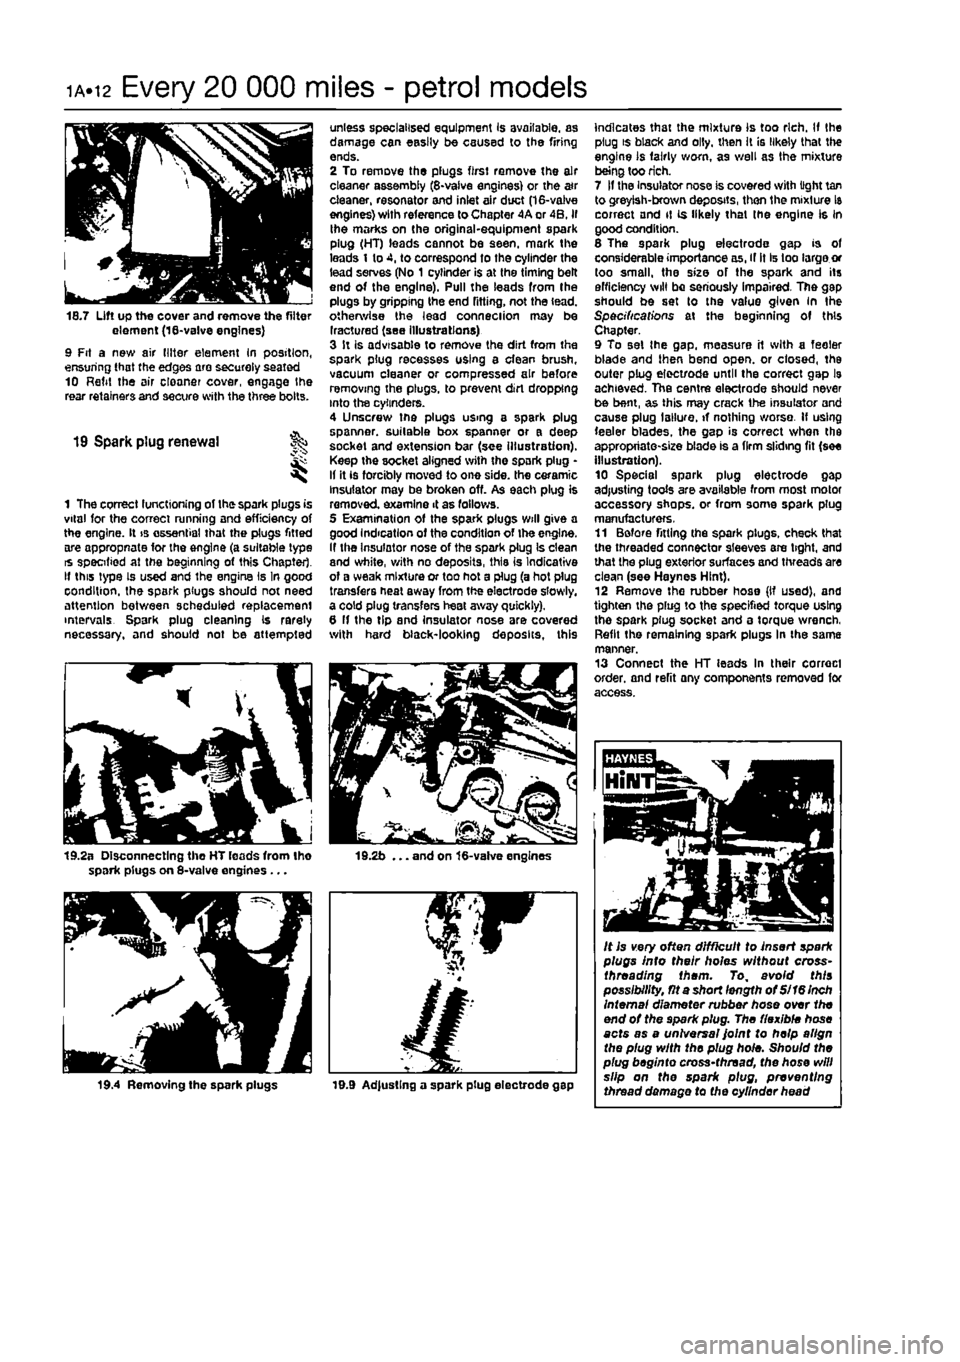
18.7 Lift up the cover and remove the filter element (18-va!ve engines) 9 Fit a new air (liter element In position, ensuring that the edges are securely seated 10 Refit the air cloaner cover, engage the rear retainers and secure with the three bolts.
19 Spark plug renewal
1 The correct functioning of the spark plugs is vital for the correct running and efficiency of the engine. It is essential that the plugs fitted are appropnate for the engine (a suitable type is specified at the beginning of this Chapter. If this type is used and the engine Is In good condition, the spark plugs should not need attention between scheduled replacement intervals Spark plug cleaning Is rarely necessary, and should not be attempted
19.2a Disconnecting tho HT leads from Iho spark plugs on 8-valve engines ...
19.4 Removing the spark plugs
unless specialised equipment Is available, as damage can easily be caused to the firing ends. 2 To remove the plugs first remove the air cleaner assembly (8-vaive engines) or the a»r cleaner, resonator and inlet air duct (16-valve engines) with reference to Chapter 4A or 4B. if the marks on the original-equipment spark plug (HT) leads cannot be seen, mark the leads 1 to 4, to correspond to the cylinder the lead serves (No 1 cylinder is at the timing belt end of the engine). Pull the leads from the plugs by gripping the end fitting, not the lead, otherwise the lead conneciion may be Iractured (see illustrations) 3 It is advisable to remove the dirt from the spark plug recesses using a clean brush, vacuum cleaner or compressed air before removing the plugs, to prevent dirt dropping into the cylinders. 4 Unscrew the plugs using a spark plug spanner, suitable box spanner or a deep socket and extension bar (see illustration). Keep the socket aligned with the spark plug • If it is forcibly moved to one side, the ceramic insulator may be broken off. As each plug is removed examine 4 as fallows. 5 Examination of the spark plugs will give a good Indication of the condition of the engine. If the Insulator nose of the spark plug Is clean and white, with no deposits, this is Indicative of a weak mixture or too hot a plug (a hot plug transfers heal away from the electrode slowly, a cold plug transfers heat away quickly). 6 If the tip and insulator nose are covered with hard black-looking deposits, this
19.2b ... and on 16-valve engines
19.9 Ad|ustlng a spark plug electrode gap
indicates that the mixture Is too rich. If the plug is black and oily, then It is likely that the engine is fairly worn, as well as the mixture being too rich. 7 If the Insulator nose is covered with light tan to greyish-brown deposits, then the mixture Is correct and it is likely that (he engine Is in good condition. 6 The spark plug electrode gap is of considerable importance as, if it Is too large or too small, the size of the spark and its efficiency will be seriously impaired. The gap should be set to the value given in the Specifications at the beginning of this Chapter. 9 To set the gap. measure it with a feeler blade and then bend open, or closed, the outer plug elect/ode until the correct gap l9 achieved. The centre electrode should never be bent, as this may crack the insulator and cause plug I allure, if nothing worse. If using feeler blades, the gap is correct when the appropriate-size blade is a firm sliding fit (see illustration). 10 Special spark plug electrode gap adjusting tools are available from most motor accessory shops, or from some spark plug manufacturers, 11 Before fitting the spark plugs, check that the threaded connector sleeves are tight, and that the plug exterior surfaces and threads are clean (see Haynes Hint). 12 Remove the rubber hose (If used), and tighten the plug to the specified torque using the spark plug socket and a torque wrench, Refit the remaining spark plugs In the same manner. 13 Connect the HT leads In their correct order, and refit any components removed for access.
It is very often difficult to insert spark plugs into their holes without cross-threading them. To, avoid this possibility, fit a short length of Si 16 Inch Internal diameter rubber hose over the end of the spark plug. The flexible hose acts as a universal Joint to help align the plug with the plug hole. Should the plug beginto cross-thread, the hose will slip on the spark plug, preventing thread damage to the cylinder head
Page 32 of 225
Every 20 000 miles - petrol models 1A.13
20 Ignition system check
81
21 Engine management system check
A
Warning: Voltages produced by an electronic ignition system are considerably higher than those produced by conventional ignition systems. Extreme care must be taken when working on the system with the Ignition switched on. Persons with surgically-Implanted cardiac pacemaker devices should keep well clear of the ignition circuits, components and test oquipment. 1 The ignition system components should be checked for damage or deterioration as follows.
General component check 2 The spark plug (HT) leads should be checked whenever new spark plugs are fitted. 3 Pull the leads from the plugs by gripping
the end
fitting, not the lead, otherwise the lead connection may be fractured.
Ensure that the leads are i numbered before removing i them, to avoid confusion when refitting
4 Check Inside the end fitting for signs of corrosion, which will look like a white crusty powder. Push the end fitting back onto the spark plug, ensuring that it is a tight fit on the plug. if not, remove the lead again and use pliers to carefully crimp the metal connector inside the end fitting until it fits securely on the
end
of the spark plug. 5 Using a clean rag, wipe Ihe emlre length of the lead to remove any built-up dirt and grease. Once the lead is clean, check for bums, cracks and other damage. Do not bend the lead excessively, nor pull the lead lengthways - the conductor inside might break. 6 Disconnect the other end of the lead from the ignition coll. Again, pull only on the end fitting. Check for corrosion and a tight fit in the
same
manner as the spark plug end. Refit the bad securely on completion. 7 Check the remaining leads one at a time, in
ihe same
way. 8 if new spark plug (HT) leads are required, purchase a set for your specific car and engine. 9 Even with the ignition system In first-class condition, some engines may still occasionally experience poor starting attributable to damp ignition components. To disperse moisture, a water-dispersant aerosol should be liberally
Ignition timing -
check
and adjustment 10 Check the ignition timing as described In Chapter 58.
1 This check is part of the manufacturer's maintenance schedule, and Involves testing Ihe engine management system using special dedicated test equipment. Such testing will allow the test equipment to read any fault codes stored in the electronic control unit memory. 2 Unless a fault is suspected, this test te not essential, although it should be noted that it is recommended by the manufacturers. 3 If access to suitable test equipment is not possible, make a thorough check of all ignition, fuel and emission control system components, hoses, and wiring, for security and obvious signs of damage. Further details of the fuet system, emission control system and ignition system can be .found In the relevant parts of Chapters 4 and 5.
22 Hinge and lock lubrication %
1
1 Lubricate the hinges of the bonnet, doors and tailgate with a light general-purpose oil. Similarly, lubricate ail latches, locks and lock strikers. At the same time, check the security and operation of all the locks, adjusting them If necessary (see Chapter 11). 2 Lightly lubricate the bonnet release mechanism and cable with a suitable grease.
23 Headlight beam adjustment % & ^
1 Accurate adjustment of the headlight beam is only possible using optical beem-setting equipment, and this work should therefore be carried out by a Fiat dealer or service station with the necessary facilities. In an emergency, however, the following procedure will provide an acceptable light pattern. 2 Position the car on a level surface with tyres correctly inflated, approximately 10 metres in front of. and at right-angles to, a wall or garage door, 3 Draw a horizontal line on the wall or door at headlamp centre height. Draw a vertical line corresponding to the centre line of the car, then measure off a point either side of this, on the horizontal line, corresponding with the headlamp centres. 4 Switch on the main beam and check that the areas of maximum illumination coincide with the headlamp centre marfcs on Ihe wall, if not. turn the adjustment screw located on the upper inside edge of the headlight unit to adjust the beam laterally, and the adjustment screw located on the upper outside edge of the headlight unit to adjust the beam
vertically. On models with electric headlight adjustment, make sure that it is set at its basic setting before making the adjustment.
24 Road test
Instruments and electrical equipment 1 Check the operation of all Instruments and electrical equipment. 2 Make sure that all instruments read correctly, and switch on all electrical equipment in turn, to check that it functions properly.
Steering and suspension 3 Check for any abnormalities in the steering, suspension, handling or road feel. 4 Drive the vehicle, and check that there are no unusual vibrations or noises. 5 Check that the steering feels positive, with no excessive sloppiness, or roughness, and check for any suspension noises when cornering and driving over bumps.
Drivetrain 6 Check the performance of the engine, clutch (where applicable), transmission and driveshafts. 7 Listen for any unusual noises from the engine, clutch and gearbox/transmission. 8 Make sure that the engine runs smoothly when Idling, and that there Is no hesitation when accelerating. 9 Check that, where applicable, the clutch action Is smooth and progressive, that the drive is taken up smoothly, and that the pedal travel is not excessive. Also listen for any noises when the clutch pedal is depressed. 10 On manual gearbox models, check that all gears can be engaged smoothly without noise, and that the gear lever action is not abnormally vsgue or notchy. 11 On automatic transmission models, check that all Ihe gear positions can be selected with the vehicle at rest, if any problems are found, they should be referred to a Flat dealer. 12 Listen for a metallic clicking sound from the front of the vehicle, as the vehicle is driven slowly in a circle with the steering on full-lock. Carry out this check in both directions. If a clicking noise is heard, this Indicates wear in a drtveshaft joint, In which case renew the joint if necessary.
Check the braking system 13 Make sure that the vehicle does not pull to one side when braking, and that the wheels do not lock prematurely when braking hard. 14 Check that there is no vibration through the steering when braking. 15 Check that the handbrake operates correctly without excessive movement of the lever, and that It holds the vehicle stationary on a slope.
Page 53 of 225
2A*10 SOHC (8-valve) petrol engine in-car repair procedures
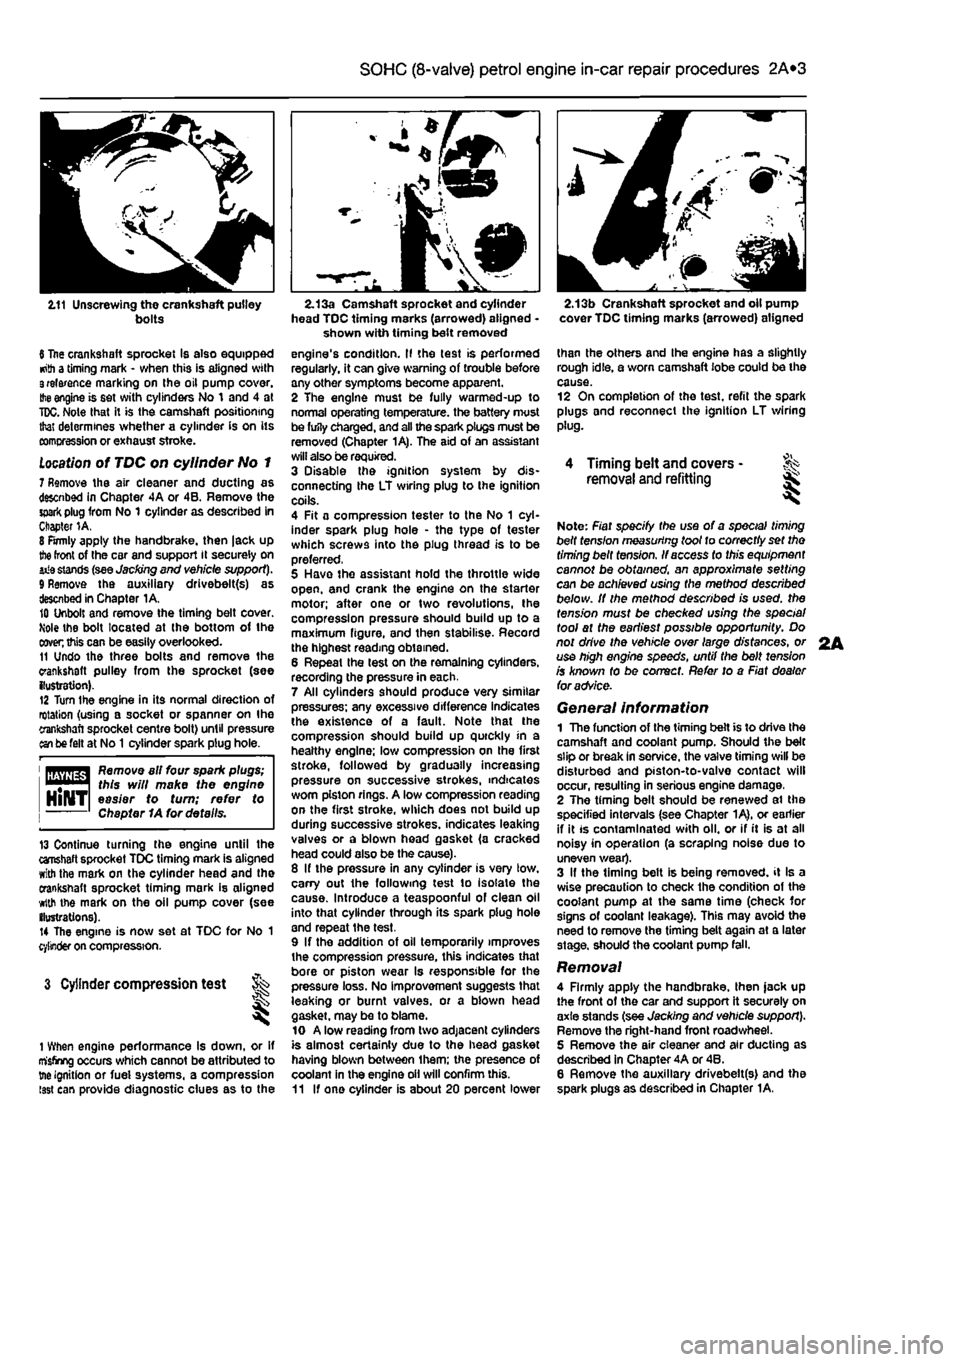
2.11 Unscrewing the crankshaft pulley bolts
6 Itae crankshaft sprocket Is also equipped •nth a timing mark - when this is aligned with 3relarence marking on the oil pump cover.
Hie
engine is set with cylinders No 1 and 4 at
TDC.
Note that it is the camshaft positioning that determines whether a cylinder is on its comcression or exhaust stroke.
Location
of TDC on cylinder No 1 7 Remove the air cleaner and ducting as descnbed in Chapter 4A or 4B. Remove the
spark
plug from No 1 cylinder as described in Chapter 1A. 8 Firmly apply the handbrake, then |ack up
the
front of the car and support it securely on iiia stands (see Jacking end vehicle support). 9 Remove the auxiliary drivebelt(s) as described in Chapter 1A. 10 Unbolt and remove the timing belt cover. Mole the bolt located at the bottom of the
coven
this can be easily overlooked. 11 Undo the three bolts and remove the crankshaft pulley from the sprocket (see {lustration). 12 Turn Ihe engine in its normal direction of rotation (using a socket or spanner on Ihe crankshaft sprocket centre bolt) until pressure an be felt at No
1
cylinder spark plug hole.
1 flfliyflg^ Remove all four spark plugs; "••"•1 this will make the engine HlNTl easier to turn; refer to Chapter 1A for details.
13 Continue turning the engine until the crahaft sprocket TDC timing mark is aligned with the mark on the cylinder head and the crankshaft sprocket timing mark is aligned with the mark on the oil pump cover (see ilustrations). 14 The engine is now set at TDC for No 1 cylinder on compression.
3 Cylinder compression test t ^
1 When engine performance Is down, or if misfiring occurs which cannot be attributed to tne ignition or fuei systems, a compression isst can provide diagnostic clues as to the
2.13a Camshaft sprocket and cylinder head TDC timing marks (arrowed) aligned -shown with timing belt removed engine's condition. II the test is performed regularly, it can give warning of trouble any other symptoms become apparent. 2 The engine must be fully warmed-up to normal operating temperature, the battery must be fufly charged, and all the spark plugs must be removed (Chapter 1A). The aid of an assistant will also be required. 3 Disable the ignition system by dis-connecting the LT wiring plug to the ignition coils. 4 Fit a compression tester to the No 1 cyl-inder spark plug hole - the type of tester which screws into the plug thread is to be preferred, 5 Have the assistant hold the throttle wide open, and crank the engine on the starter motor; after one or two revolutions, the compression pressure should build up to a maximum figure, and then stabilise. Record the highest reading obtained. 6 Repeat the lest on the remaining cylinders, recording the pressure in each. 7 All cylinders should produce very similar pressures; any excessive difference indicates the existence of a fault. Note that the compression should build up quickly in a healthy engine; low compression on the first stroke, followed by gradually increasing pressure on successive strokes, indicates worn piston rings. A low compression reading on the first stroke, which does not build up during successive strokes, indicates leaking valves or a blown head gasket (a cracked head could also be the cause). 8 If the pressure in any cylinder is very low. carry out the following test to isolate the cause. Introduce a teaspoonful of clean oil into that cylinder through its spark plug hole and repeat the test. 9 If the addition of oil temporarily improves the compression pressure, this indicates that bore or piston wear Is responsible for the pressure loss. No improvement suggests that leaking or burnt valves, or a biown head gasket, may be to blame. 10 A low reading from two adjacent cylinders is almost certainly due to the head gasket having blown between them; the presence of coolant in the engine oil will confirm this. 11 If one cylinder is about 20 percent lower
2.13b Crankshaft sprocket and oil pump cover TDC timing marks (arrowed) aligned
than the others and Ihe engine has a slightly rough idle, a worn camshaft lobe could be the cause. 12 On completion of the test, refit the spark plugs and reconnect the ignition LT wiring plug.
4 Timing belt and covers -removal and refitting ^
Note: Fiat specify the use of a special timing belt fens/on measuring toot to correctly set tho timing belt tension. If access to this equipment cannot be obtained, an approximate setting can be achieved using the method described below. It the method described is used, the tension must be checked using the special tool at the earliest possible opportunity. Do not drive the vehicle over large distances, or use high engine speeds, until the belt tension is known fo be correct. Refer to a Fiat dealer foradvSce.
General information 1 The function of the timing belt is to drive Ihe camshaft and coolant pump. Should the belt slip or break In service, the valve timing will be disturbed and piston-to-valvo contact will occur, resulting in serious engine damage, 2 The timing belt should be renewed ai the specified intervals (see Chapter 1A), or earlier if it is contaminated with oil. or if it is at all noisy in operation (a scraping noise due to uneven wear). 3 If the timing belt is being removed, it Is a wise precaution to check the condition of the coolant pump at the same time (check for signs of coolant leakage). This may avoid the need to remove the timing belt again at a later stage, should the coolant pump fall.
Removal 4 Firmly apply the handbrake, then jack up the front of the car and support it securely on axle stands (see Jacking and vehicle support). Remove the right-hand front road wheel. 5 Remove the air cleaner and air ducting as described in Chapter 4A or 46. 6 Remove the auxiliary drivebelt(s) and the spark plugs as described in Chapter 1A.
2A
Page 54 of 225
2A*10 SOHC (8-valve) petrol engine in-car repair procedures
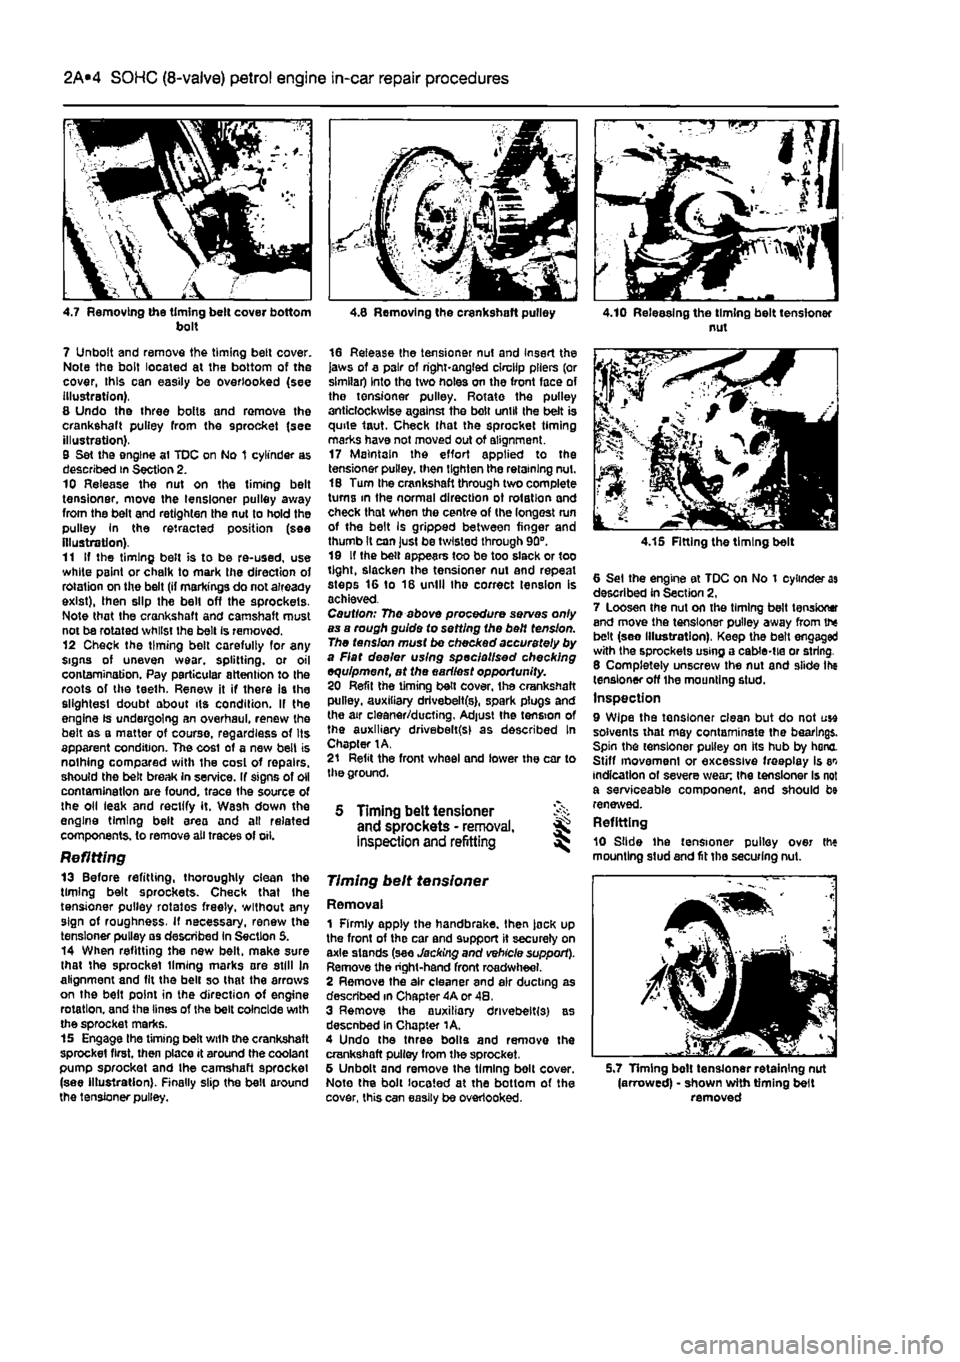
4.7 Removing the timing belt cover bottom bolt
7 Unbolt and remove the timing belt cover. Note the bolt located at the bottom of the cover, this can easily be overlooked (see illustration), 8 Undo the three bolts and remove the crankshaft pulley from the sprocket (see illustration). 9 Set the engine al TDC on No 1 cylinder as described in Section 2. 10 Release the nut on the timing belt tensioner, move the lensloner pulley away from the belt and retighten the nut to hold the pulley In the retracted position (see illustration). 11 If the timing belt is to be re-used, use white paint or chalk to mark the direction of rotation on the belt (if markings do not already exist), then slip the bell off the sprockets-Note that the crankshaft and camshaft must not be rotated whilst the belt Is removed. 12 Check the timing belt carefully for any signs of uneven wear, splitting, or oil contamination. Pay particular attention to the roots of the teeth. Renew it if there is the slightest doubt about its condition. If the engine ts undergoing an overhaul, renew the belt as a matter of course, regardless of Its apparent condition. The cost of a new belt is nothing compared with the cost of repairs, should the belt break in sen/ice. If signs of oil contamination are found, trace the source of the oil leak and rectify it. Wash down the engine timing belt area and alt related components, to remove all traces of oil.
Refitting 13 Before refitting, thoroughly clean the timing belt sprockets. Check that Ihe tensioner pulley rotates freely, without any sign of roughness. If necessary, renew the tensioner pulley as described In Section 5. 14 When refitting the new belt, make sure that the sprocket liming marks ore still In alignment and fit the belt so that the arrows on the belt point in the direction of engine rotation, and the lines of the belt coincide with the sprocket marks. 15 Engage the timing belt wilh the crankshaft sprocket first, then place it around the coolant pump sprocket and the camshaft sprocket (see illustration). Finally slip the bell around the tensioner pulley.
II
4.8 Removing the crankshaft pulley
16 Refease the tensioner nut and Insert the laws of a pair of right-angled clmilp pliers (or similar Into the two holes on the front face of the tensioner pulley. Rotate the pulley anticlockwise against the belt until the belt is quite taut. Check lhat the sprocket timing marks have not moved out of alignment. 17 Maintain the effort apptied to the tensioner pulley, then tighten the retaining nut. 18 Turn the crankshaft through two complete turns in the normal direction ot rotation and check that when the centre of (he longest run of the belt Is gripped between finger and thumb It can Just be twisted through 90°. 19 If the belt appears too be too slack or too fight, slacken the tensioner nut and repeat steps 16 to 18 until the correct tension is achieved. Caution: The above procedure serves only as a rough guide to setting the belt tension. The tension must be checked accurately by a Flat dealer using specialised checking equipment, at the earliest opportunity. 20 Refit the timing belt cover, the crankshaft pulley, auxiliary drivebelt(s>, spark plugs and the air cleaner/ducting. Adjust the tension of the auxiliary drivebelt(sl as described In Chapter 1A. 21 Refit the front wheel and lower the car to the ground.
5 Timing belt tensioner % and sprockets - removal, ^ Inspection and refitting ^
Timing beit tensioner
Removal 1 Firmly apply the handbrake, then jock up the front of the car and support it securely on axle stands (see Jacking and vehicle support). Remove the right-hand front roadwheel. 2 Remove the air cleaner and air ducting as described m Chapter 4A or 48, 3 Remove the auxiliary drivebeltfs) as descnbed In Chapter 1A. 4 Undo the three bolts and remove the crankshaft pulley from the sprocket, 5 Unbolt and remove the timing bolt cover. Note the bolt located at the bottom ot the cover, this can easily be overlooked.
4.10 Releasing the timing belt tensioner nut
4.15 Fitting the timing belt
6 Set the engine at TDC on No 1 cylinder as described In Section 2, 7 Loosen the nut on the timing belt tension* and move the tensioner pulley away from the belt (see Illustration), Keep the belt engaged with the sprockets using a cable-tie or string. 8 Completely unscrew the nut and slide Ihe tensioner off Ihe mounting stud. Inspection 9 Wipe the tensioner clean but do not use solvents that may contaminate the bearings. Spin the tensioner pulley on Its hub by hono. Stiff movement or excessive freeplay is w indication of severe wean the tensioner Is not a serviceable component, and should be renewed. Refitting 10 Slide the tensioner pulley over the mounting stud and fit the securing nut.
S.7 Timing bell tensioner retaining nut (arrowed) - shown with timing belt removed
Page 63 of 225
2B*3 DOHC (16-valve) petrol engine in-car repair procedures
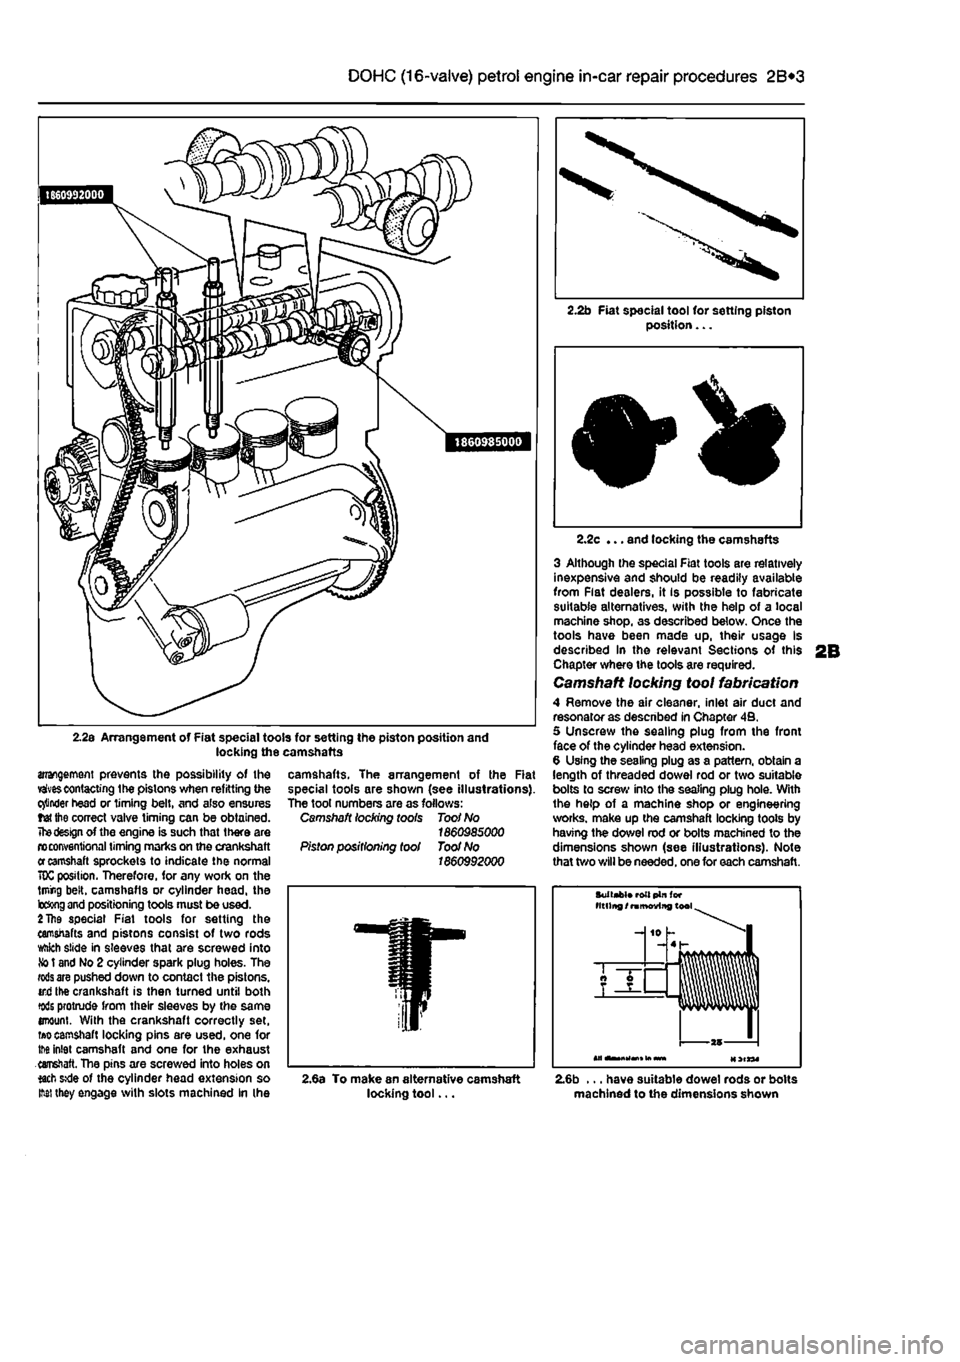
2.2s Arrangement of Fiat special tools for setting the piston position and locking the camshafts
arrangement prevents the possibility of the vaivescontacting the pistons when refitting the cinder head or timing belt, and also ensures tet the correct valve timing can be obtained.
The design
of the engine is such that there are n> conventional timing marks on the crankshaft
er
camshaft sprockets to indicate the normal 70C position. Therefore, for any work on the lining belt, camshafls or cylinder head, the b&ng
and
positioning tools must be used.
2 The
special Fiat tools for setting the camshafts and pistons consist of two rods ttikh slide in sleeves that are screwed into
So
t and No 2 cylinder spark plug holes. The
rods are
pushed down to contact the pistons, ird the crankshaft is then turned until both tods protrude from their sleeves by the same enount. With the crankshaft correctly set,
ti»o
camshaft locking pins are used, one for tM inlet camshaft and one for the exhaust earretaft. The pins are screwed into holes on *ach »de of the cylinder head extension so M they engage with slots machined In (he
2.2b Fiat special tool for setting piston position...
camshafts. The arrangement of the Rat special tools are shown (see illustrations). The tool numbers are as follows: Camshaft locking toots Toot No 1860985000 Piston positioning tool Toot No 1860992000
2.2c ... and locking the camshafts
3 Although the special Fiat tools are relatively inexpensive and should be readily available from Flat dealers, it is possible to fabricate suitable alternatives, with the help of a local machine shop, as described below. Once the tools have been made up, their usage Is described In the relevant Sections of this Chapter where the tools are required. Camshaft locking tool fabrication 4 Remove the air cleaner, inlet air duct and resonator as descnbed in Chapter 4B. 5 Unscrew the sealing plug from the front face of the cylinder head extension. 6 Using the sealing plug as a pattern, obtain a length of threaded dowel rod or two suitable bolts to screw into the sealing plug hole. With the help of a machine shop or engineering works, make up the camshaft locking toots by having the dowel rod or bolts machined to the dimensions shown (see illustrations). Note that two will be needed, one for each camshaft.
Suitabt* roll pin (or titling /
ramoviitg
tool
-J 10 h -4 h
AT —
T
—
2,6a To make an alternative camshaft locking tool... 2.6b ... have suitable dowel rods or bolts machined to the dimensions shown
Page 64 of 225
2B*4 DOHC (16-valve) petrol engine in-car repair procedures
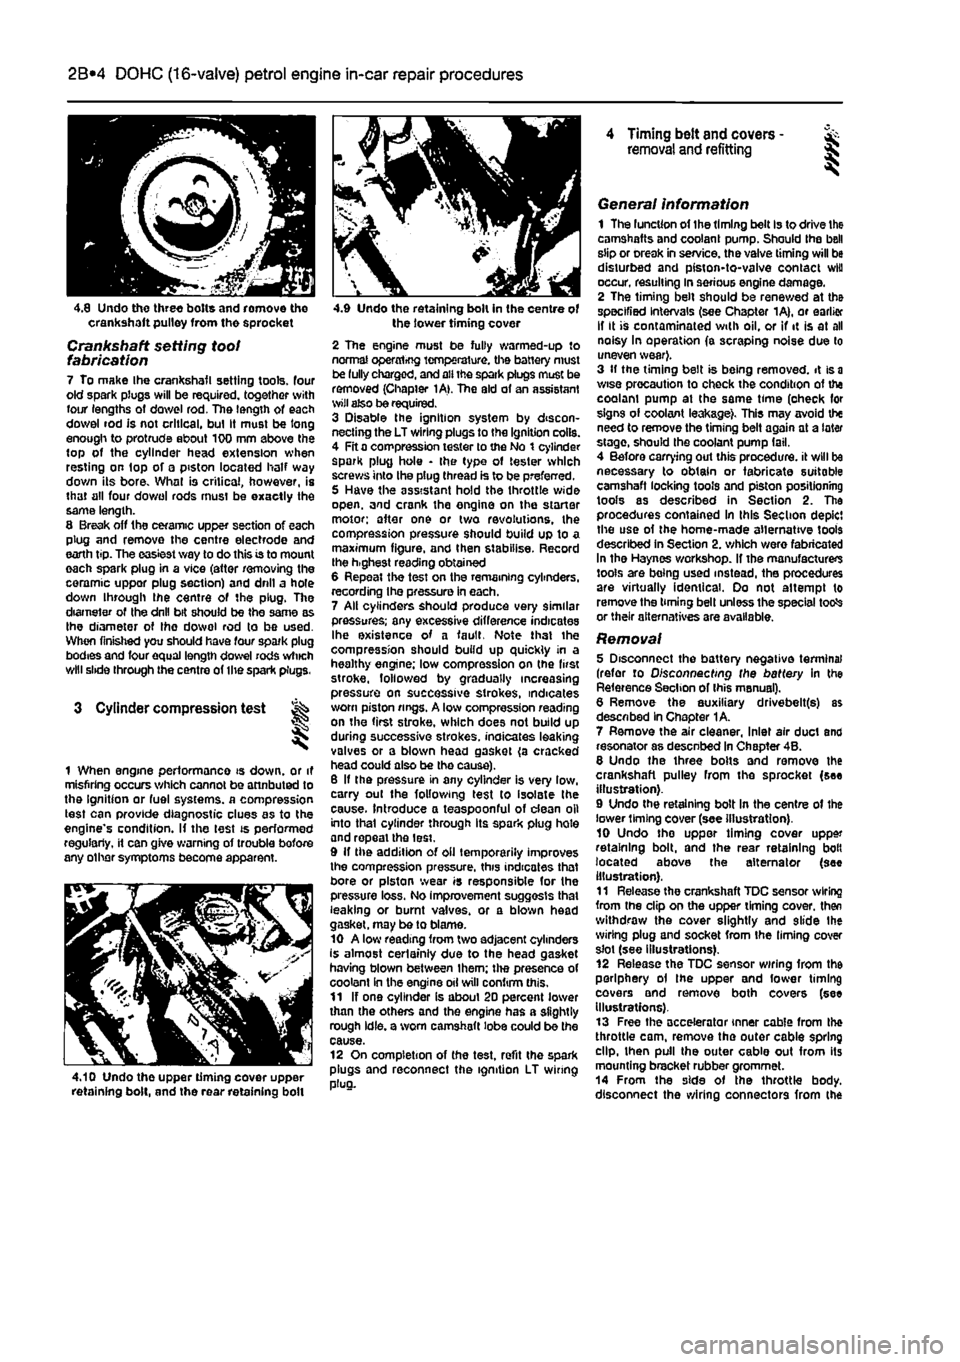
4.8 Undo three bolts and romove tho crankshaft pulley from the sprocket
Crankshaft setting toot fabrication 7 To make Ihe crankshafl setting tools, four old spark plugs will be required, together with four lengths of dowel rod. The length of each dowel rod is not critical, bul It must be long enough to protrude about 100 mm above the top of the cylinder head extension when resting on top of a piston located half way down its bore. What is critical, however, is that all four do wo I rods must be exactly the same length. 8 Break off the ceramic upper section of each plug and remove the centre electrode and earth tip. The easiest way to do this is to mount each spark plug in a vice (attar removing the ceramic uppor plug section) and drill a hole down through ihe centre of the plug. The diameter of Ihe drill bit should be the same as Ihe diameter of Ihe dowol rod to be used. When finished you should have four spark plug bodies and four equal length dowel rods which will slide through the centre of the spark plugs.
3 Cylinder compression test
1 When engine performance is down, or it misfiring occurs which cannot be attnbuted to the Ignition or fuel systems, a compression test can provide diagnostic clues as to the engine's condition. If the lest is performed regularly, it can give warning of trouble bofore any other symptoms become apparent.
4.10 Undo the upper timing cover upper retaining bolt, and the rear retaining boll
4.9 Undo the retaining bolt in the centre of the lower timing cover
2 The engine must be fully warmed-up to normal operxrtrfjg temperature, the battery must be fully charged, and all the spark plugs muse be removed (Chapter 1A>. The aid of an assistant wilt also be required. 3 Disable the ignition system by discon-necting the LT wiring plugs to the Ignition coils. 4 Fit a compression tester to the No t cylinder spark plug hole • the type of tester which screws into the plug thread is to be preferred. 5 Have the assistant hold the throttle wide open, and crank the engine on the starter motor; after one or two revolutions, the compression pressure should build up to a maximum figure, and then stabilise. Record the h.ghest reading obtained 6 Repeat the test on the remaining cylinders, recording Ihe pressure in each. 7 All cylinders should produce very similar pressures; any excessive difference indicates Ihe existence of a fault. Note that the compression should build up quickly in a healthy engine; low compression on (he first stroke, followed by gradually increasing pressure on successive strokes, indicates worn piston rings. A low compression reading on the first stroke, which does not build up during successive strokes, indicates leaking valves or a blown head gasket (a cracked head could also be tho cause). 6 If the pressure in any cylinder is very low, carry out the following test to isolate the cause. Introduce a teaspoonful of dean oil into that cylinder through its spark plug hole and repeal the lest. 9 If the addition of oil temporarily improves the compression pressure, this indicates that bore or piston wear is responsible for the pressure loss. No improvement suggests that leaking or burnt valves, or a blown head gasket, may be to blame. 10 A low reading from two adjacent cylinders is almost certainly due to the head gasket having blown between Ihem; the presence of coolant in the engine oil will confirm this. 11 If one cylinder is about 20 percent lower than the others and the engine has a slightly rough idle, a worn camshaft lobe could be the cause. 12 On completion of the test, refit the spark plugs and reconnect the ignition LT wiring plug.
4 Timing belt and covers -removal and refitting §
General information 1 The luncUon of the timing belt Is to drive the camshafts and coolant pump. Should the bell slip or creak in service, the valve timing will be disturbed and piston-to-valve contact wiu occur, resulting in serious engine damage. 2 The timing belt should be renewed at the specified Intervals (see Chapter 1A), or earlier If It is contaminated with oil, or if it is at all noisy In operation (a scraping noise due to uneven wear}. 3 If the timing belt is being removed, it is
a
wise precaution to check the condition of the coolam pump at the same time (oheck for signs of coolant leakage). This may avoid the need to remove the timing belt again at a later stage, should the coolant pump fail. 4 Before carrying out this procedure, it will be necessary to obtain or fabricate suitable camshaft locking tools and piston positioning tools as described in Section 2. The procedures contained In this Section depict the use of the home-made alternative tools described in Section 2. which were fabricated In the Haynes workshop. If the manufacturers tools are being used instead, the procedures are virtually identical. Oo not attempt to remove the timing bell unless the special totfs or their alternatives are available.
Removal 5 Disconnect the battery negative terminal (refer to Disconnecting the battery in the Reference Section of Ihis manual). 6 Remove the auxiliary drivebelt(s) as described In Chapter 1A. 7 Remove the air cleaner, Inlet air duct and resonator as desenbed In Chapter 4B. 8 Undo the three bolts and remove the crankshaft pulley from the sprocket (see illustration). 9 Undo the retaining bolt In the centre of the lower liming cover (see illustration). 10 Undo tho uppor timing cover upper retaining bolt, and the rear retaining bolt located above the alternator (see illustration). 11 Release the crankshaft TDC sensor wiring from the clip on the upper timing cover, then withdraw the cover slightly and slide Ihe wiring plug and socket from the liming cover slot (see illustrations). 12 Release the TDC sensor wiring from the periphery ol the upper and fower timing covers and remove both covers (see Illustrations). 13 Free the accelerator inner cable from the throttle cam, remove the outer cable spring dip, then pull the outer cable out from its mounting bracket rubber grommet. 14 From the side of the throttle body, disconnect the wiring connectors from the
Page 65 of 225
2B*5 DOHC (16-valve) petrol engine in-car repair procedures
4.11a Release the crankshaft TDC sensor wiring from the clip on the upper timing cover... throttle potentiometer and the Idle control stepper motor. Disconnect the coolant temperature sensor wiring connector located
in
the inlet manifold below the throttle body,
end
disconnect the brake servo vacuum hose. 15 Disconnect the wiring connectors for the fuel injector harness and the intake air temperature/pressure sensor, then fcconnect the fuel pressure regulator vacuum hose and the EVAP purge valve hose. 18 Undo the two bolts securing the plastic mlet manifold upper section to the lower section. Release the spark plug HT lead from the location groove in the manifold upper wctton, then lift the upper section, complete
»ith
throttle body, off the engine. Recover the 0-rngs from the manifold ports. 17 Unscrew the two bolts securing the fuel
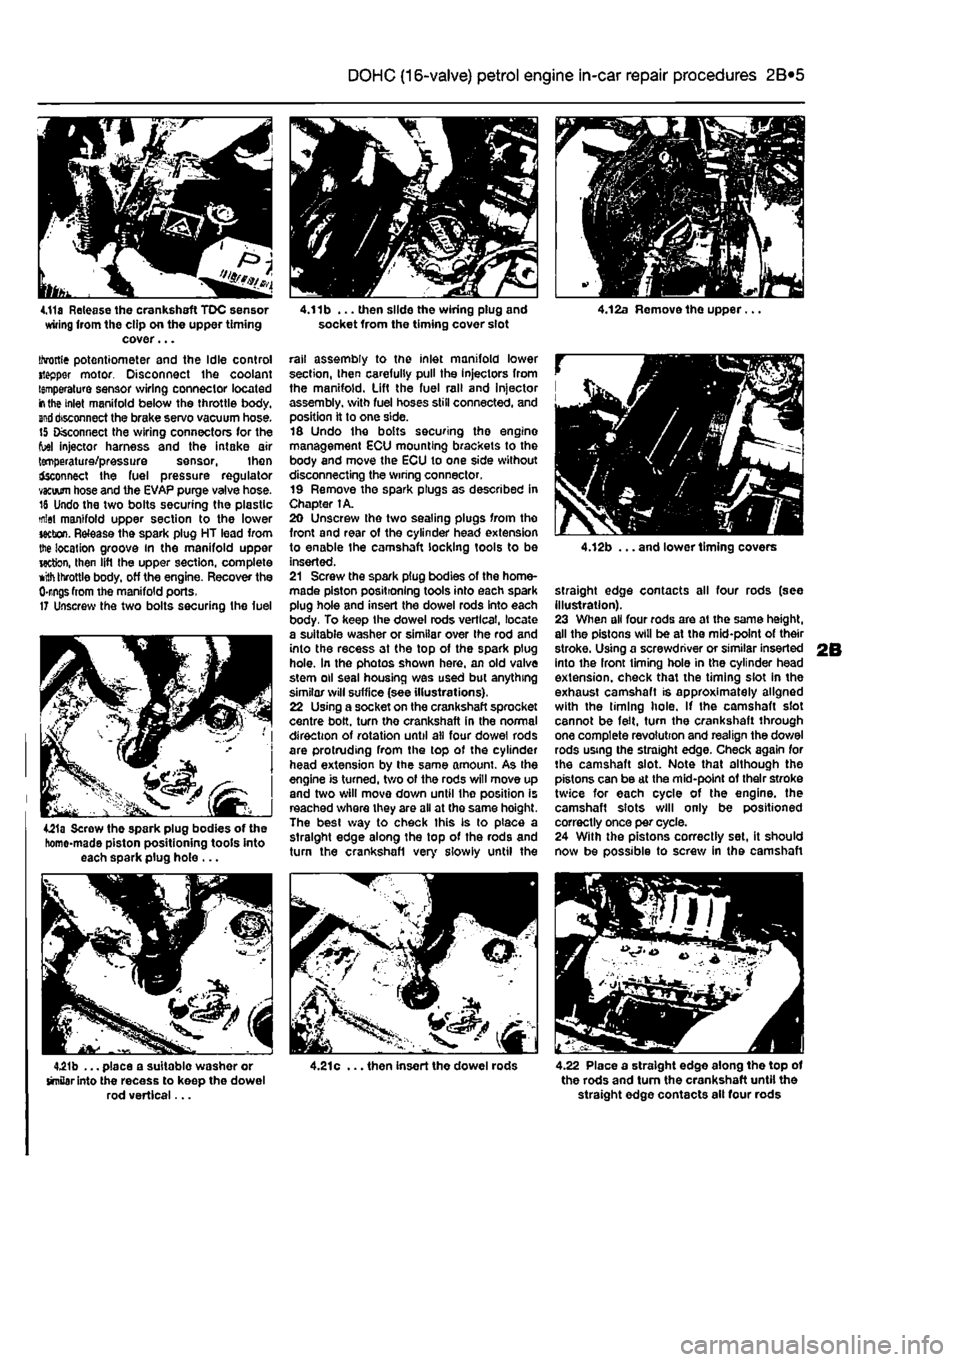
4£1a Screw the spark plug bodies of the homo-made piston positioning tools into each spark plug hole ...
4.21b ... place a suitable washer or similar into the recess to keep the dowel rod vertical...
4.11b ... then slide the wiring plug and socket from the timing cover slot
rail assembly to the inlet manifold lower section, then carefully pull the Injectors from the manifold. Lift the fuel rail and Injector assembly, with fuel hoses still connected, and position it to one side. 16 Undo the bolts securing the engine management ECU mounting brackets to the body and move the ECU to one side without disconnecting the wiring connector. 19 Remove the spark plugs as described in Chapter 1A. 20 Unscrew the two sealing plugs from the front and rear of the cylinder head extension to enable the camshaft locking tools to be inserted. 21 Screw the spark plug bodies of the home-made piston positioning tools into each spark plug hole and insert the dowel rods into each body. To keep the dowel rods vertical, locate a suitable washer or similar over Ihe rod and into the recess at the top of the spark plug hole. In the photos shown here, an old valve stem oil seal housing was used but anything similar will suffice (see illustrations). 22 Using a socket on the crankshaft sprocket centre bolt, turn the crankshaft in the normal direction of rotation until all four dowel rods are protruding from the top of the cylinder head extension by the same amount. As the engine is turned, two of the rods will move up and two will move down until the position is reached where they are all at the same hoight. The best way to check this is to place a straight edge along the top of the rods and turn the crankshafl very slowly until the
4.21c ... then insert the dowel rods
4.12b ... and lower timing covers
straight edge contacts all four rods (see illustration). 23 When all four rods are at the same height, all the pistons will be at the mid-point of their stroke. Using a screwdriver or similar inserted into the front timing hole in the cylinder head extension, check that the timing slot in the exhaust camshaft is approximately aligned with the liming hole. If the camshaft slot cannot be felt, turn the crankshaft through one complete revolution and realign the dowel rods using the straight edge. Check again for the camshaft slot. Note that although the pistons can be at the mid-point of their stroke twice for each cycle of the engine, the camshaft slots will only be positioned correctly once per cycle. 24 With the pistons correctly set, it should now be possible to screw in the camshaft
4.22 Place a straight edge along the top of the rods and turn the crankshaft until the straight edge contacts ail four rods
Page 67 of 225
2B*7 DOHC (16-valve) petrol engine in-car repair procedures
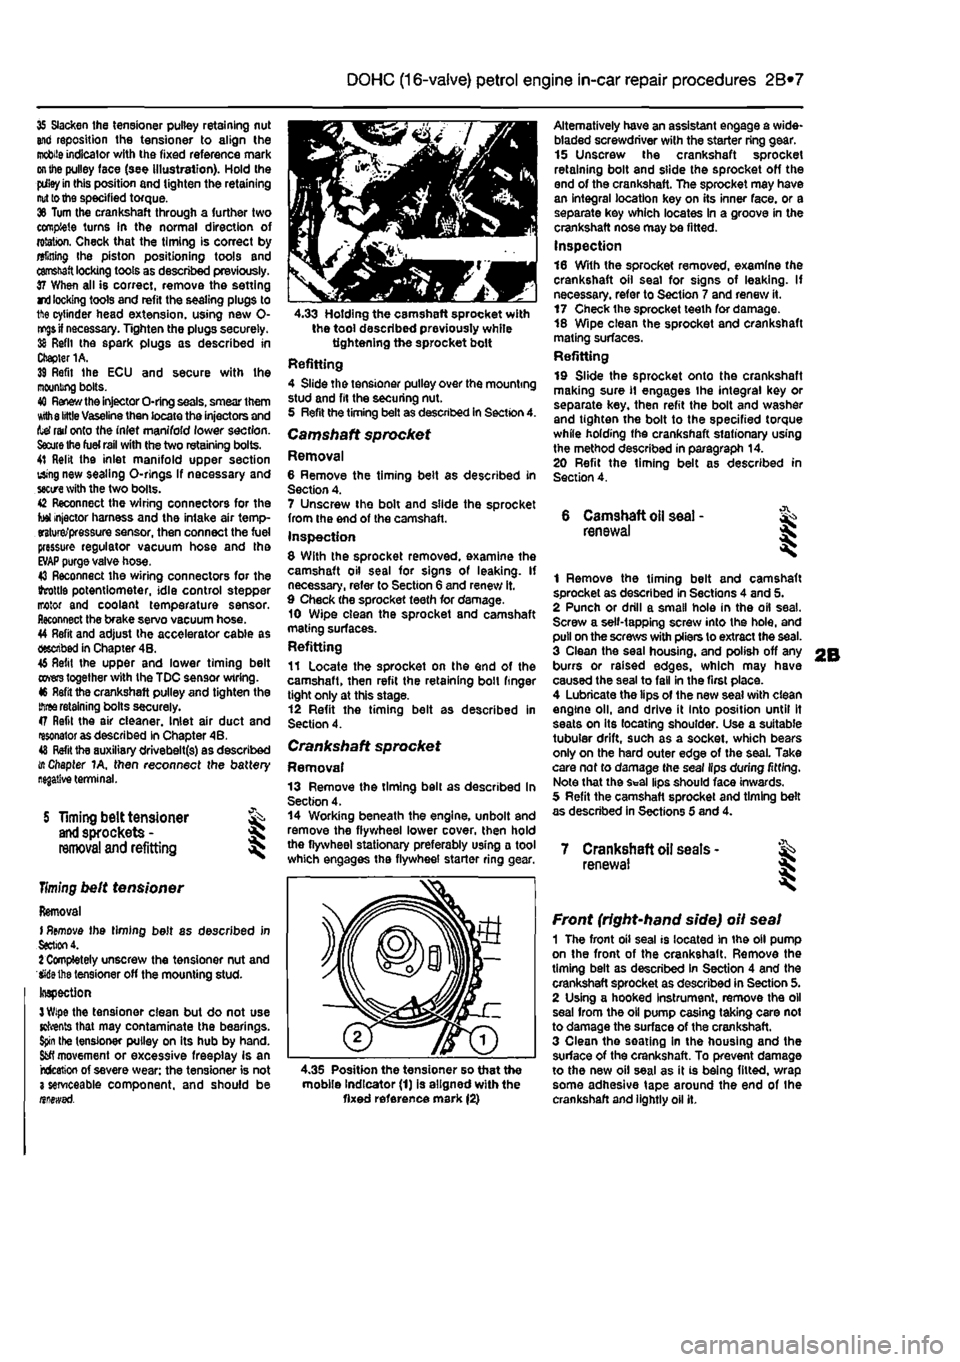
35 Slacken the tensioner pulley retaining nut and reposition the tensioner to align the
mobile
indicator with the fixed reference mark
on the
pulley face (see illustration). Hold the
pdley in
this position and tighten the retaining
nut to the
specified torque. 36 Turn the crankshaft through a further two complete turns In the normal direction of rotation. Check that the timing is correct by alining Ihe piston positioning tools and
camshaft
locking tools as described previously. 37 When all is correct, remove the setting rri
locking
tools and refit the sealing plugs to 1ft© cylinder head extension, using new 0-
nr^s if
necessary. Tighten the plugs securely. 38 Refit the spark plugs as described in Chapter 1A. 39 Refit Ihe ECU and secure with Ihe mooning bolts. 40
Renew the
injector O-ring seals, smear them Kith
8 little
Vaseline then locate the injectors and tef rail onto the inlet manifold lower section.
Saute Ihe fuel rail
with the two retaining bolts. 41 Relit the inlet manifold upper section using new sealing O-rlngs If necessary and
sectre
with the two bolts. 42 Reconnect the wiring connectors for the tot injector harness and the intake air temp-erature/pressure sensor, then connect the fuel pressure regulator vacuum hose and tha
EVAP
purge valve hose. 43 Reconnect the wiring connectors for the ihrottls potentiometer, idle control stepper motor and coolant temperature sensor. Reconnect the brake servo vacuum hose. 44 Refit and adjust the accelerator cable as described in Chapter 4B. 46 Refit the upper and lower timing belt
covers
together with the TDC sensor wiring. 46 Refit the crankshaft pulley and tighten the
three
retaining bolts securely. 47 Refit the air cleaner. Inlet air duct and resonator as described in Chapter 4B. 48
Refit
tha auxiliary drivebelt(s) as described i/t Chapter 1A, then reconnect the battery
S Timing belt tensioner
and
sprockets -
removal
and refitting
Timing
belt tensioner
Removal I
Remove
the timing belt as described in
Section
4. 1 Completely unscrew the tensioner nut and Wiethe tensioner off the mounting stud-Inspection
3 Wipe
the tensioner clean but do not use Kfrents that may contaminate the bearings.
Spin
the tensioner pulley on its hub by hand.
Sfcfl
movement or excessive freeplay is an rcfceticn of severe wear: the tensioner is not 3 serviceable component, and should be nnewsd.
4.33 Holding the camshaft sprocket with the tool described previously while tightening the sprocket bolt Refitting 4 Slide the tensioner pulley over the mounting stud and fit the securing nut. 5 Refit the timing belt as described in Section 4. Camshaft sprocket Removal 6 Remove the timing belt as described in Section 4. 7 Unscrew the bolt and slide the sprocket from the end of the camshaft. Inspection 8 With the sprocket removed, examine the camshaft oil seal for signs of leaking. If necessary, refer to Section 6 and renew it. 9 Check the sprocket teeth for damage. 10 Wipe clean the sprocket and camshaft mating surfaces. Refitting 11 Locate the sprocket on the end of the camshaft, then refit the retaining boll finger tight only at this stage. 12 Refit the timing belt as described in Section 4.
Crankshaft sprocket Removal 13 Remove the timing bell as described In Section 4. 14 Working beneath the engine, unbolt and remove the flywheel lower cover, then hold the flywheel stationary preferably using a tool which engages the flywheel starter ring
<
Alternatively have an assistant engage a wide-bladed screwdriver with the starter ring gear. 15 Unscrew the crankshaft sprocket retaining bolt and slide the sprocket off the end of the crankshaft. The sprocket may have an integral location key on its inner face, or a separate key which locates In a groove in the crankshaft nose may be fitted. Inspection 16 With the sprocket removed, examine the crankshaft oil seal for signs of leaking. If necessary, refer to Section 7 and renew it. 17 Check the sprocket teeth for damage. 18 Wipe clean the sprocket and crankshaft mating surfaces. Refitting 19 Slide the sprocket onto the crankshaft making sure
11
engages the integral key or separate key, then refit the bolt and washer and tighten the bolt to the specified torque while holding the crankshaft stationary using the method described in paragraph 14. 20 Refit the timing belt as described in Section 4.
6 Camshaft
oil
seal -renewal
1 Remove the timing belt and camshaft sprocket as described in Sections 4 and 5. 2 Punch or drill a small hole in the oil seal. Screw a self-tapping screw into the hole, and pull on the screws with pliers to extract the seal. 3 Clean the seal housing, and polish off any burrs or raised edges, which may have caused the seal to fall in the first place. 4 Lubricate the lips of the new seal with clean engine oil, and drive it into position until It seats on its locating shoulder. Use a suitable tubular drift, such as a socket, which bears only on the hard outer edge of the seal. Take care nof to damage the seal lips during fitting. Note that the Seal lips should face inwards. 5 Refit the camshaft sprocket and timing belt as described in Sections 5 and 4.
7 Crankshaft oil seats -renewal I
4.35 Position the tensioner so that the mobile Indicator (1) is aligned with the fixed reference mark (2)
Front (right-hand side) oil seal 1 The front oil seal is located in the oil pump on the front of the crankshaft. Remove the timing belt as described in Section 4 and the crankshaft sprocket as described in Section 5. 2 Using a hooked Instrument, remove the oil seal from the oil pump casing taking care not to damage the surface of the crankshaft. 3 Clean the seating in the housing and the surface of the crankshaft. To prevent damage to the new oil seal as it is being fitted, wrap some adhesive tape around the end of the crankshaft and lightly oil it.
Page 98 of 225
2D*10 Engine removal and overhaul procedures
05 Remove the brush holder assembly from the automatic transmission as described in Chapter 7B, Section 4. The brushes bear on the slip rings at the rear of the electro-magnetic clutch housing and they may be damaged when the transmission is removed. 86 Unscrew and remove the transmission-to-engine bolts then carefully draw the transmission away from the engine, resting It securely on wooden blocks. Collect the locating dowels If they are loose enough to be extracted, 87 If the oil pump driveshaft remains engaged with the crankshaft, remove it and reert Into the transmission to protect It from damage.
Connection 86 If the engine and transmission have not been separated, go to paragraph 104. Manual transmission models 89 Smear a little high-melting-point grease
on
the splines of the transmission input shaft. Do not use an excessive amount as there Is the risk of contaminating the clutch friction plate. 90 Carefully offer up the transmission to the engine cylinder block, guiding the input shaft through the clutch friction plate. 91 Refit the transmission-to-engine bolts and
the
single nut. hand^jghtenlng 1hem to secure the transmission in position. Note: Do not hghten them to force the engine and transmission together. Ensure that the beilhousing and cylinder block mating faces will butt together evenly without obstruction, before finally tightening the bolts and nut securely. Automatic transmission models 92 Check that the oil pump driveshaft is correctly engaged with the oil pump in the transmission. 93 Carefully offer up the transmission to Ihe rear of the engine and insert the oil pump driveshaft In the centre of the electro-magnetic clutch housing. Locate the transmission on the locating dowels then Insert the bolts and tighten them securely. 94 Refit the brush holder assembly to the automatic transmission with reference to Chapter 7B, Section 4. Petrol engines 96 Refit the transmission lower cover and tighten the bolts. 96 Locate the support bracket on the lower cover, then insert the bolts hand-tight. Also Insert the bolts securing the bracket lo the rear of Ihe cylinder block. With all the bolts Inserted, tighten them securely. 97 Refit the earth leads and tighten the bolts. Diesel engines 98 Refit the rpm sensor and tighten the bolts. 99 Insert the Intermediate shaft through the bracket then locate the dust boot on it and insert the Inner end in the transmission.
100 Refit and tighten the bolts securing the Intermediate shaft to the bracket on the rear of the cylinder block. 101 Refit the transmission lower cover and tighten the bolts. Ail models 102 Refit the starter motor (see Chapter 5A). 103 Refit the wiring harness to the components on the engine/transmission assembly making sure it is routed correctly.
Refitting 104 Locate the engine/transmission assembly beneath the engine compartment and attach the hoist to the lifting eyes. 105 Carefully lift the assembly up into the engine compartment taking care not to damage the surrounding components. 106 Reconnect the left-hand engine/trans-mission mounting to the body and tighten the bolts. 107 Reconnect Ihe right-hand engine mounting to the body and tighten the bolts. 108 Working beneath the vehicle, refit the rear engine mounting and tighten the bolts. 109 Disconnect the hoist from the engine and transmission lifting eyes and remove the hoist from under the vehicle. 110 The remainder of the refitting procedure is the direct reverse of the removal procedure, noting the following points:
a) Ensure that alf sections of the wiring harness follow their original routing; use new cable-ties to secure the harness In position, keeping it away from sources
of
heat and abrasion. b) On vehicles with manual transmission check and if necessary adjust the gearchenge cable and rod with reference to Chapter 7A. c) On vehicles with automatic transmission use new ro//p/ns fo secure the driveshafts to the transmission output stubs. Also check and if necessary adjust the kickdown end selector cables with reference to Chapter 78. d) Ensure that afi hoses are correctly routed and are secured with the correct hose clips, where applicable. If the hose clips cannot be used again; proprietary worm drive clips should be fitted
In
their place. e) Refill the cooling system as described in Chapter 1A or 18. f) Refill the engine with appropriate grades and quantities of oil (Chapter
1A
or 1B). g) Refit and adjust the auxiliary drivebelt(s) wfth reference fo Chapter 1A or 1B. h) Check and If necessary adjust the accelerator cable with reference to Chapter
AA,
48 or
AC.
i) When the engine is started for the first time, check for
air,
coolant, lubricant and fuel leaks from manifolds, hoses etc. If
the
engine has been overhauled, read
the
notes In Section 13 before attempting to starlit.
5 Engine overhaul • dismantling sequence
1 It is much easier to dismantle and work on the engine if it is mounted on a portable engine stand. These stands can often be hired from a tool hire shop. Before the engine is mounted on a stand, the flywheel should be removed, so that the stand bolts can be tightened Into the end of the cylinder block/crankcase. 2 If a stand Is not available, it Is possible to dismantle the engine with it blocked up on a sturdy workbench, or on the floor, Be very careful not to tip or drop the engine when working without a stand. 3 If you intend to obtain a reconditioned engine, all anclllarles must be removed first, to be transferred to the replacement engine (just as they will If you are doing a complete engine overhaul yourself). These components Include the following:
Petroi engines a) Power steering pump if removed with the engine (Chapter
10).
b) Alternator fmcluding mounting brackets) and starter motor (Chapter
SA).
c) The Ignition system and HT components including ail sensors, HT leads and
spark
plugs (Chapters 1A and
SB).
d) The fuel injection system components (Chapters A A and
AB).
e) All electrical switches, actuators and sensors, and the engine wiring harness (Chapters 4A, AB, SB). f) Inlet and exhaust manifolds (Chapters 4A, AB end
AD).
g) Engine oil dipstick and tube. h) Engine mountings (Chapter
2A).
i) Flywheef/driveptate (Chapter
2A).
j) Clutch components (Chapter
6)
- manual transmission. k) Electro-magnetic clutch components (Chapter 7B) - automatic transmission. I) Cooling system components (Chapter
3).
Diesei engines a) Power steering pump //removed with the engine (Chapter
10).
b) Alternator (Including mounting brackets) and starter motor (Chapter 5A). c) The glow plugfpre-heatlng system components (Chapter
SC).
d) Ait fuel system components, including the fuel injection pump, all sensors and actuators (Chapter
AC).
e) The vacuum pump. f) Ail electrical switches, actuators and sensors, and the engine wiring harness (Chapter 4C and 5C). g) Inlet and exhaust manifolds and, where applicable, the turbocharger (Chapter
AC
and 4D). h) The engine oil level dipstick and its tube. i) Engine mountings (Chapter
2C).
Page 99 of 225
2D*10 Engine removal and overhaul procedures
6.5s Prising out the feed stub of the camshaft lubricating pipe J) Flywheel (Chapter 2C). k) Clutch components (Chapter
6).
I) Cooling system components (Chapter
3).
Note: When removing trie external components from the engine, pay close attention to details that may be helpful or important during refitting. Note the fitted position of gaskets, seals, spacers, pins, washers, bolts, and other small components. 4 If you are obtaining a short engine (the engine cylinder block/crankcase, crankshaft, pistons and connecting rods, all fully assembled), then the cylinder head, sump, oil pump, timing belt (together with its tensloner and covers), coolant pump, thermostat housing, coolant outlet elbows, oil filter housing and where applicable oil cooler will also have to be removed. 5 If you are planning a full overhaul, the engine can be dismantled in the order given below: $) Ftywhaoi/drivoplate.
6.5d When removing the camshaft bearing caps, note the position of the (ong and short locating dowels
bearing/banjo union bolt b) Timing belt, sprockets, and tensioner. c) Inlet and exhaust manifolds. d) Cylinder head. e) Sump. f) Oil pump. g) Pistons and crankshaft.
6 Cylinder head - % dismantling, cleaning, inspection and reassembly ^
Note: Now and reconditioned cylinder heads are available from the manufacturer or engine overhaul specialists. Be aware that some specialist tools are required for the dismantling and inspection procedures, and new com-ponents may not be readily available. It may therefore be mors practical and economical for the home mechanic to purchase a reconditioned head, rather than dismantle, inspect and recondition the original head.
Dismantling Note: On 8-valve petrol engines and diesel engines, the camshaft and cam followers are /oca fed In the cylinder head assembly and the relevant dismantling and reassembly procedures are contained in this Section. On 1$-valve petrol engines, the camshafts and cam followers are /oca fed In a separate housing (cylinder head extension) which is bo/fed fo the top of the cylinder head. All procedures relating to the camshafts and cam followers on 16-valve engines are therefore contained in Chapter 2B. Proceed fo paragraph 15 for cylinder head dismantling
6.8a Unscrew and remove the bolts from the thermostat housing, noting the location of the bracket
6.5c Removing the camshaft lubricating pipe procedures on /6-vafve engines, and ignore any references to camshafts, cam followers and oil seals in the paragraphs that follow. 1 Remove the cylinder head as described in Part A. B or C of this Chapter (as applicable). 2 If not already done, remove the inlet and exhaust manifolds with reference to the relevant Part of Chapter 4. Also remove the spark plugs, glow plugs and injectors as applicable. 3 Remove the camshaft sprocket with reference to Chapter 2A or 2C. Petrol engines 4 Mark the positions of the camshaft bearing caps, numbering them from the timing end. 5 Unbolt and remove the lubrication pipe (prise the oil feed stub out with a screwdriver). Unscrew the remaining bolts and take off the bearing caps (see illustrations). 6 Lift the camshaft carefully from the cylinder head, checking lhat the valve clearance shims and cam followers are not withdrawn by the adhesion of the oil (see Illustration). 7 Remove the shims and cam followers, but keep them In their originally fitted order. Diesel engines 8 Unbolt the thermostat housing and gasket, and vacuum pump from the left-hand end of the cylinder head. Also if necessary unbolt the coolant cover and gasket from the right-hand end of the head. Note the location of brackets (see illustrations) 9 Using a soft metal drift, carefully lap out the left-hand side mount and recover the gasket (soe illustrations). 10 At tho timing bait end of the cylinder head.
6.8b Removing the thermostat housing ... 6.6 Removing the camshaft