diagram FIAT PUNTO 2014 Owner handbook (in English)
[x] Cancel search | Manufacturer: FIAT, Model Year: 2014, Model line: PUNTO, Model: FIAT PUNTO 2014Pages: 219, PDF Size: 3.67 MB
Page 13 of 219
9SAFETYSTARTING
AND DRIVINGWARNING
LIGHTS AND
MESSAGESIN AN
EMERGENCYSERVICE
AND CARETECHNICAL
SPECIFICATIONSINDEXCONTROLS
AND DEVICES
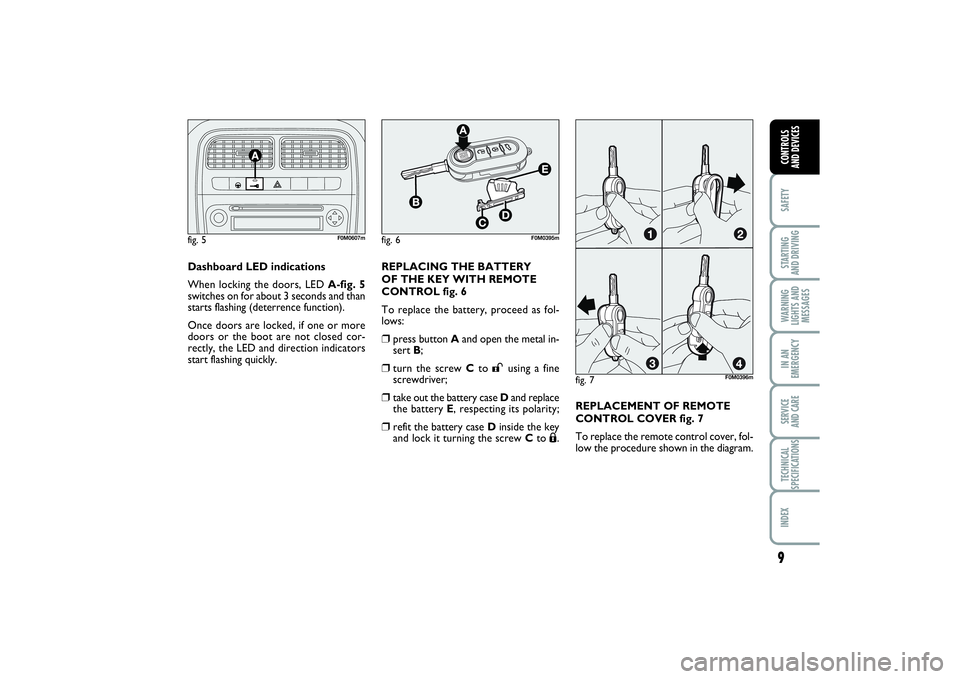
Dashboard LED indications
When locking the doors, LED A-fig. 5
switches on for about 3 seconds and than
starts flashing (deterrence function).
Once doors are locked, if one or more
doors or the boot are not closed cor-
rectly, the LED and direction indicators
start flashing quickly.fig. 5
F0M0607m
fig. 7
fig. 6
F0M0395m
F0M0396m
REPLACING THE BATTERY
OF THE KEY WITH REMOTE
CONTROL fig. 6
To replace the battery, proceed as fol-
lows:❒
press button Aand open the metal in-
sert B;
❒
turn the screw Cto
:
using a fine
screwdriver;
❒
take out the battery case Dand replace
the battery E, respecting its polarity;
❒
refit the battery case Dinside the key
and lock it turning the screw Cto
Á.REPLACEMENT OF REMOTE
CONTROL COVER fig. 7
To replace the remote control cover, fol-
low the procedure shown in the diagram.
001-032 PUNTO POP 1ed EN 29/08/13 14.32 Pagina 9
Page 72 of 219
68SAFETYSTARTING
AND DRIVINGWARNING
LIGHTS AND
MESSAGESIN AN
EMERGENCYSERVICE
AND CARETECHNICAL
SPECIFICATIONSINDEXCONTROLS
AND DEVICES
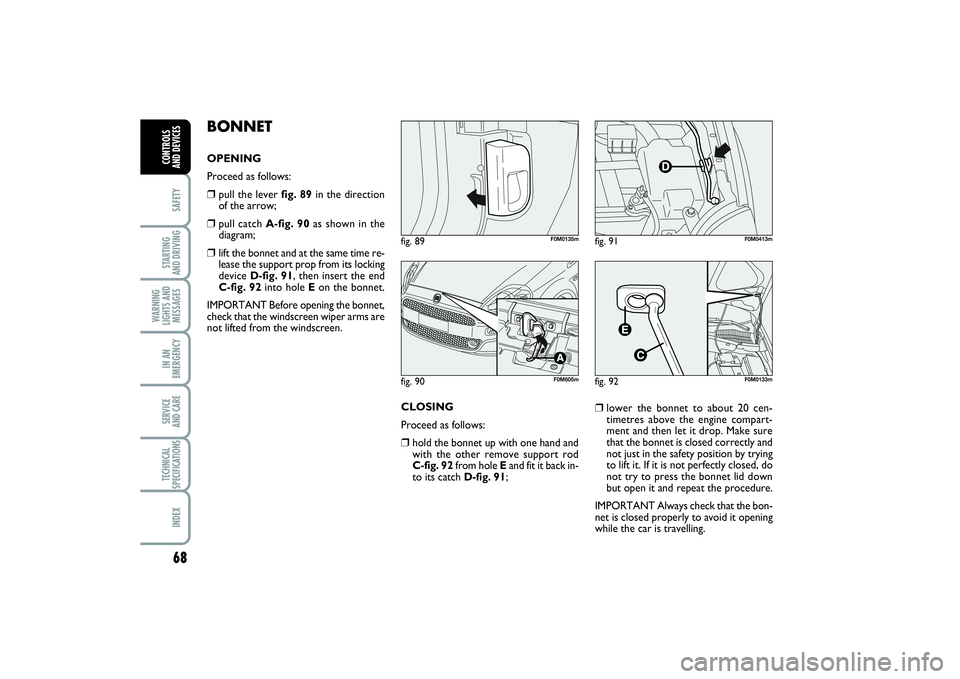
BONNETOPENING
Proceed as follows:❒
pull the lever fig. 89in the direction
of the arrow;
❒
pull catch A-fig. 90as shown in the
diagram;
❒
lift the bonnet and at the same time re-
lease the support prop from its locking
device D-fig. 91, then insert the end
C-fig. 92 into hole Eon the bonnet.
IMPORTANT Before opening the bonnet,
check that the windscreen wiper arms are
not lifted from the windscreen.
CLOSING
Proceed as follows:
❒
hold the bonnet up with one hand and
with the other remove support rod
C-fig. 92 from hole Eand fit it back in-
to its catch D-fig. 91;
fig. 90
F0M605m
fig. 89
F0M0135m
❒
lower the bonnet to about 20 cen-
timetres above the engine compart-
ment and then let it drop. Make sure
that the bonnet is closed correctly and
not just in the safety position by trying
to lift it. If it is not perfectly closed, do
not try to press the bonnet lid down
but open it and repeat the procedure.
IMPORTANT Always check that the bon-
net is closed properly to avoid it opening
while the car is travelling.
fig. 91
F0M0413m
fig. 92
F0M0133m
033-069 PUNTO POP 1ed EN 29/08/13 14.34 Pagina 68
Page 89 of 219
85
SAFETYSTARTING
AND DRIVINGWARNING
LIGHTS AND
MESSAGESIN AN
EMERGENCYSERVICE
AND CARETECHNICAL
SPECIFICATIONSINDEXCONTROLS
AND DEVICES
SOUND SYSTEM(for versions/markets, where provided)
For the operation of the radio with CD/
MP3 player (for versions/markets, where
provided), read the Supplement attached
to this Owner’s Handbook.
SOUND SYSTEM READINESS
(for versions/markets, where provided)
The system consists of:❒
sound system power cables
❒
cables to connect front and rear
speakers
❒
aerial power cable
❒
2 tweeters on front doors (30 W max
power each);
❒
2 mid-woofers on front doors
(165 mm diameter, 40 W max power
each);
❒
2 full-range speakers on rear doors
and rear valance panels (130 mm
diameter, 40 W max power each);
❒
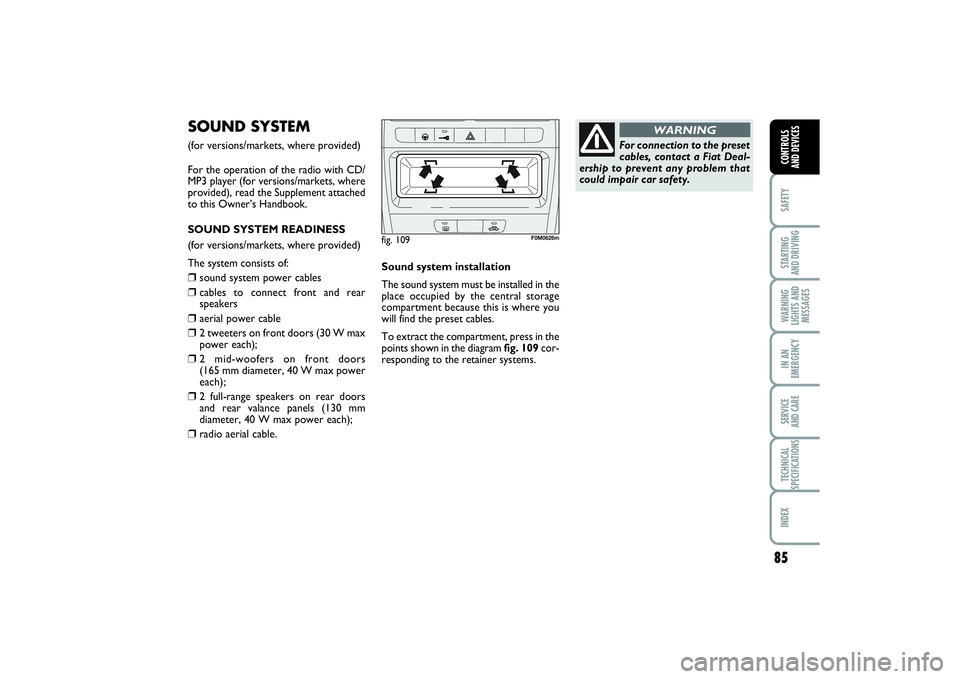
radio aerial cable.Sound system installation
The sound system must be installed in the
place occupied by the central storage
compartment because this is where you
will find the preset cables.
To extract the compartment, press in the
points shown in the diagram fig. 109cor-
responding to the retainer systems.
fig. 109
F0M0626m
For connection to the preset
cables, contact a Fiat Deal-
ership to prevent any problem that
could impair car safety.
WARNING
070-090 PUNTO POP 1ed EN 24/09/13 14.23 Pagina 85
Page 102 of 219
98STARTING
AND DRIVINGWARNING
LIGHTS AND
MESSAGESIN AN
EMERGENCYSERVICE
AND CARETECHNICAL
SPECIFICATIONSINDEXCONTROLS
AND DEVICESSAFETY
Do not place a cradle seat
facing backwards on the
front seat if the passenger side airbag
is enabled. Deployment of the airbag
in an accident could cause fatal in-
juries to the baby regardless of the
severity of the collision. It is advisable
to always carry children in dedicat-
ed child seats on the rear seat, which
is the most protected position in the
event of an accident.
WARNING
SERIOUS HAZARD Should
it be absolutely necessary to
carry a child on the front
seat in a backwards-facing
cradle seat, the passenger’s
front and side airbags should
be deactivated through the setup
menu. Deactivation can be verified by
checking the
“
warning light on the
instrument panel. Also, the passen-
ger seat should be as far back as pos-
sible to avoid contact between the
child seat and the dashboard.WARNING
fig. 8
F0M0046m
fig. 9
F0M0504m
The diagram is only an indi-
cation. For assembly, refer to
the instructions supplied with the
child seat.
WARNING
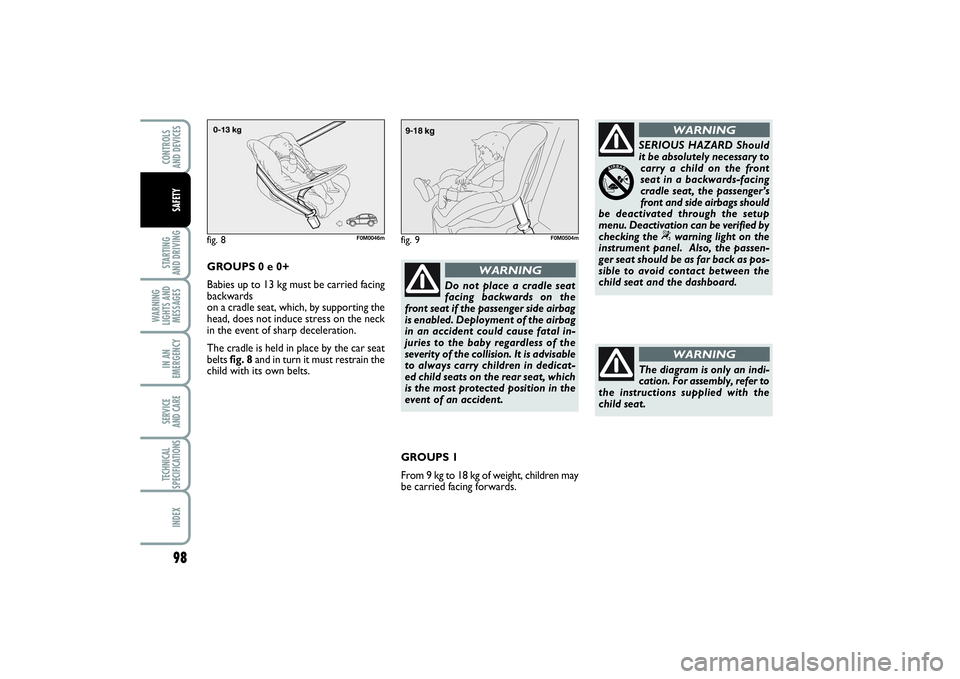
GROUPS 0 e 0+
Babies up to 13 kg must be carried facing
backwards
on a cradle seat, which, by supporting the
head, does not induce stress on the neck
in the event of sharp deceleration.
The cradle is held in place by the car seat
belts fig. 8and in turn it must restrain the
child with its own belts.
GROUPS 1
From 9 kg to 18 kg of weight, children may
be carried facing forwards.
091-110 PUNTO POP 1ed EN 29/08/13 14.52 Pagina 98
Page 103 of 219
99
STARTING
AND DRIVINGWARNING
LIGHTS AND
MESSAGESIN AN
EMERGENCYSERVICE
AND CARETECHNICAL
SPECIFICATIONSINDEXCONTROLS
AND DEVICESSAFETY
fig. 10
F0M0048m
GROUP 2
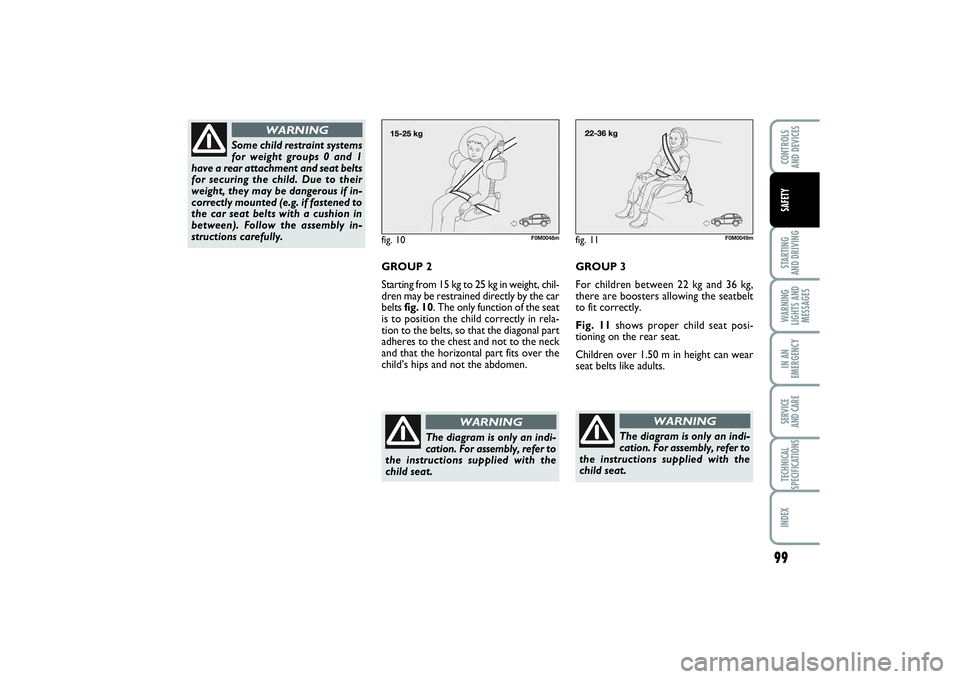
Starting from 15 kg to 25 kg in weight, chil-
dren may be restrained directly by the car
belts fig. 10. The only function of the seat
is to position the child correctly in rela-
tion to the belts, so that the diagonal part
adheres to the chest and not to the neck
and that the horizontal part fits over the
child’s hips and not the abdomen.
The diagram is only an indi-
cation. For assembly, refer to
the instructions supplied with the
child seat.
WARNING
Some child restraint systems
for weight groups 0 and 1
have a rear attachment and seat belts
for securing the child. Due to their
weight, they may be dangerous if in-
correctly mounted (e.g. if fastened to
the car seat belts with a cushion in
between). Follow the assembly in-
structions carefully.
WARNING
GROUP 3
For children between 22 kg and 36 kg,
there are boosters allowing the seatbelt
to fit correctly.
Fig. 11shows proper child seat posi-
tioning on the rear seat.
Children over 1.50 m in height can wear
seat belts like adults.fig. 11
F0M0049m
The diagram is only an indi-
cation. For assembly, refer to
the instructions supplied with the
child seat.
WARNING
091-110 PUNTO POP 1ed EN 29/08/13 14.52 Pagina 99
Page 118 of 219
114SAFETY
WARNING
LIGHTS AND
MESSAGESIN AN
EMERGENCYSERVICE
AND CARETECHNICAL
SPECIFICATIONSINDEXCONTROLS
AND DEVICESSTARTING
AND DRIVING
IMPORTANT If this is not the case, con-
tact a Fiat Dealership to have the hand-
brake adjusted.
When the handbrake is on and the igni-
tion key is at MAR, the instrument panel
warning light
x
will come on.
To release the handbrake, proceed as
follows:
❒
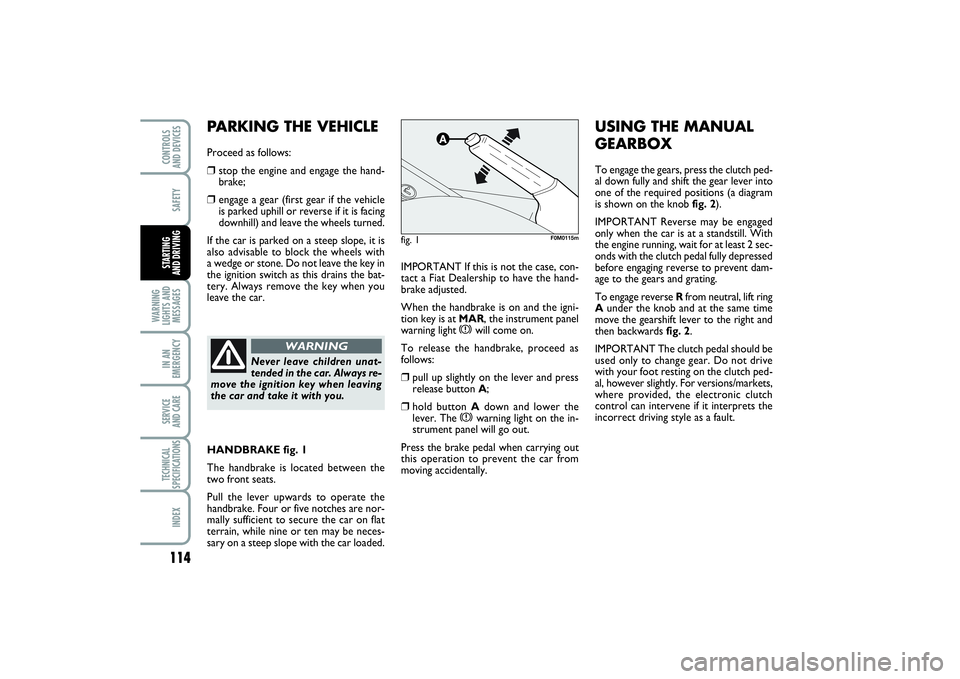
pull up slightly on the lever and press
release button A;
❒
hold button Adown and lower the
lever. The
x
warning light on the in-
strument panel will go out.
Press the brake pedal when carrying out
this operation to prevent the car from
moving accidentally.
PARKING THE VEHICLEProceed as follows:❒
stop the engine and engage the hand-
brake;
❒
engage a gear (first gear if the vehicle
is parked uphill or reverse if it is facing
downhill) and leave the wheels turned.
If the car is parked on a steep slope, it is
also advisable to block the wheels with
a wedge or stone. Do not leave the key in
the ignition switch as this drains the bat-
tery. Always remove the key when you
leave the car.
Never leave children unat-
tended in the car. Always re-
move the ignition key when leaving
the car and take it with you.
WARNING
fig. 1
F0M0115m
HANDBRAKE fig. 1
The handbrake is located between the
two front seats.
Pull the lever upwards to operate the
handbrake. Four or five notches are nor-
mally sufficient to secure the car on flat
terrain, while nine or ten may be neces-
sary on a steep slope with the car loaded.
USING THE MANUAL
GEARBOXTo engage the gears, press the clutch ped-
al down fully and shift the gear lever into
one of the required positions (a diagram
is shown on the knob fig. 2).
IMPORTANT Reverse may be engaged
only when the car is at a standstill. With
the engine running, wait for at least 2 sec-
onds with the clutch pedal fully depressed
before engaging reverse to prevent dam-
age to the gears and grating.
To engage reverse Rfrom neutral, lift ring
Aunder the knob and at the same time
move the gearshift lever to the right and
then backwards fig. 2.
IMPORTANT The clutch pedal should be
used only to change gear. Do not drive
with your foot resting on the clutch ped-
al, however slightly. For versions/markets,
where provided, the electronic clutch
control can intervene if it interprets the
incorrect driving style as a fault.
111-120 PUNTO POP 1ed EN 24/09/13 14.29 Pagina 114
Page 122 of 219
118SAFETY
WARNING
LIGHTS AND
MESSAGESIN AN
EMERGENCYSERVICE
AND CARETECHNICAL
SPECIFICATIONSINDEXCONTROLS
AND DEVICESSTARTING
AND DRIVING
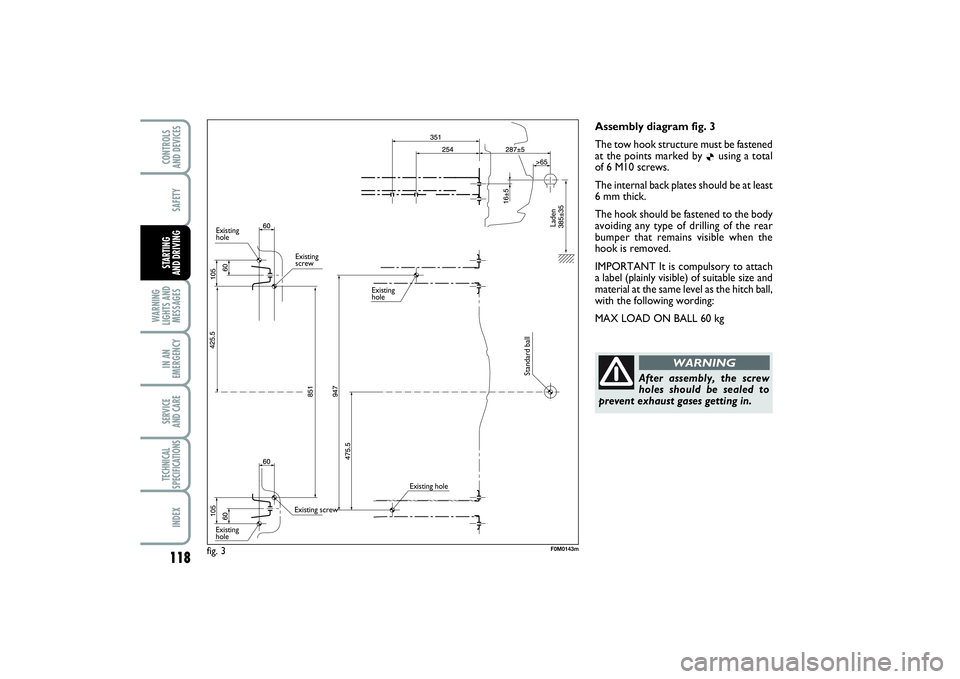
Assembly diagram fig. 3
The tow hook structure must be fastened
at the points marked by
Ø
using a total
of 6 M10 screws.
The internal back plates should be at least
6 mm thick.
The hook should be fastened to the body
avoiding any type of drilling of the rear
bumper that remains visible when the
hook is removed.
IMPORTANT It is compulsory to attach
a label (plainly visible) of suitable size and
material at the same level as the hitch ball,
with the following wording:
MAX LOAD ON BALL 60 kg
After assembly, the screw
holes should be sealed to
prevent exhaust gases getting in.
WARNING
fig. 3
F0M0143m
Existing
hole
Existing
screw
Existing screw
Existing
holeExisting
hole
Existing hole
Standard ball
Laden
111-120 PUNTO POP 1ed EN 24/09/13 14.29 Pagina 118
Page 167 of 219
163
SAFETYSTARTING
AND DRIVINGWARNING
LIGHTS AND
MESSAGESSERVICE
AND CARETECHNICAL
SPECIFICATIONSINDEXCONTROLS
AND DEVICESIN AN
EMERGENCY
fig. 41
F0M601m
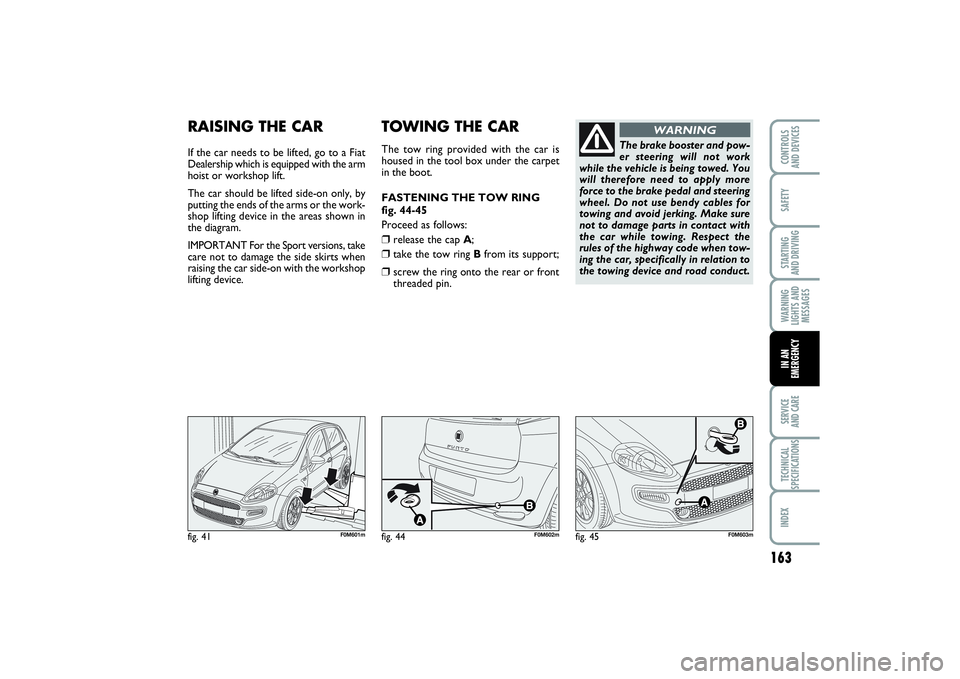
RAISING THE CARIf the car needs to be lifted, go to a Fiat
Dealership which is equipped with the arm
hoist or workshop lift.
The car should be lifted side-on only, by
putting the ends of the arms or the work-
shop lifting device in the areas shown in
the diagram.
IMPORTANT For the Sport versions, take
care not to damage the side skirts when
raising the car side-on with the workshop
lifting device.
TOWING THE CARThe tow ring provided with the car is
housed in the tool box under the carpet
in the boot.
FASTENING THE TOW RING
fig. 44-45
Proceed as follows:❒
release the cap A;
❒
take the tow ring Bfrom its support;
❒
screw the ring onto the rear or front
threaded pin.
The brake booster and pow-
er steering will not work
while the vehicle is being towed. You
will therefore need to apply more
force to the brake pedal and steering
wheel. Do not use bendy cables for
towing and avoid jerking. Make sure
not to damage parts in contact with
the car while towing. Respect the
rules of the highway code when tow-
ing the car, specifically in relation to
the towing device and road conduct.
WARNING
fig. 44
F0M602m
fig. 45
F0M603m
133-164 PUNTO POP 1ed EN 29/08/13 15.08 Pagina 163