display FIAT QUBO 2010 1.G Owners Manual
[x] Cancel search | Manufacturer: FIAT, Model Year: 2010, Model line: QUBO, Model: FIAT QUBO 2010 1.GPages: 230, PDF Size: 4.38 MB
Page 4 of 230
KNOW YOUR VEHICLE
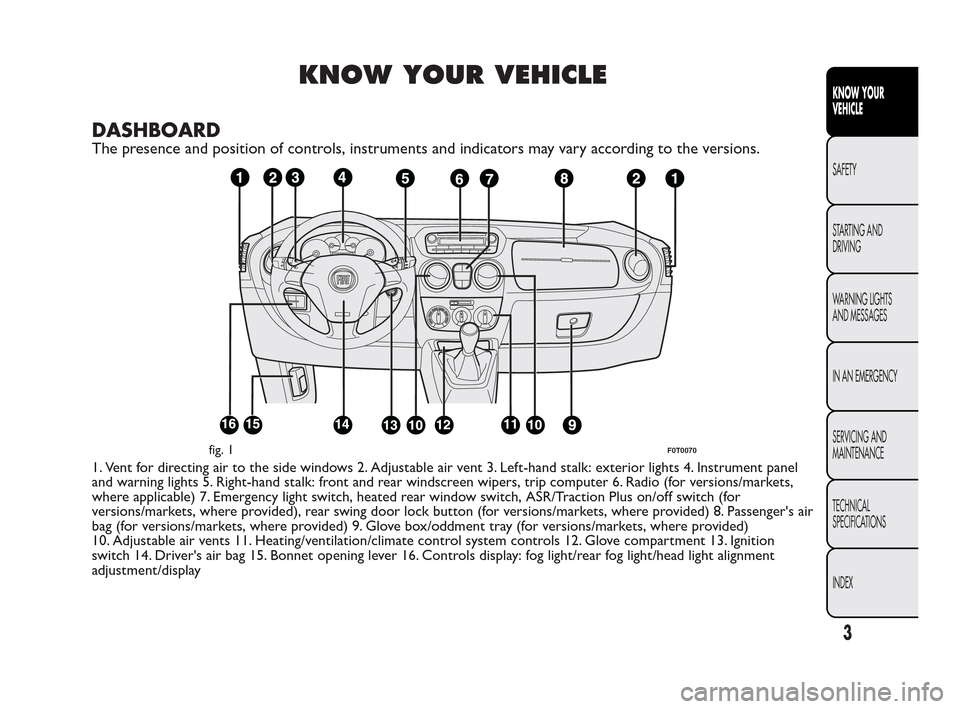
DASHBOARD
The presence and position of controls, instruments and indicators may vary according to the versions.
1. Vent for directing air to the side windows 2. Adjustable air vent 3. Left-hand stalk: exterior lights 4. Instrument panel
and warning lights 5. Right-hand stalk: front and rear windscreen wipers, trip computer 6. Radio (for versions/markets,
where applicable) 7. Emergency light switch, heated rear window switch, ASR/Traction Plus on/off switch (for
versions/markets, where provided), rear swing door lock button (for versions/markets, where provided) 8. Passenger's air
bag (for versions/markets, where provided) 9. Glove box/oddment tray (for versions/markets, where provided)
10. Adjustable air vents 11. Heating/ventilation/climate control system controls 12. Glove compartment 13. Ignition
switch 14. Driver's air bag 15. Bonnet opening lever 16. Controls display: fog light/rear fog light/head light alignment
adjustment/display
fig. 1F0T0070
3
KNOW YOUR
VEHICLE
SAFETY
ST
ARTING AND
DRIVING
WARNING LIGHTS
AND MESSAGES
IN AN EMERGENCY
SERVICING AND
MAINTENANCE
TECHNICAL
SPECIFICATIONS
INDEX
Page 5 of 230
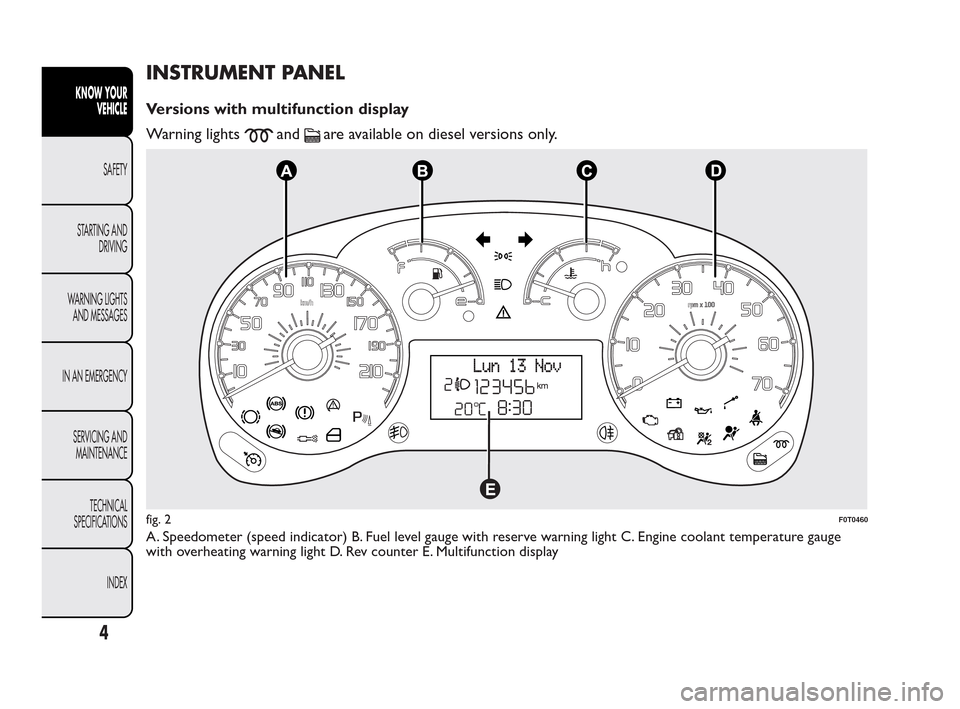
INSTRUMENT PANEL
Versions with multifunction display
Warning lights
andare available on diesel versions only.
A. Speedometer (speed indicator) B. Fuel level gauge with reserve warning light C. Engine coolant temperature gauge
with overheating warning light D. Rev counter E. Multifunction display
fig. 2F0T0460
4
KNOW YOUR
VEHICLE
SAFETY
ST
ARTING AND
DRIVING
WARNING LIGHTS
AND MESSAGES
IN AN EMERGENCY
SERVICING AND
MAINTENANCE
TECHNICAL
SPECIFICATIONS
INDEX
Page 6 of 230
SYMBOLS
Special coloured labels have been attached near or
on some of the components of your vehicle. These
labels bear symbols that draw your attention to
the precautions required when handling the
component in question.
The inner surface of the engine bonnet includes a
label with the different symbols used.
THE FIAT CODE SYSTEM
This is an electrical engine immobiliser system which
increases protection against attempted theft of the
vehicle. It is automatically activated when the ignition
key is extracted.
Each time the vehicle is started turning the ignition
key toMAR, the Fiat CODE system control unit
sends a recognition code to the engine control unit
to deactivate the inhibitor.
If, during ignition, the code is not correctly
recognized, a warning light
is lit on the
instrument panel.
In this case, turn the key toSTOPand then back to
MAR. Try with the other keys provided if the
problem persists. Contact a Fiat Dealership if you
still cannot start the engine.
IMPORTANT Each key has its own code which must
be stored by the system ECU. Contact the Fiat
Dealership to have new keys (up to eight) stored
with the code.
Warning light
coming on when driving
❒If the
warning light (or symbol in the display)
comes on, this means that the system is running a
self-diagnosis test (caused, for example, by a
voltage drop). When you stop for the first time,
turn the key to STOP and then to MAR: the
warning light
will not light up if no faults are
detected.
5
KNOW YOUR
VEHICLE
SAFETY
ST
ARTING AND
DRIVING
WARNING LIGHTS
AND MESSAGES
IN AN EMERGENCY
SERVICING AND
MAINTENANCE
TECHNICAL
SPECIFICATIONS
INDEX
Page 7 of 230
❒If the warning light(or symbol on the display)
stays on, repeat the procedure described above
leaving the key at STOP for longer than 30
seconds. If the problem persists, contact the Fiat
Dealership.
❒The code is not recognised if the warning light
(or symbol on the display) stays on. In this
case, turn the key to STOP and then to MAR; if it
is still locked, try again with the other keys that
come with the vehicle. If you still cannot start the
engine, perform the emergency start procedure
(see chapter “In an emergency”) and then contact
the Fiat Dealership.
The electronic components inside the key
may be damaged if the key is subjected
to sharp knocks.
KEYS
KEY WITHOUT REMOTE CONTROL
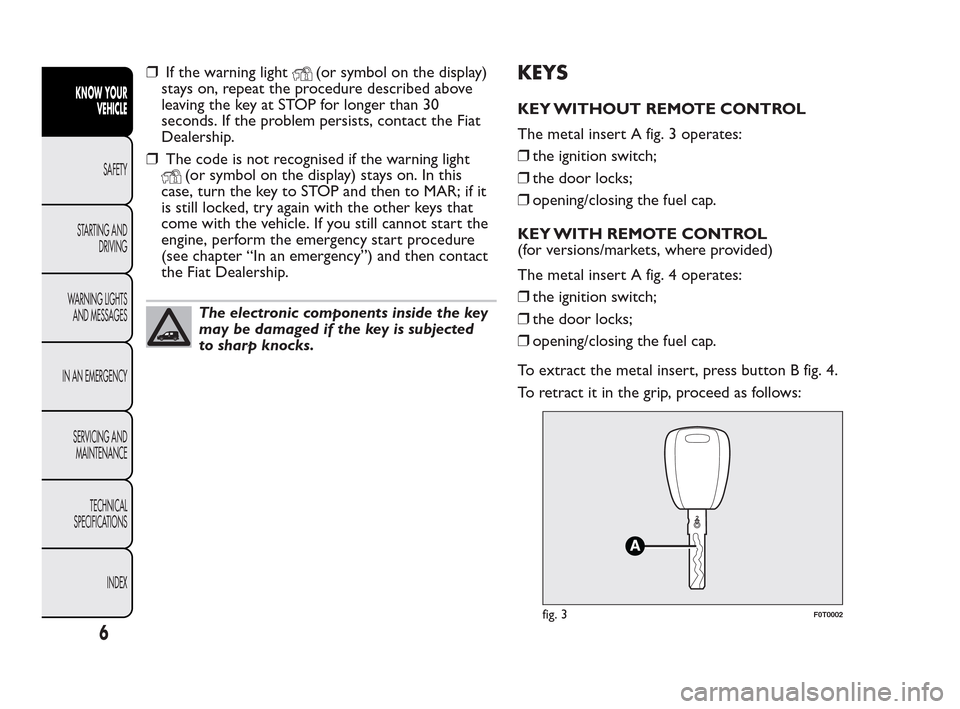
The metal insert A fig. 3 operates:
❒the ignition switch;
❒the door locks;
❒opening/closing the fuel cap.
KEY WITH REMOTE CONTROL
(for versions/markets, where provided)
The metal insert A fig. 4 operates:
❒the ignition switch;
❒the door locks;
❒opening/closing the fuel cap.
To extract the metal insert, press button B fig. 4.
To retract it in the grip, proceed as follows:
fig. 3F0T0002
6
KNOW YOUR
VEHICLE
SAFETY
ST
ARTING AND
DRIVING
WARNING LIGHTS
AND MESSAGES
IN AN EMERGENCY
SERVICING AND
MAINTENANCE
TECHNICAL
SPECIFICATIONS
INDEX
Page 12 of 230
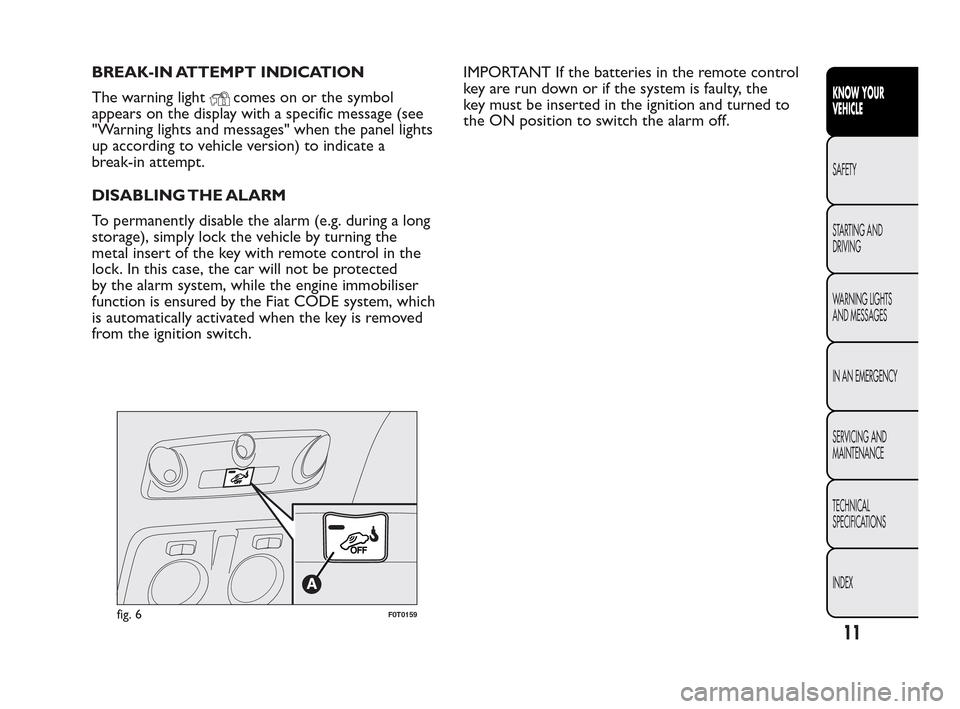
BREAK-IN ATTEMPT INDICATION
The warning light
comes on or the symbol
appears on the display with a specific message (see
"Warning lights and messages" when the panel lights
up according to vehicle version) to indicate a
break-in attempt.
DISABLING THE ALARM
To permanently disable the alarm (e.g. during a long
storage), simply lock the vehicle by turning the
metal insert of the key with remote control in the
lock. In this case, the car will not be protected
by the alarm system, while the engine immobiliser
function is ensured by the Fiat CODE system, which
is automatically activated when the key is removed
from the ignition switch.IMPORTANT If the batteries in the remote control
key are run down or if the system is faulty, the
key must be inserted in the ignition and turned to
the ON position to switch the alarm off.
fig. 6F0T0159
11
KNOW YOUR
VEHICLE
SAFETY
ST
ARTING AND
DRIVING
WARNING LIGHTS
AND MESSAGES
IN AN EMERGENCY
SERVICING AND
MAINTENANCE
TECHNICAL
SPECIFICATIONS
INDEX
Page 15 of 230
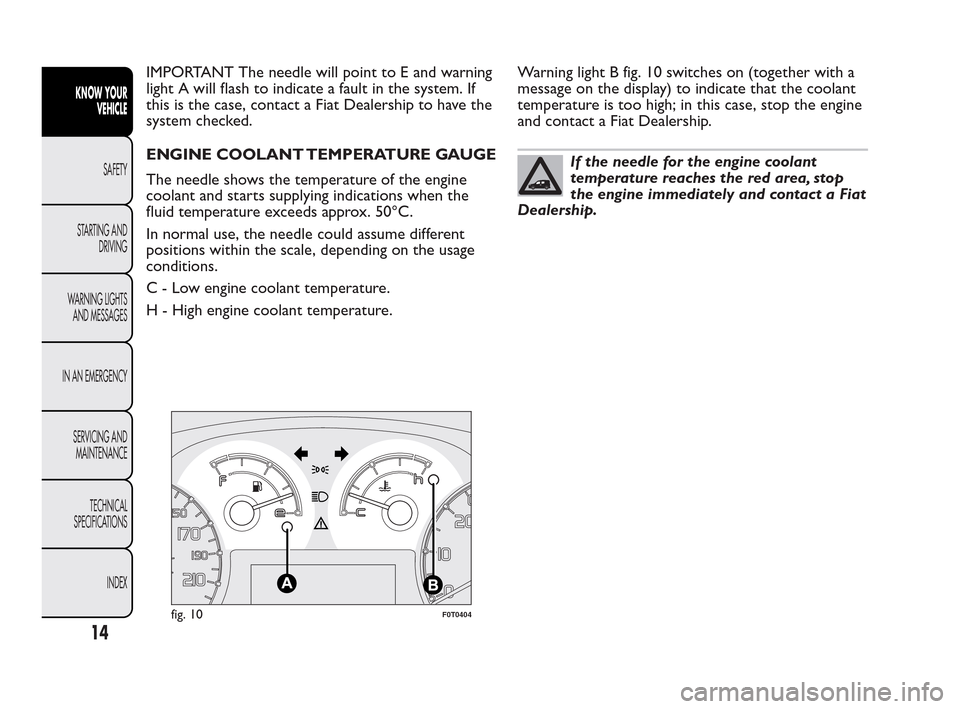
IMPORTANT The needle will point to E and warning
light A will flash to indicate a fault in the system. If
this is the case, contact a Fiat Dealership to have the
system checked.
ENGINE COOLANT TEMPERATURE GAUGE
The needle shows the temperature of the engine
coolant and starts supplying indications when the
fluid temperature exceeds approx. 50°C.
In normal use, the needle could assume different
positions within the scale, depending on the usage
conditions.
C - Low engine coolant temperature.
H - High engine coolant temperature.Warning light B fig. 10 switches on (together with a
message on the display) to indicate that the coolant
temperature is too high; in this case, stop the engine
and contact a Fiat Dealership.
If the needle for the engine coolant
temperature reaches the red area, stop
the engine immediately and contact a Fiat
Dealership.
fig. 10F0T0404
14
KNOW YOUR
VEHICLE
SAFETY
ST
ARTING AND
DRIVING
WARNING LIGHTS
AND MESSAGES
IN AN EMERGENCY
SERVICING AND
MAINTENANCE
TECHNICAL
SPECIFICATIONS
INDEX
Page 16 of 230
MULTIFUNCTION DISPLAY
The vehicle may be equipped with a multifunction
display that gives the driver useful information
depending on the previous settings.
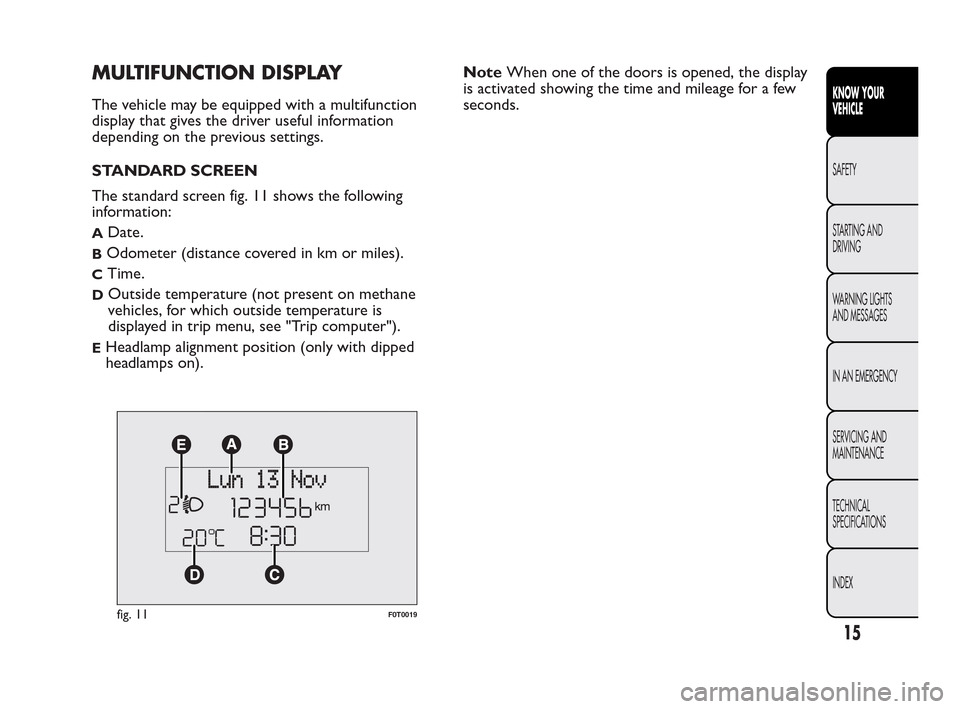
STANDARD SCREEN
The standard screen fig. 11 shows the following
information:
ADate.
BOdometer (distance covered in km or miles).
CTime.
DOutside temperature (not present on methane
vehicles, for which outside temperature is
displayed in trip menu, see "Trip computer").
EHeadlamp alignment position (only with dipped
headlamps on).NoteWhen one of the doors is opened, the display
is activated showing the time and mileage for a few
seconds.
fig. 11F0T0019
15
KNOW YOUR
VEHICLE
SAFETY
ST
ARTING AND
DRIVING
WARNING LIGHTS
AND MESSAGES
IN AN EMERGENCY
SERVICING AND
MAINTENANCE
TECHNICAL
SPECIFICATIONS
INDEX
Page 17 of 230
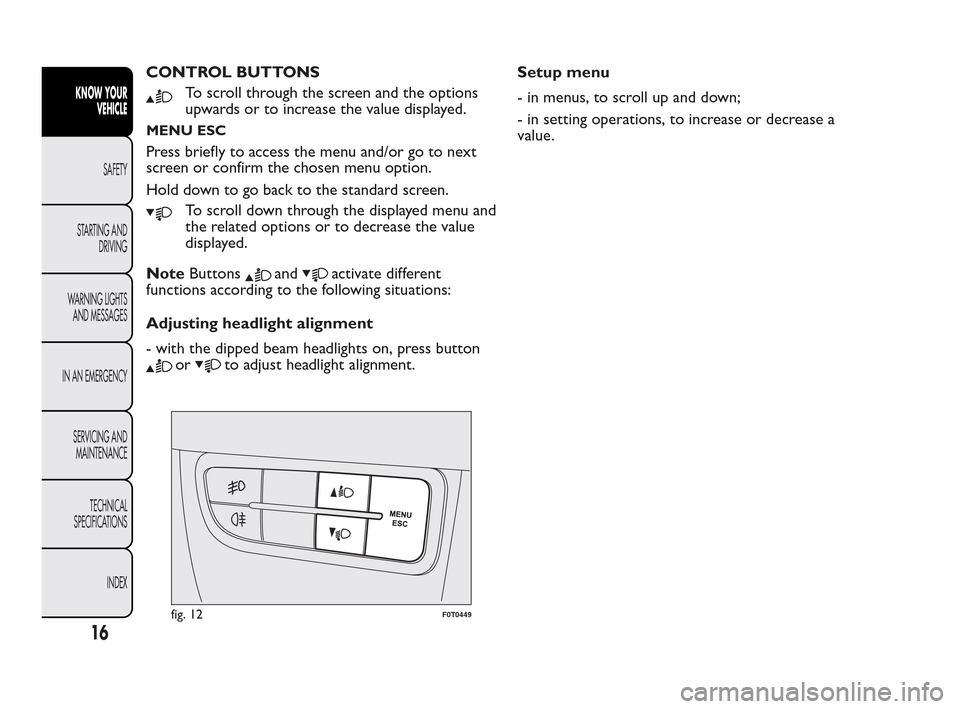
CONTROL BUTTONS
To scroll through the screen and the options
upwards or to increase the value displayed.
MENU ESC
Press briefly to access the menu and/or go to next
screen or confirm the chosen menu option.
Hold down to go back to the standard screen.
To scroll down through the displayed menu and
the related options or to decrease the value
displayed.
NoteButtons
andactivate different
functions according to the following situations:
Adjusting headlight alignment
- with the dipped beam headlights on, press button
orto adjust headlight alignment.Setup menu
- in menus, to scroll up and down;
- in setting operations, to increase or decrease a
value.
fig. 12F0T0449
16
KNOW YOUR
VEHICLE
SAFETY
ST
ARTING AND
DRIVING
WARNING LIGHTS
AND MESSAGES
IN AN EMERGENCY
SERVICING AND
MAINTENANCE
TECHNICAL
SPECIFICATIONS
INDEX
Page 19 of 230
Setup menu function
The menu fig. 13 comprises a series of functions in
"circular" arrangement, which can be selected by
pressing the
andbuttons to access the
different operations and settings described in the
following paragraphs. A submenu is provided for
some items (clock and unit setting).
The setup menu can be activated by pressing the
MENU ESC button briefly.
Press buttons
orto scroll the setup menu
options.
Management modes differ according to the option
selected.
Selecting an option from the main menu without a
submenu:
- briefly press MENU ESC to select the main menu
option you wish to set;
- press
or(with single presses) to select the
new setting;
- a short press on button MENU ESC will store the
setting and then return to the same main menu
option that was first selected.Selecting an option from the main menu with a
submenu:
- briefly press the MENU ESC button to display the
first submenu option;
- press
or(with single presses) to scroll all
the submenu options;
- briefly press the MENU ESC button to select the
displayed submenu option and to open the relevant
setup menu;
- press
or(with single presses) to select the
new setting for this submenu option;
- briefly press the MENU ESC button to store the
new setting and go back to the previous menu
option.
Selecting “Date” and “Set time”:
- briefly press MENU ESC to select the first value to
change (e.g. hours/minutes or year/month/day);
- press
or(with single presses) to select the
new setting;
- briefly press MENU ESC to store the new setting
and go to the next setup menu option: if this is
the last one you will go back to the previous menu
option.
18
KNOW YOUR
VEHICLE
SAFETY
ST
ARTING AND
DRIVING
WARNING LIGHTS
AND MESSAGES
IN AN EMERGENCY
SERVICING AND
MAINTENANCE
TECHNICAL
SPECIFICATIONS
INDEX
Page 20 of 230
Hold down MENU ESC:
- to quit the set up menu if you are in the main
menu;
- to quit the main menu if you are in another point of
the menu (e.g. at submenu option setting level, at
submenu level or at main menu option setting level);
- to save only the settings already stored (and
confirmed by pressing the MENU ESC button).
The setup menu page is timed. Only the changes
already stored by pressing the MENU ESC button are
saved when you come out of the menu.
On the standard screen, briefly press MENU ESC to
start browsing.
Press
orto browse within the menu.
NoteOnly the short menu may be accessed for
reasons of safety while the vehicle is moving ("Speed
Beep" setting). Stop the vehicle to access the full
menu.Adjusting the vehicle interior lighting
This function is available with the dipped beam
headlights on to adjust brightness of the instrument
panel, buttons and radio display.
To adjust the light intensity, proceed as follows:
❒press the MENU ESC button briefly to make the
display flash the previously set level;
❒press button
andto set the required
brightness level;
❒press the MENU ESC button briefly to return to
the menu screen or give the button a long press
to return to the standard screen without storing.
Speed limit (Speed Beep)
This function is used to set the vehicle speed limit
(km/h or mph). When this limit is exceeded the
driver is immediately alerted (see “Warning lights
and messages” section).
To set the desired speed limit, proceed as follows:
- briefly press the MENU ESC button: the display will
show the words (Speed Beep);
- press
orto select speed limit activation
(On) or deactivation (Off );
- if the function is on, press
orto select the
required speed limit and then press MENU ESC to
confirm;
19
KNOW YOUR
VEHICLE
SAFETY
ST
ARTING AND
DRIVING
WARNING LIGHTS
AND MESSAGES
IN AN EMERGENCY
SERVICING AND
MAINTENANCE
TECHNICAL
SPECIFICATIONS
INDEX