ESP FIAT QUBO 2015 1.G Owner's Manual
[x] Cancel search | Manufacturer: FIAT, Model Year: 2015, Model line: QUBO, Model: FIAT QUBO 2015 1.GPages: 231, PDF Size: 5.01 MB
Page 147 of 231
Halogen bulbs must be handled holding
the metallic part only.Touching the
transparent part of the bulb with your
fingers may reduce the intensity of the emitted
light and even reduce the lifespan of the bulb.
If you do touch it accidentally, rub the bulb with
an alcohol-soaked cloth and leave to dry.If possible, we recommend have bulbs
replaced by a Fiat Dealership. Proper
operation and orientation of the external
lights are essential for the safety of the running
vehicle, and to avoid incurring legal sanctions.IMPORTANT The internal surface of the light may
appear slightly misty: this does not indicate a fault,
and is actually caused by low temperature and the
degree of humidity in the air. Misting will rapidly
disappear when the headlights are switched on. The
presence of drops inside the headlights indicates
infiltration of water. Go to a Fiat Dealership.
143KNOW YOUR
VEHICLE
SAFETY
STARTING AND
DRIVING
WARNING LIGHTS
AND MESSAGESIN AN
EMERGENCYSERVICING AND
MAINTENANCE
TECHNICAL
SPECIFICATIONS
INDEX
Page 150 of 231
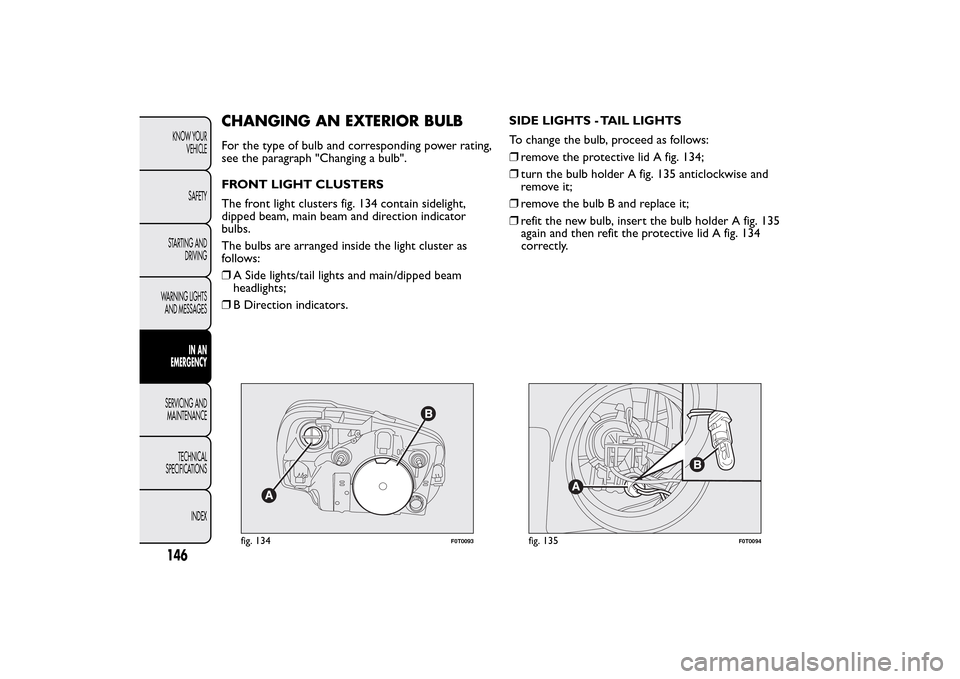
CHANGING AN EXTERIOR BULBFor the type of bulb and corresponding power rating,
see the paragraph "Changing a bulb".
FRONT LIGHT CLUSTERS
The front light clusters fig. 134 contain sidelight,
dipped beam, main beam and direction indicator
bulbs.
The bulbs are arranged inside the light cluster as
follows:
❒A Side lights/tail lights and main/dipped beam
headlights;
❒B Direction indicators.SIDE LIGHTS - TAIL LIGHTS
To change the bulb, proceed as follows:
❒remove the protective lid A fig. 134;
❒turn the bulb holder A fig. 135 anticlockwise and
remove it;
❒remove the bulb B and replace it;
❒refit the new bulb, insert the bulb holder A fig. 135
again and then refit the protective lid A fig. 134
correctly.
fig. 134
F0T0093
fig. 135
F0T0094
146KNOW YOUR
VEHICLE
SAFETY
STARTING AND
DRIVING
WARNING LIGHTS
AND MESSAGES
IN AN
EMERGENCY
SERVICING AND
MAINTENANCE
TECHNICAL
SPECIFICATIONS
INDEX
Page 156 of 231
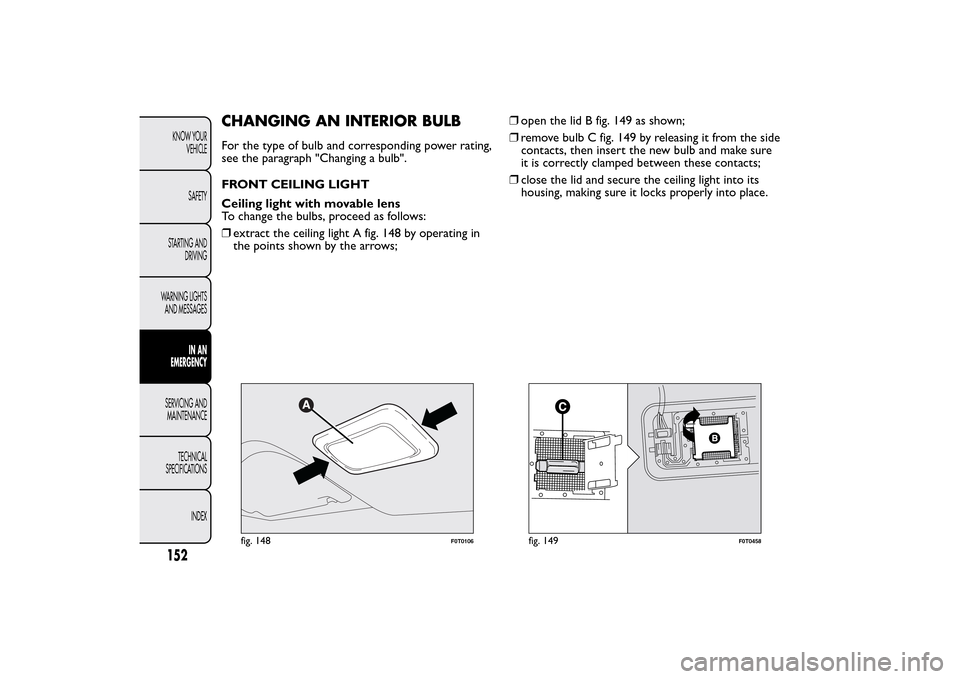
CHANGING AN INTERIOR BULBFor the type of bulb and corresponding power rating,
see the paragraph "Changing a bulb".
FRONT CEILING LIGHT
Ceiling light with movable lens
To change the bulbs, proceed as follows:
❒extract the ceiling light A fig. 148 by operating in
the points shown by the arrows;❒open the lid B fig. 149 as shown;
❒remove bulb C fig. 149 by releasing it from the side
contacts, then insert the new bulb and make sure
it is correctly clamped between these contacts;
❒close the lid and secure the ceiling light into its
housing, making sure it locks properly into place.
fig. 148
F0T0106
fig. 149
F0T0458
152KNOW YOUR
VEHICLE
SAFETY
STARTING AND
DRIVING
WARNING LIGHTS
AND MESSAGES
IN AN
EMERGENCY
SERVICING AND
MAINTENANCE
TECHNICAL
SPECIFICATIONS
INDEX
Page 159 of 231
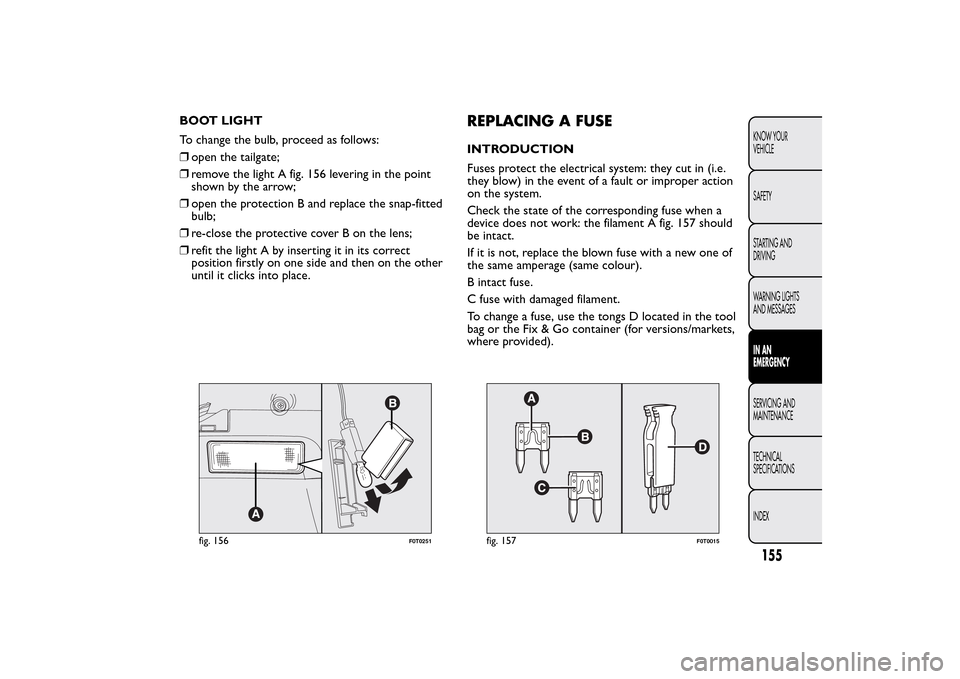
BOOT LIGHT
To change the bulb, proceed as follows:
❒open the tailgate;
❒remove the light A fig. 156 levering in the point
shown by the arrow;
❒open the protection B and replace the snap-fitted
bulb;
❒re-close the protective cover B on the lens;
❒refit the light A by inserting it in its correct
position firstly on one side and then on the other
until it clicks into place.
REPLACING A FUSEINTRODUCTION
Fuses protect the electrical system: they cut in (i.e.
they blow) in the event of a fault or improper action
on the system.
Check the state of the corresponding fuse when a
device does not work: the filament A fig. 157 should
be intact.
If it is not, replace the blown fuse with a new one of
the same amperage (same colour).
B intact fuse.
C fuse with damaged filament.
To change a fuse, use the tongs D located in the tool
bag or the Fix & Go container (for versions/markets,
where provided).
fig. 156
F0T0251
fig. 157
F0T0015
155KNOW YOUR
VEHICLE
SAFETY
STARTING AND
DRIVING
WARNING LIGHTS
AND MESSAGESIN AN
EMERGENCYSERVICING AND
MAINTENANCE
TECHNICAL
SPECIFICATIONS
INDEX
Page 162 of 231
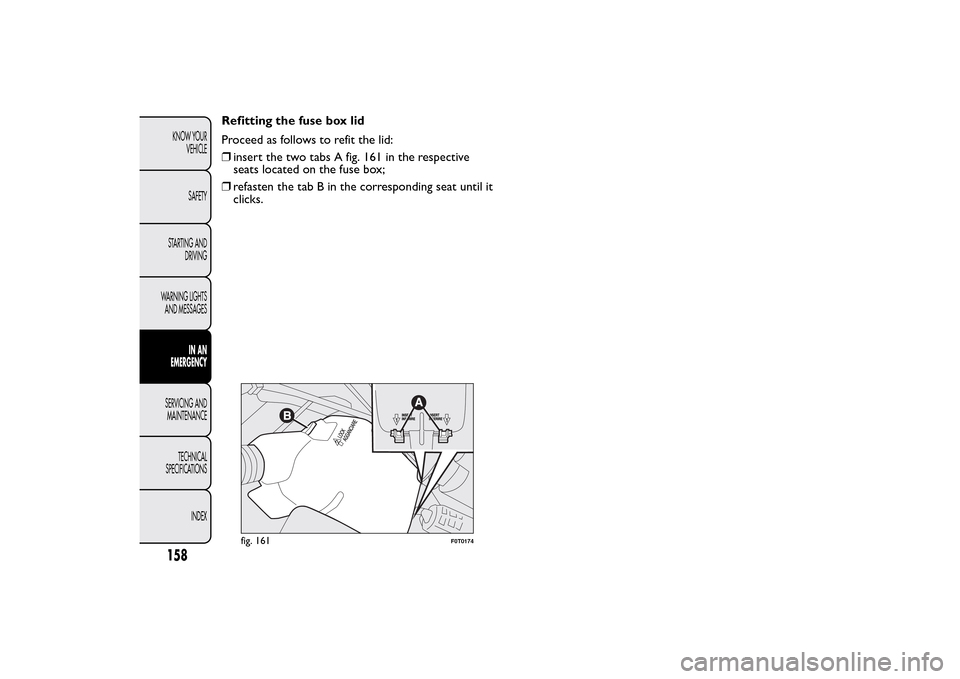
Refitting the fuse box lid
Proceed as follows to refit the lid:
❒insert the two tabs A fig. 161 in the respective
seats located on the fuse box;
❒refasten the tab B in the corresponding seat until it
clicks.
fig. 161
F0T0174
158KNOW YOUR
VEHICLE
SAFETY
STARTING AND
DRIVING
WARNING LIGHTS
AND MESSAGES
IN AN
EMERGENCY
SERVICING AND
MAINTENANCE
TECHNICAL
SPECIFICATIONS
INDEX
Page 171 of 231
The front and rear tow hooks should be
used only for emergencies on the road.You
are allowed to tow the car for short
distances using an appropriate device in
accordance with the highway code (a rigid bar),
to move the vehicle on the road in readiness
for towing or transporting via a breakdown
vehicle.Tow hooks MUST NOT be used to tow
vehicles off the road or where there are obstacles
and/or for towing operations using cables or
other non-rigid devices. Respecting the above
conditions, towing must take place with the two
vehicles (one towing, the other towed) aligned
as much as possible along the same centre line.
167KNOW YOUR
VEHICLE
SAFETY
STARTING AND
DRIVING
WARNING LIGHTS
AND MESSAGESIN AN
EMERGENCYSERVICING AND
MAINTENANCE
TECHNICAL
SPECIFICATIONS
INDEX
Page 178 of 231
ENGINE OIL
Engine oil check
Check the oil level a few minutes (about 5) after the
engine has stopped, with the vehicle parked on
level ground.
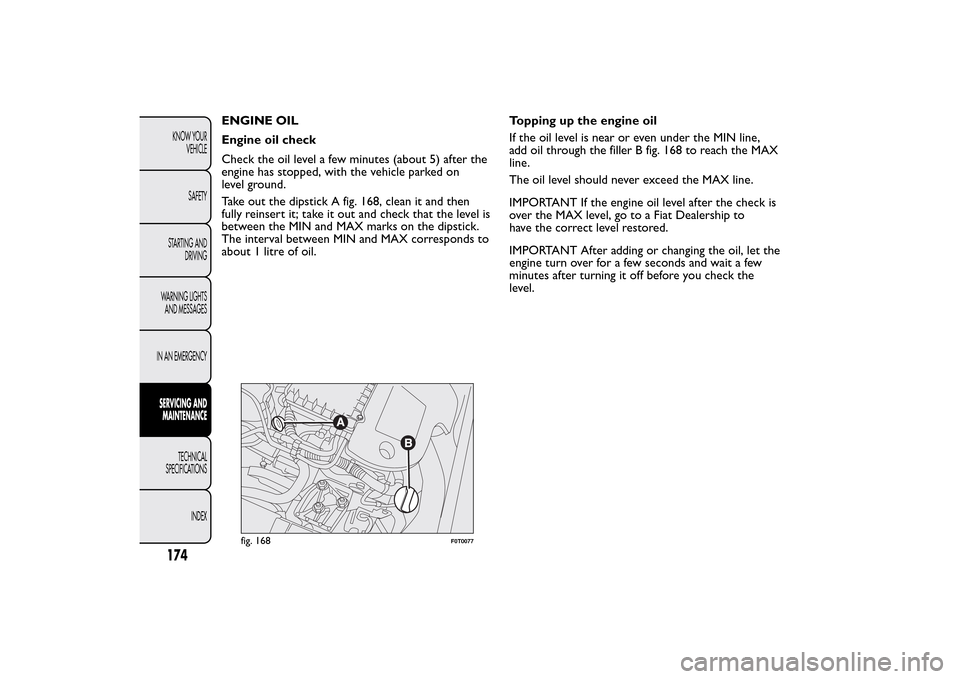
Take out the dipstick A fig. 168, clean it and then
fully reinsert it; take it out and check that the level is
between the MIN and MAX marks on the dipstick.
The interval between MIN and MAX corresponds to
about 1 litre of oil.Topping up the engine oil
If the oil level is near or even under the MIN line,
add oil through the filler B fig. 168 to reach the MAX
line.
The oil level should never exceed the MAX line.
IMPORTANT If the engine oil level after the check is
over the MAX level, go to a Fiat Dealership to
have the correct level restored.
IMPORTANT After adding or changing the oil, let the
engine turn over for a few seconds and wait a few
minutes after turning it off before you check the
level.
fig. 168
F0T0077
174KNOW YOUR
VEHICLE
SAFETY
STARTING AND
DRIVING
WARNING LIGHTS
AND MESSAGES
IN AN EMERGENCY
SERVICING AND
MAINTENANCE
TECHNICAL
SPECIFICATIONS
INDEX
Page 185 of 231
Follow the battery manufacturer's instructions for
maintenance.
Incorrect assembly of electric and
electronic devices may cause severe
damage to your vehicle. Go to a Fiat
Dealership if you want to install accessories
(alarms, mobile phone, etc .): they will suggest the
most suitable devices and advise you if a higher
capacity batter y needs to be installed.Batteries contain substances that are very
harmful to the environment .You are
recommended to go to a Fiat Dealership
to have the batter y replaced where the old
battery will be disposed of respecting both the
environment and the laws in force.If the vehicle needs to be off the road for
a long period under conditions of intense
cold, remove the battery and take it to
a heated place, otherwise it may freeze.
WARNING
When performing any operation on the
battery or near it , always protect your
eyes with the special goggles.USEFUL ADVICE FOR EXTENDING THE
LIFE OF YOUR BATTERY
To avoid draining your battery and make it last
longer, follow these instructions closely:
❒when you park the vehicle, ensure the doors, boot
and bonnet are closed properly so that the ceiling
lights do not stay on;
❒turn off the ceiling lights, although the car does
have an automatic system for switching off internal
lights;
❒do not keep accessories (e.g. sound system, hazard
lights, etc.) switched on for a long time when the
engine is not running;
❒before performing any operation on the electrical
system, disconnect the battery negative cable;
❒make sure that battery terminals are always be
perfectly tight.
181KNOW YOUR
VEHICLE
SAFETY
STARTING AND
DRIVING
WARNING LIGHTS
AND MESSAGES
IN AN EMERGENCYSERVICING AND
MAINTENANCETECHNICAL
SPECIFICATIONS
INDEX
Page 192 of 231
❒the car wash should use water added to a soapy
solution;
❒rinse thoroughly to avoid soap marks staying on
the bodywork or less visible parts.
Some car washes with old-style blades
and/or in a poor state of repair can
damage the paintwork, facilitating the
formation of lines that give the paint a dull/misty
appearance, especially on dark colours. If this
happens, lightly polish the paintwork with
appropriate products.
Dry the less visible parts particularly carefully, such
as the door frames, bonnet and the headlight frames,
where water may stagnate more easily. It is a good
idea to leave the vehicle outdoors for a while after
washing it to give water time to evaporate.
Do not wash the vehicle after it has been left in the
sun or with the bonnet hot: this may alter the shine
of the paintwork.Exterior plastic parts should be cleaned in the same
way as the rest of the vehicle. Where possible, do
not park the vehicle under trees; the resinous
substances released by many species give the paint a
dull appearance and increase the possibility of rust.
IMPORTANT Bird droppings should be washed
off immediately and thoroughly as the acid
they contain is particularly aggressive.
Detergents cause water pollution.The
vehicle should be washed in areas
equipped for collecting and purifying the
liquid used in the washing process.
188KNOW YOUR
VEHICLE
SAFETY
STARTING AND
DRIVING
WARNING LIGHTS
AND MESSAGES
IN AN EMERGENCY
SERVICING AND
MAINTENANCE
TECHNICAL
SPECIFICATIONS
INDEX
Page 196 of 231
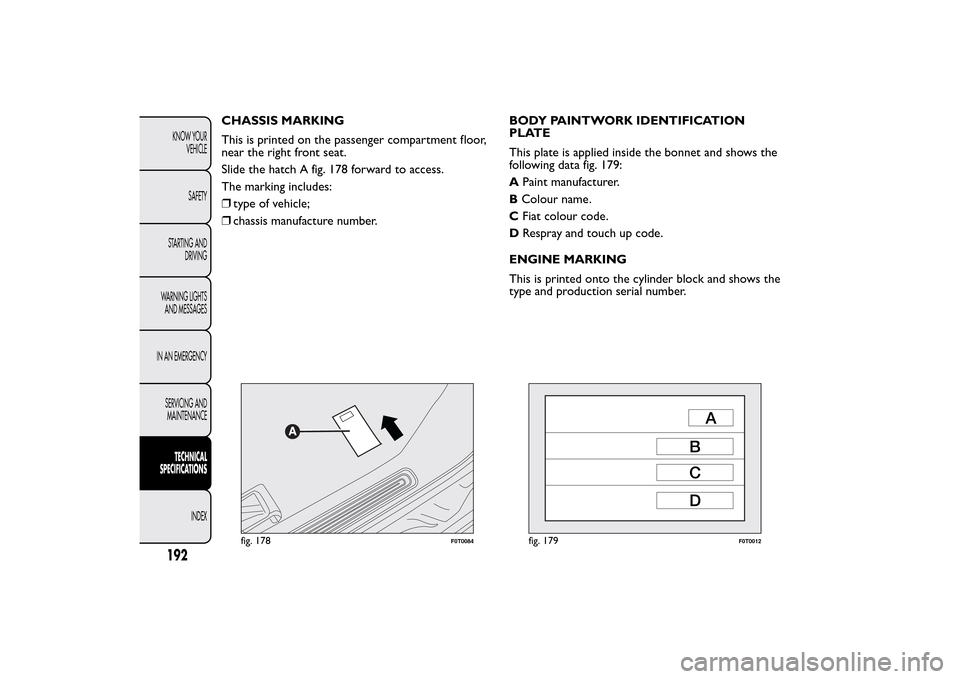
CHASSIS MARKING
This is printed on the passenger compartment floor,
near the right front seat.
Slide the hatch A fig. 178 forward to access.
The marking includes:
❒type of vehicle;
❒chassis manufacture number.BODY PAINTWORK IDENTIFICATION
PLATE
This plate is applied inside the bonnet and shows the
following data fig. 179:
APaint manufacturer.
BColour name.
C
D
ENGINE MARKING
This is printed onto the cylinder block and shows the
type and production serial number.
fig. 178
F0T0084
fig. 179
F0T0012
192KNOW YOUR
VEHICLE
SAFETY
STARTING AND
DRIVING
WARNING LIGHTS
AND MESSAGES
IN AN EMERGENCY
SERVICING AND
MAINTENANCETECHNICAL
SPECIFICATIONS
INDEX
Fiat colour code.
Respray and touch up code.