height FIAT SEDICI 2009 2.G Owners Manual
[x] Cancel search | Manufacturer: FIAT, Model Year: 2009, Model line: SEDICI, Model: FIAT SEDICI 2009 2.GPages: 270, PDF Size: 3.44 MB
Page 30 of 270
29
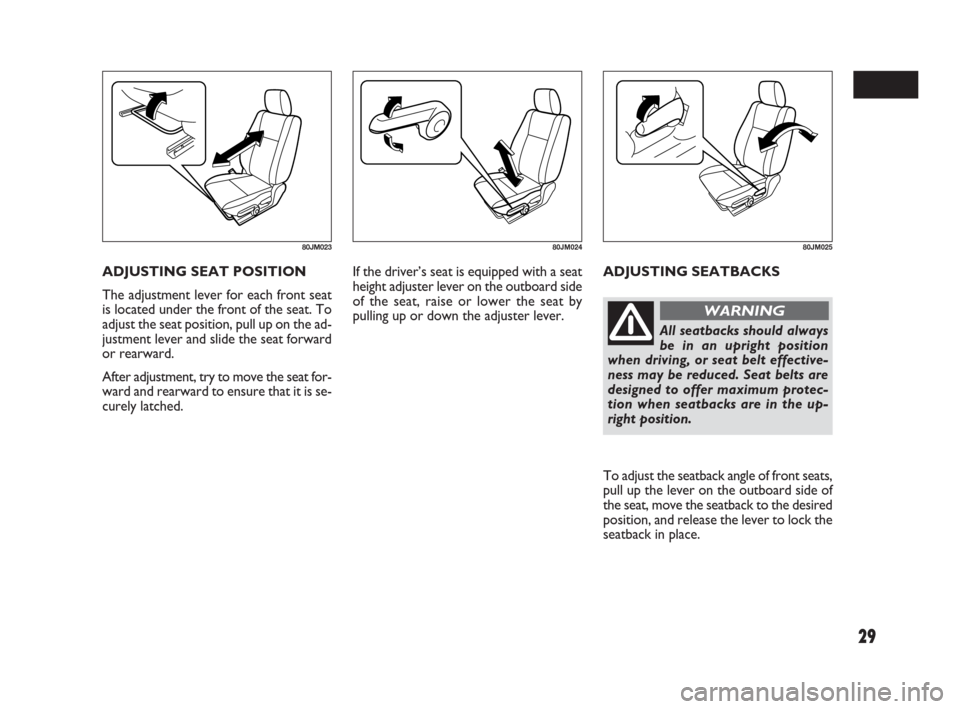
If the driver’s seat is equipped with a seat
height adjuster lever on the outboard side
of the seat, raise or lower the seat by
pulling up or down the adjuster lever.ADJUSTING SEATBACKS ADJUSTING SEAT POSITION
The adjustment lever for each front seat
is located under the front of the seat. To
adjust the seat position, pull up on the ad-
justment lever and slide the seat forward
or rearward.
After adjustment, try to move the seat for-
ward and rearward to ensure that it is se-
curely latched.
80JM02380JM02480JM025
All seatbacks should always
be in an upright position
when driving, or seat belt effective-
ness may be reduced. Seat belts are
designed to offer maximum protec-
tion when seatbacks are in the up-
right position.
WARNING
To adjust the seatback angle of front seats,
pull up the lever on the outboard side of
the seat, move the seatback to the desired
position, and release the lever to lock the
seatback in place.
009-056 SEDICI LUM FL GB 1E 19-06-2009 14:11 Pagina 29
Page 37 of 270
36
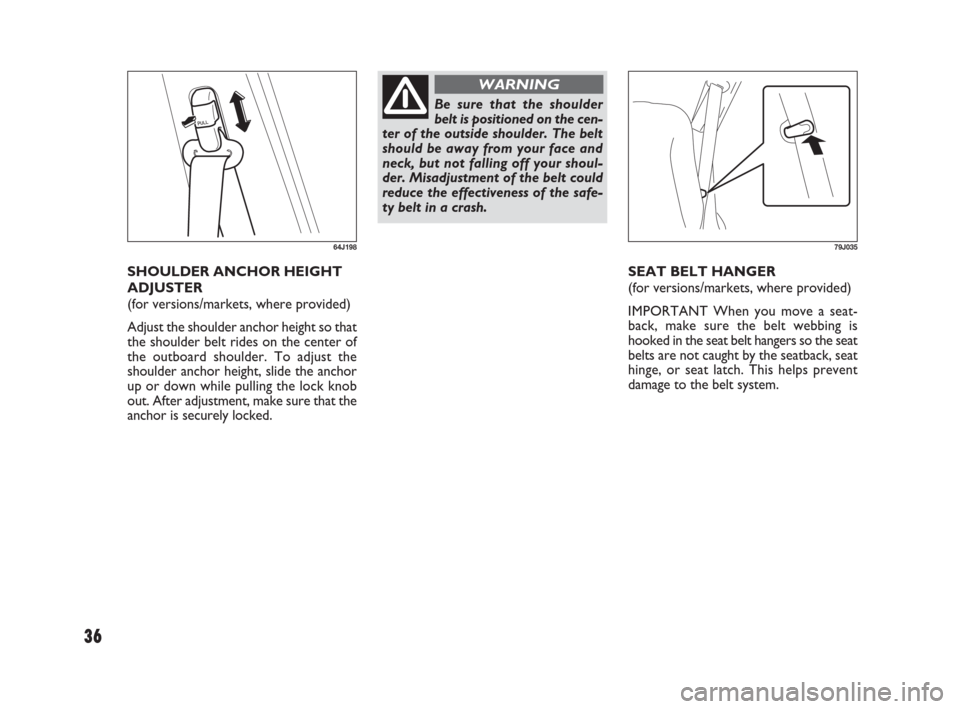
SEAT BELT HANGER
(for versions/markets, where provided)
IMPORTANT When you move a seat-
back, make sure the belt webbing is
hooked in the seat belt hangers so the seat
belts are not caught by the seatback, seat
hinge, or seat latch. This helps prevent
damage to the belt system. SHOULDER ANCHOR HEIGHT
ADJUSTER
(for versions/markets, where provided)
Adjust the shoulder anchor height so that
the shoulder belt rides on the center of
the outboard shoulder. To adjust the
shoulder anchor height, slide the anchor
up or down while pulling the lock knob
out. After adjustment, make sure that the
anchor is securely locked.
64J198
Be sure that the shoulder
belt is positioned on the cen-
ter of the outside shoulder. The belt
should be away from your face and
neck, but not falling off your shoul-
der. Misadjustment of the belt could
reduce the effectiveness of the safe-
ty belt in a crash.
WARNING
79J035
009-056 SEDICI LUM FL GB 1E 19-06-2009 14:11 Pagina 36
Page 68 of 270
67
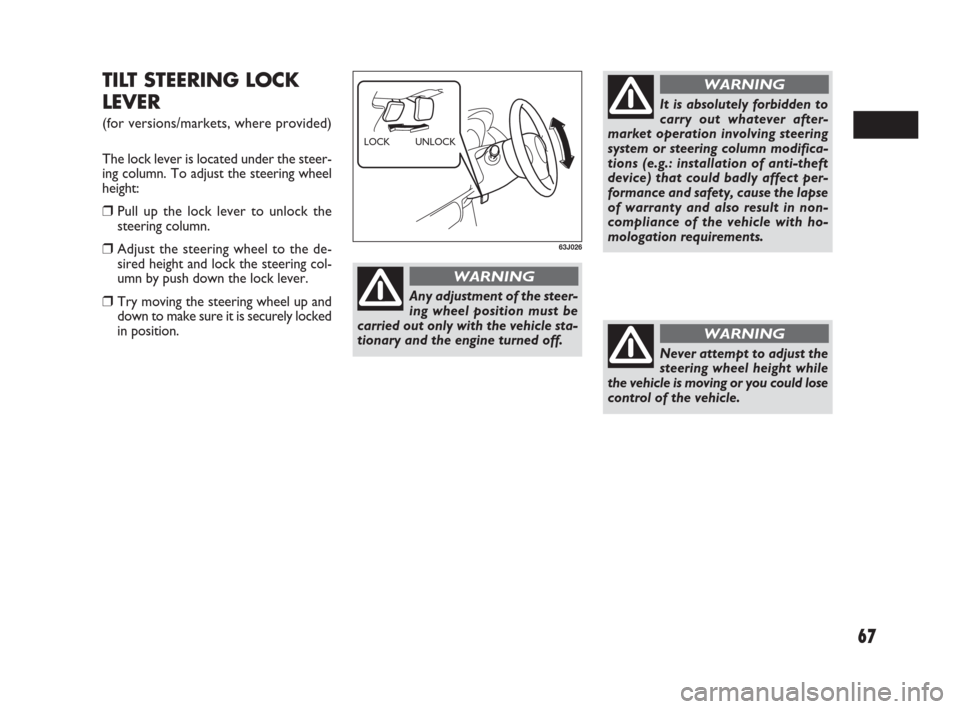
TILT STEERING LOCK
LEVER
(for versions/markets, where provided)
The lock lever is located under the steer-
ing column. To adjust the steering wheel
height:
❒Pull up the lock lever to unlock the
steering column.
❒Adjust the steering wheel to the de-
sired height and lock the steering col-
umn by push down the lock lever.
❒Try moving the steering wheel up and
down to make sure it is securely locked
in position.
63J026
UNLOCK LOCK
Never attempt to adjust the
steering wheel height while
the vehicle is moving or you could lose
control of the vehicle.
WARNING
Any adjustment of the steer-
ing wheel position must be
carried out only with the vehicle sta-
tionary and the engine turned off.
WARNING
It is absolutely forbidden to
carry out whatever after-
market operation involving steering
system or steering column modifica-
tions (e.g.: installation of anti-theft
device) that could badly affect per-
formance and safety, cause the lapse
of warranty and also result in non-
compliance of the vehicle with ho-
mologation requirements.
WARNING
057-070 SEDICI LUM FL GB 1E 19-06-2009 10:32 Pagina 67
Page 177 of 270
176
MIRRORS
Check to see if your vehicle’s mirrors
meet local requirements for mirrors used
on towing vehicles. If they do not, you
must install the required mirrors before
you tow.
VEHICLE/TRAILER LOADING
To load your vehicle and trailer proper-
ly, you must know how to measure gross
trailer weight and trailer nose weight.
Gross Trailer Weight is the weight of the
trailer plus all the cargo in it. You can mea-
sure gross trailer weight by putting the ful-
ly loaded trailer on a vehicle scale.
Nose Weight is the downward force ex-
erted on the tow bar by the trailer cou-
pler, with the trailer fully loaded and the
coupler at its normal towing height. This
weight can be measured using a bathroom
scales.
The weight of your loaded trailer (Gross
Trailer Weight) should never exceed the
“Towing capacity”.Distribute cargo in your trailer so that
nose weight is about 10% of gross trailer
weight, but does not exceed “Maximum
vertical load on trailer hitch point”. You
should measure gross trailer weight and
nose weight before towing to make sure
that your load is properly distributed. TIRES
When towing a trailer, it is
very important for your ve-
hicle and trailer to have properly in-
flated tires. Your vehicle’s tires should
be inflated to the pressures listed on
your vehicles Tire Information label.
If laden pressures are listed on the la-
bel, the tires should be inflated to the
laden pressures. Inflate trailer tires
according to the specifications pro-
vided by the trailer manufacturer.
WARNING
Improper weight distribution
of your trailer may result in
poor vehicle handling and swaying of
the trailer. Always make sure that
trailer nose weight is about 10% of
gross trailer weight, but does not ex-
ceed “Maximum vertical load on
trailer hitch point”. Also make sure
that the cargo is properly secured.
Failure to observe this requirement
may result in an accident.
WARNING
173-182 SEDICI LUM FL GB 1E 19-06-2009 10:49 Pagina 176
Page 207 of 270
206
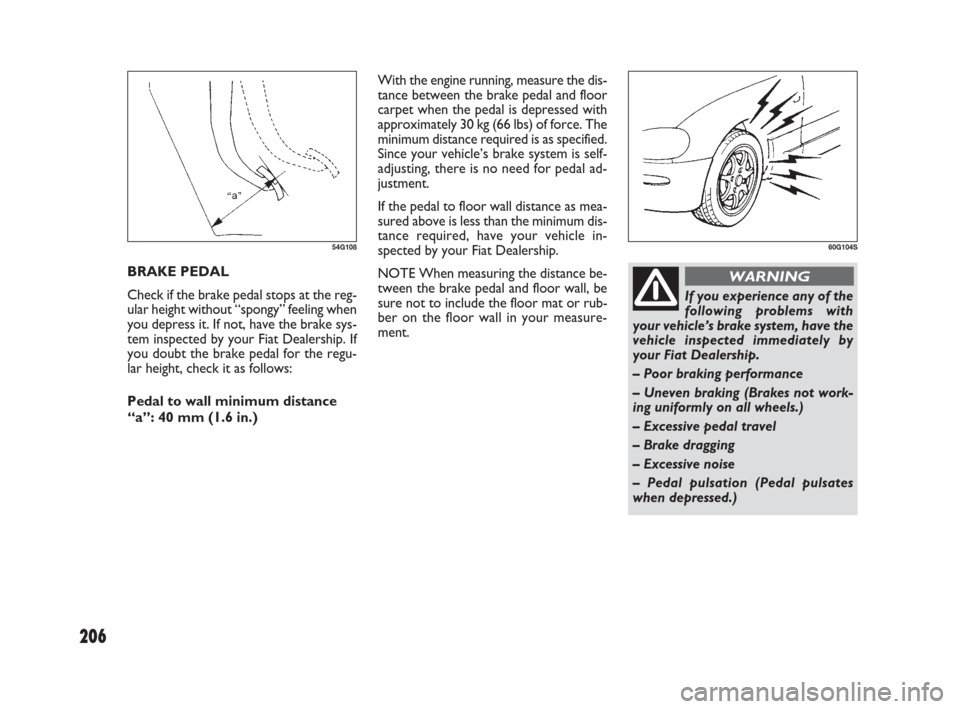
With the engine running, measure the dis-
tance between the brake pedal and floor
carpet when the pedal is depressed with
approximately 30 kg (66 lbs) of force. The
minimum distance required is as specified.
Since your vehicle’s brake system is self-
adjusting, there is no need for pedal ad-
justment.
If the pedal to floor wall distance as mea-
sured above is less than the minimum dis-
tance required, have your vehicle in-
spected by your Fiat Dealership.
NOTE When measuring the distance be-
tween the brake pedal and floor wall, be
sure not to include the floor mat or rub-
ber on the floor wall in your measure-
ment. BRAKE PEDAL
Check if the brake pedal stops at the reg-
ular height without “spongy” feeling when
you depress it. If not, have the brake sys-
tem inspected by your Fiat Dealership. If
you doubt the brake pedal for the regu-
lar height, check it as follows:
Pedal to wall minimum distance
“a”: 40 mm (1.6 in.)
54G10860G104S
If you experience any of the
following problems with
your vehicle’s brake system, have the
vehicle inspected immediately by
your Fiat Dealership.
– Poor braking performance
– Uneven braking (Brakes not work-
ing uniformly on all wheels.)
– Excessive pedal travel
– Brake dragging
– Excessive noise
– Pedal pulsation (Pedal pulsates
when depressed.)
WARNING
183-230 SEDICI LUM FL GB 1E 19-06-2009 11:00 Pagina 206
Page 254 of 270
253
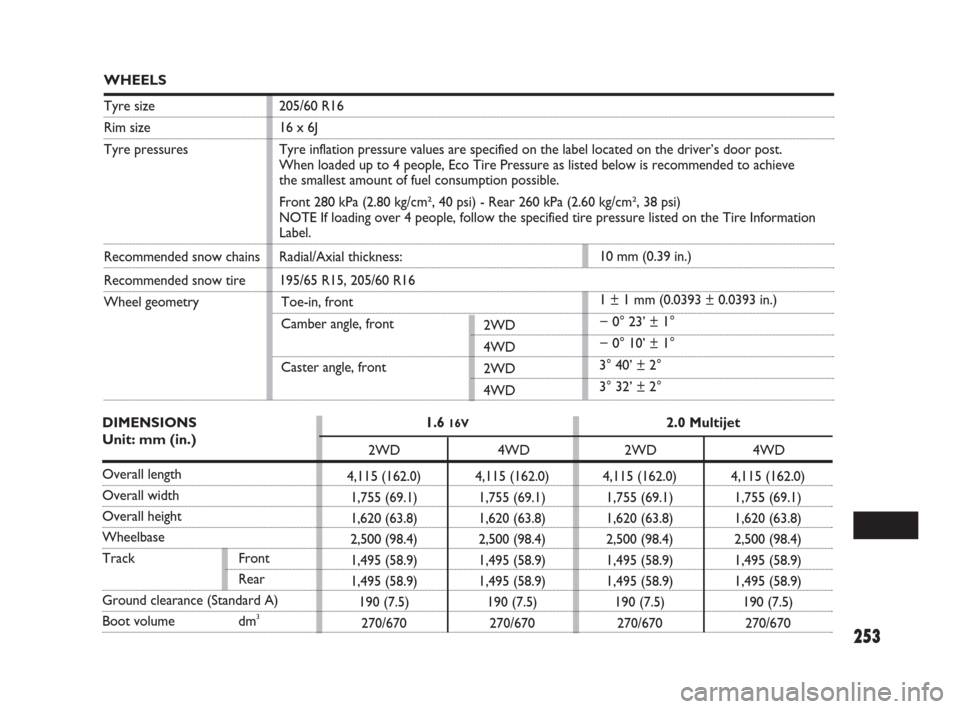
4,115 (162.0)
1,755 (69.1)
1,620 (63.8)
2,500 (98.4)
1,495 (58.9)
1,495 (58.9)
190 (7.5)
270/6704,115 (162.0)
1,755 (69.1)
1,620 (63.8)
2,500 (98.4)
1,495 (58.9)
1,495 (58.9)
190 (7.5)
270/6704,115 (162.0)
1,755 (69.1)
1,620 (63.8)
2,500 (98.4)
1,495 (58.9)
1,495 (58.9)
190 (7.5)
270/6704,115 (162.0)
1,755 (69.1)
1,620 (63.8)
2,500 (98.4)
1,495 (58.9)
1,495 (58.9)
190 (7.5)
270/670
DIMENSIONS 1.6 16V2.0 Multijet
Unit: mm (in.)
2WD 4WD 2WD 4WD
Overall length
Overall width
Overall height
Wheelbase
Track Front
Rear
Ground clearance (Standard A)
Boot volume dm3
WHEELS
Tyre size 205/60 R16
Rim size 16 x 6J
Tyre pressures Tyre inflation pressure values are specified on the label located on the driver’s door post.
When loaded up to 4 people, Eco Tire Pressure as listed below is recommended to achieve
the smallest amount of fuel consumption possible.
Front 280 kPa (2.80 kg/cm², 40 psi) - Rear 260 kPa (2.60 kg/cm², 38 psi)
NOTE If loading over 4 people, follow the specified tire pressure listed on the Tire Information
Label.
Recommended snow chains Radial/Axial thickness:
Recommended snow tire 195/65 R15, 205/60 R16
Wheel geometry Toe-in, front
Camber angle, front
2WD
4WD
Caster angle, front
2WD
4WD10 mm (0.39 in.)
1 ± 1 mm (0.0393 ± 0.0393 in.)
− 0° 23’ ± 1°
− 0° 10’ ± 1°
3° 40’ ± 2°
3° 32’ ± 2°
249-254 SEDICI LUM FL GB 1E 19-06-2009 11:10 Pagina 253
Page 264 of 270
263
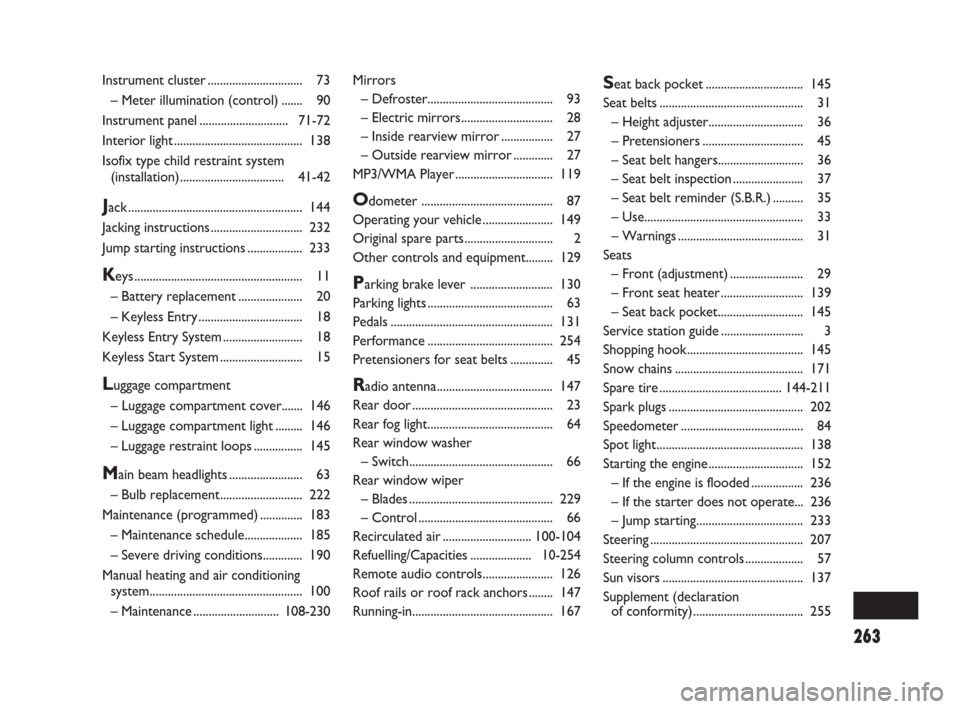
Mirrors
– Defroster......................................... 93
– Electric mirrors.............................. 28
– Inside rearview mirror ................. 27
– Outside rearview mirror ............. 27
MP3/WMA Player ................................ 119
Odometer ........................................... 87
Operating your vehicle....................... 149
Original spare parts............................. 2
Other controls and equipment......... 129
Parking brake lever ........................... 130
Parking lights ......................................... 63
Pedals..................................................... 131
Performance ......................................... 254
Pretensioners for seat belts .............. 45
Radio antenna...................................... 147
Rear door.............................................. 23
Rear fog light......................................... 64
Rear window washer
– Switch............................................... 66
Rear window wiper
– Blades............................................... 229
– Control ............................................ 66
Recirculated air.............................100-104
Refuelling/Capacities....................10-254
Remote audio controls....................... 126
Roof rails or roof rack anchors ........ 147
Running-in.............................................. 167
Seat back pocket ................................ 145
Seat belts............................................... 31
– Height adjuster............................... 36
– Pretensioners................................. 45
– Seat belt hangers............................ 36
– Seat belt inspection....................... 37
– Seat belt reminder (S.B.R.) .......... 35
– Use.................................................... 33
– Warnings......................................... 31
Seats
– Front (adjustment) ........................ 29
– Front seat heater........................... 139
– Seat back pocket............................ 145
Service station guide........................... 3
Shopping hook...................................... 145
Snow chains .......................................... 171
Spare tire........................................144-211
Spark plugs............................................ 202
Speedometer........................................ 84
Spot light................................................ 138
Starting the engine............................... 152
– If the engine is flooded................. 236
– If the starter does not operate... 236
– Jump starting................................... 233
Steering.................................................. 207
Steering column controls................... 57
Sun visors .............................................. 137
Supplement (declaration
of conformity).................................... 255 Instrument cluster............................... 73
– Meter illumination (control) ....... 90
Instrument panel.............................71-72
Interior light.......................................... 138
Isofix type child restraint system
(installation)..................................41-42
Jack ......................................................... 144
Jacking instructions.............................. 232
Jump starting instructions .................. 233
Keys ....................................................... 11
– Battery replacement..................... 20
– Keyless Entry.................................. 18
Keyless Entry System.......................... 18
Keyless Start System........................... 15
Luggage compartment
– Luggage compartment cover....... 146
– Luggage compartment light ......... 146
– Luggage restraint loops ................ 145
Main beam headlights ........................ 63
– Bulb replacement........................... 222
Maintenance (programmed) .............. 183
– Maintenance schedule................... 185
– Severe driving conditions............. 190
Manual heating and air conditioning
system.................................................. 100
– Maintenance............................108-230
261-268 SEDICI LUM FL GB 1E 19-06-2009 11:12 Pagina 263