FIAT SPIDER ABARTH 2017 Owners Manual
Manufacturer: FIAT, Model Year: 2017, Model line: SPIDER ABARTH, Model: FIAT SPIDER ABARTH 2017Pages: 292, PDF Size: 9.24 MB
Page 261 of 292
body, wax the metal trim to maintain its
lustre:
Use wax which contains no
abrasives. Waxes containing abrasive
will remove paint and could damage
bright metal parts.
Use a good grade of natural wax for
metallic, mica, and solid colors.
When waxing, coat evenly with the
sponge supplied or a soft cloth.
Wipe off the wax with a soft cloth.
Note: A spot remover to remove oil,
tar, and similar materials will usually also
take off the wax. Rewax these areas
even if the rest of the vehicle does not
need it.
Repairing Damage To
The Finish
Deep scratches or chips on the finish
should be repaired promptly. Exposed
metal quickly rusts and can lead to
major repairs.
Note: If your vehicle is damaged and
needs metal parts repaired or replaced,
make sure the body shop applies
corrosion prevention materials to all
parts, both repaired and new. This will
prevent them from rusting.
Bright-Metal
Maintenance
Use tar remover to remove road tar and
insects. Never do this with a knife or
similar tool. To prevent corrosion on brigh-tmetal
surfaces, apply wax or chrome
preservative and rub it to a high lustre.
During cold weather or in coastal areas,
cover bright-metal parts with a coating
of wax or preservative heavier than
usual. It would also help to coat them
with noncorrosive petroleum jelly or
some other protective compound.
Caution!Do not use steel wool, abrasive cleaners, or
strong detergents containing highly alkaline
or caustic agents on chrome plated or
anodized aluminium parts. This may result
in damage to the protective coating and
cause discoloration or paint deterioration.
Underbody Maintenance
Road chemicals and salt used for ice
and snow removal and solvents used
for dust control may collect on the
underbody. If not removed, they will
speed up rusting and deterioration of
such underbody parts as fuel lines,
frame, floor pan, and exhaust system,
even though these parts may be coated
with anti-corrosive material.
Thoroughly flush the underbody and
wheel housings with lukewarm or cold
water at the end of each winter. Try also
to do this every month.
Pay special attention to these areas
because they easily hide mud and dirt. It will do more harm than good to wet
down the road grime without removing
it.
The lower edges of doors, rocker
panels, and frame members have drain
holes that should not be clogged.
Water trapped there will cause rusting.
Aluminium Wheel
Maintenance
A protective coating is provided over
the aluminium wheels. Special care is
needed to protect this coating.
Note: Do not use any detergent other
than mild detergent. Before using any
detergent, verify the ingredients.
Otherwise, the product could discolor
or stain the aluminium wheels.
Caution!Do not use a wire brush or any abrasive
cleaner, polishing compound, or solvent on
aluminium wheels. They may damage the
coating.
Note: Always use a sponge or soft
cloth to clean the wheels. Rinse the
wheels thoroughly with lukewarm or
cold water. Also, be sure to clean the
wheels after driving on dusty or salted
roads to help prevent corrosion.
259
Page 262 of 292
Convertible Top
Maintenance
The convertible top is made of a special
high-grade material, but if it's not taken
good care of, hardening, staining, and
loss of lustre will result. Maintain it
under these guidelines.
Washing
Do not wait until the convertible top
gets really dirty before cleaning it. Dirt
that's there too long will cause
deterioration.
Before washing, remove dust and
coarse particulate with a soft brush.
Gently clean the convertible top with
a synthetic neutral detergent, lots of
water, and a soft brush.
Rinse it thoroughly with clean water
to remove all the soap.
Wipe it as dry as you can before the
water dries on it.
Then allow it to dry completely before
lowering it. Caution!Automatic and high-pressure car
washes are harmful to a convertible top.
Avoid them.
Do not spray water directly on the area
where the window glass and the
convertible top meet. This would probably
cause water to enter the interior.
Do not spray water directly on the seam
area of the body and the convertible top as
it could result in water penetrating the
interior.
Do not wipe the convertible top using
alcohol, chlorine bleach, or organic
solvents such as thinner, benzene, or
gasoline. Otherwise, they may cause
discoloration or stains.
Too much treatment on the convertible
top can be as damaging as too little. Follow
the manufacturer's directions. Do not over
do it!
Note:
Some leather treatment products
can ruin the convertible top's gloss. Be
careful of the one you choose.
Test on an inconspicuous, small
corner of the convertible top if you are
not sure. Do not get any car wax on the
convertible top.
If you do, remove it with a good
leather cleaner or mild detergent
(about 5% solution).
Let the convertible top dry
completely before lowering after
applying treatment or dressing.
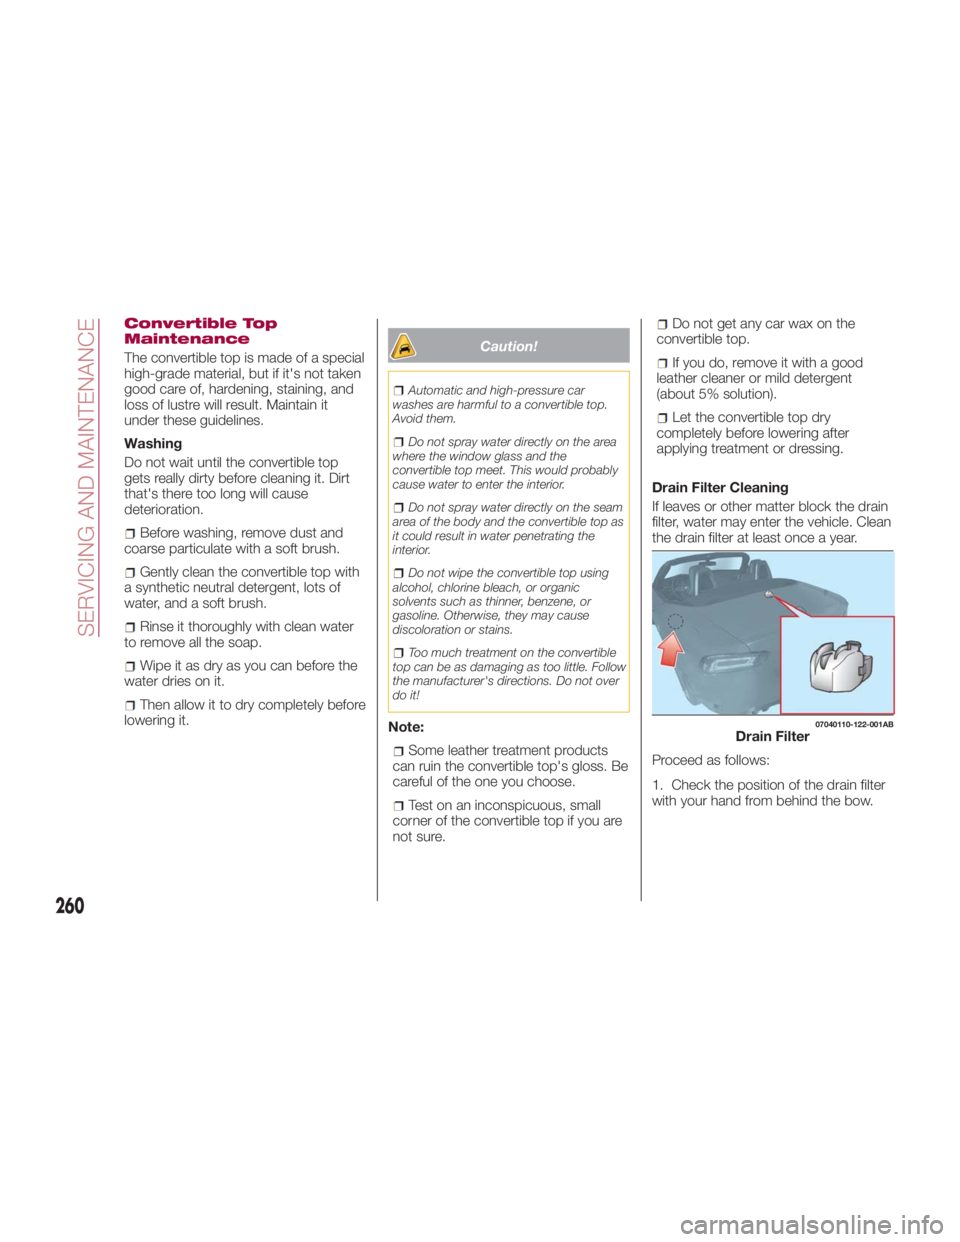
Drain Filter Cleaning
If leaves or other matter block the drain
filter, water may enter the vehicle. Clean
the drain filter at least once a year.
Proceed as follows:
1. Check the position of the drain filter
with your hand from behind the bow. 07040110-122-001AB
Drain Filter
260
SERVICING AND MAINTENANCE
Page 263 of 292
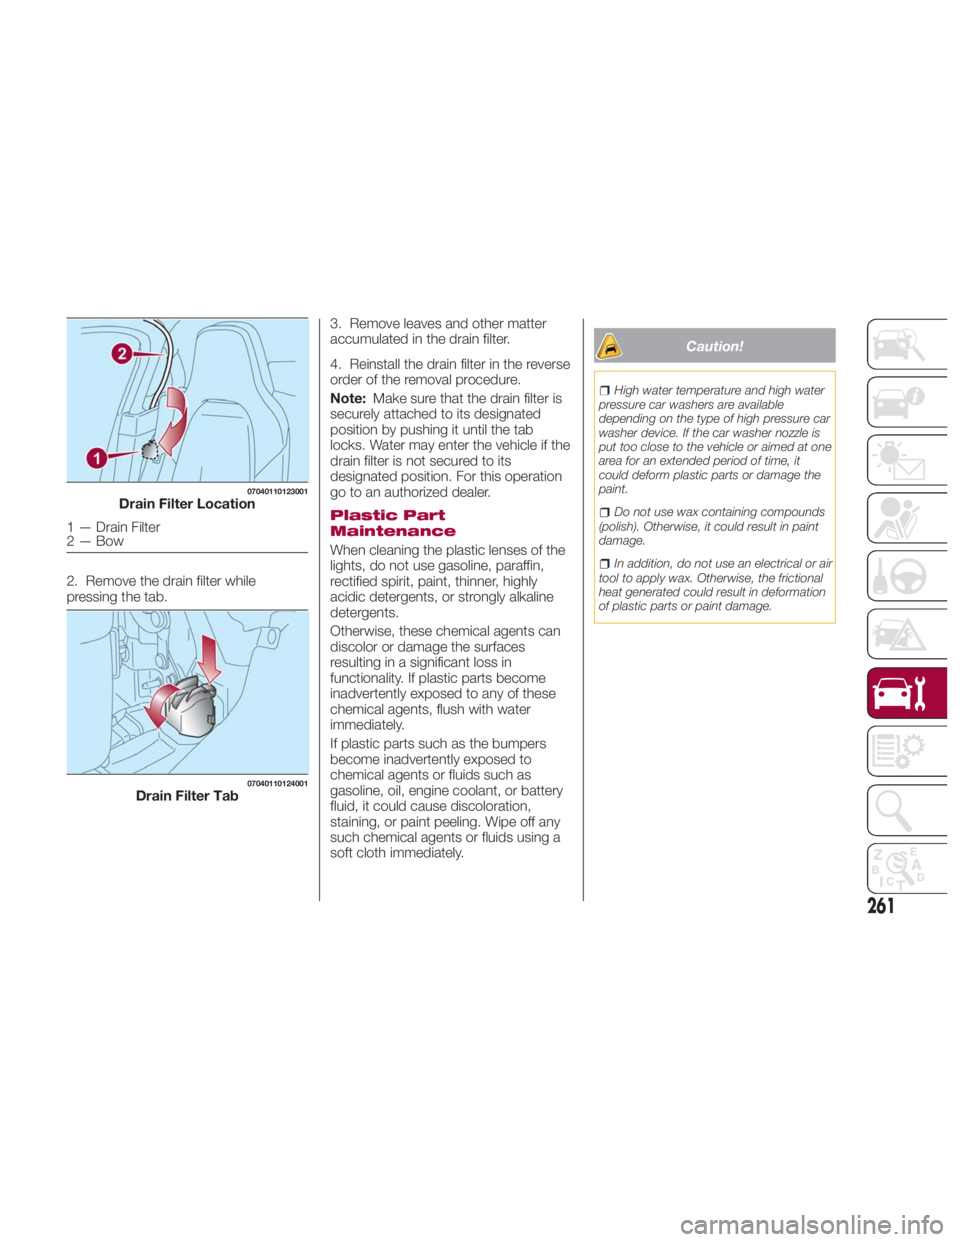
2. Remove the drain filter while
pressing the tab. 3. Remove leaves and other matter
accumulated in the drain filter.
4. Reinstall the drain filter in the reverse
order of the removal procedure.
Note: Make sure that the drain filter is
securely attached to its designated
position by pushing it until the tab
locks. Water may enter the vehicle if the
drain filter is not secured to its
designated position. For this operation
go to an authorized dealer.
Plastic Part
Maintenance
When cleaning the plastic lenses of the
lights, do not use gasoline, paraffin,
rectified spirit, paint, thinner, highly
acidic detergents, or strongly alkaline
detergents.
Otherwise, these chemical agents can
discolor or damage the surfaces
resulting in a significant loss in
functionality. If plastic parts become
inadvertently exposed to any of these
chemical agents, flush with water
immediately.
If plastic parts such as the bumpers
become inadvertently exposed to
chemical agents or fluids such as
gasoline, oil, engine coolant, or battery
fluid, it could cause discoloration,
staining, or paint peeling. Wipe off any
such chemical agents or fluids using a
soft cloth immediately. Caution! High water temperature and high water
pressure car washers are available
depending on the type of high pressure car
washer device. If the car washer nozzle is
put too close to the vehicle or aimed at one
area for an extended period of time, it
could deform plastic parts or damage the
paint.
Do not use wax containing compounds
(polish). Otherwise, it could result in paint
damage.
In addition, do not use an electrical or air
tool to apply wax. Otherwise, the frictional
heat generated could result in deformation
of plastic parts or paint damage.07040110123001
Drain Filter Location
1 — Drain Filter
2 — Bow 07040110124001
Drain Filter Tab
261
Page 264 of 292
INTERIORS Seats And Fabric Parts
Warning!Do not use volatile solvents for cleaning
purposes. Many are potentially flammable,
and if used in closed areas they may cause
respiratory harm.
Do not keep aerosol cans in the car: they
might explode. Aerosol cans must not be
exposed to a temperature exceeding
122°F (50°C). When the vehicle is exposed
to sunlight the internal temperature can
greatly exceed this value.
Caution!Direct contact of air fresheners, insect
repellents, suntan lotions, or hand
sanitizers, to the plastic, painted, or
decorated surfaces of the interior may
cause permanent damage. Wipe away
immediately.
Damage caused by these type of
products may not be covered by your New
Vehicle Limited Warranty.
Rubbing the interior side of the
convertible top vigorously with a stiff brush
or cloth may cause damage. Vinyl
Remove dust and loose dirt from vinyl
with a whisk broom or vacuum cleaner.
Clean vinyl with a leather-and-vinyl
cleaner.
Fabric
Remove dust and loose dirt from fabric
with a whisk broom or vacuum cleaner.
Clean it with a mild soap solution good
for upholstery and carpets.
Remove fresh spots immediately with a
fabric spot cleaner.
To keep the fabric looking clean and
fresh, take care of it. Otherwise its color
will be affected, it can be stained easily,
and its fire-resistance may be reduced.
Note: Use only recommended cleaners
and procedures. Others may affect
appearance and fire-resistance.
Interior Panels
When the interior panels need to be
cleaned, use soft material such as a
soft cloth soaked in clean water and
wrung out well and lightly wipe off dirt
from the surface.
If a panel requires further cleaning, wipe
dirt off using a soft cloth soaked in mild
detergent (about 5% solution) and wipe
off any remaining detergent using a
cloth soaked in clean water and wrung
out well. Caution!Do not wipe leather parts using alcohol,
chlorine bleach, or organic solvents such
as thinner, benzene, or gasoline. Otherwise,
it may cause discoloration or stains.
Note:
Scratches or nicks on the panels
and metallic trim resulting from the use
of a hard brush or cloth may not be
repairable.
Be particularly careful when
cleaning high gloss panels and metallic
trim as they can be easily scratched.
Lap / Shoulder Belt
Warning!A frayed or torn belt could rip apart in a
collision and leave you with no protection.
Inspect the belt system periodically,
checking for cuts, frays, or loose parts.
Damaged parts must be replaced
immediately. Do not disassemble or modify
the system. Seat belt assemblies must be
replaced after a collision if they have been
damaged (i.e., bent retractor, torn
webbing, etc.).
262
SERVICING AND MAINTENANCE
Page 265 of 292
Clean the webbing with a mild soap
solution recommended for upholstery or
carpets. Follow instructions. Do not
bleach or dye the belts, this may
weaken them.
After cleaning the belts, thoroughly dry
the belt webbing and make sure there
is no remaining moisture before
retracting them.
Plastic And Coated
Parts
Clean interior plastic parts with a damp
cloth (if possible made from microfiber),
and a solution of water and neutral,
non-abrasive detergent.
To clean oily or persistent stains, use
specific products free from solvents and
designed to maintain the original
appearance and color of the
components.
Remove any dust using a microfiber
cloth, if necessary moistened with
water. The use of paper tissues is not
recommended as these may leave
residues. Instrument panel precautions
Prevent caustic solutions such as
perfume and cosmetic oils from
contacting the instrument panel. They
will damage and discolor the instrument
panel. If these solutions get on the
instrument panel, wipe them off
immediately.
Note: Never use alcohol, gasoline and
derivatives to clean the instrument
panel lens.
Caution!Do not use glazing agents. Glazing agents
contain ingredients which may cause
discoloration, wrinkling, cracks and peeling.
Instrument Panel Top
When cleaning, it is recommended that
you use a clean towel dampened in a
mild detergent to remove debris.
Caution!If the surface is rubbed harshly, it could
result in the surface being damaged leaving
white scratch marks. Window Interiors
If the windows become covered with an
oily, greasy, or waxy film, clean them
with glass cleaner. Follow the directions
on the container.
Note: Do not scrape or scratch the
inside of the window glass. It could
damage the thermal filaments.
Caution!When washing the inside of the window
glass, use a soft cloth dampened in
lukewarm water, gently wiping the thermal
filaments. Use of glass cleaning products
could damage the thermal filaments.
263
Page 266 of 292
Leather Parts — If
Equipped
Caution!Do not use Alcohol and Alcohol-based
and/or Ketone based cleaning products to
clean leather seats, as damage to the seat
may result.
Remove dust and sand first using a
vacuum cleaner or other means, then
wipe dirt off using a soft cloth with a
leather cleaner or a soft cloth soaked in
mild soap.
Wipe off the remaining cleaner or soap
using a cloth soaked in clean water and
wrung out well.
Remove moisture with a dry, soft cloth
and allow the leather to further dry in a
well-ventilated, shaded area. If the leather gets wet such as from
rain, also remove moisture and dry it as
soon as possible.
Note:
Because genuine leather is a natural
material, its surface is not uniform and
it may have natural scars, scratches,
and wrinkles.
To maintain the quality for as long
as possible, periodical maintenance,
about twice a year, is recommended. Caution! Sand and dust on the seat surface may
damage the overcoat of the genuine
leather surfaces and accelerate wear
.Greasy soiling on genuine leather may
cause molding and stains.
Rubbing hard with a stiff brush or cloth
may cause damage.
Do not wipe the leather using alcohol,
chlorine bleach, or organic solvents such
as thinner, benzene, or gasoline. Otherwise,
it may cause discoloration or stains.
If the seats get wet, promptly remove
moisture with a dry cloth. Remaining
moisture on the surface may cause
deterioration such as hardening and
shrinkage.
Exposure to direct sunlight for long
periods may cause deterioration and
shrinkage. When parking the car under
direct sunlight for long periods, shade the
interior using sunshades.
Do not leave vinyl products on the seats
for long periods as they may affect the
leather quality and coloring. If the cabin
temperature becomes hot, the vinyl may
deteriorate and adhere to the genuine
leather.
264
SERVICING AND MAINTENANCE
Page 267 of 292
TECHNICAL SPECIFICATIONSIDENTIFICATION DATA ....... .266
RECOMMENDED TIRE INFLATION
PRESSURE .............. .267
ENGINE................. .269
TRANSMISSION ........... .270
BRAKES ................ .271
SUSPENSIONS ............ .272
STEERING ............... .273
DIMENSIONS ............. .274
FLUID CAPACITIES ......... .275
FLUIDS AND LUBRICANTS .... .276
PERFORMANCE ........... .278
265
Page 268 of 292
IDENTIFICATION
DATA Identification Numbers
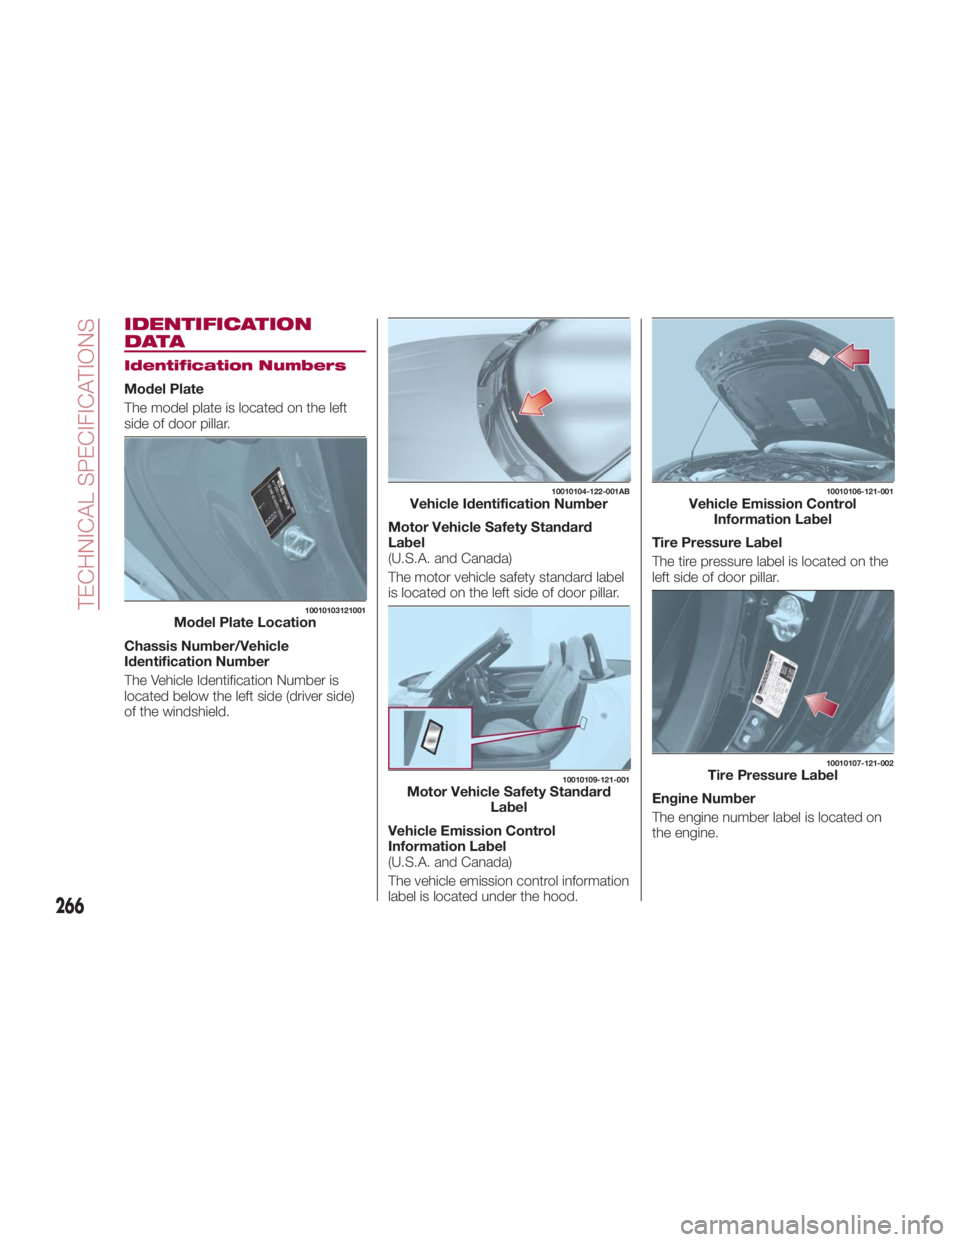
Model Plate
The model plate is located on the left
side of door pillar.
Chassis Number/Vehicle
Identification Number
The Vehicle Identification Number is
located below the left side (driver side)
of the windshield. Motor Vehicle Safety Standard
Label
(U.S.A. and Canada)
The motor vehicle safety standard label
is located on the left side of door pillar.
Vehicle Emission Control
Information Label
(U.S.A. and Canada)
The vehicle emission control information
label is located under the hood. Tire Pressure Label
The tire pressure label is located on the
left side of door pillar.
Engine Number
The engine number label is located on
the engine.10010103121001
Model Plate Location 10010104-122-001AB
Vehicle Identification Number 10010109-121-001
Motor Vehicle Safety Standard
Label 10010106-121-001
Vehicle Emission Control
Information Label 10010107-121-002
Tire Pressure Label
266
TECHNICAL SPECIFICATIONS
Page 269 of 292
RECOMMENDED
TIRE INFLATION
PRESSURE On the tire label you will find the
recommended tire inflation pressure in
both psi and kPa for the tires installed
as original equipment on the vehicle.
It is very important that the inflation
pressure of the tires on your vehicle is
maintained at the recommended
pressure.
You should check the tire pressure
regularly to insure that the proper
inflation pressure is maintained.
Note:
Tire pressures listed on the vehicle
placard or tire information label indicate
the recommended cold tire inflation
pressure, measured when the tires are
cold, after the vehicle has been parked
for at least three hours. As you drive,
the temperature in the tire warms up,
increasing the tire pressure. Always check the tire inflation
pressures on a regular basis according
to the recommended tire inflation
pressure on the tire label and in
conjunction with the information in this
Owner's Manual. Driving your vehicle
with under-inflated tires is dangerous.
Under-inflation is the most common
cause of failures in any kind of tire and
may result in severe cracking, tread
separation or “blowout”, with
unexpected loss of vehicle control and
increased risk of injury. Under-inflation
increases sidewall flexing and rolling
resistance, resulting in heat buildup
and internal damage to the tire. It
results in unnecessary tire stress,
irregular wear, loss of control and
accidents. A tire can lose up to half of
its air pressure and not appear to be
flat. It is impossible to determine
whether or not tires are properly
inflated just by looking at them. Checking Tire Pressure
Proceed as follows:
1. When you check the air pressure,
make sure the tires are cold - meaning
they are not hot from driving even a
mile.
2. Remove the cap from the valve on
one tire.
3. Firmly press a tire gauge onto the
valve.
4. Add air to achieve recommended air
pressure.
5. If you overfill the tire, release air by
pushing on the metal stem in the center
of the valve. Then recheck the pressure
with your tire gauge.
6. Replace the valve cap.
7. Visually inspect the tires to make
sure there are no nails or other objects
embedded that could poke a hole in the
tire and cause an air leak.
8. Check the sidewalls to make sure
there are no gouges, cuts, bulges,
cracks or other irregularities.
267
Page 270 of 292
Glossary Of Terms
Tire Placard
A label indicating the OE (Original
Equipment) tire sizes, recommended
inflation pressure, and the maximum
weight the vehicle can carry.
Tire Identification Number (TIN)
A number on the sidewall of each tire
providing information about the tire
brand and manufacturing plant, tire
size, and date of manufacture.
Inflation Pressure
A measure of the amount of air in a tire. kPa
Kilopascal, the metric unit for air
pressure.
psi
Pounds per square inch, the English
unit for air pressure.
B-pillar
The structural member at the side of
the vehicle behind the front door.
Original Equipment (OE)
Describes components originally
equipped on the vehicle. Vehicle Load Limit
The maximum value of the combination
weight of occupants and cargo.
Bead Area of the Tire
Area of the tire next to the rim.
Sidewall Area of the Tire
Area between the bead area and the
tread.
Tread Area of the Tire
Area on the perimeter of the tire that
contacts the road when it's mounted
on the vehicle.
268
TECHNICAL SPECIFICATIONS