bulb FIAT SPIDER ABARTH 2017 Owners Manual
[x] Cancel search | Manufacturer: FIAT, Model Year: 2017, Model line: SPIDER ABARTH, Model: FIAT SPIDER ABARTH 2017Pages: 292, PDF Size: 9.24 MB
Page 43 of 292
System Activation
With the ignition switched to ACC or
OFF, pull the headlight control lever
rearward and the low beam headlights
will turn on.
The headlights turn off after a period of
time after all doors are closed.
The time until the headlights turn off
after all of the doors are closed can be
changed through the Connect system.
The headlights turn off if the lever is
pulled again while the headlights are on,
or after three minutes of no further
action after the first pull of the lever.
Front Fog Lights
The front fog light can be activated
when the ignition is in the ON position
and the headlights or parking lights are
on.
Activation
Turn the headlight switch to the
or
position.
Rotate the fog light switch to the
position. The fog light indicator in the
instrument cluster illuminates while the
front fog lights are on.
Deactivation
Perform one of the following operations
to turn off the front fog lights:
Rotate the fog light switch to the OFF
position.
Turn the headlight switch to the OFF
position.
Switch the ignition to a position other
than ON.
The
fog light indicator in the
instrument cluster goes off when the
front fog light is turned off.
With Auto-Light Control
When the fog light switch is in
position and the headlight switch is in AUTO position, the front fog lights will
stay on.
Turn Signals
The ignition must be in the ON position
to use the turn signals and lane change
assist.
Move the signal lever down (for a left
turn) or up (for a right turn). The signal
will self-cancel after the turn is
completed.
If the indicator light continues to flash
after a turn, manually return the lever to
its original position.
The turn signal indicators (green)
in the instrument cluster flash
according to the operation of the turn
signal lever to show which signal is
active.
Note: If an indicator light stays on
without flashing or if it flashes
abnormally, one of the turn signal bulbs
may be burned out.
Lane Change Assist
Move the lever halfway toward the
direction of the lane change (until the
indicator flashes) and hold it there. It will
return to the off position when released.
Three-Flash Turn Signal
After releasing the turn signal lever, the
turn signal indicator flashes three times.
The operation can be cancelled by
moving the lever in the direction
opposite to which it was operated. 05030101-132-001AB
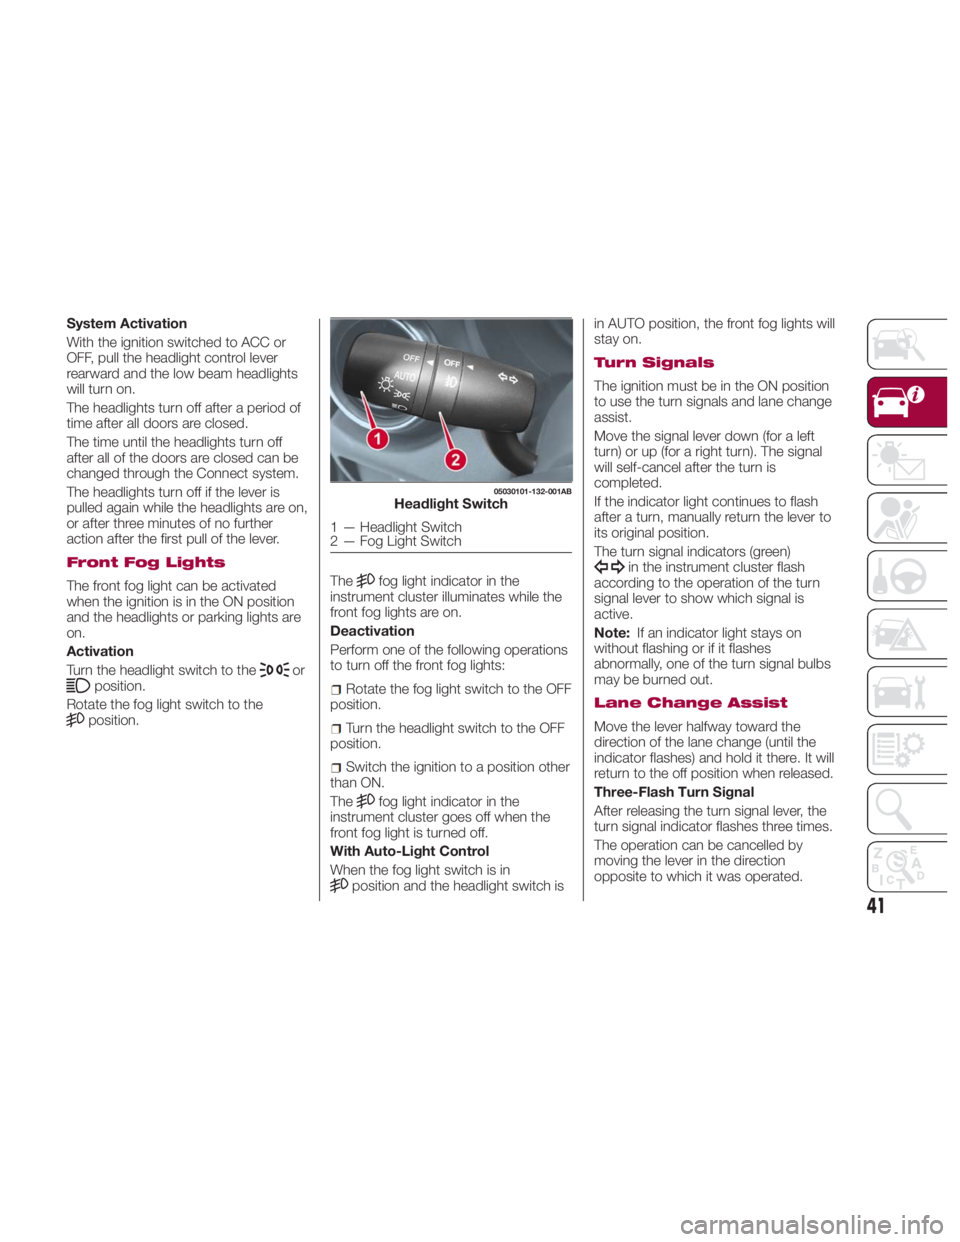
Headlight Switch
1 — Headlight Switch
2 — Fog Light Switch
41
Page 98 of 292
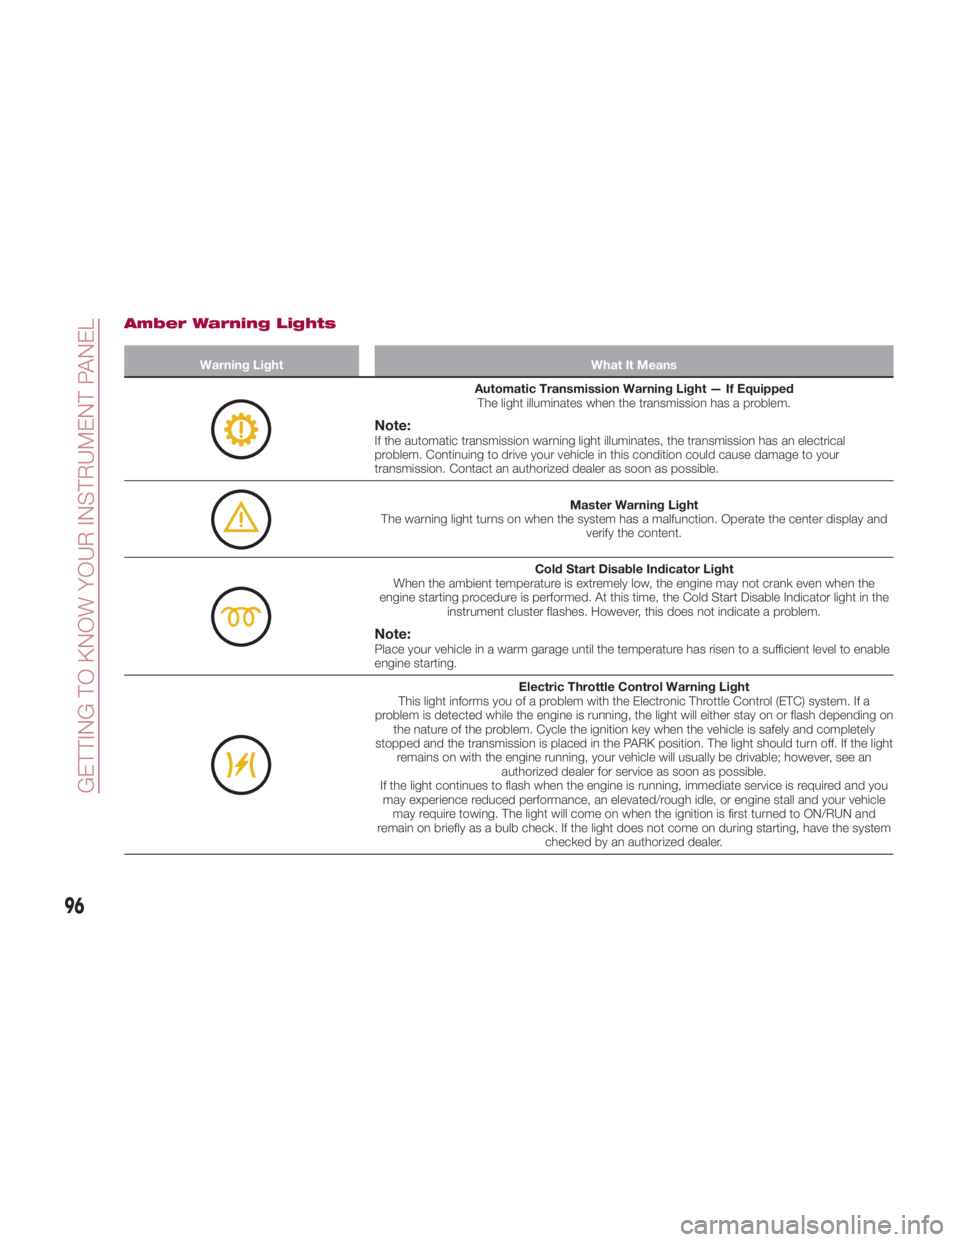
Amber Warning Lights Warning Light What It Means
Automatic Transmission Warning Light — If Equipped
The light illuminates when the transmission has a problem.
Note: If the automatic transmission warning light illuminates, the transmission has an electrical
problem. Continuing to drive your vehicle in this condition could cause damage to your
transmission. Contact an authorized dealer as soon as possible.
Master Warning Light
The warning light turns on when the system has a malfunction. Operate the center display and
verify the content.
Cold Start Disable Indicator Light
When the ambient temperature is extremely low, the engine may not crank even when the
engine starting procedure is performed. At this time, the Cold Start Disable Indicator light in the
instrument cluster flashes. However, this does not indicate a problem.
Note: Place your vehicle in a warm garage until the temperature has risen to a sufficient level to enable
engine starting.
Electric Throttle Control Warning Light
This light informs you of a problem with the Electronic Throttle Control (ETC) system. If a
problem is detected while the engine is running, the light will either stay on or flash depending on
the nature of the problem. Cycle the ignition key when the vehicle is safely and completely
stopped and the transmission is placed in the PARK position. The light should turn off. If the light
remains on with the engine running, your vehicle will usually be drivable; however, see an
authorized dealer for service as soon as possible.
If the light continues to flash when the engine is running, immediate service is required and you
may experience reduced performance, an elevated/rough idle, or engine stall and your vehicle
may require towing. The light will come on when the ignition is first turned to ON/RUN and
remain on briefly as a bulb check. If the light does not come on during starting, have the system
checked by an authorized dealer.
96
GETTING TO KNOW YOUR INSTRUMENT PANEL
Page 112 of 292
EMISSIONS
INSPECTION AND
MAINTENANCE
PROGRAMS In some localities, it may be a legal
requirement to pass an inspection of
your vehicle's emissions control
system. Failure to pass could prevent
vehicle registration.
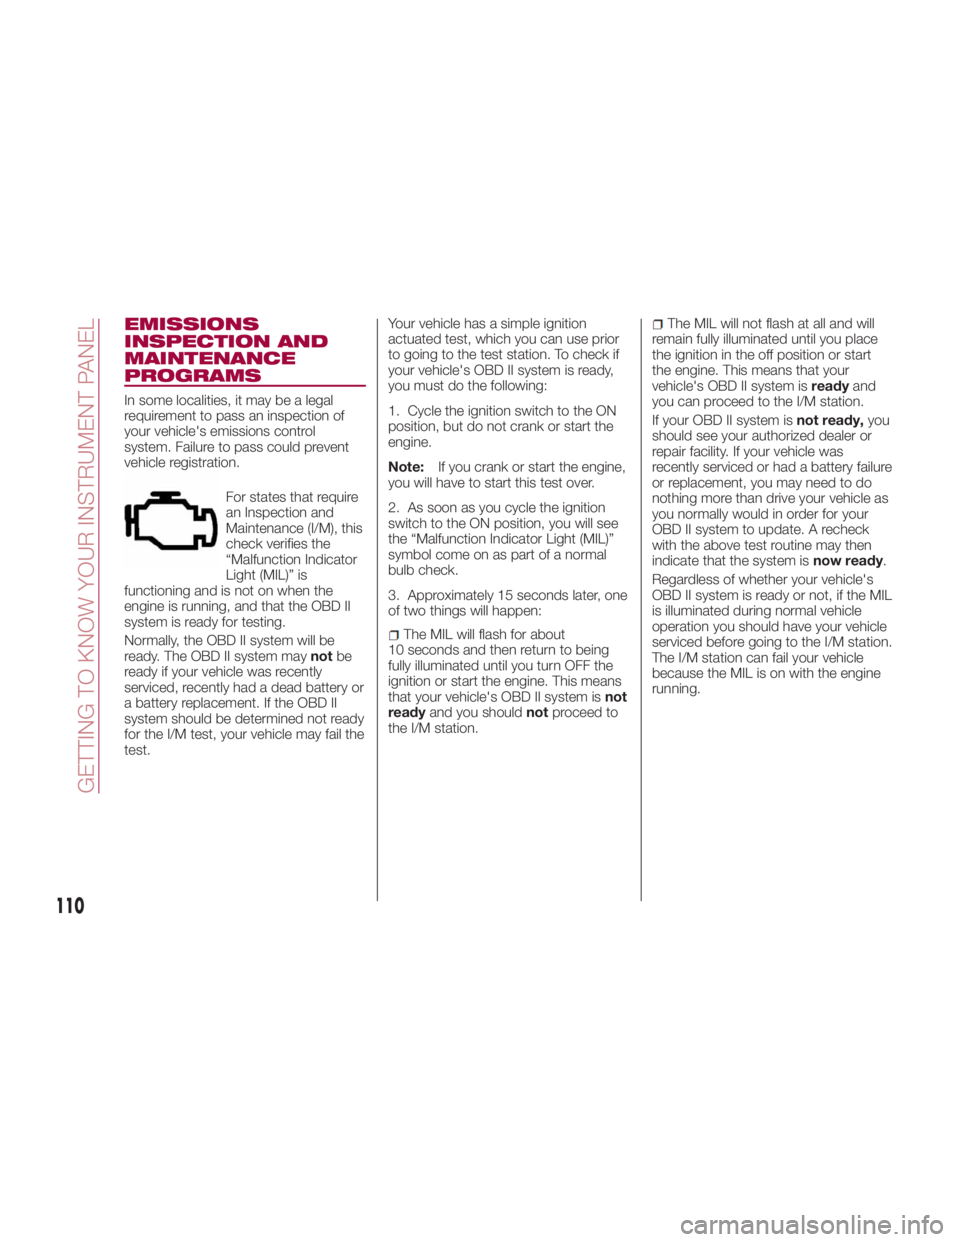
For states that require
an Inspection and
Maintenance (I/M), this
check verifies the
“Malfunction Indicator
Light (MIL)” is
functioning and is not on when the
engine is running, and that the OBD II
system is ready for testing.
Normally, the OBD II system will be
ready. The OBD II system may not be
ready if your vehicle was recently
serviced, recently had a dead battery or
a battery replacement. If the OBD II
system should be determined not ready
for the I/M test, your vehicle may fail the
test. Your vehicle has a simple ignition
actuated test, which you can use prior
to going to the test station. To check if
your vehicle's OBD II system is ready,
you must do the following:
1. Cycle the ignition switch to the ON
position, but do not crank or start the
engine.
Note: If you crank or start the engine,
you will have to start this test over.
2. As soon as you cycle the ignition
switch to the ON position, you will see
the “Malfunction Indicator Light (MIL)”
symbol come on as part of a normal
bulb check.
3. Approximately 15 seconds later, one
of two things will happen:
The MIL will flash for about
10 seconds and then return to being
fully illuminated until you turn OFF the
ignition or start the engine. This means
that your vehicle's OBD II system is not
ready and you should not proceed to
the I/M station. The MIL will not flash at all and will
remain fully illuminated until you place
the ignition in the off position or start
the engine. This means that your
vehicle's OBD II system is ready and
you can proceed to the I/M station.
If your OBD II system is not ready, you
should see your authorized dealer or
repair facility. If your vehicle was
recently serviced or had a battery failure
or replacement, you may need to do
nothing more than drive your vehicle as
you normally would in order for your
OBD II system to update. A recheck
with the above test routine may then
indicate that the system is now ready .
Regardless of whether your vehicle's
OBD II system is ready or not, if the MIL
is illuminated during normal vehicle
operation you should have your vehicle
serviced before going to the I/M station.
The I/M station can fail your vehicle
because the MIL is on with the engine
running.
110
GETTING TO KNOW YOUR INSTRUMENT PANEL
Page 139 of 292
Warning Light/Beep
A system malfunction or operation
conditions are indicated by a warning.
Refer to the beginning paragraph of
“Warning Lights And Messages” in
“Getting To Know Your Instrument
Panel” for further information.
Warning!Ignoring the Air Bag Warning Light in your
instrument panel could mean you won’t
have the air bags to protect you in a
collision. If the light does not come on as a
bulb check when the ignition is first turned
on, stays on after you start the vehicle, or if
it comes on as you drive, have an
authorized dealer service the air bag
system immediately.
Passenger Side Front Air Bag And
Child Restraint Systems
Rearward-facing child restraint systems
must NEVER be fitted on the front seat
with an active passenger side air bag
since in the event of an impact the air
bag activation may cause fatal injuries
to the transported child.
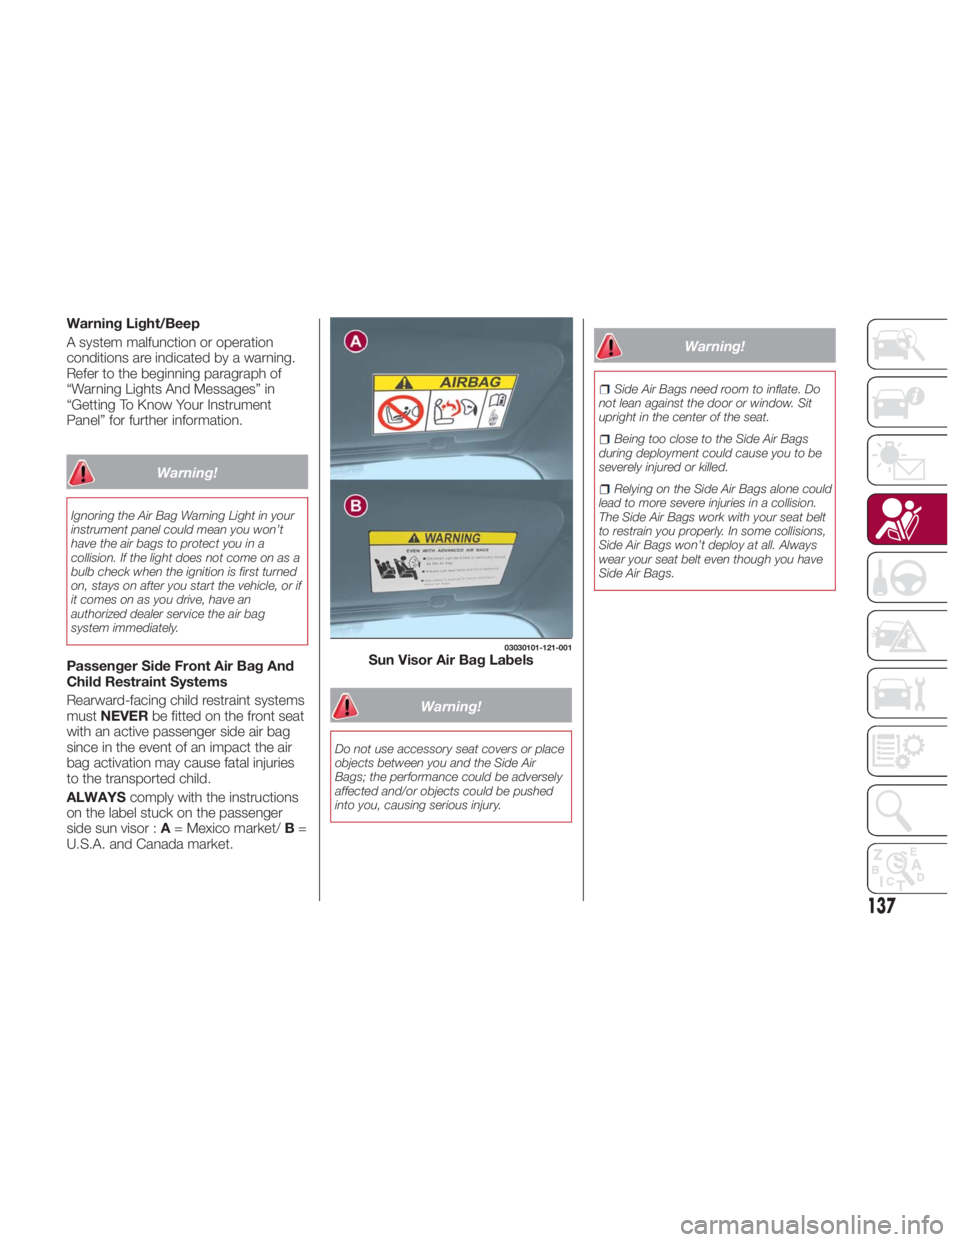
ALWAYS comply with the instructions
on the label stuck on the passenger
side sun visor : A = Mexico market/ B =
U.S.A. and Canada market. Warning!Do not use accessory seat covers or place
objects between you and the Side Air
Bags; the performance could be adversely
affected and/or objects could be pushed
into you, causing serious injury. Warning! Side Air Bags need room to inflate. Do
not lean against the door or window. Sit
upright in the center of the seat.
Being too close to the Side Air Bags
during deployment could cause you to be
severely injured or killed.
Relying on the Side Air Bags alone could
lead to more severe injuries in a collision.
The Side Air Bags work with your seat belt
to restrain you properly. In some collisions,
Side Air Bags won’t deploy at all. Always
wear your seat belt even though you have
Side Air Bags. 03030101-121-001
Sun Visor Air Bag Labels
137
Page 141 of 292
(**) Passenger Occupant Classification System : the passenger front and side air bags and the seat belt pretensioner are
designed to deploy when the passenger occupant classification sensor detects a passenger sitting on the passenger's seat.
Note: In a frontal offset collision, the equipped air bags and pretensioners may all deploy depending on the direction, angle,
and rate of impact.
Warning!Unapproved modifications or service procedures to the passenger seat assembly, its related components, seat cover, or cushion may
inadvertently change the air bag deployment in case of a frontal collision. This could result in death or serious injury to the front passenger if
the vehicle is involved in a collision. A modified vehicle may not comply with required Federal Motor Vehicle Safety Standards (FMVSS) and/or
Canadian Motor Vehicle Safety Standards (CMVSS).
If it is necessary to modify the air bag system for persons with disabilities, contact your authorized dealer.
Warning!Deployed air bags and seat belt pretensioners cannot protect you in another collision. Have the air bags, seat belt pretensioners, and the seat
belt retractor assemblies replaced by an authorized dealer immediately. Also, have the Occupant Restraint Controller System serviced as well.
Warning!Ignoring the Air Bag Warning Light in your instrument panel could mean you won’t have the air bags to protect you in a collision. If the light
does not come on as a bulb check when the ignition is first turned on, stays on after you start the vehicle, or if it comes on as you drive, have
an authorized dealer service the air bag system immediately.
Placing an object on the floor under the front passenger seat may prevent the occupant classification sensor from working properly, which
may result in serious injury or death in a collision. Do not place any objects on the floor under the front passenger seat.
If there is a fault present in the occupant classification sensor, both the Indicator Light and the Air Bag Warning Light will illuminate to show
that the Passenger Advanced Front Air Bag is deactivated. Should this occur, the Passenger Advanced Front Air Bag will remain deactivated
until the fault is cleared. This indicates that you should take the vehicle to an authorized dealer for service immediately.
139
Page 143 of 292
Passenger Occupant
Classification Sensor
Your vehicle is equipped with a
passenger occupant classification
sensor as a part of the supplementary
restraint system. This sensor is
equipped in the passenger's seat
cushion. This sensor measures the
electrostatic capacity of the
passenger's seat.
The SRS unit is designed to prevent the
passenger front and side Air Bags and
seat belt pretensioner system from
deploying if the passenger Air Bag
deactivation indicator light turns on.
To reduce the chance of injuries caused
by deployment of the passenger Air
Bag, the system deactivates the
passenger front and side Air Bags and
also the seat belt pretensioner system
when the passenger Air Bag
deactivation indicator light turns on.
This system shuts off the passenger
front and side Air Bags and seat belt
pretensioner system, so make sure the
passenger Air Bag deactivation
indicator light turns on.
The air bag/seat belt pretensioner
system warning light flashes and the
passenger Air Bag deactivation
indicator light illuminates if the sensors
have a possible malfunction. If this
happens, the passenger front and side
Air Bags and seat belt pretensioner
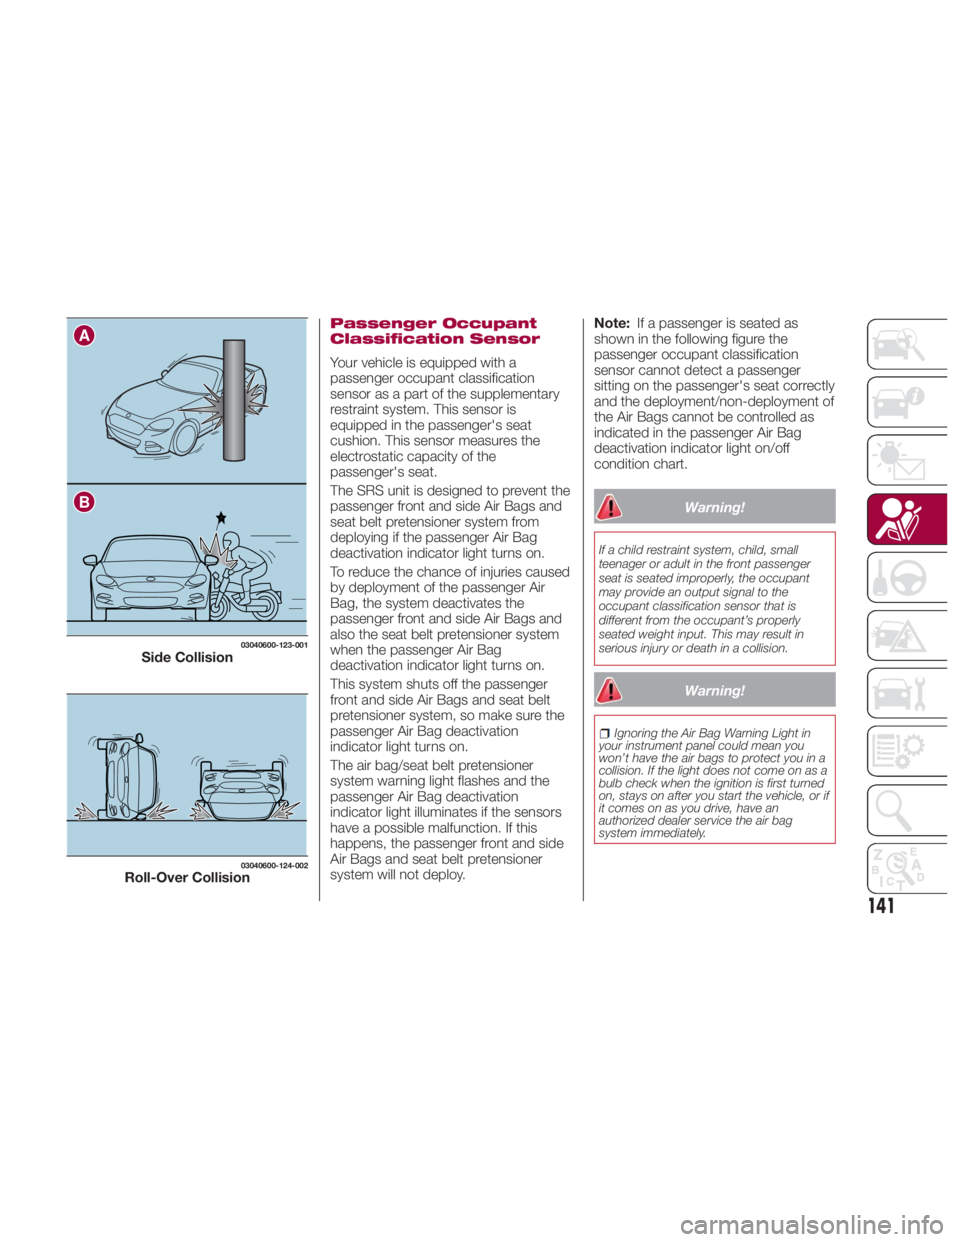
system will not deploy. Note: If a passenger is seated as
shown in the following figure the
passenger occupant classification
sensor cannot detect a passenger
sitting on the passenger's seat correctly
and the deployment/non-deployment of
the Air Bags cannot be controlled as
indicated in the passenger Air Bag
deactivation indicator light on/off
condition chart.
Warning!If a child restraint system, child, small
teenager or adult in the front passenger
seat is seated improperly, the occupant
may provide an output signal to the
occupant classification sensor that is
different from the occupant’s properly
seated weight input. This may result in
serious injury or death in a collision.
Warning! Ignoring the Air Bag Warning Light in
your instrument panel could mean you
won’t have the air bags to protect you in a
collision. If the light does not come on as a
bulb check when the ignition is first turned
on, stays on after you start the vehicle, or if
it comes on as you drive, have an
authorized dealer service the air bag
system immediately.A
B 03040600-123-001
Side Collision 03040600-124-002
Roll-Over Collision
141
Page 185 of 292
IN CASE OF EMERGENCYHAZARD WARNING LIGHTS . . . .184
REPLACING A BULB ......... .184
REPLACING FUSES ......... .194
JACKING AND TIRE CHANGING . .203
TIRE SERVICE KIT .......... .208
JUMPSTARTING........... .217
IF YOUR ENGINE OVERHEATS . . .219
TOWINGTHEVEHICLE....... .220
EVENT DATA RECORDER (EDR) . .222
183
Page 186 of 292
HAZARD WARNING
LIGHTS Control
The Hazard Warning Lights should
always be used when you stop on or
near a roadway in an emergency.
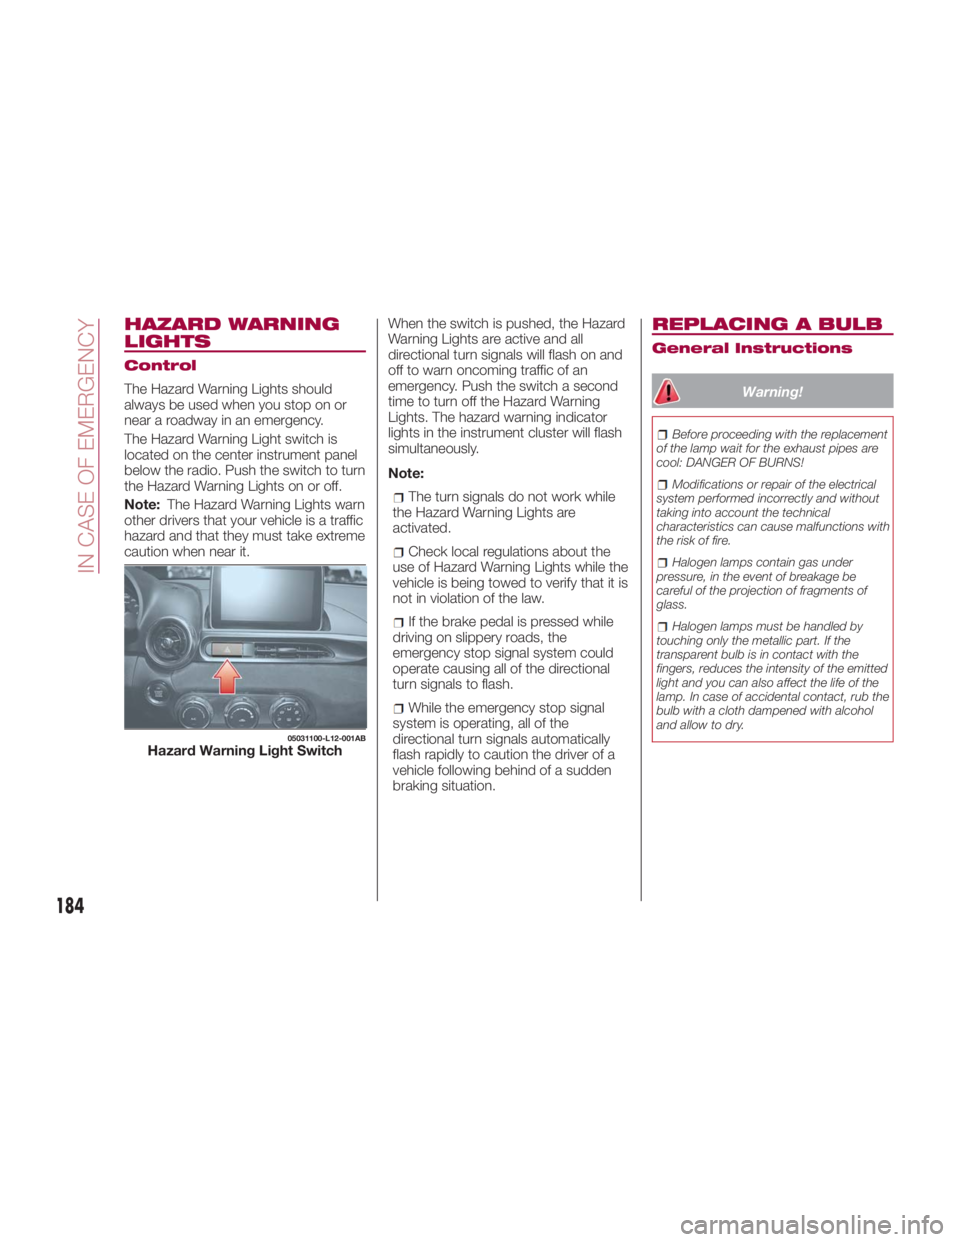
The Hazard Warning Light switch is
located on the center instrument panel
below the radio. Push the switch to turn
theHazardWarningLightsonoroff.
Note: The Hazard Warning Lights warn
other drivers that your vehicle is a traffic
hazard and that they must take extreme
caution when near it. When the switch is pushed, the Hazard
Warning Lights are active and all
directional turn signals will flash on and
off to warn oncoming traffic of an
emergency. Push the switch a second
time to turn off the Hazard Warning
Lights. The hazard warning indicator
lights in the instrument cluster will flash
simultaneously.
Note:
The turn signals do not work while
the Hazard Warning Lights are
activated.
Check local regulations about the
use of Hazard Warning Lights while the
vehicle is being towed to verify that it is
not in violation of the law.
If the brake pedal is pressed while
driving on slippery roads, the
emergency stop signal system could
operate causing all of the directional
turn signals to flash.
While the emergency stop signal
system is operating, all of the
directional turn signals automatically
flash rapidly to caution the driver of a
vehicle following behind of a sudden
braking situation. REPLACING A BULB General Instructions
Warning! Before proceeding with the replacement
of the lamp wait for the exhaust pipes are
cool: DANGER OF BURNS!
Modifications or repair of the electrical
system performed incorrectly and without
taking into account the technical
characteristics can cause malfunctions with
the risk of fire.
Halogen lamps contain gas under
pressure, in the event of breakage be
careful of the projection of fragments of
glass.
Halogen lamps must be handled by
touching only the metallic part. If the
transparent bulb is in contact with the
fingers, reduces the intensity of the emitted
light and you can also affect the life of the
lamp. In case of accidental contact, rub the
bulb with a cloth dampened with alcohol
and allow to dry.05031100-L12-001AB
Hazard Warning Light Switch
184
IN CASE OF EMERGENCY
Page 187 of 292
Before replacing a bulb check the
contacts for oxidation.
Replace blown bulbs with others of
the same type and power.
After replacing a headlight bulb,
always check its alignment.
To replace the bulb, contact your
authorized dealer.
When a light is not working, check
that the corresponding fuse is intact
before replacing the bulb. For the
location of fuses, refer to the section on
“Replacing Fuses” in this chapter.
Caution!Use the protective cover and carton for the
replacement bulb to dispose of the old bulb
promptly and out of the reach of children. Note:
When removing the lens or light unit
using a flathead screwdriver, make
sure that the flathead screwdriver does
not contact the interior terminal. If the
flathead screwdriver contacts the
terminal, a short circuit may occur.
When the weather is cold or damp
or after heavy rain or washing, the
surface of headlights or rear lights may
steam up and/or form drops of
condensation on the inside. This is a
natural phenomenon due to the
difference in temperature and humidity
between the inside and the outside of
the glass which does not indicate a
fault and does not compromise the
normal operation of lighting devices.
The mist disappears quickly when the
lights are turned on, starting from the
center of the diffuser, extending
progressively towards the edges.
185
Page 188 of 292
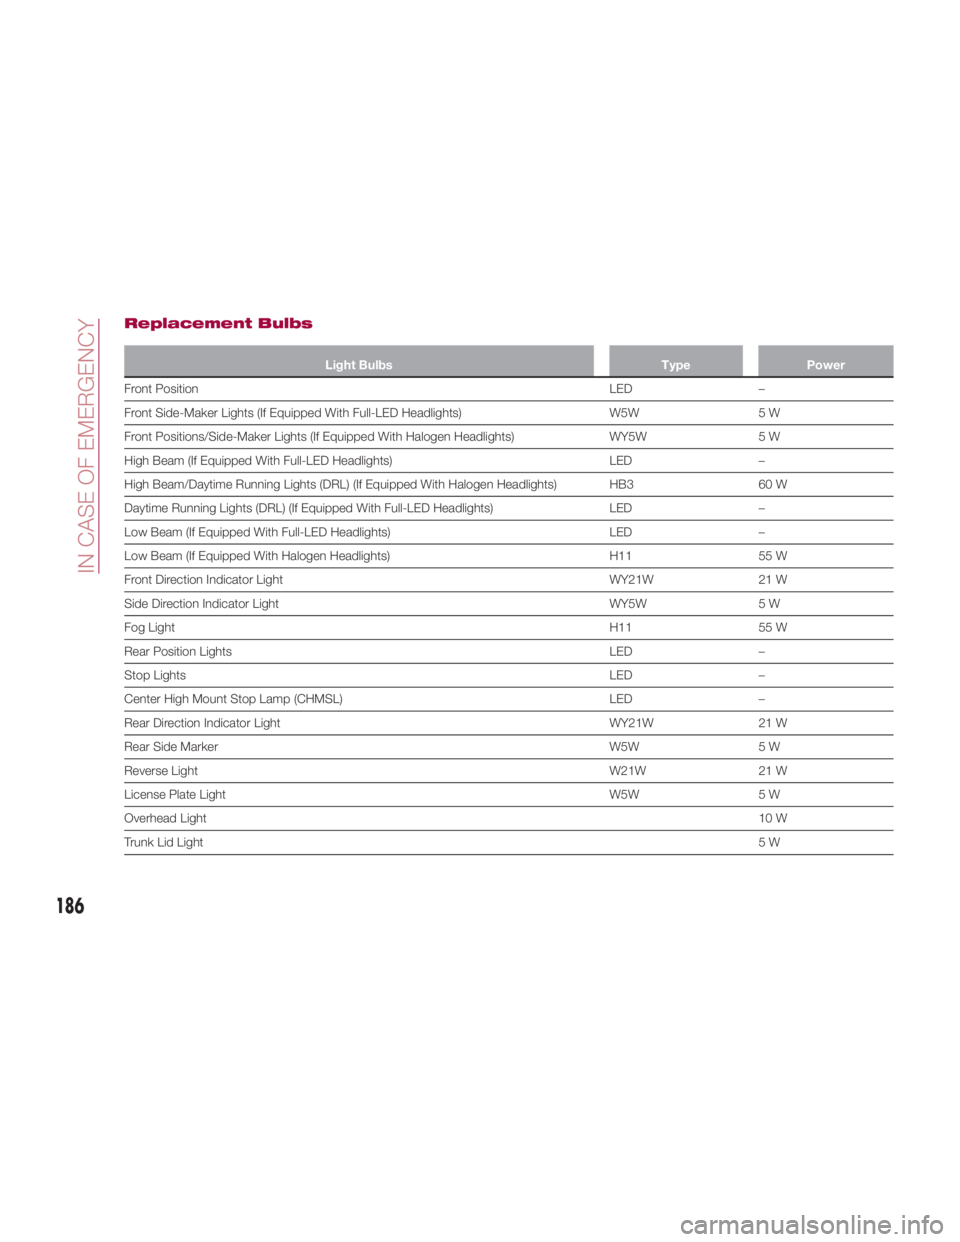
Replacement Bulbs Light Bulbs Type Power
Front Position LED –
Fr
ont Side-Maker Lights (If Equipped With Full-LED Headlights) W5W 5 W
Front Positions/Side-Maker Lights (If Equipped With Halogen Headlights) WY5W 5 W
High Beam (If Equipped With Full-LED Headlights) LED –
High Beam/Daytime Running Lights (DRL) (If Equipped With Halogen Headlights) HB3 60 W
Daytime Running Lights (DRL) (If Equipped With Full-LED Headlights) LED –
Low Beam (If Equipped With Full-LED Headlights) LED –
Low Beam (If Equipped With Halogen Headlights) H11 55 W
Front Direction Indicator Light WY21W 21 W
Side Direction Indicator Light WY5W 5 W
Fog Light H11 55 W
Rear Position Lights LED –
Stop Lights LED –
Center High Mount Stop Lamp (CHMSL) LED –
Rear Direction Indicator Light WY21W 21 W
Rear Side Marker W5W 5 W
Reverse Light W21W 21 W
License Plate Light W5W 5 W
Overhead Light 10 W
Trunk Lid Light 5W
186
IN CASE OF EMERGENCY