radio FIAT SPIDER ABARTH 2017 Owners Manual
[x] Cancel search | Manufacturer: FIAT, Model Year: 2017, Model line: SPIDER ABARTH, Model: FIAT SPIDER ABARTH 2017Pages: 292, PDF Size: 9.24 MB
Page 6 of 292
Vehicle Modifications / Alterations Warning!Any change or alteration of the vehicle might seriously affect its safety and road holding, thus causing accidents, in which the occupants
could be fatally injured.
ACCESSORIES PURCHASED BY THE OWNER
If after buying the vehicle, you decide to install electrical accessories that require a permanent electrical supply (e.g. radio,
satellite anti-theft system, etc.) or accessories that burden the electrical supply, contact your authorized dealer, whose
personnel will check whether the vehicles's electrical system is able to withstand the load required , or whether it needs to be
integrated with a more powerful battery.
Note: Use only floor mats that leave the pedal area unobstructed and that are firmly secured so that they cannot slip out of
position and interfere with the pedals or impair safe operation of your vehicle in other ways.
INSTALLING ELECTRICAL / ELECTRONIC DEVICES
The following regulatory statement applies to all radio frequency (RF) devices equipped in this vehicle:
This device complies with part 15 of the FCC Rules and with Industry Canada license-exempt RSS standard(s). Operation is
subject to the following two conditions:
1. This device may not cause harmful interference.
2. This device must accept any interference received, including interference that may cause undesired operation.
Note: Changes or modifications not expressly approved by the party responsible for compliance could void the user’s authority
to operate the equipment.
Page 7 of 292

RADIO TRANSMITTERS AND MOBILE PHONES
Radio transmitter equipment (vehicle mobile phones, CB radios, amateur radio etc.) cannot be used inside the vehicle unless a
separate aerial is mounted externally.
Transmission and reception of these devices may be affected by the shielding effect of the vehicle body. As far as the use of
EC-approved mobile phones is concerned (GSM, GPRS, UMTS, LTE), follow the usage instructions provided by the mobile
phone Manufacturer.
The use of these devices inside the vehicle (without an external aerial) may cause the electrical systems to malfunction. This
could compromise the vehicle safety in addition to constituting a potential hazard for passengers' health.
If mobile phones/laptops/smartphones/tablets are inside the vehicle and/or close to the electronic key, a reduced performance
of the Advanced Keyless Entry System may occur.
CELL PHONE WARNING
Note: Please comply with the legal regulations concerning the use of communication equipment in vehicles in your country.
Use of any electrical devices such as cell phones, computers, portable radios, vehicle navigation or other devices by the driver
while the vehicle is moving is dangerous. Dialing a number on a cell phone while driving also ties-up the driver's hands. Use of
these devices will cause the driver to be distracted and could lead to a serious accident. If a passenger is unable to use the
device, pull off the right-of-way to a safe area before use. If use of a cell phone is necessary despite this warning, use a
hands-free system to at least leave the hands free to drive the vehicle. Never use a cell phone or other electrical devices while
the vehicle is moving and, instead, concentrate on the full-time job of driving.
Page 14 of 292
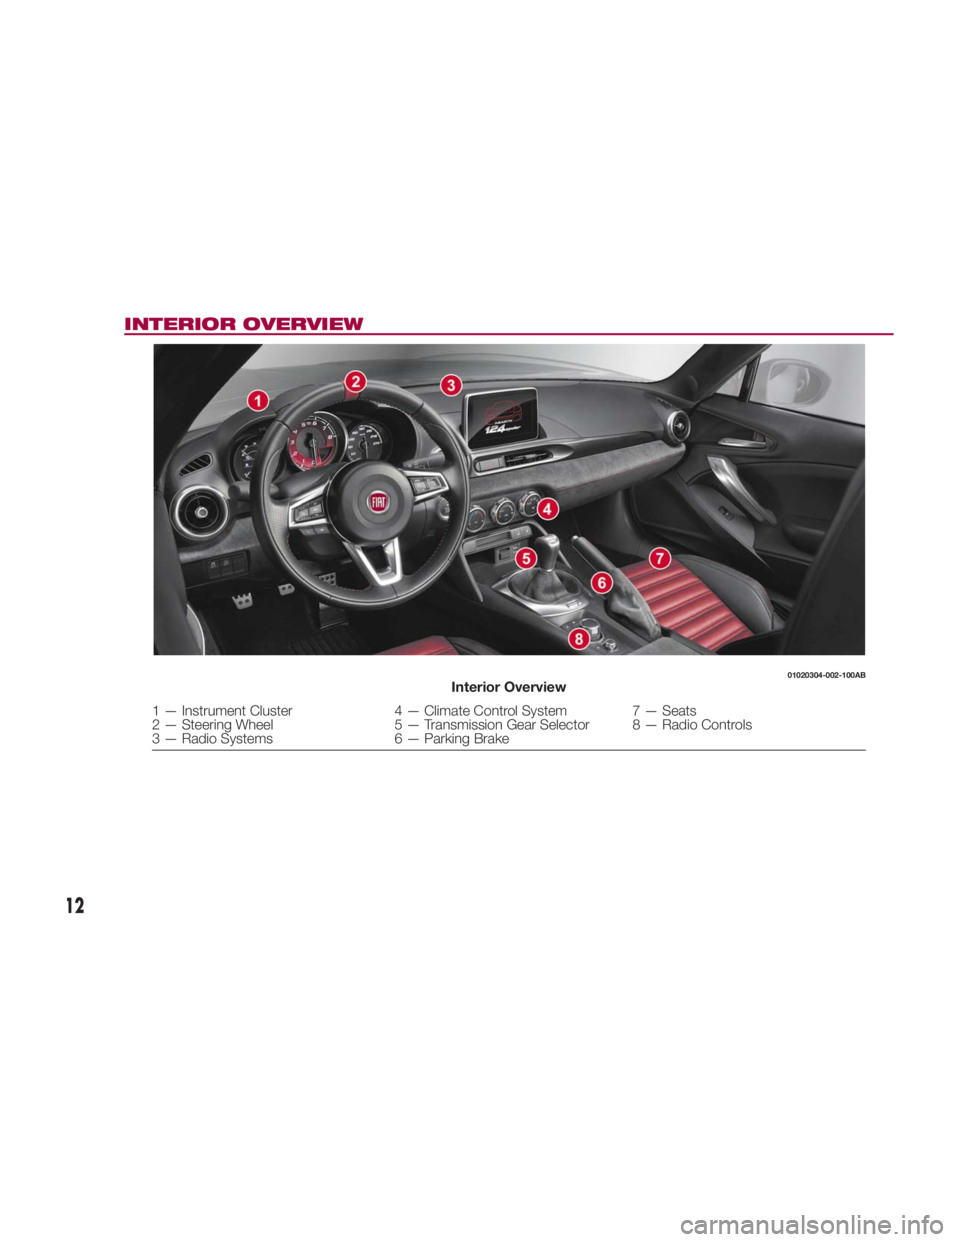
INTERIOR OVERVIEW 01020304-002-100AB
Interior Overview
1 — Instrument Cluster 4 — Climate Control System 7 — Seats
2 — Steering Wheel 5 — Transmission Gear Selector 8 — Radio Controls
3 — Radio Systems 6 — Parking Brake
12
Page 21 of 292
Emergency Operation For Starting
The Engine
If the key warning light (red) illuminates,
or the keyless ignition start indicator
light (amber) flashes, this could indicate
that the engine may not start using the
usual starting method. Contact an
authorized dealer as soon as possible.
If this occurs, the engine can be
force-started. push and hold the
keyless ignition START/STOP button
until the engine starts.
Other procedures necessary for starting
the engine such as having the key fob
in the vehicle, and depressing the
clutch pedal (manual transmission) or
the brake pedal (automatic
transmission) are required.
Key Fob Cautions
Because the key fob uses low-intensity
radio waves, it may not function
correctly under the following conditions:
The key fob is carried with
communication devices such as cellular
phones.
The key fob contacts or is covered
by a metal object. The key fob is near electronic
devices such as personal computers.
Non-FCA genuine electronic
equipment is installed in the vehicle.
There is equipment which discharges
radio waves near the vehicle.
The key fob may consume battery
power excessively if it receives
high-intensity radio waves. Do not place
the key fob near electronic devices
such as televisions or personal
computers.
To avoid damage to the key fob, DO
NOT:
Drop the key fob.
Get the key fob wet.
Disassemble the key fob unless
replacing battery.
Expose the key fob to high
temperatures on places such as the
instrument panel or engine
compartment, under direct sunlight.
Expose the key fob to any kind of
magnetic field.
Place heavy objects on the key fob.
Put the key fob in an ultrasonic
cleaner.
Put any magnetized objects close to
the key fob. General Information
The following regulatory statement
applies to all Radio Frequency (RF)
devices equipped in this vehicle:
This device complies with Part 15 of the
FCC Rules and with Industry Canada
license-exempt RSS standard(s).
Operation is subject to the following
two conditions:
1. This device may not cause harmful
interference.
2. This device must accept any
interference received, including
interference that may cause undesired
operation.
Note: Changes or modifications not
expressly approved by the party
responsible for compliance could void
the user’s authority to operate the
equipment.
19
Page 24 of 292
Battery life is about one year.
Replace the battery with a new one if
the Warning light (green) flashes in
the instrument cluster. Replacing the
battery about once a year is
recommended because the
Warning light may not illuminate or
flash if the battery is low or discharged.
Additional key fobs may be
obtained at an authorized dealer. Up to
six key fobs may be used with the
Advanced Keyless Entry System per
vehicle. Bring all key fobs to an
authorized dealer when additional keys
are required.
The Advanced Keyless Entry function
allows you to lock/unlock the door,
trunk lid, and fuel filler door, or open the
trunk lid while carrying the key fob. Warning!Radio waves from the key fob may affect
medical devices such as pacemakers:
before using the key fob near people who
use medical devices, ask the medical
device manufacturer or your physician if
radio waves from the key fob will affect the
device.
Note: The Advanced Keyless Entry
System functions can be deactivated to
prevent any possible adverse effect on
a user wearing a pacemaker or other
medical device. If the system is
deactivated, you will be unable to start
the engine by carrying the key fob.
Contact an authorized dealer for
details. If the Advanced Keyless Entry
System has been deactivated, you can
start the engine by following the
procedure indicated when the key fob
battery becomes discharged.
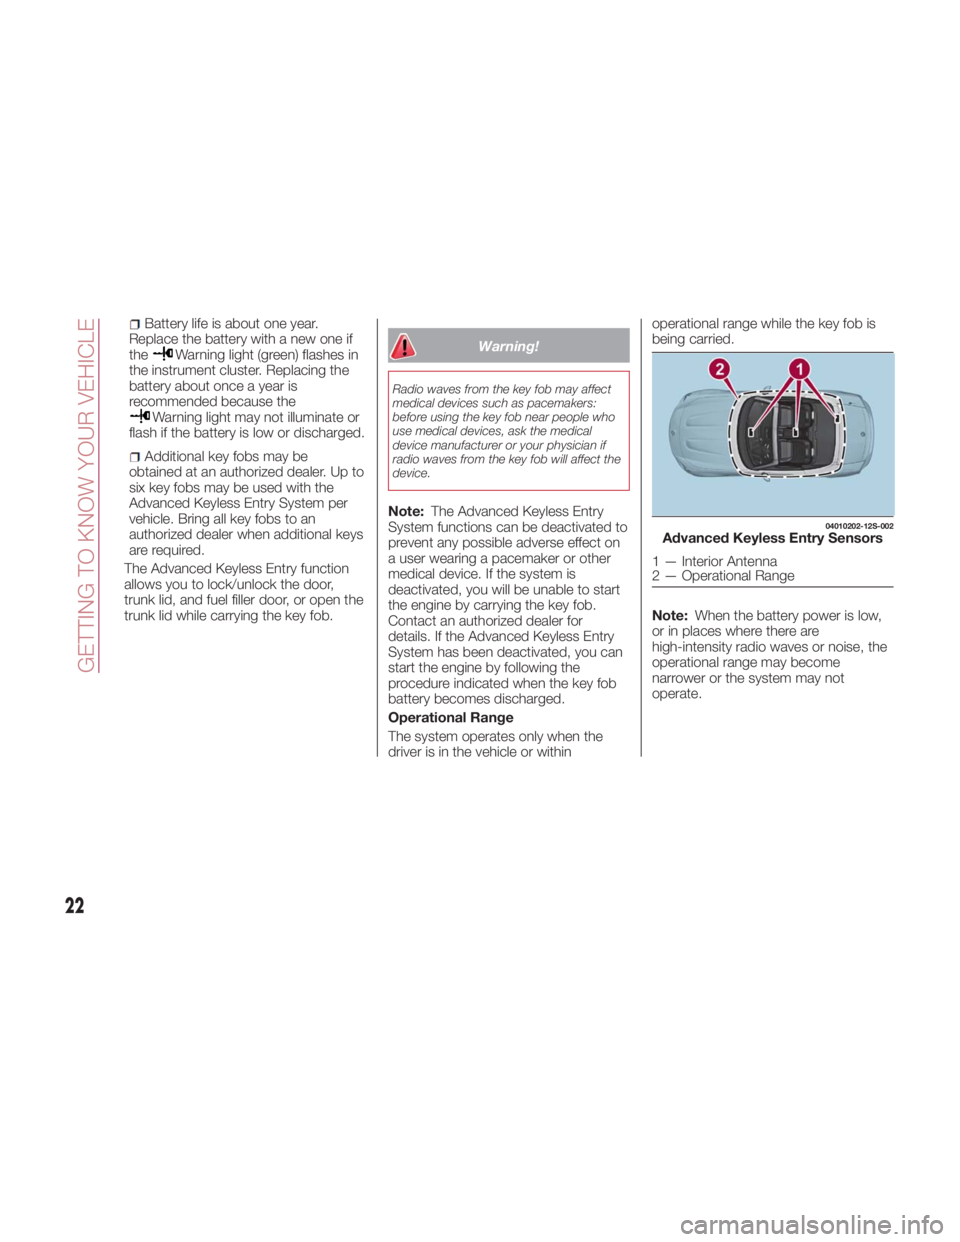
Operational Range
The system operates only when the
driver is in the vehicle or within operational range while the key fob is
being carried.
Note: When the battery power is low,
or in places where there are
high-intensity radio waves or noise, the
operational range may become
narrower or the system may not
operate. 04010202-12S-002
Advanced Keyless Entry Sensors
1 — Interior Antenna
2 — Operational Range
22
GETTING TO KNOW YOUR VEHICLE
Page 25 of 292
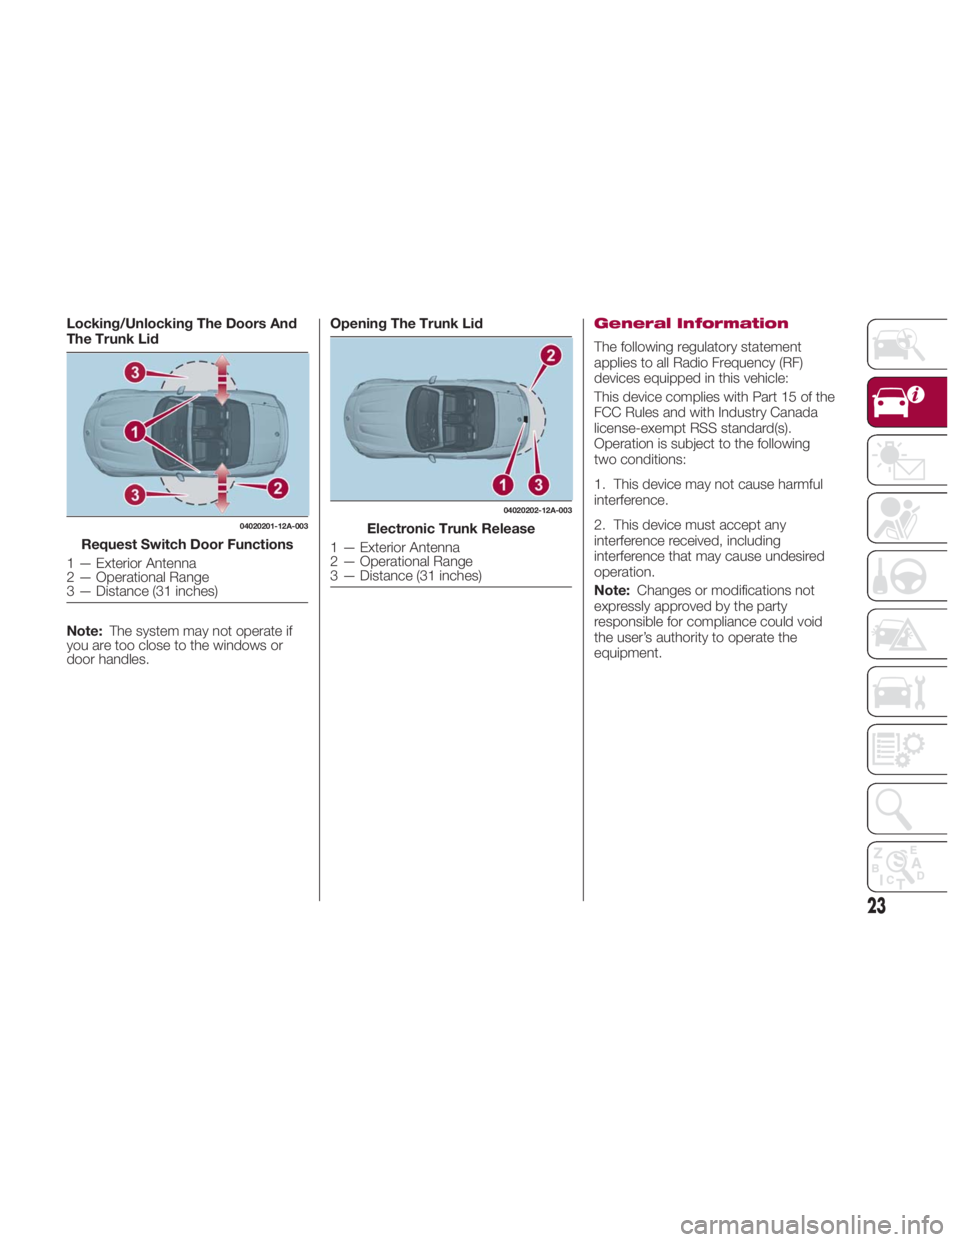
Locking/Unlocking The Doors And
The Trunk Lid
Note: The system may not operate if
you are too close to the windows or
door handles. Opening The Trunk Lid
General Information
The following regulatory statement
applies to all Radio Frequency (RF)
devices equipped in this vehicle:
This device complies with Part 15 of the
FCC Rules and with Industry Canada
license-exempt RSS standard(s).
Operation is subject to the following
two conditions:
1. This device may not cause harmful
interference.
2. This device must accept any
interference received, including
interference that may cause undesired
operation.
Note: Changes or modifications not
expressly approved by the party
responsible for compliance could void
the user’s authority to operate the
equipment.04020201-12A-003
Request Switch Door Functions
1 — Exterior Antenna
2 — Operational Range
3 — Distance (31 inches) 04020202-12A-003
Electronic Trunk Release
1 — Exterior Antenna
2 — Operational Range
3 — Distance (31 inches)
23
Page 26 of 292
VEHICLE SECURITY
ALARM SYSTEM — IF
EQUIPPED Modifications And
Add-On Equipment
FCA cannot guarantee the immobilizer
and the vehicle security alarm system
operation if the system has been
modified or if any add-on equipment
has been installed.
Note: To avoid damage to the vehicle,
do not modify the system or install any
add-on equipment to the immobilizer
and the vehicle security alarm system
or the vehicle.
Immobilizer System
The immobilizer system allows the
engine to start only with a key fob the
system recognizes.
If someone attempts to start the engine
with an unrecognized key fob, the
engine will not start, thereby helping to
prevent unlawful vehicle use.
If you have a problem with the
immobilizer system or the key fob,
contact an authorized dealer.
To avoid damage to the key fob, do not:
Drop the key fob.
Get the key fob wet.
Expose the key fob to any kind of
magnetic field. Expose the key fob to high
temperatures on places such as the
instrument panel, hood, or under direct
sunlight.
Note:
Changes or modifications not
expressly approved by the party
responsible for compliance could void
the user's authority to operate the
equipment.
If the engine does not start with the
correct key fob, and the warning
light keeps illuminating or flashing, the
system may have a malfunction.
Contact an authorized dealer.
The key fobs carry a unique
electronic code. For this reason, and to
assure your safety, obtaining a
replacement key fob can only be done
through your authorized dealer, and will
require some waiting time.
Always keep a spare key fob in
case one is lost. If a key fob is lost,
contact an authorized dealer as soon
as possible.
If you lose a key fob, an authorized
dealer will reset the electronic codes of
your remaining key fobs and
immobilizer system. Bring all the
remaining key fobs to an authorized
dealer to reset. Starting the vehicle
with a key fob that has not been reset
is not possible. Operation
The engine may not start and
warning light may illuminate or flash
if the key fob is placed in an area where
it is difficult for the system to detect the
signal, such as on the instrument panel.
Move the key fob to a location within
the signal range, cycle the ignition off,
and then restart the engine.
Note: Signals from a TV, radio station,
transceiver, or mobile telephone could
interfere with your immobilizer system. If
you are using the proper key fob and
the engine fails to start, check the
warning light.
Arming
The system is armed when the ignition
is cycled from the ON to OFF position.
The
warning light in the instrument
cluster flashes every two seconds until
the system is disarmed.
Disarming
The system is disarmed when the
ignition is placed in the ON position with
the correct programmed key fob. The
warning light illuminates for about
three seconds and then turns off. If the
engine does not start with the correct
key fob, and the
warning light
remains illuminated or flashing, try the
following:
Make sure the key fob is within the
operational range for signal
transmission.
24
GETTING TO KNOW YOUR VEHICLE
Page 44 of 292
The three-flash turn signal function can
be turned on or off using the
personalization function in the radio.
Adaptive Front Lighting
System (AFS) — If
Equipped
This system directs the main headlight
beams and adapts it to the driving
conditions around bends and turns,
continuously and automatically.
The system directs the headlight beam
to illuminate the road in the best way,
taking into account the speed of the
vehicle, the bend or corner angle and
the speed of steering.
The Adaptive Front Lighting System is
automatically activated when the
vehicle is started.
Leaving Home Light
System
The Leaving Home Light System turns
the headlights on when the unlock
button on the key fob is pushed while
away from the vehicle.
Activation
With the ignition switch in the OFF
position, and the headlight switch is in
the
or position, the
headlights will illuminate when the
unlock button on the key fob is pushed,
and the vehicle receives the signal.
The headlights turn off after
30 seconds. The following lights turn on when the
Leaving Home Light System is
operated: low beams/parking lights/tail
lights/license plate lights.
Operation of the Leaving Home Light
System can be turned on or off through
the Connect system.
When the lock button on the key fob
is pushed, and the vehicle receives the
signal, the headlights turn off.
When the headlight switch is in a
position other than
or ,the
headlights turn off.
Headlamp Leveling
System — If Equipped
On some models, the angle of the
headlights will be automatically adjusted
when turning on the headlights.
Adjusting The Headlight
When Abroad
Dipped headlights are adjusted for
driving in the country where the vehicle
was originally purchased.
When travelling in countries with
opposite driving direction, to avoid
flashing the drivers on the other side of
the road, you need to cover areas of
the headlight. For this operation contact
an authorized dealer. WINDSHIELD
WIPERS / WASHER Windshield Wipers And
Washer
The windshield wiper/washer lever is
located on the right side of the steering
wheel. The ignition must be in the ON
position to use these features.
Windshield Wipers
Activate the windshield wipers by
pushing the wiper lever up or down.
With Intermittent Wiper
Set the lever to the intermittent position
and choose the interval timing by
rotating the center switch.
Switch positions:
or MIST : operation while
pushing the lever upward
OFF : stop
--- or INT : intermittent operation
— or LO : low speed operation
= or HI : high speed operation
42
GETTING TO KNOW YOUR VEHICLE
Page 61 of 292
Pre-Programming The
System
Note: It is recommended that a new
battery be placed in the hand-held
transmitter of the device being
programmed to HomeLink for quicker
training and accurate transmission of
the radio-frequency signal.
Proceed as follows:
1. Verify that there is a remote control
transmitter available for the device you
would like to program.
2. Disconnect the power to the device.
Programming The
System
Note: When programming a garage
door opener or a gate, disconnect the
power to these devices before
programming. Continuous operation of
the devices could damage the motor.
The HomeLink system provides three
buttons which can be individually
selected and programmed using the
transmitters for current, on-market
devices as follows:
1. Disconnect power to the device
being programmed.
2. Position the end of your handheld
transmitter one to three inches (2.5 -
7.5 cm) away from the HomeLink
button you wish to program while
keeping the indicator light in view.
3. Simultaneously press and hold both
the chosen HomeLink and hand-held transmitter buttons. Do not release
the buttons until step four has been
completed.
4. After the HomeLink indicator light
changes from a slow to a rapidly
blinking light, release both the
HomeLink and hand-held transmitter
buttons.
5. Connect power to the device being
programmed.
6. Firmly press and hold the
programmed HomeLink button for five
seconds, and then release it. Perform
this operation two times to activate the
door or gate. If the door or gate does
not activate, press and hold the
just-trained HomeLink button and
observe the indicator light. If the
indicator light stays on constantly, programming is complete and your
device should activate when the
HomeLink button is pressed and
released.
Note: To program the remaining two
HomeLink buttons, begin with step
one.
7. If the indicator light blinks rapidly for
two seconds and then turns to a
constant light, continue with
“Programming” steps (see below) to
complete the programming of a rolling
code equipped device (most commonly
a garage door opener).
8. At the garage door opener receiver
(motor-head unit) in the garage, locate
the “learn” or “smart” button. This can
usually be found where the hanging
antenna wire is attached to the
motorhead unit.
9. Press and release the “learn” or
“smart” button (the name and color of
the button may vary by manufacturer).
Note: Complete the programming
within 30 seconds.
10. Return to the vehicle and firmly
press, hold for two seconds and
release the programmed HomeLink
button. Repeat the “ press/hold/
release ” sequence a second time, and,
depending on the brand of the garage
door opener (or other rolling code
equipped device), repeat this sequence
a third time to complete the
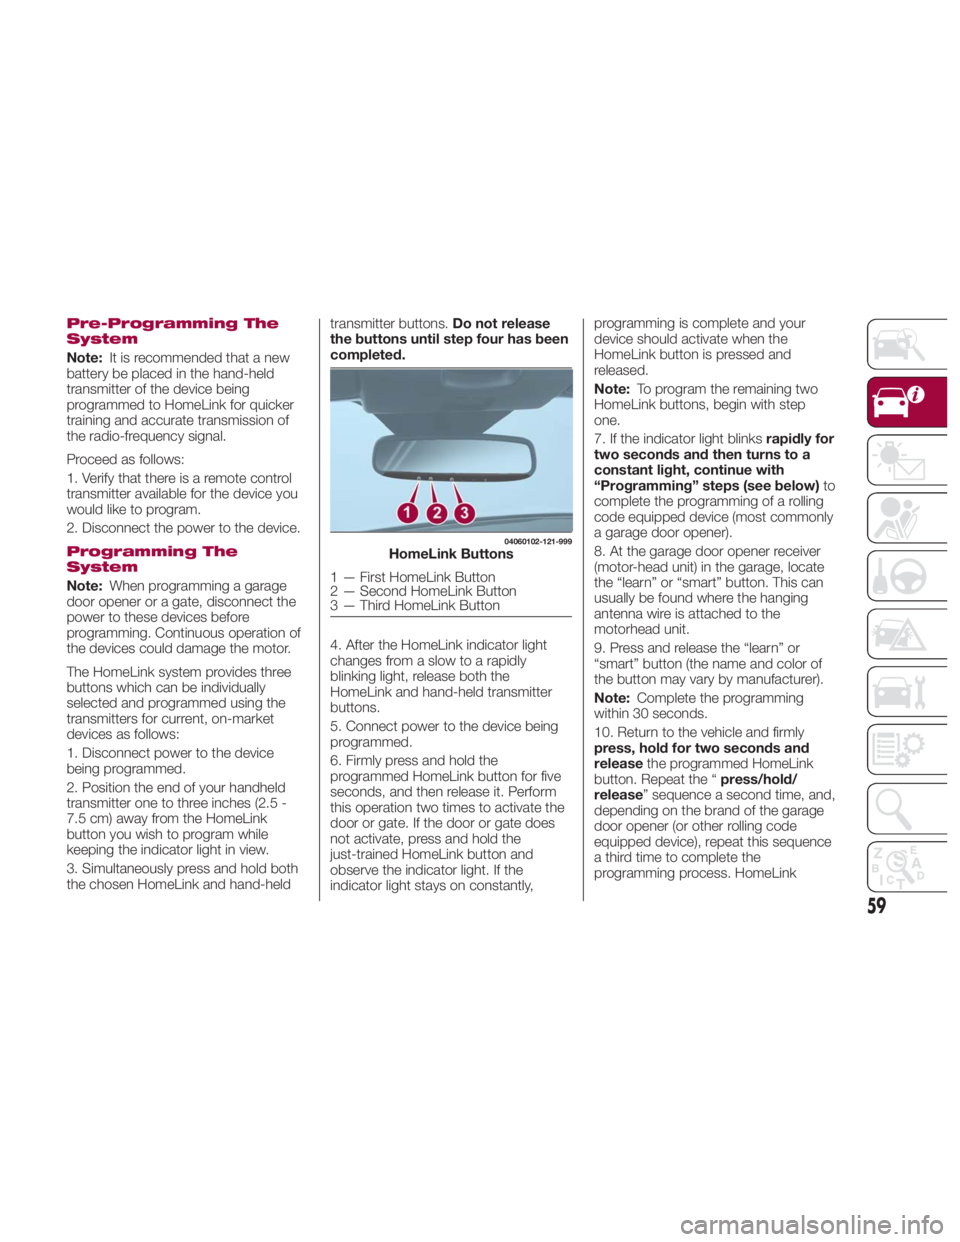
programming process. HomeLink 04060102-121-999
HomeLink Buttons
1 — First HomeLink Button
2 — Second HomeLink Button
3 — Third HomeLink Button
59
Page 62 of 292
should now activate your rolling code
equipped device.
Note: To program the remaining two
HomeLink buttons, begin with step
one.
For questions or comments, please
contact HomeLink at
www.homelink.com or
1-800-355-3515 .
Gate Operator/Canadian
Programming
Canadian radio-frequency laws require
transmitter signals to “time-out” (or quit)
after several seconds of transmission -
which may not be long enough for
HomeLink to pick up the signal during
programming.
Similar to this Canadian law, some U.S.
gate operators are designed to
“time-out” in the same manner.
If you live in Canada or you are having
difficulties programming a gate operator
by using the “Programming”
procedures (regardless of where you
live), replace “Programming The
System” step three with the following:
Note: If programming a garage door
opener or gate operator, it is advised to
unplug the device during the “cycling”
process to prevent possible
overheating.
1. Continue to press and hold the
HomeLink button while you press and
release - every two seconds (“cycle”)
your hand-held transmitter until the frequency signal has successfully been
accepted by HomeLink (the indicator
light will flash slowly and then rapidly).
2. Proceed with the “Programming”
steps to complete.
Operating The System
Push the programmed HomeLink
button to operate a programmed
device.
The code will continue being
transmitted for a maximum of
20 seconds.
Reprogramming The
System
To program a device to HomeLink using
a HomeLink button previously trained,
follow these steps:
1. Push and hold the desired HomeLink
button. DO NOT release the button;
2. The indicator light will begin to flash
after 20 seconds. Without releasing the
HomeLink button, proceed with
“Programming The System” step one.
Erasing Programmed
HomeLink Buttons
To erase the existing programming from
all three operating channels, push and
hold the two outside buttons 1 and
3 on the auto-dimming mirror until the
HomeLink indicator light begins to flash
after approximately 10 seconds.
Verify that the programming has been
erased when you resell the vehicle. INTERNAL
EQUIPMENT Storage Compartments
Center Console
The center console is located between
the driver’s and passenger’s seats.
Warning!Keep storage compartments closed when
driving. Driving with the storage
compartments open is dangerous. To
reduce the possibility of injury in an
accident or a sudden stop, keep the
storage compartments closed when
driving.
Caution!Do not leave lighters or eyeglasses in the
storage compartments while parked under
the sun. A lighter could explode or the
plastic material in eyeglasses could deform
and crack from high temperature.
60
GETTING TO KNOW YOUR VEHICLE