Button FIAT STILO 2004 1.G Connect NavPlus Manual
[x] Cancel search | Manufacturer: FIAT, Model Year: 2004, Model line: STILO, Model: FIAT STILO 2004 1.GPages: 166, PDF Size: 3.8 MB
Page 22 of 166
CONNECT Nav+
21
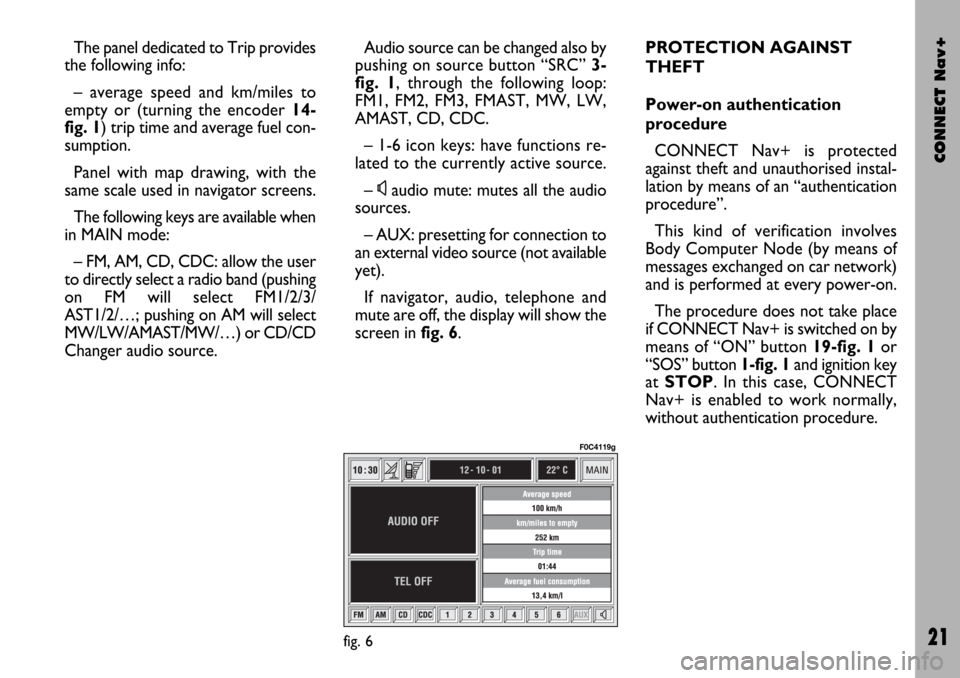
The panel dedicated to Trip provides
the following info:
– average speed and km/miles to
empty or (turning the encoder 14-
fig. 1) trip time and average fuel con-
sumption.
Panel with map drawing, with the
same scale used in navigator screens.
The following keys are available when
in MAIN mode:
– FM, AM, CD, CDC: allow the user
to directly select a radio band (pushing
on FM will select FM1/2/3/
AST1/2/…; pushing on AM will select
MW/LW/AMAST/MW/…) or CD/CD
Changer audio source.Audio source can be changed also by
pushing on source button “SRC” 3-
fig. 1, through the following loop:
FM1, FM2, FM3, FMAST, MW, LW,
AMAST, CD, CDC.
– 1-6 icon keys: have functions re-
lated to the currently active source.
–
Ùaudio mute: mutes all the audio
sources.
– AUX: presetting for connection to
an external video source (not available
yet).
If navigator, audio, telephone and
mute are off, the display will show the
screen in fig. 6.PROTECTION AGAINST
THEFT
Power-on authentication
procedure
CONNECT Nav+ is protected
against theft and unauthorised instal-
lation by means of an “authentication
procedure”.
This kind of verification involves
Body Computer Node (by means of
messages exchanged on car network)
and is performed at every power-on.
The procedure does not take place
if CONNECT Nav+ is switched on by
means of “ON” button 19-fig. 1or
“SOS” button 1-fig. 1and ignition key
at STOP. In this case, CONNECT
Nav+ is enabled to work normally,
without authentication procedure.
fig. 6
F0C4119g
Page 23 of 166
CONNECT Nav+
22
With ignition key at MAR, if au-
thentication fails, system starts work-
ing as usual, but the user is asked to
enter the 4-digit “Master Code” to al-
low access to the standard functions.
Master code is unique for each
CONNECT Nav+, and is stored in its
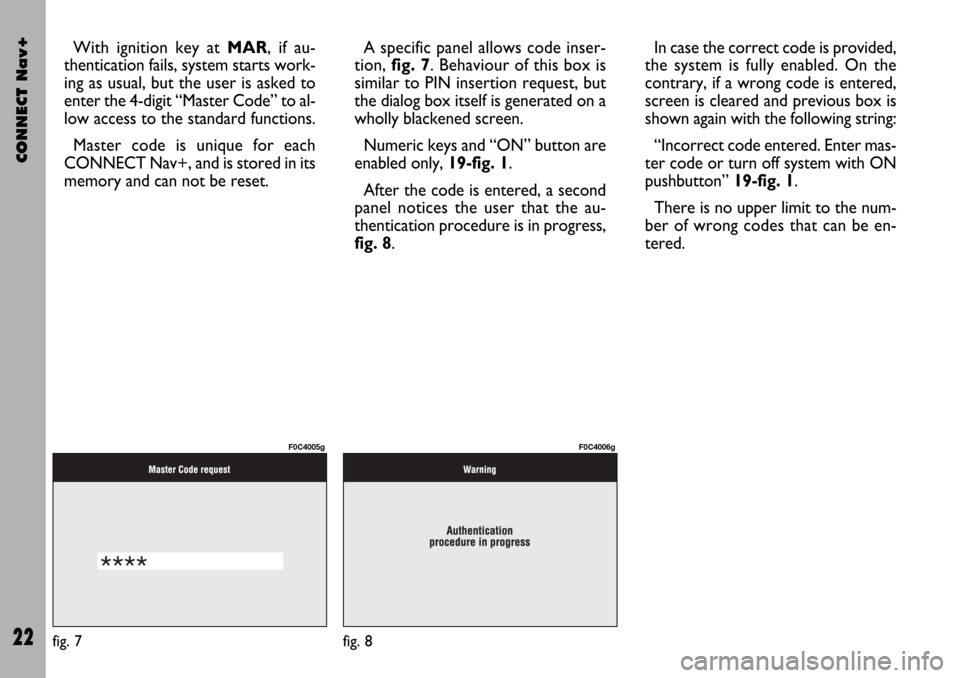
memory and can not be reset.A specific panel allows code inser-
tion, fig. 7. Behaviour of this box is
similar to PIN insertion request, but
the dialog box itself is generated on a
wholly blackened screen.
Numeric keys and “ON” button are
enabled only, 19-fig. 1.
After the code is entered, a second
panel notices the user that the au-
thentication procedure is in progress,
fig. 8.In case the correct code is provided,
the system is fully enabled. On the
contrary, if a wrong code is entered,
screen is cleared and previous box is
shown again with the following string:
“Incorrect code entered. Enter mas-
ter code or turn off system with ON
pushbutton” 19-fig. 1.
There is no upper limit to the num-
ber of wrong codes that can be en-
tered.
fig. 7
F0C4005g
fig. 8
F0C4006g
Page 24 of 166
CONNECT Nav+
23
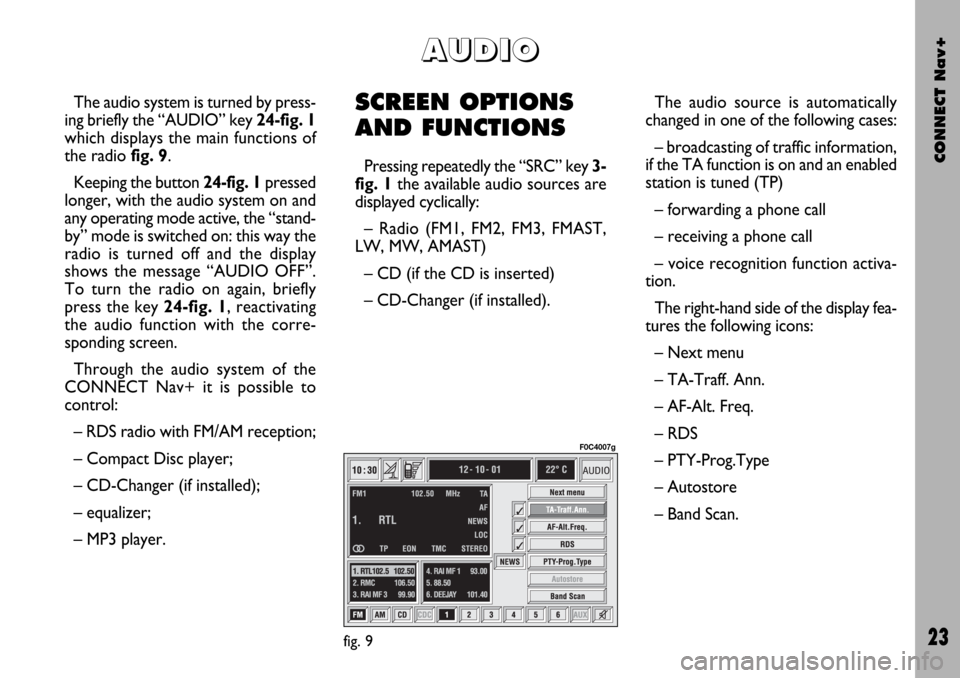
The audio system is turned by press-
ing briefly the “AUDIO” key 24-fig. 1
which displays the main functions of
the radio fig. 9.
Keeping the button 24-fig. 1pressed
longer, with the audio system on and
any operating mode active, the “stand-
by” mode is switched on: this way the
radio is turned off and the display
shows the message “AUDIO OFF”.
To turn the radio on again, briefly
press the key 24-fig. 1, reactivating
the audio function with the corre-
sponding screen.
Through the audio system of the
CONNECT Nav+ it is possible to
control:
– RDS radio with FM/AM reception;
– Compact Disc player;
– CD-Changer (if installed);
– equalizer;
– MP3 player.SCREEN OPTIONS
AND FUNCTIONS
Pressing repeatedly the “SRC” key 3-
fig. 1the available audio sources are
displayed cyclically:
– Radio (FM1, FM2, FM3, FMAST,
LW, MW, AMAST)
– CD (if the CD is inserted)
– CD-Changer (if installed).The audio source is automatically
changed in one of the following cases:
– broadcasting of traffic information,
if the TA function is on and an enabled
station is tuned (TP)
– forwarding a phone call
– receiving a phone call
– voice recognition function activa-
tion.
The right-hand side of the display fea-
tures the following icons:
– Next menu
– TA-Traff. Ann.
– AF-Alt. Freq.
– RDS
– PTY-Prog.Type
– Autostore
– Band Scan.
A A
U U
D D
I I
O O
fig. 9
F0C4007g
Page 25 of 166
CONNECT Nav+
24
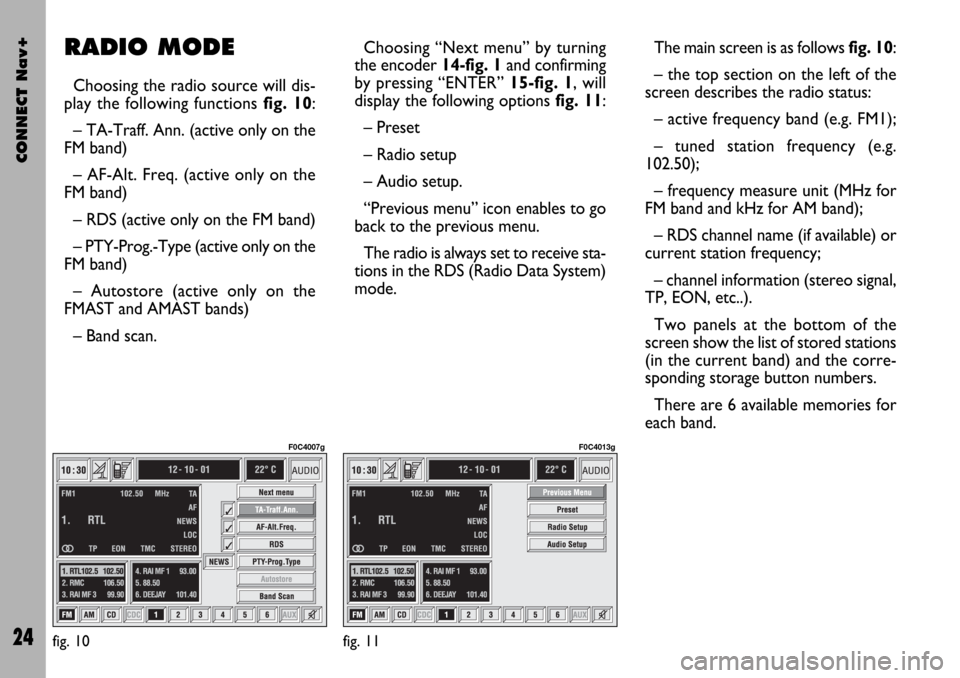
The main screen is as follows fig. 10:
– the top section on the left of the
screen describes the radio status:
– active frequency band (e.g. FM1);
– tuned station frequency (e.g.
102.50);
– frequency measure unit (MHz for
FM band and kHz for AM band);
– RDS channel name (if available) or
current station frequency;
– channel information (stereo signal,
TP, EON, etc..).
Two panels at the bottom of the
screen show the list of stored stations
(in the current band) and the corre-
sponding storage button numbers.
There are 6 available memories for
each band.RADIO MODE
Choosing the radio source will dis-
play the following functions fig. 10:
– TA-Traff. Ann. (active only on the
FM band)
– AF-Alt. Freq. (active only on the
FM band)
– RDS (active only on the FM band)
– PTY-Prog.-Type (active only on the
FM band)
– Autostore (active only on the
FMAST and AMAST bands)
– Band scan.Choosing “Next menu” by turning
the encoder 14-fig. 1and confirming
by pressing “ENTER” 15-fig. 1, will
display the following options fig. 11:
– Preset
– Radio setup
– Audio setup.
“Previous menu” icon enables to go
back to the previous menu.
The radio is always set to receive sta-
tions in the RDS (Radio Data System)
mode.
fig. 10
F0C4007g
fig. 11
F0C4013g
Page 26 of 166

CONNECT Nav+
25
At the screen bottom there are the
functions that can be activated by
pressing the corresponding multifunc-
tion keys 17-fig. 1, on the front pan-
el:
– FMactivates, on successive push-
es FM1, FM2, FM3, FMAST, FM1… ra-
dio bands in a loop.
– AMactivates, on successive push-
es MW, LW, AMAST, MW… radio
bands in a loop
– CD activates CD
– CDCactivates CD Changer
– 1-6buttons (short push), select a
pre-stored station
– 1-6 buttons (long push), store the
currently active station at the select-
ed button.
– AUX, presetting for connection to
an external video source (not available
yet).
– Ùactivates/deactivates the MUTE
function (regardless of the selected au-
dio source).Tuning
This function seeks stations in the
chosen band.
Proceed as follows:
– select the frequency band (FM1,
FM2, FM3, MW, LW) pressing the
“SRC” key repeatedly 3-fig. 1;
– press key “
¯¯” 22-fig. 1or “˙˙”
18-fig. 1to start the automatic search
for tuning the next or previous station
that can be received.
If the “TA” function is on (traffic in-
formation), the tuner only seeks sta-
tions that broadcast traffic bulletins.
If the “PTY” function is on, the tuner
only seeks PTY stations.Manual station storage
The station being heard can be
stored in the range chosen with key-
pad buttons 17-fig. 1numbered from
“1” to “6” at the bottom of the main
screen.
Keep one of these keys pressed un-
til the display shows the number of the
key with which the station has been
stored; a confirmation beep will indi-
cate that the station has been stored.
Page 29 of 166

CONNECT Nav+
28
– With AF OFF the radio will not
tune the strongest station automati-
cally and it will have to be found man-
ually using the tuner buttons.
To turn the “AF-Alt. Freq.” function
on/off, select “AF-Alt. Freq.” icon by
encoder 14-fig. 1and then press
“ENTER” 15-fig. 1repeatedly.
When the AF function is on, the dis-
play shows “AF” and the symbol “✓”
is shown near the icon.
The RDS channel name (if available)
is still shown on the display.“RDS” FUNCTION
The “RDS” function enables/disables
RDS string (showing the tuned station
name) display.
To turn the “RDS” function on/off,
select the “RDS” function turning the
encoder 14-fig. 1and then press
“ENTER” 15-fig. 1.
When the “RDS” function is on, the
display shows the string with tuned
station name and the symbol “✓” is
shown near the corresponding icon. “AF-Alt. Freq.” FUNCTION
(SEEKING ALTERNATIVE
FREQUENCIES)
Within the RDS system the radio can
work in two different modes:
– AF ON: alternative frequency
search on;
– AF OFF: alternative frequency
search off.
When the signal of the RDS station
tuned weakens, the following two cas-
es may occur:
– With AF ON the RDS system ac-
tivates automatic tuning of the opti-
mum frequency of the station chosen,
with the stations enabled, therefore
the radio is automatically tuned to the
station with the strongest signal that
is broadcasting the same programme.
During the journey it will thus be pos-
sible to continue listening to the sta-
tion chosen without having to change
the frequency when changing area. Of
course, the station being listened to
must be receivable in the area the car
is crossing.
Page 32 of 166

CONNECT Nav+
31
IMPORTANTIt may occur that
the Autostore function is unable to
find 6 stations with a strong signal; in
this case only the stations found are
stored.
IMPORTANTActivating the “Au-
tostore” function cancels the stations
stored previously in the FMAST or
AMAST band.“Band Scan” FUNCTION
The “Band scan” function activates
station scanning in the chosen fre-
quency band. Each station frequency
will be displayed for about 10 seconds.
To turn on the “Band scan” function,
select the “Band scan” icon with the
encoder 14-fig. 1, then press “EN-
TER” 15-fig. 1to confirm.
During scanning, the display will
show “Band Scan”.
To stop the band scan function, press
“ENTER” 15-fig. 1again.“Preset Scan” FUNCTION
The “Preset scan” function activates
stored station scanning in the chosen
frequency band. Each stored station
will be played for about 10 seconds.
To turn on the “Preset scan” func-
tion, select the “Preset scan” icon with
the encoder 14-fig. 1, then press
“ENTER” 15-fig. 1to confirm.
During stations scan, the scanned
one is highlighted in the stored sta-
tions window and corresponding low-
bar button too. During operations the
string “Preset Scan” is displayed in the
main window.
To stop the preset scan function,
press “ENTER” 15-fig. 1again.
Page 34 of 166

CONNECT Nav+
33
Regional function
This function enables or disables a
RDS regional service.
To turn on/off the “Regional” func-
tion, press button 15-fig. 1, after se-
lecting the “Regional” function by turn-
ing the encoder 14-fig. 1. This func-
tion is only available on FM band. The
display shows
– “DISABLED”
or
– “ENABLED”.NEWS function
This function shortly enables or not
the PTY code News.
To turn on/off the “NEWS” function,
press button 15-fig. 1 after selecting
the “NEWS” function by turning the
encoder 14-fig. 1. This function is on-
ly available on FM band. The display
shows
– “ON”
or
– “OFF”.OK
Choosing “OK” with the encoder 14-
fig. 1and confirming it by pressing the
button 15-fig. 1goes back to the pre-
vious screen storing the adjustments
set. Pressing “ESCAPE” 13-fig. 1goes
back to the previous screen resuming
the settings stored previously.
Page 41 of 166

CONNECT Nav+
40
If the CD is not inserted, is illegible
or is not an audio CD, the display will
show the message “No CD” or “No
CD-DA” and all CD/CDC icon keys
are disabled.
Press respectively “
¯¯” 22-fig. 1or
“
˙˙” 18-fig. 1to play the previous or
the next track on the CD.
To stop the CD press briefly “
11/˙”
21-fig. 1. To restart CD playing, press
briefly again “
11/˙” 21-fig. 1. To pause
the CD player press continuously
“
11/˙” 21-fig. 1.
To eject the CD from the slot 5-
fig. 1press key9-fig. 1.“Shuffle” FUNCTION
(RANDOM PLAYING)
To turn the “Shuffle” function on/off,
turn the encoder 14-fig. 1and press
button 15-fig. 1after selecting it.
When the Shuffle function is on, the
display shows “SHUFFLE” and symbol
“✓” is shown near the corresponding
icon.
With this function on, the CD tracks
are played in random sequence. To
turn off this function, press again “EN-
TER” 15-fig. 1. “TA-Traff. Ann.” FUNCTION
(TRAFFIC INFORMATION)
To turn the TA function (Traffic An-
nouncement) on/off while listening to
a CD, select the corresponding icon
and then press “ENTER” to confirm
15-fig. 1.
When the TA function is on, sym-
bol “✓” is shown near the corre-
sponding icon.
For the description of the function,
refer to the corresponding paragraph
in the “RADIO MODE” chapter.
“Prog” FUNCTION
To turn the “Prog” function on/off,
rotate the encoder 14-fig. 1and then
press “ENTER” 15-fig. 1after select-
ing the function.
This function enables or disables
playback of the previously user pro-
grammed track list (see “CD setup”
functions).
“Prog” icon key is disabled if no pro-
grammed list has been entered.
When list has been programmed and
programmed list playing has been cho-
sen, symbol “✓” is shown near the
corresponding icon.
Page 42 of 166
CONNECT Nav+
41
“Scan” FUNCTION
(BRIEF PLAYBACK)
The “Scan” function is turned on/off
selecting the relevant icon key with
the encoder 14-fig. 1and pressing
button 15-fig. 1.
When this function is on, all the CD
tracks are played for about 10 seconds
in the actual sequence on the CD.
Press “ENTER” again 15-fig. 1to
turn the function off. “Compression” FUNCTION
This function activates dynamic
sound compression when playing a
CD in the car.
To turn this function on/off, select
the “Compression” icon with the en-
coder 14-fig. 1and press “ENTER”
15-fig. 1.
When the “Compression” function
is on, symbol “✓” is shown near the
corresponding icon.
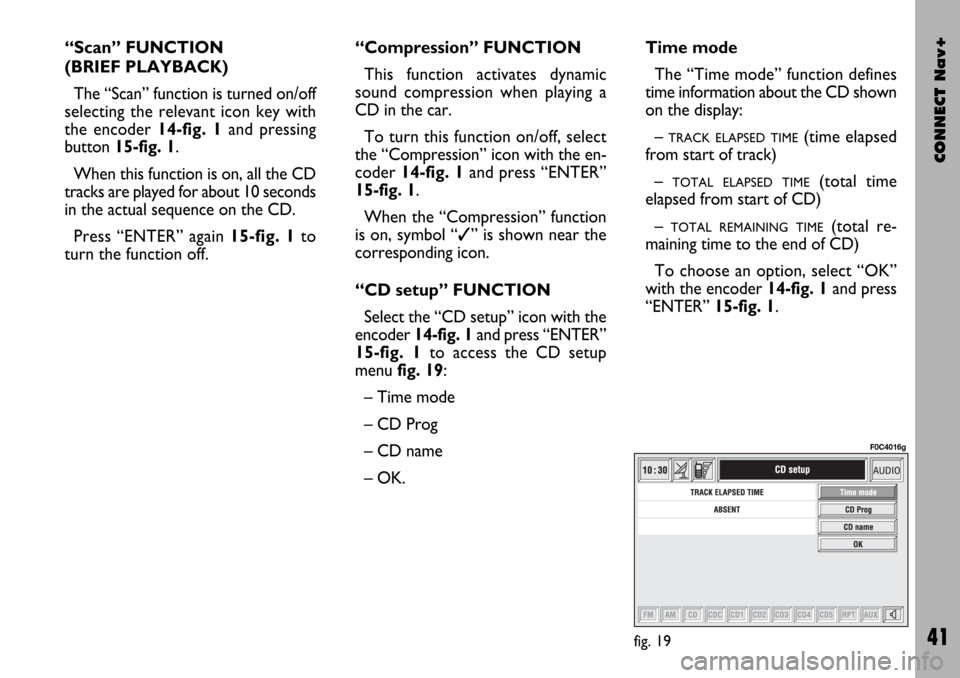
“CD setup” FUNCTION
Select the “CD setup” icon with the
encoder 14-fig. 1and press “ENTER”
15-fig. 1to access the CD setup
menu fig. 19:
– Time mode
– CD Prog
– CD name
– OK.Time mode
The “Time mode” function defines
time information about the CD shown
on the display:
–
TRACK ELAPSED TIME(time elapsed
from start of track)
–
TOTAL ELAPSED TIME(total time
elapsed from start of CD)
–
TOTAL REMAINING TIME(total re-
maining time to the end of CD)
To choose an option, select “OK”
with the encoder 14-fig. 1and press
“ENTER” 15-fig. 1.
fig. 19
F0C4016g