ECO mode FIAT STILO 2004 1.G Connect NavPlus Manual
[x] Cancel search | Manufacturer: FIAT, Model Year: 2004, Model line: STILO, Model: FIAT STILO 2004 1.GPages: 166, PDF Size: 3.8 MB
Page 92 of 166
CONNECT Nav+
91
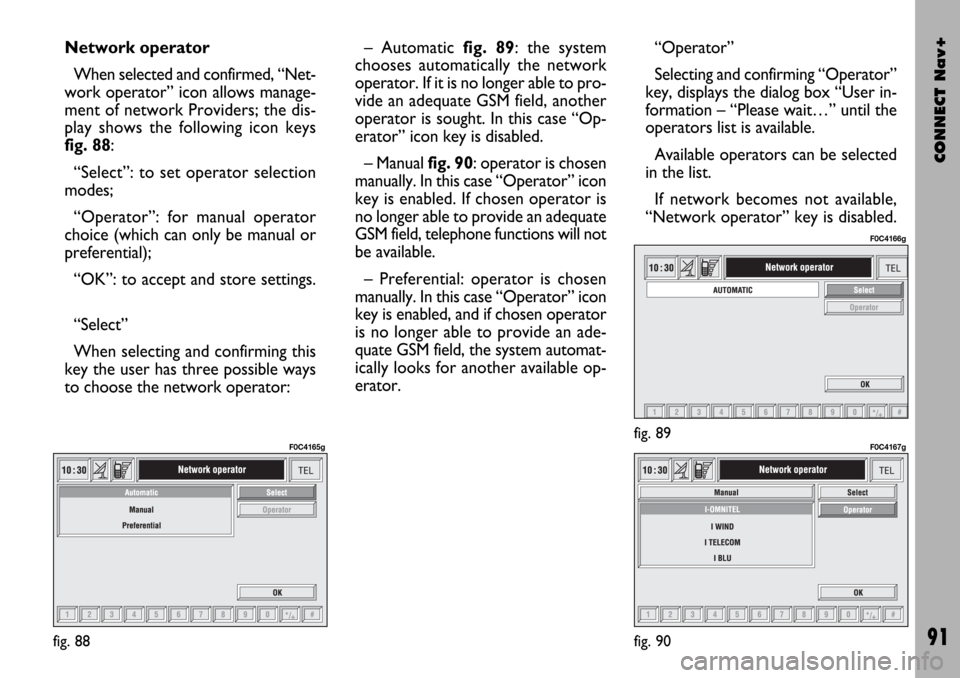
Network operator
When selected and confirmed, “Net-
work operator” icon allows manage-
ment of network Providers; the dis-
play shows the following icon keys
fig. 88:
“Select”: to set operator selection
modes;
“Operator”: for manual operator
choice (which can only be manual or
preferential);
“OK”: to accept and store settings.
“Select”
When selecting and confirming this
key the user has three possible ways
to choose the network operator:– Automatic fig. 89: the system
chooses automatically the network
operator. If it is no longer able to pro-
vide an adequate GSM field, another
operator is sought. In this case “Op-
erator” icon key is disabled.
– Manual fig. 90: operator is chosen
manually. In this case “Operator” icon
key is enabled. If chosen operator is
no longer able to provide an adequate
GSM field, telephone functions will not
be available.
– Preferential: operator is chosen
manually. In this case “Operator” icon
key is enabled, and if chosen operator
is no longer able to provide an ade-
quate GSM field, the system automat-
ically looks for another available op-
erator.“Operator”
Selecting and confirming “Operator”
key, displays the dialog box “User in-
formation – “Please wait…” until the
operators list is available.
Available operators can be selected
in the list.
If network becomes not available,
“Network operator” key is disabled.
fig. 88
F0C4165gfig. 89
F0C4166g
fig. 90
F0C4167g
Page 132 of 166

CONNECT Nav+
131
“Navigator” function
VOICE COMMANDS - KEYWORDS
1
stLEVEL
KEYWORDS
Navigator
Once a command has been pronounced and executed, second level “keywords” and all first level keywords will remain available for further
commands. (*) After these commands the system will ask: “The destination, please”.
2ndLEVEL
KEYWORDS
Destination (*)
Display/show
Zoom in
Zoom out
List of destinations
3rdLEVEL
KEYWORDS
Map
Route
Hotels
Restaurants
Parking
Petrol station
Nothing
Read
Delete
4thLEVEL
KEYWORDS
Destination (*)
All
REQUIRED FUNCTION
Navigator
Select destination (only with
“voice identification” mode)
Show map
Show route
Show hotels on the map
Show restaurants on the map
Show parking on the map
Show petrol stations on the map
Nothing (hide what is shown at the moment)
Zoom in
Zoom out
Play list of destinations
stored with
“voice identification” mode
Delete a destination (only with
“voice identification” mode)
Delete all the voice samples
associated to destinations
stored in directory
Page 133 of 166
CONNECT Nav+
132
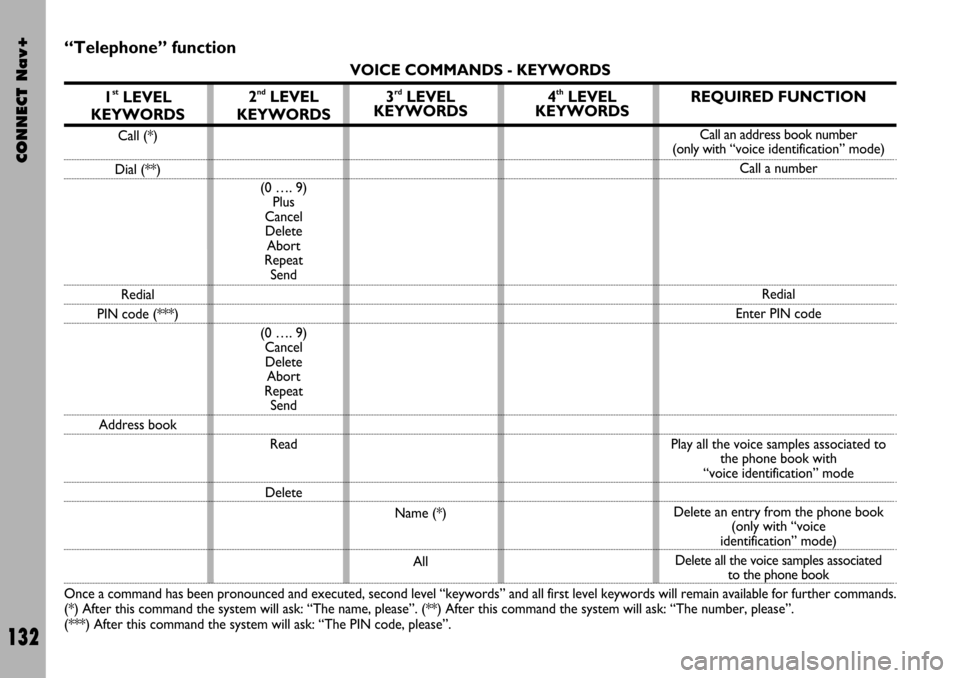
“Telephone” function
VOICE COMMANDS - KEYWORDS
1
stLEVEL
KEYWORDS
Call (*)
Dial (**)
Redial
PIN code (***)
Address book
Once a command has been pronounced and executed, second level “keywords” and all first level keywords will remain available for further commands.
(*) After this command the system will ask: “The name, please”. (**) After this command the system will ask: “The number, please”.
(***) After this command the system will ask: “The PIN code, please”.
2ndLEVEL
KEYWORDS
(0 …. 9)
Plus
Cancel
Delete
Abort
Repeat
Send
(0 …. 9)
Cancel
Delete
Abort
Repeat
Send
Read
Delete
3rdLEVEL
KEYWORDS
Name (*)
All
4thLEVEL
KEYWORDSREQUIRED FUNCTION
Call an address book number
(only with“voice identification” mode)
Call a number
Redial
Enter PIN code
Play all the voice samples associated to
the phone book with
“voice identification” mode
Delete an entry from the phone book
(only with “voice
identification” mode)
Delete all the voice samples associated
to the phone book
Page 138 of 166

CONNECT Nav+
137
Storing an entry in the address
book with voice identification
The user can insert into the tele-
phone book a voice sample associat-
ed to a number (only with “voice
identification” mode).
Recording stage cannot be per-
formed through voice commands (for
further details see section “Cellular
telephone with voice commands” at
paragraph “Directory function – Voice
recognition”).
User can stop the operation only by
pressing the front panel key
ô2-fig. 1or the steering wheel key ô3-fig. 2:
First example:
CONNECT: The name, please?
User: Barbara
CONNECT: Please, repeat
the name
User: Barbara
CONNECT: The name has been
stored.Second example:
CONNECT: The name, please?
User: Francesca
CONNECT: Please, repeat the
name
User: Maria
CONNECT: The name has not
been stored.
The name, please?
User: Francesca
CONNECT: Please, repeat
the name
User: Francesca
CONNECT: The name has been
stored.Calling an entry from the
address book
with voice recognition
Pronouncing 1st level keyword
“Call”, opens a dialogue enabling the
following keywords:
– Cancel
– Delete
– Abort
– Repeat
– Send.
First example:
User: Call
CONNECT: The name, please?
User: Paola
CONNECT: Paola
User: Send
CONNECT: The number is being
dialled.
Second example:
User: Call
CONNECT: The address book
is empty.
Page 143 of 166

CONNECT Nav+
142
First example:
CONNECT: The destination,
please?
User: Office
CONNECT: Office
User: Abort
CONNECT Abort. Fourth example:
User: Navigator -
List of destinations -
Delete -
Destination.
CONNECT: The destination,
please?
User: Office Milano
CONNECT: Do you wish to
delete
(Office Milano)?
User: Cancel
CONNECT: The destination,
please?
User: Paola’s house
CONNECT: Do you wish to
delete
(Paola’s house)?
User: Yes
CONNECT: The destination has
been deleted.Stopping the dialogue
To stop a dialogue, pronounce
“Abort” keyword. Keywords entered
before pronouncing “abort”, are delet-
ed.
“Abort” is recognized by the system
only in “voice recognition without
voice identification” mode.
Page 151 of 166
CONNECT Nav+
150
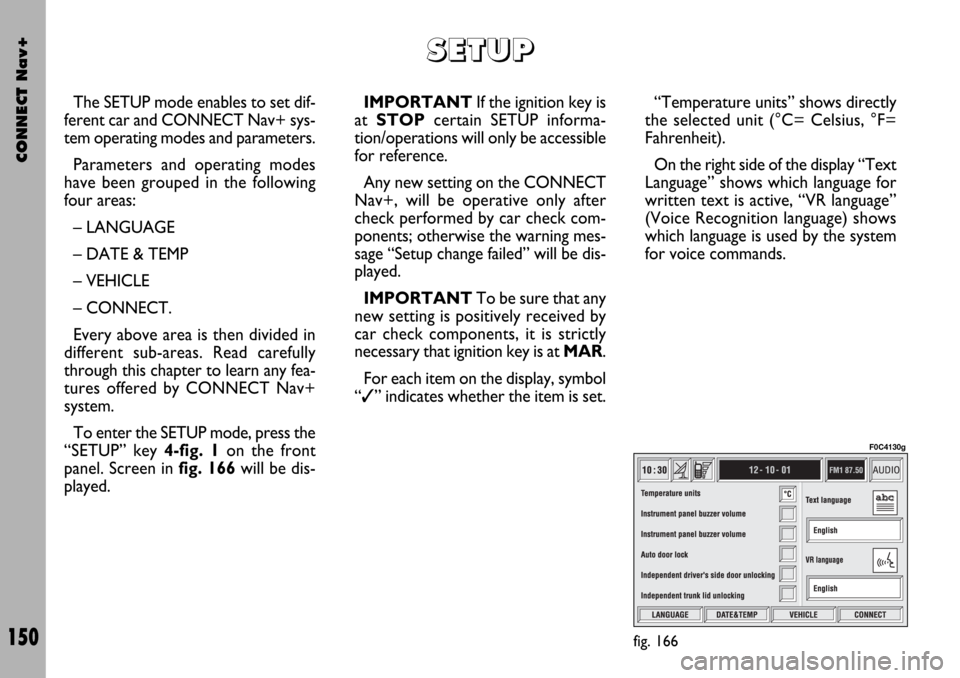
The SETUP mode enables to set dif-
ferent car and CONNECT Nav+ sys-
tem operating modes and parameters.
Parameters and operating modes
have been grouped in the following
four areas:
– LANGUAGE
– DATE & TEMP
– VEHICLE
– CONNECT.
Every above area is then divided in
different sub-areas. Read carefully
through this chapter to learn any fea-
tures offered by CONNECT Nav+
system.
To enter the SETUP mode, press the
“SETUP” key 4-fig. 1on the front
panel. Screen in fig. 166will be dis-
played.IMPORTANTIf the ignition key is
at STOPcertain SETUP informa-
tion/operations will only be accessible
for reference.
Any new setting on the CONNECT
Nav+, will be operative only after
check performed by car check com-
ponents; otherwise the warning mes-
sage “Setup change failed” will be dis-
played.
IMPORTANTTo be sure that any
new setting is positively received by
car check components, it is strictly
necessary that ignition key is at MAR.
For each item on the display, symbol
“✓” indicates whether the item is set.“Temperature units” shows directly
the selected unit (°C= Celsius, °F=
Fahrenheit).
On the right side of the display “Text
Language” shows which language for
written text is active, “VR language”
(Voice Recognition language) shows
which language is used by the system
for voice commands.
S S
E E
T T
U U
P P
fig. 166
F0C4130g
Page 152 of 166
CONNECT Nav+
151
IMPORTANTSetting (whatever)
language will start the updating pro-
cedure for both the written text and
for voice commands and instructions.
The written text (strings) will be up-
dated immediately upon selecting the
language. To update voice command
and message language the Setup CD
shall be inserted. if the Setup CD is not
inserted when requested, the required
voice command and message language
will not be updated.
To change parameters and operating
modes, press keypad keys 17-fig. 1
under LANGUAGE, DATE&TEMP,
VEHICLE or CONNECT.
This operation will display the spe-
cific screen thus allowing the desired
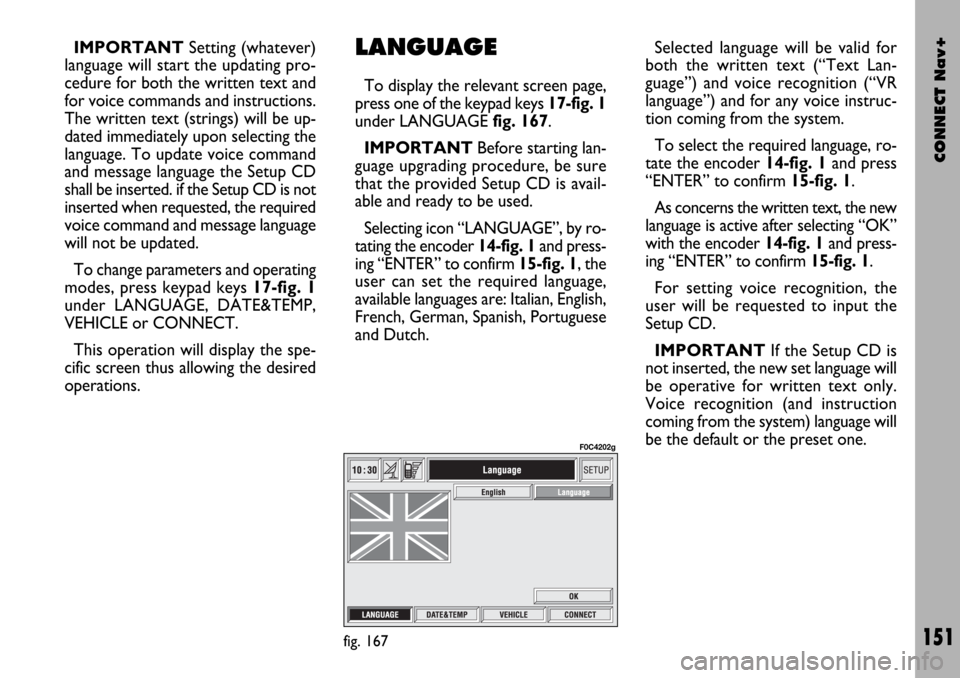
operations.LANGUAGE
To display the relevant screen page,
press one of the keypad keys 17-fig. 1
under LANGUAGE fig. 167.
IMPORTANTBefore starting lan-
guage upgrading procedure, be sure
that the provided Setup CD is avail-
able and ready to be used.
Selecting icon “LANGUAGE”, by ro-
tating the encoder 14-fig. 1and press-
ing “ENTER” to confirm 15-fig. 1, the
user can set the required language,
available languages are: Italian, English,
French, German, Spanish, Portuguese
and Dutch.Selected language will be valid for
both the written text (“Text Lan-
guage”) and voice recognition (“VR
language”) and for any voice instruc-
tion coming from the system.
To select the required language, ro-
tate the encoder 14-fig. 1and press
“ENTER” to confirm 15-fig. 1.
As concerns the written text, the new
language is active after selecting “OK”
with the encoder 14-fig. 1and press-
ing “ENTER” to confirm 15-fig. 1.
For setting voice recognition, the
user will be requested to input the
Setup CD.
IMPORTANTIf the Setup CD is
not inserted, the new set language will
be operative for written text only.
Voice recognition (and instruction
coming from the system) language will
be the default or the preset one.
fig. 167
F0C4202g
Page 153 of 166
CONNECT Nav+
152
The display will show the following
string:
“Insert Setup CD to change language
of messages and voice commands.
Press ESC to cancel”.
If the Setup CD is inserted the fol-
lowing message will be permanently
displayed:
“System will be unavailable for a few
seconds and calls in progress will be
terminated. Press ENTER to continue
or ESC to cancel”.
If “ENTER” has been pressed 15-
fig. 1the following message will be
permanently displayed:
“Message and voice command lan-
guage change in progress. Do not turn
off system. Please wait”.
The end of the procedure is indicat-
ed by the following message:
“Message and voice command lan-
guage change concluded correctly”.If some errors occur during language
updating, the following message will be
displayed:
“Language change failed. Please re-
peat procedure”.
This message asks the user to repeat
the above procedure.
Whenever the system is switched on
turning the ignition key to MAR, the
language module is checked and if the
system finds a fault the following mes-
sage is displayed:
“Voice commands and messages not
available. Please change the language”.
This message asks the user to repeat
language change procedure.
The user shall set again the desired
language in the SETUP menu and then
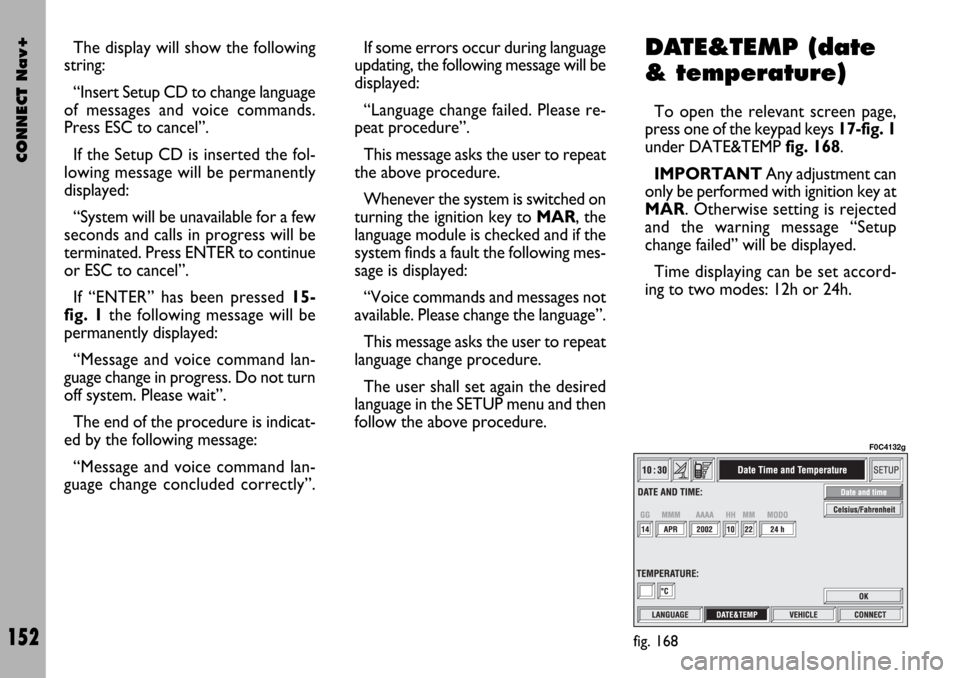
follow the above procedure.DATE&TEMP (date
& temperature)
To open the relevant screen page,
press one of the keypad keys 17-fig. 1
under DATE&TEMP fig. 168.
IMPORTANTAny adjustment can
only be performed with ignition key at
MAR. Otherwise setting is rejected
and the warning message “Setup
change failed” will be displayed.
Time displaying can be set accord-
ing to two modes: 12h or 24h.
fig. 168
F0C4132g
Page 159 of 166
CONNECT Nav+
158
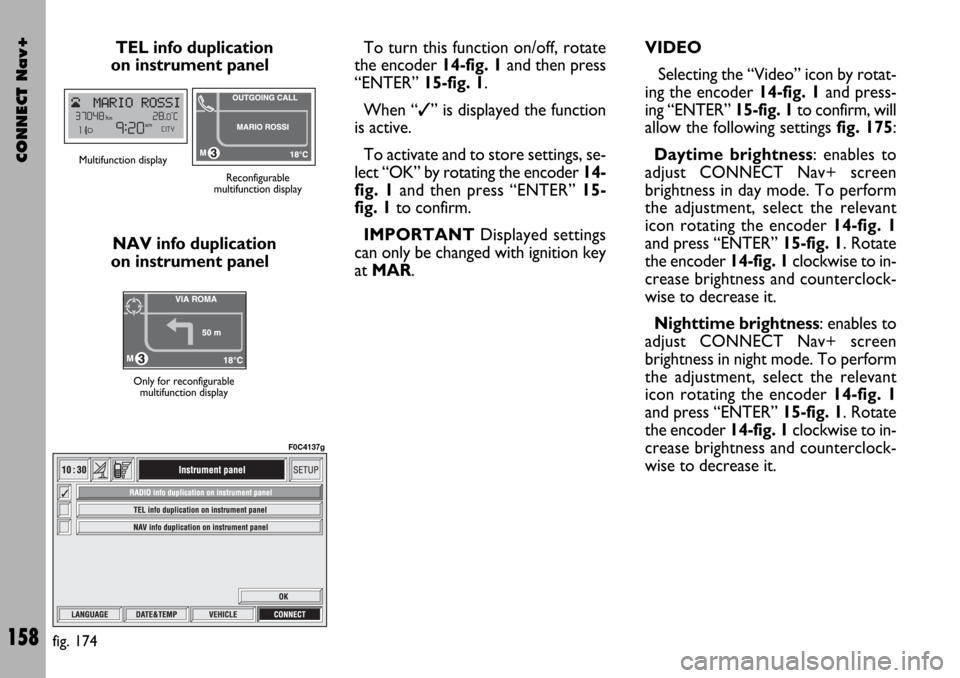
TEL info duplication
on instrument panel
NAV info duplication
on instrument panelTo turn this function on/off, rotate
the encoder 14-fig. 1and then press
“ENTER” 15-fig. 1.
When “✓” is displayed the function
is active.
To activate and to store settings, se-
lect “OK” by rotating the encoder 14-
fig. 1and then press “ENTER” 15-
fig. 1to confirm.
IMPORTANTDisplayed settings
can only be changed with ignition key
at MAR.
Multifunction display
Reconfigurable
multifunction display
Only for reconfigurable
multifunction display
fig. 174
F0C4137g
VIDEO
Selecting the “Video” icon by rotat-
ing the encoder 14-fig. 1and press-
ing “ENTER” 15-fig. 1to confirm, will
allow the following settings fig. 175:
Daytime brightness: enables to
adjust CONNECT Nav+ screen
brightness in day mode. To perform
the adjustment, select the relevant
icon rotating the encoder 14-fig. 1
and press “ENTER” 15-fig. 1. Rotate
the encoder 14-fig. 1clockwise to in-
crease brightness and counterclock-
wise to decrease it.
Nighttime brightness: enables to
adjust CONNECT Nav+ screen
brightness in night mode. To perform
the adjustment, select the relevant
icon rotating the encoder 14-fig. 1
and press “ENTER” 15-fig. 1. Rotate
the encoder 14-fig. 1clockwise to in-
crease brightness and counterclock-
wise to decrease it.