FIAT STILO 2006 1.G Service Manual
Manufacturer: FIAT, Model Year: 2006, Model line: STILO, Model: FIAT STILO 2006 1.GPages: 274, PDF Size: 4.76 MB
Page 41 of 274
40
SAFETY
DEVICES
CORRECT USE
OF THE CAR
WARNING
LIGHTS AND
MESSAGES
IN AN
EMERGENCY
CAR
MAINTENANCE
TECHNICAL
SPECIFICATIONS
INDEX
DASHBOARD
AND CONTROLS
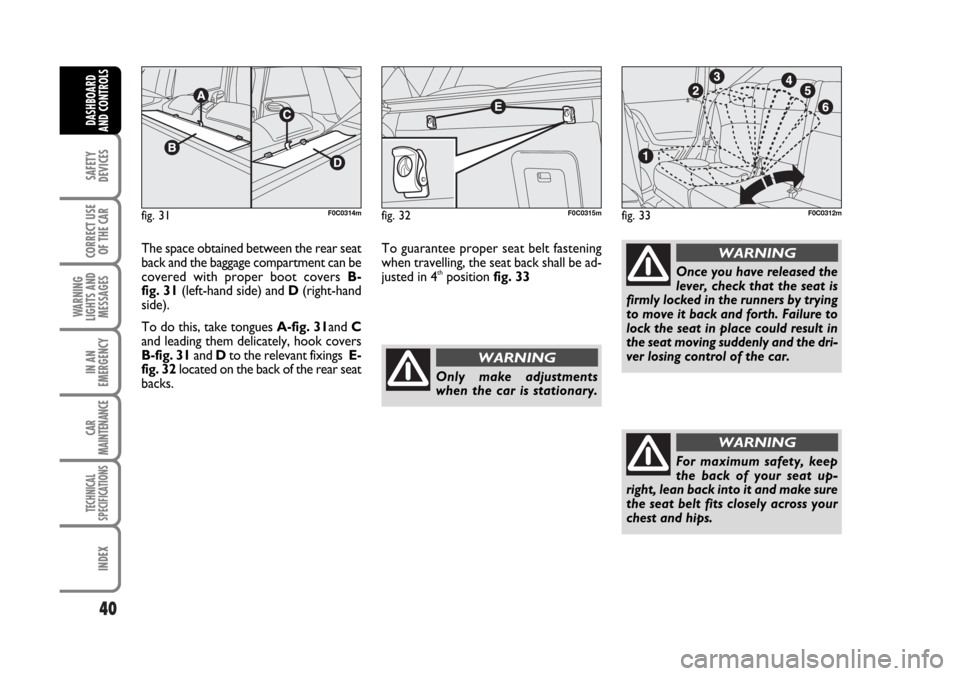
The space obtained between the rear seat
back and the baggage compartment can be
covered with proper boot covers B-
fig. 31(left-hand side) and D(right-hand
side).
To do this, take tongues A-fig. 31and C
and leading them delicately, hook covers
B-fig. 31and Dto the relevant fixings E-
fig. 32located on the back of the rear seat
backs.
fig. 31F0C0314mfig. 32F0C0315mfig. 33F0C0312m
Only make adjustments
when the car is stationary.
WARNING
Once you have released the
lever, check that the seat is
firmly locked in the runners by trying
to move it back and forth. Failure to
lock the seat in place could result in
the seat moving suddenly and the dri-
ver losing control of the car.
WARNING
For maximum safety, keep
the back of your seat up-
right, lean back into it and make sure
the seat belt fits closely across your
chest and hips.
WARNING
To guarantee proper seat belt fastening
when travelling, the seat back shall be ad-
justed in 4
thposition fig. 33
Page 42 of 274
41
SAFETY
DEVICES
CORRECT USE
OF THE CAR
WARNING
LIGHTS AND
MESSAGES
IN AN
EMERGENCY
CAR
MAINTENANCE
TECHNICAL
SPECIFICATIONS
INDEX
DASHBOARD
AND CONTROLS
HEAD RESTRAINTS
FRONT
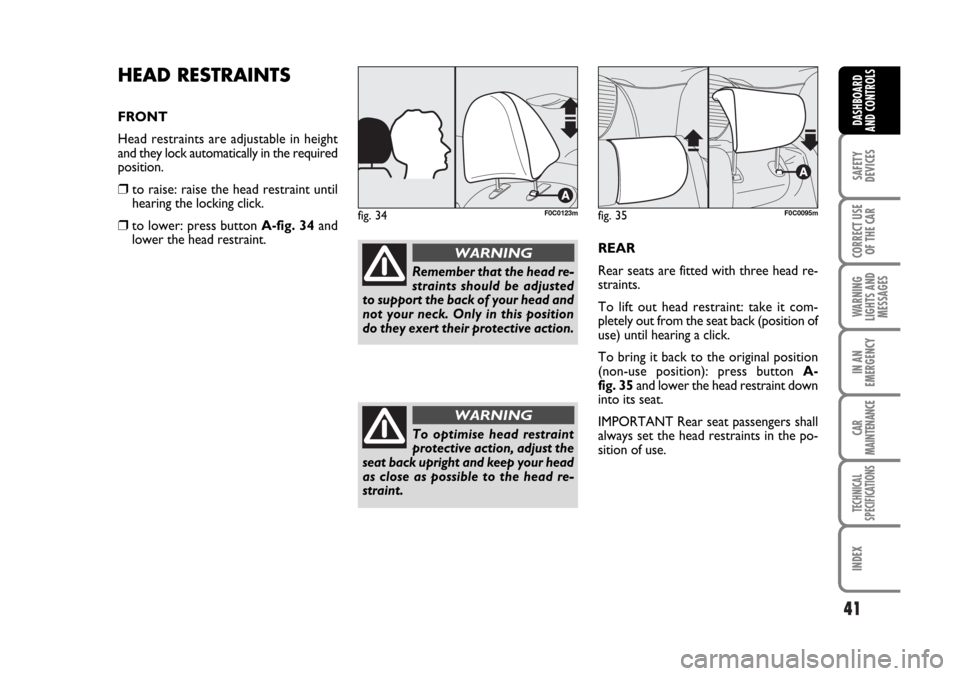
Head restraints are adjustable in height
and they lock automatically in the required
position.
❒ to raise: raise the head restraint until
hearing the locking click.
❒to lower: press button A-fig. 34and
lower the head restraint.
REAR
Rear seats are fitted with three head re-
straints.
To lift out head restraint: take it com-
pletely out from the seat back (position of
use) until hearing a click.
To bring it back to the original position
(non-use position): press button A-
fig. 35and lower the head restraint down
into its seat.
IMPORTANT Rear seat passengers shall
always set the head restraints in the po-
sition of use.fig. 34F0C0123m
Remember that the head re-
straints should be adjusted
to support the back of your head and
not your neck. Only in this position
do they exert their protective action.
WARNING
To optimise head restraint
protective action, adjust the
seat back upright and keep your head
as close as possible to the head re-
straint.
WARNING
fig. 35F0C0095m
Page 43 of 274
42
SAFETY
DEVICES
CORRECT USE
OF THE CAR
WARNING
LIGHTS AND
MESSAGES
IN AN
EMERGENCY
CAR
MAINTENANCE
TECHNICAL
SPECIFICATIONS
INDEX
DASHBOARD
AND CONTROLS
STEERING WHEEL
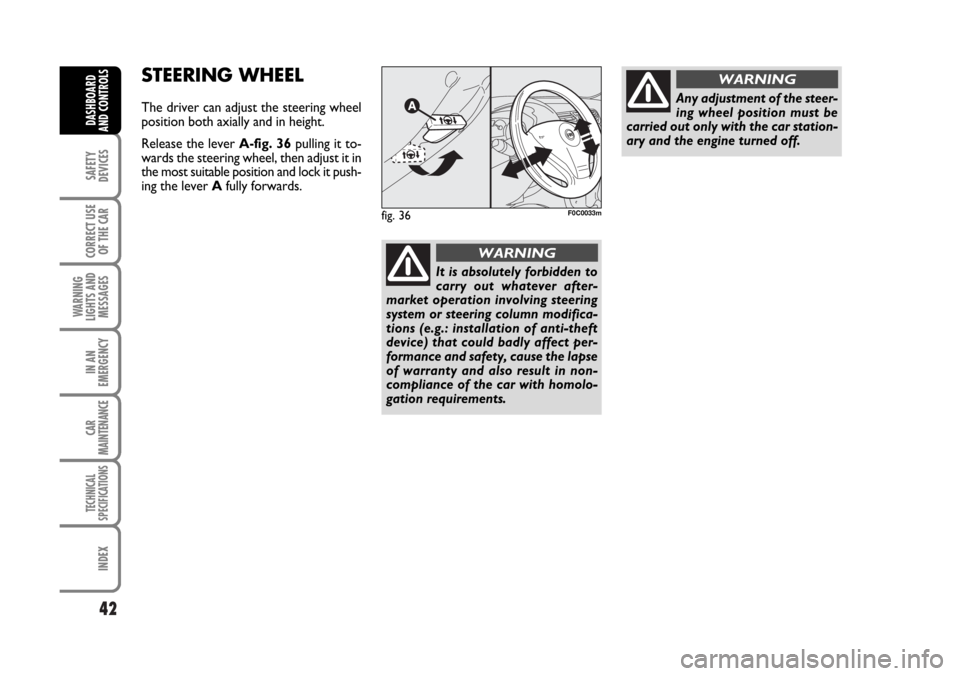
The driver can adjust the steering wheel
position both axially and in height.
Release the lever A-fig. 36pulling it to-
wards the steering wheel, then adjust it in
the most suitable position and lock it push-
ing the lever Afully forwards.
fig. 36F0C0033m
It is absolutely forbidden to
carry out whatever after-
market operation involving steering
system or steering column modifica-
tions (e.g.: installation of anti-theft
device) that could badly affect per-
formance and safety, cause the lapse
of warranty and also result in non-
compliance of the car with homolo-
gation requirements.
WARNING
Any adjustment of the steer-
ing wheel position must be
carried out only with the car station-
ary and the engine turned off.
WARNING
Page 44 of 274
43
SAFETY
DEVICES
CORRECT USE
OF THE CAR
WARNING
LIGHTS AND
MESSAGES
IN AN
EMERGENCY
CAR
MAINTENANCE
TECHNICAL
SPECIFICATIONS
INDEX
DASHBOARD
AND CONTROLS
REARVIEW MIRRORS
DRIVING MIRROR
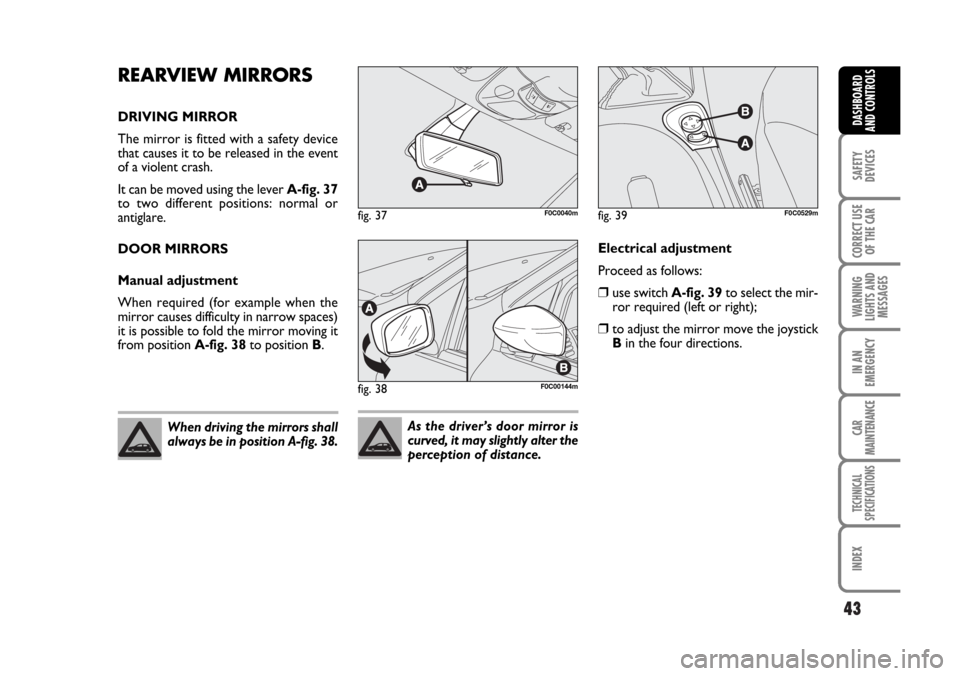
The mirror is fitted with a safety device
that causes it to be released in the event
of a violent crash.
It can be moved using the lever A-fig. 37
to two different positions: normal or
antiglare.
DOOR MIRRORS
Manual adjustment
When required (for example when the
mirror causes difficulty in narrow spaces)
it is possible to fold the mirror moving it
from position A-fig. 38to position B.
fig. 37F0C0040m
fig. 38F0C00144m
When driving the mirrors shall
always be in position A-fig. 38.As the driver’s door mirror is
curved, it may slightly alter the
perception of distance.
Electrical adjustment
Proceed as follows:
❒use switch A-fig. 39to select the mir-
ror required (left or right);
❒to adjust the mirror move the joystick
Bin the four directions.
fig. 39F0C0529m
Page 45 of 274
44
SAFETY
DEVICES
CORRECT USE
OF THE CAR
WARNING
LIGHTS AND
MESSAGES
IN AN
EMERGENCY
CAR
MAINTENANCE
TECHNICAL
SPECIFICATIONS
INDEX
DASHBOARD
AND CONTROLS
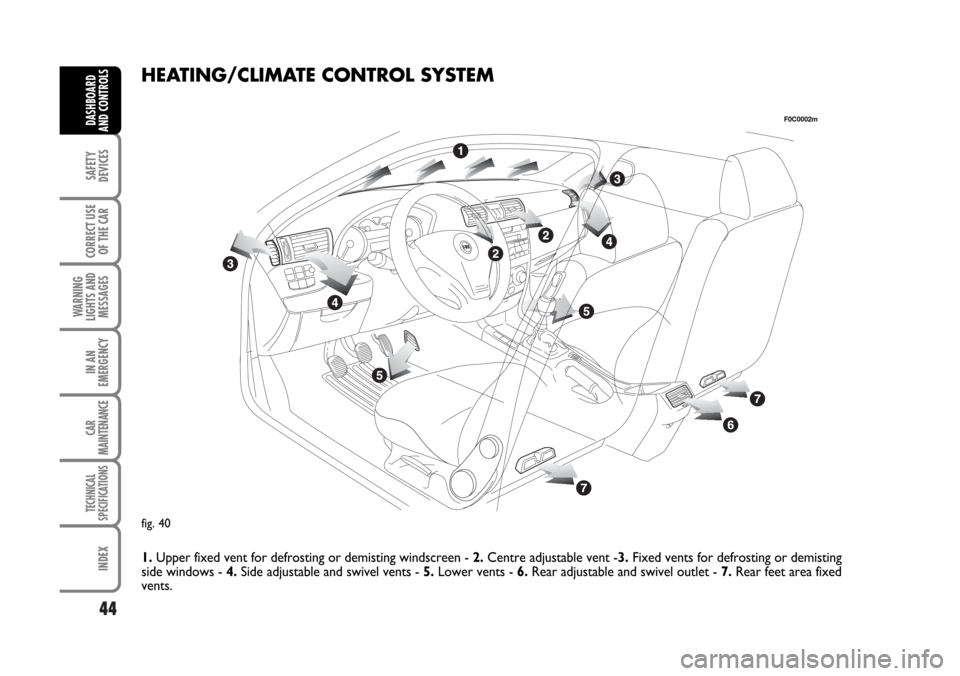
HEATING/CLIMATE CONTROL SYSTEM
1.Upper fixed vent for defrosting or demisting windscreen - 2.Centre adjustable vent -3.Fixed vents for defrosting or demisting
side windows - 4.Side adjustable and swivel vents - 5.Lower vents - 6.Rear adjustable and swivel outlet - 7.Rear feet area fixed
vents.
fig. 40
F0C0002m
Page 46 of 274
45
SAFETY
DEVICES
CORRECT USE
OF THE CAR
WARNING
LIGHTS AND
MESSAGES
IN AN
EMERGENCY
CAR
MAINTENANCE
TECHNICAL
SPECIFICATIONS
INDEX
DASHBOARD
AND CONTROLS
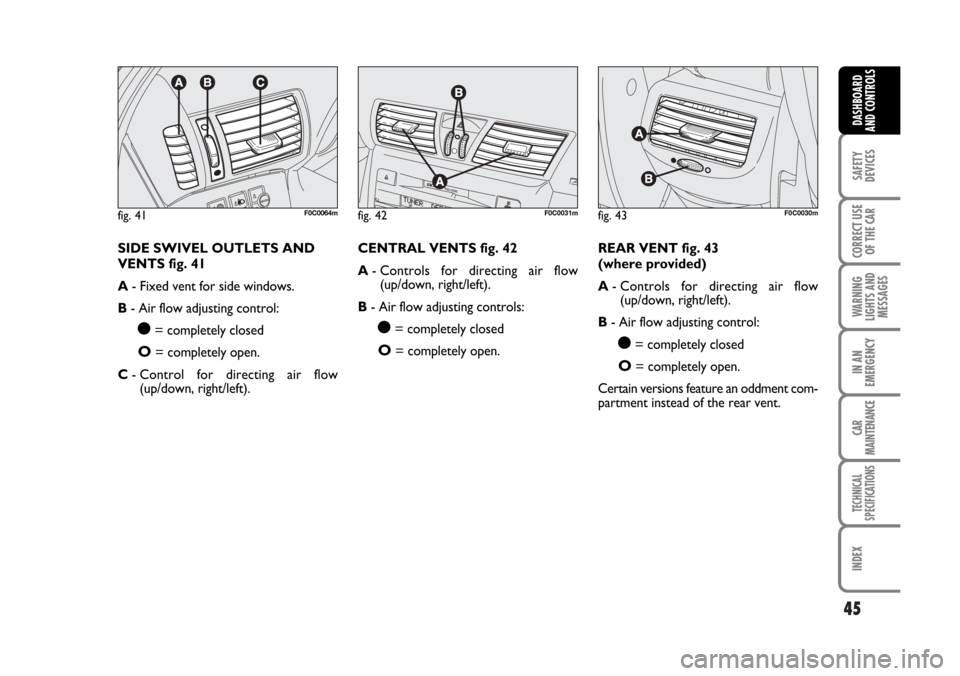
SIDE SWIVEL OUTLETS AND
VENTS fig. 41
A- Fixed vent for side windows.
B- Air flow adjusting control:
ç= completely closed
O= completely open.
C- Control for directing air flow
(up/down, right/left).CENTRAL VENTS fig. 42
A- Controls for directing air flow
(up/down, right/left).
B- Air flow adjusting controls:
ç= completely closed
O= completely open.REAR VENT fig. 43
(where provided)
A- Controls for directing air flow
(up/down, right/left).
B- Air flow adjusting control:ç= completely closed
O= completely open.
Certain versions feature an oddment com-
partment instead of the rear vent.
fig. 41F0C0064mfig. 42F0C0031mfig. 43F0C0030m
Page 47 of 274
46
SAFETY
DEVICES
CORRECT USE
OF THE CAR
WARNING
LIGHTS AND
MESSAGES
IN AN
EMERGENCY
CAR
MAINTENANCE
TECHNICAL
SPECIFICATIONS
INDEX
DASHBOARD
AND CONTROLS
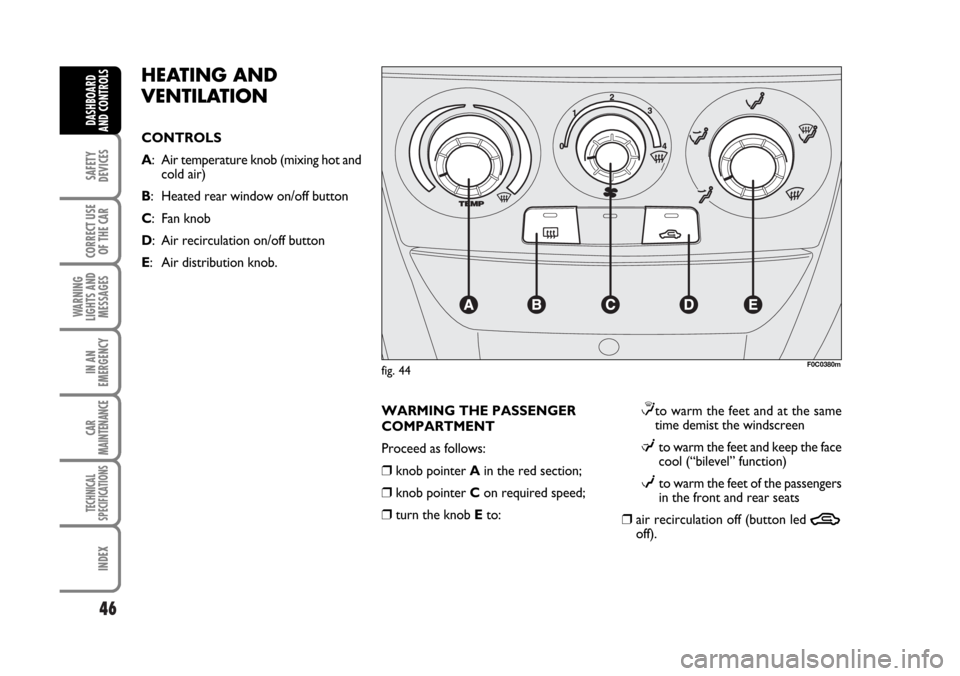
HEATING AND
VENTILATION
CONTROLS
A: Air temperature knob (mixing hot and
cold air)
B: Heated rear window on/off button
C: Fan knob
D: Air recirculation on/off button
E: Air distribution knob.
WARMING THE PASSENGER
COMPARTMENT
Proceed as follows:
❒knob pointer Ain the red section;
❒knob pointer Con required speed;
❒turn the knob Eto:
≤to warm the feet and at the same
time demist the windscreen
μto warm the feet and keep the face
cool (“bilevel” function)
wto warm the feet of the passengers
in the front and rear seats
❒air recirculation off (button led Toff).
F0C0380mfig. 44
Page 48 of 274

47
SAFETY
DEVICES
CORRECT USE
OF THE CAR
WARNING
LIGHTS AND
MESSAGES
IN AN
EMERGENCY
CAR
MAINTENANCE
TECHNICAL
SPECIFICATIONS
INDEX
DASHBOARD
AND CONTROLS
FRONT WINDOW
FAST DEMISTING/DEFROSTING
Proceed as follows:
❒rotate completely (pointer on -)
knob Ato the right;
❒turn knob Cto -;
❒turn knob Eto -;
❒air recirculation off (button led Toff).
After demisting/defrosting use common
controls to maintain the optimum condi-
tions of visibility and comfort.
Window demisting
In the event of considerable outside mois-
ture and/or rain and/or considerable dif-
ferences in temperature inside and out-
side the passenger compartment, perform
the following preventive demisting proce-
dure:
❒air recirculation off (button led Toff);
❒turn knob Ato red section;
❒turn knob Cto 2ndspeed;
❒turn knob Eto -or to ≤if the win-
dows do not demist.HEATED REAR WINDOW
AND DOOR MIRROR
DEMISTING/DEFROSTING
Pressing button
(turns on this function
which is shown by the turning on of the
led on the button
(.
This function is timed and switches off au-
tomatically after 20 minutes. To cut out
this function press again button
(.
IMPORTANT Do not apply stickers on
the inside of the rear window over the
heating filaments to avoid damage that
might cause it to stop working properly.
FAN SPEED ADJUSTMENT
To ventilate the passenger’s compartment
properly, proceed as follows:
❒Central and side vents: completely
open;
❒Knob pointer Aon blue section;
❒knob pointer Con required speed;
❒Knob pointer Eto ¥;
❒air recirculation off (button led Toff).RECIRCULATION
Pressing button
Tturns on this func-
tion which is shown by the turning on of
the led on the button. This function is par-
ticularly useful when the outside air is
heavily polluted (in a traffic jam, tunnel,
etc.). However, it is better not to use it
for long periods, especially if there are sev-
eral people in the car.
IMPORTANT The inside air recirculation
system makes it possible to reach the re-
quired “heating” or “cooling” conditions
faster. Do not use the air recirculation
function on rainy/cold days as it would
considerably increase the possibility of the
windows misting inside.
Page 49 of 274
48
SAFETY
DEVICES
CORRECT USE
OF THE CAR
WARNING
LIGHTS AND
MESSAGES
IN AN
EMERGENCY
CAR
MAINTENANCE
TECHNICAL
SPECIFICATIONS
INDEX
DASHBOARD
AND CONTROLS
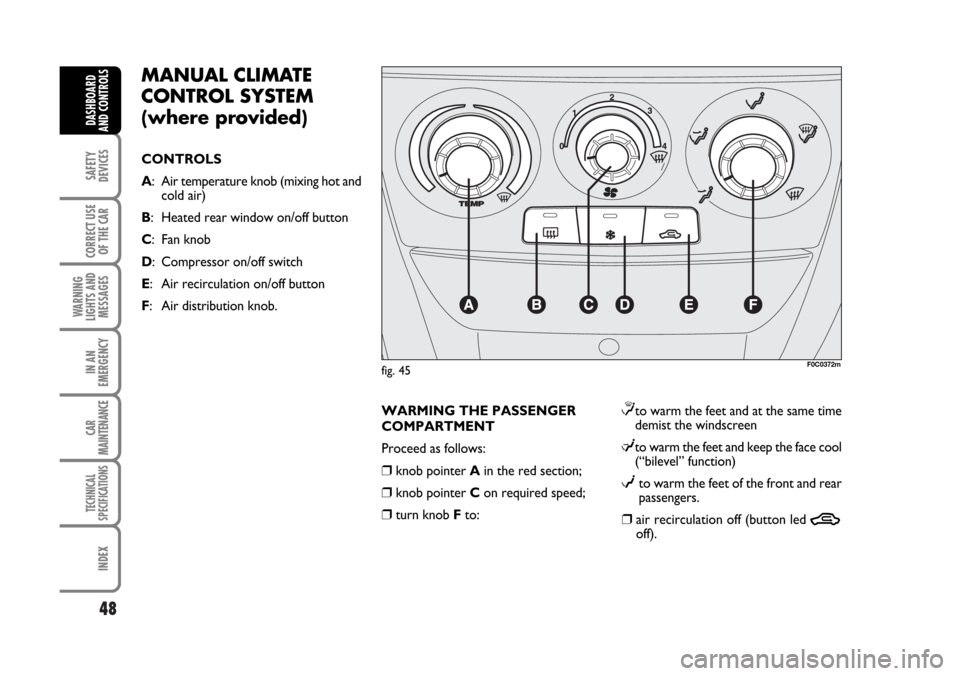
MANUAL CLIMATE
CONTROL SYSTEM
(where provided)
CONTROLS
A: Air temperature knob (mixing hot and
cold air)
B: Heated rear window on/off button
C: Fan knob
D: Compressor on/off switch
E: Air recirculation on/off button
F: Air distribution knob.
WARMING THE PASSENGER
COMPARTMENT
Proceed as follows:
❒knob pointer Ain the red section;
❒knob pointer Con required speed;
❒turn knob Fto:
≤to warm the feet and at the same time
demist the windscreen
μto warm the feet and keep the face cool
(“bilevel” function)
wto warm the feet of the front and rear
passengers.
❒air recirculation off (button led Toff).
F0C0372mfig. 45
Page 50 of 274

49
SAFETY
DEVICES
CORRECT USE
OF THE CAR
WARNING
LIGHTS AND
MESSAGES
IN AN
EMERGENCY
CAR
MAINTENANCE
TECHNICAL
SPECIFICATIONS
INDEX
DASHBOARD
AND CONTROLS
FRONT WINDOW
FAST DEMISTING/DEFROSTING
Proceed as follows:
❒press button ❄;
❒rotate completely (pointer on -)
knob Ato the right;
❒turn knob Cto -;
❒turn knob Fto -;
❒air recirculation off (button led Toff).
After demisting/defrosting use common
controls to maintain the optimum condi-
tions of visibility and comfort.
Window demisting
In the event of considerable outside mois-
ture and/or rain and/or considerable dif-
ferences in temperature inside and out-
side the passenger compartment, perform
the following preventive demisting proce-
dure:
❒press button ❄;
❒air recirculation off (button led Toff);
❒turn knob Ato red section;
❒turn knob Cto 2ndspeed;
❒turn knob Fto -or to ≤if the win-
dows do not demist.
Climate control system is very useful to
speed up demisting since it dehumidifies
the air. Set controls to demisting function
and switch on the climate control system
by pressing button
❄.
HEATED REAR WINDOW
AND DOOR MIRROR
DEMISTING/DEFROSTING
Pressing button
(turns on this function
which is shown by the turning on of the
led on the button
(.
This function is timed and switches off au-
tomatically after 20 minutes. To cut out
this function press again button
(.
IMPORTANT Do not apply stickers on
the inside of the rear window over the
heating filaments to avoid damage that
might cause it to stop working properly.FAN SPEED ADJUSTMENT
To ventilate the passenger’s compartment
properly, proceed as follows:
❒Central and side vents: completely
open;
❒Knob pointer Aon blue section;
❒knob pointer Con required speed;
❒Knob pointer Fto ¥;
❒air recirculation off (button led Toff).